Flutter for OpenHarmony 三方库鸿蒙适配实战:flutter_video_info
技术点AndroidiOSHarmonyOS元数据提取类AVURLAsset导入方式原生 Java原生 Swift文件操作。
欢迎加入开源鸿蒙跨平台社区:https://openharmonycrossplatform.csdn.net
📝 本文详细记录了
flutter_video_info库适配 HarmonyOS(鸿蒙)平台的完整过程,包括前置准备、项目导入、模板创建、代码实现、问题解决以及最佳实践。
📋 目录
一、前置准备
1.1 环境要求
在开始适配前,请确保你的开发环境满足以下条件:
| 环境项 | 要求 |
|---|---|
| Flutter SDK | 建议 3.27.及以上版本,并配置好环境变量 |
| DevEco Studio | 已安装 OpenHarmony 开发工具,并配置 OH SDK |
| OpenHarmony 设备 | 真机或模拟器,且开启开发者模式 |
| AtomGit | 已配置代码仓库的访问权限 |
1.2 验证环境
# 检查 Flutter 版本
flutter --version

# 检查连接的设备
flutter devices
二、项目导入与初始化
2.1 将项目托管到 AtomGit
方式一:Fork 原项目
如果原项目在 GitHub 上,可以通过 Fork 的方式导入:
- 登录 AtomGit 平台
- 点击「导入仓库」或「Fork」
- 输入原项目的 GitHub 地址,如:
https://atomgit.com/oh-flutter/flutter_video_info - 选择目标组织和仓库名称,点击确认
方式二:创建新仓库(推荐使用Fork)
- 登录 AtomGit 平台,创建新的代码仓库
- 建议命名与插件名一致,如
flutter_video_info - 将本地待适配的 Flutter 插件代码推送到该仓库
2.2 克隆代码到本地
将 AtomGit 上的仓库克隆到本地开发环境:
# 替换为你的 AtomGit 仓库地址
git clone https://atomgit.com/[你的用户名]/flutter_video_info.git

# 进入项目目录
cd flutter_video_info

# 建议创建 ohos-adapt 分支进行适配开发
git checkout -b ohos-adapt
2.3 初始化 OH 平台插件结构
Flutter 插件默认不包含 OH 平台的代码结构,需要通过命令初始化:
# 在插件根目录执行,初始化 OH 平台的插件模板
flutter create . --template=plugin --platforms=ohos
命令参数说明:
| 参数 | 说明 |
|---|---|
. |
表示在当前目录执行 |
--template=plugin |
指定创建插件模板 |
--platforms=ohos |
仅生成 OH 平台相关的代码目录,避免覆盖已有 iOS/Android 代码 |
执行结果:
flutter_video_info/
├── ohos/                       # 🆕 自动生成的鸿蒙平台目录
│   ├── src/main/ets/
│   │   └── components/plugin/
│   │       └── FlutterVideoInfoPlugin.ets
│   ├── module.json5
│   ├── oh-package.json5
│   ├── build-profile.json5
│   ├── hvigorfile.ts
│   └── index.ets
├── example/ohos/               # 🆕 自动生成的鸿蒙示例项目
│   ├── AppScope/
│   ├── entry/
│   ├── oh-package.json5
│   └── ...
└── pubspec.yaml                # 📝 已更新,添加 ohos 平台配置
2.4 更新依赖
执行依赖更新命令,确保 Flutter 侧能识别 OH 平台的配置:
flutter pub get
验证 pubspec.yaml 配置:
flutter:
  plugin:
    platforms:
      android:
        package: com.example.flutter_video_info
        pluginClass: FlutterVideoInfoPlugin
      ios:
        pluginClass: FlutterVideoInfoPlugin
      ohos:                          # 🆕 自动添加的鸿蒙配置
        pluginClass: FlutterVideoInfoPlugin
三、项目结构分析
3.1 原有目录结构
flutter_video_info/
├── android/                    # Android 平台实现
│   └── src/main/java/
│       └── FlutterVideoInfoPlugin.java
├── ios/                        # iOS 平台实现
│   └── Classes/
│       └── SwiftFlutterVideoInfoPlugin.swift
├── lib/                        # Dart 层代码
│   ├── flutter_video_info.dart
│   └── flutter_video_info_platform_interface.dart
├── example/                    # 示例应用
└── pubspec.yaml
3.2 分析原有实现
🔍 Android 实现(Java)
Android 平台使用 MediaMetadataRetriever 类获取视频元数据:
// FlutterVideoInfoPlugin.java
MediaMetadataRetriever mediaRetriever = new MediaMetadataRetriever();
mediaRetriever.setDataSource(context, Uri.fromFile(file));

String author = getData(MediaMetadataRetriever.METADATA_KEY_AUTHOR, mediaRetriever);
String mimeType = getData(MediaMetadataRetriever.METADATA_KEY_MIMETYPE, mediaRetriever);
String width = getData(MediaMetadataRetriever.METADATA_KEY_VIDEO_WIDTH, mediaRetriever);
String height = getData(MediaMetadataRetriever.METADATA_KEY_VIDEO_HEIGHT, mediaRetriever);
String duration = getData(MediaMetadataRetriever.METADATA_KEY_DURATION, mediaRetriever);
// ... 更多字段
🔍 iOS 实现(Swift)
iOS 平台使用 AVURLAsset 获取视频元数据:
// SwiftFlutterVideoInfoPlugin.swift
let asset = AVURLAsset(url: url)
let tracks = asset.tracks(withMediaType: .video)

let fps = tracks.first?.nominalFrameRate
let size = tracks.first?.naturalSize
let durationTime = round(CMTimeGetSeconds(asset.duration) * 1000)
🔍 Dart 层接口
// flutter_video_info.dart
class FlutterVideoInfo {
  static const MethodChannel _channel = MethodChannel('flutter_video_info');

  Future<VideoData?> getVideoInfo(String path) async {
    final jsonStr = await _channel.invokeMethod('getVidInfo', {"path": path});
    final jsonMap = json.decode(jsonStr);
    return VideoData.fromJson(jsonMap);
  }
}
关键发现:
- 📌 使用 MethodChannel 进行平台通信
- 📌 方法名为
getVidInfo - 📌 参数为
path(视频文件路径) - 📌 返回 JSON 字符串格式
四、适配步骤详解
4.1 实现核心功能
🔧 初始实现(第一版)
根据 Android 实现,使用鸿蒙的 AVMetadataRetriever:
import { AVMetadataRetriever } from '@ohos.multimedia.media';

// ❌ 错误:导入方式不正确
遇到问题:编译报错 Module has no exported member 'AVMetadataRetriever'
🔧 修正实现(第二版)
查阅鸿蒙 API 文档后,发现正确用法:
import { media } from '@kit.MediaKit';
import { fileIo as fs } from '@kit.CoreFileKit';

export default class FlutterVideoInfoPlugin implements FlutterPlugin, MethodCallHandler {
  private channel: MethodChannel | null = null;

  onAttachedToEngine(binding: FlutterPluginBinding): void {
    this.channel = new MethodChannel(binding.getBinaryMessenger(), "flutter_video_info");
    this.channel.setMethodCallHandler(this);
  }

  async onMethodCall(call: MethodCall, result: MethodResult): Promise<void> {
    if (call.method == "getVidInfo") {
      let path = call.argument("path") as string;
      let jsonStr = await this.getVidInfo(path);
      result.success(jsonStr);
    } else {
      result.notImplemented();
    }
  }

  async getVidInfo(path: string): Promise<string> {
    // 实现细节...
  }
}
遇到问题:AVMetadata 属性名与预期不符
🔧 最终实现(第三版)
根据鸿蒙 API 文档,AVMetadata 的正确属性:
| Android 属性 | 鸿蒙 AVMetadata 属性 |
|---|---|
| METADATA_KEY_MIMETYPE | mimeType |
| METADATA_KEY_AUTHOR | artist |
| METADATA_KEY_VIDEO_WIDTH | videoWidth |
| METADATA_KEY_VIDEO_HEIGHT | videoHeight |
| METADATA_KEY_DURATION | duration |
完整实现代码:
import {
  FlutterPlugin,
  FlutterPluginBinding,
  MethodCall,
  MethodCallHandler,
  MethodChannel,
  MethodResult,
} from '@ohos/flutter_ohos';
import { media } from '@kit.MediaKit';
import { fileIo as fs } from '@kit.CoreFileKit';

export default class FlutterVideoInfoPlugin implements FlutterPlugin, MethodCallHandler {
  private channel: MethodChannel | null = null;

  constructor() {}

  getUniqueClassName(): string {
    return "FlutterVideoInfoPlugin";
  }

  onAttachedToEngine(binding: FlutterPluginBinding): void {
    this.channel = new MethodChannel(binding.getBinaryMessenger(), "flutter_video_info");
    this.channel.setMethodCallHandler(this);
  }

  onDetachedFromEngine(binding: FlutterPluginBinding): void {
    if (this.channel != null) {
      this.channel.setMethodCallHandler(null);
    }
  }

  async onMethodCall(call: MethodCall, result: MethodResult): Promise<void> {
    if (call.method == "getVidInfo") {
      let path = call.argument("path") as string;
      let jsonStr = await this.getVidInfo(path);
      result.success(jsonStr);
    } else {
      result.notImplemented();
    }
  }

  async getVidInfo(path: string): Promise<string> {
    let isFileExist = false;
    let mimetype = "";
    let author = "";
    let dateStr = "";
    let width = "";
    let height = "";
    let location = "";
    let framerate = "";
    let duration = "";
    let filesize: number = 0;
    let orientation = "";

    try {
      // 检查文件是否存在并获取文件大小
      let stat = fs.statSync(path);
      isFileExist = true;
      filesize = stat.size;

      // 创建元数据提取器
      let avMetadataExtractor: media.AVMetadataExtractor = await media.createAVMetadataExtractor();

      try {
        // 打开文件
        let file = fs.openSync(path, fs.OpenMode.READ_ONLY);

        // 设置文件描述符
        avMetadataExtractor.fdSrc = file;

        // 获取元数据
        let metadata: media.AVMetadata = await avMetadataExtractor.fetchMetadata();

        if (metadata) {
          mimetype = metadata.mimeType ?? "";
          author = metadata.artist ?? "";
          width = metadata.videoWidth?.toString() ?? "";
          height = metadata.videoHeight?.toString() ?? "";
          duration = metadata.duration?.toString() ?? "";
        }

        // 关闭文件
        fs.closeSync(file);
      } catch (e) {
        console.error('AVMetadataExtractor error: ' + e);
      } finally {
        // 释放资源
        await avMetadataExtractor.release();
      }
    } catch (e) {
      console.error('File access error: ' + e);
      isFileExist = false;
    }

    // 构建 JSON 返回结果
    let jsonObj: Record<string, Object> = {
      "path": path,
      "mimetype": mimetype,
      "author": author,
      "date": dateStr,
      "width": width,
      "height": height,
      "location": location,
      "framerate": framerate,
      "duration": duration,
      "filesize": filesize,
      "orientation": orientation,
      "isfileexist": isFileExist
    };

    return JSON.stringify(jsonObj);
  }
}
4.2 配置权限
⚠️ 遇到的问题
编译时报错:
Error: The reason and usedScene attributes are mandatory for user_grant permissions.
原因分析:ohos.permission.READ_MEDIA 是用户授权权限,必须包含 reason 和 usedScene 属性。
✅ 解决方案
步骤 1:在示例应用的 module.json5 中配置权限
// example/ohos/entry/src/main/module.json5
{
  "module": {
    "requestPermissions": [
      {
        "name": "ohos.permission.INTERNET"
      },
      {
        "name": "ohos.permission.READ_MEDIA",
        "reason": "$string:read_media_reason",
        "usedScene": {
          "abilities": ["EntryAbility"],
          "when": "inuse"
        }
      }
    ]
  }
}
步骤 2:添加权限说明字符串
// example/ohos/entry/src/main/resources/base/element/string.json
{
  "string": [
    {
      "name": "module_desc",
      "value": "module description"
    },
    {
      "name": "EntryAbility_desc",
      "value": "description"
    },
    {
      "name": "EntryAbility_label",
      "value": "flutter_video_info_example"
    },
    {
      "name": "read_media_reason",
      "value": "用于读取视频文件信息"
    }
  ]
}
💡 注意:HAR 模块本身不能声明权限,权限需要在宿主应用中声明。
4.3 解决编译错误
错误 1:导入方式错误
Error: Module '@ohos.multimedia.media' has no exported member 'AVMetadataRetriever'
解决方案:使用正确的导入方式
// ❌ 错误
import { AVMetadataRetriever } from '@ohos.multimedia.media';

// ✅ 正确
import { media } from '@kit.MediaKit';
let extractor = await media.createAVMetadataExtractor();
错误 2:使用 any 类型
Error: Use explicit types instead of "any", "unknown" (arkts-no-any-unknown)
解决方案:为所有变量指定明确类型
// ❌ 错误
let metadata = await avMetadataExtractor.fetchMetadata();

// ✅ 正确
let metadata: media.AVMetadata = await avMetadataExtractor.fetchMetadata();
错误 3:属性不存在
Error: Property 'date' does not exist on type 'AVMetadata'
Error: Property 'videoFrameRate' does not exist on type 'AVMetadata'
解决方案:使用正确的属性名,部分属性鸿蒙暂不支持
// ❌ 错误
dateStr = metadata.date;
framerate = metadata.videoFrameRate;

// ✅ 正确 - 部分属性暂不支持,返回空字符串
dateStr = "";
framerate = "";
五、示例应用适配
5.1 配置 OH 示例项目签名
为了真机调试,需要对 example/ohos 目录下的示例项目进行签名配置:
- 用 DevEco Studio 打开
example/ohos项目 - 点击菜单栏「File」→「Project Structure」→「Modules」→「ohos」→「Signing Configs」
- 选择已有的签名证书(若无则创建),配置签名信息
- 同步项目(Sync Now),确保签名配置生效
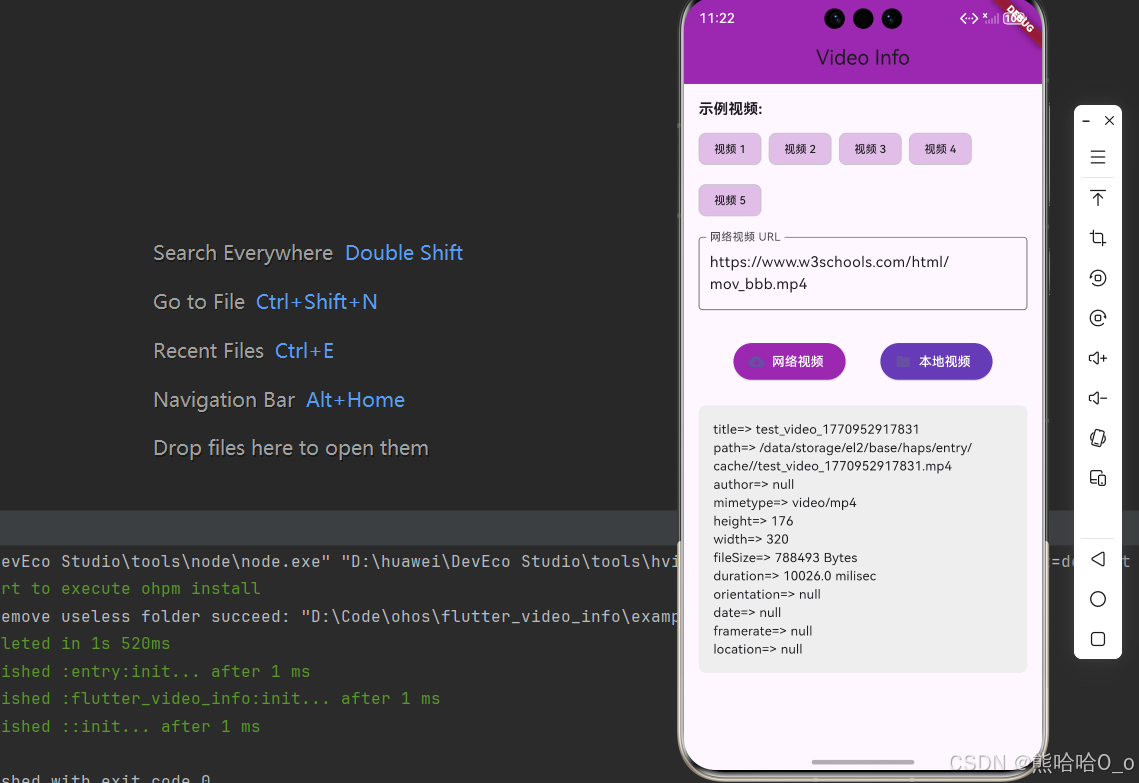
5.2 添加网络视频测试功能
由于本地视频路径难以测试,添加网络视频下载功能:
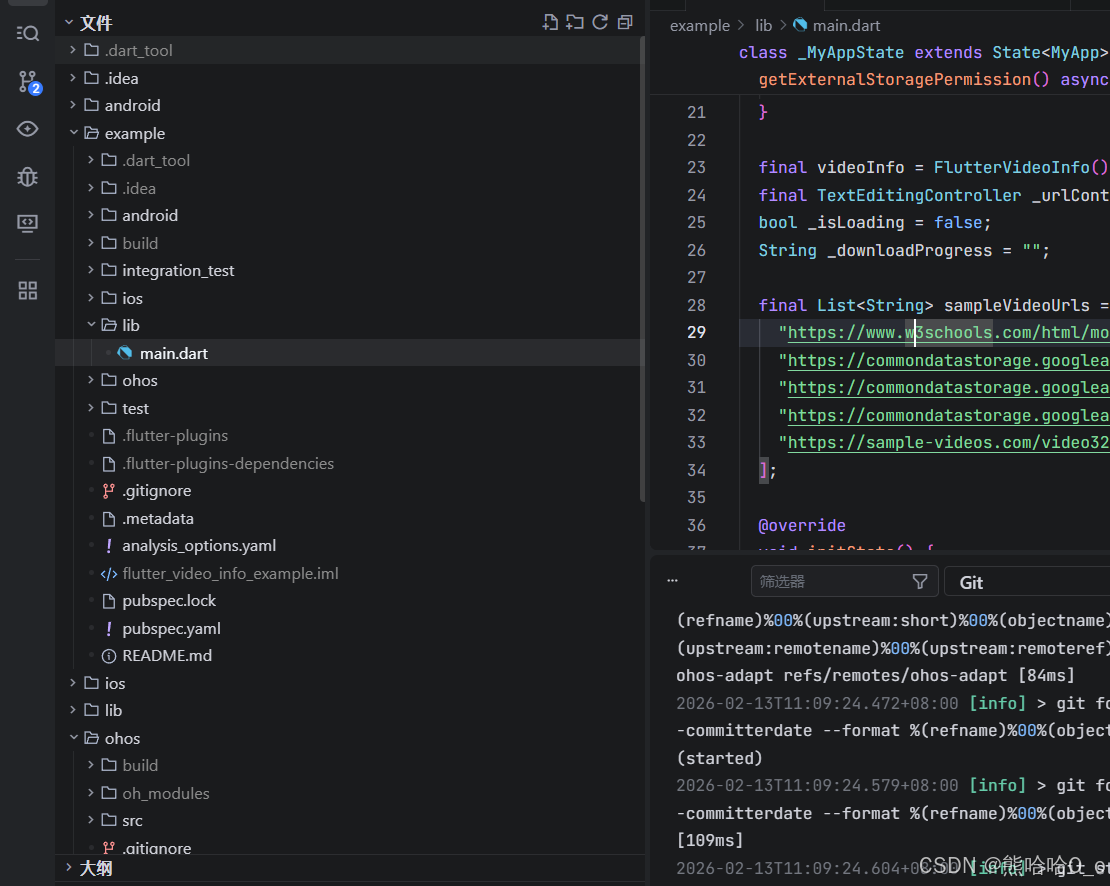
// example/lib/main.dart
import 'dart:io';
import 'package:dio/dio.dart';

final List<String> sampleVideoUrls = [
  "https://www.w3schools.com/html/mov_bbb.mp4",
  "https://commondatastorage.googleapis.com/gtv-videos-bucket/sample/BigBuckBunny.mp4",
  // ... 更多示例视频
];

Future<String> downloadVideo(String url) async {
  final fileName = 'test_video_${DateTime.now().millisecondsSinceEpoch}.mp4';
  final tempDir = Directory.systemTemp;  // 使用系统临时目录
  final filePath = '${tempDir.path}/$fileName';

  final dio = Dio();
  await dio.download(url, filePath);

  return filePath;
}
5.3 遇到的问题
MissingPluginException: No implementation found for method getApplicationDocumentsDirectory
原因:path_provider 插件未适配鸿蒙
解决方案:使用 dart:io 的 Directory.systemTemp 替代
// ❌ 错误 - path_provider 未适配鸿蒙
final appDir = await getApplicationDocumentsDirectory();

// ✅ 正确 - 使用 dart:io 内置方法
final tempDir = Directory.systemTemp;
5.4 更新 pubspec.yaml
dependencies:
  flutter:
    sdk: flutter
  permission_handler: ^11.3.1
  dio: ^5.4.0          # 用于下载网络视频
  cupertino_icons: ^1.0.6
5.5 真机调试
将 OH 真机连接到电脑,执行调试命令:
# 在插件根目录执行,运行 OH 示例项目
flutter run -d [你的设备ID] --verbose
调试要点:
- 观察终端输出,排查代码语法错误、API 调用错误等问题
- 在真机上验证核心功能是否与 iOS/Android 端表现一致
- 反复调试修复兼容性问题
六、文档编写
6.1 创建中英文 README
适配完成后,需要新增文档说明 OH 平台的使用方式:
| 文档 | 说明 |
|---|---|
README.OpenHarmony_CN.md |
中文使用文档 |
README.OpenHarmony.md |
英文使用文档 |
七、代码提交
确认所有功能正常、文档完整后,执行代码提交操作:
# 添加适配相关的文件
git add ohos/                    # OH 平台核心代码
git add example/ohos/            # OH 示例项目
git add README_CN.md README_EN.md ADAPTATION_GUIDE.md  # 适配文档
git add pubspec.yaml             # 平台配置文件
git add lib/                     # 若 Flutter 侧代码有改动需添加

# 提交代码
git commit -m "ohoh适配"

# 推送到 AtomGit 仓库
git push origin ohos-adapt
八、总结与注意事项
8.1 关键技术点
| 技术点 | Android | iOS | HarmonyOS |
|---|---|---|---|
| 元数据提取类 | MediaMetadataRetriever | AVURLAsset | AVMetadataExtractor |
| 导入方式 | 原生 Java | 原生 Swift | import { media } from '@kit.MediaKit' |
| 文件操作 | java.io.File | FileManager | import { fileIo } from '@kit.CoreFileKit' |

开源鸿蒙跨平台开发社区汇聚开发者与厂商,共建“一次开发,多端部署”的开源生态,致力于降低跨端开发门槛,推动万物智联创新。
更多推荐

 2
2 0
0- 0


 已为社区贡献46条内容

所有评论(0)