Visual Studio社区2015:移动化
This article was sponsored by Microsoft. Thank you for supporting the sponsors who make SitePoint possible.本文由Microsoft赞助。 感谢您支持使SitePoint成为可能的赞助商。Welcome back to our series of articles using Micr...
This article was sponsored by Microsoft. Thank you for supporting the sponsors who make SitePoint possible.
本文由Microsoft赞助。 感谢您支持使SitePoint成为可能的赞助商。
Welcome back to our series of articles using Microsoft’s modern IDE: Visual Studio Community 2015 to quickly design and build an attractive, functional site for a client. If you missed the previous instalments, check them out below:
欢迎使用Microsoft的现代IDE返回我们的系列文章:Visual Studio Community 2015,为客户快速设计和构建一个有吸引力的功能站点。 如果错过了以前的付款,请在下面查看:
-
Visual Studio Community 2015: Adding Email and Contact Pages
-
Visual Studio Community 2015: Adding Ecommerce Functionality
In the final article of the series, we’re going to create a mobile app. The app will display a notification if there are new lessons available. Once the user sees the notification and dismisses it, they’ll see a cloud icon next to the new lesson, which helps the lesson stand out from the others.
在本系列的最后一篇文章中,我们将创建一个移动应用程序。 如果有新课程可用,该应用程序将显示一条通知。 用户看到通知并将其取消后,他们将在新课程旁边看到一个云形图标,这有助于使该课程在其他课程中脱颖而出。
We’ll use the popular Cordova framework to create our app. This will allow us to use web languages such as HTML and Javascript.
我们将使用流行的Cordova框架来创建我们的应用程序。 这将使我们能够使用诸如HTML和Javascript之类的网络语言。
Behind the scenes, we’ll see how to create a multi page app using jQuery Mobile. jQuery Mobile will help us with styling and also making calls to a REST service. We’ll use the REST service to mock getting lessons from a remote source. This will let you see how to retreive remote data and parse it.
在幕后,我们将看到如何使用jQuery Mobile创建多页应用。 jQuery Mobile将帮助我们进行样式设计以及调用REST服务。 我们将使用REST服务来模拟从远程源上的课程。 这将使您了解如何检索远程数据并进行解析。
创建一个Cordova项目 (Creating a Cordova Project)
To create a Cordova app in Visual Studio, select File > New > Project > Blank App (Apache Cordova).
要在Visual Studio中创建Cordova应用,请选择“文件”>“新建”>“项目”>“空白应用”(Apache Cordova)。

Now that you have a new Cordova based project created, let’s talk a little about the foldes and files.
现在,您已经创建了一个新的基于Cordova的项目,让我们谈谈折叠和文件。

We’ll mainly be working with index.html and index.js, as shown above. Think of index.html as the homepage for a website. It will contain our view. index.js is where we can put business logic.
如上所示,我们将主要使用index.html和index.js。 将index.html视为网站的主页。 它将包含我们的观点。 index.js是我们放置业务逻辑的地方。
If you run the app now by selecting Android as the solution platform and one of the Ripple devices, you should see something similar to the following:
如果您现在通过选择Android作为解决方案平台和其中一个Ripple设备来运行该应用程序,则应该看到与以下内容类似的内容:

This is a working mobile application. It doesn’t do much at this point but we’re about to fix that.
这是一个正在运行的移动应用程序。 在这一点上,它并没有太大的作用,但是我们将要解决。
添加jQuery Mobile (Adding jQuery Mobile)
We’re going to add the jQuery Mobile library to our project. Since it requires jQuery, we’ll also need that library. Go to https://code.jquery.com/mobile/ and download the latest minified version of jQuery Mobile. Simply right click and download the JS file. Save to your project’s wwwroot/script folder.
我们将把jQuery Mobile库添加到我们的项目中。 由于它需要jQuery,因此我们也需要该库。 转到https://code.jquery.com/mobile/并下载jQuery Mobile的最新缩小版本。 只需右键单击并下载JS文件。 保存到项目的wwwroot / script文件夹。
Also download the theme file from the same location for the latest version. The theme file is the CSS that will help with styling our app. Save it to wwwroot/css.
还可以从同一位置下载主题文件以获取最新版本。 主题文件是CSS,可帮助设计我们的应用程序。 将其保存到wwwroot / css。
Now we need the jQuery library. Download the minified 2.x version here: https://code.jquery.com. Save to wwwroot/script.
现在我们需要jQuery库。 在此处下载缩小的2.x版本: https : //code.jquery.com 。 保存到wwwroot / script。
In the index.html, we can add references to our JS files. Cordova projects are a little different in that JS files go to the bottom of a page. Once you add the references, the bottom of index.html should look like this:
在index.html中,我们可以添加对JS文件的引用。 Cordova项目的不同之处在于JS文件位于页面底部。 添加引用后, index.html的底部应如下所示:
<!-- Start of first page: #one -->
  <div data-role="page" id="one">

    <div data-role="header">
      <h1>Guitar Lessons</h1>
    </div><!-- /header -->

    <div role="main" class="ui-content">
      <p><a href="#two" class="ui-btn ui-shadow ui-corner-all">About</a></p>
   </div><!-- /content -->

    <div data-role="footer" data-theme="a">
      <h4>Page Footer</h4>
    </div><!-- /footer -->
  </div><!-- /page one -->

  <!-- Start of second page: #two -->
  <div data-role="page" id="two" data-theme="a">

    <div data-role="header">
      <h1>About</h1>
    </div><!-- /header -->

    <div role="main" class="ui-content">
      <h2>Who Am I</h2>
      <p>I have an id of "two" on my page container. I'm the second page container in this multi-page template.</p>
      <p>Notice that the theme is different for this page because we've added a few <code>data-theme</code> swatch assigments here to show off how flexible it is. You can add any content or widget to these pages, but we're keeping these simple.</p>
      <h2>How It All Started</h2>
      <p>I have an id of "two" on my page container. I'm the second page container in this multi-page template.</p>
      <p>Notice that the theme is different for this page because we've added a few <code>data-theme</code> swatch assigments here to show off how flexible it is. You can add any content or widget to these pages, but we're keeping these simple.</p>

<p><a href="#one" data-direction="reverse" class="ui-btn ui-shadow ui-corner-all ui-btn-b">Back</a></p>

    </div><!-- /content -->

    <div data-role="footer">
      <h4>Page Footer</h4>
    </div><!-- /footer -->
  </div><!-- /page two -->
If you run the app, it should look like this:
如果您运行该应用程序,则它应如下所示:

At this point, you can click the About button, which will display the About page:
此时,您可以单击“关于”按钮,这将显示“关于”页面:

增加课程 (Adding Lessons)
We’re going to mock a REST call for lessons. We’ll use jQuery Mobile to help with the call and a service called jsonplaceholder.typicode.com. This service is great for testing a REST call and getting some JSON back. It will save you a lot of time during the testing phase when all you need is to hit an endpoint and get some structured data back.
我们将模拟一个REST调用课程。 我们将使用jQuery Mobile来帮助完成此调用,并使用一个名为jsonplaceholder.typicode.com的服务。 此服务非常适合测试REST调用并获取一些JSON。 当您需要做的只是击中一个端点并取回一些结构化数据时,它将在测试阶段节省大量时间。
Before we do the REST call, we’ll fill our app with known lessons. Meaning, lessons that are sitting on the server. Then, we can setup a timer to periodically poll the server checking for new lessons.
在进行REST调用之前,我们将使用已知的课程来填充应用程序。 意思是,服务器上的课程。 然后,我们可以设置一个计时器来定期轮询服务器,以检查是否有新课程。
We’ll add a function called initialCheck() to the index.js. This will make the initial call and fill the list with lessons.
我们将在index.js中添加一个名为initialCheck()的函数。 这将进行初始呼叫,并在列表中添加课程。
Open index.js. You’ll see several methods. onDeviceReady is our main method to kick things off. This is similar to $(document).ready() in the web design world. Under the two addEventListener methods, add the following function call:
打开index.js。 您会看到几种方法。 onDeviceReady是我们开始工作的主要方法。 这类似于Web设计领域中的$(document).ready() 。 在两个addEventListener方法下,添加以下函数调用:
initialCheck();Below onPause() and onResume(), define the initialCheck() method as follows:
在onPause()和onResume() ,按以下方式定义initialCheck()方法:
function initialCheck() {
  var lessonList = $("#lessonlist");
  var lesson1 = "<li><h2>Lesson 1</h2><p>Guitar In and Outs</p></li>";
  var lesson2 = "<li><h2>Lesson 2</h2><p>Beginner Chords</p></li>";
  lessonList.append(lesson1);
  lessonList.append(lesson2);
}
We would want this method to make a remote call but for simplicity, we’re going to do that in the second method. All that’s being done here appending lessons to a list named lessonlist.
我们希望该方法进行远程调用,但为简单起见,我们将在第二种方法中进行此操作。 此处所做的所有操作都将课程添加到名为lessonlist的列表中。
We need to add a lessonlist element to index.html. This will be added in the page one code just below the header:
我们需要在index.html添加一个lessonlist元素。 这将添加到页眉标题下方的第一页代码中:
<div role="main" class="ui-content">
<ul data-role="listview" id="lessonlist">
</ul>
<p> </p>
<p><a href="#two" class="ui-btn ui-shadow ui-corner-all">About</a></p>
</div>If you run the app, you’ll see that lessons are starting to appear.
如果您运行该应用程序,将会看到教训开始出现。
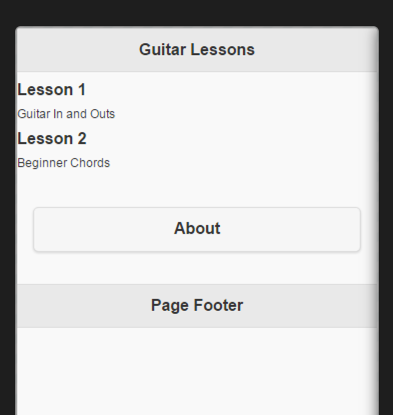
Notice the sub headers in each lesson. From the code inside the initialCheck() function, you can probably determine how the sub headers are created. H2 tags for the heading and p tags for the sub-heading.
请注意每课中的子标题。 从initialCheck()函数内部的代码中,您可能可以确定如何创建子头。 标题的H2标签和子标题的p标签。
从REST呼叫中吸取教训 (Populating Lessons From a REST Call)
We’re going to define our second method in the index.js. In onDeviceReady() and under initialCheck(), add the following:
我们将在index.js定义第二个方法。 在onDeviceReady()和initialCheck() ,添加以下内容:
window.setInterval(getLessons, 60000);This code will execute the getLessons() function every minute. for testing, if you want this to happen every 5 seconds, just change the interval value to 5000.
此代码将每分钟执行一次getLessons()函数。 为了进行测试,如果您希望每5秒发生一次,只需将interval值更改为5000。
Define the getLessons() function under the initialCheck() function:
在initialCheck()函数下定义getLessons() initialCheck()函数:
function getLessons() {
    $.getJSON("http://jsonplaceholder.typicode.com/posts/2", function (data) {

    if (data.length > 0) {
      var lessonList = $("#lessonlist")
      lessonList.append('<li data-icon="cloud"><a>' + data.title + '</a></li>');
      /*$.each(data, function (index) {
        lessonList.append('<li><a>'+data[index].title+'</a></li>');
      });
      */
      lessonList.listview("refresh");
      navigator.notification.alert(
      'A new lesson has just arrived', // message
      '',                // callback
      'New Lesson Available',      // title
      'Ok'               // buttonName
      );
    }
});
The first thing we do is get the JSON. Results of that call will be assigned to the data variable. Notice the loop is commented out. This is because of the structure of JSON we get back. If you paste the above typicode.com URL into your browser, you’ll see what I mean. We get the following instead of an array:
我们要做的第一件事就是获取JSON。 该调用的结果将分配给data变量。 注意循环已被注释掉。 这是因为我们得到了JSON的结构。 如果将上面的typicode.com URL粘贴到浏览器中,您将明白我的意思。 我们得到以下内容而不是数组:
{
 "userId": 1,
 "id": 2,
 "title": "qui est esse",
 "body": "est rerum tempore vitae\nsequi sint nihil reprehenderit dolor beatae ea dolores neque\nfugiat blanditiis voluptate porro vel nihil molestiae ut reiciendis\nqui aperiam non debitis possimus qui neque nisi nulla"
}
We would likely have complete control over the JSON sent back when it comes form our server. In this case, the JSON would work better in an array, even if it has only one element. In that case, we can always use the loop.
我们很可能完全控制从服务器返回的JSON。 在这种情况下,即使仅包含一个元素,JSON也可以在数组中更好地工作。 在这种情况下,我们总是可以使用循环。
You can see we make a call to refresh the list. This ensures the new lesson will appear in real-time. To help it stand out, we’ve wrapped the new list item in anchor tags, which will give this row a gray color. The cloud icon will also appear to the right side of the row.
您可以看到我们打电话来刷新列表。 这样可以确保新课程将实时显示。 为了使它突出,我们将新列表项包装在锚定标记中,这将使该行具有灰色。 云图标也将出现在该行的右侧。
You’re probably wondering about the navigator.notification.alert code. This is actually a plugin used to provide the user with a notification once a new lesson arrives.
您可能想知道navigator.notification.alert代码。 实际上,这是一个插件,用于在新课程到来后向用户提供通知。
In the next section, we’ll install the Notification plugin.
在下一节中,我们将安装Notification插件。
安装通知插件 (Installing the Notification Plugin)
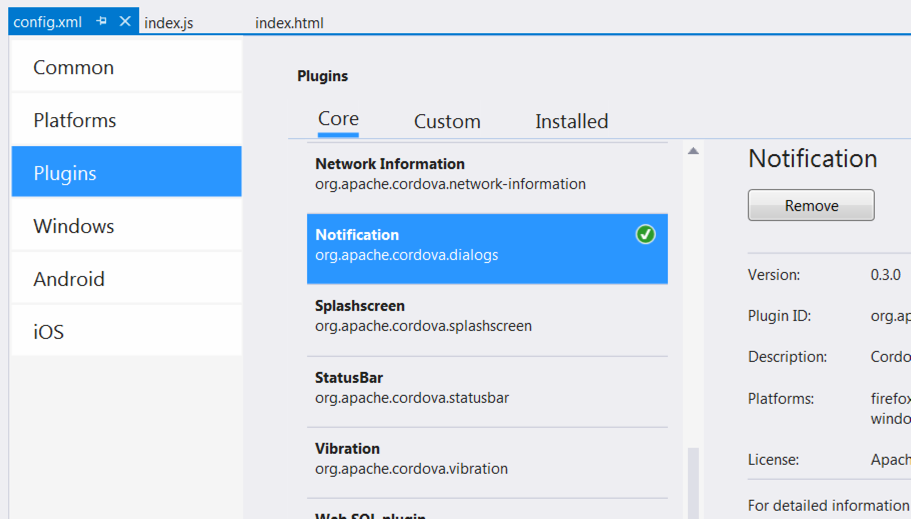
Click the config.xml file to open it. This is where most of the meta data for our mobile app is stored. It’s also where we can install plugins. Click the Plugins tab then scroll down until you see Notifications. In the screenshot below, I’ve already it installed:
单击config.xml文件将其打开。 这是我们移动应用程序的大多数元数据存储的地方。 这也是我们可以安装插件的地方。 单击插件选项卡,然后向下滚动,直到看到通知。 在下面的屏幕截图中,我已经安装了它:
Now if you run the app, you’ll see the notification once the getLessons() method fire.
现在,如果您运行该应用程序,则一旦getLessons()方法启动,您将看到通知。
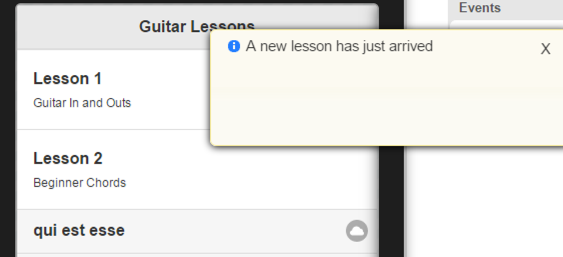
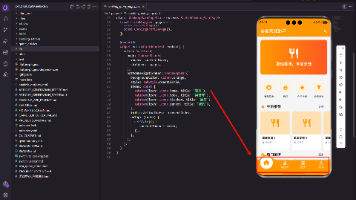
Notice also the new lesson has arrived. Although it is displaying the title from typicode.com, which is fine for our testing. The cloud icon is there also.
还请注意,新课程已到。 尽管它显示的是来自typicode.com的标题,但对我们的测试而言还不错。 云图标也在那里。
摘要 (Summary)
In this article, we created a Cordova based mobile application. We integrated jQuery Mobile to help with styling the look of the app and providing some great functionality, such as calls to REST services. We also saw how easy it is to add plugins that extend functionality.
在本文中,我们创建了一个基于Cordova的移动应用程序。 我们集成了jQuery Mobile,以帮助样式化应用程序的外观并提供一些出色的功能,例如对REST服务的调用。 我们还看到添加扩展功能的插件有多么容易。
With this foundation, you can certainly expand the app’s capabilities. The jQuery Mobile website will be a great resource to see what other components are available for enhancing the app. The examples on the site are also functional and show the source behind them. This is great for learning and inspiration.
有了这个基础,您当然可以扩展应用程序的功能。 jQuery Mobile网站将是了解其他哪些组件可用于增强应用程序的好资源。 该站点上的示例也具有功能,并显示了其背后的来源。 这非常适合学习和启发。
This brings us to the end of our series on Visual Studio Community 2015. I hope you’ve come to realize how useful the app is in developing and designing websites and apps, and outfitting them with powerful integrations with tools and services.
这使我们进入了有关Visual Studio Community 2015的系列文章的结尾。我希望您已经意识到该应用程序在开发和设计网站和应用程序以及为它们配备工具和服务的强大集成方面的实用性。
Have you used Visual Studio Community 2015? What are your tips for making the most of the app?
您是否使用过Visual Studio Community 2015? 充分利用该应用程序的秘诀是什么?
翻译自: https://www.sitepoint.com/visual-studio-community-2015-going-mobile/

开源鸿蒙跨平台开发社区汇聚开发者与厂商,共建“一次开发,多端部署”的开源生态,致力于降低跨端开发门槛,推动万物智联创新。
更多推荐
 0
0 0
0- 0


 已为社区贡献4条内容

所有评论(0)