【open harmony/harmonyos】ArkTS 实现 3D 透视投影:让普通组件拥有空间感
【open harmony/harmonyos】ArkTS 实现 3D 透视投影:让普通组件拥有空间感
前言 🌌
在 HarmonyOS / OpenHarmony 应用中,如果想做 3D 效果,很多人第一反应可能是使用 3D 引擎。
但如果需求只是“让节点有空间感”,其实不一定要上复杂引擎。对于轻量级知识图谱、星图、关系网络这类场景,可以用 ArkTS 数学计算 + ArkUI 普通组件实现一个简化版 3D 透视效果。
这篇文章会结合我的项目 星图 Xingtu,分享如何用 ArkTS 实现 3D 坐标旋转、透视投影、节点缩放、深度排序,让普通 ArkUI 组件呈现出空间层次。✨
一、目标效果
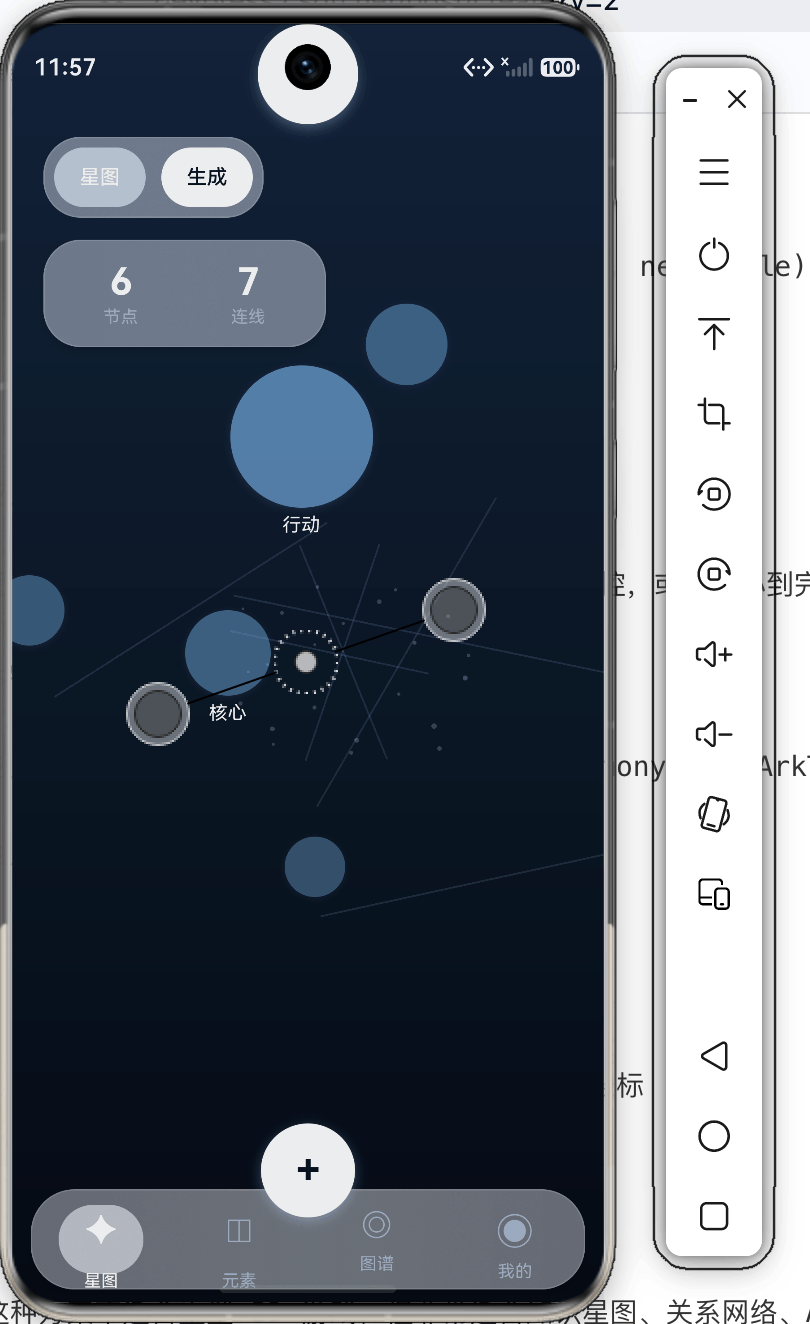
项目中希望实现这样一个星图界面:
- 节点分布在 3D 空间里
- 拖动时节点会围绕视角旋转
- 近处节点更大、更亮
- 远处节点更小、更淡
- 近处节点覆盖远处节点
- 整体看起来像一个可探索的数据空间
重点是:这些节点本质上仍然是 ArkUI 组件,不是复杂 3D 模型。
二、定义 3D 坐标和投影结果
首先定义一个三维坐标类型:
export interface Vec3 {
  x: number;
  y: number;
  z: number;
}
节点保存在真实的 3D 坐标中:
export interface XingtuNode {
  id: string;
  title: string;
  note: string;
  tags: string[];
  position: Vec3;
}
经过投影后,节点会变成屏幕上的二维位置:
export interface ProjectedNode {
  id: string;
  title: string;
  note: string;
  tags: string[];
  screenX: number;
  screenY: number;
  scale: number;
  opacity: number;
  depth: number;
}
这里的 ProjectedNode 是 UI 真正需要的数据:
screenX:屏幕横坐标screenY:屏幕纵坐标scale:节点大小比例opacity:节点透明度depth:节点深度
三、相机状态设计 📷
为了让用户可以旋转和缩放星图,需要一个相机状态。
export interface CameraState {
  yaw: number;
  pitch: number;
  distance: number;
  scale: number;
}
项目中的默认相机如下:
export function defaultCamera(): CameraState {
  return { yaw: -18, pitch: -10, distance: 620, scale: 1 };
}
每个字段的含义:
yaw:水平旋转角度pitch:垂直旋转角度distance:相机和节点空间的距离scale:整体缩放比例
有了相机状态,就可以通过改变相机,而不是直接改变所有节点位置,来实现视角变化。
四、坐标旋转计算
3D 投影的第一步,是根据相机角度旋转节点。
const DEGREE = Math.PI / 180;

export function rotatePoint(point: Vec3, yaw: number, pitch: number): Vec3 {
  const yawRad: number = yaw * DEGREE;
  const pitchRad: number = pitch * DEGREE;

  const yawX: number = point.x * Math.cos(yawRad) + point.z * Math.sin(yawRad);
  const yawZ: number = -point.x * Math.sin(yawRad) + point.z * Math.cos(yawRad);

  const pitchY: number = point.y * Math.cos(pitchRad) - yawZ * Math.sin(pitchRad);
  const pitchZ: number = point.y * Math.sin(pitchRad) + yawZ * Math.cos(pitchRad);

  return { x: yawX, y: pitchY, z: pitchZ };
}
这段逻辑分两步:
- 根据
yaw做水平旋转 - 根据
pitch做上下旋转
用户拖动屏幕时,实际更新的是 yaw 和 pitch,然后所有节点重新计算屏幕位置。
五、透视投影核心算法 🔵
坐标旋转后,需要把 3D 坐标投影到 2D 屏幕。
const CAMERA_FOCAL = 560;

export function projectNode(
  node: XingtuNode,
  camera: CameraState,
  viewport: ViewportSize
): ProjectedNode {
  const rotated: Vec3 = rotatePoint(node.position, camera.yaw, camera.pitch);
  const depth: number = camera.distance - rotated.z;
  const perspective: number = CAMERA_FOCAL / Math.max(220, depth);
  const halfWidth: number = viewport.width / 2;
  const halfHeight: number = viewport.height / 2;

  return {
    id: node.id,
    title: node.title,
    note: node.note,
    tags: node.tags,
    screenX: halfWidth + rotated.x * perspective * camera.scale,
    screenY: halfHeight + rotated.y * perspective * camera.scale,
    scale: perspective * camera.scale,
    opacity: Math.max(0.28, Math.min(1, 0.2 + perspective * 0.35)),
    depth
  };
}
这里最关键的是 perspective:
const perspective: number = CAMERA_FOCAL / Math.max(220, depth);
depth 越小,说明节点越靠近用户,perspective 越大,节点显示就越大。
depth 越大,说明节点越远,perspective 越小,节点显示就越小。
这就是透视感的来源。
六、让远近影响透明度
除了大小,透明度也可以用来强化空间感。
opacity: Math.max(0.28, Math.min(1, 0.2 + perspective * 0.35))
这段代码限制了透明度范围:
- 最低不低于
0.28 - 最高不超过
1 - 近处节点更亮
- 远处节点更淡
如果只改变大小,不改变透明度,空间感会弱一些。大小 + 透明度一起变化,效果会更自然。
七、节点深度排序
在 3D 空间中,近处节点应该盖住远处节点。
项目中在 Store 里对投影节点做了排序:
projectedNodes(viewport: ViewportSize): ProjectedNode[] {
  return this.nodes
    .map((node: XingtuNode) => projectNode(node, this.camera, viewport))
    .sort((left: ProjectedNode, right: ProjectedNode) => right.depth - left.depth);
}
排序后,远处节点先渲染,近处节点后渲染。
在 Stack 里,后面的组件会覆盖前面的组件,所以这样就能模拟基本的深度遮挡。
八、渲染节点组件
投影完成后,节点组件只关心自己的屏幕位置、大小和透明度。
private nodeSize(): number {
  return Math.max(30, Math.min(108, 58 * this.node.scale));
}

private nodePosX(): number {
  return this.node.screenX - this.nodeSize() / 2;
}

private nodePosY(): number {
  return this.node.screenY - this.nodeSize() / 2;
}
渲染时:
Stack() {}
  .width(this.nodeSize())
  .height(this.nodeSize())
  .borderRadius(this.nodeSize() / 2)
  .backgroundColor(this.selected ? XingtuTheme.primaryAction : XingtuTheme.accent)
  .opacity(this.selected ? 0.98 : this.node.opacity * 0.82)
  .shadow({
    radius: this.selected ? 30 : 12 + this.node.scale * 5,
    color: this.selected ? XingtuTheme.harmonyLightShadow : '#3493C5FD',
    offsetX: 0,
    offsetY: this.selected ? 0 : 4
  })
这里节点本质上就是一个带圆角和阴影的 ArkUI 组件,但因为它的位置、大小、透明度都来自 3D 投影,所以看起来就有了空间感。
九、监听视口尺寸变化
投影计算需要知道当前屏幕宽高。
项目中使用 onAreaChange 获取视口尺寸:
.onAreaChange((_, area) => {
  this.viewportWidth = Number(area.width);
  this.viewportHeight = Number(area.height);
})
然后在计算投影时传入:
this.store.projectedNodes({
  width: this.viewportWidth,
  height: this.viewportHeight
});
这样不同设备尺寸下,星图都可以以屏幕中心为基准进行布局。
十、拖动时更新相机
当用户单指拖动时,更新相机角度:
this.store.updateCamera(deltaX * 0.42, deltaY * 0.28);
this.refreshScene();
Store 中的实现:
updateCamera(deltaYaw: number, deltaPitch: number): void {
  this.camera = {
    yaw: this.camera.yaw + deltaYaw,
    pitch: clampPitch(this.camera.pitch + deltaPitch),
    distance: this.camera.distance,
    scale: this.camera.scale
  };
}
垂直角度需要限制:
export function clampPitch(nextPitch: number): number {
  return Math.max(-80, Math.min(80, nextPitch));
}
如果不限制 pitch,用户可能把场景翻转到不舒服的角度。
十一、缩放时更新 scale
双指缩放最终修改的是 camera.scale。
updateScale(nextScale: number): void {
  this.camera = {
    yaw: this.camera.yaw,
    pitch: this.camera.pitch,
    distance: this.camera.distance,
    scale: Math.max(0.6, Math.min(2.2, nextScale))
  };
}
这里限制缩放范围在 0.6 到 2.2 之间。
适当限制交互范围,可以避免用户把节点放大到失控,或者缩小到完全看不清。
十二、总结 🌟
这篇文章分享了如何在 HarmonyOS / OpenHarmony 中用 ArkTS 和 ArkUI 普通组件实现轻量级 3D 透视投影。
核心步骤是:
- 用
Vec3保存节点三维坐标 - 用
CameraState保存相机旋转和缩放 - 用
rotatePoint计算旋转后的坐标 - 用
projectNode把 3D 坐标转换成屏幕坐标 - 用
scale、opacity表现远近关系 - 用
depth排序模拟遮挡关系 - 用 ArkUI 组件渲染节点
这种方案不适合重型 3D 游戏,但非常适合知识星图、关系网络、AI 概念图、灵感空间等轻量级场景。
不用复杂引擎,也能让普通组件拥有空间感。✨

开源鸿蒙跨平台开发社区汇聚开发者与厂商,共建“一次开发,多端部署”的开源生态,致力于降低跨端开发门槛,推动万物智联创新。
更多推荐


 0
0 0
0- 0


 已为社区贡献158条内容

所有评论(0)