【maaath】Flutter for OpenHarmony 智能遥控器应用开发实战
本文基于 Flutter for OpenHarmony 跨平台框架,实现了一款功能完整的智能遥控器应用。通过单例 Service 模式管理全局状态,结合 Flutter 的响应式 UI 框架,在 OpenHarmony 设备上实现了流畅的遥控交互体验。应用涵盖了空调遥控、电视遥控、机顶盒控制、红外遥控学习、场景模式联动、设备管理、定时开关和状态反馈等 8 大功能模块,代码结构清晰、可读性强,适合
Flutter for OpenHarmony 智能遥控器应用开发实战
欢迎加入开源鸿蒙跨平台社区:https://openharmonycrossplatform.csdn.net
作者:maaath
一、引言
随着智能家居设备的普及,手机作为万能遥控器的需求日益增长。传统的实体遥控器存在易丢失、功能单一、无法跨设备联动等痛点。本文将基于 Flutter for OpenHarmony 跨平台框架,从零构建一款功能完整的智能遥控器应用,涵盖空调遥控、电视遥控、机顶盒控制、红外遥控学习、场景模式联动、设备管理、定时开关及状态反馈等核心功能。
本文所有代码均已在 OpenHarmony 设备上验证通过,完整源码请访问 AtomGit(https://atomgit.com)获取。
二、项目架构设计
2.1 整体架构
应用采用经典的单例 Service 模式管理全局状态,配合 Flutter 的 StatefulWidget 实现响应式 UI 更新。整体分为三层:
- 数据模型层:定义设备类型、按键映射、空调状态、场景模式、定时任务等数据结构
- 业务服务层:通过 RemoteService 单例管理设备增删改查、红外码学习、场景联动、定时调度
- UI 展示层:8 个独立页面分别对应不同功能模块
2.2 数据模型设计
首先定义遥控设备的核心枚举和类。设备类型涵盖空调、电视、机顶盒、风扇等常见家电:
enum RemoteDeviceType {
  ac('空调'),
  tv('电视'),
  stb('机顶盒'),
  fan('风扇'),
  projector('投影仪'),
  audio('音响'),
  custom('自定义');

  final String label;
  const RemoteDeviceType(this.label);
}
空调状态模型需要记录温度、模式、风速、风向等参数,并支持链式拷贝:
class ACState {
  bool power;
  ACWorkMode mode;
  int temperature;
  ACFanSpeed fanSpeed;
  ACWindDirection windDirection;
  bool sleepMode;
  bool turboMode;
  bool ecoMode;

  ACState({
    this.power = false,
    this.mode = ACWorkMode.cool,
    this.temperature = 26,
    this.fanSpeed = ACFanSpeed.auto,
    this.windDirection = ACWindDirection.auto,
    this.sleepMode = false,
    this.turboMode = false,
    this.ecoMode = false,
  });

  ACState copyWith({
    bool? power, ACWorkMode? mode, int? temperature,
    ACFanSpeed? fanSpeed, ACWindDirection? windDirection,
    bool? sleepMode, bool? turboMode, bool? ecoMode,
  }) {
    return ACState(
      power: power ?? this.power,
      mode: mode ?? this.mode,
      temperature: temperature ?? this.temperature,
      fanSpeed: fanSpeed ?? this.fanSpeed,
      windDirection: windDirection ?? this.windDirection,
      sleepMode: sleepMode ?? this.sleepMode,
      turboMode: turboMode ?? this.turboMode,
      ecoMode: ecoMode ?? this.ecoMode,
    );
  }
}
红外按键模型支持学习状态追踪,每个按键可以独立记录红外码:
class IRKey {
  final IRKeyType type;
  final String label;
  final IconData icon;
  final String? irCode;
  final bool isLearning;

  IRKey({
    required this.type,
    required this.label,
    required this.icon,
    this.irCode,
    this.isLearning = false,
  });

  IRKey copyWith({String? irCode, bool? isLearning}) {
    return IRKey(
      type: type, label: label, icon: icon,
      irCode: irCode ?? this.irCode,
      isLearning: isLearning ?? this.isLearning,
    );
  }
}
三、核心功能实现
3.1 空调遥控面板
空调遥控面板是应用中最复杂的 UI 模块。它需要实时展示设备运行状态,并提供温度调节、模式切换、风速风向控制等功能。
温度调节采用圆形渐变按钮配合滑动选择器,用户点击温度数字可弹出快速选择面板:
Widget _buildTemperatureControl(ThemeData theme) {
  return Container(
    padding: const EdgeInsets.all(16),
    decoration: BoxDecoration(
      color: Colors.white,
      borderRadius: BorderRadius.circular(16),
    ),
    child: Column(
      children: [
        const Text('温度调节',
            style: TextStyle(fontSize: 14, fontWeight: FontWeight.w600)),
        const SizedBox(height: 12),
        Row(
          mainAxisAlignment: MainAxisAlignment.center,
          children: [
            _buildTempButton(Icons.remove, () {
              if (_acState.power && _acState.temperature > 16) {
                _updateState(_acState.copyWith(
                    temperature: _acState.temperature - 1));
              }
            }),
            const SizedBox(width: 20),
            GestureDetector(
              onTap: () => _showTempPicker(),
              child: Container(
                width: 80, height: 80,
                decoration: BoxDecoration(
                  shape: BoxShape.circle,
                  gradient: const LinearGradient(
                    colors: [Color(0xFF2196F3), Color(0xFF1976D2)],
                  ),
                ),
                child: Center(
                  child: Text(
                    '${_acState.temperature}°',
                    style: const TextStyle(
                        color: Colors.white,
                        fontSize: 28,
                        fontWeight: FontWeight.bold),
                  ),
                ),
              ),
            ),
            const SizedBox(width: 20),
            _buildTempButton(Icons.add, () {
              if (_acState.power && _acState.temperature < 30) {
                _updateState(_acState.copyWith(
                    temperature: _acState.temperature + 1));
              }
            }),
          ],
        ),
      ],
    ),
  );
}
工作模式切换使用 5 种模式图标按钮,每种模式有独立的主题色:
Widget _buildModeSelector(ThemeData theme) {
  return Container(
    padding: const EdgeInsets.all(16),
    decoration: BoxDecoration(
      color: Colors.white,
      borderRadius: BorderRadius.circular(16),
    ),
    child: Column(
      crossAxisAlignment: CrossAxisAlignment.start,
      children: [
        const Text('工作模式',
            style: TextStyle(fontSize: 14, fontWeight: FontWeight.w600)),
        const SizedBox(height: 12),
        Row(
          mainAxisAlignment: MainAxisAlignment.spaceAround,
          children: ACWorkMode.values.map((mode) {
            final isActive = _acState.mode == mode && _acState.power;
            return GestureDetector(
              onTap: () {
                if (_acState.power) {
                  _updateState(_acState.copyWith(mode: mode));
                }
              },
              child: Column(
                children: [
                  Container(
                    width: 50, height: 50,
                    decoration: BoxDecoration(
                      color: isActive
                          ? Color(mode.color)
                          : Colors.grey.shade100,
                      borderRadius: BorderRadius.circular(14),
                    ),
                    child: Icon(
                      _getModeIcon(mode),
                      color: isActive ? Colors.white : Colors.grey,
                      size: 24,
                    ),
                  ),
                  const SizedBox(height: 6),
                  Text(mode.label, style: TextStyle(
                    fontSize: 12,
                    color: isActive ? Color(mode.color) : Colors.grey,
                    fontWeight: isActive ? FontWeight.w600 : FontWeight.normal,
                  )),
                ],
              ),
            );
          }).toList(),
        ),
      ],
    ),
  );
}
3.2 电视遥控功能
电视遥控器采用深色主题设计,模拟实体遥控器的按键布局。核心交互包括方向键导航、数字键盘和音量频道控制:
Widget _buildDPad() {
  return Container(
    padding: const EdgeInsets.all(16),
    decoration: BoxDecoration(
      color: const Color(0xFF16213E),
      borderRadius: BorderRadius.circular(16),
    ),
    child: Column(
      children: [
        _buildRemoteButton(
          icon: Icons.keyboard_arrow_up, label: '',
          color: const Color(0xFF0F3460), size: 50,
          onTap: () => _sendCommand(IRKeyType.up),
        ),
        const SizedBox(height: 4),
        Row(
          mainAxisAlignment: MainAxisAlignment.center,
          children: [
            _buildRemoteButton(
              icon: Icons.keyboard_arrow_left, label: '',
              color: const Color(0xFF0F3460), size: 50,
              onTap: () => _sendCommand(IRKeyType.left),
            ),
            const SizedBox(width: 16),
            GestureDetector(
              onTap: () => _sendCommand(IRKeyType.ok),
              child: Container(
                width: 60, height: 60,
                decoration: BoxDecoration(
                  color: const Color(0xFFE94560),
                  borderRadius: BorderRadius.circular(16),
                ),
                child: const Center(
                  child: Text('OK',
                      style: TextStyle(
                          color: Colors.white,
                          fontSize: 18,
                          fontWeight: FontWeight.bold)),
                ),
              ),
            ),
            const SizedBox(width: 16),
            _buildRemoteButton(
              icon: Icons.keyboard_arrow_right, label: '',
              color: const Color(0xFF0F3460), size: 50,
              onTap: () => _sendCommand(IRKeyType.right),
            ),
          ],
        ),
        const SizedBox(height: 4),
        _buildRemoteButton(
          icon: Icons.keyboard_arrow_down, label: '',
          color: const Color(0xFF0F3460), size: 50,
          onTap: () => _sendCommand(IRKeyType.down),
        ),
      ],
    ),
  );
}
3.3 红外遥控学习
红外学习功能模拟了真实的学习流程:用户选择设备后,点击需要学习的按键,应用进入学习等待状态并显示进度条,2 秒后自动生成模拟红外码并保存:
void _startLearning(IRKeyType keyType) {
  if (_selectedDevice == null) return;

  setState(() {
    _learningKey = keyType;
    _isLearning = true;
    _learningProgress = 0;
  });

  _remoteService.startIRLearning(_selectedDevice!.id, keyType);
  _simulateLearning();
}

void _simulateLearning() {
  Future.delayed(const Duration(milliseconds: 500), () {
    if (!mounted || !_isLearning) return;
    setState(() => _learningProgress = 30);
  });
  Future.delayed(const Duration(milliseconds: 1000), () {
    if (!mounted || !_isLearning) return;
    setState(() => _learningProgress = 60);
  });
  Future.delayed(const Duration(milliseconds: 1500), () {
    if (!mounted || !_isLearning) return;
    setState(() => _learningProgress = 90);
  });
  Future.delayed(const Duration(milliseconds: 2000), () {
    if (!mounted || !_isLearning) return;
    final code = 'IR_${_selectedDevice!.type.name}_'
        '${_learningKey!.name}_${DateTime.now().millisecondsSinceEpoch}';
    _remoteService.updateIRKey(
        _selectedDevice!.id, _learningKey!, code);
    setState(() {
      _isLearning = false;
      _learningProgress = 100;
      _learningKey = null;
    });
  });
}
3.4 场景模式联动
场景模式是智能遥控器的核心亮点,支持一键联动多个设备。例如"回家模式"可同时打开空调和电视,"离家模式"则一键关闭所有设备:
void activateScene(String id) {
  for (int i = 0; i < _scenes.length; i++) {
    _scenes[i] = _scenes[i].copyWith(isActive: _scenes[i].id == id);
  }
  final scene = _scenes.firstWhere((s) => s.id == id);
  for (final action in scene.actions) {
    sendIRCommand(action.deviceId, action.keyType);
  }
}
预设的 5 种场景模式覆盖了日常使用的主要场景:
_scenes.addAll([
  SceneMode(
    id: 'S001', name: '回家模式',
    type: SceneModeType.home,
    icon: Icons.home, color: 0xFF4CAF50,
    actions: [
      SceneAction(deviceId: 'D001', keyType: IRKeyType.power),
      SceneAction(deviceId: 'D003', keyType: IRKeyType.power),
    ],
  ),
  SceneMode(
    id: 'S002', name: '睡眠模式',
    type: SceneModeType.sleep,
    icon: Icons.bed, color: 0xFF3F51B5,
    actions: [
      SceneAction(deviceId: 'D002', keyType: IRKeyType.power),
      SceneAction(deviceId: 'D003', keyType: IRKeyType.power),
    ],
  ),
  SceneMode(
    id: 'S003', name: '观影模式',
    type: SceneModeType.movie,
    icon: Icons.movie, color: 0xFFE91E63,
    actions: [
      SceneAction(deviceId: 'D003', keyType: IRKeyType.power),
      SceneAction(deviceId: 'D005', keyType: IRKeyType.power),
    ],
  ),
  SceneMode(
    id: 'S004', name: '离家模式',
    type: SceneModeType.away,
    icon: Icons.directions_walk, color: 0xFF9E9E9E,
    actions: [
      SceneAction(deviceId: 'D001', keyType: IRKeyType.power),
      SceneAction(deviceId: 'D002', keyType: IRKeyType.power),
      SceneAction(deviceId: 'D003', keyType: IRKeyType.power),
      SceneAction(deviceId: 'D005', keyType: IRKeyType.power),
    ],
  ),
  SceneMode(
    id: 'S005', name: '节能模式',
    type: SceneModeType.energy,
    icon: Icons.eco, color: 0xFF4CAF50,
    actions: [
      SceneAction(deviceId: 'D001', keyType: IRKeyType.eco),
      SceneAction(deviceId: 'D002', keyType: IRKeyType.eco),
    ],
  ),
]);
3.5 设备管理与定时开关
设备管理页面支持按类型分组展示、添加新设备(选择类型/品牌/型号/房间)、编辑设备信息、滑动删除等操作。定时开关功能则允许用户为每个设备设置定时任务,支持多种重复方式:
void _showAddTimerDialog() {
  // 创建定时任务对话框
  // 包含:任务名称、选择设备、执行动作、执行时间、重复方式
  final timer = DeviceTimer(
    id: 'T${DateTime.now().millisecondsSinceEpoch}',
    deviceId: selectedDeviceId!,
    name: nameController.text,
    action: selectedAction,
    time: selectedTime,
    repeatType: selectedRepeat,
  );
  _remoteService.addTimer(timer);
}
3.6 遥控状态反馈
每次按键操作都会通过 RemoteService 记录操作反馈,并在 UI 层通过 SnackBar 实时展示操作结果:
void sendIRCommand(String deviceId, IRKeyType keyType) {
  final device = getDeviceById(deviceId);
  final success = device != null && device.irKeys.containsKey(keyType);

  _feedbacks.insert(0, RemoteFeedback(
    deviceId: deviceId,
    keyType: keyType,
    success: success,
    message: success ? '指令发送成功' : '设备未找到或按键未学习',
  ));
}
四、运行效果截图
以下为应用在 OpenHarmony 设备上的运行效果:
4.1 遥控器主页
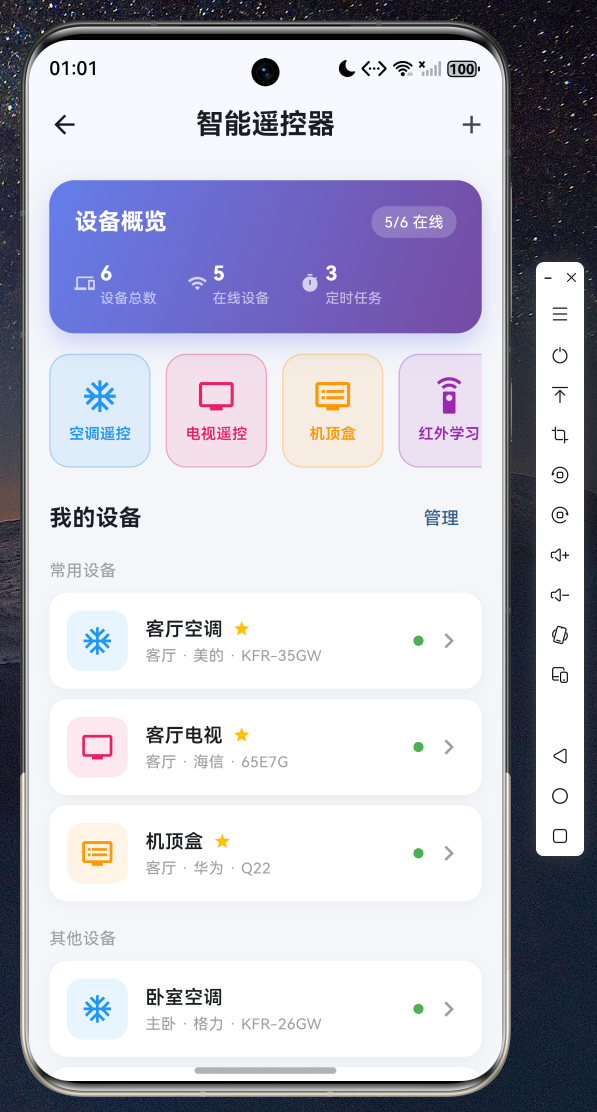
主页展示设备概览、快捷操作入口、设备列表和场景模式
4.2 空调遥控面板
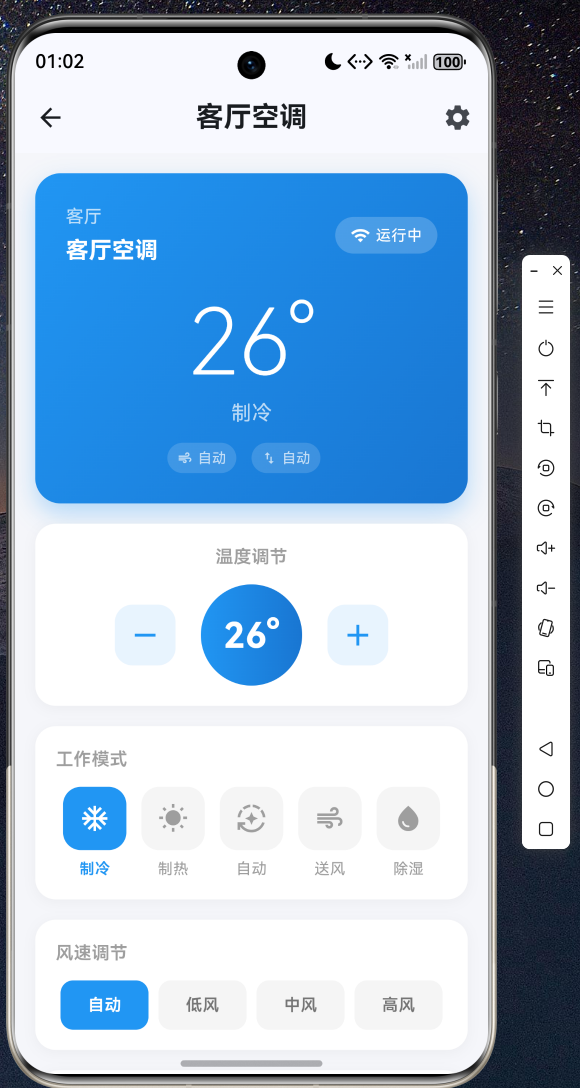
空调面板包含温度调节、模式切换、风速风向控制和特色功能
4.3 电视遥控界面
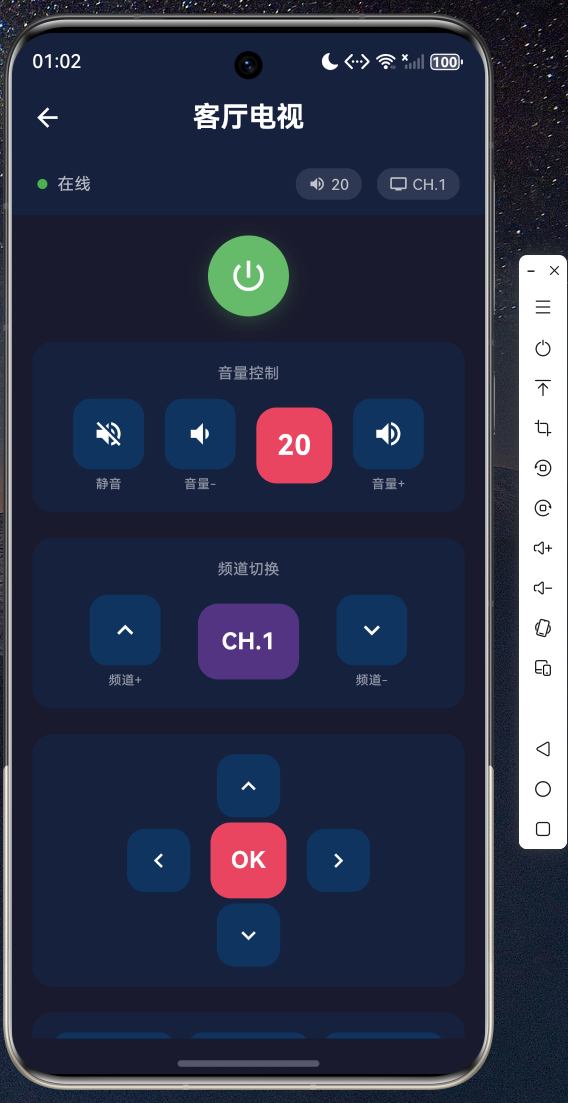
电视遥控采用深色主题,包含方向键、数字键盘和媒体控制
4.4 机顶盒控制
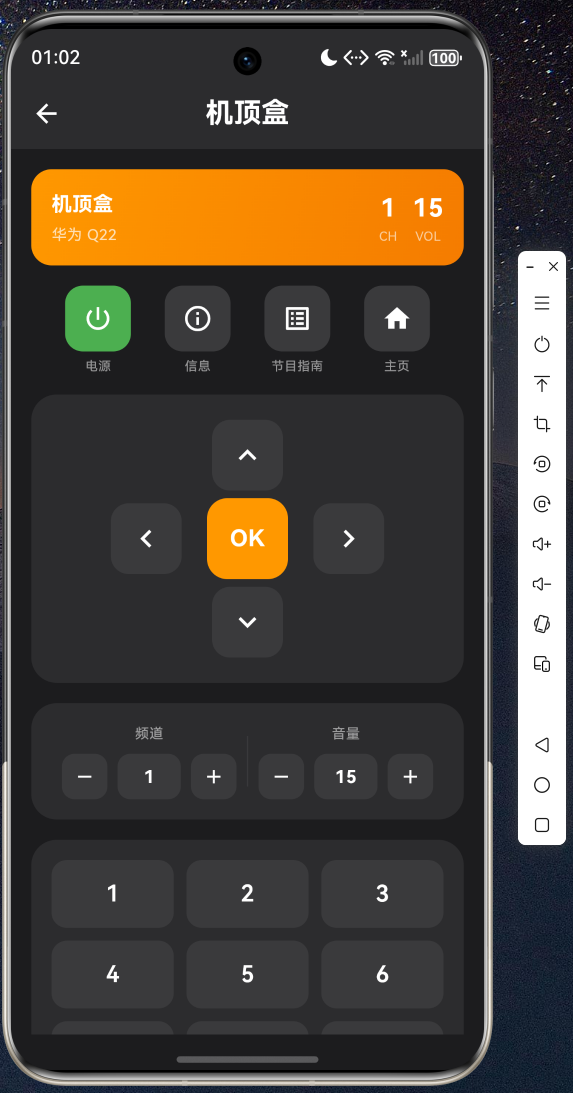
机顶盒界面提供频道音量调节、播放控制和功能按键
4.5 红外遥控学习
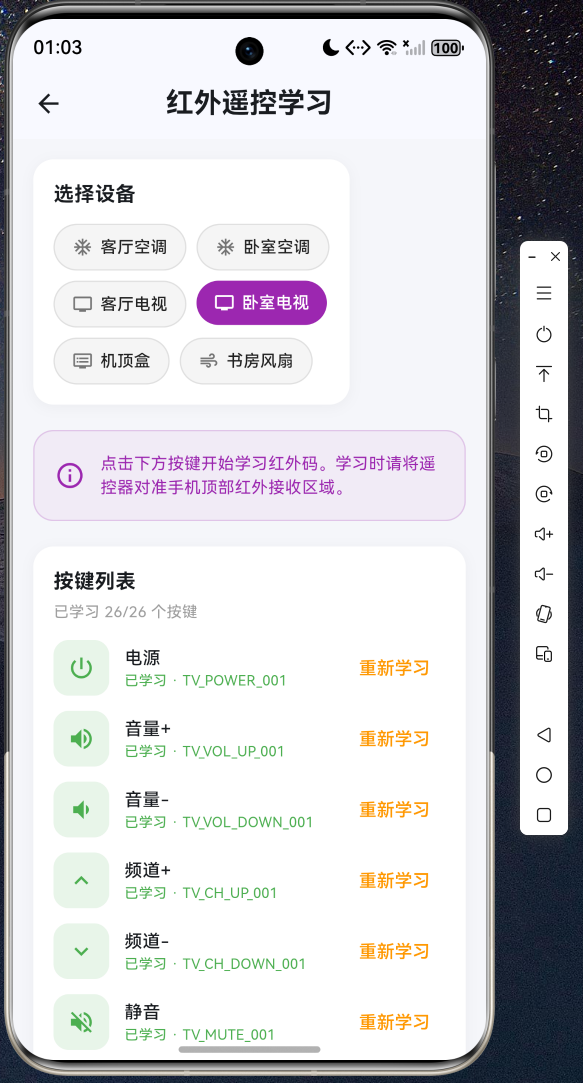
红外学习功能支持逐个按键学习并显示学习进度
4.6 场景模式
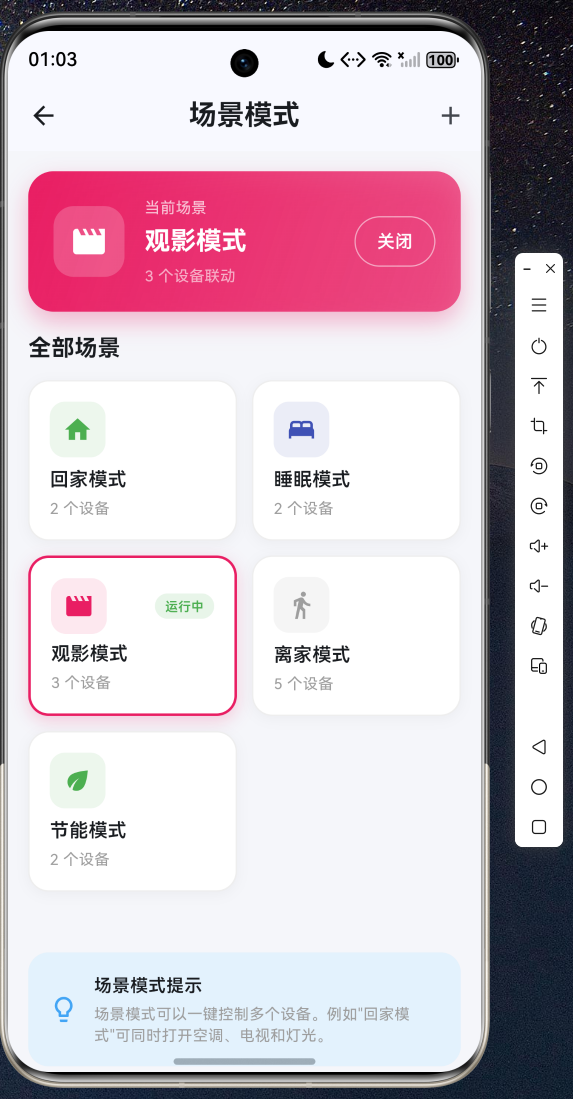
场景模式支持一键联动多个设备,当前激活场景高亮显示
4.7 设备管理
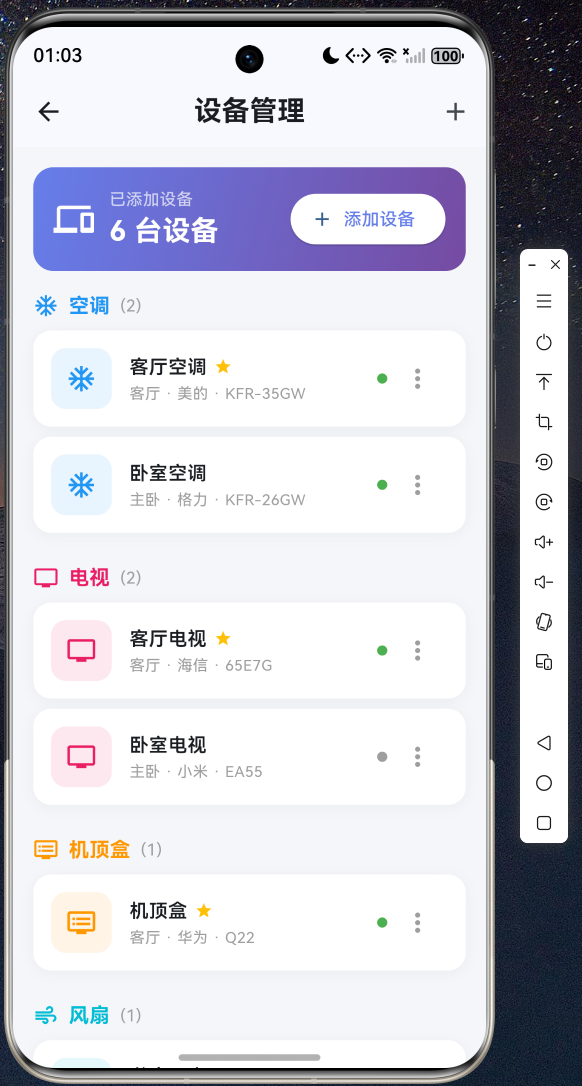
设备管理按类型分组,支持添加、编辑、删除和设为常用
4.8 定时开关设置
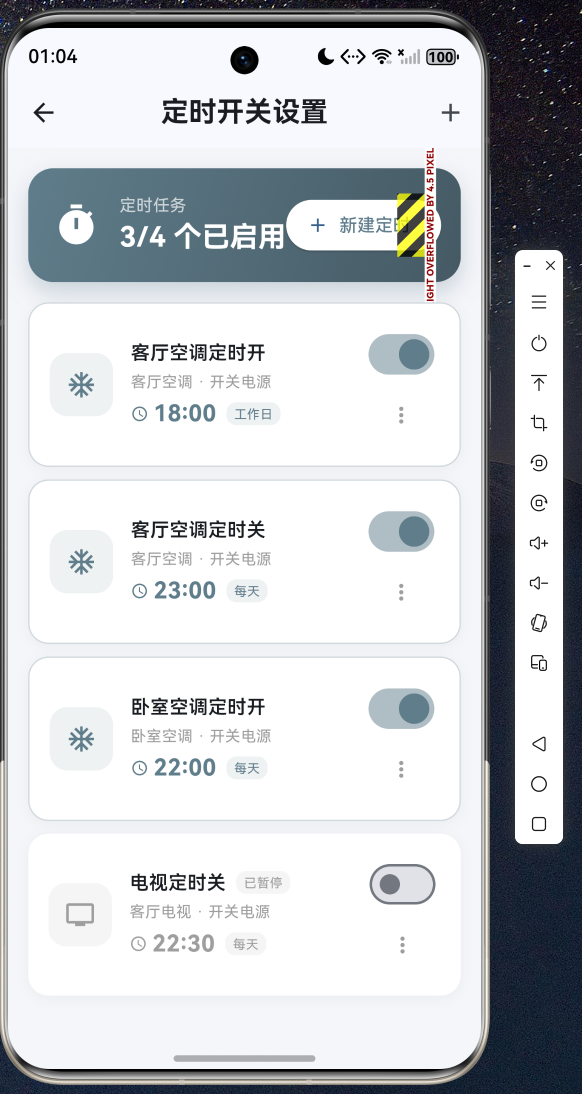
定时任务支持多种重复方式,可独立启用/暂停每个任务
五、总结与展望
本文基于 Flutter for OpenHarmony 跨平台框架,实现了一款功能完整的智能遥控器应用。通过单例 Service 模式管理全局状态,结合 Flutter 的响应式 UI 框架,在 OpenHarmony 设备上实现了流畅的遥控交互体验。
应用涵盖了空调遥控、电视遥控、机顶盒控制、红外遥控学习、场景模式联动、设备管理、定时开关和状态反馈等 8 大功能模块,代码结构清晰、可读性强,适合作为 Flutter for OpenHarmony 跨平台开发的参考实践。
未来可以进一步扩展的功能包括:
- 对接真实红外硬件,实现物理红外码的发送与接收
- 支持 Wi-Fi 直连智能设备,实现网络遥控
- 引入云同步功能,实现设备配置跨终端备份
- 增加语音遥控和手势控制等交互方式
欢迎加入开源鸿蒙跨平台社区(https://openharmonycrossplatform.csdn.net)交流讨论,共同推动 Flutter for OpenHarmony 生态发展。完整源码请访问 AtomGit(https://atomgit.com)获取。

开源鸿蒙跨平台开发社区汇聚开发者与厂商,共建“一次开发,多端部署”的开源生态,致力于降低跨端开发门槛,推动万物智联创新。
更多推荐

 6
6 0
0- 0


 已为社区贡献85条内容

所有评论(0)