Flutter for OpenHarmony 实战:routemaster 模块化路由的最佳实践和鸿蒙适配
Flutter for OpenHarmony 实战:routemaster 模块化路由解决方案 本文介绍了如何在 HarmonyOS NEXT 应用中使用 routemaster 插件实现高效的路由管理。该插件提供声明式路由配置、嵌套路由支持和 Tab 导航管理,特别适合大型鸿蒙应用开发。文章包含: 路由集成指南 多层级 URL 映射实现 鸿蒙专属路由守卫设计 针对鸿蒙平台的编译错误修复方案 模
Flutter for OpenHarmony 实战:routemaster 模块化路由的最佳实践

前言
在构建大型 HarmonyOS NEXT 应用时,如何高效管理数百个页面的跳转、权限拦截以及 URL 同步,是架构设计的核心挑战。虽然官方提供了 Navigator 2.0,但其原生 API 的复杂度让不少开发者望而却步。
routemaster 是一款极简且功能强大的声明式路由插件。它采用了类似于 Web 开发的路由配置风格,完美支持嵌套路由和重定向,是构建模块化鸿蒙应用的理想选择。
一、 为什么选择 Routemaster 适配鸿蒙?
1.1 极致的声明式定义
路由配置像一个简单的 Map,清晰可见。这对于团队协作开发鸿蒙应用时,统一管理跳转逻辑非常有帮助。
1.2 内置的 Tab 导航支持
它提供了一套非常精简的 API 来处理底部导航(IndexedStack)的路由状态,能保证在鸿蒙端切换 Tab 时,每个页面的状态都能被正确保留且 URL 实时对齐。
二、 集成指南
2.1 添加依赖
dependencies:
  routemaster: ^1.0.1
四、 实战:构建鸿蒙应用的高级路由架构
4.1 实现多层级 URL 反映 (Path Reflecting)
final routes = RouteMap(
  routes: {
    '/': (_) => const CupertinoPage(child: HomeScreen()),
    // 💡 亮点:自动提取并反映嵌套路径
    '/dashboard/:tab': (info) => TabPage(
      child: DashboardPage(),
      paths: ['/dashboard/home', '/dashboard/settings'],
    ),
  },
);
4.2 路由守卫 (Guards) 的工业级实现
在鸿蒙端处理 VIP 权限拦截:
RouteMap(
  onUnknownRoute: (_) => const Redirect('/404'),
  routes: {
    '/premium-video': (route) {
      final user = context.read<UserStore>();
      if (!user.isVIP) return const Redirect('/subscription');
      return const MaterialPage(child: VideoPlayerPage());
    },
  },
)
五、 鸿蒙平台的适配建议
5.1 深度链接 (Deep Link) 同步
鸿蒙系统支持通过 URL 直接唤起应用特定页面。Routemaster 天生对 URL 敏感,能自动解析 URI 并导航到对应的深层页面。
5.2 路由动画定制
鸿蒙系统追求丝滑的转场。在使用 Routemaster 时,建议指定 CupertinoPage,以确保在鸿蒙真机上展现出符合系统预期的侧滑动画。
5.3 权限拦截器 (Guards) 的实战
在鸿蒙端,我们可以结合 InheritedWidget 或 Provider,将用户登录状态实时注入到路由表中。当状态变更时,Routemaster 会自动重新计算路由有效性,实现无缝的“登录强制跳转”。
五、 鸿蒙环境下的“暗坑”修复:解决编译错误
在 HarmonyOS NEXT 环境下直接运行 routemaster 可能会遇到以下编译报错:Error: A non-null value must be returned since the return type 'PageTransition' doesn't allow null.
5.1 错误原因分析
这是由于 routemaster 的源码在声明转场动画时,仅显式处理了 android、iOS 等平台。在鸿蒙设备上,Flutter 返回的平台标识为 ohos,导致 platformDefault 方法在 switch 中无法匹配到任何分支,最终因返回空值而违反了 Dart 的强空安全规则。
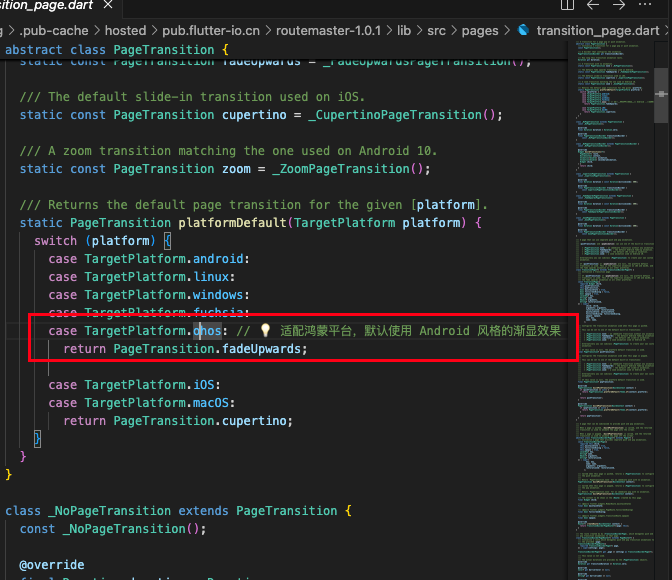
5.2 解决方案:源码级适配补丁
您可以暂时修改本地 .pub-cache 中插件的 transition_page.dart 文件:
// 文件路径:.pub-cache/hosted/pub.flutter-io.cn/routemaster-1.0.1/lib/src/pages/transition_page.dart

static PageTransition platformDefault(TargetPlatform platform) {
  switch (platform) {
    case TargetPlatform.android:
    case TargetPlatform.linux:
    case TargetPlatform.windows:
    case TargetPlatform.fuchsia:
    case TargetPlatform.ohos: // 💡 补丁:显式支持鸿蒙平台
      return PageTransition.fadeUpwards;

    case TargetPlatform.iOS:
    case TargetPlatform.macOS:
      return PageTransition.cupertino;
  }
}
后续作者会将其 fork 后,发布一个 package 适配鸿蒙
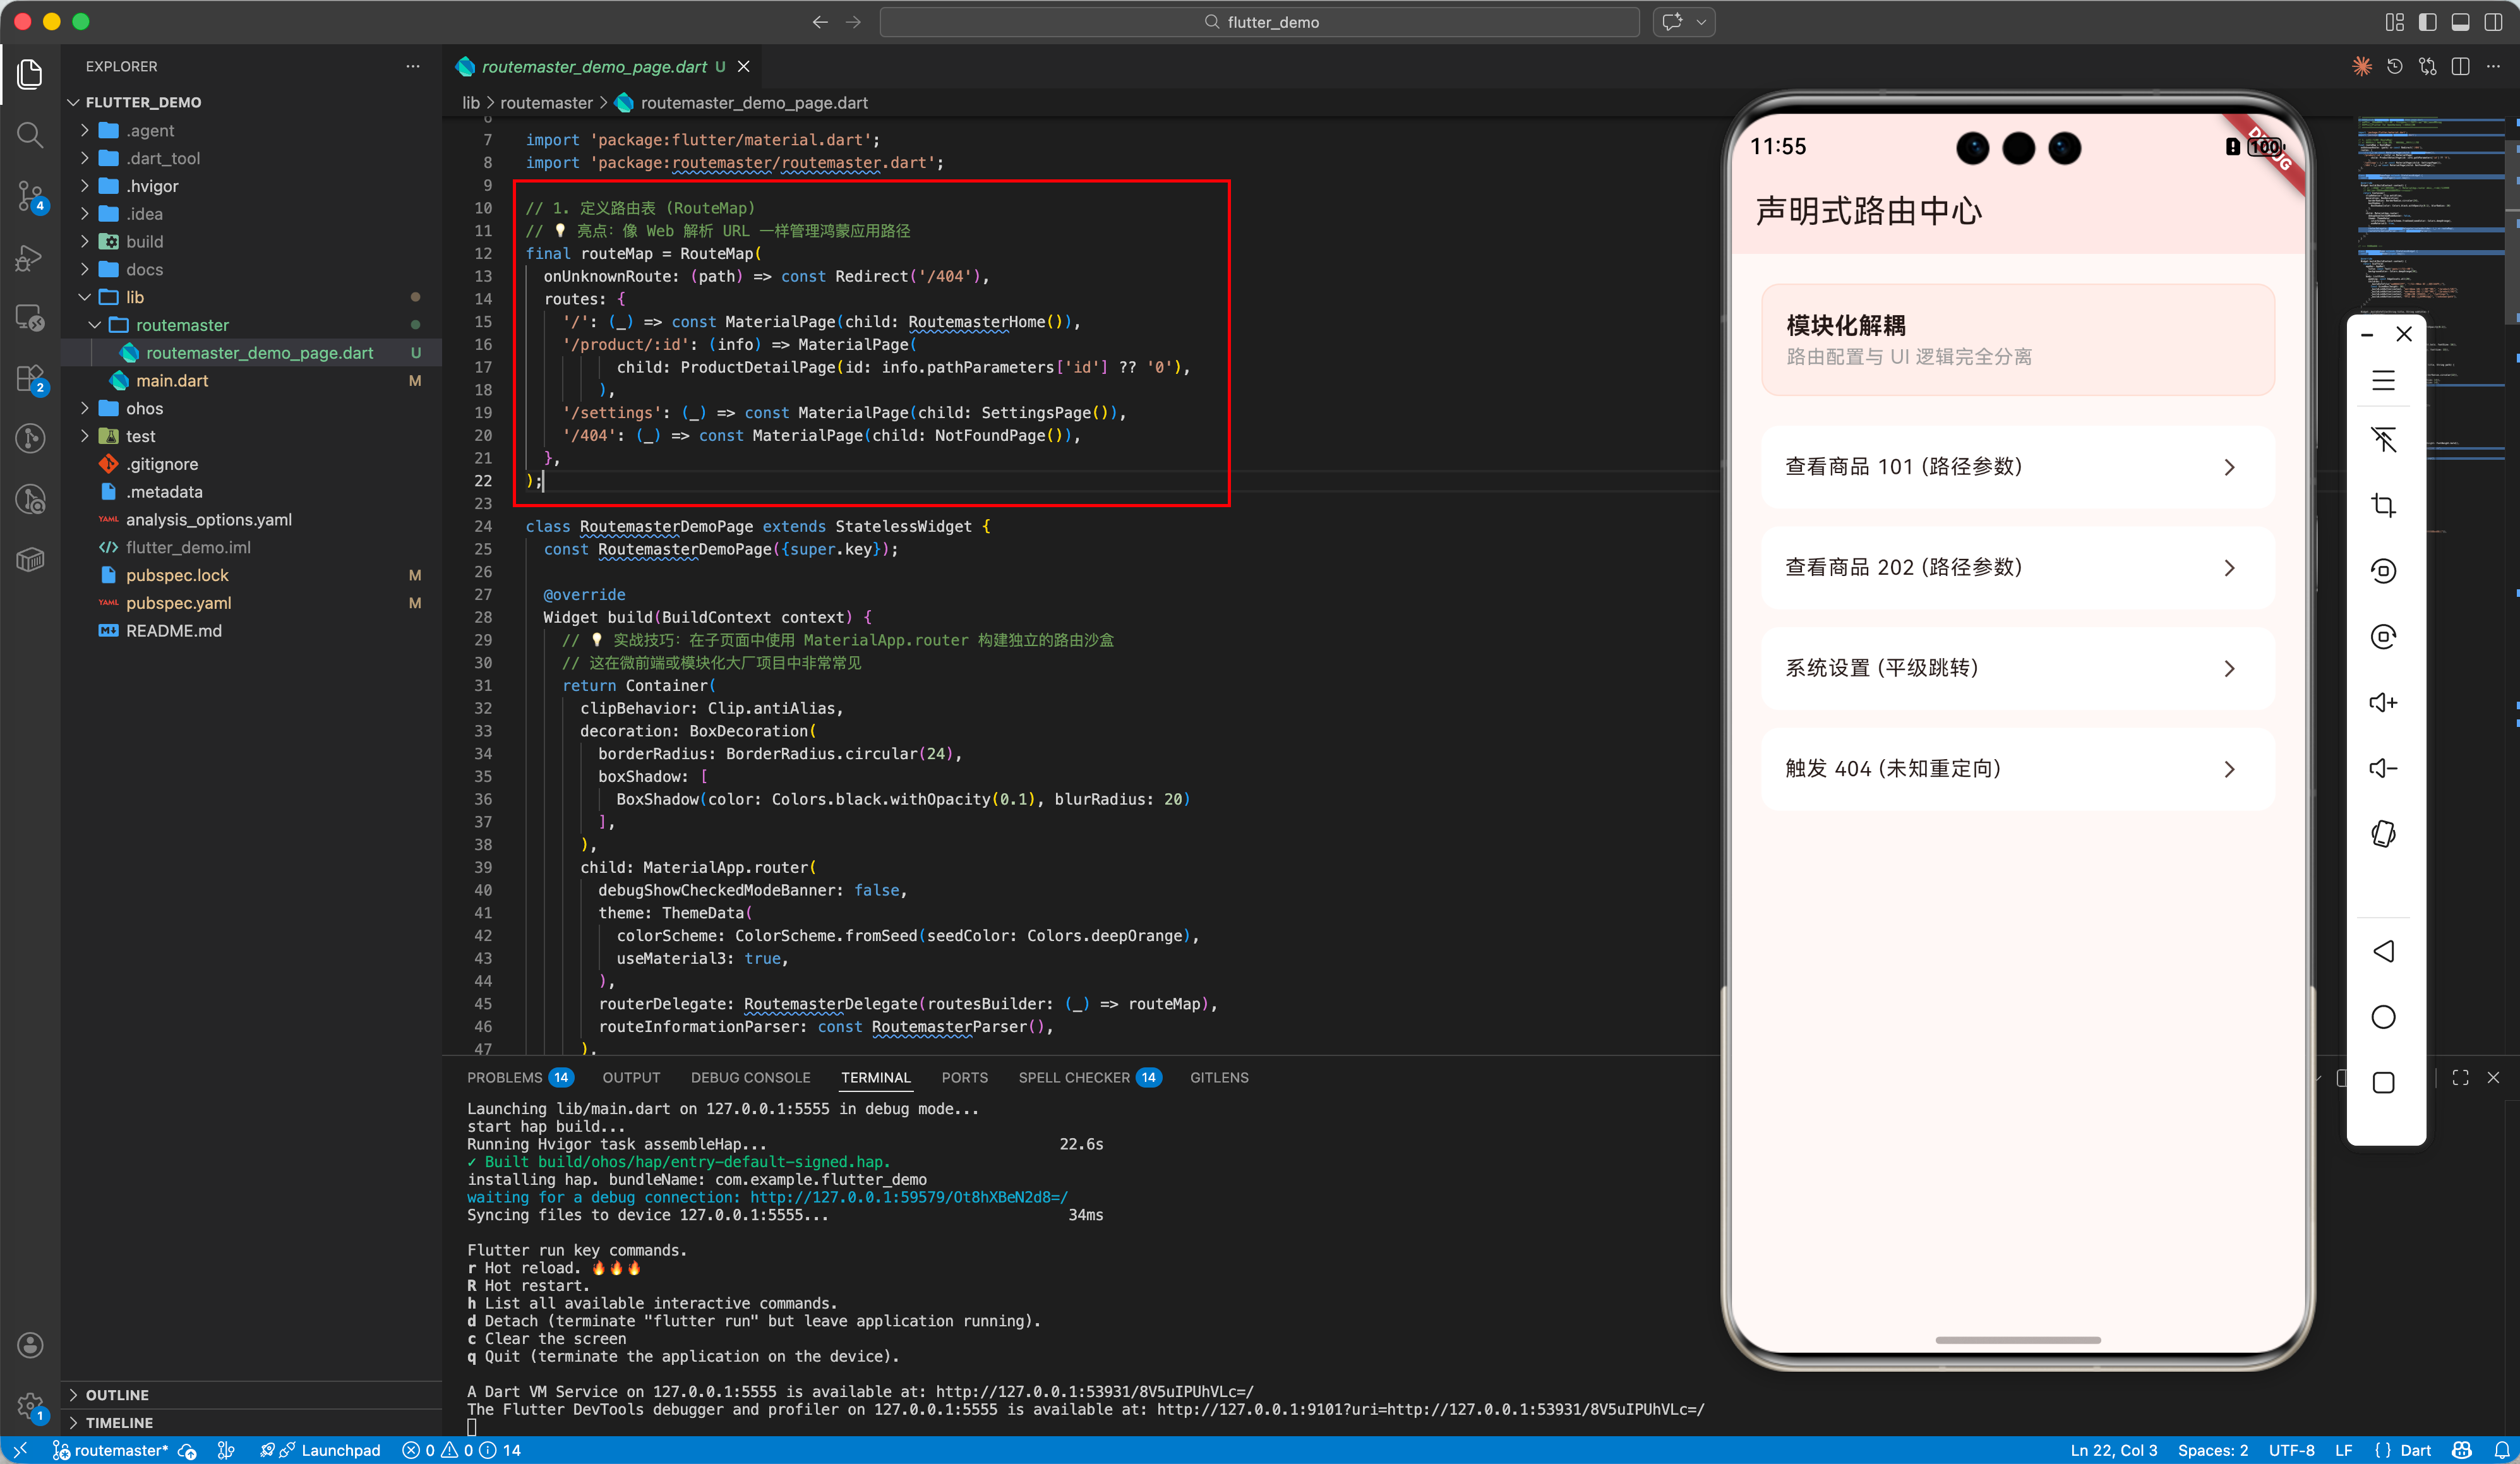
六、 实战示例:构建“鸿蒙模块化路由中心”
在大型鸿蒙项目中,我们经常需要将不同的业务模块隔离。以下演示了如何利用 routemaster 在一个独立的子模块(路由沙盒)中管理复杂的页面映射关系。
import 'package:flutter/material.dart';
import 'package:routemaster/routemaster.dart';
// 1. 定义路由表 (RouteMap)
// 💡 亮点:像 Web 解析 URL 一样管理鸿蒙应用路径
final routeMap = RouteMap(
onUnknownRoute: (path) => const Redirect('/404'),
routes: {
'/': (_) => const MaterialPage(child: RoutemasterHome()),
'/product/:id': (info) => MaterialPage(
child: ProductDetailPage(id: info.pathParameters['id'] ?? '0'),
),
'/settings': (_) => const MaterialPage(child: SettingsPage()),
'/404': (_) => const MaterialPage(child: NotFoundPage()),
},
);
class RoutemasterDemoPage extends StatelessWidget {
const RoutemasterDemoPage({super.key});
Widget build(BuildContext context) {
// 💡 实战技巧:在子页面中使用 MaterialApp.router 构建独立的路由沙盒
// 这在微前端或模块化大厂项目中非常常见
return Container(
clipBehavior: Clip.antiAlias,
decoration: BoxDecoration(
borderRadius: BorderRadius.circular(24),
boxShadow: [
BoxShadow(color: Colors.black.withOpacity(0.1), blurRadius: 20)
],
),
child: MaterialApp.router(
debugShowCheckedModeBanner: false,
theme: ThemeData(
colorScheme: ColorScheme.fromSeed(seedColor: Colors.deepOrange),
useMaterial3: true,
),
routerDelegate: RoutemasterDelegate(routesBuilder: (_) => routeMap),
routeInformationParser: const RoutemasterParser(),
),
);
}
}
// --- 页面组件 ---
class RoutemasterHome extends StatelessWidget {
const RoutemasterHome({super.key});
Widget build(BuildContext context) {
return Scaffold(
appBar: AppBar(
title: const Text('声明式路由中心'),
backgroundColor: Colors.deepOrange[50],
),
body: ListView(
padding: const EdgeInsets.all(20),
children: [
_buildInfoTile("模块化解耦", "路由配置与 UI 逻辑完全分离"),
const SizedBox(height: 20),
_buildLinkButton(context, "查看商品 101 (路径参数)", "/product/101"),
_buildLinkButton(context, "查看商品 202 (路径参数)", "/product/202"),
_buildLinkButton(context, "系统设置 (平级跳转)", "/settings"),
_buildLinkButton(context, "触发 404 (未知重定向)", "/unknown-path"),
],
),
);
}
Widget _buildInfoTile(String title, String subtitle) {
return Container(
padding: const EdgeInsets.all(16),
decoration: BoxDecoration(
color: Colors.deepOrange.withOpacity(0.05),
borderRadius: BorderRadius.circular(12),
border: Border.all(color: Colors.deepOrange.withOpacity(0.1)),
),
child: Column(
crossAxisAlignment: CrossAxisAlignment.start,
children: [
Text(title,
style:
const TextStyle(fontWeight: FontWeight.bold, fontSize: 16)),
Text(subtitle,
style: const TextStyle(color: Colors.grey, fontSize: 13)),
],
),
);
}
Widget _buildLinkButton(BuildContext context, String title, String path) {
return Padding(
padding: const EdgeInsets.only(bottom: 12),
child: ListTile(
shape: RoundedRectangleBorder(borderRadius: BorderRadius.circular(12)),
tileColor: Colors.white,
title: Text(title, style: const TextStyle(fontSize: 14)),
trailing: const Icon(Icons.arrow_forward_ios, size: 14),
onTap: () => Routemaster.of(context).push(path),
),
);
}
}
class ProductDetailPage extends StatelessWidget {
final String id;
const ProductDetailPage({super.key, required this.id});
Widget build(BuildContext context) {
return Scaffold(
appBar: AppBar(title: const Text('商品详情')),
body: Center(
child: Column(
mainAxisAlignment: MainAxisAlignment.center,
children: [
const Icon(Icons.shopping_bag_outlined,
size: 80, color: Colors.deepOrange),
const SizedBox(height: 20),
Text("正在解析路径参数 ID: $id",
style:
const TextStyle(fontSize: 18, fontWeight: FontWeight.bold)),
const SizedBox(height: 10),
const Text("Routemaster 自动完成了参数提取与类型传递",
style: TextStyle(color: Colors.grey)),
const SizedBox(height: 40),
ElevatedButton(
onPressed: () => Routemaster.of(context).pop(),
child: const Text('返回路由首页'),
),
],
),
),
);
}
}
class SettingsPage extends StatelessWidget {
const SettingsPage({super.key});
Widget build(BuildContext context) {
return Scaffold(
appBar: AppBar(title: const Text('系统设置')),
body: const Center(child: Text("应用设置页面")),
);
}
}
class NotFoundPage extends StatelessWidget {
const NotFoundPage({super.key});
Widget build(BuildContext context) {
return Scaffold(
appBar: AppBar(title: const Text('404')),
body: const Center(child: Text("抱歉,您访问的鸿蒙页面不存在")),
);
}
}
5.1 鸿蒙平台的适配建议
- 侧滑返回适配: Routemaster 完美继承了
Navigator 2.0的特性。在鸿蒙真机上,使用CupertinoPage代替MaterialPage可以获得更接近原生的侧滑返回手势支持。 - 状态保留 (State Preservation): 利用
TabPage路由,可以轻松实现在底部导航切换时保留每个页面的滚动位置或输入框状态。 - Deep Link 同步: 鸿蒙系统支持
Want跳转。通过监听系统事件并调用Routemaster.of(context).push(url),可以实现从系统通知或浏览器直接拉起 App 深层页面的能力。
六、 总结
路由是应用的“骨架”。通过 routemaster 方案,我们不仅在鸿蒙平台上实现了一个高效的跳转引擎,更通过声明式配置提升了代码的可读性和模块化解耦。在 HarmonyOS NEXT 这个大前端融合的时代,拥抱这种 Web 化的路由思想,将助你构建出逻辑边界最清晰的高质量应用。
🌐 欢迎加入开源鸿蒙跨平台社区:开源鸿蒙跨平台开发者社区

开源鸿蒙跨平台开发社区汇聚开发者与厂商,共建“一次开发,多端部署”的开源生态,致力于降低跨端开发门槛,推动万物智联创新。
更多推荐


 21
21 0
0- 0


 已为社区贡献33条内容

所有评论(0)