Flutter for OpenHarmony 美食烹饪助手 App 实战:创建菜谱功能实现
本文介绍了创建菜谱功能的实现思路和关键代码。采用分步填写方式降低用户负担,使用StatefulWidget管理表单状态,包含菜谱名称、描述、难度选择和时间输入等基本字段。重点展示了食材列表的实现:通过List存储食材,提供添加和删除功能,使用setState更新UI。整体采用清晰的布局结构和交互设计,确保用户能够轻松完成菜谱创建。代码示例展示了TextField、ChoiceChip等核心组件的使
每个热爱烹饪的人都有自己的独门秘方,今天我们要实现创建菜谱功能,让用户能够记录和分享自己的烹饪心得。这个功能不仅能帮助用户保存自己的菜谱,还能让他们在社区中展示自己的厨艺。
创建菜谱的设计思路
创建菜谱是一个复杂的表单,需要收集很多信息:名称、描述、难度、时间、食材、步骤等。如何让用户轻松完成这个过程,是设计的关键。
我采用了分步填写的方式。先填写基本信息,然后添加食材,最后编写步骤。这种渐进式的设计能降低用户的心理负担,不会一开始就被大量的表单吓到。
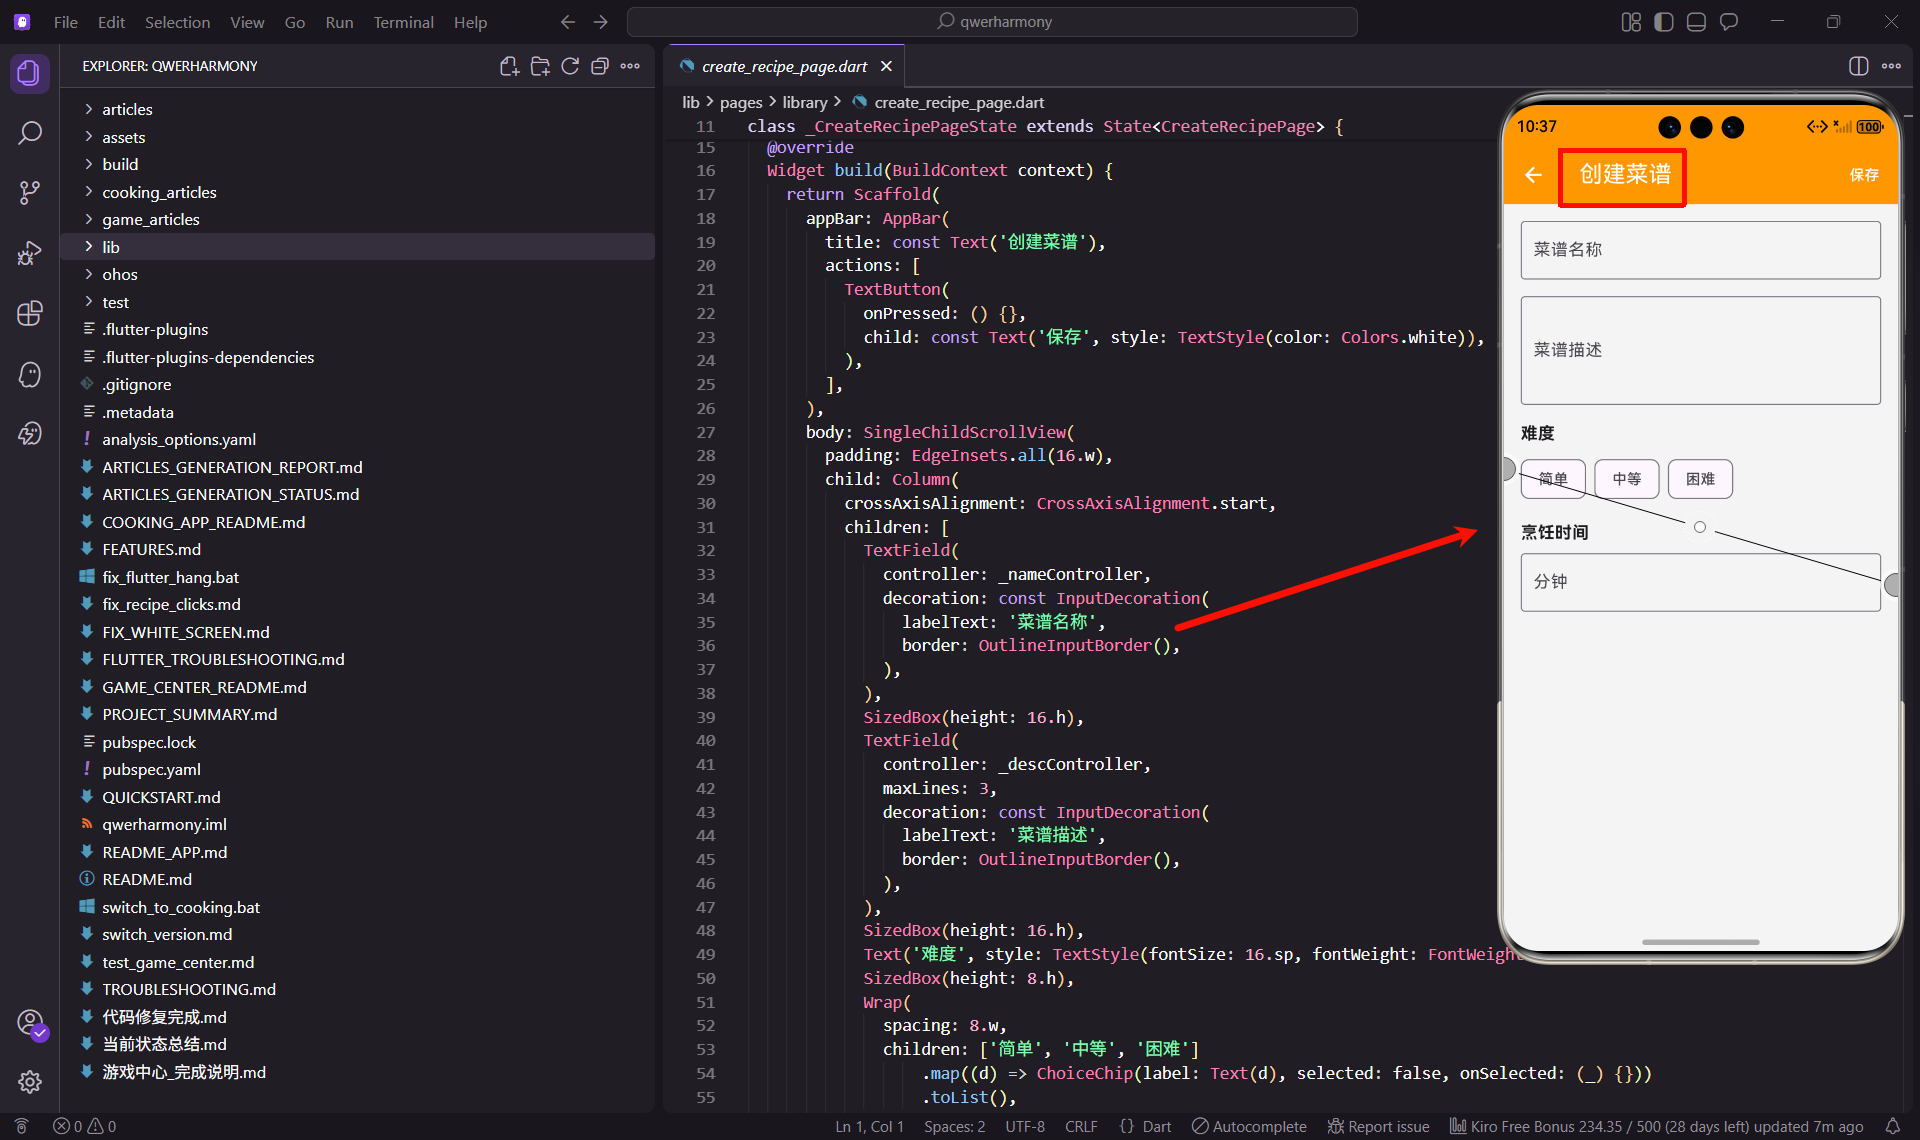
表单使用 TextField 组件,配合清晰的标签和提示文字。每个字段都有明确的说明,用户知道该填什么。保存按钮放在 AppBar 右侧,随时可以保存草稿。
创建有状态组件
创建菜谱需要管理表单状态,所以要使用 StatefulWidget。
import 'package:flutter/material.dart';
import 'package:flutter_screenutil/flutter_screenutil.dart';
class CreateRecipePage extends StatefulWidget {
const CreateRecipePage({super.key});
State<CreateRecipePage> createState() => _CreateRecipePageState();
}
class _CreateRecipePageState extends State<CreateRecipePage> {
final _nameController = TextEditingController();
final _descController = TextEditingController();
使用两个 TextEditingController 来管理名称和描述的输入。Controller 可以获取输入内容,也可以程序化地设置内容。
创建 controller 后要记得在 dispose 方法中释放,避免内存泄漏:
void dispose() {
_nameController.dispose();
_descController.dispose();
super.dispose();
}
构建页面结构
页面使用 SingleChildScrollView 包裹,让表单可以滚动。
Widget build(BuildContext context) {
return Scaffold(
appBar: AppBar(
title: const Text('创建菜谱'),
actions: [
TextButton(
onPressed: () {},
child: const Text('保存', style: TextStyle(color: Colors.white)),
),
],
),
AppBar 右侧放了一个"保存"按钮,用白色文字显示。点击后会验证表单并保存菜谱。这个按钮始终可见,用户随时可以保存。
      body: SingleChildScrollView(
        padding: EdgeInsets.all(16.w),
        child: Column(
          crossAxisAlignment: CrossAxisAlignment.start,
          children: [
            TextField(
              controller: _nameController,
              decoration: const InputDecoration(
                labelText: '菜谱名称',
                border: OutlineInputBorder(),
              ),
            ),
第一个字段是菜谱名称。使用 TextField 组件,labelText 设置为"菜谱名称",会显示在输入框上方。border 使用 OutlineInputBorder,显示一个边框。
TextField 的 controller 绑定到 _nameController,这样我们就能获取用户输入的内容。用户输入时,controller 会自动更新。
            SizedBox(height: 16.h),
            TextField(
              controller: _descController,
              maxLines: 3,
              decoration: const InputDecoration(
                labelText: '菜谱描述',
                border: OutlineInputBorder(),
              ),
            ),
第二个字段是菜谱描述。maxLines 设置为 3,让输入框显示三行,用户可以输入更多内容。如果内容超过三行,输入框会自动滚动。
两个字段之间用 SizedBox 分隔,高度 16.h。这个间距让表单看起来不会太拥挤,也不会太松散。
实现难度选择
难度使用标签选择的方式,比下拉框更直观。
            SizedBox(height: 16.h),
            Text('难度', style: TextStyle(fontSize: 16.sp, fontWeight: FontWeight.bold)),
            SizedBox(height: 8.h),
            Wrap(
              spacing: 8.w,
              children: ['简单', '中等', '困难']
                  .map((d) => ChoiceChip(label: Text(d), selected: false, onSelected: (_) {}))
                  .toList(),
            ),
标题使用粗体,字号 16.sp,让用户知道这是一个新的字段。标题和标签之间有 8.h 的间距。
标签使用 ChoiceChip 组件,这是 Flutter 提供的单选标签组件。三个难度选项水平排列,用 Wrap 包裹,会自动换行。
现在 selected 都是 false,实际开发中应该用一个变量来存储选中的难度,点击时更新这个变量。
实现时间输入
烹饪时间使用数字输入框。
            SizedBox(height: 16.h),
            Text('烹饪时间', style: TextStyle(fontSize: 16.sp, fontWeight: FontWeight.bold)),
            SizedBox(height: 8.h),
            TextField(
              keyboardType: TextInputType.number,
              decoration: const InputDecoration(
                labelText: '分钟',
                border: OutlineInputBorder(),
              ),
            ),
          ],
        ),
      ),
    );
  }
}
keyboardType 设置为 number,这样弹出的键盘只有数字,方便用户输入。labelText 设置为"分钟",说明单位。
实际开发中,可以添加输入验证,确保用户输入的是有效的数字。也可以使用 Slider 组件,让用户拖动滑块选择时间。
添加食材列表
食材是菜谱的重要组成部分,需要一个列表来管理。
List<String> _ingredients = [];

Widget _buildIngredientsSection() {
  return Column(
    crossAxisAlignment: CrossAxisAlignment.start,
    children: [
      Row(
        mainAxisAlignment: MainAxisAlignment.spaceBetween,
        children: [
          Text('食材', style: TextStyle(fontSize: 16.sp, fontWeight: FontWeight.bold)),
          TextButton.icon(
            onPressed: _addIngredient,
            icon: Icon(Icons.add),
            label: Text('添加'),
          ),
        ],
      ),
      ..._ingredients.map((ingredient) => ListTile(
        title: Text(ingredient),
        trailing: IconButton(
          icon: Icon(Icons.delete),
          onPressed: () {
            setState(() {
              _ingredients.remove(ingredient);
            });
          },
        ),
      )),
    ],
  );
}
食材列表使用一个 List 来存储。标题右侧有一个"添加"按钮,点击后弹出对话框让用户输入食材。
每个食材显示为一个 ListTile,右侧有删除按钮。点击删除按钮会从列表中移除这个食材,并调用 setState 刷新页面。
void _addIngredient() {
  showDialog(
    context: context,
    builder: (context) {
      final controller = TextEditingController();
      return AlertDialog(
        title: Text('添加食材'),
        content: TextField(
          controller: controller,
          decoration: InputDecoration(
            labelText: '食材名称',
            hintText: '例如: 鸡蛋 2个',
          ),
        ),
        actions: [
          TextButton(
            onPressed: () => Navigator.pop(context),
            child: Text('取消'),
          ),
          TextButton(
            onPressed: () {
              if (controller.text.isNotEmpty) {
                setState(() {
                  _ingredients.add(controller.text);
                });
                Navigator.pop(context);
              }
            },
            child: Text('添加'),
          ),
        ],
      );
    },
  );
}
添加食材的对话框包含一个输入框和两个按钮。用户输入食材名称后点击"添加",食材会被添加到列表中。
hintText 提供了一个示例,告诉用户应该怎么填写。这种引导能帮助用户更好地使用功能。
添加步骤列表
制作步骤和食材类似,也需要一个列表来管理。
List<String> _steps = [];

Widget _buildStepsSection() {
  return Column(
    crossAxisAlignment: CrossAxisAlignment.start,
    children: [
      Row(
        mainAxisAlignment: MainAxisAlignment.spaceBetween,
        children: [
          Text('步骤', style: TextStyle(fontSize: 16.sp, fontWeight: FontWeight.bold)),
          TextButton.icon(
            onPressed: _addStep,
            icon: Icon(Icons.add),
            label: Text('添加'),
          ),
        ],
      ),
      ..._steps.asMap().entries.map((entry) {
        final index = entry.key;
        final step = entry.value;
        return ListTile(
          leading: CircleAvatar(
            backgroundColor: Colors.orange,
            child: Text('${index + 1}', style: TextStyle(color: Colors.white)),
          ),
          title: Text(step),
          trailing: IconButton(
            icon: Icon(Icons.delete),
            onPressed: () {
              setState(() {
                _steps.removeAt(index);
              });
            },
          ),
        );
      }),
    ],
  );
}
步骤列表和食材列表类似,但每个步骤前面有一个序号。使用 asMap().entries 可以同时获取索引和值。
序号使用 CircleAvatar 显示,背景色是橙色,文字是白色。这种设计和详情页的步骤显示保持一致。
实现表单验证
保存前需要验证表单,确保必填字段都已填写。
void _saveRecipe() {
  if (_nameController.text.isEmpty) {
    Get.snackbar('提示', '请输入菜谱名称');
    return;
  }

  if (_ingredients.isEmpty) {
    Get.snackbar('提示', '请至少添加一种食材');
    return;
  }

  if (_steps.isEmpty) {
    Get.snackbar('提示', '请至少添加一个步骤');
    return;
  }

  // 保存菜谱
  final recipe = Recipe(
    id: uuid.v4(),
    name: _nameController.text,
    description: _descController.text,
    difficulty: _selectedDifficulty,
    cookTime: int.parse(_timeController.text),
    ingredients: _ingredients,
    steps: _steps,
    createdAt: DateTime.now(),
  );

  // 保存到数据库
  RecipeService.saveRecipe(recipe);

  Get.back();
  Get.snackbar('成功', '菜谱已保存');
}
验证逻辑很简单,检查必填字段是否为空。如果为空,显示提示信息并返回。
验证通过后,创建一个 Recipe 对象,包含所有的表单数据。id 使用 uuid 生成,确保唯一性。createdAt 设置为当前时间。
最后调用 RecipeService 保存到数据库,返回上一页,并显示成功提示。
添加图片上传
菜谱通常需要配图,可以添加图片上传功能。
File? _image;

Widget _buildImagePicker() {
  return GestureDetector(
    onTap: _pickImage,
    child: Container(
      height: 200.h,
      decoration: BoxDecoration(
        color: Colors.grey.shade200,
        borderRadius: BorderRadius.circular(12.r),
      ),
      child: _image == null
          ? Column(
              mainAxisAlignment: MainAxisAlignment.center,
              children: [
                Icon(Icons.add_photo_alternate, size: 50.sp, color: Colors.grey),
                SizedBox(height: 8.h),
                Text('添加图片', style: TextStyle(color: Colors.grey)),
              ],
            )
          : Image.file(_image!, fit: BoxFit.cover),
    ),
  );
}

Future<void> _pickImage() async {
  final picker = ImagePicker();
  final pickedFile = await picker.pickImage(source: ImageSource.gallery);

  if (pickedFile != null) {
    setState(() {
      _image = File(pickedFile.path);
    });
  }
}
图片选择器显示一个占位符,点击后打开相册选择图片。选择后显示图片预览。
使用 image_picker 包来选择图片。这个包在 iOS 和 Android 上都能工作,但在鸿蒙上需要使用适配版本。
添加草稿保存
用户可能不会一次性填完所有内容,可以添加草稿保存功能。
void _saveDraft() {
  final draft = {
    'name': _nameController.text,
    'description': _descController.text,
    'difficulty': _selectedDifficulty,
    'ingredients': _ingredients,
    'steps': _steps,
  };

  // 保存到本地存储
  SharedPreferences.getInstance().then((prefs) {
    prefs.setString('recipe_draft', jsonEncode(draft));
  });

  Get.snackbar('成功', '草稿已保存');
}
草稿保存到本地存储,使用 SharedPreferences。下次打开页面时,可以加载草稿继续编辑。
总结
创建菜谱功能使用表单收集用户输入,包括基本信息、食材列表和制作步骤。通过合理的布局和交互设计,我们让创建过程既简单又完整。
表单验证确保数据的完整性,草稿保存避免用户的输入丢失。这些细节能大大提升用户体验,让用户愿意使用这个功能。
下一篇文章我们将实现编辑菜谱功能,让用户能够修改已创建的菜谱。
欢迎加入开源鸿蒙跨平台社区:https://openharmonycrossplatform.csdn.net

开源鸿蒙跨平台开发社区汇聚开发者与厂商,共建“一次开发,多端部署”的开源生态,致力于降低跨端开发门槛,推动万物智联创新。
更多推荐

 16
16 0
0- 0


 已为社区贡献14条内容

所有评论(0)