Hi3861 OpenHarmony 多线程操作、Timer 定时器、点灯、 IO 相关设备控制
本文介绍了OpenHarmony系统中的多线程编程和设备控制技术。主要内容包括:1)多线程操作基础,如线程创建、调度和同步机制(互斥锁、信号量);2)消息队列实现线程间通信;3)定时器应用;4)GPIO编程控制LED灯、蜂鸣器、人体传感器和按键等硬件设备。通过代码示例详细展示了如何配置引脚模式、控制输入输出电平,实现声光报警、按键检测等功能。文章提供了完整的组件构建配置,为OpenHarmony系
6. 多线程操作【重点】
6.1 OHOS 多线程操作
学习 OHOS 多线程操作是为后续的 RTT 准备
- 多线程操作
- 锁机制【Mutex Sem】
- 消息队列【MessageQueue】
6.2 多个线程创建和调度
多线程案例
/*
C 语言标准库三剑客
*/
#include <stdio.h>
#include <stdlib.h>
#include <string.h>
/*
以下是需要导入的 OpenHarmony 相关头文件
ohos_init.h OpenHarmony OS 系统初始化相关头文件
cmsis_os2.h 实时操作系统头文件
hi_timer.h 海思提供的 timer 定时器头文件
*/
#include "ohos_init.h"
#include "cmsis_os2.h"
#include "hi_timer.h"
/*
多个线程任务执行和调度
*/
void test_thread1(void *arg);
void test_thread2(void *arg);
void test_thread3(void *arg);
static void threadTestTask(void)
{
osThreadAttr_t thread_attr;
memset(&thread_attr, 0, sizeof(osThreadAttr_t));
thread_attr.name = "thread1";
thread_attr.stack_size = 1024;
thread_attr.priority = osPriorityNormal;
osThreadId_t thread_id1 = osThreadNew(test_thread1, HI_NULL, &thread_attr);
if (HI_NULL == thread_id1)
{
perror("[osThreadNew] create thread [thread_id1] failed!");
exit(EXIT_FAILURE);
}
thread_attr.name = "thread2";
osThreadId_t thread_id2 = osThreadNew(test_thread2, HI_NULL, &thread_attr);
if (HI_NULL == thread_id2)
{
perror("[osThreadNew] create thread [thread_id2] failed!");
exit(EXIT_FAILURE);
}
thread_attr.name = "thread3";
osThreadId_t thread_id3 = osThreadNew(test_thread3, HI_NULL, &thread_attr);
if (HI_NULL == thread_id3)
{
perror("[osThreadNew] create thread [thread_id3] failed!");
exit(EXIT_FAILURE);
}
}
APP_FEATURE_INIT(threadTestTask);
void test_thread1(void *arg)
{
while (1)
{
printf("Thread Test1 Running!\n");
osDelay(200);
}
}
void test_thread2(void *arg)
{
while (1)
{
printf("Thread Test2 Running!\n");
osDelay(500);
}
}
void test_thread3(void *arg)
{
while (1)
{
printf("Thread Test3 Running!\n");
osDelay(1000);
}
}
组件内部 BUILD.gn
static_library("demo02_thread") {
sources = [
"demo_thread.c"
]
include_dirs = [
"//utils/native/lite/include",
"//kernel/liteos_m/kal/cmsis"
]
}
App 目录下 BUILD.gn
import("//build/lite/config/component/lite_component.gni")
lite_component("app") {
features = [
# "demo01_hello",
"demo02_thread",
]
}
6.3 Mutex 互斥锁机制
Linux 系统编程中互斥锁使用方式
- 定义 Mutex 互斥锁变量
- 对 Mutex 进行 init 初始化操作
- 利用 lock 和 unlock 限制同步资源内容
- 使用完毕利用 destroy 对锁变量进行销毁
OpenHarmony 中的操作流程和 Linux 系统编程一致,只是函数方式略有不同。
互斥锁案例代码
/*
C 语言标准库三剑客
*/
#include <stdio.h>
#include <stdlib.h>
#include <string.h>
/*
以下是需要导入的 OpenHarmony 相关头文件
ohos_init.h OpenHarmony OS 系统初始化相关头文件
cmsis_os2.h 实时操作系统头文件
hi_timer.h 海思提供的 timer 定时器头文件
*/
#include "ohos_init.h"
#include "cmsis_os2.h"
#include "hi_timer.h"
/**
* @brief 自定义字符串数据处理函数
*
* @param str 所需参数是字符串数据
*/
void print_string(const char *str);
/*
线程任务函数
*/
void test_thread1(void *arg);
void test_thread2(void *arg);
/// \details Mutex ID identifies the mutex.
// typedef void *osMutexId_t;  互斥锁类型
osMutexId_t mutex;
static void mutexTestTask(void)
{
/*
osMutexId_t osMutexNew (const osMutexAttr_t *attr);
互斥锁初始化操作,所需参数是 osMutexAttr_t 类型,互斥锁属性类型。
/// Create and Initialize a Mutex object.
/// \param[in]
attr
mutex attributes; NULL: default values.
/// \return mutex ID for reference by other functions or NULL in case of
error.
osMutexId_t osMutexNew (const osMutexAttr_t *attr);
osMutexAttr_t 互斥属性结构体,默认情况下 osMutexNew 所需参数为 NULL
*/
mutex = osMutexNew(HI_NULL);
if (HI_NULL == mutex)
{
perror("[osMutexNew] create and Initialize Mutex object Failed!");
exit(EXIT_FAILURE);
}
osThreadAttr_t thread_attr;
memset(&thread_attr, 0, sizeof(osThreadAttr_t));
thread_attr.name = "thread1";
thread_attr.stack_size = 1024;
thread_attr.priority = osPriorityNormal;
osThreadId_t tid1 = osThreadNew(test_thread1, "Hello_XX", &thread_attr);
if (HI_NULL == tid1)
{
perror("[osThreadNew] create thread [thread1] failed!");
exit(EXIT_FAILURE);
    }
    thread_attr.name = "thread2";
    osThreadId_t tid2 = osThreadNew(test_thread2, "Hello_ZZ", &thread_attr);
    if (HI_NULL == tid2)
    {
        perror("[osThreadNew] create thread [thread2] failed!");
        exit(EXIT_FAILURE);
    }
}
APP_FEATURE_INIT(mutexTestTask);
void print_string(const char *str)
{
    while (*str)
    {
        printf("%c", *str);
        str++;
        osDelay(100);
    }
}
void test_thread1(void *arg)
{
    /*
    osStatus_t osMutexAcquire (osMutexId_t mutex_id, uint32_t timeout);
        去指针化操作 osMutexId_t mutex_id 实际类型是一个 void *
    获取当前 Mutex 互斥锁执行权限,
        osMutexId_t mutex_id mutex 互斥锁 ID
        uint32_t timeout 指定获取的时间。
    返回值 osStatus_t OHOS 中错误类型,枚举类型
    typedef enum {
        osOK                      =  0,         ///< Operation completed
successfully.
        osError                   = -1,         ///< Unspecified RTOS error:
run-time error but no other error message fits.
        osErrorTimeout            = -2,         ///< Operation not completed
within the timeout period.
        osErrorResource           = -3,         ///< Resource not available.
        osErrorParameter          = -4,         ///< Parameter error.
        osErrorNoMemory           = -5,         ///< System is out of memory: it
was impossible to allocate or reserve memory for the operation.
        osErrorISR                = -6,         ///< Not allowed in ISR context:
the function cannot be called from interrupt service routines.
        osStatusReserved          = 0x7FFFFFFF  ///< Prevents enum down-size
compiler optimization.
    } osStatus_t;
    */
    osStatus_t status = osMutexAcquire(mutex, osWaitForever);
    if (status)
    {
        perror("[osMutexAcquire] Acquire a Mutex Failed!\n");
        exit(EXIT_FAILURE);
    }
print_string((const char *)arg);
status = osMutexRelease(mutex);
if (status)
{
perror("[osMutexRelease] Release a Mutex Failed!\n");
exit(EXIT_FAILURE);
}
}
void test_thread2(void *arg)
{
osStatus_t status = osMutexAcquire(mutex, osWaitForever);
if (status)
{
perror("[osMutexAcquire] Acquire a Mutex Failed!\n");
exit(EXIT_FAILURE);
}
print_string((const char *)arg);
status = osMutexRelease(mutex);
if (status)
{
perror("[osMutexRelease] Release a Mutex Failed!\n");
exit(EXIT_FAILURE);
}
}
组件内部 BUILD.gn
}
static_library("demo03_mutex") {
sources = [
"demo_mutex.c"
]
include_dirs = [
"//utils/native/lite/include",
"//kernel/liteos_m/kal/cmsis"
]
App 目录下 BUILD.gn
import("//build/lite/config/component/lite_component.gni")
lite_component("app") {
features = [
# "demo01_hello",
# "demo02_thread",
"demo03_mutex",
]
}
6.4 Semaphore 信号量机制
控制线程执行的方式,可以利用信号量完成线程同步和互斥。
- 控制线程的执行顺序
- 控制线程的执行个数
- 控制线程执行使用共享资源的互斥效应。
Linux 系统编程中,使用信号量的方式
- 定义信号量变量 sem_t
- 对信号量变量进行 init 初始化操作,需要给予明确的信号量底层 int 变量初始化数据。 针对于共享资源进行线程信号量 P 操作,判断信号量底层 int 类型变量数据是否大于 0 ,如 果大于 0,底层 int 类型数据 -= 1 ,同时获取线程 CPU 执行权。如果底层 int 变量为 0,当 前线程进入阻塞等待状态
- 共享执行完毕之后,信号量 V 操作,对当前信号量底层 int 数据进行 += 1,释放信号量内容
- 信号量 destroy
6.4.1 信号量互斥
原码内容
/*
C 语言标准库三剑客
*/
#include <stdio.h>
#include <stdlib.h>
#include <string.h>
/*
以下是需要导入的 OpenHarmony 相关头文件
ohos_init.h OpenHarmony OS 系统初始化相关头文件
cmsis_os2.h 实时操作系统头文件
hi_timer.h 海思提供的 timer 定时器头文件
*/
#include "ohos_init.h"
#include "cmsis_os2.h"
#include "hi_timer.h"
/*
信号量案例
*/
/**
* @brief 自定义字符串数据处理函数
*
* @param str 所需参数是字符串数据
*/
void print_string(const char *str);
void test_thread1(void *arg);
void test_thread2(void *arg);
/*
信号量变量,去指针化操作
/// \details Semaphore ID identifies the semaphore.
typedef void *osSemaphoreId_t;
*/
osSemaphoreId_t sem;
static void semTestTask(void)
{
    /*
    osSemaphoreId_t osSemaphoreNew (uint32_t max_count,
        uint32_t initial_count,
        const osSemaphoreAttr_t *attr);
        uint32_t max_count 信号量底层 int 类型数据最大值
        uint32_t initial_count 信号量底层 int 类型数据初始化值
        const osSemaphoreAttr_t *attr 信号量初始化结构体,默认参数为 NULL
    */
    sem = osSemaphoreNew(1, 1, HI_NULL);
    if (HI_NULL == sem)
    {
        perror("[osSemaphoreNew] create Semaphore failed!");
        exit(EXIT_FAILURE);
    }
    osThreadAttr_t thread_attr;
    memset(&thread_attr, 0, sizeof(osThreadAttr_t));
    thread_attr.name = "thread1";
    thread_attr.stack_size = 1024;
    thread_attr.priority = osPriorityNormal;
    osThreadId_t tid1 = osThreadNew(test_thread1, "Hello World!", &thread_attr);
    if (HI_NULL == tid1)
    {
        perror("[osThreadNew] create thread [test_thread1] failed!");
        exit(EXIT_FAILURE);
    }
    osThreadId_t tid2 = osThreadNew(test_thread2, "Hello BZR!!!", &thread_attr);
    if (HI_NULL == tid2)
    {
        perror("[osThreadNew] create thread [test_thread2] failed!");
        exit(EXIT_FAILURE);
    }
}
APP_FEATURE_INIT(semTestTask);
void print_string(const char *str)
{
    while (*str)
    {
        printf("%c", *str);
        str++;
        osDelay(100);
    }
}
void test_thread1(void *arg)
{
    /*
组件内 BUILD.gn
    osStatus_t osSemaphoreAcquire (osSemaphoreId_t semaphore_id, uint32_t
timeout);
        Sem 信号量 P 操作
        所需参数是信号量类型和等待时间,osWaitForever 永久等待。
    */
    osStatus_t status = osSemaphoreAcquire(sem, osWaitForever);
    if (status)
    {
        perror("[osSemaphoreAcquire] P Operate failed");
        exit(EXIT_FAILURE);
    }
    print_string((const char *)arg);
    /*
    osStatus_t osSemaphoreRelease (osSemaphoreId_t semaphore_id);
        Sem 信号量 V 操作
        所需参数是信号量类型
    */
    status = osSemaphoreRelease(sem);
    if (status)
    {
        perror("[osSemaphoreAcquire] P Operate failed");
        exit(EXIT_FAILURE);
    }
}
void test_thread2(void *arg)
{
    /*
   osStatus_t osSemaphoreAcquire (osSemaphoreId_t semaphore_id, uint32_t
timeout);
       Sem 信号量 P 操作
       所需参数是信号量类型和等待时间,osWaitForever 永久等待。
   */
    osStatus_t status = osSemaphoreAcquire(sem, osWaitForever);
    if (status)
    {
        perror("[osSemaphoreAcquire] P Operate failed");
        exit(EXIT_FAILURE);
    }
    print_string((const char *)arg);
    /*
    osStatus_t osSemaphoreRelease (osSemaphoreId_t semaphore_id);
        Sem 信号量 V 操作
        所需参数是信号量类型
    */
    status = osSemaphoreRelease(sem);
    if (status)
    {
        perror("[osSemaphoreAcquire] P Operate failed");
        exit(EXIT_FAILURE);
    }
}
组件内 BUILD.gn
static_library("demo04_sem") {
sources = [
"demo_sem.c"
]
include_dirs = [
"//utils/native/lite/include",
"//kernel/liteos_m/kal/cmsis"
]
}
APP 目录下 BUILD.gn
import("//build/lite/config/component/lite_component.gni")
lite_component("app") {
features = [
# "demo01_hello",
# "demo02_thread",
# "demo03_mutex",
"demo04_sem",
]
}
6.4.2 信号量控制线程执行顺序
原码内容
/*
C 语言标准库三剑客
*/
#include <stdio.h>
#include <stdlib.h>
#include <string.h>
/*
以下是需要导入的 OpenHarmony 相关头文件
ohos_init.h OpenHarmony OS 系统初始化相关头文件
cmsis_os2.h 实时操作系统头文件
hi_timer.h 海思提供的 timer 定时器头文件
*/
#include "ohos_init.h"
#include "cmsis_os2.h"
#include "hi_timer.h"
/*
信号量案例
*/
/**
* @brief 自定义字符串数据处理函数
*
* @param str 所需参数是字符串数据
*/
void print_string(const char *str);
void test_thread1(void *arg);
void test_thread2(void *arg);
void test_thread3(void *arg);
/*
信号量变量,去指针化操作
/// \details Semaphore ID identifies the semaphore.
typedef void *osSemaphoreId_t;
利用 多个信号量,控制线程的执行顺序
*/
osSemaphoreId_t sem1;
osSemaphoreId_t sem2;
osSemaphoreId_t sem3;
static void semTestTask(void)
{
/*
osSemaphoreId_t osSemaphoreNew (uint32_t max_count,
uint32_t initial_count,
const osSemaphoreAttr_t *attr);
uint32_t max_count 信号量底层 int 类型数据最大值
uint32_t initial_count 信号量底层 int 类型数据初始化值
const osSemaphoreAttr_t *attr 信号量初始化结构体,默认参数为 NULL
*/
sem1 = osSemaphoreNew(1, 1, HI_NULL);
if (HI_NULL == sem1)
{
perror("[osSemaphoreNew] create Semaphore failed!");
exit(EXIT_FAILURE);
}
sem2 = osSemaphoreNew(1, 0, HI_NULL);
if (HI_NULL == sem2)
{
perror("[osSemaphoreNew] create Semaphore failed!");
exit(EXIT_FAILURE);
}
sem3 = osSemaphoreNew(1, 0, HI_NULL);
if (HI_NULL == sem3)
{
perror("[osSemaphoreNew] create Semaphore failed!");
exit(EXIT_FAILURE);
}
osThreadAttr_t thread_attr;
memset(&thread_attr, 0, sizeof(osThreadAttr_t));
thread_attr.name = "thread1";
thread_attr.stack_size = 1024;
thread_attr.priority = osPriorityNormal;
osThreadId_t tid1 = osThreadNew(test_thread1, HI_NULL, &thread_attr);
if (HI_NULL == tid1)
{
        perror("[osThreadNew] create thread [test_thread1] failed!");
        exit(EXIT_FAILURE);
    }
    thread_attr.name = "thread2";
    osThreadId_t tid2 = osThreadNew(test_thread2, HI_NULL, &thread_attr);
    if (HI_NULL == tid2)
    {
        perror("[osThreadNew] create thread [test_thread2] failed!");
        exit(EXIT_FAILURE);
    }
    thread_attr.name = "thread3";
    osThreadId_t tid3 = osThreadNew(test_thread3, HI_NULL, &thread_attr);
    if (HI_NULL == tid3)
    {
        perror("[osThreadNew] create thread [test_thread3] failed!");
        exit(EXIT_FAILURE);
    }
}
APP_FEATURE_INIT(semTestTask);
void print_string(const char *str)
{
    while (*str)
    {
        printf("%c", *str);
        str++;
        osDelay(100);
    }
}
void test_thread1(void *arg)
{
    while (1)
    {
        /*
        osStatus_t osSemaphoreAcquire (osSemaphoreId_t semaphore_id, uint32_t
timeout);
            Sem 信号量 P 操作
            所需参数是信号量类型和等待时间,osWaitForever 永久等待。
        */
        osStatus_t status = osSemaphoreAcquire(sem1, osWaitForever);
        if (status)
        {
            perror("[osSemaphoreAcquire] P Operate failed");
            exit(EXIT_FAILURE);
        }
        printf("Thread1 Running!!!\n");
        osDelay(100);
        /*
        osStatus_t osSemaphoreRelease (osSemaphoreId_t semaphore_id);
            Sem 信号量 V 操作
            所需参数是信号量类型
        */
        status = osSemaphoreRelease(sem2);
        if (status)
        {
            perror("[osSemaphoreAcquire] P Operate failed");
            exit(EXIT_FAILURE);
        }
    }
}
void test_thread2(void *arg)
{
    while (1)
    {
        /*
        osStatus_t osSemaphoreAcquire (osSemaphoreId_t semaphore_id, uint32_t
timeout);
           Sem 信号量 P 操作
           所需参数是信号量类型和等待时间,osWaitForever 永久等待。
       */
        osStatus_t status = osSemaphoreAcquire(sem2, osWaitForever);
        if (status)
        {
            perror("[osSemaphoreAcquire] P Operate failed");
            exit(EXIT_FAILURE);
        }
        printf("Thread2 Running!!!\n");
        osDelay(100);
        /*
        osStatus_t osSemaphoreRelease (osSemaphoreId_t semaphore_id);
            Sem 信号量 V 操作
            所需参数是信号量类型
        */
        status = osSemaphoreRelease(sem3);
        if (status)
        {
            perror("[osSemaphoreAcquire] P Operate failed");
            exit(EXIT_FAILURE);
        }
    }
}
void test_thread3(void *arg)
{
    while (1)
    {
        /*
        osStatus_t osSemaphoreAcquire (osSemaphoreId_t semaphore_id, uint32_t
timeout);
            Sem 信号量 P 操作
            所需参数是信号量类型和等待时间,osWaitForever 永久等待。
        */
        osStatus_t status = osSemaphoreAcquire(sem3, osWaitForever);
        if (status)
        {
            perror("[osSemaphoreAcquire] P Operate failed");
            exit(EXIT_FAILURE);
组件内容 BUILD.gn 内容
APP 目录下 BUILD.gn
6.5 MessageQueue 消息队列
线程之间,进程之间,进行数据传递。而且是通过数据包形式。消息队列底层结构遵循 FIFO 结构
(First In First Out)。
在 Linux 系统编程中,消息队列设计到的技术点
数据包格式,自定义结构体,要求第一个字段是一个【long】类型,告知当前消息队列数据
包类型【Message Type】
创建消息队列,根据 IPC Key 创建,同时要求提供对应消息队列的权限,默认权限是 0664
        }
        printf("Thread3 Running!!!\n");
        osDelay(100);
        /*
        osStatus_t osSemaphoreRelease (osSemaphoreId_t semaphore_id);
            Sem 信号量 V 操作
            所需参数是信号量类型
        */
        status = osSemaphoreRelease(sem1);
        if (status)
        {
            perror("[osSemaphoreAcquire] P Operate failed");
            exit(EXIT_FAILURE);
        }
    }
}
组件内容 BUILD.gn 内容
static_library("demo05_sem") {
    sources = [
        "demo_sem.c"
    ]
    include_dirs = [
        "//utils/native/lite/include",
        "//kernel/liteos_m/kal/cmsis"
    ]
}
APP 目录下 BUILD.gn
import("//build/lite/config/component/lite_component.gni")
lite_component("app") {
    features = [
      # "demo01_hello",
      # "demo02_thread",
      # "demo03_mutex",
      # "demo04_sem",
      "demo05_sem",
    ]
}
6.5 MessageQueue 消息队列
线程之间,进程之间,进行数据传递。而且是通过数据包形式。消息队列底层结构遵循 FIFO 结构 (First In First Out)。
在 Linux 系统编程中,消息队列设计到的技术点
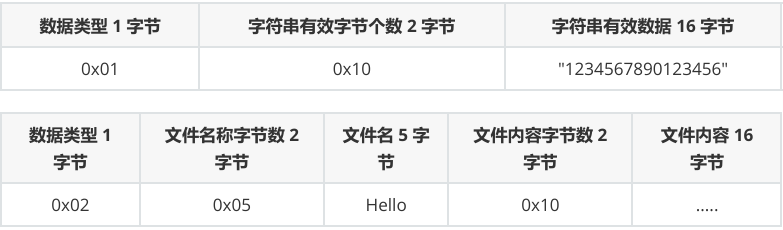
- 数据包格式,自定义结构体,要求第一个字段是一个【long】类型,告知当前消息队列数据 包类型【Message Type】
- 创建消息队列,根据 IPC Key 创建,同时要求提供对应消息队列的权限,默认权限是 0664
- 通过 send 函数进行数据发送
- 通过 recv 函数进行数据接收
- 利用 msgctl 进行控制销毁
【重点】数据包/数据帧概念
- 数据类型 0x01 对应字符串内容
- 数据类型 0x02 对应文件传递内容
原码实现
/*
C 语言标准库三剑客
*/
#include <stdio.h>
#include <stdlib.h>
#include <string.h>
/*
以下是需要导入的 OpenHarmony 相关头文件
    ohos_init.h OpenHarmony OS 系统初始化相关头文件
    cmsis_os2.h 实时操作系统头文件
    hi_timer.h 海思提供的 timer 定时器头文件
*/
#include "ohos_init.h"
#include "cmsis_os2.h"
#include "hi_timer.h"
void test_mq_get_thread(void *arg);
void test_mq_put_thread(void *arg);
/*
消息队列案例
*/
osMessageQueueId_t mq;
typedef struct
{
    /*
    键值对 Key = Value
    */
    char key[32];
    char value[32];
} MQ_Data;
static void mqTestTask(void)
{
    /*
    osMessageQueueId_t osMessageQueueNew (uint32_t msg_count,
                uint32_t msg_size,
                const osMessageQueueAttr_t *attr);
    */
    mq = osMessageQueueNew(10, 64, HI_NULL);
    if (HI_NULL == mq)
    {
        perror("[osMessageQueueNew] create MQ failed!");
        exit(EXIT_FAILURE);
    }
    osThreadAttr_t thread_attr;
    memset(&thread_attr, 0, sizeof(osThreadAttr_t));
    thread_attr.name = "mq_put";
    thread_attr.stack_size = 1024;
    thread_attr.priority = osPriorityNormal;
    osThreadId_t mq_put = osThreadNew(test_mq_put_thread, HI_NULL,
&thread_attr);
    thread_attr.name = "mq_get";
    osThreadId_t mq_get = osThreadNew(test_mq_get_thread, HI_NULL,
&thread_attr);
}
APP_FEATURE_INIT(mqTestTask);
void test_mq_get_thread(void *arg)
{
    MQ_Data *data = (MQ_Data *)calloc(1, sizeof(MQ_Data));
    while (1)
    {
        osDelay(100);
        osMessageQueueGet(mq, data, osPriorityNormal, osWaitForever);
        printf("Key : %s, Value : %s\n", data->key, data->value);
        memset(data, 0, sizeof(MQ_Data));
    }
}
void test_mq_put_thread(void *arg)
{
    int n = 0;
    MQ_Data mq_data;
    memset(&mq_data, 0, sizeof(MQ_Data));
    while (1)
    {
        if (n % 2)
        {
            memcpy(mq_data.key, "把子肉", strlen("把子肉") + 1);
            memcpy(mq_data.value, "15RMB", strlen("15RMB") + 1);
        }
        else
组件内部 BUILD.gn 文件
APP目录下 BUILD.gn 文件
        {
            memcpy(mq_data.key, "烤面筋", strlen("烤面筋") + 1);
            memcpy(mq_data.value, "10RMB", strlen("10RMB") + 1);
        }
        /*
        osStatus_t osMessageQueuePut (osMessageQueueId_t mq_id,
                    const void *msg_ptr,
                    uint8_t msg_prio,
                    uint32_t timeout);
            osMessageQueueId_t mq_id 指定消息队列 ID 号
            const void *msg_ptr 发送/放入到消息队列中的数据包首地址
            uint8_t msg_prio    当前消息队列的优先级
            uint32_t timeout    当前消息的过期时间
        */
        osMessageQueuePut(mq, &mq_data, osPriorityNormal, osWaitForever);
        memset(&mq_data, 0, sizeof(MQ_Data));
        osDelay(100);
        n += 1;
    }
}
组件内部 BUILD.gn 文件
static_library("demo06_messagequeue") {
    sources = [
        "demo_messagequeue.c"
    ]
    include_dirs = [
        "//utils/native/lite/include",
        "//kernel/liteos_m/kal/cmsis"
    ]
}
APP目录下 BUILD.gn 文件
import("//build/lite/config/component/lite_component.gni")
lite_component("app") {
    features = [
      # "demo01_hello",
      # "demo02_thread",
      # "demo03_mutex",
      # "demo04_sem",
      # "demo05_sem",
      "demo06_messagequeue",
    ]
}
7. Timer 定时器
7.1 定时器概述
用于解决开发中的定时任务
- 定时备份,处理
- 定时数据上传。。。
定时器核心参数
- 定时器对应的周期时间
- 定时器对应的执行任务 ==> 任务函数
- 定时器为一次性任务还是周期性任务。
7.2 定时器代码实现
源码
/*
C 语言标准库三剑客
*/
#include <stdio.h>
#include <stdlib.h>
#include <string.h>
/*
以下是需要导入的 OpenHarmony 相关头文件
ohos_init.h OpenHarmony OS 系统初始化相关头文件
cmsis_os2.h 实时操作系统头文件
hi_timer.h 海思提供的 timer 定时器头文件
*/
#include "ohos_init.h"
#include "cmsis_os2.h"
#include "hi_timer.h"
/*
Timer 所需的任务函数和 Thread 所需一致,都是要求
1. 返回值为 void 类型
2. 参数为 void * 类型
函数指针
*/
void timer_task(void *arg);
static void timerTestTask(void)
{
/*
osTimerId_t osTimerNew (osTimerFunc_t func,
osTimerType_t type,
void *argument,
const osTimerAttr_t *attr);
osTimerFunc_t func 当前 Timer 定时器对应的任务函数
osTimerType_t type 定时器工作类型,一次性还是重复性
void *argument
定时器任务函数对应的外来参数
const osTimerAttr_t *attr 定时器属性,默认为 NULL
*/
osTimerId_t timer = osTimerNew(timer_task, osTimerPeriodic, HI_NULL,
HI_NULL);
if (HI_NULL == timer)
组件内部 BUILD.gn 文件
    {
        perror("[osTimerNew] create Timer failed!");
        exit(EXIT_FAILURE);
    }
    /*
    osStatus_t osTimerStart (osTimerId_t timer_id, uint32_t ticks);
        定时器启动函数和对应定时器周期时间
    */
    osStatus_t status = osTimerStart(timer, 500);
    if (status)
    {
        perror("[osTimerStart] Timer Start failed!");
        exit(EXIT_FAILURE);
    }
    osDelay(2000);
    /*
    osStatus_t osTimerStop (osTimerId_t timer_id);
        定时器停止
    */
    status = osTimerStop(timer);
    if (status)
    {
        perror("[osTimerStop] Timer Stop failed!");
        exit(EXIT_FAILURE);
    }
    /*
    删除定时器
    */
    osTimerDelete(timer);
}
APP_FEATURE_INIT(timerTestTask);
int count = 1;
void timer_task(void *arg)
{
    printf("Timer running! count : %d\n", count);
    count += 1;
}
组件内部 BUILD.gn 文件
static_library("demo07_timer") {
    sources = [
        "demo_timer.c"
    ]
    include_dirs = [
        "//utils/native/lite/include",
        "//kernel/liteos_m/kal/cmsis"
    ]
}
APP目录下 BUILD.gn 文件
import("//build/lite/config/component/lite_component.gni")
lite_component("app") {
features = [
# "demo01_hello",
# "demo02_thread",
# "demo03_mutex",
# "demo04_sem",
# "demo05_sem",
# "demo06_messagequeue",
"demo07_timer",
]
}
8. 点灯大师
8.1 为什么开发板都需要点灯
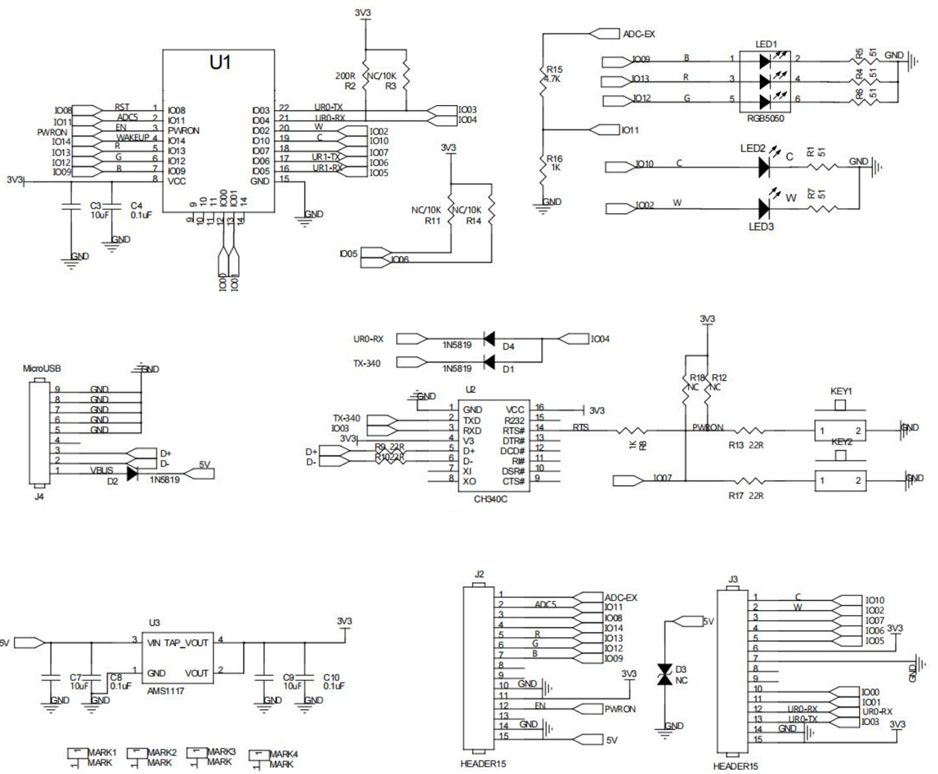
根据开发板原理图和对应的芯片操作方式,来分析如何使用当前开发板/芯片。根据点灯需求需要 明确知晓的内容
- 原理图 LED 灯亮灭的电平情况。
- 明确 LED 灯对应的 MCU 引脚关系。
- 当前 MCU 引脚工作模式分析和配置。
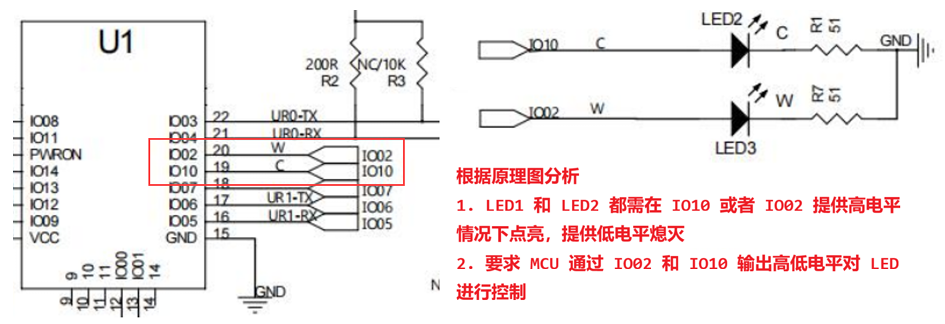
8.2 OpenHarmony GPIO 编程控制
OHOS 已经对内部的 IO 进行了封装,提供了相关的函数和使用方式,操作非常简单 根据原理分析,需要通过操作 IO02 对应 LED3 进行控制 ,对 IO02 进行 GPIO 配置
- 开启 HI GPIO 配置模式
- 配置 IO02 引脚工作模式为 GPIO 工作模式
- 配置 IO02 引脚为输出工作状态
- 配置 IO02 引脚默认的电平为低电平
8.2.1 OpenHarmony 针对于芯片引脚的名称管理枚举类型
对应所在头文件是 hi_io.h
/**
* @ingroup iot_io
*
* GPIO pin ID. CNcomment:IO硬件管脚编号。CNend
*/
typedef enum {
HI_IO_NAME_GPIO_0,
/**< GPIO0 */
HI_IO_NAME_GPIO_1,
HI_IO_NAME_GPIO_2,
HI_IO_NAME_GPIO_3,
HI_IO_NAME_GPIO_4,
HI_IO_NAME_GPIO_5,
HI_IO_NAME_GPIO_6,
HI_IO_NAME_GPIO_7,
HI_IO_NAME_GPIO_8,
HI_IO_NAME_GPIO_9,
HI_IO_NAME_GPIO_10,
HI_IO_NAME_GPIO_11,
HI_IO_NAME_GPIO_12,
HI_IO_NAME_GPIO_13,
HI_IO_NAME_GPIO_14,
HI_IO_NAME_SFC_CSN,
HI_IO_NAME_SFC_IO1,
HI_IO_NAME_SFC_IO2,
/**< GPIO1 */
/**< GPIO2 */
/**< GPIO3 */
/**< GPIO4 */
/**< GPIO5 */
/**< GPIO6 */
/**< GPIO7 */
/**< GPIO8 */
/**< GPIO9 */
/**< GPIO10 */
/**< GPIO11 */
/**< GPIO12 */
/**< GPIO13 */
/**< GPIO14 */
/**< SFC_CSN */
/**< SFC_IO1 */
/**< SFC_IO2 */
HI_IO_NAME_SFC_IO0,
HI_IO_NAME_SFC_CLK,
HI_IO_NAME_SFC_IO3,
HI_IO_NAME_MAX,
} hi_io_name;
8.2.2 OpenHarmony 针对于引脚功能复用描述枚举
对应所在头文件是 hi_io.h
/**
* @ingroup iot_io
*
* GPIO_2 pin function.CNcomment:GPIO_2管脚功能。CNend
*/
typedef enum {
HI_IO_FUNC_GPIO_2_GPIO,
HI_IO_FUNC_GPIO_2_UART1_RTS_N = 2,
HI_IO_FUNC_GPIO_2_SPI1_TXD,
HI_IO_FUNC_GPIO_2_JTAG_TRSTN,
HI_IO_FUNC_GPIO_2_PWM2_OUT,
HI_IO_FUNC_GPIO_2_SSI_CLK = 7,
} hi_io_func_gpio_2;
8.2.3 OpenHarmony 基于 GPIO 输入输出控制枚举
对应所在头文件是 hi_gpio.h
/**
* @ingroup iot_gpio
*
* I/O direction. CNcomment:GPIO方向。CNend
*/
typedef enum {
HI_GPIO_DIR_IN = 0,
HI_GPIO_DIR_OUT
/**< Input.CNcomment:输入方向CNend*/
/**< Output.CNcomment:输出方向CNend*/
} hi_gpio_dir;
8.2.4 OpenHarmony 控制 IO 引脚高低电平控制枚举
对应所在头文件是 hi_io.h
typedef enum {
HI_IO_PULL_NONE,
HI_IO_PULL_UP,
HI_IO_PULL_DOWN,
HI_IO_PULL_MAX,
} hi_io_pull;
8.2.5 OpenHarmony 控制 GPIO 高低电平枚举
对应所在头文件是 hi_gpio.h
/**
* @ingroup iot_gpio
*
* I/O level. CNcomment:GPIO电平状态。CNend
*/
typedef enum {
HI_GPIO_VALUE0 = 0,
HI_GPIO_VALUE1
/**< Low level.CNcomment:低电平CNend*/
/**< High level.CNcomment:高电平CNend*/
} hi_gpio_value;
8.2.6 代码实现
/*
C 语言标准库三剑客
*/
#include <stdio.h>
#include <stdlib.h>
#include <string.h>
/*
以下是需要导入的 OpenHarmony 相关头文件
ohos_init.h OpenHarmony OS 系统初始化相关头文件
cmsis_os2.h 实时操作系统头文件
hi_timer.h 海思提供的 timer 定时器头文件
*/
#include "ohos_init.h"
#include "cmsis_os2.h"
#include "hi_timer.h"
// 海思(OHOS) 提供的标准 IO 头文件,所有对外接口的模式,相关函数
#include "hi_io.h"
// 海思(OHOS) 提供的标准 GPIO 头文件,针对 GPIO 相关控制
#include "hi_gpio.h"
/*
利用宏对当前使用的引脚和目标期望对应的工作模式进行预处理
*/
/*
明确当前使用的引脚是 IO02 引脚
*/
#define LED3_PIN HI_IO_NAME_GPIO_2
/*
设置当前引脚的工作模式为 GPIO 工作模式
HI_IO_FUNC_GPIO_2_GPIO
HI ==> 海思
IO ==> IO引脚
FUNC ==> 工作方式配置
GPIO_2 ==> 操作的引脚是通用引脚 2
GPIO ==> 当前引脚工作模式为 GPIO 模式
*/
#define LED3_PIN_FUNC HI_IO_FUNC_GPIO_2_GPIO
/**
* @brief 配置当前 LED 对应 IO 引脚的工作状态.
*/
void led_init(void);
/**
* @brief LED3 控制线程任务函数
*
* @param arg 线程所需参数
*/
void led_thread(void *arg);
static ledTestTask(void)
{
    osThreadAttr_t thread_attr;
    memset(&thread_attr, 0, sizeof(osThreadAttr_t));
    thread_attr.name = "led_thread";
    thread_attr.stack_size = 1024;
    thread_attr.priority = osPriorityNormal;
    osThreadId_t tid = osThreadNew(led_thread, HI_NULL, &thread_attr);
    if (HI_NULL == tid)
    {
        perror("[osThreadNew] create led_thread failed!");
    }
}
APP_FEATURE_INIT(ledTestTask);
void led_init(void)
{
    /*
    1. 开启 GPIO 配置模式
        hi_u32 hi_gpio_init(hi_void);
        海思内部针对于 IO 引脚启动配置模式函数
    */
    hi_gpio_init();
    /*
    2. 设置当前 IO02 工作模式为 GPIO 通用 IO 模式
        hi_u32 hi_io_set_func(hi_io_name id, hi_u8 val);
        设置当前 IO 引脚的工作模式
        提供参数是当前 IO 引脚在 HI 中的名称枚举,和对应工作模式枚举,
        预先使用宏定义方式将 IO 引脚名称和模式,修改为当前功能模块对
        应名称,方便后续使用。
    */
    hi_io_set_func(LED3_PIN, LED3_PIN_FUNC);
    /*
    3. 设置当前 IO02 在 GPIO 工作模式下的输出方向
        hi_u32 hi_gpio_set_dir(hi_gpio_idx id, hi_gpio_dir dir);
            hi_gpio 表示当前操作的基于 IO 引脚已经明确工作模式为 GPIO 情况下
            进行输入/输出配置。
    */
    hi_gpio_set_dir(LED3_PIN, HI_GPIO_DIR_OUT);
    /*
    4. 设置当前 IO 引脚模式为低电平模式
        hi_u32 hi_io_set_pull(hi_io_name id, hi_io_pull val);
        设置指定 IO 引脚的电平情况
    */
    hi_io_set_pull(LED3_PIN, HI_IO_PULL_DOWN);
}
void led_thread(void *arg)
{
    led_init();
    while (1)
    {
        /*
        hi_u32 hi_gpio_set_ouput_val(hi_gpio_idx id, hi_gpio_value val);
当前 IO 工作模式为 GPIO 情况下,设置对应输出高低电平情况
*/
hi_gpio_set_ouput_val(LED3_PIN, HI_GPIO_VALUE1);
osDelay(100);
hi_gpio_set_ouput_val(LED3_PIN, HI_GPIO_VALUE0);
osDelay(100);
}
}
组件内部 BUILD.gn
static_library("demo08_led") {
sources = [
"demo_led.c"
]
include_dirs = [
"//utils/native/lite/include",
"//kernel/liteos_m/kal/cmsis"
]
}
APP 目录下的 BUILD.gn
import("//build/lite/config/component/lite_component.gni")
lite_component("app") {
features = [
# "demo01_hello",
# "demo02_thread",
# "demo03_mutex",
# "demo04_sem",
# "demo05_sem",
# "demo06_messagequeue",
# "demo07_timer",
"demo08_led",
]
}
9. IO 相关设备控制
9.1 Beep 控制-GPIO输出控制
9.1.1 Beep 操作基本概述和连线方式
提供设备警告,声光报警组成部分。一般情况下,目前使用的设备蜂鸣器有两种情况
- 低电平导通
- 高电平导通
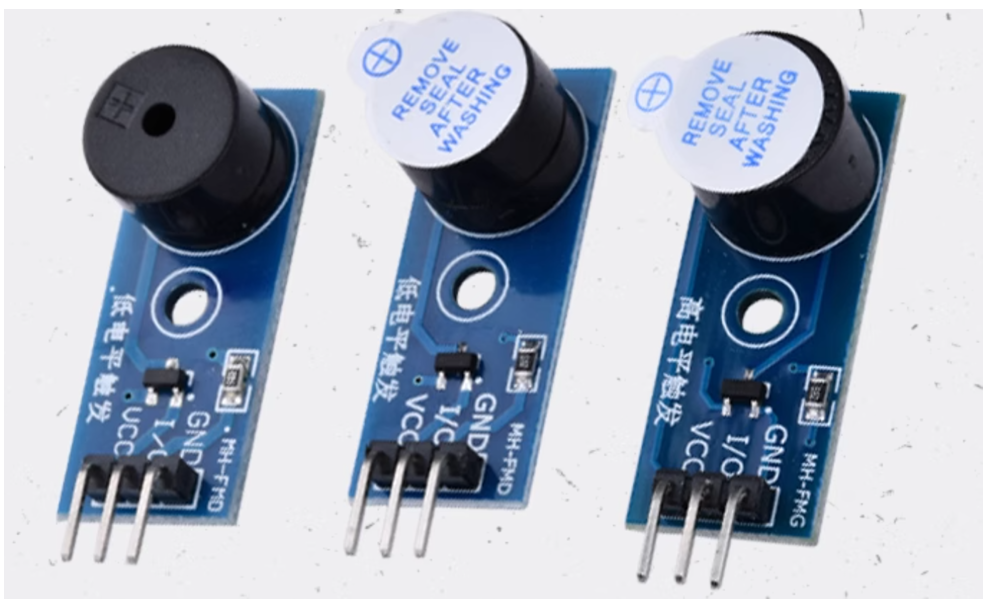
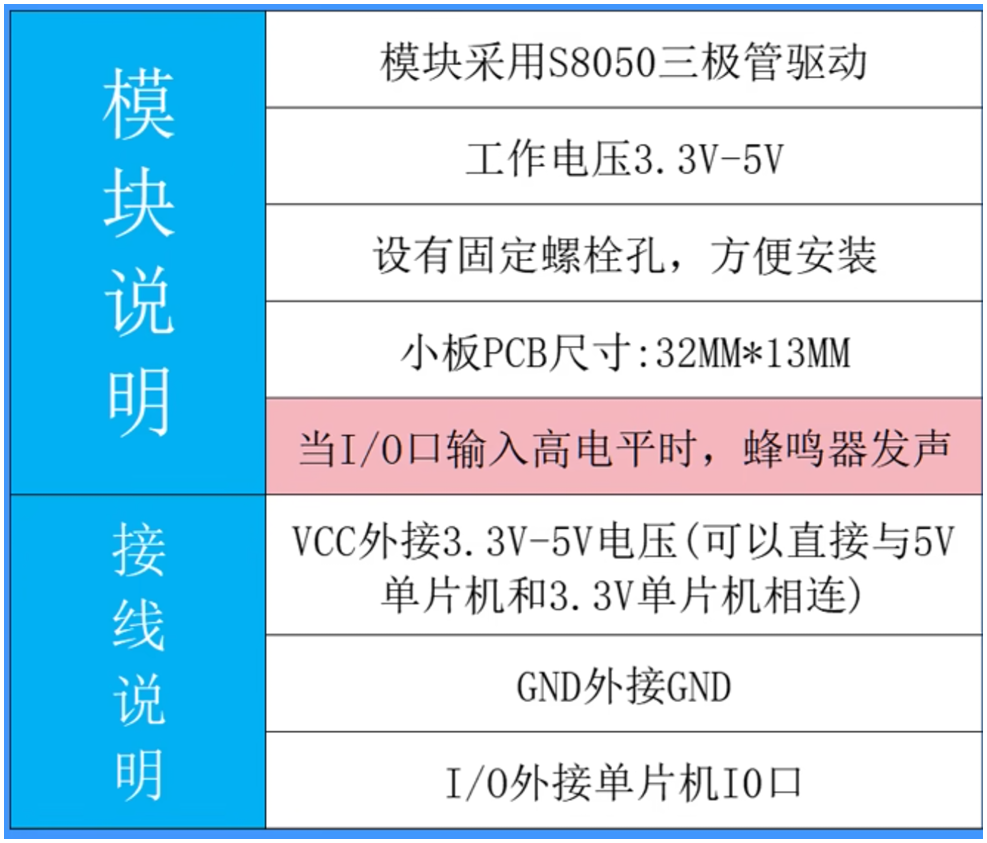
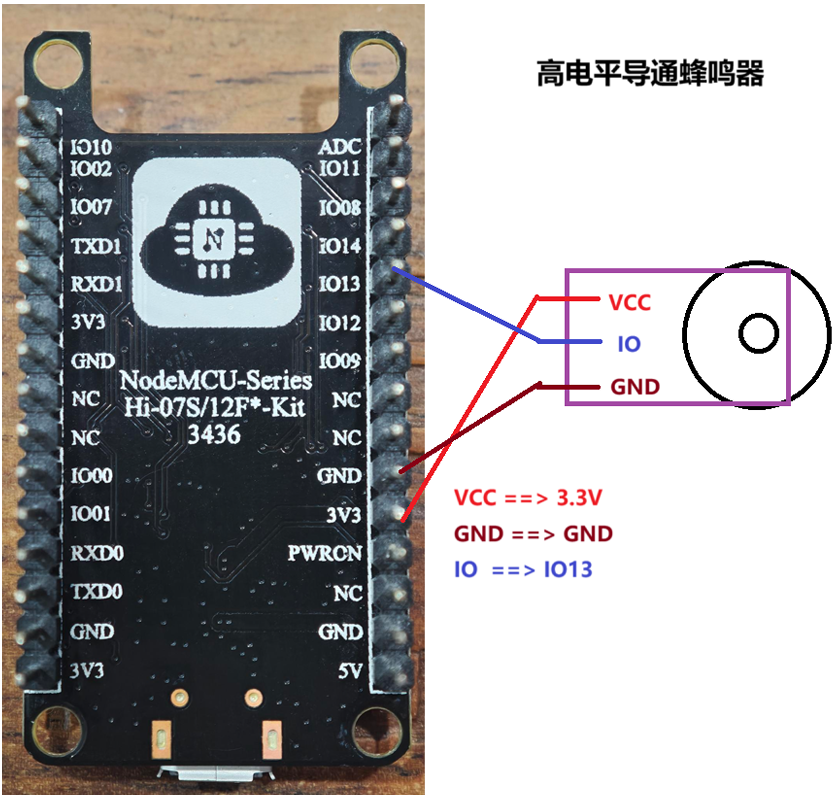
高电平触发 BEEP
- 连线方式 蜂鸣器 IO 连接 IO13
- 当前蜂鸣器是高电平导通,对应蜂鸣器工作,RGB 灯 Red 灯亮。
9.1.2 代码实现
根据原理分析和连线方式,需要通过控制 IO13 引脚对当前 RGB 灯以及蜂鸣进行控制。
- IO13 ==> GPIO 模式
- GPIO 选择输出工作状态
- IO13
- 高电平 RGB 灯 Red 灯亮,同时 BEEP 工作
- 低电平 RGB 灯 Red 灯灭,同时 BEEP 不工作
/*
C 语言标准库三剑客
*/
#include <stdio.h>
#include <stdlib.h>
#include <string.h>
/*
以下是需要导入的 OpenHarmony 相关头文件
ohos_init.h OpenHarmony OS 系统初始化相关头文件
cmsis_os2.h 实时操作系统头文件
hi_timer.h 海思提供的 timer 定时器头文件
*/
#include "ohos_init.h"
#include "cmsis_os2.h"
#include "hi_timer.h"
// 海思(OHOS) 提供的标准 IO 头文件,所有对外接口的模式,相关函数
#include "hi_io.h"
// 海思(OHOS) 提供的标准 GPIO 头文件,针对 GPIO 相关控制
#include "hi_gpio.h"
/*
利用宏对当前使用的引脚和目标期望对应的工作模式进行预处理
*/
/*
明确当前使用的引脚是 IO13 引脚
*/
#define BEEP_PIN HI_IO_NAME_GPIO_13
/*
设置当前引脚的工作模式为 GPIO 工作模式
*/
#define BEEP_PIN_FUNC HI_IO_FUNC_GPIO_13_GPIO
/**
* @brief 配置当前 LED 对应 IO 引脚的工作状态.
*/
void beep_init(void);
/**
* @brief Beep 控制线程任务函数
*
* @param arg 线程所需参数
*/
void beep_thread(void *arg);
static beepTestTask(void)
{
osThreadAttr_t thread_attr;
memset(&thread_attr, 0, sizeof(osThreadAttr_t));
thread_attr.name = "beep_thread";
thread_attr.stack_size = 1024;
thread_attr.priority = osPriorityNormal;
osThreadId_t tid = osThreadNew(beep_thread, HI_NULL, &thread_attr);
if (HI_NULL == tid)
{
perror("[osThreadNew] create led_thread failed!");
}
}
APP_FEATURE_INIT(beepTestTask);
void beep_init(void)
{
/*
1. 开启 GPIO 配置模式
hi_u32 hi_gpio_init(hi_void);
海思内部针对于 IO 引脚启动配置模式函数
*/
hi_gpio_init();
组件内部 BUILD.gn
APP 目录下的 BUILD.gn
    /*
    2. 设置当前 IO02 工作模式为 GPIO 通用 IO 模式
        hi_u32 hi_io_set_func(hi_io_name id, hi_u8 val);
        设置当前 IO 引脚的工作模式
        提供参数是当前 IO 引脚在 HI 中的名称枚举,和对应工作模式枚举,
        预先使用宏定义方式将 IO 引脚名称和模式,修改为当前功能模块对
        应名称,方便后续使用。
    */
    hi_io_set_func(BEEP_PIN, BEEP_PIN_FUNC);
    /*
    3. 设置当前 IO02 在 GPIO 工作模式下的输出方向
        hi_u32 hi_gpio_set_dir(hi_gpio_idx id, hi_gpio_dir dir);
            hi_gpio 表示当前操作的基于 IO 引脚已经明确工作模式为 GPIO 情况下
            进行输入/输出配置。
    */
    hi_gpio_set_dir(BEEP_PIN, HI_GPIO_DIR_OUT);
    /*
    4. 设置当前 IO 引脚模式为低电平模式
        hi_u32 hi_io_set_pull(hi_io_name id, hi_io_pull val);
        设置指定 IO 引脚的电平情况
    */
    hi_io_set_pull(BEEP_PIN, HI_IO_PULL_DOWN);
}
void beep_thread(void *arg)
{
    beep_init();
    while (1)
    {
        /*
        hi_u32 hi_gpio_set_ouput_val(hi_gpio_idx id, hi_gpio_value val);
            当前 IO 工作模式为 GPIO 情况下,设置对应输出高低电平情况
        */
        hi_gpio_set_ouput_val(BEEP_PIN, HI_GPIO_VALUE1);
        osDelay(100);
        hi_gpio_set_ouput_val(BEEP_PIN, HI_GPIO_VALUE0);
        osDelay(100);
    }
}
组件内部 BUILD.gn
static_library("demo09_beep_rgb") {
    sources = [
        "demo_beep_rgb.c"
    ]
    include_dirs = [
        "//utils/native/lite/include",
        "//kernel/liteos_m/kal/cmsis"
    ]
}
APP 目录下的 BUILD.gn
import("//build/lite/config/component/lite_component.gni")
lite_component("app") {
features = [
# "demo01_hello",
# "demo02_thread",
# "demo03_mutex",
# "demo04_sem",
# "demo05_sem",
# "demo06_messagequeue",
# "demo07_timer",
# "demo08_led",
"demo09_beep_rgb",
]
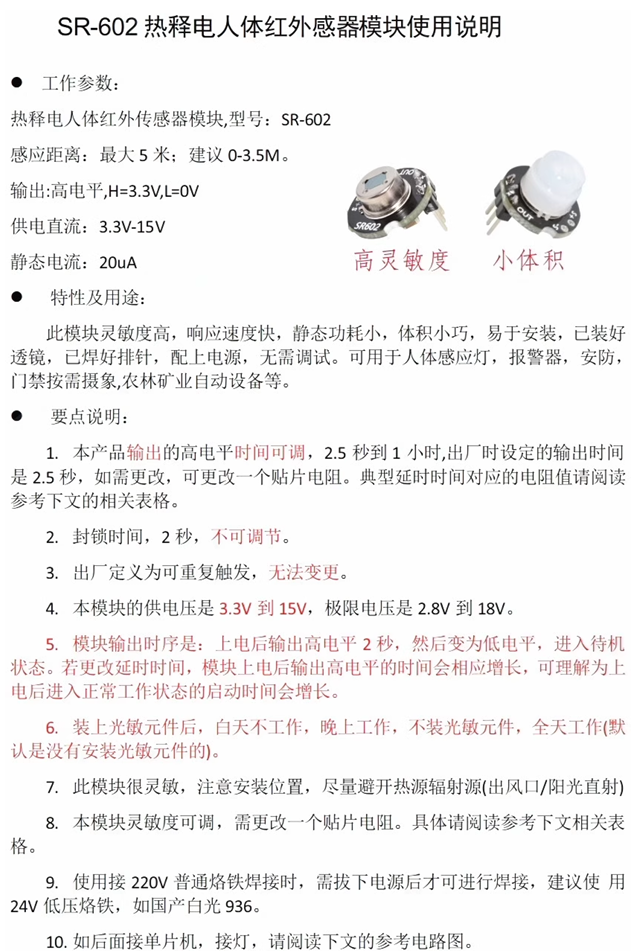
}9.2 SR602 人体传感器-GPIO输入检测
9.2.1 SR602 传感器分析
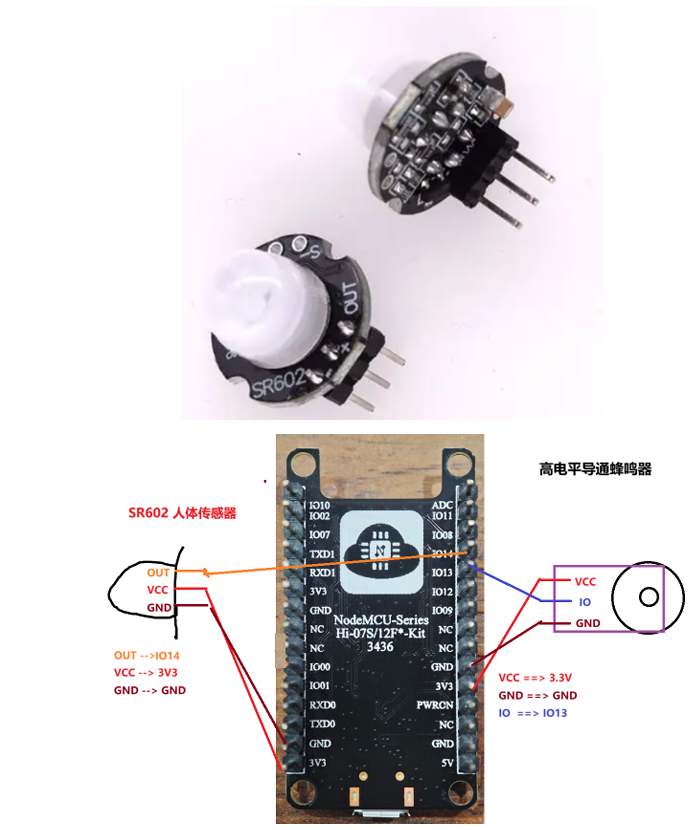
9.2.2 功能实现和分析
SR602 检测到人体,RBG 红灯亮 + BEEP 工作,人体信号离开,RGB 绿灯亮 + BEEP 停止工作
/*
C 语言标准库三剑客
*/
#include <stdio.h>
#include <stdlib.h>
#include <string.h>
/*
以下是需要导入的 OpenHarmony 相关头文件
ohos_init.h OpenHarmony OS 系统初始化相关头文件
cmsis_os2.h 实时操作系统头文件
hi_timer.h 海思提供的 timer 定时器头文件
*/
#include "ohos_init.h"
#include "cmsis_os2.h"
#include "hi_timer.h"
// 海思(OHOS) 提供的标准 IO 头文件,所有对外接口的模式,相关函数
#include "hi_io.h"
// 海思(OHOS) 提供的标准 GPIO 头文件,针对 GPIO 相关控制
#include "hi_gpio.h"
/*
引脚宏定义和工作模式宏定义
*/
#define GREEN_LED_PIN HI_IO_NAME_GPIO_12
#define GREEN_LED_FUNC HI_IO_FUNC_GPIO_12_GPIO
#define BEEP_RED_PIN HI_IO_NAME_GPIO_13
#define BEEP_RED_PIN_FUNC HI_IO_FUNC_GPIO_13_GPIO
#define SR602_PIN HI_IO_NAME_GPIO_14
#define SR602_PIN_FUNC HI_IO_FUNC_GPIO_14_GPIO
void sr602_init(void);
void sr602_thread(void *arg);
static void sr602TestTask(void)
{
osThreadAttr_t thread_attr;
memset(&thread_attr, 0, sizeof(osThreadAttr_t));
thread_attr.name = "sr602_thread";
thread_attr.stack_size = 1024;
thread_attr.priority = osPriorityNormal;
osThreadId_t tid = osThreadNew(sr602_thread, HI_NULL, &thread_attr);
if (HI_NULL == tid)
{
perror("[osThreadNew] create sr602_thread failed!");
}
}
APP_FEATURE_INIT(sr602TestTask);
void sr602_init(void)
{
hi_gpio_init();
组件内部 BUILD.gn
    // IO12 引脚配置 ==> GREEN LED【GPIO 输出】
    hi_io_set_func(GREEN_LED_PIN, GREEN_LED_FUNC);
    hi_gpio_set_dir(GREEN_LED_PIN, HI_GPIO_DIR_OUT);
    hi_io_set_pull(GREEN_LED_PIN, HI_IO_PULL_DOWN);
    // IO13 引脚配置 ==> BEEP + RED LED 【GPIO 输出】
    hi_io_set_func(BEEP_RED_PIN, BEEP_RED_PIN_FUNC);
    hi_gpio_set_dir(BEEP_RED_PIN, HI_GPIO_DIR_OUT);
    hi_io_set_pull(BEEP_RED_PIN, HI_IO_PULL_DOWN);
    // IO14 引脚配置 ==> SR602 【GPIO 输入】
    hi_io_set_func(SR602_PIN, SR602_PIN_FUNC);
    hi_gpio_set_dir(SR602_PIN, HI_GPIO_DIR_IN); // 设置 GPIO 输入工作模式
    hi_io_set_pull(SR602_PIN, HI_IO_PULL_DOWN);
}
void sr602_thread(void *arg)
{
    sr602_init();
    hi_gpio_value sr602_val = HI_GPIO_VALUE0;
    while (1)
    {
        osDelay(10);
        /*
        读取 SR602 对应引脚 IO14 电平情况
            hi_u32 hi_gpio_get_input_val(hi_gpio_idx id, hi_gpio_value *val);
            获取指定引脚高低电平数据状态,状态信息是存储到 hi_gpio_value *val 指针对应
            变量中,需要提供 hi_gpio_value 变量地址作为当前函数的参数,用于【结果参数】使用
        */
        hi_gpio_get_input_val(SR602_PIN, &sr602_val);
        if (sr602_val)
        {
            // SR602 传感器反馈高电平,有人
            // RED + BEEP 工作
            hi_gpio_set_ouput_val(BEEP_RED_PIN, HI_GPIO_VALUE1);
            // GREEN 停止工作
            hi_gpio_set_ouput_val(GREEN_LED_PIN, HI_GPIO_VALUE0);
        }
        else
        {
            // SR602 传感器反馈高电平,有人
            // RED + BEEP 不工作
            hi_gpio_set_ouput_val(BEEP_RED_PIN, HI_GPIO_VALUE0);
            // GREEN 工作
            hi_gpio_set_ouput_val(GREEN_LED_PIN, HI_GPIO_VALUE1);
        }
    }
}
组件内部 BUILD.gn
static_library("demo10_sr602") {
sources = [
"demo_sr602.c"
]
include_dirs = [
"//utils/native/lite/include",
"//kernel/liteos_m/kal/cmsis"
]
}
APP目录下的 BUILD.gn
import("//build/lite/config/component/lite_component.gni")
lite_component("app") {
features = [
# "demo01_hello",
# "demo02_thread",
# "demo03_mutex",
# "demo04_sem",
# "demo05_sem",
# "demo06_messagequeue",
# "demo07_timer",
# "demo08_led",
# "demo09_beep_rgb",
"demo10_sr602",
]
}
9.3 可编程按键 Key-GPIO输入检测
9.3.1 可编程按键原理图分析

9.3.2 程序分析和实现
需要操作的按键对应 IO 口是 IO07
- 工作模式选择 GPIO 工作模式
- IO 输入输出选择输入状态
- IO 默认电平选择【无拉模式 浮空模式】,也可以选择【上拉模式】
通过按键电平状态修改 RGB 灯光
- 需要对 IO09 13 12 配置为 GPIO 输出工作模式,默认为下拉低电平。
- 通过按键操作实现 Red->Green->Blue->White->Black->Red 循环模式。
/*
C 语言标准库三剑客
*/
#include <stdio.h>
#include <stdlib.h>
#include <string.h>
/*
以下是需要导入的 OpenHarmony 相关头文件
ohos_init.h OpenHarmony OS 系统初始化相关头文件
cmsis_os2.h 实时操作系统头文件
hi_timer.h 海思提供的 timer 定时器头文件
*/
#include "ohos_init.h"
#include "cmsis_os2.h"
#include "hi_timer.h"
// 海思(OHOS) 提供的标准 IO 头文件,所有对外接口的模式,相关函数
#include "hi_io.h"
// 海思(OHOS) 提供的标准 GPIO 头文件,针对 GPIO 相关控制
#include "hi_gpio.h"
/*
引脚宏定义和工作模式宏定义
*/
// KEY2 按键对应引脚宏和工作模式
#define KEY_PIN HI_IO_NAME_GPIO_7
#define KEY_PIN_FUNC HI_IO_FUNC_GPIO_7_GPIO
// RGB 灯对应的 IO 引脚和工作模式
#define RED_PIN HI_IO_NAME_GPIO_13
#define RED_PIN_FUNC HI_IO_FUNC_GPIO_13_GPIO
#define GREEN_PIN HI_IO_NAME_GPIO_12
#define GREEN_PIN_FUNC HI_IO_FUNC_GPIO_12_GPIO
#define BLUE_PIN HI_IO_NAME_GPIO_9
#define BLUE_PIN_FUNC HI_IO_FUNC_GPIO_9_GPIO
void key2_init(void);
void rgb_led_init(void);
/**
* @brief RGB 灯光控制函数,通过参数 flag 修改当前 RGB 的工作状态
*
* @param flag 当前 RGB 工作状态标志变量
*/
void rgb_ctrl(int flag);
/**
* @brief 按键线程函数
*/
void key_press(void *arg);
static void keyTestTask(void)
{
osThreadAttr_t thread_attr;
memset(&thread_attr, 0, sizeof(osThreadAttr_t));
thread_attr.name = "key_ctrl_rgb";
thread_attr.stack_size = 1024;
thread_attr.priority = osPriorityNormal;
osThreadId_t tid = osThreadNew(key_press, HI_NULL, &thread_attr);
if (HI_NULL == tid)
{
perror("[osThreadNew] create key_ctrl_rgb failed!");
}
}
APP_FEATURE_INIT(keyTestTask);
void key2_init(void)
{
hi_gpio_init();
// 配置 KEY2 ,对应 GPIO 输入工作模式,电平选择无拉
// 电平状态取决于外部的电路影响。
hi_io_set_func(KEY_PIN, KEY_PIN_FUNC);
hi_gpio_set_dir(KEY_PIN, HI_GPIO_DIR_IN);
hi_io_set_pull(KEY_PIN, HI_IO_PULL_NONE);
}
void rgb_led_init(void)
{
hi_gpio_init();
// RGB 配置
hi_io_set_func(RED_PIN, RED_PIN_FUNC);
hi_gpio_set_dir(RED_PIN, HI_GPIO_DIR_OUT);
hi_io_set_pull(RED_PIN, HI_IO_PULL_DOWN);
hi_io_set_func(GREEN_PIN, GREEN_PIN_FUNC);
hi_gpio_set_dir(GREEN_PIN, HI_GPIO_DIR_OUT);
hi_io_set_pull(GREEN_PIN, HI_IO_PULL_DOWN);
hi_io_set_func(BLUE_PIN, BLUE_PIN_FUNC);
hi_gpio_set_dir(BLUE_PIN, HI_GPIO_DIR_OUT);
hi_io_set_pull(BLUE_PIN, HI_IO_PULL_DOWN);
}
void rgb_ctrl(int flag)
{
int choose = flag % 5;
switch (choose)
{
case 0:
/* Red LED 亮 */
hi_gpio_set_ouput_val(RED_PIN, HI_GPIO_VALUE1);
hi_gpio_set_ouput_val(GREEN_PIN, HI_GPIO_VALUE0);
hi_gpio_set_ouput_val(BLUE_PIN, HI_GPIO_VALUE0);
break;
    case 1:
        /* Green LED 亮 */
        hi_gpio_set_ouput_val(RED_PIN, HI_GPIO_VALUE0);
        hi_gpio_set_ouput_val(GREEN_PIN, HI_GPIO_VALUE1);
        hi_gpio_set_ouput_val(BLUE_PIN, HI_GPIO_VALUE0);
        break;
    case 2:
        /* Blue LED 亮 */
        hi_gpio_set_ouput_val(RED_PIN, HI_GPIO_VALUE0);
        hi_gpio_set_ouput_val(GREEN_PIN, HI_GPIO_VALUE0);
        hi_gpio_set_ouput_val(BLUE_PIN, HI_GPIO_VALUE1);
        break;
    case 3:
        /* White LED 亮 */
        hi_gpio_set_ouput_val(RED_PIN, HI_GPIO_VALUE1);
        hi_gpio_set_ouput_val(GREEN_PIN, HI_GPIO_VALUE1);
        hi_gpio_set_ouput_val(BLUE_PIN, HI_GPIO_VALUE1);
        break;
    case 4:
        /* Black 所有 LED 灭 */
        hi_gpio_set_ouput_val(RED_PIN, HI_GPIO_VALUE0);
        hi_gpio_set_ouput_val(GREEN_PIN, HI_GPIO_VALUE0);
        hi_gpio_set_ouput_val(BLUE_PIN, HI_GPIO_VALUE0);
        break;
    }
}
void key_press(void *arg)
{
    key2_init();
    rgb_led_init();
    /*
    根据电路分析,当前按键对应引脚 IO07 默认情况下是高电平状态
    当前按键按下,对应电平状态为低电平。
    【读取操作】
        根据 IO07 引脚的电平情况分析当前按键是否按下。
    */
    int flag = -1;
    /*
    按键对应引脚 IO07 电平变量
    */
    hi_gpio_value key_value = HI_GPIO_VALUE1;
    while (1)
    {
        /*
        读取 IO07 电平情况
            hi_u32 hi_gpio_get_input_val(hi_gpio_idx id, hi_gpio_value *val);
        */
        hi_gpio_get_input_val(KEY_PIN, &key_value);
        if (HI_GPIO_VALUE0 == key_value)
        {
            /*
            当前按键已经按下,电平从高电平 --> 低电平
            osDelay(2); ==> 20ms 设置延时函数
            */
组件内部 BUILD.gn
APP目录下的 BUILD.gn
            osDelay(2);
            // 再次读取 IO07 引脚的电平情况。
            hi_gpio_get_input_val(KEY_PIN, &key_value);
            /*
            延时 + 再次读取引脚电平 ==> 消抖 + 去抖。【程序实现】
            */
            if (HI_GPIO_VALUE0 == key_value)
            {
                // 再次读取之后,依然是低电平,可以确定当前按键已按下。
                flag += 1;
                rgb_ctrl(flag);
                flag = 5 == flag ? -1 : flag;
            }
            /*
            利用 while 循环判断当前的电平情况
            如果电平始终为低电平,当前用户尚未松开按键。while 循环一直执行。
            【低电平过滤 or 等待高电平】
            */
            while (HI_GPIO_VALUE0 == key_value)
            {
                hi_gpio_get_input_val(KEY_PIN, &key_value);
            }
            // key_value 重新赋值为高电平
            key_value = HI_GPIO_VALUE1;
        }
    }
}
组件内部 BUILD.gn
static_library("demo11_Key") {
    sources = [
        "demo_key.c"
    ]
    include_dirs = [
        "//utils/native/lite/include",
        "//kernel/liteos_m/kal/cmsis"
    ]
}
APP目录下的 BUILD.gn
import("//build/lite/config/component/lite_component.gni")
lite_component("app") {
    features = [
      # "demo01_hello",
      # "demo02_thread",
      # "demo03_mutex",
      # "demo04_sem",
# "demo05_sem",
# "demo06_messagequeue",
# "demo07_timer",
# "demo08_led",
# "demo09_beep_rgb",
# "demo10_sr602",
"demo11_Key",
]
}
开源鸿蒙跨平台开发社区汇聚开发者与厂商,共建“一次开发,多端部署”的开源生态,致力于降低跨端开发门槛,推动万物智联创新。
更多推荐


 18
18 0
0- 0


 已为社区贡献2条内容

所有评论(0)