高级进阶 ReactNative for Harmony 项目鸿蒙化三方库集成实战:react-native-video
是 React Native 社区最流行的视频播放库,提供了一套完整的视频播放解决方案。它支持本地视频、网络视频、直播流等多种视频源,提供了丰富的播放控制功能(播放、暂停、seek、倍速播放等),并且完全兼容 Android、iOS 和 HarmonyOS 三端。库名称版本信息6.13.2: 支持 RN 0.72 版本6.14.0: 支持 RN 0.77 版本官方仓库主要功能支持本地视频、网络视频
内容由熊哈哈O_o大佬指导创作:https://blog.csdn.net/qq_61024956?type=blog
📋 前言
react-native-video 是 React Native 社区最流行的视频播放库,提供了一套完整的视频播放解决方案。它支持本地视频、网络视频、直播流等多种视频源,提供了丰富的播放控制功能(播放、暂停、seek、倍速播放等),并且完全兼容 Android、iOS 和 HarmonyOS 三端。
🎯 库简介
基本信息
-
库名称: @react-native-ohos/react-native-video
-
版本信息:
6.13.2: 支持 RN 0.72 版本6.14.0: 支持 RN 0.77 版本
-
官方仓库: https://github.com/react-native-oh-library/react-native-video
-
主要功能:
- 支持本地视频、网络视频、直播流
- 丰富的播放控制(播放、暂停、seek、倍速)
- 支持画中画模式
- 支持字幕、多音轨选择
- 兼容 Android、iOS 和 HarmonyOS
-
兼容性验证:
- RNOH: 0.72.96; SDK: HarmonyOS 6.0.0 Release SDK; IDE: DevEco Studio 6.0.0.858; ROM: 6.0.0.112;
- RNOH: 0.72.33; SDK: HarmonyOS NEXT B1; IDE: DevEco Studio: 5.0.3.900; ROM: Next.0.0.71;
- RNOH: 0.77.18; SDK: HarmonyOS 6.0.0 Release SDK; IDE: DevEco Studio 6.0.0.858; ROM: 6.0.0.112;
为什么需要这个库?
- 功能完整: 提供完整的视频播放解决方案
- 性能优异: 原生渲染,流畅播放
- 跨平台: 在三端提供一致的播放体验
- 易于集成: API 简单直观
- 丰富的控制: 支持播放、暂停、seek、倍速等多种控制
📦 安装步骤
1. 使用 npm 安装
根据您的 RN 版本选择对应的包名:
npm install @react-native-ohos/react-native-video@6.13.2-rc.1
2. 验证安装
安装完成后,检查 package.json 文件,应该能看到新增的依赖:
{
  "dependencies": {
    "@react-native-ohos/react-native-video": "^6.13.2-rc.1",
    // ... 其他依赖
  }
}
🔧 HarmonyOS 平台配置 ⭐
由于 HarmonyOS 暂不支持 AutoLink,需要手动配置原生端代码。本文采用方法二:直接链接源码的方式。
1. 在工程根目录的 oh-package.json5 添加 overrides 字段
首先需要使用 DevEco Studio 打开项目里的 HarmonyOS 工程 harmony
打开 harmony/oh-package.json5,添加以下配置:
{
  ...
  "overrides": {
    "@rnoh/react-native-openharmony": "^0.72.90"
  }
}
2. 引入原生端代码
目前有两种方法:
方法一:通过 har 包引入
[!TIP] har 包位于三方库安装路径的
harmony文件夹下。
打开 entry/oh-package.json5,添加以下依赖:
"dependencies": {
    "@react-native-ohos/react-native-video": "file:../../node_modules/@react-native-ohos/react-native-video/harmony/rn_video.har"
}
点击右上角的 sync 按钮
或者在终端执行:
cd entry
ohpm install
方法二:直接链接源码(我用的这个)
目前 DevEco Studio 不支持通过源码引入外部 module,我们推荐使用直接链接源码的方式,将源码通过操作改成 harmony 工程的内部模块。
步骤 1: 把 <RN工程>/node_modules/@react-native-ohos/react-native-video/harmony 目录下的源码 rn_video 复制到 harmony(鸿蒙壳工程)工程根目录下。
步骤 2: 在 harmony 工程根目录的 build-profile.template.json5(若存在)和 build-profile.json5 添加以下模块:
modules: [
  ...
  {
    name: '<xxx>',
    srcPath: './<xxx>',
  },
  {
    name: 'rn_video',
    srcPath: './rn_video',
  }
]
步骤 3: 打开 rn_video/oh-package.json5,修改 react-native-openharmony 和项目的版本一致。
步骤 4: 打开 entry/oh-package.json5,添加以下依赖:
"dependencies": {
  "@rnoh/react-native-openharmony": "0.72.90",
  "@react-native-ohos/react-native-video": "file:../rn_video"
}
步骤 5: 点击 DevEco Studio 右上角的 sync 按钮
3. 配置 CMakeLists 和引入 RNCVideoPackage
打开 entry/src/main/cpp/CMakeLists.txt,添加:
project(rnapp)
cmake_minimum_required(VERSION 3.4.1)
set(CMAKE_SKIP_BUILD_RPATH TRUE)
set(RNOH_APP_DIR "${CMAKE_CURRENT_SOURCE_DIR}")
set(NODE_MODULES "${CMAKE_CURRENT_SOURCE_DIR}/../../../../../node_modules")
+ set(OH_MODULES "${CMAKE_CURRENT_SOURCE_DIR}/../../../oh_modules")
set(RNOH_CPP_DIR "${CMAKE_CURRENT_SOURCE_DIR}/../../../../../../react-native-harmony/harmony/cpp")
set(LOG_VERBOSITY_LEVEL 1)
set(CMAKE_ASM_FLAGS "-Wno-error:unused-command-line-argument -Qunused-arguments")
set(CMAKE_CXX_FLAGS "-fstack-protector-strong -Wl,-z,relro,-z,noexecstack,-s -fPIE -pie")
set(WITH_HITRACE_SYSTRACE 1) # for other CMakeLists.txt files to use
add_compile_definitions(WITH_HITRACE_SYSTRACE)

add_subdirectory("${RNOH_CPP_DIR}" ./rn)

# RNOH_BEGIN: manual_package_linking_1
add_subdirectory("../../../../sample_package/src/main/cpp" ./sample-package)
+ add_subdirectory("${OH_MODULES}/@react-native-ohos/react-native-video/src/main/cpp" ./video)
# RNOH_END: manual_package_linking_1

file(GLOB GENERATED_CPP_FILES "./generated/*.cpp")

add_library(rnoh_app SHARED
    ${GENERATED_CPP_FILES}
    "./PackageProvider.cpp"
    "${RNOH_CPP_DIR}/RNOHAppNapiBridge.cpp"
)
target_link_libraries(rnoh_app PUBLIC rnoh)

# RNOH_BEGIN: manual_package_linking_2
target_link_libraries(rnoh_app PUBLIC rnoh_sample_package)
+ target_link_libraries(rnoh_app PUBLIC rnoh_video)
# RNOH_END: manual_package_linking_2
打开 entry/src/main/cpp/PackageProvider.cpp,添加:
#include "RNOH/PackageProvider.h"
#include "generated/RNOHGeneratedPackage.h"
#include "SamplePackage.h"
+ #include "RNCVideoPackage.h"

using namespace rnoh;

std::vector<std::shared_ptr<Package>> PackageProvider::getPackages(Package::Context ctx) {
    return {
      std::make_shared<RNOHGeneratedPackage>(ctx),
      std::make_shared<SamplePackage>(ctx),
+     std::make_shared<RNCVideoPackage>(ctx)
    };
}
4. 在 ArkTs 侧引入 RNCVideo 组件
找到 function buildCustomComponent(),一般位于 entry/src/main/ets/pages/index.ets 或 entry/src/main/ets/rn/LoadBundle.ets,添加:
+ import { RNCVideo, RNC_VIDEO_TYPE } from "@react-native-ohos/react-native-video"

@Builder
function buildCustomRNComponent(ctx: ComponentBuilderContext) {
+ if (ctx.componentName === RNC_VIDEO_TYPE) {
+   RNCVideo({
+     ctx: ctx.rnComponentContext,
+     tag: ctx.tag
+   })
+ }
...
}
[!TIP] 本库使用了混合方案,需要添加组件名。
在 entry/src/main/ets/pages/index.ets 或 entry/src/main/ets/rn/LoadBundle.ets 找到常量 arkTsComponentNames 在其数组里添加组件名
const arkTsComponentNames: Array<string> = [
+ RNC_VIDEO_TYPE
  ];
5. 在 ArkTs 侧引入 RNCVideoPackage
打开 entry/src/main/ets/RNPackagesFactory.ts,添加:
+ import { RNCVideoPackage } from '@react-native-ohos/react-native-video/ts';

export function createRNPackages(ctx: RNPackageContext): RNPackage[] {
  return [
    new SamplePackage(ctx),
+   new RNCVideoPackage(ctx)
  ];
}
6. 运行
点击右上角的 sync 按钮
或者在终端执行:
cd entry
ohpm install
然后编译、运行即可。
💻 完整代码示例
下面是一个完整的示例,展示了 react-native-video 的各种使用场景:
import React, { useState, useRef } from 'react';
import {
View,
StyleSheet,
Text,
ScrollView,
TouchableOpacity,
Switch,
TextInput,
} from 'react-native';
import RNCVideo, { type VideoRef } from 'react-native-video';
import {
type OnPlaybackStateChangedData,
OnSeekData,
} from 'react-native-video';
function VideoDemo() {
const [muted, setMuted] = useState(true);
const [paused, setPaused] = useState(false);
const [repeat, setRepeat] = useState(true);
const [controls, setControls] = useState(false);
const [disableFocus, setDisableFocus] = useState(false);
const [uri, setUri] = useState(
'https://res.vmallres.com//uomcdn/CN/cms/202210/C75C7E20060F3E909F2998E13C3ABC03.mp4'
);
const [resizeMode, setResizeMode] = useState<'contain' | 'cover' | 'stretch'>('contain');
const [seekSec, setSeekSec] = useState(5000);
const [onVideoLoad, setOnVideoLoad] = useState('onVideoLoad');
const [onVideoLoadStart, setOnVideoLoadStart] = useState('onVideoLoadStart');
const [onVideoError, setOnVideoError] = useState('onVideoError');
const [onVideoProgress, setOnVideoProgress] = useState('onVideoProgress');
const [onVideoEnd, setOnVideoEnd] = useState('onVideoEnd');
const [onVideoBuffer, setOnVideoBuffer] = useState('onVideoBuffer');
const [onPlaybackStateChanged, setPlaybackStateChanged] = useState('onPlaybackStateChanged');
const [enterPictureInPictureOnLeave, setEnterPictureInPictureOnLeave] = useState(false);
const videoRef = useRef<VideoRef>(null);
const toggleMuted = () => {
setMuted((prevMuted) => !prevMuted);
};
const toggleControls = () => {
setControls((prevControls) => !prevControls);
};
const togglePaused = () => {
setPaused((prevPaused) => !prevPaused);
};
const toggleRepeat = () => {
setRepeat((prevRepeat) => !prevRepeat);
};
const toggleDisableFocus = () => {
setDisableFocus((prevDisableFocus) => !prevDisableFocus);
};
const firstVideo = () => {
setUri('https://vjs.zencdn.net/v/oceans.mp4');
};
const secondVideo = () => {
setUri('https://res.vmallres.com//uomcdn/CN/cms/202210/C75C7E20060F3E909F2998E13C3ABC03.mp4');
};
const changeResizeMode = (mode: string) => {
setResizeMode(mode as any);
};
return (
<ScrollView style={styles.container}>
<View style={styles.content}>
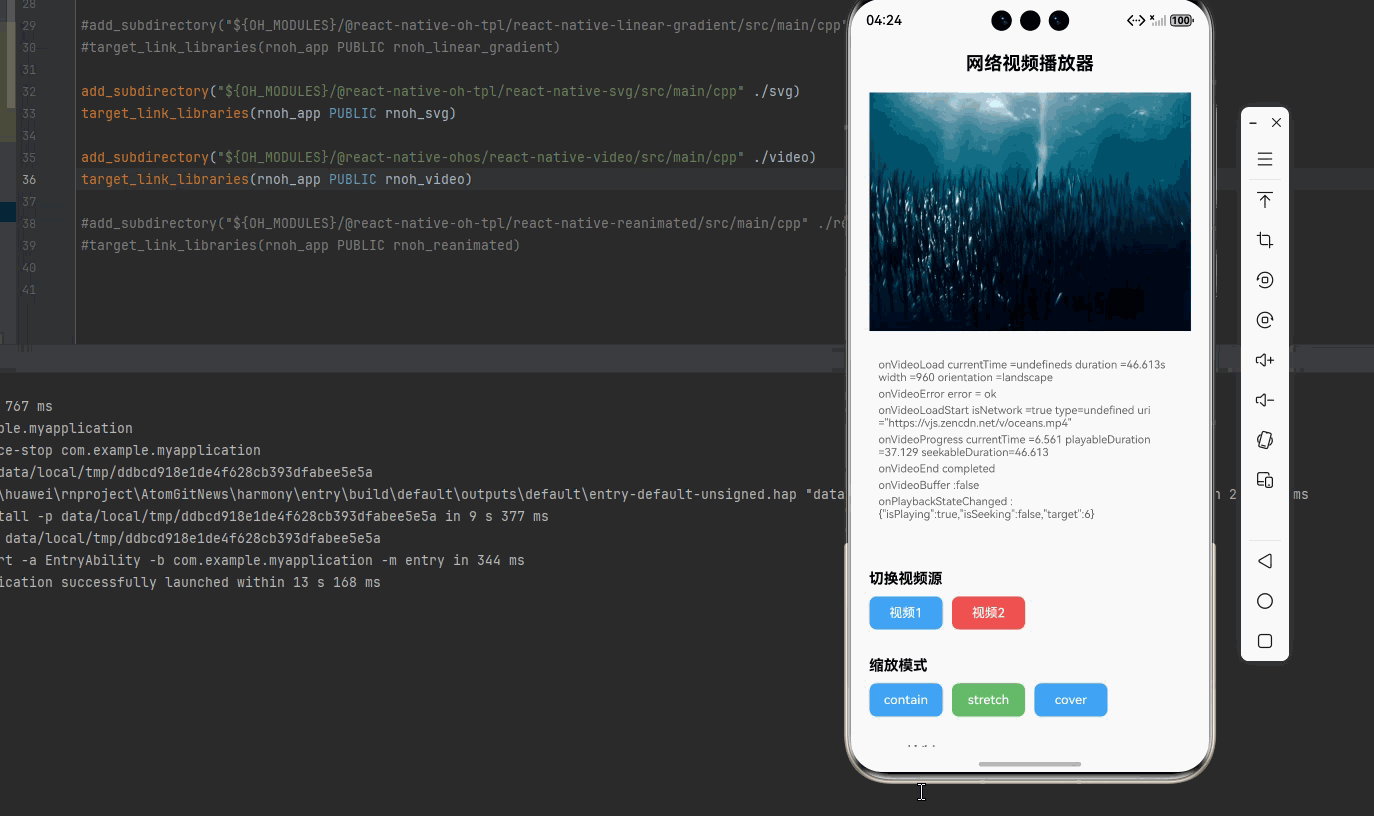
<Text style={styles.title}>网络视频播放器</Text>
{/* 视频播放器 */}
<RNCVideo
style={styles.video}
ref={videoRef}
source={{ uri, isNetwork: true }}
paused={paused}
muted={muted}
enterPictureInPictureOnLeave={enterPictureInPictureOnLeave}
resizeMode={resizeMode}
controls={controls}
repeat={repeat}
volume={1}
disableFocus={disableFocus}
poster="https://res.vmallres.com/pimages/uomcdn/CN/pms/202304/sbom/4002010007801/group/800_800_9B1356F1330EADDCB20D35D2AE1F46E0.jpg"
onLoad={(e) => {
setOnVideoLoad(
`onVideoLoad currentTime =${e.currentTime}s duration =${e.duration}s width =${e.naturalSize.width} orientation =${e.naturalSize.orientation}`
);
setOnVideoError('onVideoError error = ok');
}}
onLoadStart={(e) => {
setOnVideoLoadStart(
`onVideoLoadStart isNetwork =${e.isNetwork} type=${e.type} uri=${e.uri}`
);
}}
onProgress={(e) => {
setOnVideoProgress(
`onVideoProgress currentTime =${e.currentTime} playableDuration=${e.playableDuration} seekableDuration=${e.seekableDuration}`
);
}}
onSeek={(data: OnSeekData) => {
console.log('onSeek');
}}
onError={(e) => {
setOnVideoError(`onVideoError error =${e.error}`);
}}
onEnd={() => {
setOnVideoEnd('onVideoEnd completed');
}}
onBuffer={(e) => {
setOnVideoBuffer(`onVideoBuffer :${e.isBuffering}`);
}}
onPlaybackStateChanged={(data: OnPlaybackStateChangedData) => {
console.log('onPlaybackStateChanged ' + JSON.stringify(data));
setPlaybackStateChanged('onPlaybackStateChanged : ' + JSON.stringify(data));
}}
onReadyForDisplay={() => {
console.log('onReadyForDisplay');
}}
/>
{/* 事件信息 */}
<View style={styles.infoSection}>
<Text style={styles.infoText}>{onVideoLoad}</Text>
<Text style={styles.infoText}>{onVideoError}</Text>
<Text style={styles.infoText}>{onVideoLoadStart}</Text>
<Text style={styles.infoText}>{onVideoProgress}</Text>
<Text style={styles.infoText}>{onVideoEnd}</Text>
<Text style={styles.infoText}>{onVideoBuffer}</Text>
<Text style={styles.infoText}>{onPlaybackStateChanged}</Text>
</View>
{/* 视频源切换 */}
<Text style={styles.sectionTitle}>切换视频源</Text>
<View style={styles.buttonRow}>
<TouchableOpacity
style={[styles.button, styles.buttonBlue]}
onPress={firstVideo}
>
<Text style={styles.buttonText}>视频1</Text>
</TouchableOpacity>
<TouchableOpacity
style={[styles.button, styles.buttonRed]}
onPress={secondVideo}
>
<Text style={styles.buttonText}>视频2</Text>
</TouchableOpacity>
</View>
{/* ResizeMode 切换 */}
<Text style={styles.sectionTitle}>缩放模式</Text>
<View style={styles.buttonRow}>
{['contain', 'stretch', 'cover'].map((mode) => (
<TouchableOpacity
key={mode}
style={[
styles.button,
resizeMode === mode && styles.buttonActive,
]}
onPress={() => changeResizeMode(mode)}
>
<Text style={styles.buttonText}>{mode}</Text>
</TouchableOpacity>
))}
</View>
{/* Seek 控制 */}
<Text style={styles.sectionTitle}>Seek 控制</Text>
<View style={styles.seekRow}>
<TextInput
style={styles.input}
placeholder="输入秒数"
keyboardType="numeric"
onChangeText={(text) => {
const newText = text.replace(/[^\d]+/, '');
setSeekSec(Number(newText));
}}
value={seekSec.toString()}
/>
<TouchableOpacity
style={styles.button}
onPress={() => videoRef.current?.seek(seekSec)}
>
<Text style={styles.buttonText}>Seek</Text>
</TouchableOpacity>
</View>
{/* 控制按钮 */}
<Text style={styles.sectionTitle}>播放控制</Text>
<View style={styles.buttonRow}>
<TouchableOpacity
style={styles.button}
onPress={togglePaused}
>
<Text style={styles.buttonText}>暂停: {paused.toString()}</Text>
</TouchableOpacity>
<TouchableOpacity
style={styles.button}
onPress={toggleMuted}
>
<Text style={styles.buttonText}>静音: {muted.toString()}</Text>
</TouchableOpacity>
<TouchableOpacity
style={styles.button}
onPress={toggleControls}
>
<Text style={styles.buttonText}>控件: {controls.toString()}</Text>
</TouchableOpacity>
<TouchableOpacity
style={styles.button}
onPress={toggleRepeat}
>
<Text style={styles.buttonText}>循环: {repeat.toString()}</Text>
</TouchableOpacity>
</View>
{/* 画中画控制 */}
<Text style={styles.sectionTitle}>画中画</Text>
<View style={styles.row}>
<Text style={styles.label}>应用返回桌面时自动启动画中画:</Text>
<Switch
trackColor={{ false: '#767577', true: '#81b0ff' }}
thumbColor={enterPictureInPictureOnLeave ? '#f5dd4b' : '#f4f3f4'}
ios_backgroundColor="#3e3e3e"
onValueChange={setEnterPictureInPictureOnLeave}
value={enterPictureInPictureOnLeave}
/>
</View>
<View style={styles.buttonRow}>
<TouchableOpacity
style={styles.button}
onPress={() => videoRef.current?.enterPictureInPicture()}
>
<Text style={styles.buttonText}>开启画中画</Text>
</TouchableOpacity>
<TouchableOpacity
style={styles.button}
onPress={() => videoRef.current?.exitPictureInPicture()}
>
<Text style={styles.buttonText}>关闭画中画</Text>
</TouchableOpacity>
</View>
</View>
</ScrollView>
);
}
const styles = StyleSheet.create({
container: {
flex: 1,
backgroundColor: '#f5f5f5',
},
content: {
padding: 20,
},
title: {
fontSize: 20,
fontWeight: 'bold',
marginBottom: 20,
textAlign: 'center',
},
video: {
width: '100%',
height: 260,
backgroundColor: '#000',
marginBottom: 20,
},
infoSection: {
marginBottom: 20,
padding: 10,
backgroundColor: '#fff',
borderRadius: 8,
},
infoText: {
fontSize: 12,
color: '#666',
marginBottom: 4,
},
sectionTitle: {
fontSize: 16,
fontWeight: 'bold',
marginBottom: 10,
marginTop: 20,
},
buttonRow: {
flexDirection: 'row',
flexWrap: 'wrap',
gap: 10,
marginBottom: 10,
},
button: {
paddingHorizontal: 15,
paddingVertical: 10,
backgroundColor: '#42a5f5',
borderRadius: 8,
minWidth: 80,
},
buttonBlue: {
backgroundColor: '#42a5f5',
},
buttonRed: {
backgroundColor: '#ef5350',
},
buttonActive: {
backgroundColor: '#66bb6a',
},
buttonText: {
color: '#fff',
fontSize: 14,
fontWeight: '500',
textAlign: 'center',
},
seekRow: {
flexDirection: 'row',
alignItems: 'center',
gap: 10,
},
input: {
flex: 1,
height: 40,
borderWidth: 1,
borderColor: '#ddd',
borderRadius: 8,
paddingHorizontal: 10,
backgroundColor: '#fff',
},
row: {
flexDirection: 'row',
alignItems: 'center',
justifyContent: 'space-between',
marginBottom: 10,
},
label: {
fontSize: 14,
color: '#333',
},
});
export default VideoDemo;
🎨 实际应用场景
react-native-video 可以应用于以下实际场景:
- 视频播放器: 实现完整的视频播放功能
- 直播应用: 支持直播流的播放
- 视频课程: 播放在线视频课程
- 社交媒体: 用户上传视频的播放
- 画中画: 支持画中画模式,边看视频边做其他事情
⚠️ 注意事项与最佳实践
1. 视频源配置
// ✅ 网络视频
source={{ uri: 'https://example.com/video.mp4', isNetwork: true }}

// ✅ 本地视频
source={{ uri: require('./video.mp4') }}

// ✅ 直播流
source={{ uri: 'rtmp://example.com/live/stream' }}
2. 视频控制
使用 ref 控制视频播放:
const videoRef = useRef<RNCVideo>(null);

// Seek 到指定位置
videoRef.current?.seek(5000);

// 暂停/播放
videoRef.current?.setNativeProps({ paused: true });
3. 性能优化
- 避免同时播放多个视频
- 使用 poster 属性添加封面图,提升加载体验
- 使用 resizeMode 控制视频缩放方式
4. HarmonyOS 特殊处理
在 HarmonyOS 上,确保:
- 已正确配置原生端代码(参考上述 HarmonyOS 配置步骤)
- 测试不同视频格式的兼容性
- 注意 HarmonyOS 设备的音频焦点问题
5. 画中画
画中画功能需要系统权限,确保:
- 应用有悬浮窗口权限
- 视频支持画中画模式
- 正确配置
enterPictureInPictureOnLeave属性
关键要点回顾
- ✅ 安装依赖:
npm install @react-native-ohos/react-native-video - ✅ 配置平台: 通过 har 包或直接链接源码,配置 CMakeLists.txt、PackageProvider.cpp、RNPackagesFactory.ts 和 buildCustomComponent
- ✅ 集成代码: 使用
Video组件 - ✅ 支持功能: 网络视频、本地视频、直播流、画中画等
- ✅ 播放控制: 播放、暂停、seek、倍速、循环等
- ✅ 重要: 本库使用了混合方案,需要在 ArkTs 侧添加组件名和 RNCVideo 组件
欢迎加入开源鸿蒙跨平台社区:https://openharmonycrossplatform.csdn.net

开源鸿蒙跨平台开发社区汇聚开发者与厂商,共建“一次开发,多端部署”的开源生态,致力于降低跨端开发门槛,推动万物智联创新。
更多推荐

 13
13 0
0- 0


 已为社区贡献3条内容

所有评论(0)