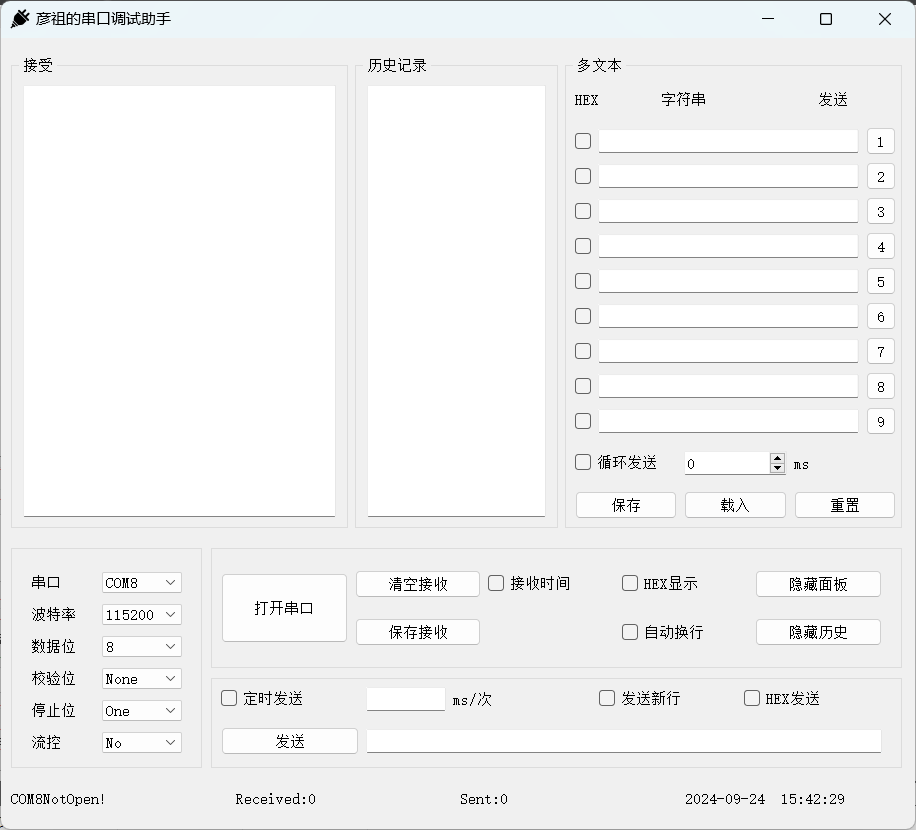
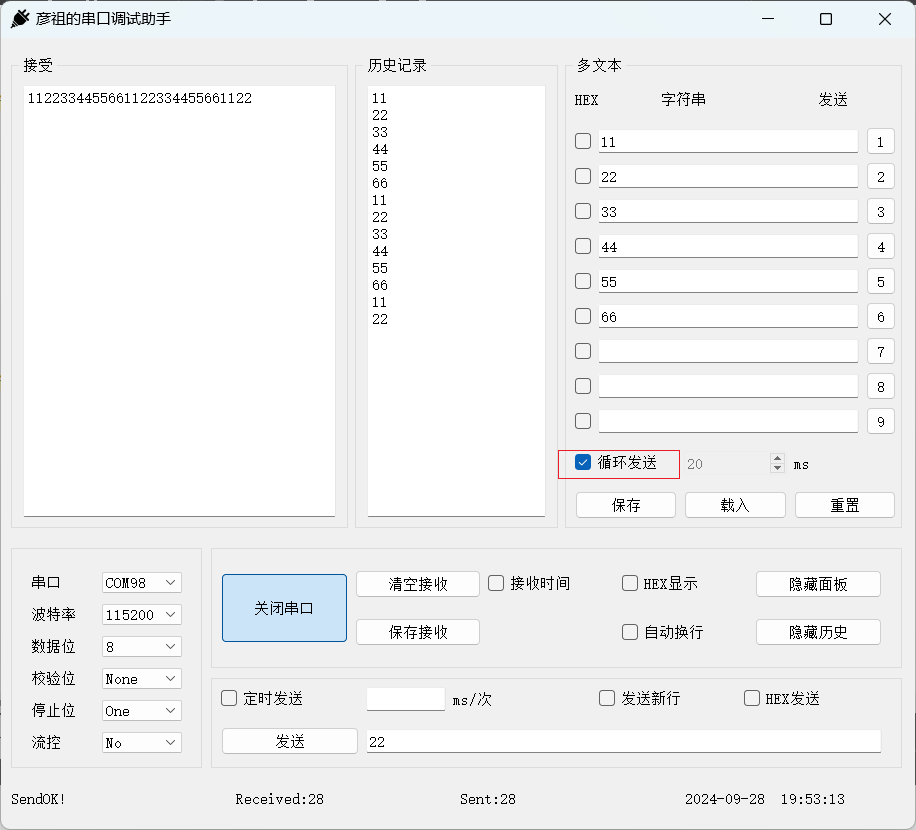
QT项目——串口调试助手
QT_串口调试助手支持选择串口,波特率,数据位,校验位,停止位,流控支持发送和接收数据支持发送新行和自动换行支持清空和保存接收的数据支持定时或循环发送特定文本支持保存,载入和重置文本private:// 定时器按钮处理// 创建指针列表// 定时器按钮处理// 遍历按钮和文本i <= 9;i++){if(btn){// 将信号发送者转换为QPushButton// 获得对应按钮的行编辑器和复选框名
文章目录
前言
完整代码:QT_串口调试助手
一、串口调试助手介绍
1. 功能介绍
- 支持选择串口,波特率,数据位,校验位,停止位,流控
- 支持发送和接收数据
- 支持发送新行和自动换行
- 支持清空和保存接收的数据
- 支持定时或循环发送特定文本
- 支持保存,载入和重置文本
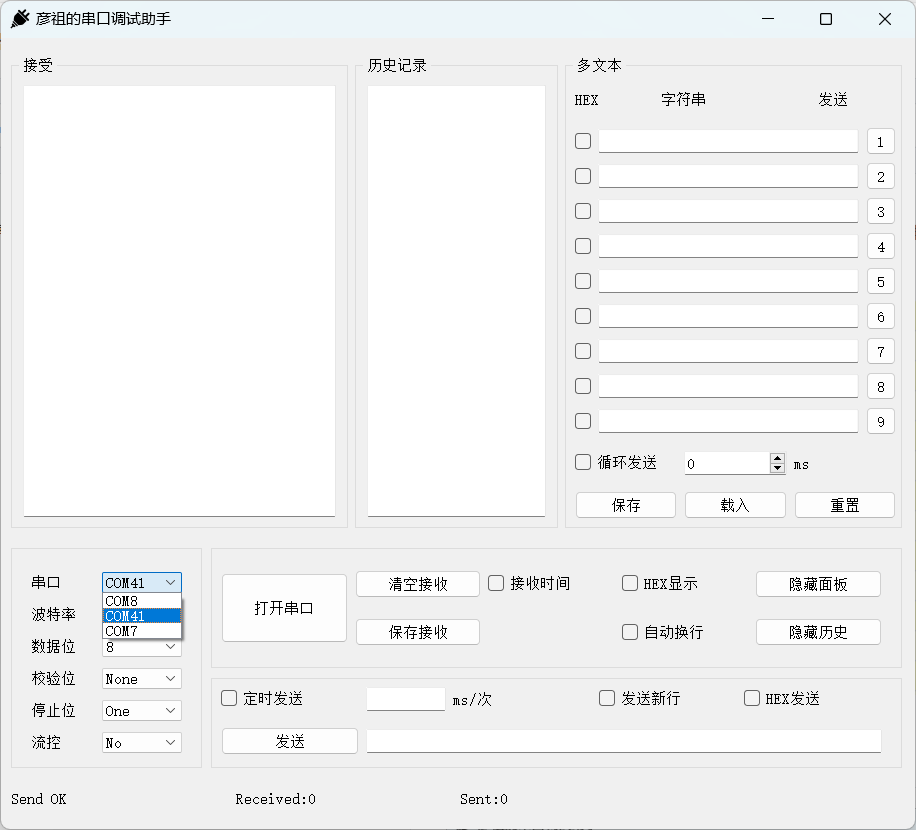
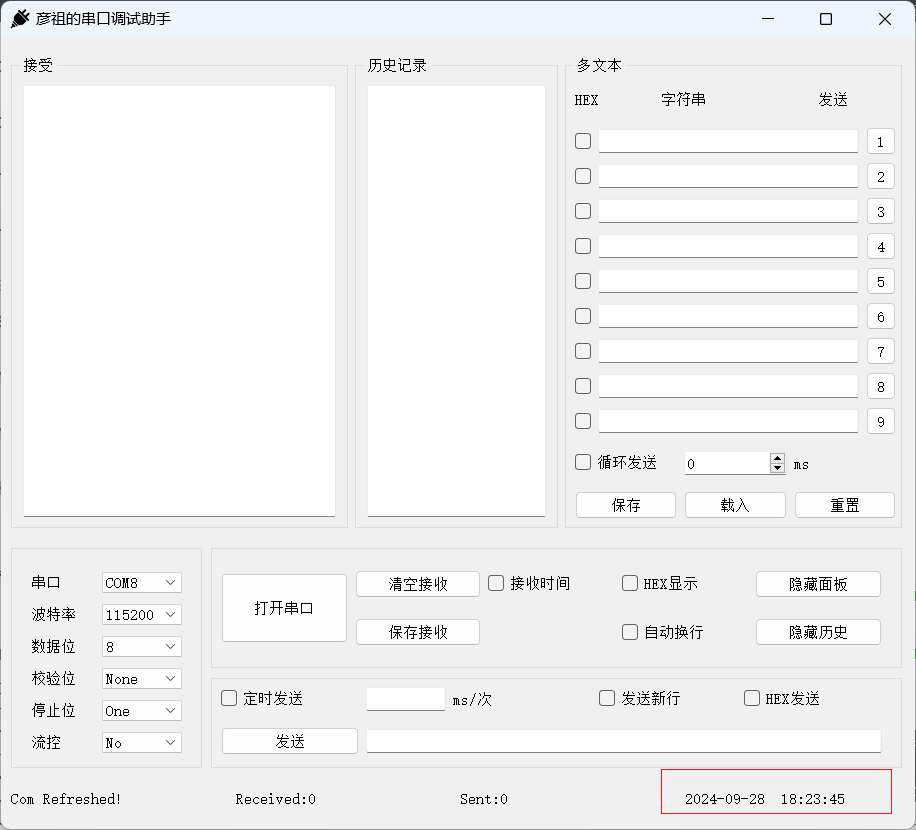
2. 界面预览
3. 串口发送与显示
3.1 发送
在使用串口发送数据时可以选择字符串发送或者十六进制发送,通常情况下我们习惯选用字符串发送数据。关于两者的区别,需要从计算机存储数据的格式说起。
在计算机中,数据是以二进制的形式存储的,例如十进制 1(10)在计算机中用 0000 0001(2)来表示。我们在用串口发送数据的时候首先将待数据转换为对应的ASCII码,然后再将这些ASCII码按照二进制的方式一位一位的发送出去。
例如我们要发送一串数据“A852010100000000A91A”,以字符串和十六进制两种方式发送:
(1)字符串发送
串口以字符串发送数据,首先将字符串转化为二进制,格式如下:
0000 1010 0000 1000 0000 0110 0000 0010 0000 0000 0000 0001 0000 0000 0000 0001
A 8 5 2 0 1 0 1
0000 0000 0000 0000 0000 0000 0000 0000 0000 1010 0000 1001 0000 0001 0000 1010
0 0 0 0 A 9 1 A
然后按照8位(串口设置数据位为8位)形式将数据发送出去。
串口接收的数据格式如下:
| 编号 | 数据内容 | 编号 | 数据内容 |
|---|---|---|---|
| 0 | A | 8 | 0 |
| 1 | 8 | 9 | 0 |
| 2 | 5 | 10 | 0 |
| 3 | 2 | 11 | 0 |
| 4 | 0 | 12 | A |
| 5 | 1 | 13 | 9 |
| 6 | 0 | 14 | 1 |
| 7 | 1 | 15 | A |
(2)十六进制发送数据
串口以十六进制发送数据,首先将数据转化为:
1010 1000 0110 0010 0000 0001 0000 0001 0000 0000 0000 0000 1010 1001 0001 1010
0XA8 0X52 0X01 0X01 0X00 0X00 0XA9 0X1A
然后按照8位(串口设置数据位为8位)形式将数据发送出去。
串口接收的数据格式如下:
| 编号 | 数据内容 | 编号 | 数据内容 |
|---|---|---|---|
| 0 | A8 | 4 | 00 |
| 1 | 52 | 5 | 00 |
| 2 | 01 | 6 | A9 |
| 3 | 01 | 7 | 1A |
仔细对照接收结果就很容易明白字符串发送和十六进制发送的区别了。
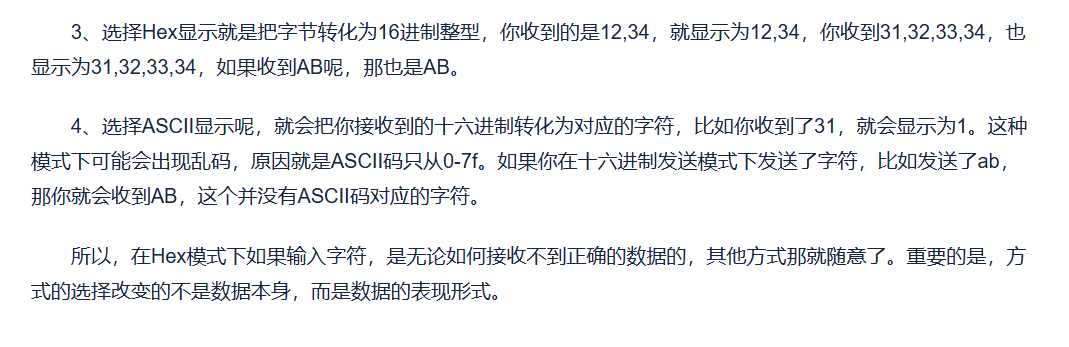
3.2 显示
字符串显示和十六进制显示区别:
二、实现UI界面
在我们实现UI界面的时候,一开始只要整体布局没有问题就可以了,然后一些细节问题等我们编写代码时,一边调试一边修改,下面我将演示如何实验串口调试助手的界面。
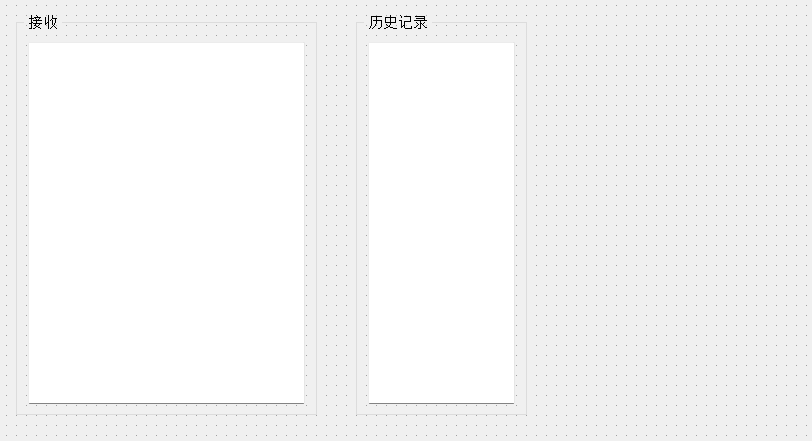
1. 上半部分
首先我们先放两个 GroupBox 容器,里面分别放入一个文本编辑框 TextEdit,实现栅格布局:
接着我们放入一个 GroupBox 容器,里面放入标签 Label,复选框 CheckBox,行编辑框 LineEdit,自选框 Spin Box,按钮 PushButton,先各部分水平布局,最后再整体栅格或者垂直布局:
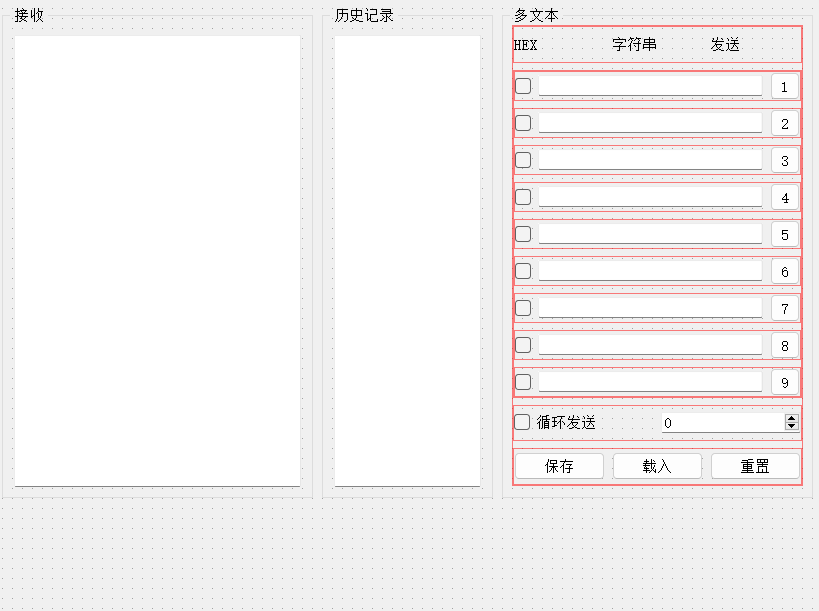
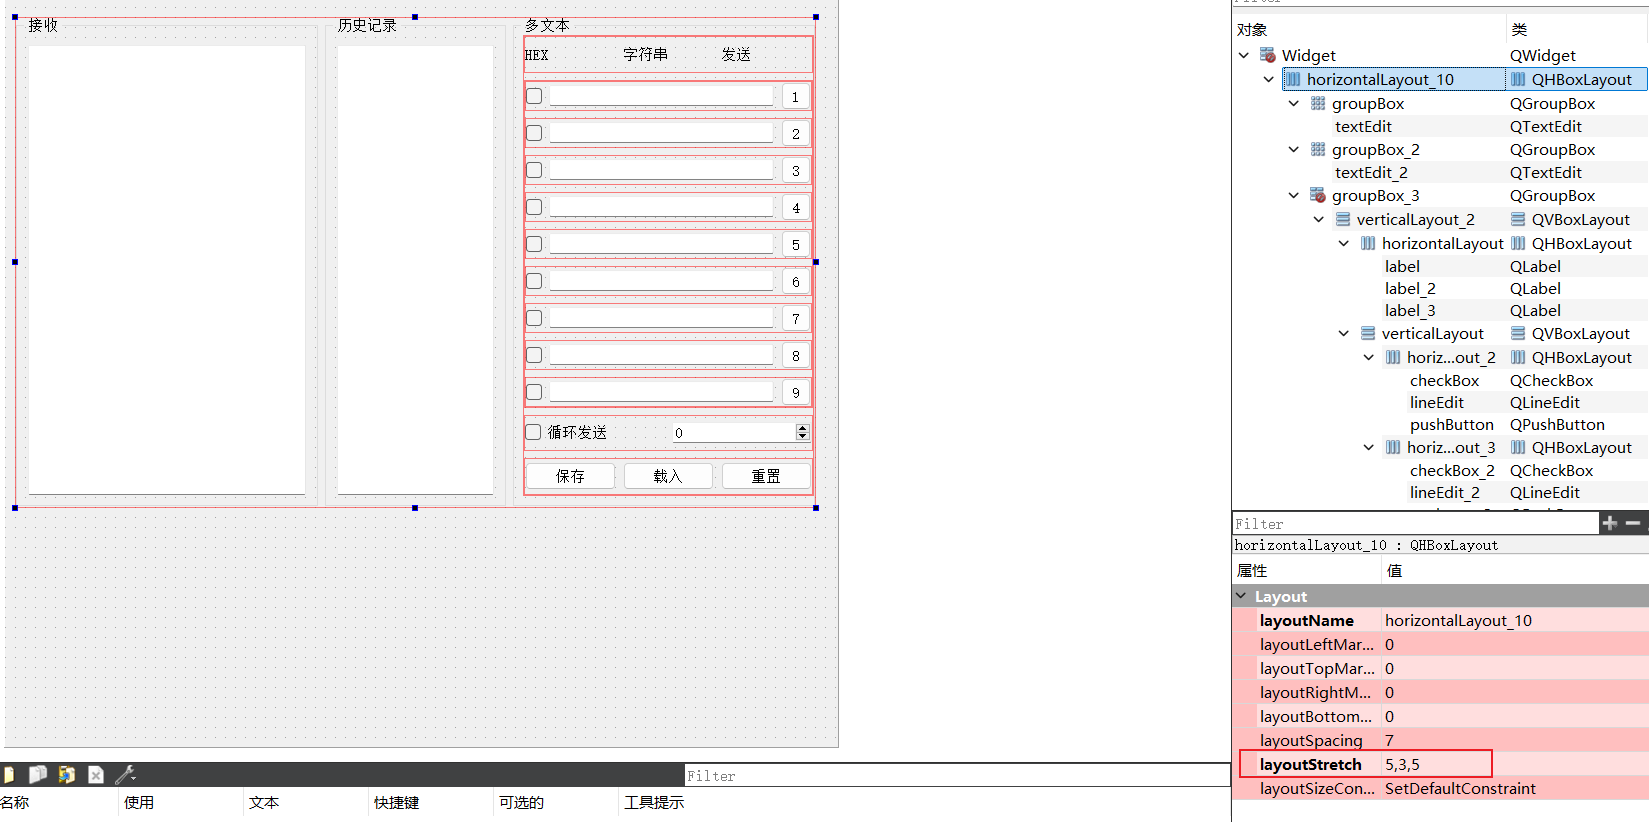
最后我们将三个 GroupBox 容器水平布局,设置比例为5:3:5,如下:
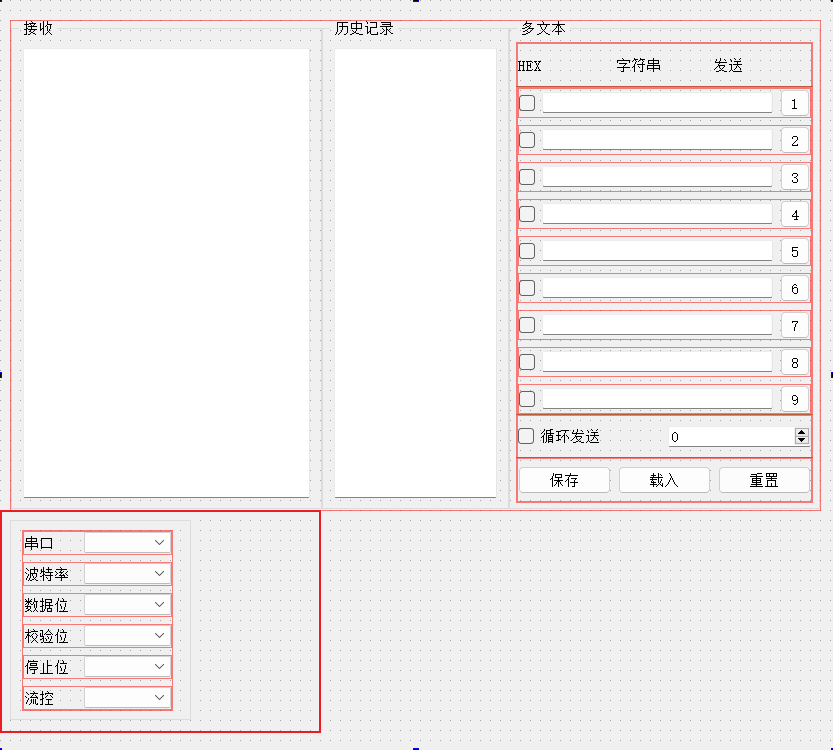
2. 下半部分
首先我们先放一个 GroupBox 容器,里面再放入标签 Label 和组合框 Combo Box ,设置串口,波特率,数据位,校验位,停止位,流控:
接着再放两个 GroupBox 容器,里面再放入标签 Label ,复选框 CheckBox,行编辑框 LineEdit,按钮 PushButton,容器内使用栅格布局:
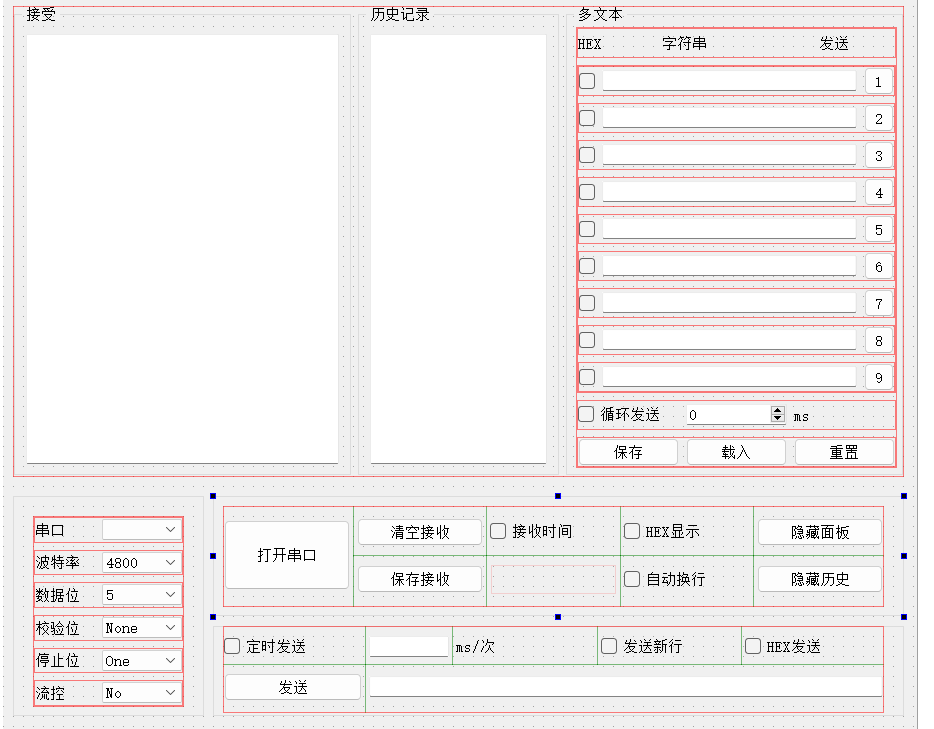
然后在最下面设置三个标签 Label,水平布局:
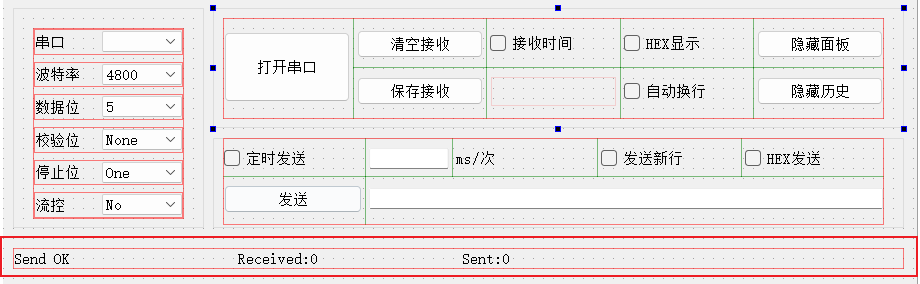
最后再修改我们的窗口名字跟图标,这样一个完整的串口调试助手就完成了:

三、实现代码框架
1. 显示所有串口设备
代码示例:
#include <QSerialPort>
#include <QSerialPortInfo>

private:
    QSerialPort *serialPort;

Widget::Widget(QWidget *parent)
    : QWidget(parent)
    , ui(new Ui::Widget)
{
    ui->setupUi(this);

    // 初始化串口,显示所有设备
    serialPort = new QSerialPort(this);

    QList<QSerialPortInfo> serialList = QSerialPortInfo::availablePorts();
    for (QSerialPortInfo serialInfo : serialList)
    {
        qDebug() << serialInfo.portName();
        ui->comboBox_serialNum->addItem(serialInfo.portName());
    }
}
程序运行结果:
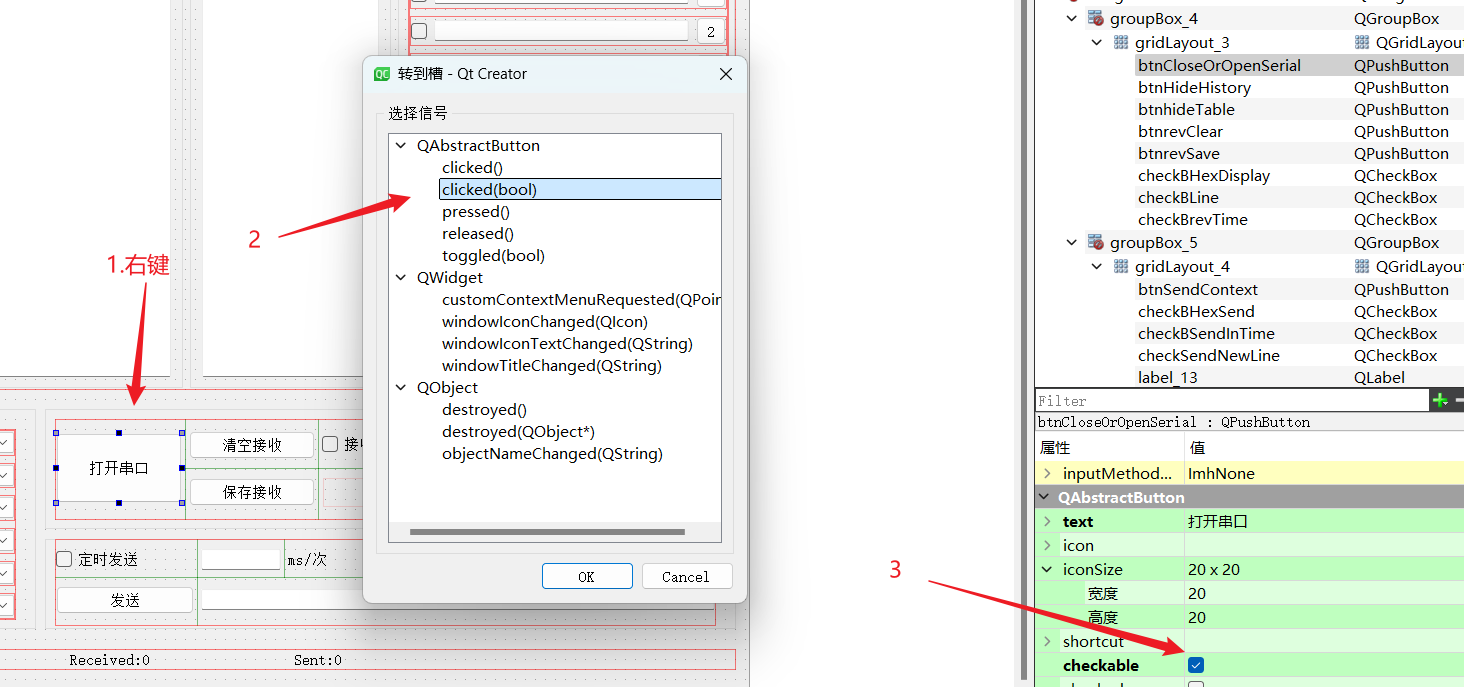
2. 实现打开和关闭串口
实现打开和关闭串口按钮步骤:
- 选择端口号
- 配置波特率
- 配置数据位
- 配置校验位
- 配置停止位
- 流控
- 打开串口
代码示例:
Widget::Widget(QWidget *parent)
    : QWidget(parent)
    , ui(new Ui::Widget)
{
    // 默认波特率为115200
    ui->comboBox_boautrate->setCurrentIndex(5);
    ui->comboBox_databit->setCurrentIndex(3);
}

void Widget::on_btnCloseOrOpenSerial_clicked(bool checked)
{
    if (checked)
    {
        //1. 选择端口号
        serialPort->setPortName(ui->comboBox_serialNum->currentText());
        //2. 配置波特率
        serialPort->setBaudRate(ui->comboBox_boautrate->currentText().toInt());
        //3. 配置数据位
        serialPort->setDataBits(QSerialPort::DataBits(
                                    ui->comboBox_databit->currentText().toUInt()));
        //4. 配置校验位
        switch (ui->comboBox_jiaoyan->currentIndex()) {
        case 0:
            serialPort->setParity(QSerialPort::NoParity);
            break;
        case 1:
            break;
            serialPort->setParity(QSerialPort::EvenParity);
        case 2:
            serialPort->setParity(QSerialPort::MarkParity);
            break;
        case 3:
            serialPort->setParity(QSerialPort::OddParity);
            break;
        case 4:
            serialPort->setParity(QSerialPort::SpaceParity);
            break;
        default:
            serialPort->setParity(QSerialPort::UnknownParity);
            break;

        }
        //5. 配置停止位
        serialPort->setStopBits(QSerialPort::StopBits(
                                    ui->comboBox_databit->currentText().toUInt()));
        //6. 流控
        if(ui->comboBox_fileCon->currentText() == "None")
            serialPort->setFlowControl(QSerialPort::NoFlowControl);

        // 7. 打开串口
        if (serialPort->open(QIODevice::ReadWrite))
        {
            qDebug() << "open";
            ui->btnCloseOrOpenSerial->setText("关闭串口");
        }
        else
        {
            QMessageBox msgBox;
            msgBox.setWindowTitle("打开串口错误");
            msgBox.setText("打开失败,串口被占用或已拔出");
            msgBox.exec();
        }
    }
    else
    {
        serialPort->close();
        ui->btnCloseOrOpenSerial->setText("打开串口");
    }
}
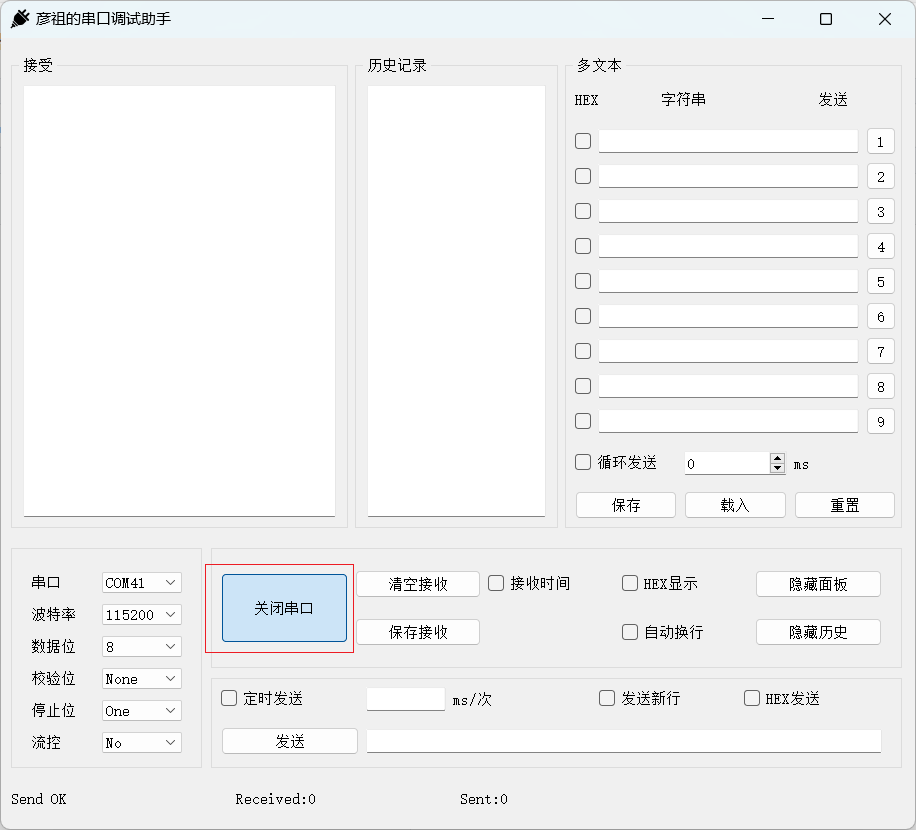
程序运行结果:
2. 发送和接收数据
代码示例:
private slots:
    void on_btnSendContext_clicked();
    void on_SerialData_readyToRead();

private:
    //用于统计接收和读取的总字节数
    int writeCntTotal;
    int readCntTotal;

    //用于比较发送记录
    QString sendBak;

Widget::Widget(QWidget *parent)
    : QWidget(parent)
    , ui(new Ui::Widget)
{
    // 初始化发送
    writeCntTotal = 0;
    readCntTotal = 0;

    // 接收数据
    connect(serialPort,&QSerialPort::readyRead,this,&Widget::on_SerialData_readyToRead);
}

void Widget::on_btnSendContext_clicked()
{
    int writeCnt = 0;
    // 读取内容
    const char* sendData = ui->lineEditSendContext->text().toLocal8Bit().constData();
    // 判断是否16进制发送,如果是的话
    if(ui->checkBHexSend->isChecked()){

        QString tmp = ui->lineEditSendContext->text();
        // 判断是否是偶数位
        QByteArray tmpArray = tmp.toLocal8Bit();
        if(tmpArray.size() % 2 != 0){
            ui->labelSendStatus->setText("Error Input!");
            return;
        }
        // 判读是否是符合16进制的表达
        for(char c : tmpArray){
            if( !std::isxdigit(c)){
                ui->labelSendStatus->setText("Error Input!");
                return;
            }
        }
        if(ui->checkSendNewLine->isChecked())
            tmpArray.append("\r\n");

        // 转换成16进制发送,用户输入1,变成1,拒绝变成字符1,ASSII 49
        QByteArray arraySend = QByteArray::fromHex(tmpArray);
        writeCnt = serialPort->write(arraySend);

    }else{
        // 如果不是16进制发送
        if(ui->checkSendNewLine->isChecked()){
            QByteArray arrySendData(sendData,strlen(sendData));
            arrySendData.append("\r\n");
            writeCnt = serialPort->write(arrySendData);
        }else
            writeCnt = serialPort->write(sendData);
    }

    // 发送失败的清空
    if(writeCnt == -1){
        ui->labelSendStatus->setText("SendError!");
    }else{
        // 发送成功的情况
        // 统计累加发送的数据量
        writeCntTotal+=writeCnt;
        // qDebug() << "SendOK" << sendData << "cnt:" << writeCnt;
        // 更新发送状态,更新发送总数据总量
        ui->labelSendStatus->setText("SendOK!");
        ui->labelSendcnt->setText("Sent:"+QString::number(writeCntTotal));
        // 更新发送记录,做重复处理
        if(strcmp(sendData,sendBak.toStdString().c_str()) != 0){
            ui->textEditRecord->append(sendData);
            sendBak = QString::fromUtf8(sendData);
        }
    }
}

void Widget::on_SerialData_readyToRead()
{
    QString revMessage = serialPort->readAll();

//    qDebug() << "revCnt:" << revMessage.size() << "context:" << revMessage;

    if(revMessage != NULL){
        if(ui->checkBLine->isChecked()) revMessage.append("\r\n");
        //16进制显示
        if(ui->checkBHexDisplay->isChecked()){
            QByteArray tmpHexString = revMessage.toUtf8().toHex().toUpper();
            //原来控件上的内容,hex
            QString tmpStringHex = ui->textEditRev->toPlainText(); //因为勾选了,读出来的就是hex
            tmpHexString = tmpStringHex.toUtf8() + tmpHexString; //把读出的旧的hex和新收到的数据转成hex进行拼接
            //重新显示在控件上
            ui->textEditRev->setText(QString::fromUtf8(tmpHexString));
        }else{
            //非16进制显示
            if(ui->checkBrevTime->checkState()== Qt::Unchecked){
                ui->textEditRev->insertPlainText(revMessage);
            }
            else if(ui->checkBrevTime->checkState()== Qt::Checked){
                // getSysTime();
                // ui->textEditRev->insertPlainText("【"+myTime+"】 "+revMessage);
            }
        }
        //接收的总字节数
        readCntTotal += revMessage.size();
        //显示接收的总字节数量
        ui->labelRevcnt->setText("Received:"+QString::number(readCntTotal));

        ui->textEditRev->moveCursor(QTextCursor::End);
        ui->textEditRev->ensureCursorVisible();
       // ui->textEditRev->setFocus();
    }
}
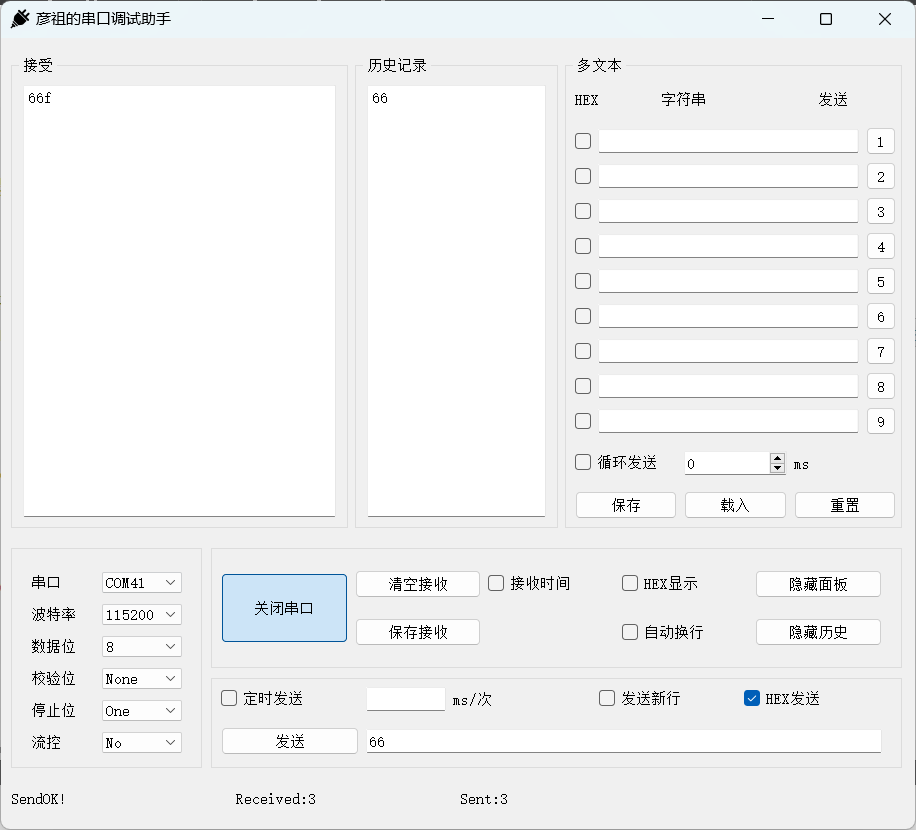
程序运行结果:
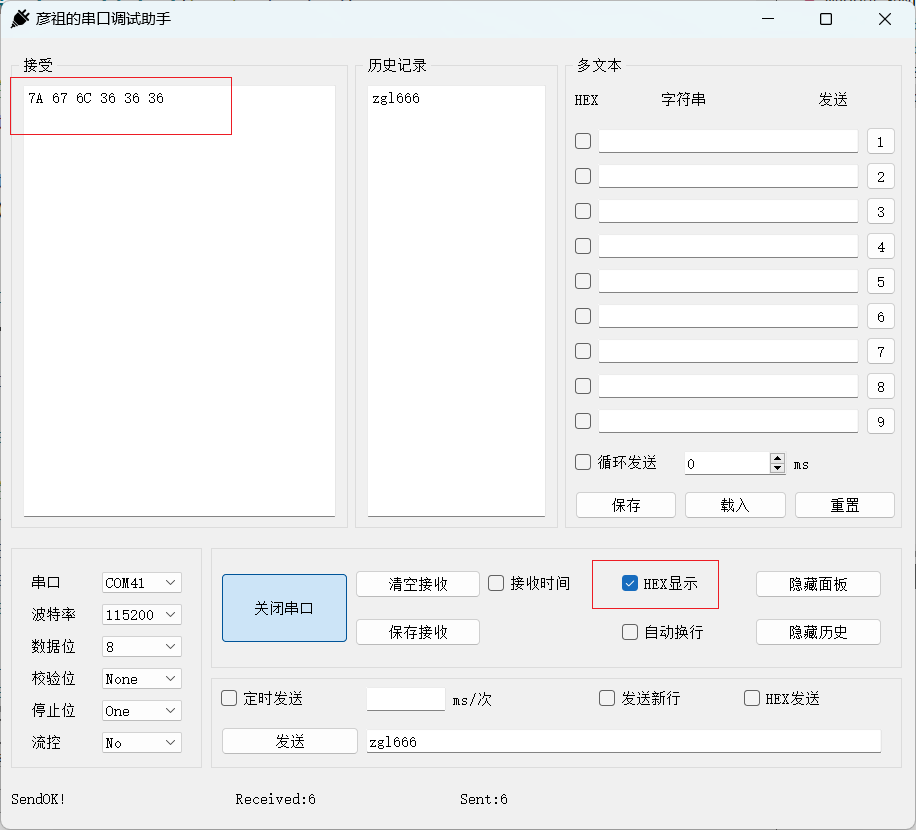
3. 十六进制显示数据
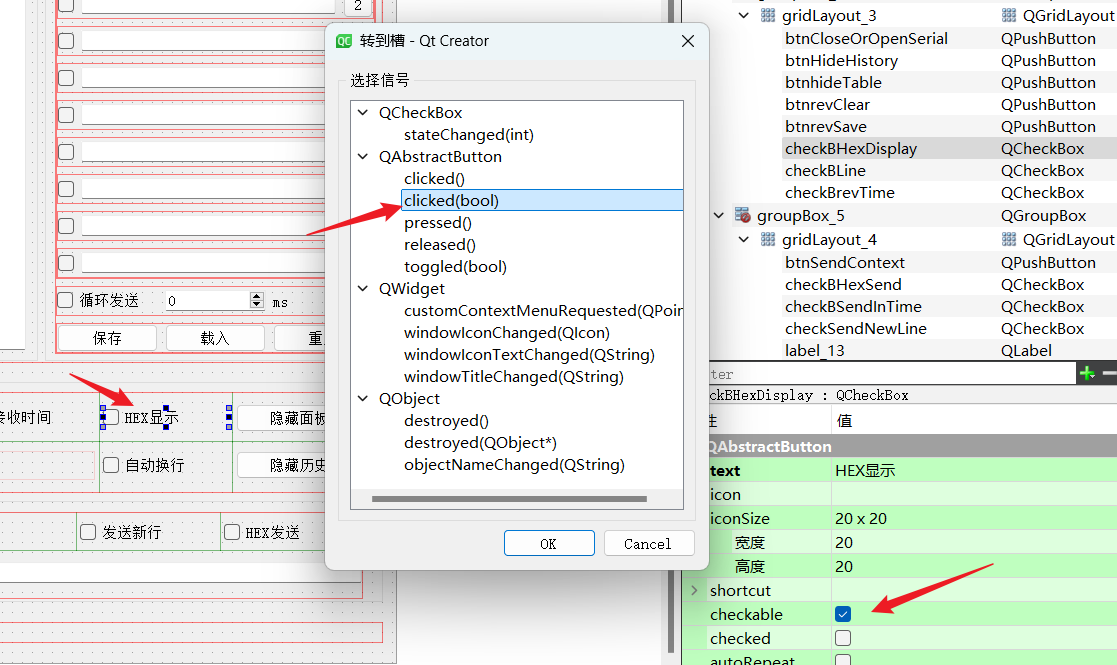
代码示例:
void Widget::on_checkBHexDisplay_clicked(bool checked)
{
    if(checked){
        //1. 读取textEdit上的内容
        QString tmp = ui->textEditRev->toPlainText();
        //2. 转换成hex
        QByteArray qtmp = tmp.toUtf8();
        qtmp = qtmp.toHex();
        //3. 显示
        QString lastShow;
        tmp  = QString::fromUtf8(qtmp); // 56 78
        for(int i=0; i<tmp.size();i+=2){
            //56
            lastShow += tmp.mid(i,2) + " ";
        }
        ui->textEditRev->setText(lastShow.toUpper());
    }else{
        //1. 读取textEdit上的内容,hex
        QString tmpHexString = ui->textEditRev->toPlainText();
        QByteArray tmpHexQBytearray = tmpHexString.toUtf8();
        QByteArray tmpQByteString = QByteArray::fromHex(tmpHexQBytearray);
        ui->textEditRev->setText(QString::fromUtf8(tmpQByteString));
    }
    ui->textEditRev->moveCursor(QTextCursor::End);
    ui->textEditRev->ensureCursorVisible();
}
程序运行结果:
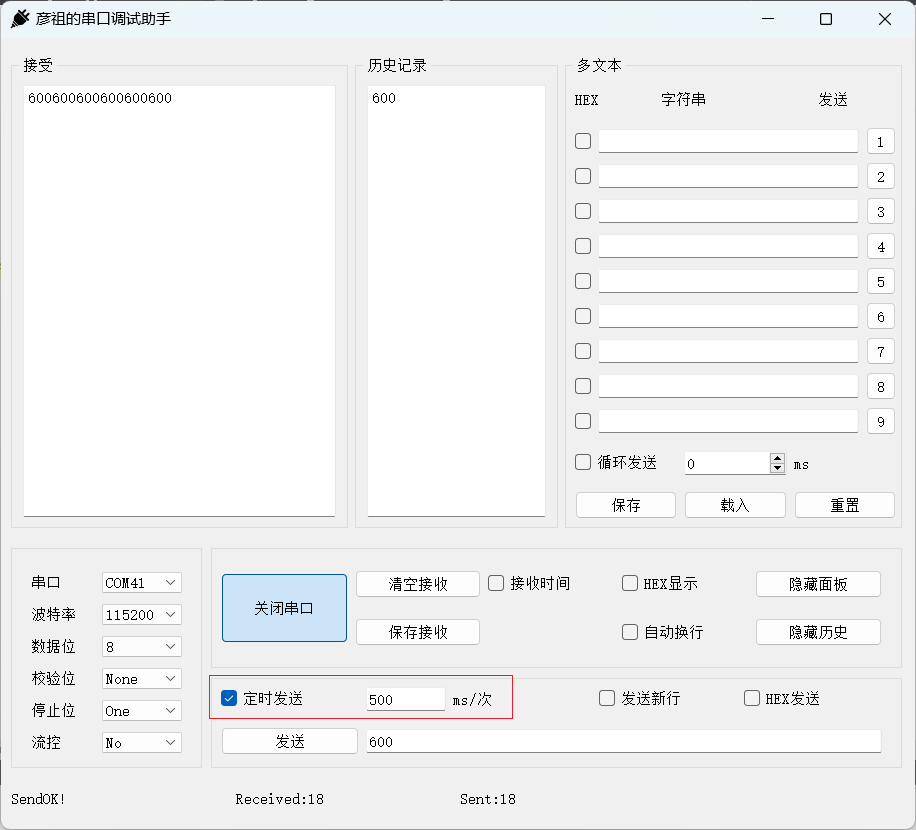
4. 定时发送数据
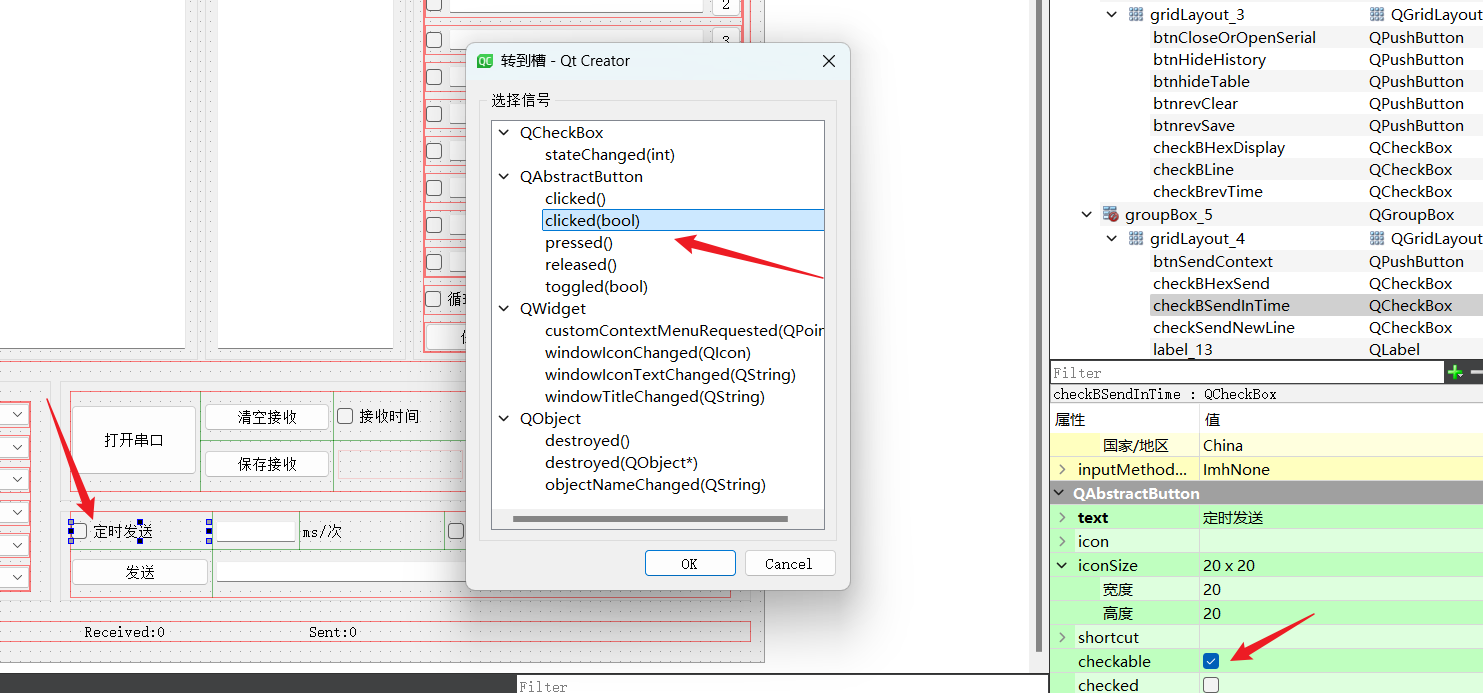
代码示例:
#include <QTimer>

Widget::Widget(QWidget *parent)
    : QWidget(parent)
    , ui(new Ui::Widget)
{
    // 定时器定时发送
    timer = new QTimer(this);
    connect(timer, &QTimer::timeout, [=](){
       on_btnSendContext_clicked();
    });
}

void Widget::on_checkBSendInTime_clicked(bool checked)
{
    // 如果定时发送被勾选
    if(checked){
        //处理控件,设置时间和发送内容不可编辑

        //启动定时器,定时时间根据控件用户设定的
        timer->start(ui->lineEditTimeeach->text().toInt());

    }else{
        //如果定时发送取消,则停止定时器
        timer->stop();
        //设置发送时间和发送内容可编辑状态
    }
}
程序运行结果:
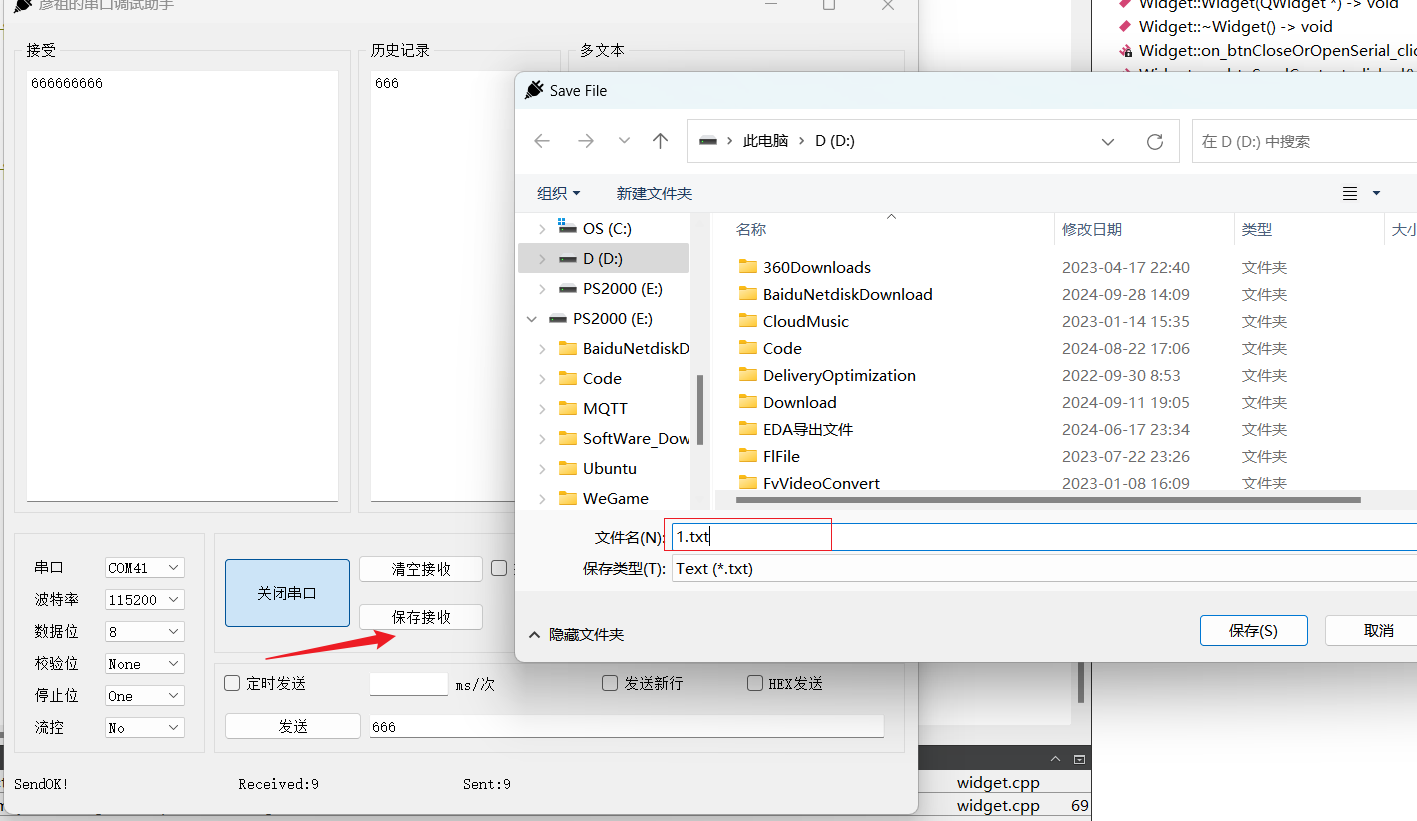
5. 清空或保存内容
代码示例:
#include <QFileDialog>

void Widget::on_btnrevClear_clicked()
{
    ui->textEditRev->setText("");
}

void Widget::on_btnrevSave_clicked()
{
    QString fileName = QFileDialog::getSaveFileName(this, tr("Save File"),
                                "D:/",
                                tr("Text (*.txt)"));

    if (fileName != NULL)
    {
        QFile file(fileName);
        if (!file.open(QIODevice::WriteOnly | QIODevice::Text))
            return;

        QTextStream out(&file);

        out << ui->textEditRev->toPlainText();
        file.close();
    }
}
程序运行结果:
6. 刷新时间
代码示例:
private slots:
    // 刷新时间显示
    void time_reflash();

private:
    // 定时器刷新系统时间
    QTimer *getSysTimeTimer;

    // 用于实时获取系统时间
    QString myTime;

    // 用于更新私有变量myTime
    void getSysTime();

Widget::Widget(QWidget *parent)
    : QWidget(parent)
    , ui(new Ui::Widget)
{
    // 定时器刷新时间
    getSysTimeTimer = new QTimer(this);
    connect(getSysTimeTimer, SIGNAL(timeout()), this, SLOT(time_reflash()));
    getSysTimeTimer->start(100);
}

void Widget::time_reflash()
{
    getSysTime();
    ui->labelCurrentTime->setText(myTime);
}

void Widget::getSysTime()
{
    QDateTime currentTime = QDateTime::currentDateTime();
    //处理日期
    QDate date = currentTime.date();
    int year  = date.year();
    int month = date.month();
    int day   = date.day();
    //处理时间
    QTime time = currentTime.time();
    int hour   = time.hour();
    int minite = time.minute();
    int second = time.second();
    //格式化成 2024-01-01  23:12:05
    myTime = QString("%1-%2-%3  %4:%5:%6")
            .arg(year, 2, 10, QChar('0'))
            .arg(month, 2, 10, QChar('0'))
            .arg(day, 2, 10, QChar('0'))
            .arg(hour, 2, 10, QChar('0'))
            .arg(minite, 2, 10, QChar('0'))
            .arg(second, 2, 10, QChar('0'));
}
程序运行结果:
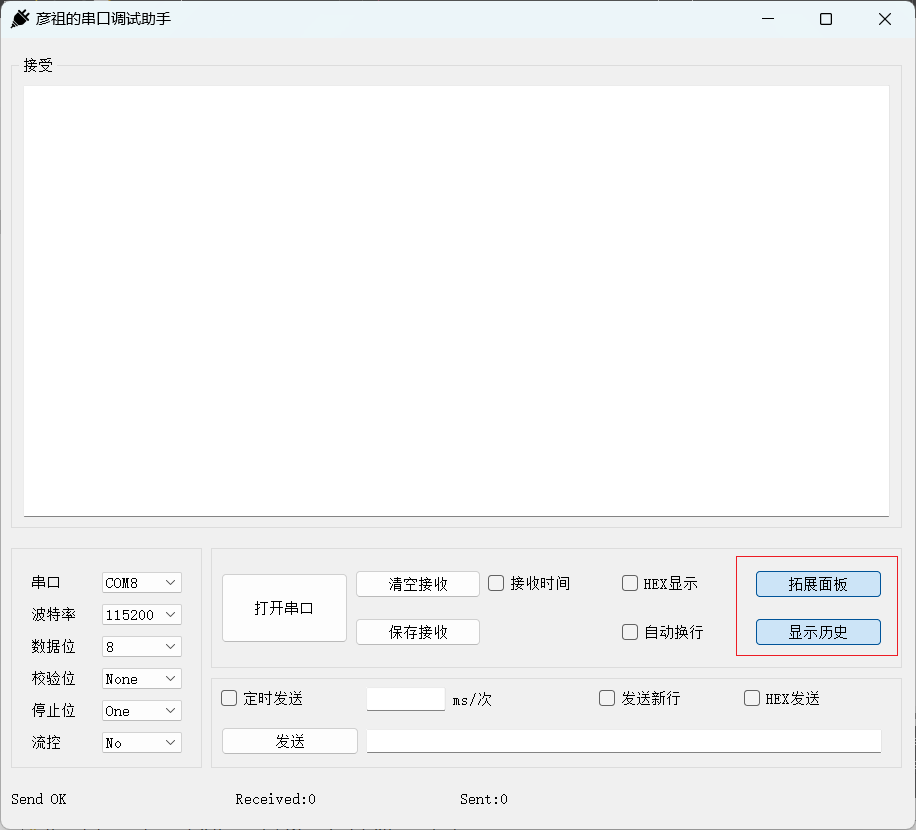
7. 隐藏面板和历史
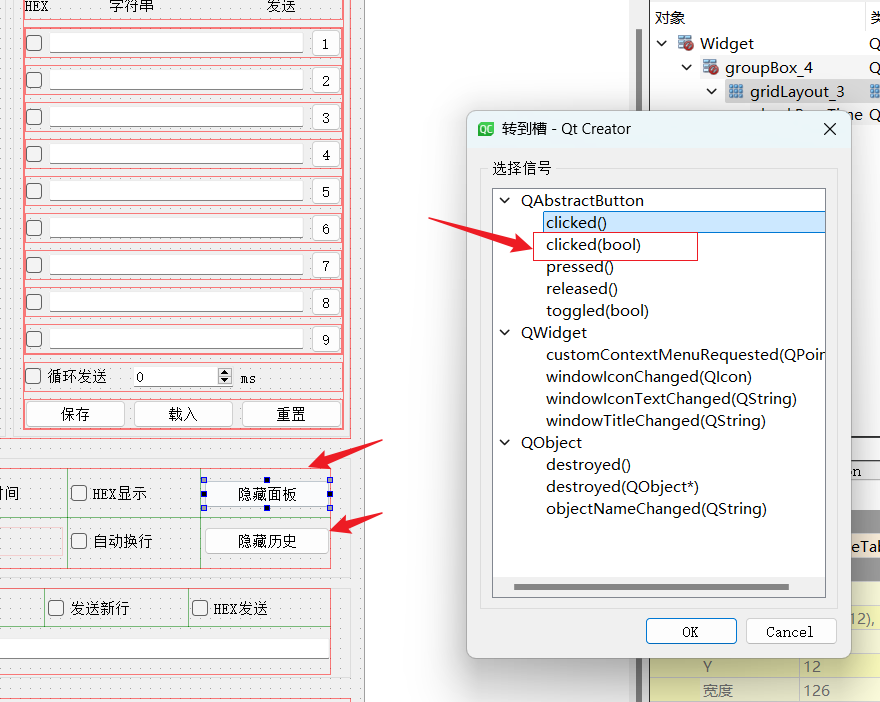
代码示例:
void Widget::on_btnhideTable_clicked(bool checked)
{
    if(checked){
        ui->btnhideTable->setText("拓展面板");
        ui->groupBoxTexts->hide();
    }else{
        ui->btnhideTable->setText("隐藏面板");
        ui->groupBoxTexts->show();
    }
}

void Widget::on_btnHideHistory_clicked(bool checked)
{
    if(checked){
        ui->btnHideHistory->setText("显示历史");
        ui->groupBoxRecord->hide();
    }else{
        ui->btnHideHistory->setText("隐藏历史");
        ui->groupBoxRecord->show();
    }
}
程序运行结果:
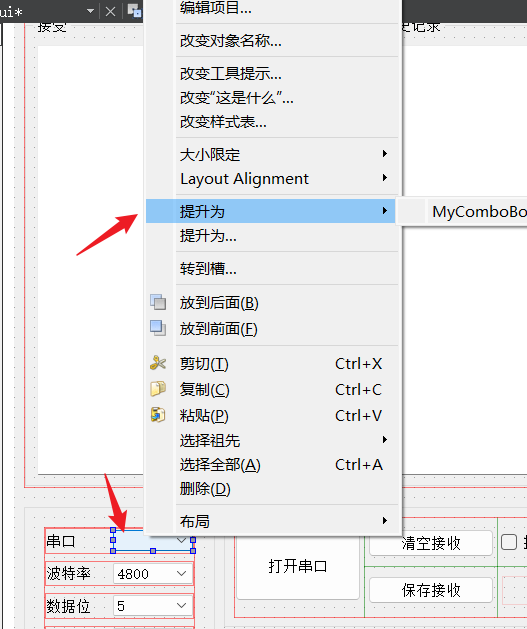
8. 刷新显示串口设备
新添加 MyComboBox 类:
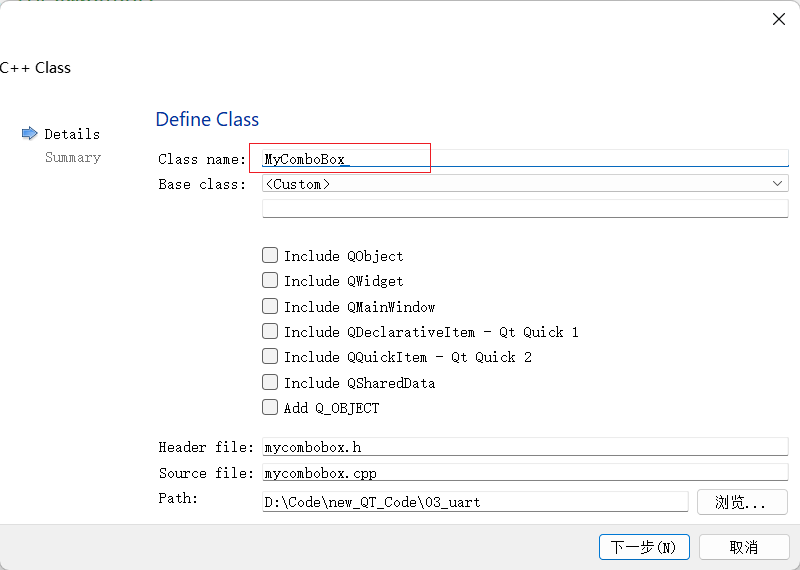
提升为新添加的类:
代码示例:
mycombobox.h
#ifndef MYCOMBOBOX_H
#define MYCOMBOBOX_H

#include <QWidget>
#include <QComboBox>

class MyComboBox : public QComboBox
{
    Q_OBJECT

public:
    MyComboBox(QWidget *parent);

protected:
    void mousePressEvent(QMouseEvent *e) override;

signals:
    void refresh();
};

#endif // MYCOMBOBOX_H
mycombobox.cpp
#include "mycombobox.h"

#include <QMouseEvent>

MyComboBox::MyComboBox(QWidget *parent):QComboBox(parent)
{

}

void MyComboBox::mousePressEvent(QMouseEvent *e)
{
    //发出一个信号
    if(e->button() == Qt::LeftButton){
        emit refresh();
    }
    QComboBox::mousePressEvent(e);
}
widget
private slots:
    void refreshSerialName();

Widget::Widget(QWidget *parent)
    : QWidget(parent)
    , ui(new Ui::Widget)
{
    //捕捉自定义控件refresh信号,更新系统中的端口号
    connect(ui->comboBox_serialNum,&MyComboBox::refresh,this,&Widget::refreshSerialName);
    refreshSerialName();

}

void Widget::refreshSerialName()
{
    ui->comboBox_serialNum->clear();
    //检测系统可用串口,并更新到comboBox上待用户选择
    QList<QSerialPortInfo> serialList = QSerialPortInfo::availablePorts();
    for(QSerialPortInfo serialInfo : serialList){
        // qDebug() << serialInfo.portName();
        ui->comboBox_serialNum->addItem(serialInfo.portName());

    }
    ui->labelSendStatus->setText("Com Refreshed!");
}
9. 循环发送添加的自定义文本
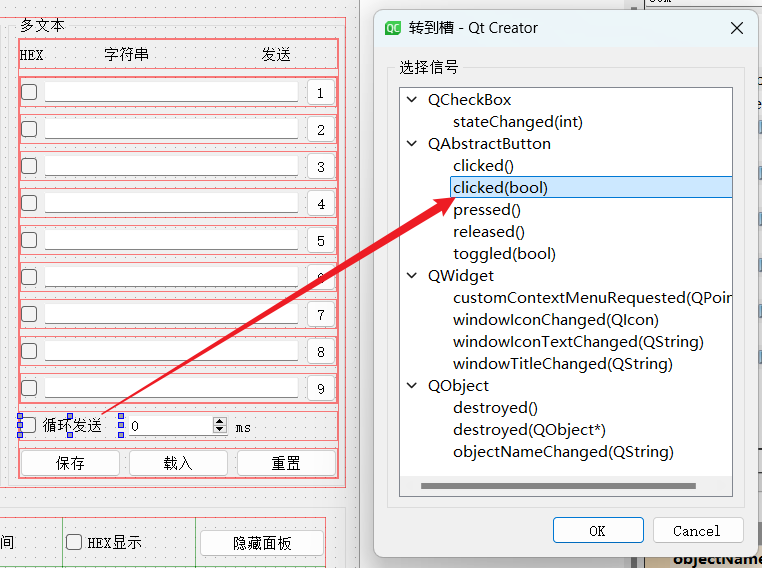
9.1 定时器实现
代码示例:
private slots:
    void buttons_handler();
    void on_command_button_clicked();
    void on_checkBox_send_clicked(bool checked);

private:
    // 定时器按钮处理
    QTimer *buttonsConTimer;
    int buttonIndex;

    // 创建指针列表
    QList<QPushButton *> buttons;
    QList<QLineEdit *> lineEdits;
    QList<QCheckBox *> checkBoxs;

Widget::Widget(QWidget *parent)
    : QWidget(parent)
    , ui(new Ui::Widget)
{
    // 定时器按钮处理
    buttonsConTimer = new QTimer(this);
    connect(buttonsConTimer,&QTimer::timeout,this,&Widget::buttons_handler);

    // 遍历按钮和文本
    for(int i = 1; i <= 9; i++){
        QString btnName = QString("pushButton_%1").arg(i);
        QPushButton* btn = findChild<QPushButton *>(btnName);
        if(btn){
            btn->setProperty("buttonId",i);
            buttons.append(btn);
            connect(btn,SIGNAL(clicked()),this,SLOT(on_command_button_clicked()));
        }

        QString lineEditName = QString("lineEdit_%1").arg(i);
        QLineEdit *lineEdit = findChild<QLineEdit *>(lineEditName);
        lineEdits.append(lineEdit);

        QString checkBoxName = QString("checkBox_%1").arg(i);
        QCheckBox *checkBox = findChild<QCheckBox *>(checkBoxName);
        checkBoxs.append(checkBox);
    }
}

void Widget::on_command_button_clicked()
{
    // 将信号发送者转换为QPushButton
    QPushButton *btn = qobject_cast<QPushButton *>(sender());

    // 获得对应按钮的行编辑器和复选框名称
    if(btn){
        int num = btn->property("buttonId").toInt();
        QString lineEditName = QString("lineEdit_%1").arg(num);
        QLineEdit *lineEdit = findChild<QLineEdit *>(lineEditName);
        if(lineEdit){
            if(lineEdit->text().size() <= 0){
                return;
            }
            ui->lineEditSendContext->setText(lineEdit->text());
        }

        QString checkBoxName = QString("checkBox_%1").arg(num);
        QCheckBox *checkBox = findChild<QCheckBox *>(checkBoxName);
        if(checkBox)
            ui->checkBHexSend->setChecked(checkBox->isChecked());

        on_btnSendContext_clicked();
    }
}

void Widget::buttons_handler()
{
    // 遍历按钮进行发送数据
    if(buttonIndex < buttons.size()){
        QPushButton *btnTmp = buttons[buttonIndex];
        emit btnTmp->clicked();
        buttonIndex++;
    }else{
        buttonIndex = 0;
    }
}

void Widget::on_checkBox_send_clicked(bool checked)
{
    // 开启定时器进行发送数据
    if(checked){
        ui->spinBox->setEnabled(false);
        buttonsConTimer->start(ui->spinBox->text().toUInt());
    }else{
        ui->spinBox->setEnabled(true);
        buttonsConTimer->stop();
    }
}
程序运行结果:
9.2 线程实现
新建一个 CustomThread 类:

代码示例:
customthread.h
#ifndef CUSTOMTHREAD_H
#define CUSTOMTHREAD_H

#include <QWidget>
#include <QThread>

class CustomThread : public QThread
{
    Q_OBJECT

protected:
    void run() override;

public:
    CustomThread(QWidget *parent);

signals:
    void threadTimeout();
};

#endif // CUSTOMTHREAD_H
customthread.cpp
#include "customthread.h"

CustomThread::CustomThread(QWidget *parent) : QThread(parent)
{

}

void CustomThread::run()
{
    while (true)
    {
        msleep(1000);
        emit threadTimeout();
    }
}
widget
private:
    CustomThread *mythread;

Widget::Widget(QWidget *parent)
    : QWidget(parent)
    , ui(new Ui::Widget)
{
    // 线程按钮处理
    mythread = new CustomThread(this);
    connect(mythread, &CustomThread::threadTimeout, this, &Widget::buttons_handler);
}

void Widget::on_checkBox_send_clicked(bool checked)
{
    // 开启线程进行发送数据
    if(checked){
        mythread->start();
    }else{
        mythread->terminate();
    }
}
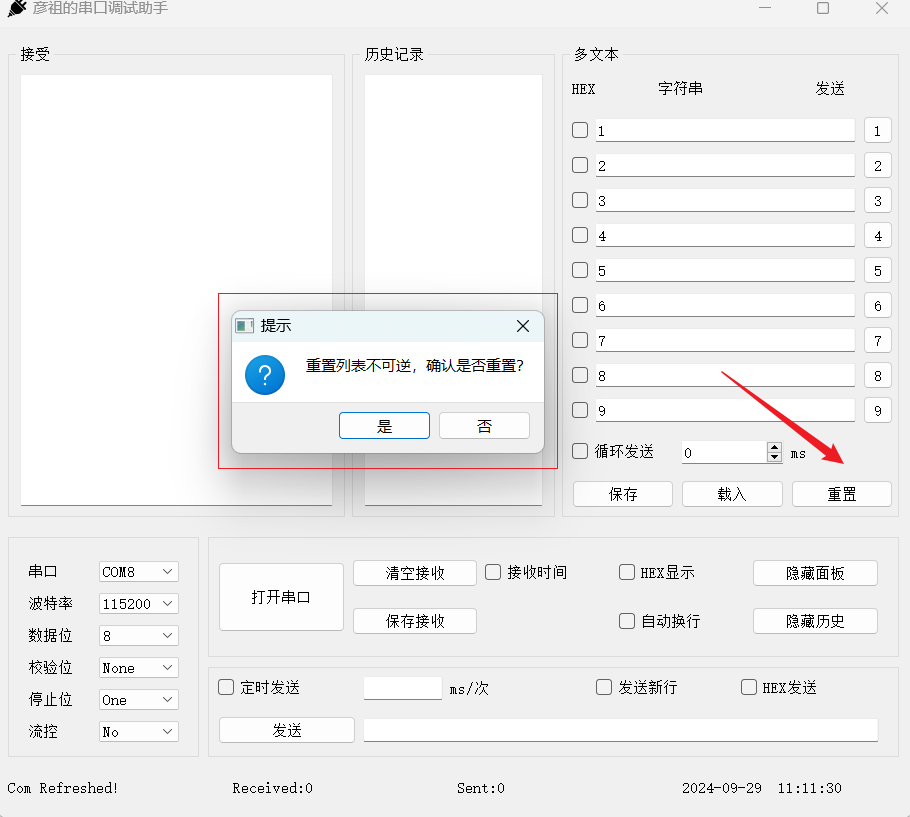
10. 保存,载入和重置文本
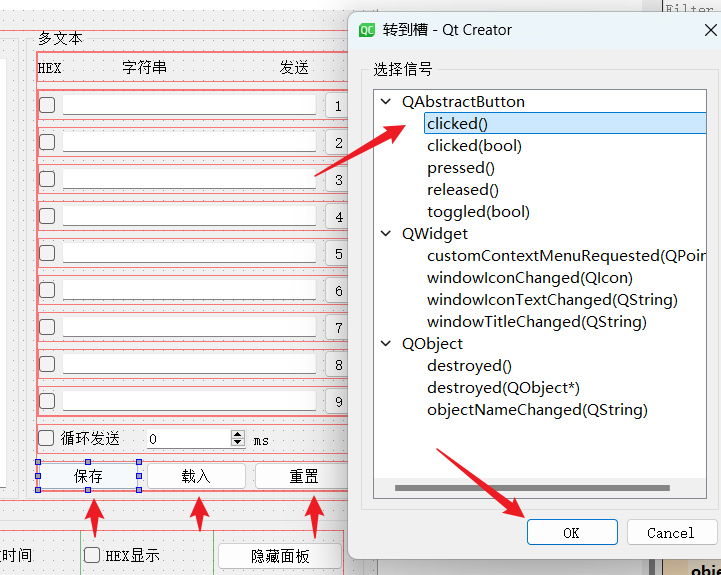
三个按钮分别转到对应槽:
代码示例:
void Widget::on_btnInit_clicked()
{
    QMessageBox msgBox;
    msgBox.setWindowTitle("提示");
    msgBox.setIcon(QMessageBox::Question);
    msgBox.setText("重置列表不可逆,确认是否重置?");
    //msgBox.setStandardButtons(QMessageBox::Yes | QMessageBox::No);
    QPushButton *yesButton = msgBox.addButton("是",QMessageBox::YesRole);
    QPushButton *noButton = msgBox.addButton("否",QMessageBox::NoRole);
    msgBox.exec();
    if(msgBox.clickedButton() == yesButton){
       // qDebug() << "yesButton";

        for(int i = 0; i < lineEdits.size(); i++){
            //遍历lineEdit,并清空内容
            lineEdits[i]->clear();
            //遍历checkBox,并取消勾选
            checkBoxs[i]->setChecked(false);
        }
    }
    if(msgBox.clickedButton() == noButton){
//        qDebug() << "noButton";
    }
}

void Widget::on_btnSave_clicked()
{
    QString fileName = QFileDialog::getSaveFileName(this, tr("保存文件"),
                                                    "D:/",
                                                    tr("文本类型 (*.txt)"));
    QFile file(fileName);
    if (!file.open(QIODevice::WriteOnly | QIODevice::Text))
        return;

    QTextStream out(&file);
    for(int i = 0; i < lineEdits.size(); i++){
        out << checkBoxs[i]->isChecked() << "|" << lineEdits[i]->text() << "\n";
    }
    file.close();
}

void Widget::on_btnLoad_clicked()
{
    int i = 0;
    QString fileName = QFileDialog::getOpenFileName(this, tr("打开文件"),
                                                    "D:/",
                                                    tr("文本类型 (*.txt)"));
    if(fileName != NULL){
        QFile file(fileName);
        if (!file.open(QIODevice::ReadOnly | QIODevice::Text))
            return;

        QTextStream in(&file);
        while(!in.atEnd() && i <= 9){
            QString line = in.readLine();
            QStringList parts = line.split("|");
            if(parts.count() == 2){
                checkBoxs[i]->setChecked(parts[0].toInt());
                lineEdits[i]->setText(parts[1]);
            }
            i++;
        }
    }
}
程序运行结果:

开源鸿蒙跨平台开发社区汇聚开发者与厂商,共建“一次开发,多端部署”的开源生态,致力于降低跨端开发门槛,推动万物智联创新。
更多推荐

 34
34 0
0- 0


 已为社区贡献7条内容

所有评论(0)