

I recently created a settings option in one of my apps that offers its users a way to personalise their navigation experience. In this tutorial I would like to show how to implement this in React Native.
我最近在我的一个应用程序中创建了一个设置选项,为用户提供了一种个性化其导航体验的方法。 在本教程中,我想展示如何在React Native中实现这一点。
More specifically, this short tutorial will demonstrate how, by utilising some of the many customisation options of React Navigation v5, you can:
更具体地说,这个简短的教程将演示如何通过利用React Navigation v5的许多自定义选项中的一些,您可以:
- Apply nested stack navigators to implement different screen transition effects. 应用嵌套堆栈导航器以实现不同的屏幕过渡效果。
- Create matching screen transitions for both iOS and Android. 为iOS和Android创建匹配的屏幕过渡。
- Customise screen transition animations to create all kinds of interesting effects. 自定义屏幕过渡动画以创建各种有趣的效果。
- Toggle between different screen transition effects with a simple settings switch. 使用简单的设置开关即可在不同的屏幕过渡效果之间切换。
At the end of this tutorial you should have gained insight in some of the many customisation options that React Navigation has to offer.
在本教程的最后,您应该已经了解了React Navigation必须提供的许多自定义选项。
React Native Starter Kit: The above is a sample taken from the React Native Share Starter Kit, which is available for purchase here.
React Native入门工具包 :以上是从React Native Share入门工具包中获取的示例,可在此处购买。
React Native Resources: Want access to the source code for this project and other React Native resources? Then signup for my newsletter.
React Native资源:是否想访问该项目和其他React Native资源的源代码? 然后注册我的新闻通讯 。
Note: the outcome of this tutorial is a stripped-down version of the above gif, which is a sample taken from the ‘React Native Share Starter Kit’.
注意:本教程的结果是上述gif的精简版本,该示例摘自“ React Native Share Starter Kit”。
设置嵌套堆栈导航器 (Setting up nested stack navigators)
The basis four this application are a collection of screens that are grouped inside two nested stack navigators:
此应用程序的基础四是一组屏幕,这些屏幕被分组在两个嵌套的堆栈导航器中:
MainNavigationStack, which holds the app’s main screens and which by default are displayed with a horizontal navigation transition effect.
MainNavigationStack ,其中包含应用程序的主屏幕,默认情况下以水平导航过渡效果显示。
PopupNavigationStack, which holds all screens that are displayed with a vertical navigation transition animation.
PopupNavigationStack ,其中包含使用垂直导航过渡动画显示的所有屏幕。
When it comes to nesting navigators, it is important to realise this is a practice that comes with a warning message from the React Navigation documentation:
在嵌套导航器时,重要的是要意识到这是来自React Navigation文档的警告消息:
We recommend to reduce nesting navigators to minimal…Think of nesting navigators as a way to achieve the UI you want rather than a way to organize your code.
我们建议将嵌套导航器减少到最小……将嵌套导航器视为实现所需UI的一种方式,而不是组织代码的一种方式。
Because we will be creating two types of navigation transitions — horizontal and vertical for our ‘default’ setting and zoom-in, zoom-out for our custom setting — we have no other option than to nest our navigators.
因为我们将创建两种类型的导航过渡-“默认”设置为水平和垂直导航,而自定义设置为“放大”,“缩小”,因此除了嵌套导航器外,我们别无选择。
To begin, set up a new Expo project and install all required React Navigation dependencies inside your new project.
首先, 设置一个新的Expo项目并在新项目中安装所有必需的React Navigation依赖项 。
In this demo I am going to assume that you have some experience developing basic screens and views. Therefore, I will not go into detail on the specifics of how to code each of the screens and components used in this demo.
在本演示中,我将假设您具有开发基本屏幕和视图的经验。 因此,在此演示中,我将不详细介绍如何对每个屏幕和组件进行编码的细节。
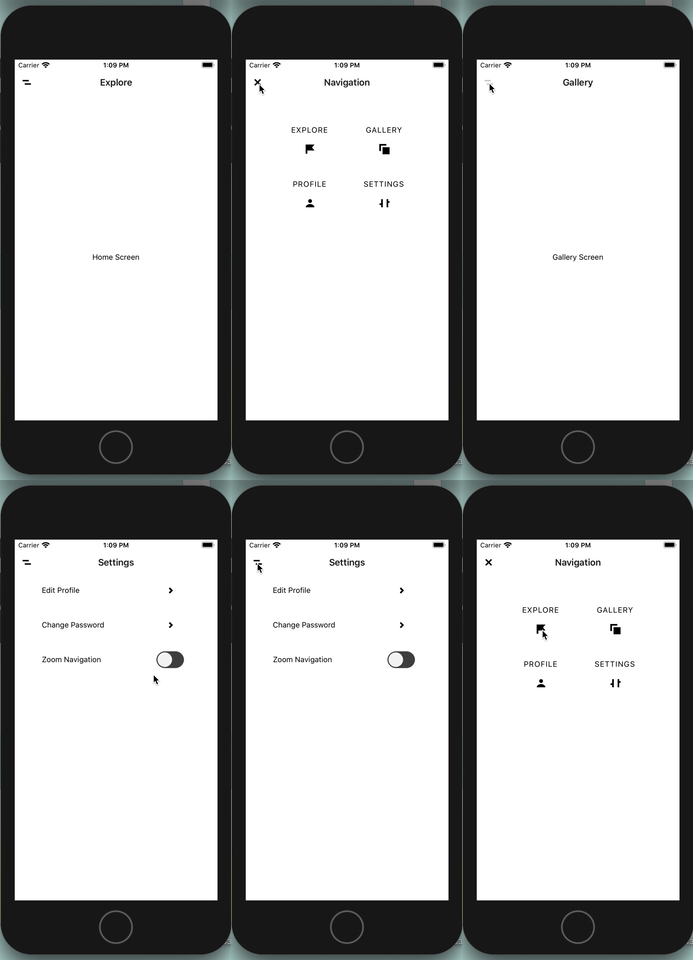
Now that our new project setup is ready, let’s build out four main screens and one menu screen. These screens should then be grouped inside two nested navigation stacks inside your routes file, like so:
现在我们的新项目设置已经准备就绪,让我们构建四个主屏幕和一个菜单屏幕。 然后,应将这些屏幕分组到routes文件内的两个嵌套导航堆栈中,如下所示:
import React from 'react';
import {
  NavigationContainer,
  DefaultTheme,
  getFocusedRouteNameFromRoute,
} from '@react-navigation/native';
import { createStackNavigator } from '@react-navigation/stack';


import IconButton from '../UI/IconButton';


import Explore from '../screens/Explore';
import Gallery from '../screens/Gallery';
import Profile from '../screens/Profile';
import Settings from '../screens/Settings';


import Navigation from '../screens/Navigation';


const closeIcon = require('../../assets/icons/close.png');
const menuIcon = require('../../assets/icons/menu.png');


// THIS REMOVES THE HEADER BOTTOM BORDER FOR IOS AND ANDROID
const styles = {
  header: {
    borderBottomWidth: 0,
    shadowColor: 'transparent',
    elevation: 0,
  },
};


const MainNavigationStack = createStackNavigator();
const PopupNavigationStack = createStackNavigator();
const RootNavigationStack = createStackNavigator();


const PopupStackScreen = () => {
  return (
    <PopupNavigationStack.Navigator>
      <PopupNavigationStack.Screen name="Navigation" component={Navigation} />
    </PopupNavigationStack.Navigator>
  );
};


const MainStackScreen = () => {
  return (
    <MainNavigationStack.Navigator>
      <MainNavigationStack.Screen name="Explore" component={Explore} />
      <MainNavigationStack.Screen name="Gallery" component={Gallery} />
      <MainNavigationStack.Screen name="Profile" component={Profile} />
      <MainNavigationStack.Screen name="Settings" component={Settings} />
    </MainNavigationStack.Navigator>
  );
};


const RootStackScreen = () => {
  // BECAUSE WE DON'T WANT TO DISPLAY THE NAVIGATION STACK TITLE
  // WE MUST GET THE ROUTE NAME FROM THE HELPER FUNCTION PROVIDED
  // BY REACT NAVIGATION
  const getHeaderTitle = (route) => {
    const routeName = getFocusedRouteNameFromRoute(route) || 'Explore';
    return routeName;
  };

  const getHeaderLeftHelper = (route, navigation) => {
  // WHEN NAVIGATING BETWEEN NESTED NAVIGATION STACKS
  // WE MUST INDICATE BOTH WHICH STACK WE NAVIGATE TO
  // AND WHICH SCREEN TO NAVIGATE TO INSIDE THE NAVIGATE
  // METHOD'S OPTIONS OBJECT
  if (route.name === 'Main') {
    return (
      <IconButton
        icon={menuIcon}
        tintColor="black"
        size={22}
        onPress={() =>
          navigation.navigate('Popup', {
            screen: 'Navigation',
          })
        }
      />
    );
  } else if (route.name === 'Popup') {
    return (
      <IconButton
        icon={closeIcon}
        tintColor="black"
        size={22}
        onPress={() => navigation.goBack()}
      />
    );
  }
};


  return (
    <RootNavigationStack.Navigator>
      <RootNavigationStack.Screen
        name="Main"
        component={MainStackScreen}
        options={({ route, navigation }) => ({
          headerStyle: styles.header,
          headerLeft: () => getHeaderLeftHelper(route, navigation),
          headerTitle: getHeaderTitle(route),
        })}
      />
      <RootNavigationStack.Screen
        name="Popup"
        component={PopupStackScreen}
        options={({ route, navigation }) => ({
          headerStyle: styles.header,
          headerLeft: () => getHeaderLeftHelper(route, navigation),
          headerTitle: getHeaderTitle(route),
        })}
      />
    </RootNavigationStack.Navigator>
  );
};


const NavigationContainerStack = () => {
  const theme = {
    ...DefaultTheme,
    colors: {
      ...DefaultTheme.colors,
      background: 'white',
    },
  };


  return (
    <NavigationContainer theme={theme}>
      <RootStackScreen />
    </NavigationContainer>
  );
};


export default NavigationContainerStack;
为iOS和Android添加相同的过渡效果 (Adding identical transition effects for iOS and Android)
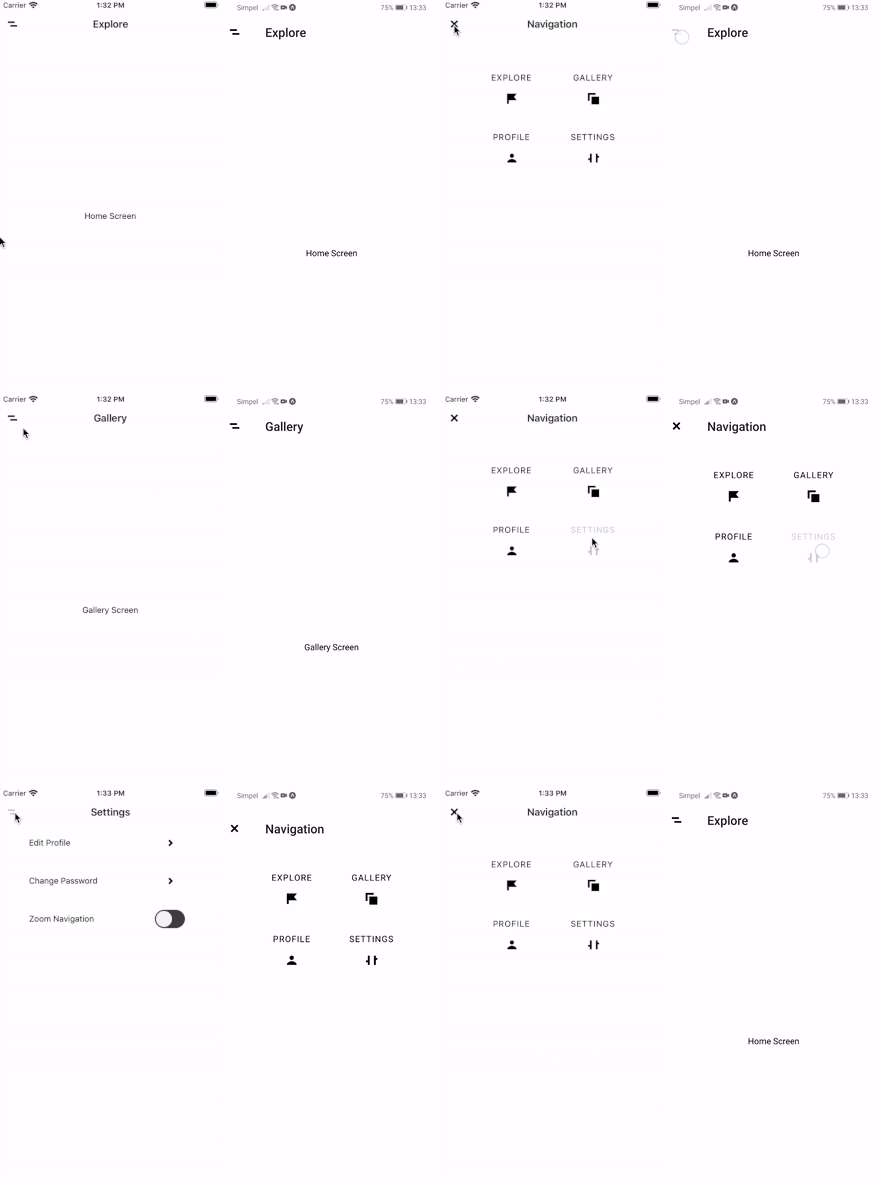
You may have noticed that iOS and Android provide different experiences when it comes to screen transition effects using React Navigation’s default setup:
您可能已经注意到,在使用React Navigation的默认设置进行屏幕过渡效果时,iOS和Android提供不同的体验:

Luckily, we are offered an option to modify these transitions and provide similar screen transition animations for our iOS and Android apps. For this we need to apply the CardStyleInterpolators and HeaderStyleInterpolators that come with the React Navigation API.
幸运的是,我们提供了一个选项来修改这些过渡,并为我们的iOS和Android应用提供类似的屏幕过渡动画。 为此,我们需要应用React Navigation API 随附的CardStyleInterpolators和HeaderStyleInterpolators 。
Which stack navigator options should these be applied to, you might ask? The React documentation might offer some insights:
您可能会问,这些应该应用于哪个堆栈导航器选项? React文档可能会提供一些见解:
You can only modify navigation options for a navigator from one of its screen components. This applies equally to navigators that are nested as screens.
您只能从导航器的屏幕组件之一修改其导航选项。 这同样适用于嵌套为屏幕的导航器。
Unfortunately, this suggestion will not work for our setup! Let’s take a look by updating the options props for the Main navigation stack screen and Popup navigation stack screen:
不幸的是,该建议不适用于我们的设置! 让我们通过更新主导航堆栈屏幕和弹出式导航堆栈屏幕的选项props来看看:
const RootStackScreen = () => {
  return (
    <RootNavigationStack.Navigator>
      <RootNavigationStack.Screen
        name="Main"
        component={MainStackScreen}
        options={({ route, navigation }) => ({
          //...OTHER OPTIONS
          headerStyleInterpolator: HeaderStyleInterpolators.forStatic,
          cardStyleInterpolator: CardStyleInterpolators.forHorizontalIOS,
        })}
      />
      <RootNavigationStack.Screen
        name="Popup"
        component={PopupStackScreen}
        options={({ route, navigation }) => ({
          //...OTHER OPTIONS
          headerStyleInterpolator: HeaderStyleInterpolators.forStatic,
          cardStyleInterpolator: CardStyleInterpolators.forVerticalIOS,
        })}
      />
    </RootNavigationStack.Navigator>
  );
};
You will notice that while the vertical transition for the Popup screen animates correctly, the horizontal transitions for our Main stack screens remain unchanged.
您会注意到,虽然Popup屏幕的垂直过渡动画正确,但Main Stack屏幕的水平过渡保持不变。
The solution is to go for a different solution, which is to bring CardStyleInterpolators and HeaderStyleInterpolators functions for our Main screens over to the navigation stack’s screenOptions props, like so:
解决方案是采用另一种解决方案, 即将主屏幕的CardStyleInterpolators和HeaderStyleInterpolators函数带到导航堆栈的screenOptions道具,如下所示:
//...SOMEWHERE INSIDE ROUTES.JS


const PopupStackScreen = () => {
  return (
    <PopupNavigationStack.Navigator
      screenOptions={{
        headerStyleInterpolator: HeaderStyleInterpolators.forStatic,
        cardStyleInterpolator: CardStyleInterpolators.forHorizontalIOS,
      }}
    >
      <PopupNavigationStack.Screen name="Navigation" component={Navigation} />
    </PopupNavigationStack.Navigator>
  );
};


//...


const RootStackScreen = () => {
  return (
    <RootNavigationStack.Navigator>
      //...MAIN ROOTNAVIGATIONSTACK


      <RootNavigationStack.Screen
        name="Popup"
        component={PopupStackScreen}
        options={({ route, navigation }) => ({
          //...OTHER OPTIONS


          headerStyleInterpolator: HeaderStyleInterpolators.forStatic,
          cardStyleInterpolator: CardStyleInterpolators.forVerticalIOS,
        })}
      />
    </RootNavigationStack.Navigator>
  )
}
While this looks awkward, we now have identical default screen transition animations for iOS and Android.
尽管这看起来很尴尬,但我们现在拥有适用于iOS和Android的相同的默认屏幕过渡动画。
Next, let’s implement our app’s custom zoom transitions effects.
接下来,让我们实现应用程序的自定义缩放过渡效果。
创建自己的自定义插值器 (Create your own custom interpolators)
For the slightly more complicated transition effect that we’re going after, we can no longer make do with React Navigation’s default transition interpolators. That means we need to create our own.
对于我们要处理的稍微复杂的过渡效果,我们无法再使用React Navigation的默认过渡插值器了。 这意味着我们需要创建自己的。
The transition animation that we’re aiming for is a zoom-out effect for our Popup screen versus a zoom-in effect for each of the Main screens.
我们旨在的过渡动画是“ 弹出”屏幕的缩小效果,而不是每个主屏幕的放大效果。
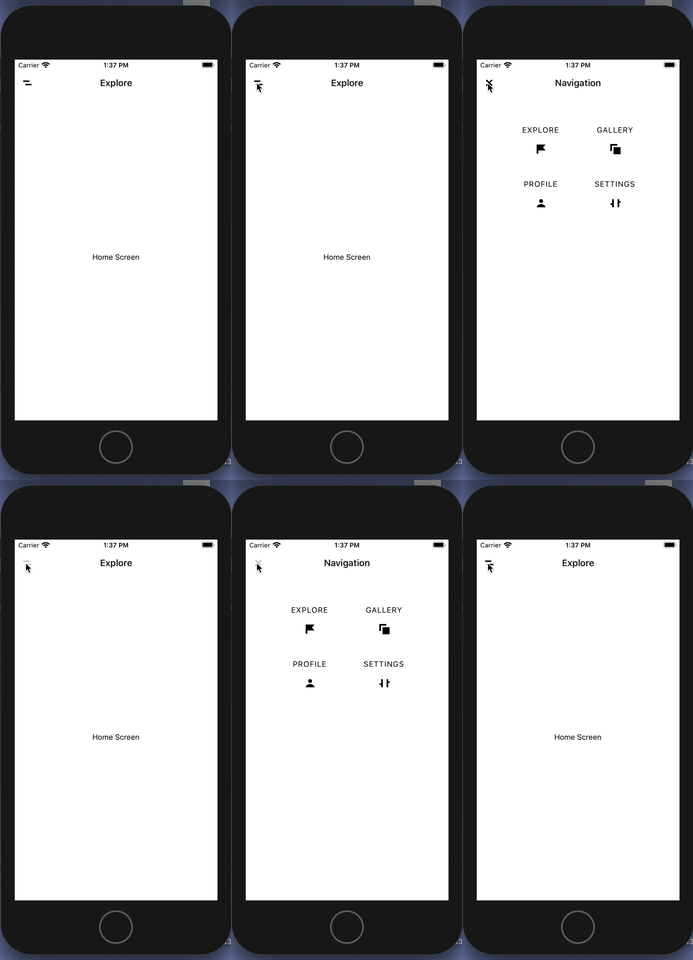
The key notions when it comes to setting up custom screen transitions are the current and next properties that are passed to the arguments of the headerStyleInterpolator and cardStyleInterpolator functions:
设置自定义屏幕过渡时的关键概念是传递给headerStyleInterpolator和cardStyleInterpolator函数的参数的current和ext属性:
screenOptions={{
  headerStyleInterpolator: ({ current, next ]) => headerStyleInterpolator(current, next),
  cardStyleInterpolator: ({ current, next ]) => cardStyleInterpolator(current, next),
}}
The current property holds the transition progress value for the screen that is being navigated away from, while the next property holds the transition progress value for the screen that will be navigated towards.
当前属性保存正在远离的屏幕的过渡进度值,而下一个属性保存将向其导航的屏幕的过渡进度值。
Note that if a screen is the last screen inside a stack navigator (or the only screen inside a stack navigator), the next argument will always stay undefined.
请注意,如果屏幕是堆栈导航器内的最后一个屏幕(或堆栈导航器内的唯一屏幕),则下一个参数将始终保持未定义状态。
Now that we have access to transition progress for incoming and outgoing screens, we can setup our transition animations. Here’s what our implementation should look like:
现在我们可以访问传入和传出屏幕的过渡进度了,我们可以设置过渡动画了。 这是我们的实现应如下所示:
- When the current screen in a stack leaves our view, it will scale from 1 to 2. At the same time, when the next screen in that stack (if it exists) enters our view, it will scale from 0 to 1. 当堆栈中的当前屏幕离开视图时,它将从1缩放到2。同时,当该堆栈中的下一个屏幕(如果存在)进入我们的视图时,它将从0缩放到1。
- When the current screen in a stack enters our view it will scale from 2 to 1 (i.e. when navigating back to previous screens). At the same time, when the next screen in that stack (if it exists) leaves our view, it will scale from 1 to 0. 当堆栈中的当前屏幕进入视图时,它将从2缩放到1(即,当导航回上一个屏幕时)。 同时,当该堆栈中的下一个屏幕(如果存在)离开我们的视图时,它将从1缩放到0。
// OUR HELPER FUNCTION CONTAiNING AlL INDIVIDUAL
// ANIMATION EFFECTS
export const cardStyleInterpolatorHelper = ({ current, next }) => ({
  cardStyle: {
    opacity: current.progress,
    transform: [
      {
        scale: current.progress.interpolate({
          inputRange: [0, 1],
          outputRange: [2, 1],
        }),
      },
      {
        scale: next
          ? next.progress.interpolate({
              inputRange: [0, 1],
              outputRange: [1, 0],
            })
          : 1,
      },
    ],
  },
});
For the headerStyleInterpolator, we basically do the same, with a few additional translate animations added to create the illusion of zooming in (from the center) and out (upwards) from our view.
对于headerStyleInterpolator ,我们基本上执行相同的操作,添加了一些附加的转换动画,以创建从视图中放大(从中心)和缩小(向上)的错觉。
import { Dimensions } from 'react-native';


const WIDTH_CENTER = Dimensions.get('window').width / 2;
const HEIGHT_CENTER = 100;


export const headerStyleInterpolatorHelper = ({ current, next }) => ({
  leftButtonStyle: {
    opacity: current.progress,
    transform: [
      {
        scale: current.progress.interpolate({
          inputRange: [0, 1],
          outputRange: [2, 1],
        }),
      },
      {
        translateY: current.progress.interpolate({
          inputRange: [0, 1],
          outputRange: [-100, 0],
        }),
      },
      {
        translateX: current.progress.interpolate({
          inputRange: [0, 1],
          outputRange: [-30, 0],
        }),
      },
      {
        translateX: next
          ? next.progress.interpolate({
              inputRange: [0, 1],
              outputRange: [1, WIDTH_CENTER - 20],
            })
          : 1,
      },
      {
        translateY: next
          ? next.progress.interpolate({
              inputRange: [0, 1],
              outputRange: [1, HEIGHT],
            })
          : 1,
      },
      {
        scale: next
          ? next.progress.interpolate({
              inputRange: [0, 1],
              outputRange: [1, 0],
            })
          : 1,
      },
    ],
  },
  titleStyle: {
    opacity: current.progress,
    transform: [
      {
        scale: current.progress.interpolate({
          inputRange: [0, 1],
          outputRange: [2, 1],
        }),
      },
      {
        translateY: current.progress.interpolate({
          inputRange: [0, 1],
          outputRange: [-100, 0],
        }),
      },
      {
        translateY: next
          ? next.progress.interpolate({
              inputRange: [0, 1],
              outputRange: [1, HEIGHT],
            })
          : 1,
      },
      {
        scale: next
          ? next.progress.interpolate({
              inputRange: [0, 1],
              outputRange: [1, 0],
            })
          : 1,
      },
    ],
  },
});
The final step is to import our helpers and update the stack navigator screenOptions to test our zoom transition effects.
最后一步是导入我们的助手,并更新堆栈导航器screenOptions以测试我们的缩放过渡效果。
Note that you may want to test your transitions at a slightly slower speed. You can do this by setting the transitionSpec options as follows:
请注意,您可能想以稍微慢一点的速度测试过渡。 您可以通过如下设置transitionSpec选项来做到这一点:
<RootNavigationStack.Screen
        name="Popup"
        component={PopupStackScreen}
        options={({ route, navigation }) => ({
          //...OTHER OPTIONS...
          transitionSpec: {
            open: {
              animation: 'timing',
              config: {
                duration: 1000,
              },
            },
            close: {
              animation: 'timing',
              config: {
                duration: 1000,
              },
            },
          },
        })}
      />
    </RootNavigationStack.Navigator>
One thing you’ll notice is that the title of the incoming screen gets covered by the header bar, which results in an unwanted effect. This is easily fixed by setting…
您会注意到的一件事是,进入屏幕的标题被标题栏覆盖,这会导致不良效果。 通过设置即可轻松解决此问题。
headerTransparent: true,… inside the above screen options.
…在上述屏幕选项内。
Finally, you will notice that our main screens continue to show horizontal transition effects below the zoom effect applied to our cardStyle.
最后,您会注意到我们的主屏幕继续在应用到cardStyle的缩放效果下方显示水平过渡效果。
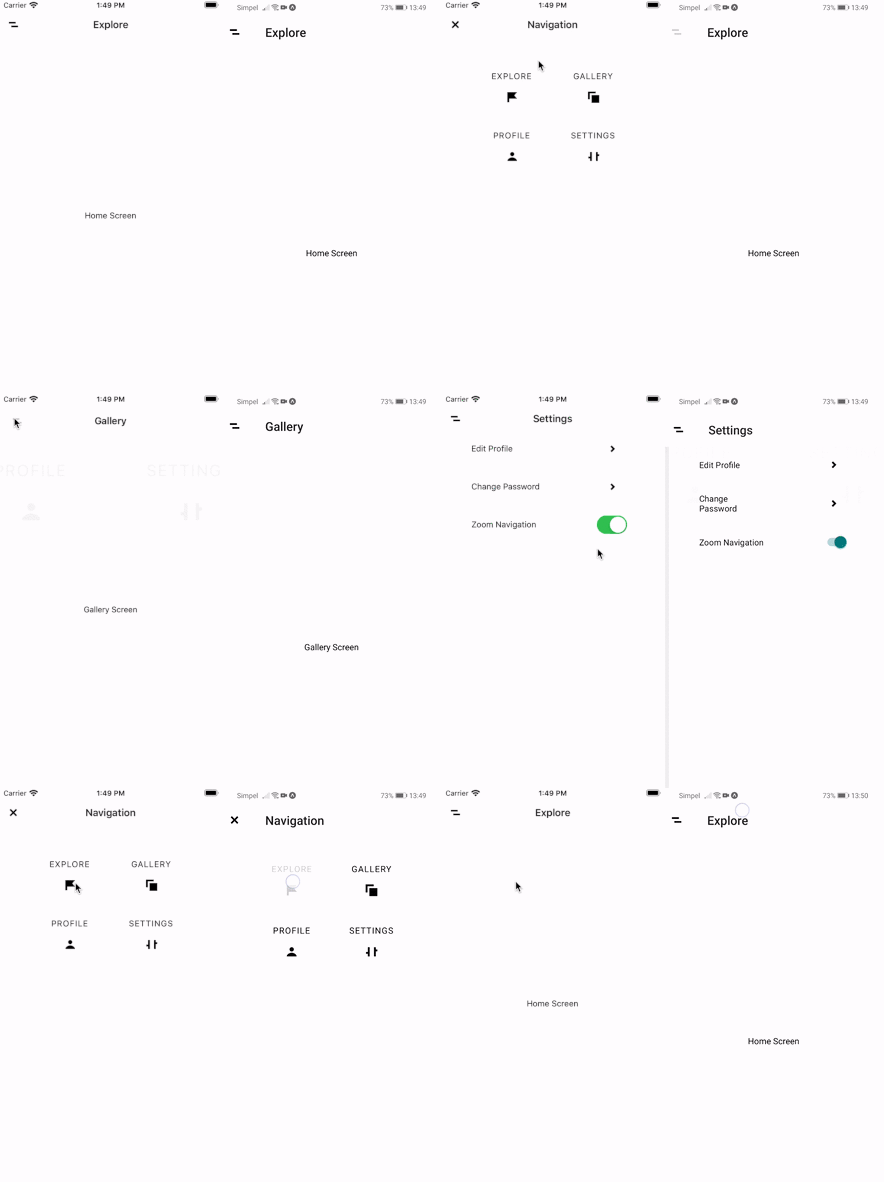
To disable the horizontal slide for all main screens, we must set the animationsEnabled property on the MainStack.Navigator:
要禁用所有主屏幕的水平滑动,我们必须在MainStack.Navigator上设置animationsEnabled属性:
<MainNavigationStack.Navigator
  screenOptions={{
    animationEnabled: false,
  }}
>
  //... SCREENS
</MainNavigationStack.Navigator>
Note that again it is one of the mysteries of React Navigation why this setting will not work when applied to the options props for our ‘Main’ screen stack. Do leave a comment if you can clear this up!
请注意,这也是React Navigation的奥秘之一,当将此设置应用于“主”屏幕堆栈的选项道具时,此设置将不起作用。 如果您可以清除此问题,请发表评论!
使用可选的过渡效果切换开关个性化您的应用 (Personalise your app with a optional transition effects toggle switch)
The final step in this tutorial is to enable / disable custom transition effect as a personalisation option to your users. To do this, we need two things:
本教程的最后一步是启用/禁用自定义过渡效果作为用户的个性化选项。 为此,我们需要做两件事:
- Adding a toggle switch to our app settings menu. 在我们的应用设置菜单中添加一个切换开关。
- Storing our switch settings in Context in a way that our navigation stacks can render either our custom transition effects or the default transition effects. 以我们的导航堆栈可以呈现自定义过渡效果或默认过渡效果的方式将切换设置存储在Context中。
Note that the React Context setup applied in this tutorial is the exact same as described here. I will also assume that you are experienced with dispatching the switch toggle action to your reducer.
请注意,本教程中应用的React Context设置与此处描述的完全相同。 我还将假设您有将开关切换动作分配给减速器的经验。
Once you have Context and your settings switch setup complete, the rest of this implementation is rather straightforward.
一旦有了Context并且设置切换设置完成,此实现的其余部分将非常简单。
All that’s left is to provide access to Context inside our navigation stacks and, based on the enableCustomNavigation value in our store, render either the custom or default transition effect:
剩下的就是在我们的导航堆栈中提供对Context的访问,并基于我们商店中的enableCustomNavigation值,呈现自定义或默认过渡效果:
import React, { useContext } from 'react';


import { Context } from '../context/store';


// ...SOMEWHERE INSIDE ROUTES.JS


const RootStackScreen = () => {
  const { state } = useContext(Context);


  return (
    <RootNavigationStack.Navigator>
      <RootNavigationStack.Screen
        name="Main"
        component={MainStackScreen}
        options={({ route, navigation }) => ({
          //...OTHER OPTIONS

          headerStyleInterpolator: state.enableCustomNavigation
            ? (props) => headerStyleInterpolatorHelper(props)
            : HeaderStyleInterpolators.forStatic,
          cardStyleInterpolator: state.enableCustomNavigation
            ? (props) => cardStyleInterpolatorHelper(props)
            : CardStyleInterpolators.forVerticalIOS,
        })}
      />
      <RootNavigationStack.Screen
        name="Popup"
        component={PopupStackScreen}
        options={({ route, navigation }) => ({
          //...OTHER OPTIONS

          headerStyleInterpolator: state.enableCustomNavigation
            ? (props) => headerStyleInterpolatorHelper(props)
            : HeaderStyleInterpolators.forStatic,
          cardStyleInterpolator: state.enableCustomNavigation
            ? (props) => cardStyleInterpolatorHelper(props)
            : CardStyleInterpolators.forVerticalIOS,
        })}
      />
    </RootNavigationStack.Navigator>
  );
};


// ...THE REMAINDER OF ROUTES.JS
There’s one final thing to take care of. Remember that earlier we disabled animations for our Main screens in order to get rid off the horizontal transition effect? That means we also need to conditionally enable / disable animations depending on Context state:
最后一件事情要照顾。 还记得早先我们为主屏幕禁用了动画以便摆脱水平过渡效果吗? 这意味着我们还需要根据Context状态有条件地启用/禁用动画:
//...SOMEWHERE INSIDE ROUTES.JS


const MainStackScreen = () => {
    const { state } = useContext(Context);


  return (
    <MainNavigationStack.Navigator
      screenOptions={{
        animationEnabled: !state.enableCustomNavigation,
        headerStyleInterpolator: HeaderStyleInterpolators.forStatic,
        cardStyleInterpolator: CardStyleInterpolators.forHorizontalIOS,
      }}
    >
      //...OUR MAIN SCREENS
    </MainNavigationStack.Navigator>
  );
};


//...THE REMAINDER OF ROUTES.JS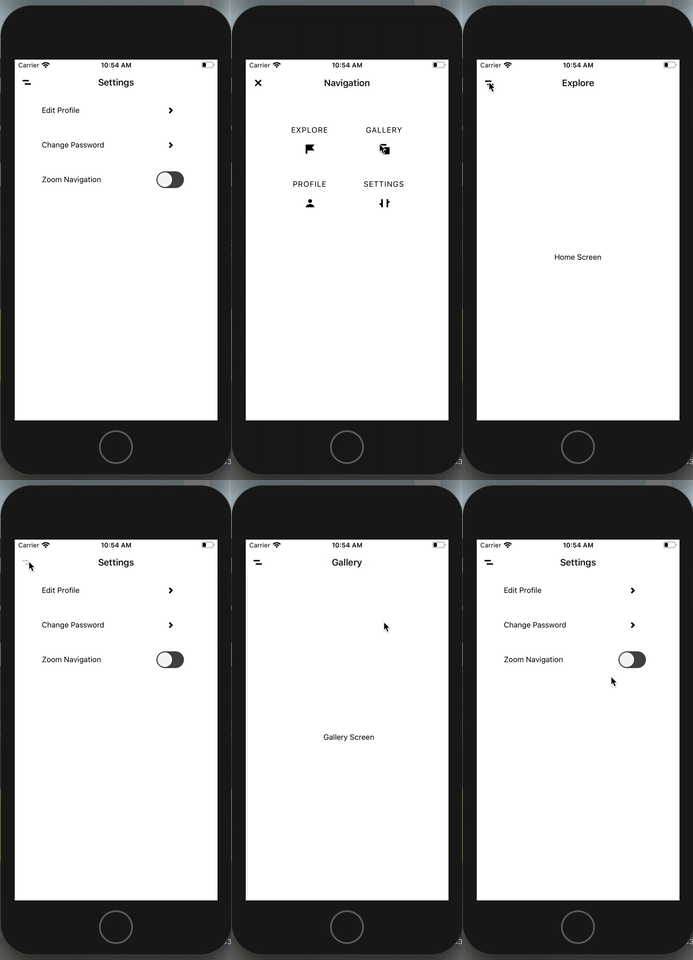
And with this, our setup is complete. If you have plans to apply this setup to your own project, or if you noticed a problem with my code, do leave a comment below!
至此,我们的设置完成。 如果您打算将此设置应用到您自己的项目,或者您发现我的代码有问题,请在下面留下评论!
普通英语JavaScript (JavaScript In Plain English)
Did you know that we have three publications and a YouTube channel? Find links to everything at plainenglish.io!
您知道我们有三个出版物和一个YouTube频道吗? 在plainenglish.io上找到所有内容的链接!


 已为社区贡献8条内容

所有评论(0)