协程三部曲之③:Flow 的使用!
Hi,大家好,这里是承香墨影!今天继续给大家分享来自作者「九心」 Kotlin 的协程系列的第三篇。Google 一直在推 Kotlin,在 Android Jetpack 中也是使用 K...
Hi,大家好,这里是承香墨影!
今天继续给大家分享来自作者「九心」 Kotlin 的协程系列的第三篇。Google 一直在推 Kotlin,在 Android Jetpack 中也是使用 Kotlin 写的,其中 Paging 3 重度使用协程,并使用了 Flow。可以说,协程已经是 Android 开发必须要掌握的知识点了。
那接下来就介绍 Kotlin 的 Flow,这是这个系列的第三篇文章。还不了解 Kotlin 协程的,可以先阅读之前的 2 篇文章:
另外 Kotlin 的协程不同于广义上的协程(轻量级线程),它背后其实还是 1:1 对应线程,只是一个类似线程池的线程调度 Api,理解这一点非常的重要。
老规矩,带着问题是去学习源码的最好方式,我想了解的是:
-
问题一:Flow为什么是一个冷流?
-
问题二:Flow流程是什么样的?
-
问题三:Flow如何切线程?
大纲
一、Flow流程总览
在介绍协程的那篇文章的时候,我们了解到,Flow 的作用也就是数据发送,上游发送,下游消费。那它和普通的数据发送有什么区别呢?
在我看来,跟 RxJava 一样,一是切线程,而是数据转化。最爽的当然是切线程,因为 Flow 必须发生在协程中,所以协程可以帮我们指定 Flow 消费的线程,那数据生产的线程呢?
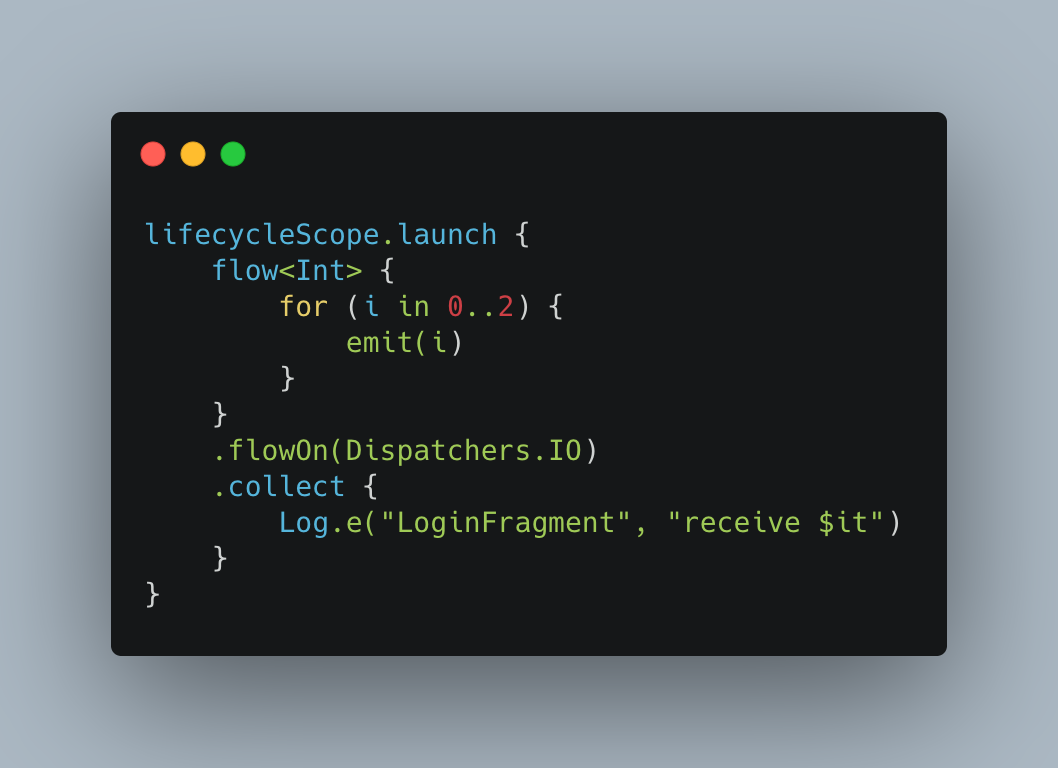
别急,我们可以通过 Flow 的扩展方法 flowOn 实现。了解了这些,我们抛出一段简单的代码,使用场景是在 Fragment 中。
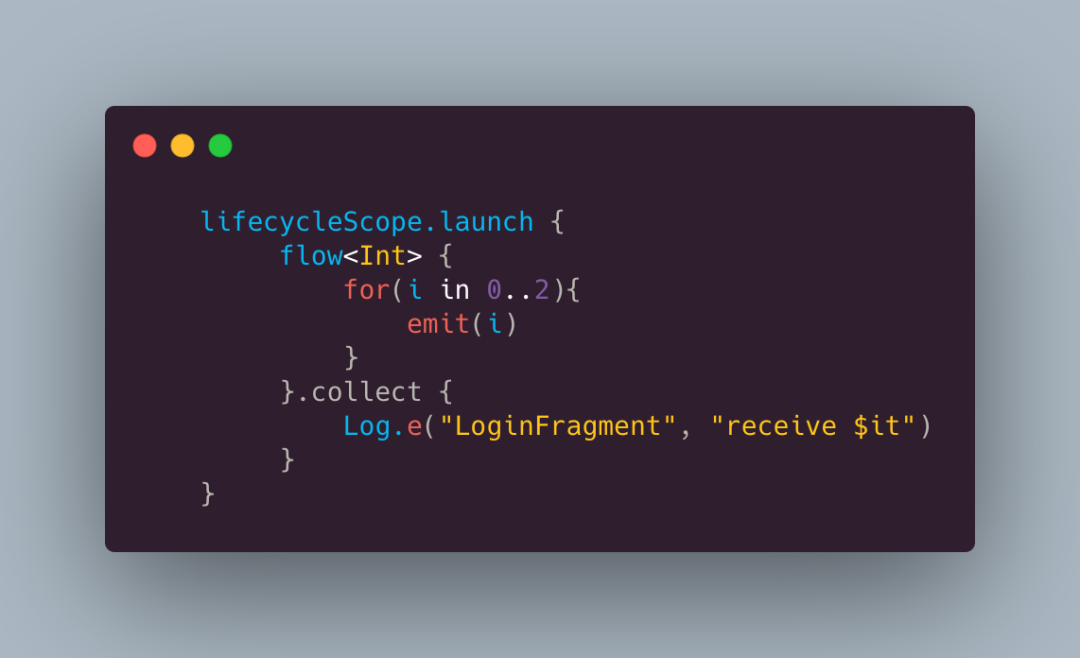
我们先不着急看整个流程,分别点击 flow<Int>() 和 .colletct() 两个方法中看看。
// flow{} 方法
public fun <T> flow(@BuilderInference block: suspend FlowCollector<T>.() -> Unit): Flow<T> = SafeFlow(block)

// colletct 方法
public suspend inline fun <T> Flow<T>.collect(crossinline action: suspend (value: T) -> Unit): Unit =
  collect(object : FlowCollector<T> {
      override suspend fun emit(value: T) = action(value)
  })
可以看到,上面的两个方法的参数都是一个 suspend 的闭包,也没有加入新的 CoroutineContext,那我们是不是就可以理解为上述代码仅仅在协程原有的基础上做了一些事呢?
CoroutineContext 在分析协程原理的那篇文章中就重复分析过了,本篇就不重复分析了。
二、flow方法
flow {} 方法中发生了什么,这个我们要从 flow()方法说起。
1 创建SafeFlow
点进上述的方法:
public fun <T> flow(@BuilderInference block: suspend FlowCollector<T>.() -> Unit): Flow<T> = SafeFlow(block)

// Named anonymous object
private class SafeFlow<T>(private val block: suspend FlowCollector<T>.() -> Unit) : AbstractFlow<T>() {
    override suspend fun collectSafely(collector: FlowCollector<T>) {
        collector.block()
    }
}
可以看到,SafeFlow 继承自 AbstractFlow,并实现了其 AbstractFlow#collectSafely 方法,从名字上看,Flow 应该做了一层安全上的校验。
2 AbstractFlow做了什么
在谈 AbstractFlow 是什么之前,我们似乎要先介绍一下 Flow,它才是我们的主角。Flow 接口足够简单,它只定义了一个功能,就是找到数据的接收方:
public interface Flow<out T> {
  @InternalCoroutinesApi
  public suspend fun collect(collector: FlowCollector<T>)
}

public interface FlowCollector<in T> {
  /**
   * Collects the value emitted by the upstream.
   * This method is not thread-safe and should not be invoked concurrently.
   */
  public suspend fun emit(value: T)
}
数据的接收方就是 FlowCollector,它的接口定义也同样比较简单,只负责接受数据的FlowCollector#emit,它也是数据发射的入口。了解了 Flow,现在看看 AbstractFlow 到底实现了什么?
public abstract class AbstractFlow<T> : Flow<T> {

  @InternalCoroutinesApi
  public final override suspend fun collect(collector: FlowCollector<T>) {
    // 1. collector 做一层包装
    val safeCollector = SafeCollector(collector, coroutineContext)
    try {
      // 2. 处理数据接收者
      collectSafely(safeCollector)
    } finally {
      // 3. 释放协程相关的参数
      safeCollector.releaseIntercepted()
    }
  }

  // collectSafely 方法应当遵循以下的约束
  // 1. 不应当在collectSafely方法里面切换线程,比如 withContext(Dispatchers.IO)
  // 2. collectSafely 默认不是线程安全的
  public abstract suspend fun collectSafely(collector: FlowCollector<T>)
}

private class SafeFlow<T>(private val block: suspend FlowCollector<T>.() -> Unit) : AbstractFlow<T>() {
  override suspend fun collectSafely(collector: FlowCollector<T>) {
    collector.block()
  }
}
发现其主要做了三件事:
-
对数据接收方
FlowCollector做了一层包装,也就是这个SafeCollector,我们现在不用管它; -
调用它里面的抽象方法
AbstractFlow#collectSafely方法; -
释放协程的一些信息;
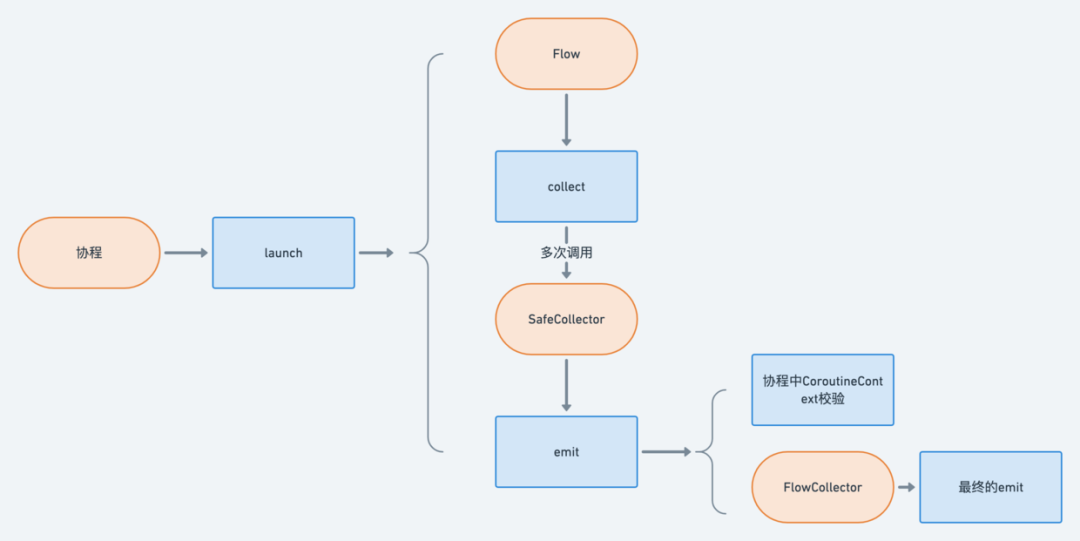
结合以下之前看的 SafeFlow,它实现了 AbstractFlow#collectSafely 方法,调用了 flow{} 的方法块,也就是闭包参数。现在有一点就很清晰了,为什么 Flow 是冷流,因为它会在每一次 collect 的时候才会去触发发送数据的动作。
3 SafeCollector做了哪些包装?
SafeCollector 从它的名字可以看出,它是一个安全的数据接收者,它不仅实现了 FlowCollector 接口,还继承了 ContinuationImpl 这个续体抽象类,你可能会有这样的一个疑问:实现 FlowCollector 接口可以理解,因为要处理接收数据,但是为啥要实现 ContinuationImpl?从官方的解释来看。
/*
 * Implementor of ContinuationImpl (that will be preserved as ABI nearly forever)
 * in order to properly control 'intercepted()' lifecycle.
 */
internal actual class SafeCollector<T> actual constructor(
    @JvmField internal actual val collector: FlowCollector<T>,
    @JvmField internal actual val collectContext: CoroutineContext
) : FlowCollector<T>, ContinuationImpl(NoOpContinuation, EmptyCoroutineContext) {
 // ... 省略
}

private object NoOpContinuation : Continuation<Any?> {
    override val context: CoroutineContext = EmptyCoroutineContext

  override fun resumeWith(result: Result<Any?>) {
    // Nothing
  }
}
实现 ContinuationImpl 是为了控制 intercepted() 生命周期,从代码来看,SafeCollector 继承 ContinuationImpl 时,仅仅放入两个空的参数,一个是 NoOpContinuation,另一个是 EmptyCoroutineContext,那我们可以不用特别注意 ContinuationImpl 这个类。
4 数据接收者的处理
通常我们会在 flow{} 方法里面发射数据,也就是调用 FollowCollector#emit 方法,具体实现也是在 SafeCollector 中。
internal actual class SafeCollector<T> actual constructor(
    @JvmField internal actual val collector: FlowCollector<T>,
    @JvmField internal actual val collectContext: CoroutineContext
) : FlowCollector<T>, ContinuationImpl(NoOpContinuation, EmptyCoroutineContext) {

  @JvmField // Note, it is non-capturing lambda, so no extra allocation during init of SafeCollector
  internal actual val collectContextSize = collectContext.fold(0) { count, _ -> count + 1 }
  private var lastEmissionContext: CoroutineContext? = null
  private var completion: Continuation<Unit>? = null

  // ContinuationImpl
  override val context: CoroutineContext
    get() = completion?.context ?: EmptyCoroutineContext


  override fun invokeSuspend(result: Result<Any?>): Any? {
    //  当result失败的时候,lastEmissionContext等于错误处理的类
    result.onFailure { lastEmissionContext = DownstreamExceptionElement(it) }
    completion?.resumeWith(result as Result<Unit>)
    return COROUTINE_SUSPENDED
  }

  override suspend fun emit(value: T) {
    // suspendCoroutineUninterceptedOrReturn 保证只会被调用一次
    return suspendCoroutineUninterceptedOrReturn sc@{ uCont ->
      try {
        emit(uCont, value)
      } catch (e: Throwable) {
        // Save the fact that exception from emit (or even check context) has been thrown
        lastEmissionContext = DownstreamExceptionElement(e)
        throw e
      }
    }
  }

  private fun emit(uCont: Continuation<Unit>, value: T): Any? {
    val currentContext = uCont.context
   // 1. 保证当前currentContext有效
    currentContext.ensureActive()
 // 2. 检查 currentContext
    val previousContext = lastEmissionContext
    if (previousContext !== currentContext) {
        checkContext(currentContext, previousContext, value)
    }
    completion = uCont
    return emitFun(collector as FlowCollector<Any?>, value, this as Continuation<Unit>)
  }

  private fun checkContext(
      currentContext: CoroutineContext,
      previousContext: CoroutineContext?,
      value: T
  ) {
    if (previousContext is DownstreamExceptionElement) {
       // 错误处理
        exceptionTransparencyViolated(previousContext, value)
    }
    checkContext(currentContext)
    lastEmissionContext = currentContext
  }

  // ... 省略
}

internal class DownstreamExceptionElement(@JvmField val e: Throwable) : CoroutineContext.Element {
  companion object Key : CoroutineContext.Key<DownstreamExceptionElement>

  override val key: CoroutineContext.Key<*> = Key
}
这里的代码有点长,不过仔细分析后就只有一点点东西:
-
invokeSuspend这个方法只做了失败时候的监听,将上次的lastEmissionContext替换为 DownstreamExceptionElement,仅此而已; -
第一个
emit(value: T)方法代码比较少,它就使用了suspendCoroutineUninterceptedOrReturn包裹了我们的另外一个emit方法(后文介绍),这个suspendCoroutineUninterceptedOrReturn的作用要么就是延迟下面方法的执行,要么就是直接返回结果,然后在里面抓取异常; -
下面的一个
emit(uCont: Continuation<Unit>, value: T),里面先检查了续体的 CoroutineContext 的状态,接着又判断上一个 CoroutineContext,也就是previousContext,是否是 DownstreamExceptionElement,如果是的话会报出异常,接着会对当前的 CoroutineContext,做下一步的检查,感兴趣的同学可以看一下源码。在该方法的最后就直接调用FlowCollector<Any?>#emit方法;
这里我们可以得出结论,SafeCollector 就是对我们的数据接收者 FlowCollector 做一层安全校验,最后还是会调用 FlowCollector#emit 方法。
三、collect方法
弄清这个问题真的很简单,看这个源码即可:
public suspend inline fun <T> Flow<T>.collect(crossinline action: suspend (value: T) -> Unit): Unit =
  collect(object : FlowCollector<T> {
    override suspend fun emit(value: T) = action(value)
  })
在里面实现了一个 FlowCollector,然后调用了我们在 collect 方法中声明的闭包。如果我们不用 flowOn 去切线程,那么我们的过程就十分清晰了:
四、flowOn方法
如果不涉及到切线程,Flow 看着挺简单的。下面是 Flow 切线程的代码:
我们先想一下,Flow 是发生在协程中的,flowOn 只是增加了一个 Dispatchers.IO,从之前的协程分析的文章中我们知道,它是一个 ContinuationInterceptor,可以帮助我们来切线程,这里的作用应同理。
1 flowOn()
点进 flowOn 方法:
public fun <T> Flow<T>.flowOn(context: CoroutineContext): Flow<T> {
  checkFlowContext(context)
  return when {
    context == EmptyCoroutineContext -> this
    this is FusibleFlow -> fuse(context = context)
    else -> ChannelFlowOperatorImpl(this, context = context)
  }
}
可以看出,在 flowOn 主要做了两步。第一步检查了参数中的的 CoroutineContext,代码我就不放了,意思就是当前的 CoroutineContext 不能包括 Job。Job 使用 launch 返回的对象,因为 flowOn 里面正常存放调度器 Dipatchers,不排除有些人不会使用。第二步根据当前的情况返回不同的 Flow,这里有三种情况:
-
参数中的 CoroutineContext 是 EmptyCoroutineContext,我们都知道,CoroutineContext 像一个集合,EmptyCoroutineContext 就是空的集合。这种情况就返回自身;
-
第二个就是连续使用多个
flowOn的情况,比如flow{}.flowOn().flowOn().collect{},第二个flowOn就是 FusibleFlow; -
如果当前是第一个
flowOn,返回一个 ChannelFlowOperatorImpl;
我们先从第三种情况开始分析。
2 ChannelFlowOperatorImpl
点进 ChannelFlowOperatorImpl 源码:
internal class ChannelFlowOperatorImpl<T>(
    flow: Flow<T>,
    context: CoroutineContext = EmptyCoroutineContext,
    capacity: Int = Channel.OPTIONAL_CHANNEL
) : ChannelFlowOperator<T, T>(flow, context, capacity) {
    override fun create(context: CoroutineContext, capacity: Int): ChannelFlow<T> =
      ChannelFlowOperatorImpl(flow, context, capacity)

  override suspend fun flowCollect(collector: FlowCollector<T>) =
      flow.collect(collector)
}
这个里面没有暴露出重要的信息,我们只需要看 Flow#collect 方法即可,点击它的父类:
internal abstract class ChannelFlowOperator<S, T>(
    @JvmField val flow: Flow<S>,
    context: CoroutineContext,
    capacity: Int
) : ChannelFlow<T>(context, capacity) {
    protected abstract suspend fun flowCollect(collector: FlowCollector<T>)

  // Changes collecting context upstream to the specified newContext, while collecting in the original context
  private suspend fun collectWithContextUndispatched(collector: FlowCollector<T>, newContext: CoroutineContext) {
    val originalContextCollector = collector.withUndispatchedContextCollector(coroutineContext)
    // invoke flowCollect(originalContextCollector) in the newContext
    return withContextUndispatched(newContext, block = { flowCollect(it) }, value = originalContextCollector)
  }

  // Slow path when output channel is required
  protected override suspend fun collectTo(scope: ProducerScope<T>) =
      flowCollect(SendingCollector(scope))

  // Optimizations for fast-path when channel creation is optional
  override suspend fun collect(collector: FlowCollector<T>) {
    // Fast-path: When channel creation is optional (flowOn/flowWith operators without buffer)
    if (capacity == Channel.OPTIONAL_CHANNEL) {
      val collectContext = coroutineContext
      val newContext = collectContext + context // compute resulting collect context
      // #1: If the resulting context happens to be the same as it was -- fallback to plain collect
      if (newContext == collectContext)
        return flowCollect(collector)
      // #2: If we don't need to change the dispatcher we can go without channels
      if (newContext[ContinuationInterceptor] == collectContext[ContinuationInterceptor])
        return collectWithContextUndispatched(collector, newContext)
    }
    // Slow-path: create the actual channel
    super.collect(collector)
  }
}
Flow#collect 方法出来了,在这个方法里,先判断一下 capacity 是否等于 Channel.OPTIONAL_CHANNEL,默认是这个值。接着 newContext = collectContext + context, 这会将 newContext[ContinuationInterceptor] 替换成我们新的拦截器,这是用来切换线程的。然后分为三种情况:
-
newContext==collectContext:直接调用flowCollect方法,这个方法在ChannelFlowOperatorImpl已经实现,直接使用了flow{}中返回的Flow对象去调用flow.collect(collector),相当于没有切线程; -
newContext[ContinuationInterceptor] == collectContext[ContinuationInterceptor]即拦截器一样,这个时候最终都会调用一个叫withContextUndispatched方法,从名字我们就可以看出,它不会走拦截器,同样页不会切线程; -
第三个走父类的
collect逻辑,我们还需看一下父类的实现;
3 ChannelFlow
ChannelFlowOperator 的父类是 ChannelFlow,它是我们的重点:
public abstract class ChannelFlow<T>(
    // upstream context
    @JvmField public val context: CoroutineContext,
    // buffer capacity between upstream and downstream context
    @JvmField public val capacity: Int
) : FusibleFlow<T> {
 // ...
  public override fun fuse(context: CoroutineContext, capacity: Int): FusibleFlow<T> {
      // ... 省略
  }

  public open fun produceImpl(scope: CoroutineScope): ReceiveChannel<T> =
      scope.produce(context, produceCapacity, start = CoroutineStart.ATOMIC, block = collectToFun)

  override suspend fun collect(collector: FlowCollector<T>): Unit =
    coroutineScope {
        collector.emitAll(produceImpl(this))
    }

  // ...
}
ChannelFlow 实现了 FusibleFlow 接口,它跟连续多个 flowOn 的处理有关,后面再分析,还是回到 Flow#collect 方法,首先,coroutineScope{} 没做什么事,可以忽略,然后重点看 collector.emitAll(produceImpl(this))。点进 emitAll 方法:
public suspend fun <T> FlowCollector<T>.emitAll(channel: ReceiveChannel<T>): Unit =
    emitAllImpl(channel, consume = true)

private suspend fun <T> FlowCollector<T>.emitAllImpl(channel: ReceiveChannel<T>, consume: Boolean) {
  try {
    while (true) {
      val result = run { channel.receiveOrClosed() }
      if (result.isClosed) {
        result.closeCause?.let { throw it }
        break // returns normally when result.closeCause == null
      }
      emit(result.value)
    }
  } catch (e: Throwable) {
    cause = e
    throw e
  } finally {
    if (consume) channel.cancelConsumed(cause)
  }
}
代码逻辑很清晰,先开一个无限循环,然后使用 Flow 中的 Channel 去接收数据,只有在接收到关闭的命令才会退出。结合协程的知识,我们知道 Channel 可以用来两个协程之间传送数据,这里是不是用来这么做的呢?接收数据的部分看完了,现在看一下生产数据的部分,produceImpl 方法在 ChannelFlow 已经给出了,它里面调用了 CoroutineScope 一个扩展方法:
public fun <E> CoroutineScope.produce(
    context: CoroutineContext = EmptyCoroutineContext,
    capacity: Int = 0,
    start: CoroutineStart = CoroutineStart.DEFAULT,
    onCompletion: CompletionHandler? = null,
    @BuilderInference block: suspend ProducerScope<E>.() -> Unit
): ReceiveChannel<E> {
  val channel = Channel<E>(capacity)
  val newContext = newCoroutineContext(context)
  val coroutine = ProducerCoroutine(newContext, channel)
  if (onCompletion != null) coroutine.invokeOnCompletion(handler = onCompletion)
  coroutine.start(start, coroutine, block)
  return coroutine
}
coroutine.start(start, coroutine, block) 是不是看着有点熟悉?没错,我们在使用 launch 启动协程的时候也会使用该方法,这里就是启动了一个子协程。原理可以看上篇文章。下面找到 Channel 发射数据的地方就行了。这个部分仍然有点长:
public abstract class ChannelFlow<T>(
    // upstream context
    @JvmField public val context: CoroutineContext,
    // buffer capacity between upstream and downstream context
    @JvmField public val capacity: Int
) : FusibleFlow<T> {

    // shared code to create a suspend lambda from collectTo function in one place
    internal val collectToFun: suspend (ProducerScope<T>) -> Unit
        get() = { collectTo(it) }

    // ...

    protected abstract suspend fun collectTo(scope: ProducerScope<T>)

    public open fun produceImpl(scope: CoroutineScope): ReceiveChannel<T> =
        scope.produce(context, produceCapacity, start = CoroutineStart.ATOMIC, block = collectToFun)

    override suspend fun collect(collector: FlowCollector<T>): Unit =
      coroutineScope {
        collector.emitAll(produceImpl(this))
      }
}

internal abstract class ChannelFlowOperator<S, T>(
    @JvmField val flow: Flow<S>,
    context: CoroutineContext,
    capacity: Int
) : ChannelFlow<T>(context, capacity) {
    protected abstract suspend fun flowCollect(collector: FlowCollector<T>)

  // Slow path when output channel is required
  protected override suspend fun collectTo(scope: ProducerScope<T>) =
      flowCollect(SendingCollector(scope))

  // ...
}

internal class ChannelFlowOperatorImpl<T>(
    flow: Flow<T>,
    context: CoroutineContext = EmptyCoroutineContext,
    capacity: Int = Channel.OPTIONAL_CHANNEL
) : ChannelFlowOperator<T, T>(flow, context, capacity) {
    //...
    override suspend fun flowCollect(collector: FlowCollector<T>) =
        flow.collect(collector)
}

public class SendingCollector<T>(
    private val channel: SendChannel<T>
) : FlowCollector<T> {
  override suspend fun emit(value: T): Unit = channel.send(value)
}
这个过程有点绕,先看一下关系,ChannelFlowOperator 继承了 ChannelFlow,ChannelFlowOperatorImpl 继承了 ChannelFlowOperator,有两点需要说明一下:
-
ChannelFlow 的
collect的方法调用顺序是这样的:ChannelFlow#collect>ChannelFlow#produceImpl>ChannelFlow#collectTo抽象 >ChannelFlowOperator#collectTo>ChannelFlowOperator#flowCollect抽象 >ChannelFlowOperatorImpl#flowCollect,最后一个方法中的内容为flow.collect(collector),这个大家应该很熟悉了; -
在 ChannelFlowOperator 中,我们使用了 SendingCollector 进行了一层包装,充当我们的数据的接收者,这个 SendingCollector 实现了
FlowCollector#emit方法,方法内容就是我们想要的channel.send(value),接收到数据以后就使用 Channel 发射数据;
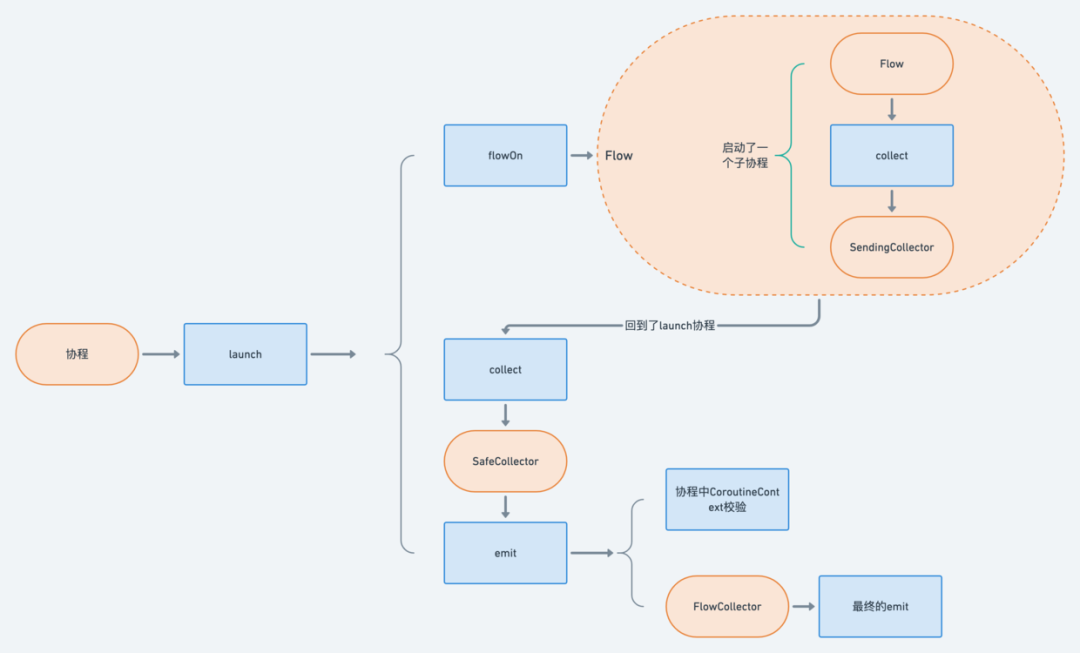
理解了 flowOn,我们更新一下流程图:
4 多个flowOn的复用
再来一个栗子:

就像上面注释的一样,代码块会在 Dispatchers.IO 的调度器中执行,原理也很简单:
public fun <T> Flow<T>.flowOn(context: CoroutineContext): Flow<T> {
    checkFlowContext(context)
    return when {
        context == EmptyCoroutineContext -> this
        this is FusibleFlow -> fuse(context = context)
        else -> ChannelFlowOperatorImpl(this, context = context)
    }
}

public abstract class ChannelFlow<T>(
    // upstream context
    @JvmField public val context: CoroutineContext,
    // buffer capacity between upstream and downstream context
    @JvmField public val capacity: Int
) : FusibleFlow<T> {
    //...
    public override fun fuse(context: CoroutineContext, capacity: Int): FusibleFlow<T> {
      // note: previous upstream context (specified before) takes precedence
      val newContext = context + this.context
      val newCapacity = when {
          this.capacity == Channel.OPTIONAL_CHANNEL -> capacity
          capacity == Channel.OPTIONAL_CHANNEL -> this.capacity
          this.capacity == Channel.BUFFERED -> capacity
          capacity == Channel.BUFFERED -> this.capacity
          this.capacity == Channel.CONFLATED -> Channel.CONFLATED
          capacity == Channel.CONFLATED -> Channel.CONFLATED
          else -> {
              // sanity checks
              assert { this.capacity >= 0 }
              assert { capacity >= 0 }
              // combine capacities clamping to UNLIMITED on overflow
              val sum = this.capacity + capacity
              if (sum >= 0) sum else Channel.UNLIMITED // unlimited on int overflow
          }
      }
      if (newContext == this.context && newCapacity == this.capacity) return this
      return create(newContext, newCapacity)
    }

    //...
}
通过上面 flowOn 的分析,我们得知,第一个 flowOn 返回一个 ChannelFlowOperatorImpl,又因为它父类的父类是 ChannelFlow,它实现了 FusibleFlow 接口,所以在执行第二个 flowOn 方法的时候,this is FusibleFlow 的条件满足,接下拉就会执行自身的 FusibleFlow#fuse 方法。在这个方法里,我们需要注意的是第一行代码:
val newContext = context + this.context
如果你不了解 CoroutineContext 的结构根部不能看出问题,context 对应着 Dispatchers.Default,this.context 对应着 Dispatchers.IO,它们两个本质上都是拦截器,所以即使它们两个加起来,context[ContinuationInterceptor] 取拦截器的时候只能取一个,后面的会把前面的覆盖掉,巧就巧在它把旧的 context 放在后面了,所以这个 newContext == this.context 条件就会成立。这个条件成立的结果就是该方法的倒数第二行,直接将自身返回回去。所以第二个 flowOn 的作用就被忽略了~
总结
学习 Flow 源码的时候你就可以发现,Flow 的原理是跟协程挂钩的,因为我学习 Flow 原理的时候,又把协程的原理翻了一遍。

这应该是网上第一篇分析 Flow 原理的,不过除了 Android Jetpack 以外,使用 Flow 的地方确实很少。之后还会分享 Flow 在 Paging 3 中的使用,敬请期待。
-- End --
本文对你有帮助吗?留言、转发、点好看是最大的支持,谢谢!
推荐阅读:
已开源!Flutter 基于分帧渲染的流畅度优化组件 Keframe
面试官:设计一个基于索引,setAll()时间复杂度为O(1)的数据结构


开源鸿蒙跨平台开发社区汇聚开发者与厂商,共建“一次开发,多端部署”的开源生态,致力于降低跨端开发门槛,推动万物智联创新。
更多推荐


 1
1 0
0- 0


 已为社区贡献11条内容

所有评论(0)