React Native鸿蒙跨平台如何使用宠物列表项渲染时,基于HarmonyOS API 24 通过 `reduce` 方法筛选最新成长记录,动态展示宠物最新体重数据
在移动应用开发领域,跨端技术已成为主流趋势,尤其是随着鸿蒙系统的兴起,如何实现一套代码覆盖多平台(iOS、Android、鸿蒙)成为开发者关注的焦点。本文将深入解析一个基于 React Native 开发的猫咪成长追踪应用(CatGrowthTrackerApp),探讨其架构设计、核心技术实现以及在鸿蒙系统上的跨端适配策略。
核心组件
该应用采用了 React Native 的多种核心组件,这些组件在鸿蒙系统上通过跨端映射机制,能够无缝转换为对应的 ArkUI 组件:
-
SafeAreaView:作为根容器,确保内容在不同设备的安全区域内显示,自动适配刘海屏、状态栏和底部导航栏。在鸿蒙系统中,React Native 会调用系统 API 获取安全区域信息,确保内容不被遮挡。
-
FlatList:用于高效渲染宠物列表和成长记录,实现虚拟滚动,只渲染可见区域的内容,减少内存占用。在鸿蒙系统中,FlatList 会转换为 ArkUI 的
list组件,保持高效的渲染性能。 -
TouchableOpacity:实现可点击区域,提供触摸反馈效果。在鸿蒙系统中,TouchableOpacity 会转换为具有点击效果的 ArkUI 组件,通过
stateStyles实现按压状态的样式变化。 -
ScrollView:作为页面的主要滚动容器,处理内容的滚动显示。在鸿蒙系统中,ScrollView 会映射为 ArkUI 的
scroll-view组件,支持惯性滚动和回弹效果。
组件化
应用采用了清晰的组件化结构,将宠物列表项(renderPetItem)和成长记录项(renderGrowthRecordItem)的渲染逻辑拆分为独立函数,提高了代码的可读性和可维护性。这种组件化设计在跨端开发中尤为重要,能够确保代码在不同平台上的一致性和可复用性。
TypeScript 类型
应用使用 TypeScript 定义了核心数据类型,包括 Pet、GrowthRecord 和 HealthRecord,确保了代码的类型安全和可读性:
// 宠物类型
type Pet = {
  id: string;
  name: string;
  breed: string;
  age: number;
  gender: 'male' | 'female';
  avatar: string;
  birthday: string;
};
在跨端开发中,TypeScript 类型定义尤为重要,能够提前发现潜在的类型错误,提高代码的可维护性。鸿蒙系统支持 TypeScript,因此这些类型定义可以直接在鸿蒙平台上使用,保持一致的类型检查机制。
Hooks 状态管理
应用使用 React Hooks(useState)管理应用状态,包括宠物列表、成长记录和健康记录:
const [pets, setPets] = useState<Pet[]>([ /* 初始数据 */ ]);
const [growthRecords, setGrowthRecords] = useState<GrowthRecord[]>([ /* 初始数据 */ ]);
const [healthRecords, setHealthRecords] = useState<HealthRecord[]>([ /* 初始数据 */ ]);
在鸿蒙系统中,React Native 的 Hook 机制会被转换为对应的 ArkUI 状态管理机制,例如 useState 会映射为 ArkUI 的 @State 装饰器,实现状态的响应式更新。当状态变化时,相关组件会自动重新渲染,无需手动操作 DOM。
数据过滤与处理
应用实现了数据过滤函数,用于获取特定宠物的成长记录和健康记录:
// 获取特定宠物的成长记录
const getGrowthRecordsForPet = (petId: string) => {
  return growthRecords.filter(record => record.petId === petId);
};
这种数据处理逻辑在鸿蒙系统上同样能够正常工作,因为 JavaScript 是跨平台的,数组方法(filter)在鸿蒙系统的 JS 引擎中能够正常执行。
最新数据获取
应用通过 reduce 方法获取最新的成长记录:
const latestRecord = petGrowthRecords.length > 0
  ? petGrowthRecords.reduce((latest, record) =>
      new Date(record.date) > new Date(latest.date) ? record : latest
    )
  : null;
这种基于 JavaScript 内置方法的数据处理,在鸿蒙系统上能够保持一致的执行结果,确保跨平台数据处理的可靠性。
StyleSheet 样式
应用使用 StyleSheet.create 方法定义样式,将所有样式集中管理:
const styles = StyleSheet.create({
  container: {
    flex: 1,
    backgroundColor: '#f5f5f5',
  },
  // 其他样式定义
});
StyleSheet 是 React Native 的最佳实践,具有以下优势:
- 性能优化:StyleSheet 在编译时会被处理,减少运行时计算
- 类型安全:TypeScript 会检查样式属性
- 模块化:便于样式复用和主题管理
在鸿蒙系统中,React Native 的样式会被转换为 ArkUI 的样式规则,例如:
flex: 1转换为flex-grow: 1backgroundColor: '#f5f5f5'转换为background-color: #f5f5f5borderRadius: 8转换为border-radius: 8px
动态样式绑定
应用实现了动态样式绑定,例如根据宠物性别显示不同的性别符号:
<Text style={styles.petGender}>{item.gender === 'male' ? '♂' : '♀'}</Text>
这种基于条件表达式的动态内容,在鸿蒙系统上能够正常工作,因为 React Native 的 JSX 语法会被转换为对应的 ArkUI 模板语法。
组件映射
React Native 组件到鸿蒙 ArkUI 组件的映射是跨端适配的核心机制。以下是应用中主要组件的映射关系:
| React Native 组件 | 鸿蒙 ArkUI 组件 | 说明 |
|---|---|---|
| SafeAreaView | Stack | 安全区域容器 |
| View | Div | 基础容器组件 |
| Text | Text | 文本组件 |
| TouchableOpacity | Button | 可点击组件 |
| FlatList | List | 高效列表组件 |
| ScrollView | ScrollView | 滚动容器 |
| Alert | AlertDialog | 弹窗组件 |
样式转换机制
React Native 的样式系统基于 CSS,但有一些差异。在鸿蒙系统中,React Native 的样式会被转换为 ArkUI 的样式规则,确保跨平台视觉一致性。例如:
flexDirection: 'row'转换为flex-direction: rowjustifyContent: 'space-between'转换为justify-content: space-betweenpaddingHorizontal: 16转换为padding-left: 16px; padding-right: 16px
API 适配机制
React Native 提供了统一的 API 层,封装了不同平台的底层 API,例如 Alert、Dimensions 等。在鸿蒙系统中,这些 API 会被转换为对应的鸿蒙系统 API 调用,确保跨平台功能的一致性。
FlatList 高性能渲染
应用使用 FlatList 组件渲染列表数据,这是 React Native 中渲染长列表的最佳实践:
<FlatList
  data={pets}
  renderItem={renderPetItem}
  keyExtractor={item => item.id}
/>
在鸿蒙系统中,FlatList 会转换为 ArkUI 的 list 组件,保持高效的虚拟滚动性能,减少内存占用和渲染时间。
组件拆分
应用将列表项的渲染逻辑拆分为独立的函数,提高了代码的可读性和可维护性,同时也有利于性能优化,避免在渲染函数中创建新的组件。
条件渲染
应用使用条件渲染,仅在有最新记录时显示体重信息:
{latestRecord && (
  <Text style={styles.latestWeight}>最新体重: {latestRecord.weight}kg</Text>
)}
这种条件渲染优化,能够减少不必要的 DOM 节点,提高渲染性能。
React Native 鸿蒙跨端开发为开发者提供了一种高效的解决方案,能够使用一套代码构建出在多平台上表现一致的高质量应用。通过合理的组件化设计、严格的类型定义、高效的状态管理和跨端兼容的样式系统,猫咪成长追踪应用能够在鸿蒙系统上无缝运行,保持与其他平台一致的用户体验。
核心技术要点包括:
- 组件化设计确保代码的可维护性和可复用性
- TypeScript 类型定义提高代码的可靠性
- Hooks 状态管理实现响应式更新
- StyleSheet 样式系统优化性能和管理
- Base64 图标避免资源适配问题
- 基于 JavaScript 内置方法的数据处理确保跨平台一致性
随着鸿蒙系统的不断发展和 React Native 对鸿蒙支持的完善,跨端开发将变得更加高效和便捷,为开发者带来更多的可能性和机遇。
在宠物管理类应用开发中,成长记录模块作为核心功能,需要兼顾数据结构化存储、多维度信息展示、交互体验一致性等核心诉求。本文以 React Native 开发的猫咪成长记录应用为例,深度剖析其数据模型设计、组件化架构实现逻辑,并系统梳理向鸿蒙(HarmonyOS)ArkTS 跨端迁移的技术路径,聚焦“复杂数据关联、多类型列表渲染、跨端体验等价”三大核心维度,为宠物类应用的跨端开发提供可落地的实践参考。
类型数据
该应用基于 TypeScript 构建了三层级的强类型数据体系,精准贴合宠物成长记录的业务场景:
Pet类型作为核心实体,除基础属性外新增birthday字段,为后续年龄计算、成长周期分析提供数据支撑;GrowthRecord类型聚焦宠物生理指标记录,包含weight/height/length等量化指标,通过petId与宠物实体建立关联;HealthRecord类型采用type: 'vaccine' | 'checkup' | 'medication'联合类型约束健康记录分类,nextDate可选字段为疫苗提醒等功能预留扩展空间。
这种分层数据模型设计不仅在开发阶段提供完整的类型校验,更重要的是为跨端开发奠定了统一的数据基础——所有类型定义可 100% 复用于鸿蒙 ArkTS 工程,从底层保证了两端数据结构的一致性,避免因数据格式差异导致的展示异常。
数据关联
应用通过工具函数实现数据的关联查询与处理,将业务逻辑与 UI 渲染解耦:
getGrowthRecordsForPet/getHealthRecordsForPet函数通过petId过滤关联记录,实现宠物与记录的精准关联;- 宠物列表项渲染时,通过
reduce方法筛选最新成长记录,动态展示宠物最新体重数据,避免在 UI 层编写复杂的数组处理逻辑; - 健康记录渲染时,基于
type字段实现类型化的视觉编码(不同类型对应不同图标与边框颜色),提升信息识别效率。
这种“数据查询-数据处理-UI 渲染”的分层逻辑,既保证了代码的可维护性,也为鸿蒙端的逻辑复用提供了清晰的边界——数据处理函数可完全复用,仅需调整 UI 渲染层的实现。
组件化
应用整体遵循“头部导航区 + 数据统计区 + 多类型列表区 + 功能菜单区 + 底部导航区”的架构设计,各区域均采用组件化思想实现高内聚低耦合的代码组织:
头部导航区
头部区域通过 flexDirection: 'row' 实现标题与添加按钮的左右布局,添加按钮采用圆形设计(borderRadius: 18)配合鲜明的蓝色背景,形成视觉焦点。onPress 事件绑定多选项弹窗逻辑,通过 Alert 的多按钮配置实现“成长记录/健康记录/取消”的操作分支,既保证交互的完整性,也为鸿蒙端的弹窗适配提供了明确的逻辑参照。
数据统计区
statsCard 采用三等分布局展示宠物数量、成长记录数、健康记录数,通过 statNumber(大号粗体)与 statLabel(小号浅灰色)的视觉对比,突出核心数据指标。这种聚合数据展示方式符合用户快速获取关键信息的需求,样式层面通过统一的卡片样式(圆角、阴影)保证与其他模块的视觉一致性。
多类型列表区
应用包含三种核心列表类型,针对不同的展示需求采用差异化的渲染策略:
- 宠物列表:基于
FlatList实现,列表项整合基础信息与最新成长数据,通过latestWeight字段动态展示宠物最新体重,形成“基础信息+关键指标”的展示模式; - 成长记录列表:采用嵌套布局实现“头部(宠物名+日期)+ 指标区(体重/身高/身长)+ 备注”的三层结构,指标区通过
justifyContent: 'space-around'实现三等分,保证数据展示的规整性; - 健康记录列表:通过
borderLeftColor实现类型化的视觉标识,不同健康记录类型对应不同的左侧边框颜色与图标,强化信息分类展示效果。
所有列表均采用 FlatList 替代 ScrollView,利用其懒加载特性优化性能,同时通过 slice(0, 3) 限制展示数量,避免长列表导致的性能问题。
功能菜单区
功能菜单采用 flexWrap: 'wrap' 实现 2x2 网格布局,每个菜单项包含“图标+文字”组合,minWidth: '50%' 保证每行固定显示两个功能项。这种网格布局既充分利用屏幕空间,又保证交互区域的足够大小,符合移动端触控操作的交互习惯。
样式
应用基于 StyleSheet.create 构建了完整的样式体系,遵循“通用样式复用、特殊样式定制、视觉规范统一”的设计原则:
- 通用样式统一:所有卡片组件统一使用 12px 圆角、16px 间距、跨平台兼容的阴影效果(
elevation适配 Android、shadow系列属性适配 iOS); - 视觉编码规范:健康记录通过颜色编码区分类型(疫苗-蓝色、体检-绿色、用药-橙色),关键数据采用高对比度颜色(如最新体重使用绿色);
- 状态样式分离:底部导航的选中态通过
activeNavItem样式类实现,包含顶部边框、图标/文字颜色变化,形成清晰的选中反馈; - 响应式适配:通过
flex: 1实现自适应布局,关键元素使用固定尺寸(如头像、图标)配合弹性布局,保证不同屏幕尺寸下的展示效果一致。
核心技术体系的等价映射
跨端适配的核心是“逻辑复用、组件等价、体验一致”,针对该应用的复杂数据关联与多类型列表渲染场景,React Native 与鸿蒙 ArkTS 的核心能力可实现精准映射:
| React Native 核心能力 | 鸿蒙 ArkTS 等价实现 | 适配核心要点 |
|---|---|---|
| TypeScript 类型定义 | TypeScript 类型定义 | 100% 复用 Pet/GrowthRecord/HealthRecord 类型声明 |
useState 状态管理 | @State 装饰器 | 状态初始化数据完全复用,更新逻辑从 setPets 改为直接赋值 |
| 数组处理函数 | 数组处理函数 | filter/reduce/slice 等函数 100% 复用,仅调整调用方式 |
FlatList 列表渲染 | List + ListItem | data → listData,renderItem → itemGenerator,keyExtractor → idGenerator |
TouchableOpacity | Button 组件 | onPress → onClick,移除透明度反馈(鸿蒙 Button 自带点击态) |
StyleSheet 样式 | @Styles/@Extend | Flex 布局属性完全复用,elevation/shadow 合并为 shadow 配置 |
| 多选项 Alert | promptAction.showActionSheet | 从 Alert 弹窗改为 ActionSheet 组件,保持选项逻辑一致 |
| 条件渲染 | 条件渲染 | && 运算符改为 if 语句,逻辑完全复用 |
| 网格布局 | Grid + GridItem | flexWrap: 'wrap' 改为 Grid 布局,保证视觉效果一致 |
React Native 端的 useState 状态定义可直接转换为鸿蒙的 @State 装饰器,数据处理函数完全复用:
// React Native 端
const [pets, setPets] = useState<Pet[]>([/* 初始数据 */]);
const [growthRecords, setGrowthRecords] = useState<GrowthRecord[]>([/* 初始数据 */]);

// 获取特定宠物的成长记录
const getGrowthRecordsForPet = (petId: string) => {
  return growthRecords.filter(record => record.petId === petId);
};

// 鸿蒙 ArkTS 端
@State pets: Pet[] = [/* 初始数据,100% 复用 */];
@State growthRecords: GrowthRecord[] = [/* 初始数据,100% 复用 */];

// 数据处理函数 100% 复用
getGrowthRecordsForPet(petId: string): GrowthRecord[] {
  return this.growthRecords.filter(record => record.petId === petId);
}
健康记录列表
健康记录列表项是典型的“类型化视觉展示”场景,迁移时需保证视觉编码的一致性:
// 鸿蒙 ArkTS 健康记录列表项
@Builder
renderHealthRecordItem(item: HealthRecord) {
  const pet = this.pets.find(p => p.id === item.petId);
  let icon = '';
  let color = '';

  switch(item.type) {
    case 'vaccine':
      icon = '💉';
      color = '#3b82f6';
      break;
    case 'checkup':
      icon = '🏥';
      color = '#10b981';
      break;
    case 'medication':
      icon = '💊';
      color = '#f59e0b';
      break;
  }

  Column() {
    Row() {
      // 图标容器
      Column()
        .width(30)
        .height(30)
        .borderRadius(15)
        .backgroundColor('#f1f5f9')
        .justifyContent(FlexAlign.Center)
        .alignItems(ItemAlign.Center)
        .marginRight(12)
      {
        Text(icon).fontSize(16);
      }

      // 信息区域
      Column().flexGrow(1) {
        // 头部(标题+日期)
        Row() {
          Text(item.title)
            .fontSize(14)
            .fontWeight(FontWeight.Bold)
            .color('#1e293b');

          Text(item.date)
            .fontSize(12)
            .color('#64748b')
            .marginLeft('auto');
        }

        // 描述
        Text(item.description)
          .fontSize(12)
          .color('#64748b')
          .marginBottom(4);

        // 下次时间(可选)
        if (item.nextDate) {
          Text(`下次: ${item.nextDate}`)
            .fontSize(11)
            .color('#f59e0b')
            .fontWeight(FontWeight.Medium);
        }

        // 宠物名
        Text(pet?.name || '未知宠物')
          .fontSize(11)
          .color('#94a3b8')
          .marginTop(2);
      }
    }
  }
  .backgroundColor('#ffffff')
  .borderRadius(8)
  .padding(12)
  .margin(8)
  .borderLeft({ width: 4, color: color })
  .shadow({ radius: 2, color: '#000', opacity: 0.1, offsetX: 0, offsetY: 1 });
}
可以看到,除了组件语法与样式写法的调整,核心的类型判断逻辑、视觉编码逻辑、布局逻辑完全复用 React Native 端的实现。
功能菜单
React Native 的 flexWrap 网格布局在鸿蒙端可通过 Grid 组件等价实现:
// 鸿蒙 ArkTS 功能菜单实现
@Builder
renderMenuGrid() {
  Grid() {
    GridItem() {
      Button() {
        Column() {
          Text('📏').fontSize(24).marginBottom(8);
          Text('记录成长').fontSize(12).color('#1e293b');
        }
        .alignItems(ItemAlign.Center);
      }
      .backgroundColor('transparent')
      .onClick(() => promptAction.showAlert({
        title: '添加成长记录',
        message: '记录宠物的体重、身高变化'
      }));
    }

    GridItem() {
      // 疫苗提醒菜单项,结构同上
    }

    GridItem() {
      // 喂食记录菜单项,结构同上
    }

    GridItem() {
      // 健康报告菜单项,结构同上
    }
  }
  .columnsTemplate('1fr 1fr') // 2列布局
  .rowsTemplate('1fr 1fr')    // 2行布局
  .width('100%');
}
通过 columnsTemplate/rowsTemplate 实现 2x2 网格布局,保证与 React Native 端一致的视觉效果与交互体验。
多选项弹窗
React Native 端的多选项 Alert 在鸿蒙端可通过 promptAction.showActionSheet 实现等价交互:
// React Native 端
<TouchableOpacity
  style={styles.addButton}
  onPress={() => Alert.alert('添加记录', '选择添加类型', [
    { text: '成长记录', onPress: () => Alert.alert('添加成长记录') },
    { text: '健康记录', onPress: () => Alert.alert('添加健康记录') },
    { text: '取消', style: 'cancel' }
  ])}
>

// 鸿蒙 ArkTS 端
Button('+')
  .width(36)
  .height(36)
  .borderRadius(18)
  .backgroundColor('#3b82f6')
  .fontSize(20)
  .fontWeight(FontWeight.Bold)
  .fontColor('#ffffff')
  .onClick(() => {
    promptAction.showActionSheet({
      title: '选择添加类型',
      buttons: [
        { text: '成长记录' },
        { text: '健康记录' },
        { text: '取消', style: ActionSheetButtonStyle.CANCEL }
      ],
      success: (result) => {
        if (result.index === 0) {
          promptAction.showAlert({ message: '添加成长记录' });
        } else if (result.index === 1) {
          promptAction.showAlert({ message: '添加健康记录' });
        }
      }
    });
  });
弹窗的标题、选项、交互逻辑完全复用,仅调整 API 调用方式与参数格式。
将 Pet/GrowthRecord/HealthRecord 类型定义、数据处理函数(getGrowthRecordsForPet/getHealthRecordsForPet)、初始数据配置抽离为独立的 TS 文件,React Native 与鸿蒙工程共享该文件,保证数据层 100% 复用。对于复杂的数据处理逻辑(如筛选最新成长记录),封装为工具类方法,两端统一调用,避免重复开发。
2. 组件层
遵循“语义等价而非代码等价”的原则,针对不同的布局场景采用等价的组件实现:
- 线性布局:React Native 的
View(flexDirection: row/column)对应鸿蒙的Row/Column; - 列表布局:React Native 的
FlatList对应鸿蒙的List + ListItem; - 网格布局:React Native 的
flexWrap: wrap对应鸿蒙的Grid + GridItem; - 交互组件:React Native 的
TouchableOpacity对应鸿蒙的Button(设置backgroundColor: transparent去除默认样式)。
重点保证布局逻辑、视觉效果、交互行为的等价,而非逐行复制代码。
3. 样式层
将通用样式(如卡片样式、列表项样式、文本样式)封装为全局样式函数:
- React Native 端:使用
StyleSheet.create定义通用样式对象; - 鸿蒙端:使用
@Styles装饰器定义通用样式函数。
保证两端使用相同的样式数值(如圆角、间距、颜色值),通过样式的统一封装减少适配工作量,同时保证视觉体验的一致性。
4. 交互层
统一弹窗提示、点击反馈、加载状态等交互细节:
- 普通提示:React Native 的
Alert.alert对应鸿蒙的promptAction.showAlert; - 确认弹窗:React Native 的多按钮 Alert 对应鸿蒙的
promptAction.showConfirmDialog; - 多选项弹窗:React Native 的多按钮 Alert 对应鸿蒙的
promptAction.showActionSheet; - 点击反馈:React Native 的
TouchableOpacity透明度反馈对应鸿蒙Button的默认点击态。
确保用户在不同平台获得一致的交互体验,减少学习成本。
- React Native 端的猫咪成长记录应用构建了多维度的强类型数据模型,通过数据关联函数实现宠物与记录的精准匹配,多类型列表采用差异化的渲染策略,满足不同的展示需求;
- 鸿蒙跨端适配的核心是“数据层 100% 复用、组件层语义等价、样式层数值统一、交互层体验一致”,复杂数据处理逻辑可完全复用,仅需调整 UI 渲染层的实现;
- 针对网格布局、多类型列表、条件渲染等复杂场景,鸿蒙端可通过
Grid、List、条件语句等实现等价效果,保证视觉与交互体验的一致性。
该猫咪成长记录应用的跨端实践表明,基于 React Native 开发的“复杂数据关联+多类型列表展示”类应用,向鸿蒙迁移时核心逻辑复用率可达 90% 以上。通过统一的数据模型、等价的组件实现、一致的交互体验,可大幅降低跨端开发成本,同时保证多平台应用的体验一致性,为宠物管理类应用的跨端开发提供了可复制的技术路径。
真实演示案例代码:
// app.tsx
import React, { useState } from 'react';
import { SafeAreaView, View, Text, StyleSheet, TouchableOpacity, ScrollView, Dimensions, Alert, FlatList } from 'react-native';

// Base64 图标库
const ICONS_BASE64 = {
  profile: 'data:image/png;base64,iVBORw0KGgoAAAANSUhEUgAAAAEAAAABCAYAAAAfFcSJAAAADUlEQVR42mNkYPhfDwAChwGA60e6kgAAAABJRU5ErkJggg==',
  settings: 'data:image/png;base64,iVBORw0KGgoAAAANSUhEUgAAAAEAAAABCAYAAAAfFcSJAAAADUlEQVR42mNkYPhfDwAChwGA60e6kgAAAABJRU5ErkJggg==',
  health: 'data:image/png;base64,iVBORw0KGgoAAAANSUhEUgAAAAEAAAABCAYAAAAfFcSJAAAADUlEQVR42mNkYPhfDwAChwGA60e6kgAAAABJRU5ErkJggg==',
  growth: 'data:image/png;base64,iVBORw0KGgoAAAANSUhEUgAAAAEAAAABCAYAAAAfFcSJAAAADUlEQVR42mNkYPhfDwAChwGA60e6kgAAAABJRU5ErkJggg==',
  food: 'data:image/png;base64,iVBORw0KGgoAAAANSUhEUgAAAAEAAAABCAYAAAAfFcSJAAAADUlEQVR42mNkYPhfDwAChwGA60e6kgAAAABJRU5ErkJggg==',
  vaccine: 'data:image/png;base64,iVBORw0KGgoAAAANSUhEUgAAAAEAAAABCAYAAAAfFcSJAAAADUlEQVR42mNkYPhfDwAChwGA60e6kgAAAABJRU5ErkJggg==',
  history: 'data:image/png;base64,iVBORw0KGgoAAAANSUhEUgAAAAEAAAABCAYAAAAfFcSJAAAADUlEQVR42mNkYPhfDwAChwGA60e6kgAAAABJRU5ErkJggg==',
  more: 'data:image/png;base64,iVBORw0KGgoAAAANSUhEUgAAAAEAAAABCAYAAAAfFcSJAAAADUlEQVR42mNkYPhfDwAChwGA60e6kgAAAABJRU5ErkJggg==',
};

const { width, height } = Dimensions.get('window');

// 宠物类型
type Pet = {
  id: string;
  name: string;
  breed: string;
  age: number;
  gender: 'male' | 'female';
  avatar: string;
  birthday: string;
};

// 成长记录类型
type GrowthRecord = {
  id: string;
  petId: string;
  date: string;
  weight: number; // kg
  height: number; // cm
  length: number; // cm
  notes: string;
};

// 健康记录类型
type HealthRecord = {
  id: string;
  petId: string;
  date: string;
  type: 'vaccine' | 'checkup' | 'medication';
  title: string;
  description: string;
  nextDate?: string;
};

const CatGrowthTrackerApp: React.FC = () => {
  const [pets, setPets] = useState<Pet[]>([
    { id: '1', name: '奶茶', breed: '英国短毛猫', age: 2, gender: 'female', avatar: '', birthday: '2021-05-15' },
    { id: '2', name: '咖啡', breed: '美国短毛猫', age: 1, gender: 'male', avatar: '', birthday: '2022-08-20' },
    { id: '3', name: '摩卡', breed: '布偶猫', age: 3, gender: 'female', avatar: '', birthday: '2020-11-10' },
  ]);

  const [growthRecords, setGrowthRecords] = useState<GrowthRecord[]>([
    { id: '1', petId: '1', date: '2023-06-01', weight: 4.2, height: 25, length: 40, notes: '健康检查正常' },
    { id: '2', petId: '1', date: '2023-05-15', weight: 4.0, height: 24.5, length: 39, notes: '体重略有增加' },
    { id: '3', petId: '1', date: '2023-05-01', weight: 3.8, height: 24, length: 38, notes: '健康成长' },
    { id: '4', petId: '2', date: '2023-06-10', weight: 3.5, height: 23, length: 37, notes: '活泼好动' },
    { id: '5', petId: '3', date: '2023-06-05', weight: 5.1, height: 27, length: 45, notes: '定期体检' },
  ]);

  const [healthRecords, setHealthRecords] = useState<HealthRecord[]>([
    { id: '1', petId: '1', date: '2023-05-20', type: 'vaccine', title: '狂犬疫苗', description: '年度狂犬疫苗接种', nextDate: '2024-05-20' },
    { id: '2', petId: '1', date: '2023-04-15', type: 'checkup', title: '常规体检', description: '全面健康检查,结果正常' },
    { id: '3', petId: '2', date: '2023-06-01', type: 'vaccine', title: '猫三联疫苗', description: '幼猫第二针疫苗', nextDate: '2023-07-01' },
    { id: '4', petId: '3', date: '2023-05-30', type: 'medication', title: '驱虫药', description: '体内驱虫处理' },
  ]);

  // 获取特定宠物的成长记录
  const getGrowthRecordsForPet = (petId: string) => {
    return growthRecords.filter(record => record.petId === petId);
  };

  // 获取特定宠物的健康记录
  const getHealthRecordsForPet = (petId: string) => {
    return healthRecords.filter(record => record.petId === petId);
  };

  // 渲染宠物项
  const renderPetItem = ({ item }: { item: Pet }) => {
    const petGrowthRecords = getGrowthRecordsForPet(item.id);
    const latestRecord = petGrowthRecords.length > 0
      ? petGrowthRecords.reduce((latest, record) =>
          new Date(record.date) > new Date(latest.date) ? record : latest
        )
      : null;

    return (
      <TouchableOpacity
        style={styles.petCard}
        onPress={() => Alert.alert('宠物详情', `查看 ${item.name} 的详细信息`)}
      >
        <View style={styles.petAvatar}>
          <Text style={styles.petAvatarText}>🐱</Text>
        </View>
        <View style={styles.petInfo}>
          <Text style={styles.petName}>{item.name}</Text>
          <Text style={styles.petBreed}>{item.breed} • {item.age}岁</Text>
          <Text style={styles.petGender}>{item.gender === 'male' ? '♂' : '♀'}</Text>
          {latestRecord && (
            <Text style={styles.latestWeight}>最新体重: {latestRecord.weight}kg</Text>
          )}
        </View>
        <View style={styles.petAction}>
          <Text style={styles.petArrow}>›</Text>
        </View>
      </TouchableOpacity>
    );
  };

  // 渲染成长记录项
  const renderGrowthRecordItem = ({ item }: { item: GrowthRecord }) => {
    const pet = pets.find(p => p.id === item.petId);

    return (
      <View style={styles.recordCard}>
        <View style={styles.recordHeader}>
          <Text style={styles.recordPetName}>{pet?.name || '未知宠物'}</Text>
          <Text style={styles.recordDate}>{item.date}</Text>
        </View>
        <View style={styles.recordDetails}>
          <View style={styles.detailItem}>
            <Text style={styles.detailLabel}>体重</Text>
            <Text style={styles.detailValue}>{item.weight} kg</Text>
          </View>
          <View style={styles.detailItem}>
            <Text style={styles.detailLabel}>身高</Text>
            <Text style={styles.detailValue}>{item.height} cm</Text>
          </View>
          <View style={styles.detailItem}>
            <Text style={styles.detailLabel}>身长</Text>
            <Text style={styles.detailValue}>{item.length} cm</Text>
          </View>
        </View>
        <Text style={styles.recordNotes}>{item.notes}</Text>
      </View>
    );
  };

  // 渲染健康记录项
  const renderHealthRecordItem = ({ item }: { item: HealthRecord }) => {
    const pet = pets.find(p => p.id === item.petId);
    let icon = '';
    let color = '';

    switch(item.type) {
      case 'vaccine':
        icon = '💉';
        color = '#3b82f6';
        break;
      case 'checkup':
        icon = '🏥';
        color = '#10b981';
        break;
      case 'medication':
        icon = '💊';
        color = '#f59e0b';
        break;
    }

    return (
      <View style={[styles.healthRecordCard, { borderLeftColor: color }]}>
        <View style={styles.healthIcon}>
          <Text style={styles.healthIconText}>{icon}</Text>
        </View>
        <View style={styles.healthInfo}>
          <View style={styles.healthHeader}>
            <Text style={styles.healthTitle}>{item.title}</Text>
            <Text style={styles.healthDate}>{item.date}</Text>
          </View>
          <Text style={styles.healthDescription}>{item.description}</Text>
          {item.nextDate && (
            <Text style={styles.nextDate}>下次: {item.nextDate}</Text>
          )}
          <Text style={styles.healthPetName}>{pet?.name || '未知宠物'}</Text>
        </View>
      </View>
    );
  };

  return (
    <SafeAreaView style={styles.container}>
      {/* 头部 */}
      <View style={styles.header}>
        <Text style={styles.title}>猫咪成长记录</Text>
        <TouchableOpacity
          style={styles.addButton}
          onPress={() => Alert.alert('添加记录', '选择添加类型', [
            { text: '成长记录', onPress: () => Alert.alert('添加成长记录') },
            { text: '健康记录', onPress: () => Alert.alert('添加健康记录') },
            { text: '取消', style: 'cancel' }
          ])}
        >
          <Text style={styles.addButtonText}>+</Text>
        </TouchableOpacity>
      </View>

      <ScrollView style={styles.content}>
        {/* 宠物统计卡片 */}
        <View style={styles.statsCard}>
          <View style={styles.statItem}>
            <Text style={styles.statNumber}>{pets.length}</Text>
            <Text style={styles.statLabel}>我的猫咪</Text>
          </View>
          <View style={styles.statItem}>
            <Text style={styles.statNumber}>{growthRecords.length}</Text>
            <Text style={styles.statLabel}>成长记录</Text>
          </View>
          <View style={styles.statItem}>
            <Text style={styles.statNumber}>{healthRecords.length}</Text>
            <Text style={styles.statLabel}>健康记录</Text>
          </View>
        </View>

        {/* 我的宠物列表 */}
        <View style={styles.section}>
          <View style={styles.sectionHeader}>
            <Text style={styles.sectionTitle}>我的猫咪</Text>
            <TouchableOpacity
              style={styles.sectionAction}
              onPress={() => Alert.alert('添加猫咪', '添加新宠物')}
            >
              <Text style={styles.sectionActionText}>+ 添加</Text>
            </TouchableOpacity>
          </View>
          <FlatList
            data={pets}
            renderItem={renderPetItem}
            keyExtractor={item => item.id}
            showsVerticalScrollIndicator={false}
          />
        </View>

        {/* 最近成长记录 */}
        <View style={styles.section}>
          <Text style={styles.sectionTitle}>成长记录</Text>
          <FlatList
            data={growthRecords.slice(0, 3)}
            renderItem={renderGrowthRecordItem}
            keyExtractor={item => item.id}
            showsVerticalScrollIndicator={false}
          />
        </View>

        {/* 健康记录 */}
        <View style={styles.section}>
          <Text style={styles.sectionTitle}>健康记录</Text>
          <FlatList
            data={healthRecords.slice(0, 3)}
            renderItem={renderHealthRecordItem}
            keyExtractor={item => item.id}
            showsVerticalScrollIndicator={false}
          />
        </View>

        {/* 成长趋势图示意 */}
        <View style={styles.trendCard}>
          <Text style={styles.trendTitle}>成长趋势</Text>
          <View style={styles.chartPlaceholder}>
            <Text style={styles.chartText}>📈 体重增长趋势图</Text>
            <Text style={styles.chartSubtext}>显示宠物体重随时间的变化</Text>
          </View>
        </View>

        {/* 功能菜单 */}
        <View style={styles.section}>
          <Text style={styles.sectionTitle}>常用功能</Text>
          <View style={styles.menuGrid}>
            <TouchableOpacity
              style={styles.menuItem}
              onPress={() => Alert.alert('添加成长记录', '记录宠物的体重、身高变化')}
            >
              <Text style={styles.menuIcon}>📏</Text>
              <Text style={styles.menuText}>记录成长</Text>
            </TouchableOpacity>
            <TouchableOpacity
              style={styles.menuItem}
              onPress={() => Alert.alert('疫苗提醒', '设置疫苗接种提醒')}
            >
              <Text style={styles.menuIcon}>💉</Text>
              <Text style={styles.menuText}>疫苗提醒</Text>
            </TouchableOpacity>
            <TouchableOpacity
              style={styles.menuItem}
              onPress={() => Alert.alert('喂食记录', '记录喂食情况')}
            >
              <Text style={styles.menuIcon}>🍽️</Text>
              <Text style={styles.menuText}>喂食记录</Text>
            </TouchableOpacity>
            <TouchableOpacity
              style={styles.menuItem}
              onPress={() => Alert.alert('健康报告', '生成健康报告')}
            >
              <Text style={styles.menuIcon}>📋</Text>
              <Text style={styles.menuText}>健康报告</Text>
            </TouchableOpacity>
          </View>
        </View>

        {/* 提示信息 */}
        <View style={styles.infoCard}>
          <Text style={styles.infoTitle}>使用提示</Text>
          <Text style={styles.infoText}>• 定期记录宠物体重有助于健康管理</Text>
          <Text style={styles.infoText}>• 设置疫苗提醒避免错过接种时间</Text>
          <Text style={styles.infoText}>• 记录喂食情况有助于调整饮食</Text>
          <Text style={styles.infoText}>• 关注宠物行为变化及时就医</Text>
        </View>
      </ScrollView>

      {/* 底部导航 */}
      <View style={styles.bottomNav}>
        <TouchableOpacity
          style={styles.navItem}
          onPress={() => Alert.alert('首页')}
        >
          <Text style={styles.navIcon}>🏠</Text>
          <Text style={styles.navText}>首页</Text>
        </TouchableOpacity>

        <TouchableOpacity
          style={styles.navItem}
          onPress={() => Alert.alert('成长')}
        >
          <Text style={styles.navIcon}>📈</Text>
          <Text style={styles.navText}>成长</Text>
        </TouchableOpacity>

        <TouchableOpacity
          style={styles.navItem}
          onPress={() => Alert.alert('健康')}
        >
          <Text style={styles.navIcon}>🏥</Text>
          <Text style={styles.navText}>健康</Text>
        </TouchableOpacity>

        <TouchableOpacity
          style={[styles.navItem, styles.activeNavItem]}
          onPress={() => Alert.alert('我的')}
        >
          <Text style={styles.navIcon}>👤</Text>
          <Text style={styles.navText}>我的</Text>
        </TouchableOpacity>
      </View>
    </SafeAreaView>
  );
};

const styles = StyleSheet.create({
  container: {
    flex: 1,
    backgroundColor: '#f8fafc',
  },
  header: {
    flexDirection: 'row',
    alignItems: 'center',
    justifyContent: 'space-between',
    padding: 20,
    backgroundColor: '#ffffff',
    borderBottomWidth: 1,
    borderBottomColor: '#e2e8f0',
  },
  title: {
    fontSize: 20,
    fontWeight: 'bold',
    color: '#1e293b',
  },
  addButton: {
    width: 36,
    height: 36,
    borderRadius: 18,
    backgroundColor: '#3b82f6',
    alignItems: 'center',
    justifyContent: 'center',
  },
  addButtonText: {
    fontSize: 20,
    color: '#ffffff',
    fontWeight: 'bold',
  },
  content: {
    flex: 1,
    padding: 16,
  },
  statsCard: {
    backgroundColor: '#ffffff',
    borderRadius: 12,
    padding: 16,
    flexDirection: 'row',
    justifyContent: 'space-around',
    marginBottom: 16,
    elevation: 1,
    shadowColor: '#000',
    shadowOffset: { width: 0, height: 1 },
    shadowOpacity: 0.1,
    shadowRadius: 2,
  },
  statItem: {
    alignItems: 'center',
  },
  statNumber: {
    fontSize: 18,
    fontWeight: 'bold',
    color: '#3b82f6',
  },
  statLabel: {
    fontSize: 12,
    color: '#64748b',
    marginTop: 4,
  },
  section: {
    backgroundColor: '#ffffff',
    borderRadius: 12,
    marginBottom: 16,
    overflow: 'hidden',
    elevation: 1,
    shadowColor: '#000',
    shadowOffset: { width: 0, height: 1 },
    shadowOpacity: 0.1,
    shadowRadius: 2,
  },
  sectionHeader: {
    flexDirection: 'row',
    justifyContent: 'space-between',
    alignItems: 'center',
    padding: 16,
    borderBottomWidth: 1,
    borderBottomColor: '#e2e8f0',
  },
  sectionTitle: {
    fontSize: 16,
    fontWeight: 'bold',
    color: '#1e293b',
  },
  sectionAction: {
    padding: 4,
  },
  sectionActionText: {
    fontSize: 14,
    color: '#3b82f6',
  },
  petCard: {
    flexDirection: 'row',
    alignItems: 'center',
    padding: 16,
    borderBottomWidth: 1,
    borderBottomColor: '#e2e8f0',
  },
  petAvatar: {
    width: 40,
    height: 40,
    borderRadius: 20,
    backgroundColor: '#e2e8f0',
    alignItems: 'center',
    justifyContent: 'center',
    marginRight: 12,
  },
  petAvatarText: {
    fontSize: 20,
  },
  petInfo: {
    flex: 1,
  },
  petName: {
    fontSize: 16,
    fontWeight: 'bold',
    color: '#1e293b',
    marginBottom: 2,
  },
  petBreed: {
    fontSize: 14,
    color: '#64748b',
    marginBottom: 2,
  },
  petGender: {
    fontSize: 12,
    color: '#94a3b8',
  },
  latestWeight: {
    fontSize: 12,
    color: '#10b981',
    fontWeight: '500',
    marginTop: 2,
  },
  petAction: {
    justifyContent: 'center',
  },
  petArrow: {
    fontSize: 16,
    color: '#94a3b8',
  },
  recordCard: {
    backgroundColor: '#f8fafc',
    borderRadius: 8,
    padding: 12,
    margin: 8,
    elevation: 1,
    shadowColor: '#000',
    shadowOffset: { width: 0, height: 1 },
    shadowOpacity: 0.1,
    shadowRadius: 2,
  },
  recordHeader: {
    flexDirection: 'row',
    justifyContent: 'space-between',
    marginBottom: 8,
  },
  recordPetName: {
    fontSize: 14,
    fontWeight: 'bold',
    color: '#1e293b',
  },
  recordDate: {
    fontSize: 12,
    color: '#64748b',
  },
  recordDetails: {
    flexDirection: 'row',
    justifyContent: 'space-around',
    marginBottom: 8,
  },
  detailItem: {
    alignItems: 'center',
  },
  detailLabel: {
    fontSize: 12,
    color: '#64748b',
  },
  detailValue: {
    fontSize: 14,
    fontWeight: 'bold',
    color: '#1e293b',
  },
  recordNotes: {
    fontSize: 12,
    color: '#64748b',
    fontStyle: 'italic',
  },
  healthRecordCard: {
    backgroundColor: '#ffffff',
    borderRadius: 8,
    flexDirection: 'row',
    alignItems: 'center',
    padding: 12,
    margin: 8,
    borderLeftWidth: 4,
    elevation: 1,
    shadowColor: '#000',
    shadowOffset: { width: 0, height: 1 },
    shadowOpacity: 0.1,
    shadowRadius: 2,
  },
  healthIcon: {
    width: 30,
    height: 30,
    borderRadius: 15,
    backgroundColor: '#f1f5f9',
    alignItems: 'center',
    justifyContent: 'center',
    marginRight: 12,
  },
  healthIconText: {
    fontSize: 16,
  },
  healthInfo: {
    flex: 1,
  },
  healthHeader: {
    flexDirection: 'row',
    justifyContent: 'space-between',
    marginBottom: 4,
  },
  healthTitle: {
    fontSize: 14,
    fontWeight: 'bold',
    color: '#1e293b',
  },
  healthDate: {
    fontSize: 12,
    color: '#64748b',
  },
  healthDescription: {
    fontSize: 12,
    color: '#64748b',
    marginBottom: 4,
  },
  nextDate: {
    fontSize: 11,
    color: '#f59e0b',
    fontWeight: '500',
  },
  healthPetName: {
    fontSize: 11,
    color: '#94a3b8',
    marginTop: 2,
  },
  trendCard: {
    backgroundColor: '#ffffff',
    borderRadius: 12,
    padding: 16,
    marginBottom: 16,
    elevation: 1,
    shadowColor: '#000',
    shadowOffset: { width: 0, height: 1 },
    shadowOpacity: 0.1,
    shadowRadius: 2,
  },
  trendTitle: {
    fontSize: 16,
    fontWeight: 'bold',
    color: '#1e293b',
    marginBottom: 12,
  },
  chartPlaceholder: {
    backgroundColor: '#f8fafc',
    borderRadius: 8,
    padding: 20,
    alignItems: 'center',
  },
  chartText: {
    fontSize: 14,
    color: '#64748b',
    fontWeight: '500',
  },
  chartSubtext: {
    fontSize: 12,
    color: '#94a3b8',
    marginTop: 4,
  },
  menuGrid: {
    flexDirection: 'row',
    flexWrap: 'wrap',
  },
  menuItem: {
    flex: 1,
    alignItems: 'center',
    padding: 16,
    minWidth: '50%',
  },
  menuIcon: {
    fontSize: 24,
    marginBottom: 8,
  },
  menuText: {
    fontSize: 12,
    color: '#1e293b',
  },
  infoCard: {
    backgroundColor: '#ffffff',
    borderRadius: 12,
    padding: 16,
    elevation: 1,
    shadowColor: '#000',
    shadowOffset: { width: 0, height: 1 },
    shadowOpacity: 0.1,
    shadowRadius: 2,
  },
  infoTitle: {
    fontSize: 16,
    fontWeight: 'bold',
    color: '#1e293b',
    marginBottom: 12,
  },
  infoText: {
    fontSize: 14,
    color: '#64748b',
    lineHeight: 22,
    marginBottom: 8,
  },
  bottomNav: {
    flexDirection: 'row',
    justifyContent: 'space-around',
    backgroundColor: '#ffffff',
    borderTopWidth: 1,
    borderTopColor: '#e2e8f0',
    paddingVertical: 12,
  },
  navItem: {
    alignItems: 'center',
    flex: 1,
  },
  activeNavItem: {
    paddingTop: 4,
    borderTopWidth: 2,
    borderTopColor: '#3b82f6',
  },
  navIcon: {
    fontSize: 20,
    color: '#94a3b8',
    marginBottom: 4,
  },
  activeNavIcon: {
    color: '#3b82f6',
  },
  navText: {
    fontSize: 12,
    color: '#94a3b8',
  },
  activeNavText: {
    color: '#3b82f6',
  },
});

export default CatGrowthTrackerApp;
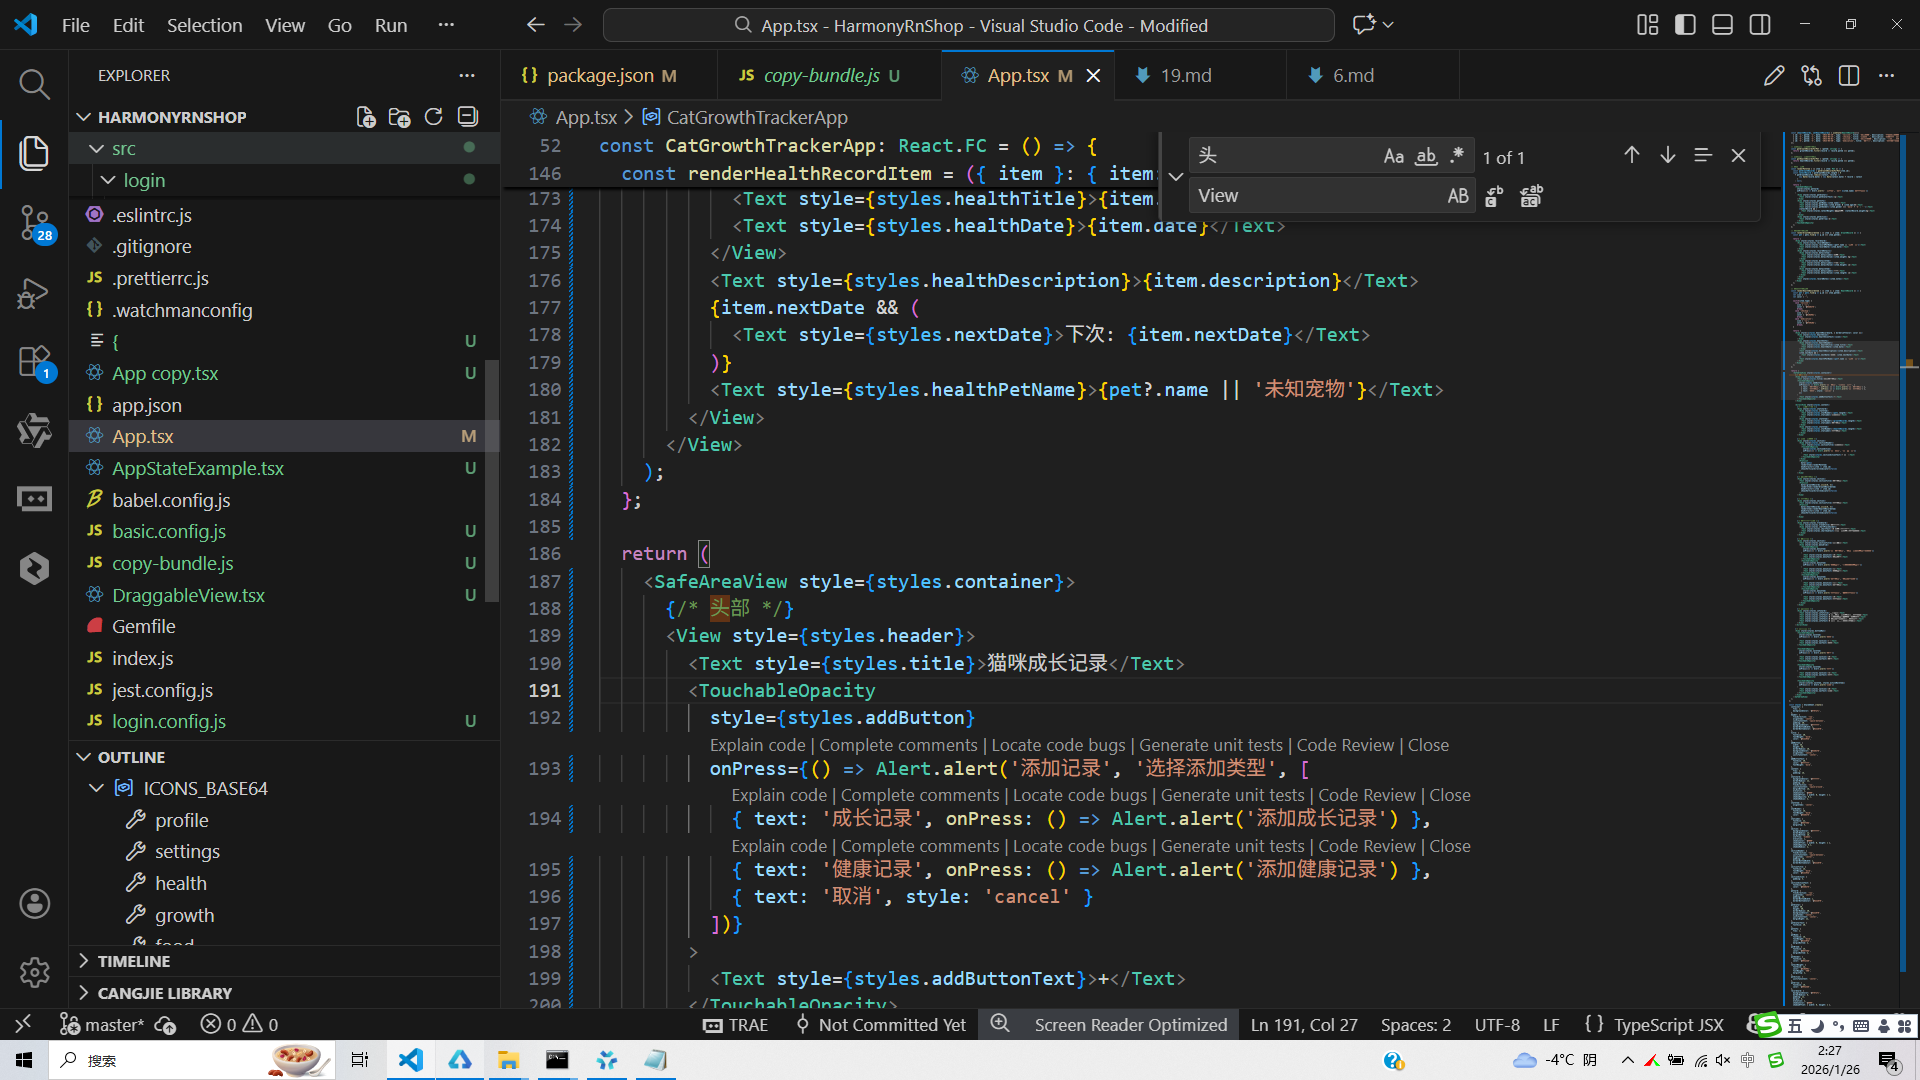
打包
接下来通过打包命令npn run harmony将reactNative的代码打包成为bundle,这样可以进行在开源鸿蒙OpenHarmony中进行使用。
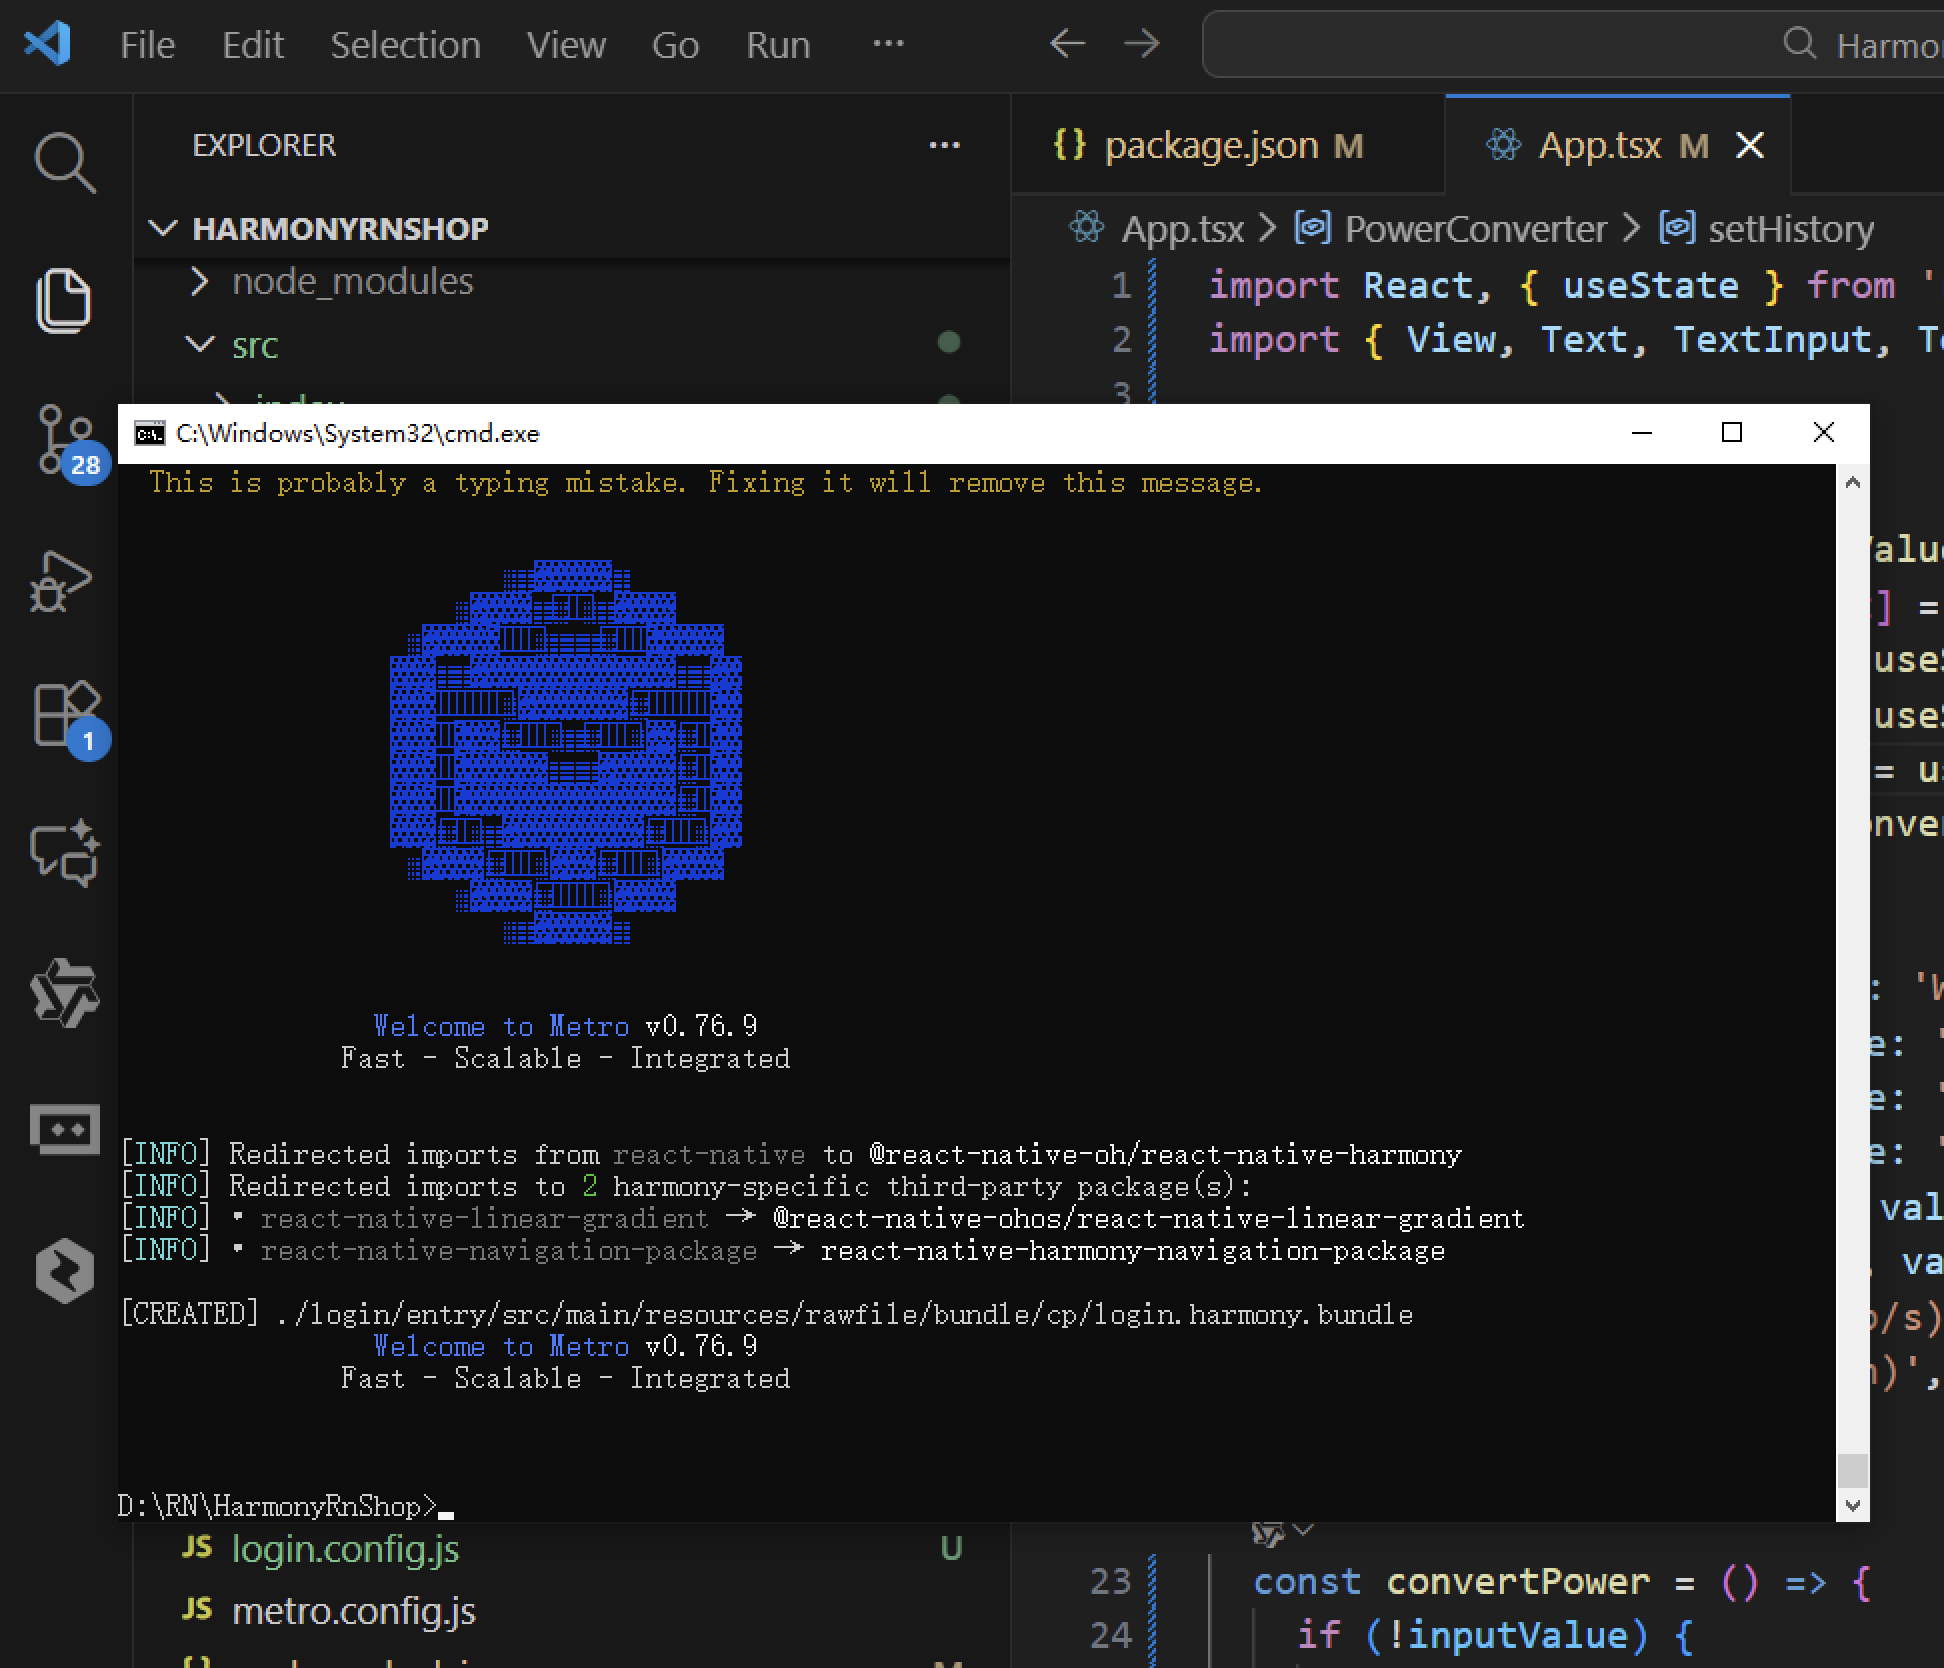
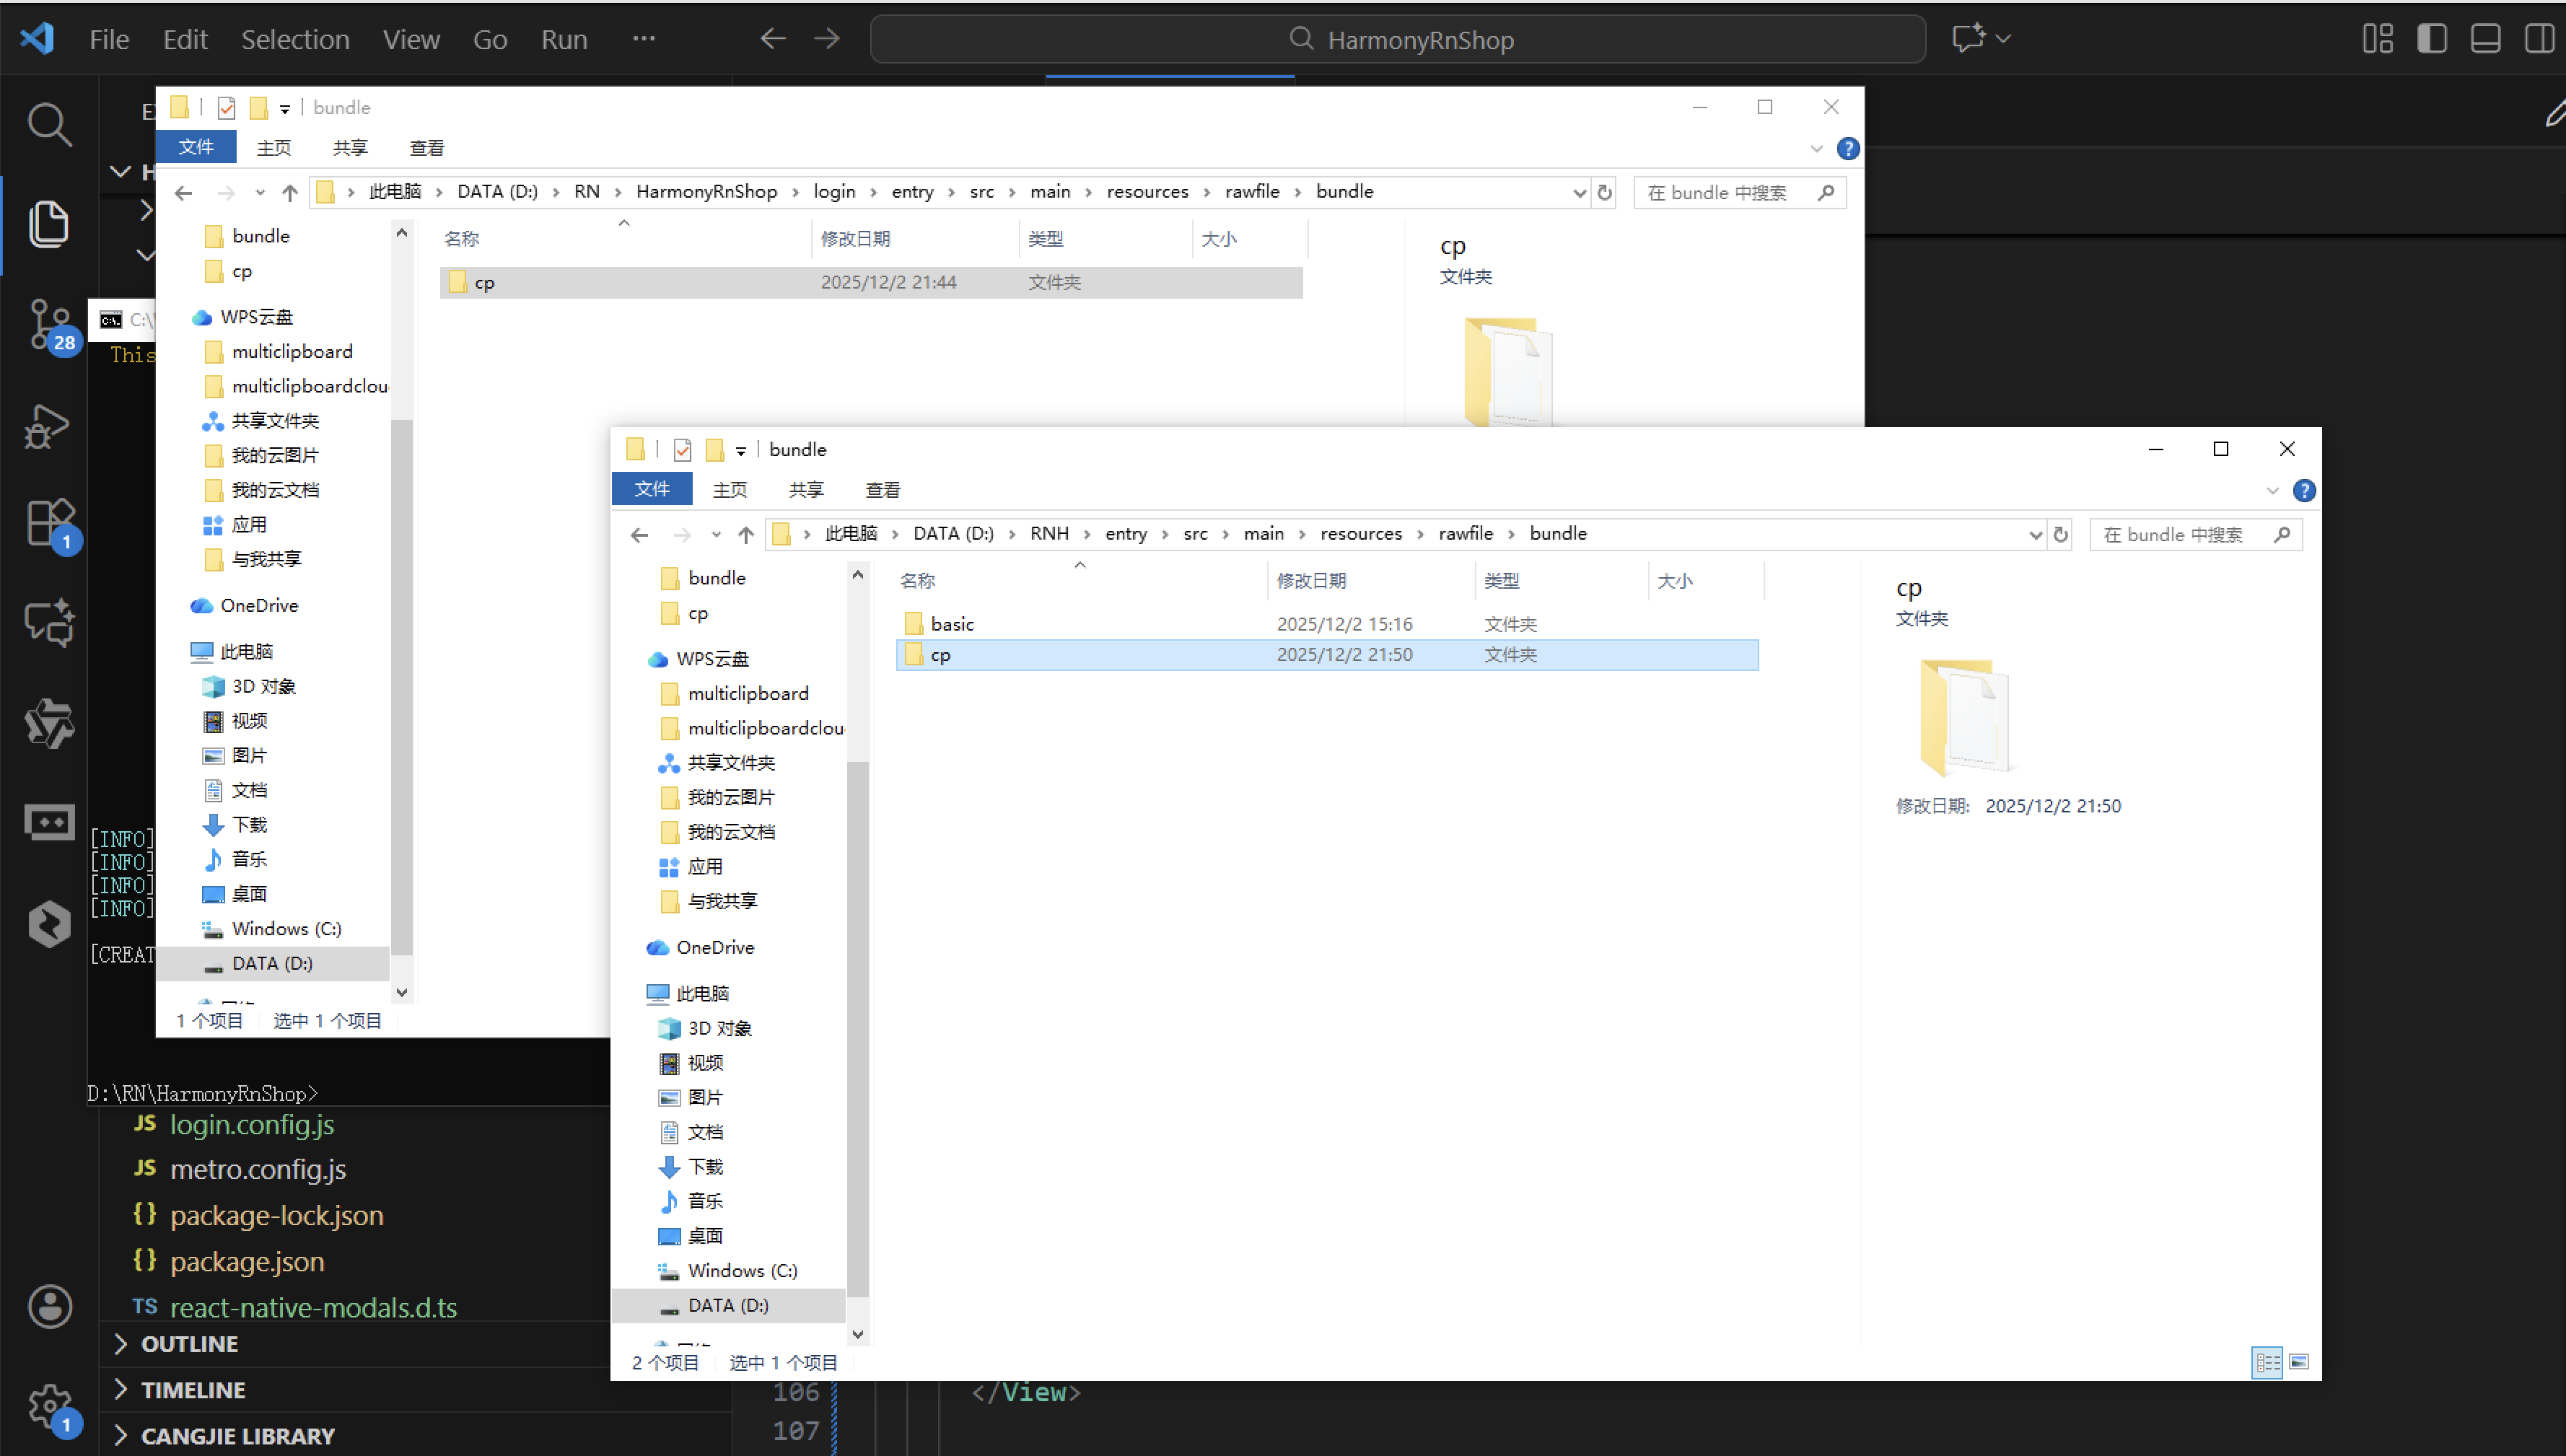
打包之后再将打包后的鸿蒙OpenHarmony文件拷贝到鸿蒙的DevEco-Studio工程目录去:
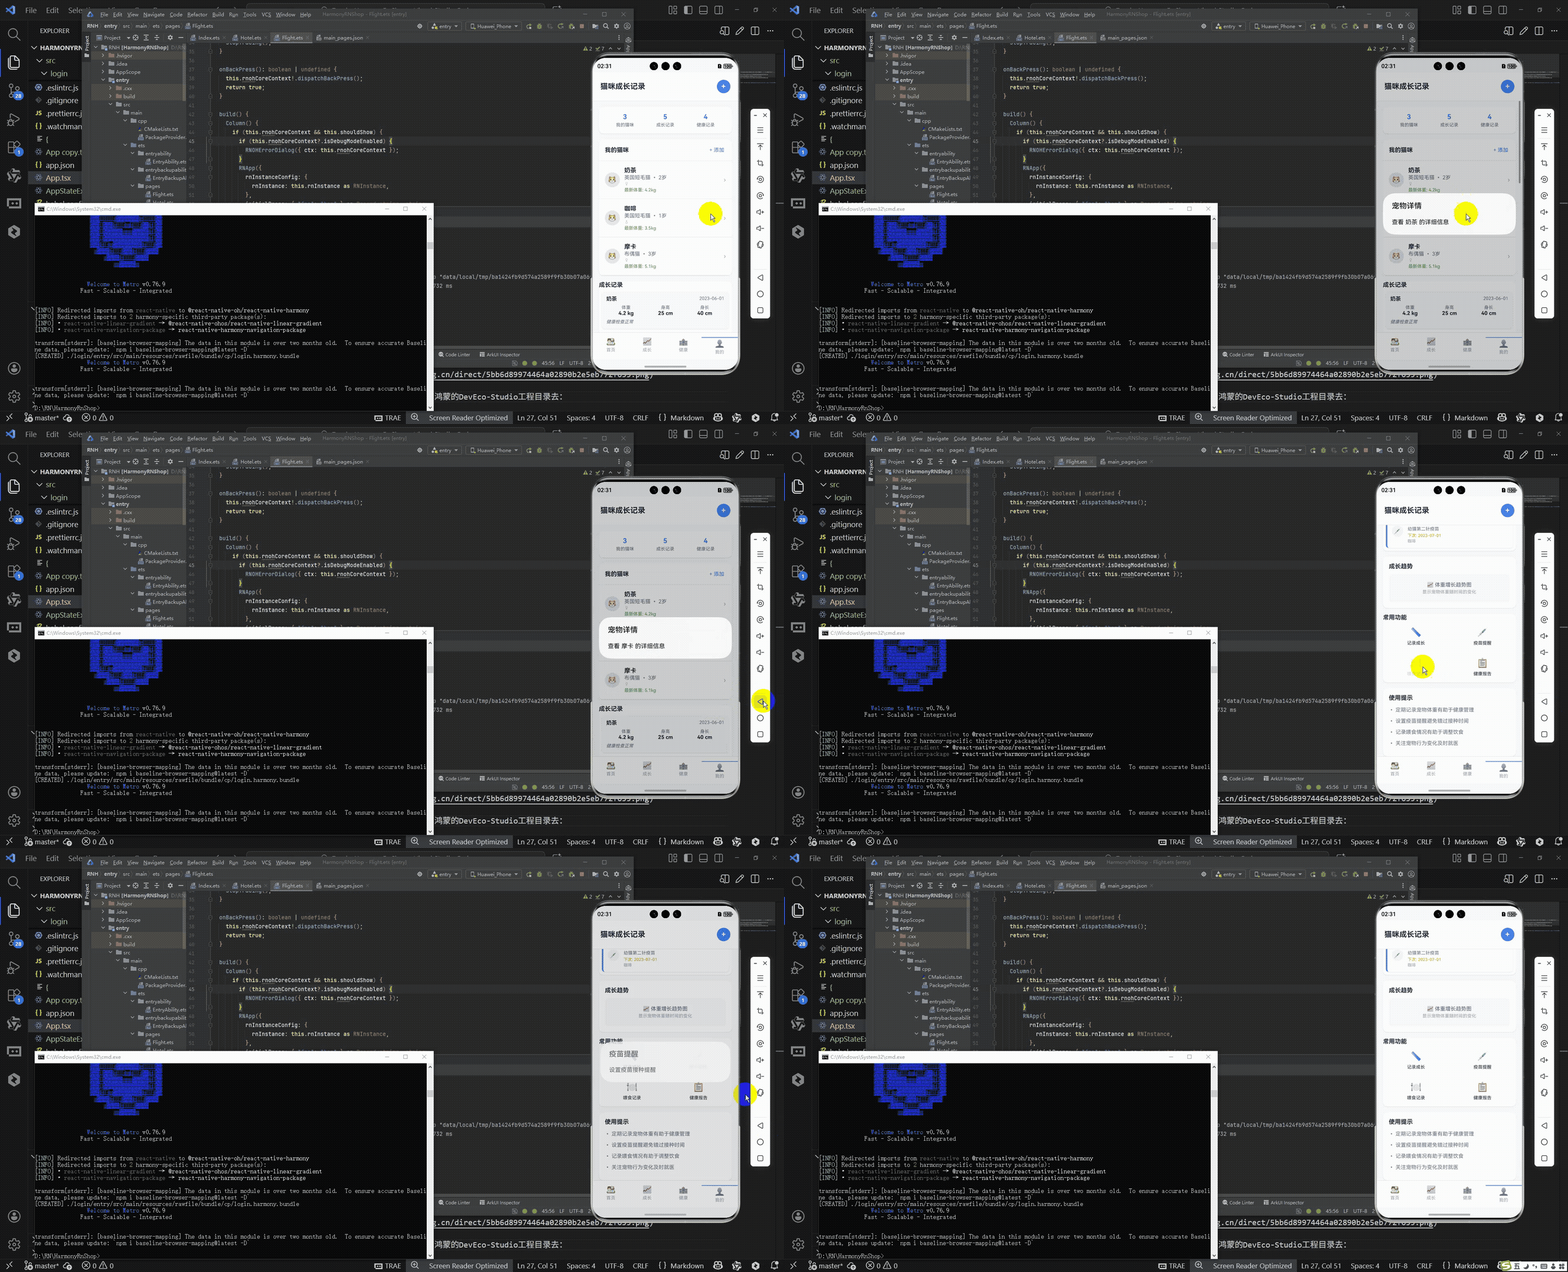
最后运行效果图如下显示:
本文以React Native开发的猫咪成长记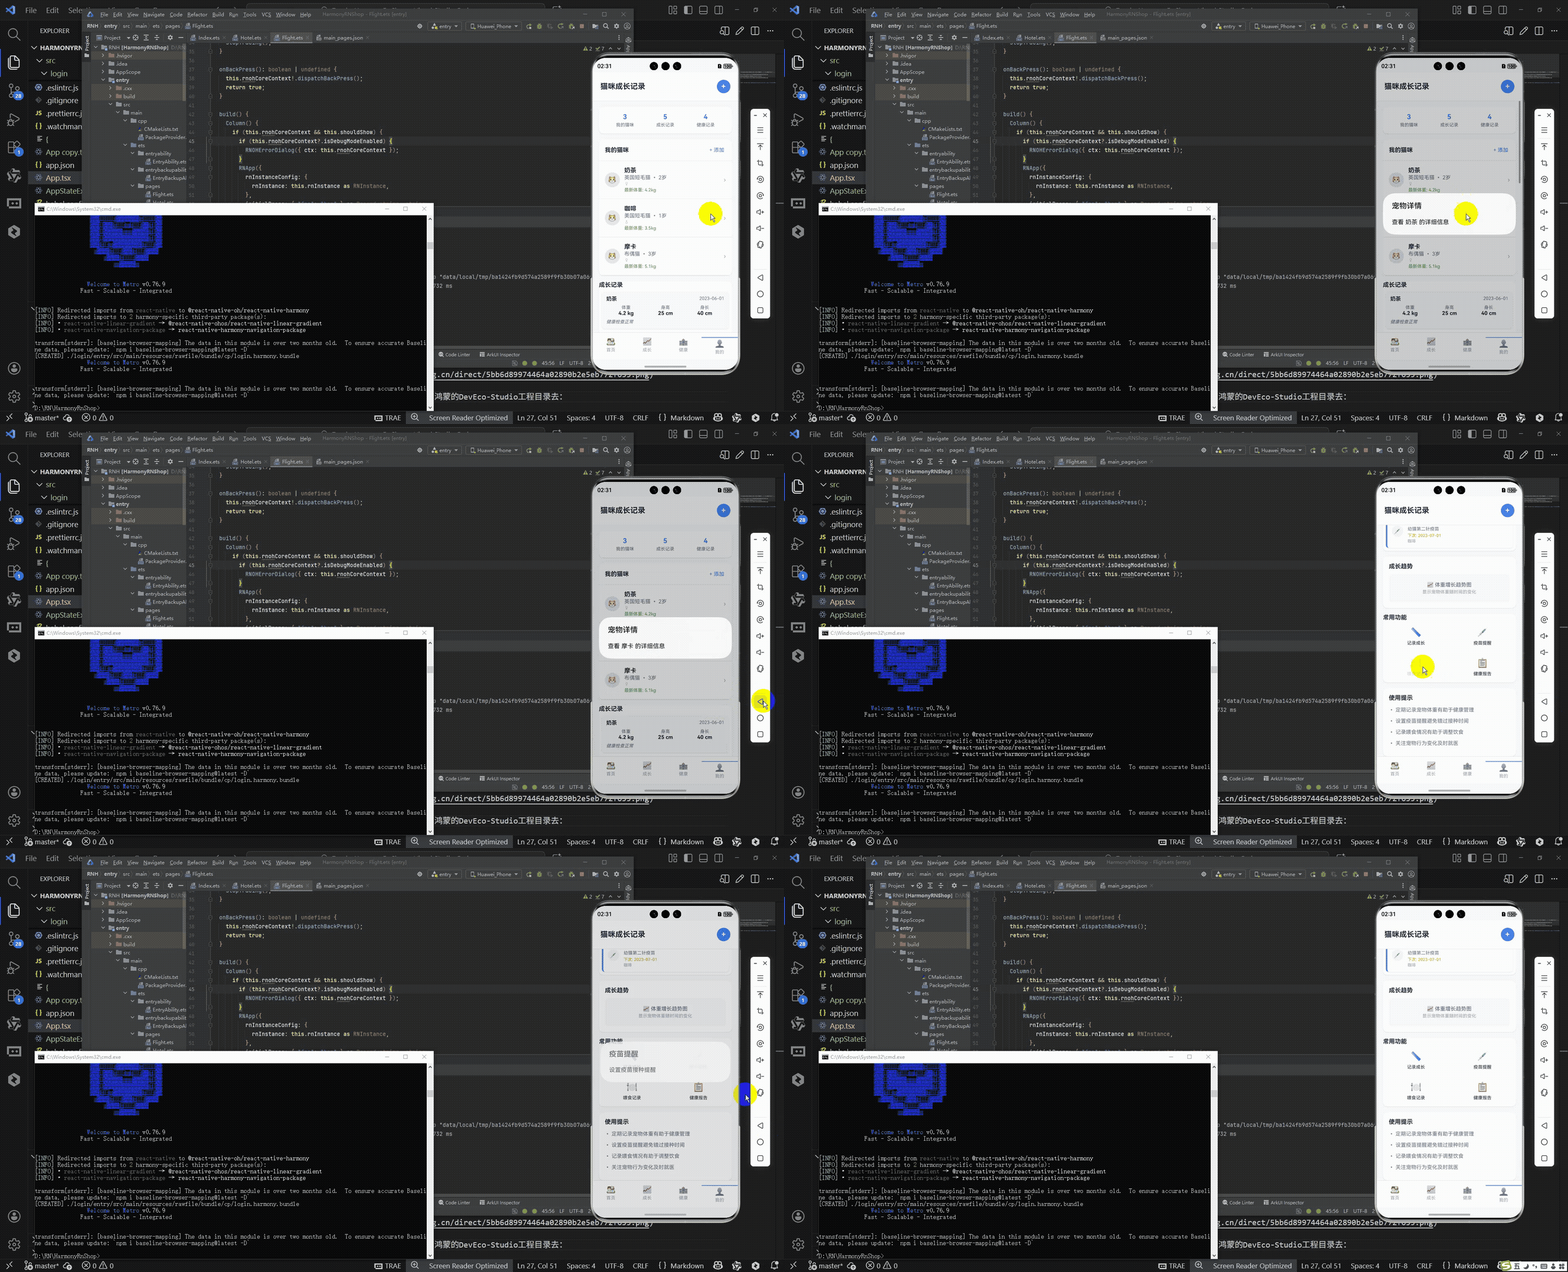
录应用为例,深入探讨跨端开发技术在宠物管理类应用中的实践。通过分析核心组件映射、TypeScript类型定义、Hooks状态管理等关键技术,系统梳理了向鸿蒙ArkTS迁移的技术路径。文章重点剖析了复杂数据关联处理、多类型列表渲染优化以及跨端体验一致性保障三大核心维度,为宠物类应用的跨端开发提供了可落地的解决方案。研究表明,合理的组件化设计和严格类型定义能有效确保代码在iOS、Android和鸿蒙平台上的可靠性和一致性,实现一套代码覆盖多平台的高效开发模式。

开源鸿蒙跨平台开发社区汇聚开发者与厂商,共建“一次开发,多端部署”的开源生态,致力于降低跨端开发门槛,推动万物智联创新。
更多推荐
 15
15 0
0- 0


 已为社区贡献95条内容

所有评论(0)