【open harmony/harmonyos】ArkTS 实现可旋转缩放的 3D 知识星图交互
【open harmony/harmonyos】ArkTS 实现可旋转缩放的 3D 知识星图交互
前言 🚀
在 HarmonyOS / OpenHarmony 应用开发中,常见的信息组织方式通常是列表、卡片、宫格或者普通思维导图。
这些方式都很稳定,但如果想做一个更有探索感的知识管理工具,就可以尝试把信息放到一个“空间”里,让用户通过旋转、缩放、点按等方式去浏览知识关系。
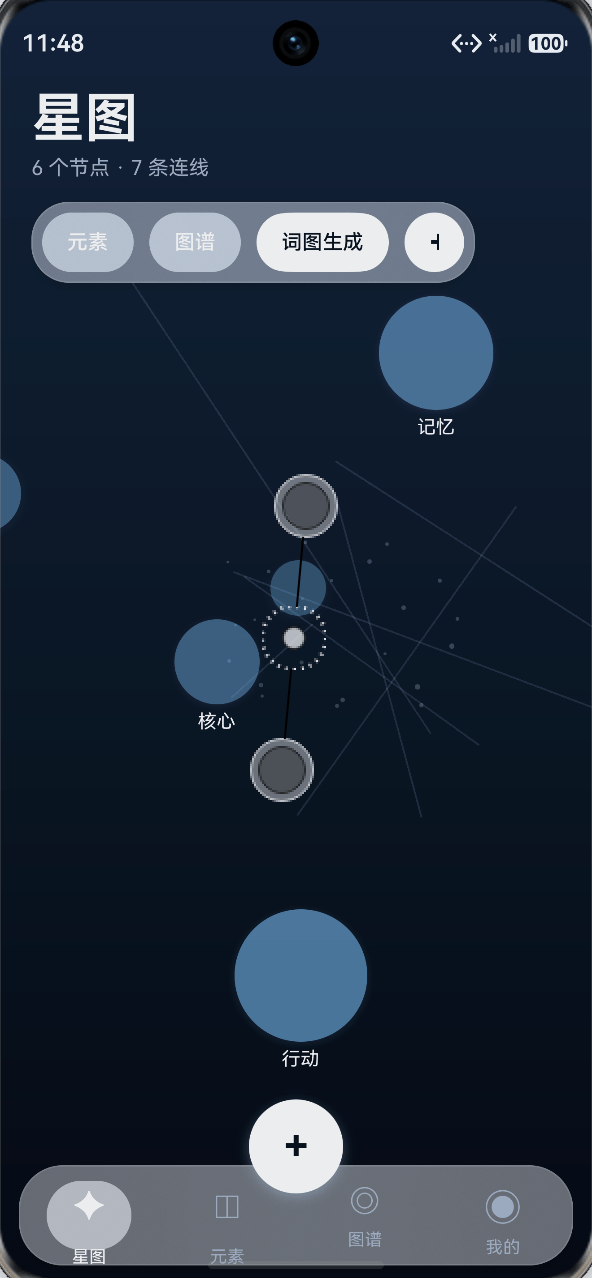
这篇文章会结合我的项目 星图 Xingtu,分享如何使用 ArkTS 在 ArkUI 中实现一个可旋转、可缩放、可点选的 3D 知识星图交互。
这套交互主要包含:
- 🌌 3D 节点坐标建模
- 👆 单指拖动旋转视角
- 🔍 双指缩放星图空间
- 🔵 节点远近透视投影
- ✨ 选中节点与关系连线高亮
- 🧠 图谱数据与 UI 分层管理
一、为什么要做 3D 知识星图
传统知识管理应用通常是这样的:
- 一条一条记录笔记
- 用文件夹分类
- 用标签筛选
- 用列表查看内容
这些方式适合管理大量内容,但缺少“关系感”和“空间感”。
而星图式交互更适合表达:
- 一个主题和多个子主题之间的关系
- 多个知识点之间的连接
- 灵感、概念、关键词之间的发散结构
- 用户对某个知识网络的整体感知
所以这个项目没有把节点简单放在列表里,而是使用 3D 坐标组织节点,再通过透视投影把它们显示到屏幕上。这样用户拖动时,会感觉整个知识网络真的在空间中旋转。✨
二、核心数据结构设计
首先,需要把节点从普通二维位置升级为三维坐标。
项目中定义了 Vec3、XingtuNode、XingtuEdge 和 CameraState 等类型。
export interface Vec3 {
  x: number;
  y: number;
  z: number;
}

export interface XingtuNode {
  id: string;
  title: string;
  note: string;
  tags: string[];
  position: Vec3;
}

export interface XingtuEdge {
  id: string;
  fromId: string;
  toId: string;
}

export interface CameraState {
  yaw: number;
  pitch: number;
  distance: number;
  scale: number;
}
这里的设计重点是:
position保存节点在 3D 空间中的位置yaw表示水平旋转角度pitch表示垂直旋转角度scale表示当前缩放比例edges表示节点之间的关系线
这样 UI 层不用关心复杂的图谱逻辑,只需要拿到投影后的节点位置进行展示。
三、3D 坐标旋转
要让星图可以旋转,首先要对节点坐标做旋转变换。
项目中封装了一个 rotatePoint 方法,用来根据相机角度计算旋转后的坐标。
const DEGREE = Math.PI / 180;

export function rotatePoint(point: Vec3, yaw: number, pitch: number): Vec3 {
  const yawRad: number = yaw * DEGREE;
  const pitchRad: number = pitch * DEGREE;

  const yawX: number = point.x * Math.cos(yawRad) + point.z * Math.sin(yawRad);
  const yawZ: number = -point.x * Math.sin(yawRad) + point.z * Math.cos(yawRad);

  const pitchY: number = point.y * Math.cos(pitchRad) - yawZ * Math.sin(pitchRad);
  const pitchZ: number = point.y * Math.sin(pitchRad) + yawZ * Math.cos(pitchRad);

  return { x: yawX, y: pitchY, z: pitchZ };
}
这里先根据 yaw 做水平方向旋转,再根据 pitch 做上下方向旋转。
用户拖动屏幕时,本质上不是节点自己在变,而是相机视角发生变化,然后所有节点重新计算投影位置。
四、透视投影:把 3D 节点画到屏幕上 🔵
ArkUI 页面最终还是二维屏幕,所以需要把 3D 坐标转换成屏幕坐标。
项目中通过 projectNode 方法完成这个过程。
const CAMERA_FOCAL = 560;

export function projectNode(
  node: XingtuNode,
  camera: CameraState,
  viewport: ViewportSize
): ProjectedNode {
  const rotated: Vec3 = rotatePoint(node.position, camera.yaw, camera.pitch);
  const depth: number = camera.distance - rotated.z;
  const perspective: number = CAMERA_FOCAL / Math.max(220, depth);
  const halfWidth: number = viewport.width / 2;
  const halfHeight: number = viewport.height / 2;

  return {
    id: node.id,
    title: node.title,
    note: node.note,
    tags: node.tags,
    screenX: halfWidth + rotated.x * perspective * camera.scale,
    screenY: halfHeight + rotated.y * perspective * camera.scale,
    scale: perspective * camera.scale,
    opacity: Math.max(0.28, Math.min(1, 0.2 + perspective * 0.35)),
    depth
  };
}
这里有几个关键点:
screenX、screenY是最终显示在屏幕上的位置scale控制节点大小opacity控制远近透明度depth用来表示节点深度
这样一来,靠近用户的节点会更大、更亮;远处节点会更小、更淡。空间感就是这样建立起来的。🌌
五、单指拖动旋转星图 👆
在 XingtuScene 组件中,通过 onTouch 监听触摸事件。
当用户单指移动时,计算本次移动距离,然后更新相机角度。
if (
  event.type === TouchType.Move &&
  this.activeTouchId >= 0 &&
  event.touches.length === 1 &&
  event.touches[0].id === this.activeTouchId
) {
  const deltaX: number = event.touches[0].windowX - this.lastTouchX;
  const deltaY: number = event.touches[0].windowY - this.lastTouchY;

  this.lastTouchX = event.touches[0].windowX;
  this.lastTouchY = event.touches[0].windowY;

  this.store.updateCamera(deltaX * 0.42, deltaY * 0.28);
  this.refreshScene();
}
相机更新逻辑放在 XingtuGraphStore 中:
updateCamera(deltaYaw: number, deltaPitch: number): void {
  this.camera = {
    yaw: this.camera.yaw + deltaYaw,
    pitch: clampPitch(this.camera.pitch + deltaPitch),
    distance: this.camera.distance,
    scale: this.camera.scale
  };
}
这里还使用了 clampPitch 限制垂直旋转角度,避免用户把场景翻到过于奇怪的位置。
export function clampPitch(nextPitch: number): number {
  return Math.max(-80, Math.min(80, nextPitch));
}
这个细节很重要。交互自由不代表完全没有边界,适当限制可以让体验更稳定。
六、双指缩放星图 🔍
除了旋转,星图还支持双指缩放。
核心思路是:
- 双指按下时记录初始距离
- 双指移动时计算新的距离
- 用新旧距离比例更新
camera.scale
if (event.touches.length === 2) {
  if (event.type === TouchType.Down || this.pinchStartDistance <= 0) {
    this.pinchStartDistance = this.touchDistance(event.touches[0], event.touches[1]);
    this.pinchScaleStart = this.store.camera.scale;
  }

  if (event.type === TouchType.Move) {
    const nextDistance: number = this.touchDistance(event.touches[0], event.touches[1]);
    if (this.pinchStartDistance > 0) {
      this.store.updateScale(this.pinchScaleStart * nextDistance / this.pinchStartDistance);
      this.refreshScene();
    }
  }

  this.activeTouchId = -1;
  return;
}
缩放范围同样要做限制:
updateScale(nextScale: number): void {
  this.camera = {
    yaw: this.camera.yaw,
    pitch: this.camera.pitch,
    distance: this.camera.distance,
    scale: Math.max(0.6, Math.min(2.2, nextScale))
  };
}
这样可以避免用户无限放大或无限缩小,保证星图始终处在可操作范围内。
七、绘制节点关系连线 ✨
星图不只是展示节点,还要展示节点之间的关系。
项目中先把节点投影结果放进 Map,然后根据边数据计算连线的位置、长度和角度。
private currentLines(nodes: ProjectedNode[]): XingtuLineProjection[] {
  const projectionMap: Map<string, ProjectedNode> = new Map<string, ProjectedNode>();
  const lines: XingtuLineProjection[] = [];

  nodes.forEach((node: ProjectedNode) => {
    projectionMap.set(node.id, node);
  });

  this.store.edges.forEach((edge: XingtuEdge) => {
    const fromNode: ProjectedNode | undefined = projectionMap.get(edge.fromId);
    const toNode: ProjectedNode | undefined = projectionMap.get(edge.toId);

    if (!fromNode || !toNode) {
      return;
    }

    const dx: number = toNode.screenX - fromNode.screenX;
    const dy: number = toNode.screenY - fromNode.screenY;

    lines.push({
      id: edge.id,
      x: fromNode.screenX,
      y: fromNode.screenY,
      width: Math.sqrt(dx * dx + dy * dy),
      angle: Math.atan2(dy, dx) * 180 / Math.PI,
      active: false
    });
  });

  return lines;
}
展示时使用一个细长的 Row,再通过旋转角度让它连接两个节点。
Row() {}
  .width(line.width)
  .height(line.active ? 2 : 1)
  .backgroundColor(line.active ? XingtuTheme.primaryAction : '#66BFDBFE')
  .opacity(line.active ? 0.82 : 0.32)
  .position({ x: line.x, y: line.y - 1 })
  .rotate({ angle: line.angle })
这种方式实现起来比较轻量,不需要引入复杂图形库,也能满足知识图谱关系线的展示需求。
八、节点选中与关系高亮
为了让用户知道当前关注的是哪个节点,项目中加入了选中节点和相关连线高亮。
先通过 relatedNodeIds 找到与当前节点有关的节点:
relatedNodeIds(): Set<string> {
  if (!this.selectedNodeId) {
    return new Set<string>();
  }

  const related: Set<string> = new Set<string>([this.selectedNodeId]);

  this.edges.forEach((edge: XingtuEdge) => {
    if (edge.fromId === this.selectedNodeId) {
      related.add(edge.toId);
    }
    if (edge.toId === this.selectedNodeId) {
      related.add(edge.fromId);
    }
  });

  return related;
}
然后在计算连线时判断这条线是否属于当前选中关系:
active: relatedIds.has(edge.fromId) && relatedIds.has(edge.toId)
这样用户点中一个节点后,就能立即看到它和哪些节点有关,图谱的关系会更清晰。🧠
九、节点视觉:远近、亮度与标题显示
节点组件 XingtuSceneNode 会根据投影后的 scale 和 opacity 控制视觉效果。
private nodeSize(): number {
  return Math.max(30, Math.min(108, 58 * this.node.scale));
}

build() {
  Column({ space: 4 }) {
    Stack() {}
      .width(this.nodeSize())
      .height(this.nodeSize())
      .borderRadius(this.nodeSize() / 2)
      .backgroundColor(this.selected ? XingtuTheme.primaryAction : XingtuTheme.accent)
      .opacity(this.selected ? 0.98 : this.node.opacity * 0.82)
      .shadow({
        radius: this.selected ? 30 : 12 + this.node.scale * 5,
        color: this.selected ? XingtuTheme.harmonyLightShadow : '#3493C5FD',
        offsetX: 0,
        offsetY: this.selected ? 0 : 4
      })

    if (this.selected || this.node.scale > 0.92) {
      Text(this.node.title)
        .fontSize(12)
        .fontColor(XingtuTheme.textPrimary)
    }
  }
  .position({ x: this.nodePosX(), y: this.nodePosY() })
  .onClick(() => this.onTap())
}
这里有一个很实用的细节:不是所有节点都显示标题。
只有选中节点,或者距离较近、缩放较大的节点,才显示文字。这样能避免文字堆满屏幕,让星图保持干净和高级感。
十、总结 🌟
这篇文章主要分享了如何在 HarmonyOS / OpenHarmony 中用 ArkTS 实现一个可旋转、可缩放的 3D 知识星图交互。
核心思路可以总结为:
- 使用 3D 坐标保存节点位置
- 使用相机状态保存旋转和缩放
- 使用透视投影把 3D 节点转换到 2D 屏幕
- 使用
onTouch实现单指旋转和双指缩放 - 使用关系边计算节点连线
- 使用选中状态高亮相关节点和连线
- 使用大小、透明度、阴影表现空间层次
这个方案不依赖复杂 3D 引擎,而是基于 ArkUI 自身组件完成空间感表达,比较适合轻量级知识图谱、AI 思维导图、词语关系网络等应用场景。✨

开源鸿蒙跨平台开发社区汇聚开发者与厂商,共建“一次开发,多端部署”的开源生态,致力于降低跨端开发门槛,推动万物智联创新。
更多推荐


 0
0 0
0- 0


 已为社区贡献153条内容

所有评论(0)