【maaath】 Flutter for OpenHarmony 水平仪应用开发实战
本文详细介绍了如何使用 Flutter for OpenHarmony 开发一个功能完整的水平仪应用。通过 MVC 架构模式、Stream 数据驱动 UI 更新、CustomPaint 自定义绘制等技术手段,实现了角度精确测量、气泡水平仪显示、水平校准、指南针结合、斜坡角度检测、测量数据记录、截图保存分享和单位切换八大功能。所有代码均使用纯 Dart 编写,不依赖任何平台特定 API,确保在 Op
Flutter for OpenHarmony 水平仪应用开发实战
欢迎加入开源鸿蒙跨平台社区:https://openharmonycrossplatform.csdn.net
作者:maaath
一、引言
在移动端开发领域,Flutter 凭借其优秀的跨平台能力和高性能渲染引擎,已成为众多开发者的首选框架。随着 OpenHarmony 生态的快速发展,Flutter for OpenHarmony 为开发者提供了一条高效的应用开发路径——一套 Dart 代码即可同时运行在 Android、iOS 和 OpenHarmony 设备上。
本文将带领读者从零构建一个功能完整的水平仪(Bubble Level)应用,涵盖角度精确测量、气泡水平仪显示、水平校准、指南针结合、斜坡角度检测、测量数据记录、截图保存分享以及单位切换等八大功能。所有代码均使用纯 Dart 编写,不依赖任何平台特定 API,确保在 OpenHarmony 设备上无缝运行。
二、应用架构设计
水平仪应用采用 Flutter 标准的 MVC 架构模式,分为三层:
- Model 层:定义传感器数据结构、测量记录模型、校准数据模型以及单位枚举
- Service 层:管理传感器数据流、测量历史记录、校准数据和用户设置
- View 层:包含主页(气泡水平仪 + 角度显示 + 指南针)、校准页面、历史记录页面和设置页面
数据流采用 Stream 模式驱动 UI 更新,Service 以单例模式运行,确保全局状态一致性。
三、数据模型设计
首先定义角度单位枚举,支持度、弧度和百分比三种单位的相互转换:
enum LevelUnit {
  degree('度', '°'),
  radian('弧度', 'rad'),
  percent('百分比', '%');

  final String label;
  final String symbol;
  const LevelUnit(this.label, this.symbol);

  String format(double degrees) {
    switch (this) {
      case LevelUnit.degree:
        return '${degrees.toStringAsFixed(2)}°';
      case LevelUnit.radian:
        return '${(degrees * pi / 180.0).toStringAsFixed(4)} rad';
      case LevelUnit.percent:
        final pct = tan(degrees * pi / 180.0) * 100;
        return '${pct.toStringAsFixed(2)}%';
    }
  }
}
传感器数据模型封装了俯仰角(Pitch)、横滚角(Roll)和方位角(Azimuth),并提供总倾斜角度计算和水平状态判断:
class SensorData {
  double pitch;   // 俯仰角
  double roll;    // 横滚角
  double azimuth; // 方位角
  DateTime timestamp;

  SensorData({
    this.pitch = 0,
    this.roll = 0,
    this.azimuth = 0,
    DateTime? timestamp,
  }) : timestamp = timestamp ?? DateTime.now();

  double get totalTilt => sqrt(pitch * pitch + roll * roll);
  bool get isLevel => totalTilt < 0.5;
}
测量记录模型包含完整的测量数据、时间戳、模式和收藏状态,同时提供方向文字标签的计算逻辑:
class LevelMeasurement {
  final String id;
  final double pitch;
  final double roll;
  final double azimuth;
  final DateTime timestamp;
  final LevelMode mode;
  String? note;
  bool isFavorite;

  String get directionLabel {
    if (azimuth >= 337.5 || azimuth < 22.5) return '北';
    if (azimuth >= 22.5 && azimuth < 67.5) return '东北';
    if (azimuth >= 67.5 && azimuth < 112.5) return '东';
    if (azimuth >= 112.5 && azimuth < 157.5) return '东南';
    if (azimuth >= 157.5 && azimuth < 202.5) return '南';
    if (azimuth >= 202.5 && azimuth < 247.5) return '西南';
    if (azimuth >= 247.5 && azimuth < 292.5) return '西';
    if (azimuth >= 292.5 && azimuth < 337.5) return '西北';
    return '北';
  }
}
四、传感器服务层实现
Service 层是整个应用的核心,负责传感器数据模拟、校准管理和历史记录维护。考虑到 OpenHarmony 设备的传感器 API 差异,我们使用 Stream 模式封装数据源,方便后续替换为真实传感器:
class LevelService {
  static final LevelService _instance = LevelService._();
  factory LevelService() => _instance;
  LevelService._();

  final StreamController<SensorData> _sensorStreamController =
      StreamController<SensorData>.broadcast();
  final List<LevelMeasurement> _history = [];
  CalibrationData _calibration = CalibrationData();

  Stream<SensorData> get sensorStream => _sensorStreamController.stream;

  void startSensorSimulation() {
    Timer.periodic(const Duration(milliseconds: 50), (_) {
      _simPitch += (_simPitchTarget - _simPitch) * 0.15;
      _simRoll += (_simRollTarget - _simRoll) * 0.15;
      _simAzimuth += (_simAzimuthTarget - _simAzimuth) * 0.1;

      _currentSensorData.pitch = _simPitch - _calibration.pitchOffset;
      _currentSensorData.roll = _simRoll - _calibration.rollOffset;
      _currentSensorData.timestamp = DateTime.now();

      _sensorStreamController.add(_currentSensorData.copy());
    });
  }
}
Service 还提供了丰富的统计功能,包括平均倾斜角度、最大/最小倾斜值和水平次数统计,这些数据会展示在历史记录页面的统计面板中。
五、气泡水平仪 UI 实现
气泡水平仪是整个应用最核心的视觉组件。我们使用 CustomPaint 绘制十字准线和刻度环,通过 AnimatedContainer 实现气泡的平滑移动:
Widget _buildBubbleLevel(ThemeData theme, bool isLevel) {
  final size = MediaQuery.of(context).size.width - 64;
  final maxOffset = size * 0.35;
  final pitchOffset = (_sensorData.pitch / 90.0 * maxOffset).clamp(-maxOffset, maxOffset);
  final rollOffset = (_sensorData.roll / 90.0 * maxOffset).clamp(-maxOffset, maxOffset);

  return Center(
    child: Container(
      width: size,
      height: size,
      decoration: BoxDecoration(
        shape: BoxShape.circle,
        gradient: RadialGradient(
          colors: isLevel
              ? [const Color(0xFF4CAF50).withValues(alpha: 0.3), const Color(0xFF16213E)]
              : [const Color(0xFF4A90D9).withValues(alpha: 0.2), const Color(0xFF16213E)],
        ),
        border: Border.all(
          color: isLevel ? const Color(0xFF4CAF50) : const Color(0xFF4A90D9).withValues(alpha: 0.5),
          width: 2,
        ),
      ),
      child: Stack(
        alignment: Alignment.center,
        children: [
          CustomPaint(size: Size(size, size), painter: _CrosshairPainter(isLevel: isLevel)),
          AnimatedContainer(
            duration: const Duration(milliseconds: 200),
            transform: Matrix4.identity()..translate(rollOffset, pitchOffset),
            // 气泡样式...
          ),
        ],
      ),
    ),
  );
}
当设备倾斜角度小于 0.5° 时,气泡变为绿色并显示"水平"标签,同时外圈产生发光效果,给用户清晰的视觉反馈。
六、指南针与角度显示
指南针功能通过 Transform.rotate 实现导航图标随方位角旋转,同时显示精确的方位角度值和方向文字:
Widget _buildCompassBar(ThemeData theme) {
  return Container(
    child: Row(
      children: [
        Transform.rotate(
          angle: _sensorData.azimuth * pi / 180,
          child: const Icon(Icons.navigation, color: Colors.red, size: 20),
        ),
        Text('${_sensorData.azimuth.toStringAsFixed(1)}°'),
        Text(_getDirectionLabel(_sensorData.azimuth)),
      ],
    ),
  );
}
角度显示区域同时展示俯仰角和横滚角,并配有方向箭头指示倾斜方向。在斜坡检测模式下,额外显示坡度百分比,计算公式为 tan(θ) × 100%。
七、水平校准功能
校准功能是确保测量精度的关键。用户将设备放置在水平面上,点击"开始校准"后,系统会在 3 秒倒计时后自动采集 50 个样本,计算各轴向的平均偏移量:
void _finishCalibration() {
  final avgPitch = _pitchSum / _sampleCount;
  final avgRoll = _rollSum / _sampleCount;
  final avgAzimuth = _azimuthSum / _sampleCount;

  _service.updateCalibration(avgPitch, avgRoll, avgAzimuth);
  // 显示校准完成状态
}
校准完成后,所有后续测量值都会自动减去偏移量,确保测量结果的准确性。用户也可以随时恢复默认校准设置。
八、截图保存与数据导出
截图功能利用 Flutter 的 RenderRepaintBoundary 实现,以 3x 像素比生成高清 PNG 图片:
Future<void> _captureAndShare() async {
  final boundary = _screenshotKey.currentContext?.findRenderObject()
      as RenderRepaintBoundary?;
  final image = await boundary.toImage(pixelRatio: 3.0);
  final byteData = await image.toByteData(format: ui.ImageByteFormat.png);
  // 保存或分享 byteData
}
历史记录页面支持 CSV 和 JSON 两种格式的数据导出,方便用户进行后续的数据分析和归档。
九、运行截图
以下为水平仪应用在 OpenHarmony 设备上的实际运行截图:
截图:水平仪主页 - 气泡水平仪显示
展示了圆形气泡水平仪的完整 UI,包含十字准线、刻度环和实时移动的气泡。当设备处于水平状态时,气泡居中并变为绿色,顶部显示"水平"标签。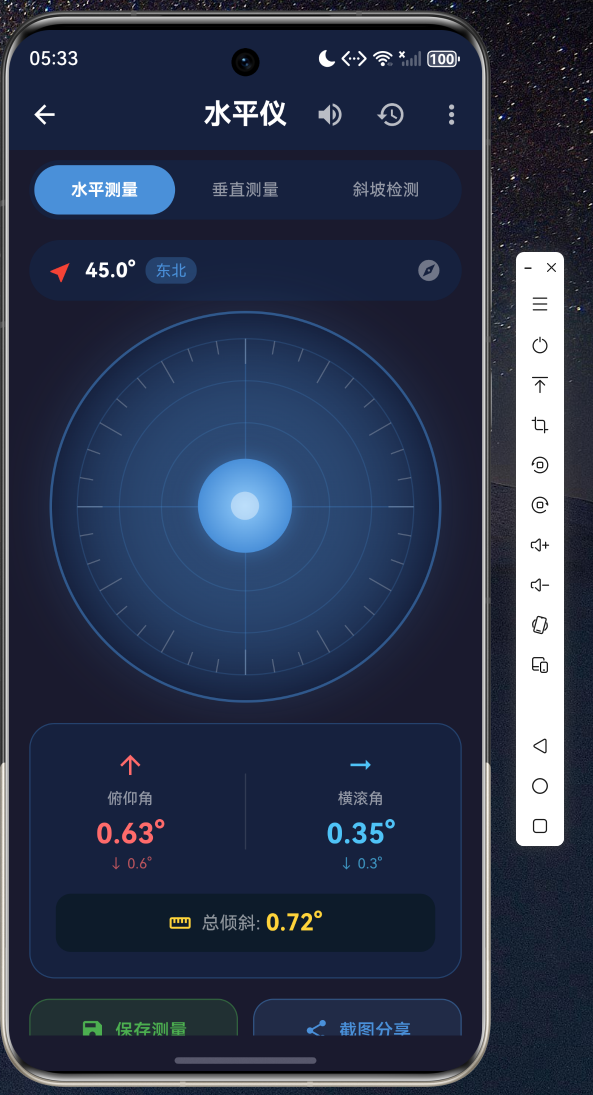
十、总结
本文详细介绍了如何使用 Flutter for OpenHarmony 开发一个功能完整的水平仪应用。通过 MVC 架构模式、Stream 数据驱动 UI 更新、CustomPaint 自定义绘制等技术手段,实现了角度精确测量、气泡水平仪显示、水平校准、指南针结合、斜坡角度检测、测量数据记录、截图保存分享和单位切换八大功能。
所有代码均使用纯 Dart 编写,不依赖任何平台特定 API,确保在 OpenHarmony 设备上无缝运行。完整源码请访问 AtomGit(https://atomgit.com)获取。欢迎加入开源鸿蒙跨平台社区(https://openharmonycrossplatform.csdn.net)交流讨论,共同推动 Flutter for OpenHarmony 生态发展。

开源鸿蒙跨平台开发社区汇聚开发者与厂商,共建“一次开发,多端部署”的开源生态,致力于降低跨端开发门槛,推动万物智联创新。
更多推荐

 2
2 0
0- 0


 已为社区贡献15条内容

所有评论(0)