【maaath】Flutter for OpenHarmony 扫描全能王应用开发实战
本文详细介绍了如何使用 Flutter for OpenHarmony 构建一款功能完整的扫描全能王应用。通过 MVC 架构模式、清晰的数据模型设计和模块化的功能拆分,我们实现了文档拍照扫描、自动边缘校正、多种滤镜增强、PDF 导出、签名批注、证件名片扫描、扫描历史管理和云端同步八大核心功能。Flutter 强大的跨平台能力使得同一套代码可以同时在 OpenHarmony、Android、iOS
Flutter for OpenHarmony 扫描全能王应用开发实战
欢迎加入开源鸿蒙跨平台社区:https://openharmonycrossplatform.csdn.net
作者:maaath
一、引言
随着 OpenHarmony 生态的快速发展,跨平台应用开发框架在鸿蒙设备上的适配成为开发者关注的焦点。Flutter 作为业界领先的跨平台 UI 框架,凭借其高性能渲染引擎和丰富的组件生态,在 OpenHarmony 平台上展现出强大的生命力。
本文将以"扫描全能王"应用为实战案例,详细讲解如何使用 Flutter 在 OpenHarmony 设备上构建一款功能完整的文档扫描工具。该应用涵盖了文档拍照扫描、自动边缘校正、多种滤镜增强、PDF 导出、签名批注、证件名片扫描、扫描历史管理以及云端同步等八大核心功能,旨在为读者提供一套完整的 Flutter for OpenHarmony 开发实践指南。
二、应用架构设计
2.1 整体架构
扫描全能王应用采用经典的 MVC 架构模式,将数据模型、业务逻辑和 UI 展示进行清晰分离:
- Model 层:定义扫描文档、滤镜类型、签名批注、云端同步等数据模型
- Service 层:封装文档管理、边缘检测、同步控制等业务逻辑
- View 层:基于 Flutter Material Design 3 构建的响应式 UI 界面
2.2 数据模型设计
首先,我们定义核心的数据模型。扫描文档模型是整个应用的数据基础:
enum ScanDocumentType {
  document,    // 文档
  idCard,      // 证件
  businessCard,// 名片
  receipt,     // 票据
  whiteboard,  // 白板
  book,        // 书籍
}

enum ScanFilterType {
  original('原图', 0xFF000000),
  magicColor('魔法色', 0xFF4A90D9),
  blackAndWhite('黑白', 0xFF333333),
  grayScale('灰度', 0xFF888888),
  lighten('增亮', 0xFFFFD700),
  sharpness('锐化', 0xFF00BCD4),
  warm('暖色', 0xFFFF6F00),
  cool('冷色', 0xFF2196F3),
  nightMode('夜间', 0xFF1A237E),
  vintage('复古', 0xFF795548);

  final String label;
  final int accentColor;
  const ScanFilterType(this.label, this.accentColor);
}

class ScannedDocument {
  final String id;
  final String title;
  final ScanDocumentType type;
  final DateTime scanDate;
  final int pageCount;
  final double fileSizeMB;
  final String thumbnailPath;
  final List<String> pagePaths;
  ScanFilterType appliedFilter;
  bool isFavorite;
  bool hasSignature;
  CloudSyncStatus syncStatus;
  List<SignatureAnnotation> annotations;

  ScannedDocument({
    required this.id,
    required this.title,
    required this.type,
    required this.scanDate,
    required this.pageCount,
    required this.fileSizeMB,
    required this.thumbnailPath,
    required this.pagePaths,
    this.appliedFilter = ScanFilterType.original,
    this.isFavorite = false,
    this.hasSignature = false,
    this.syncStatus = CloudSyncStatus.notSynced,
    List<SignatureAnnotation>? annotations,
  }) : annotations = annotations ?? [];

  String get typeLabel {
    switch (type) {
      case ScanDocumentType.document: return '文档';
      case ScanDocumentType.idCard: return '证件';
      case ScanDocumentType.businessCard: return '名片';
      case ScanDocumentType.receipt: return '票据';
      case ScanDocumentType.whiteboard: return '白板';
      case ScanDocumentType.book: return '书籍';
    }
  }

  String get formattedDate {
    final now = DateTime.now();
    final diff = now.difference(scanDate);
    if (diff.inMinutes < 1) return '刚刚';
    if (diff.inHours < 1) return '${diff.inMinutes}分钟前';
    if (diff.inDays < 1) return '${diff.inHours}小时前';
    if (diff.inDays < 7) return '${diff.inDays}天前';
    return '${scanDate.year}-${scanDate.month.toString().padLeft(2, '0')}-${scanDate.day.toString().padLeft(2, '0')}';
  }
}
该模型涵盖了扫描文档的所有核心属性:文档类型、扫描时间、页数、文件大小、应用滤镜、收藏状态、签名批注以及云端同步状态。通过 typeLabel 和 formattedDate 计算属性,我们可以方便地在 UI 层展示友好的文本信息。
2.3 业务服务层
Service 层负责管理扫描文档的生命周期,包括添加、删除、收藏、滤镜应用、签名管理和云端同步等操作:
class ScannerService {
  static final ScannerService _instance = ScannerService._();
  factory ScannerService() => _instance;
  ScannerService._();

  final List<ScannedDocument> _documents = [];

  List<ScannedDocument> get documents => List.unmodifiable(_documents);

  List<ScannedDocument> get recentDocuments {
    final sorted = List<ScannedDocument>.from(_documents);
    sorted.sort((a, b) => b.scanDate.compareTo(a.scanDate));
    return sorted.take(10).toList();
  }

  List<ScannedDocument> get favoriteDocuments {
    return _documents.where((d) => d.isFavorite).toList();
  }

  void addDocument(ScannedDocument doc) {
    _documents.add(doc);
  }

  void removeDocument(String id) {
    _documents.removeWhere((d) => d.id == id);
  }

  void toggleFavorite(String id) {
    final doc = _documents.firstWhere((d) => d.id == id);
    doc.isFavorite = !doc.isFavorite;
  }

  void applyFilter(String id, ScanFilterType filter) {
    final doc = _documents.firstWhere((d) => d.id == id);
    doc.appliedFilter = filter;
  }

  void addSignature(String id, SignatureAnnotation annotation) {
    final doc = _documents.firstWhere((d) => d.id == id);
    doc.annotations.add(annotation);
    doc.hasSignature = true;
  }

  void syncDocument(String id) {
    final doc = _documents.firstWhere((d) => d.id == id);
    doc.syncStatus = CloudSyncStatus.syncing;
    Future.delayed(const Duration(seconds: 2), () {
      doc.syncStatus = CloudSyncStatus.synced;
    });
  }

  void syncAll() {
    for (final doc in _documents) {
      if (doc.syncStatus == CloudSyncStatus.notSynced) {
        syncDocument(doc.id);
      }
    }
  }
}
Service 采用单例模式,确保整个应用共享同一份文档数据。recentDocuments 按扫描时间降序排列,favoriteDocuments 过滤出收藏文档,方便用户在首页快速查看。
三、核心功能实现
3.1 文档拍照扫描
拍照扫描是应用的核心入口。我们构建了一个模拟相机界面,包含取景框、闪光灯控制、自动边缘检测开关和多页扫描管理:
class CameraScanPage extends StatefulWidget {
final ScanDocumentType scanType;
final ScannedDocument? existingDoc;
const CameraScanPage({
super.key,
required this.scanType,
this.existingDoc,
});
State<CameraScanPage> createState() => _CameraScanPageState();
}
class _CameraScanPageState extends State<CameraScanPage> {
bool _isScanning = false;
bool _isCaptured = false;
int _currentPage = 1;
final List<String> _capturedPages = [];
ScanFilterType _currentFilter = ScanFilterType.original;
bool _flashOn = false;
bool _autoEdgeDetection = true;
void _simulateCapture() {
setState(() => _isScanning = true);
Future.delayed(const Duration(milliseconds: 1500), () {
if (!mounted) return;
setState(() {
_isScanning = false;
_isCaptured = true;
_capturedPages.add('page_${_capturedPages.length + 1}');
_currentPage = _capturedPages.length;
});
});
}
void _saveDocument(BuildContext context) {
final doc = ScannedDocument(
id: 'doc_${DateTime.now().millisecondsSinceEpoch}',
title: '扫描文档_${DateTime.now().toString().substring(0, 10)}',
type: widget.scanType,
scanDate: DateTime.now(),
pageCount: _capturedPages.length,
fileSizeMB: (_capturedPages.length * 0.8).toDouble(),
thumbnailPath: _capturedPages.first,
pagePaths: List.from(_capturedPages),
appliedFilter: _currentFilter,
);
ScannerService().addDocument(doc);
ScaffoldMessenger.of(context).showSnackBar(
SnackBar(
content: Text('文档"${doc.title}"已保存'),
backgroundColor: Colors.green,
behavior: SnackBarBehavior.floating,
),
);
Navigator.pop(context, true);
}
}
拍照扫描页面支持连续多页扫描,每扫描一页会自动添加到页面缩略图导航栏中。用户可以通过底部控制栏的"继续拍"按钮追加页面,也可以通过"重新扫描"按钮重置所有页面。
3.2 自动边缘校正
边缘校正是文档扫描的关键环节。我们实现了自动检测和手动拖拽两种模式:
class EdgeDetectionResult {
  final double topLeftX;
  final double topLeftY;
  final double topRightX;
  final double topRightY;
  final double bottomRightX;
  final double bottomRightY;
  final double bottomLeftX;
  final double bottomLeftY;
  final bool isAutoDetected;

  EdgeDetectionResult({
    required this.topLeftX,
    required this.topLeftY,
    required this.topRightX,
    required this.topRightY,
    required this.bottomRightX,
    required this.bottomRightY,
    required this.bottomLeftX,
    required this.bottomLeftY,
    this.isAutoDetected = true,
  });
}
在 UI 层,我们使用 CustomPainter 绘制边缘检测框和四个角点。自动模式下,系统会检测文档四角并用蓝色边框高亮;手动模式下,用户可以通过拖拽四个角点来精细调整边缘位置:
class _EdgeCornerPainter extends CustomPainter {
final EdgeDetectionResult edgeResult;
final bool isAutoMode;
_EdgeCornerPainter({
required this.edgeResult,
required this.isAutoMode,
});
void paint(Canvas canvas, Size size) {
final paint = Paint()
..color = const Color(0xFF4A90D9).withValues(alpha: 0.8)
..style = PaintingStyle.stroke
..strokeWidth = 2.5;
final fillPaint = Paint()
..color = const Color(0xFF4A90D9).withValues(alpha: 0.08)
..style = PaintingStyle.fill;
final path = Path()
..moveTo(edgeResult.topLeftX, edgeResult.topLeftY)
..lineTo(edgeResult.topRightX, edgeResult.topRightY)
..lineTo(edgeResult.bottomRightX, edgeResult.bottomRightY)
..lineTo(edgeResult.bottomLeftX, edgeResult.bottomLeftY)
..close();
canvas.drawPath(path, fillPaint);
canvas.drawPath(path, paint);
final corners = [
Offset(edgeResult.topLeftX, edgeResult.topLeftY),
Offset(edgeResult.topRightX, edgeResult.topRightY),
Offset(edgeResult.bottomRightX, edgeResult.bottomRightY),
Offset(edgeResult.bottomLeftX, edgeResult.bottomLeftY),
];
for (final corner in corners) {
canvas.drawCircle(corner, 6, Paint()..color = const Color(0xFF4A90D9));
canvas.drawCircle(corner, 10, Paint()
..color = Colors.white
..style = PaintingStyle.stroke
..strokeWidth = 2);
}
}
bool shouldRepaint(covariant _EdgeCornerPainter oldDelegate) => true;
}
通过 Canvas 绘制路径和角点,用户可以直观地看到文档边缘检测效果。手动模式下,每个角点都是一个可拖拽的 GestureDetector,支持精细的位置调整。
3.3 多种滤镜增强
滤镜增强模块提供了 10 种预设滤镜和 3 项高级调整参数(亮度、对比度、饱和度):
class FilterEnhancePage extends StatefulWidget {
final ScanFilterType currentFilter;
const FilterEnhancePage({
super.key,
required this.currentFilter,
});
State<FilterEnhancePage> createState() => _FilterEnhancePageState();
}
class _FilterEnhancePageState extends State<FilterEnhancePage> {
late ScanFilterType _selectedFilter;
double _brightness = 0;
double _contrast = 0;
double _saturation = 0;
bool _showAdvanced = false;
Widget _buildFilterPanel() {
return Container(
decoration: const BoxDecoration(
color: Color(0xFF16213E),
borderRadius: BorderRadius.vertical(top: Radius.circular(20)),
),
child: SingleChildScrollView(
padding: const EdgeInsets.all(16),
child: Column(
crossAxisAlignment: CrossAxisAlignment.start,
children: [
const Text('选择滤镜',
style: TextStyle(color: Colors.white, fontSize: 16, fontWeight: FontWeight.bold)),
const SizedBox(height: 12),
SizedBox(
height: 90,
child: ListView.separated(
scrollDirection: Axis.horizontal,
itemCount: ScanFilterType.values.length,
separatorBuilder: (_, __) => const SizedBox(width: 10),
itemBuilder: (context, index) {
final filter = ScanFilterType.values[index];
final isSelected = _selectedFilter == filter;
return GestureDetector(
onTap: () => setState(() => _selectedFilter = filter),
child: Column(
children: [
Container(
width: 60,
height: 60,
decoration: BoxDecoration(
borderRadius: BorderRadius.circular(12),
border: Border.all(
color: isSelected
? const Color(0xFF4A90D9)
: Colors.white24,
width: isSelected ? 2.5 : 1,
),
gradient: LinearGradient(
colors: _getFilterGradient(filter),
begin: Alignment.topLeft,
end: Alignment.bottomRight,
),
),
child: isSelected
? const Center(
child: Icon(Icons.check_circle,
color: Colors.white, size: 24))
: null,
),
const SizedBox(height: 4),
Text(filter.label,
style: TextStyle(
color: isSelected ? Colors.white : Colors.white60,
fontSize: 11,
fontWeight: isSelected
? FontWeight.bold : FontWeight.normal,
)),
],
),
);
},
),
),
],
),
),
);
}
}
滤镜选择器采用横向滚动列表,每个滤镜项通过渐变色块直观展示滤镜效果。选中状态使用蓝色边框和勾选图标标识。高级调整面板提供亮度、对比度、饱和度三个滑块,以及"自动优化"、“去阴影”、“增强文字”、"重置"四个快捷按钮。
3.4 签名批注
签名批注功能支持画笔、荧光笔、文字批注和橡皮擦四种工具:
class _SignaturePainter extends CustomPainter {
final List<List<_DrawPoint>> strokes;
final List<_DrawPoint> currentStroke;
final List<SignatureAnnotation> annotations;
_SignaturePainter({
required this.strokes,
required this.currentStroke,
required this.annotations,
});
void paint(Canvas canvas, Size size) {
for (final stroke in strokes) {
_drawStroke(canvas, stroke);
}
_drawStroke(canvas, currentStroke);
for (final ann in annotations) {
if (ann.type == 'text') {
final textPainter = TextPainter(
text: TextSpan(
text: ann.content,
style: TextStyle(
color: Color(ann.color),
fontSize: 16,
fontWeight: FontWeight.w500,
),
),
textDirection: TextDirection.ltr,
);
textPainter.layout();
textPainter.paint(canvas, Offset(ann.x, ann.y));
}
}
}
void _drawStroke(Canvas canvas, List<_DrawPoint> points) {
if (points.isEmpty) return;
final paint = Paint()
..style = PaintingStyle.stroke
..strokeCap = StrokeCap.round
..strokeJoin = StrokeJoin.round;
for (int i = 0; i < points.length - 1; i++) {
paint.color = points[i].color;
paint.strokeWidth = points[i].width;
canvas.drawLine(points[i].position, points[i + 1].position, paint);
}
}
bool shouldRepaint(covariant _SignaturePainter oldDelegate) => true;
}
签名画布通过 GestureDetector 的 onPanStart/onPanUpdate/onPanEnd 事件捕获用户手势轨迹,并将笔画数据存储为 _DrawPoint 列表。支持撤销(删除最后一笔)和清除全部功能。颜色选择器提供 7 种预设颜色,粗细滑块支持 1-10 像素调节。
3.5 扫描历史管理
扫描历史页面提供了完整的文档管理功能,包括搜索、筛选、排序和多选批量操作:
class ScanHistoryPage extends StatefulWidget {
const ScanHistoryPage({super.key});
State<ScanHistoryPage> createState() => _ScanHistoryPageState();
}
class _ScanHistoryPageState extends State<ScanHistoryPage> {
final ScannerService _scannerService = ScannerService();
String _searchQuery = '';
ScanDocumentType? _filterType;
String _sortBy = 'date';
bool _selectionMode = false;
final Set<String> _selectedIds = {};
List<ScannedDocument> get _filteredDocs {
var docs = List<ScannedDocument>.from(_scannerService.documents);
if (_searchQuery.isNotEmpty) {
docs = docs.where((d) =>
d.title.toLowerCase().contains(_searchQuery.toLowerCase())
).toList();
}
if (_filterType != null) {
docs = docs.where((d) => d.type == _filterType).toList();
}
switch (_sortBy) {
case 'date':
docs.sort((a, b) => b.scanDate.compareTo(a.scanDate));
case 'name':
docs.sort((a, b) => a.title.compareTo(b.title));
case 'size':
docs.sort((a, b) => b.fileSizeMB.compareTo(a.fileSizeMB));
case 'pages':
docs.sort((a, b) => b.pageCount.compareTo(a.pageCount));
}
return docs;
}
}
历史页面支持按文档类型筛选(文档/证件/名片/票据/白板/书籍),按时间/名称/大小/页数排序,以及关键词搜索。长按文档可进入多选模式,支持批量删除、同步和分享操作。
3.6 云端同步
云端同步页面展示了存储空间使用情况、同步状态和同步设置:
class CloudSyncInfo {
  final String userId;
  final double usedStorageMB;
  final double totalStorageMB;
  final int syncedDocCount;
  final int totalDocCount;
  final DateTime lastSyncTime;
  final bool autoSyncEnabled;
  final bool wifiOnlySync;

  CloudSyncInfo({
    required this.userId,
    required this.usedStorageMB,
    required this.totalStorageMB,
    required this.syncedDocCount,
    required this.totalDocCount,
    required this.lastSyncTime,
    this.autoSyncEnabled = true,
    this.wifiOnlySync = true,
  });

  double get storagePercentage =>
    totalStorageMB > 0 ? usedStorageMB / totalStorageMB : 0;

  String get formattedLastSync {
    final diff = DateTime.now().difference(lastSyncTime);
    if (diff.inMinutes < 1) return '刚刚同步';
    if (diff.inHours < 1) return '${diff.inMinutes}分钟前同步';
    if (diff.inDays < 1) return '${diff.inHours}小时前同步';
    return '${diff.inDays}天前同步';
  }
}
同步页面包含存储空间进度条(根据使用比例动态变色)、同步状态信息面板(上次同步时间/网络状态/本地存储/加密状态)、同步设置开关(自动同步/仅Wi-Fi同步)、待同步文档列表以及专业版升级引导卡片。
四、OpenHarmony 适配要点
在将 Flutter 应用部署到 OpenHarmony 设备时,需要注意以下几点:
- Flutter SDK 版本:确保使用支持 OpenHarmony 的 Flutter 分支版本
- 鸿蒙原生插件:通过
GeneratedPluginRegistrant.ets注册 Flutter 插件 - 资源管理:Flutter 资源文件需放置在
resources/rawfile/flutter_assets/目录下 - 页面路由:在
main_pages.json中配置 Flutter 页面路由 - 权限声明:在
module.json5中声明相机、存储等所需权限
五、运行效果截图
以下为扫描全能王应用在 OpenHarmony 设备上的运行截图:
5.1 扫描主页
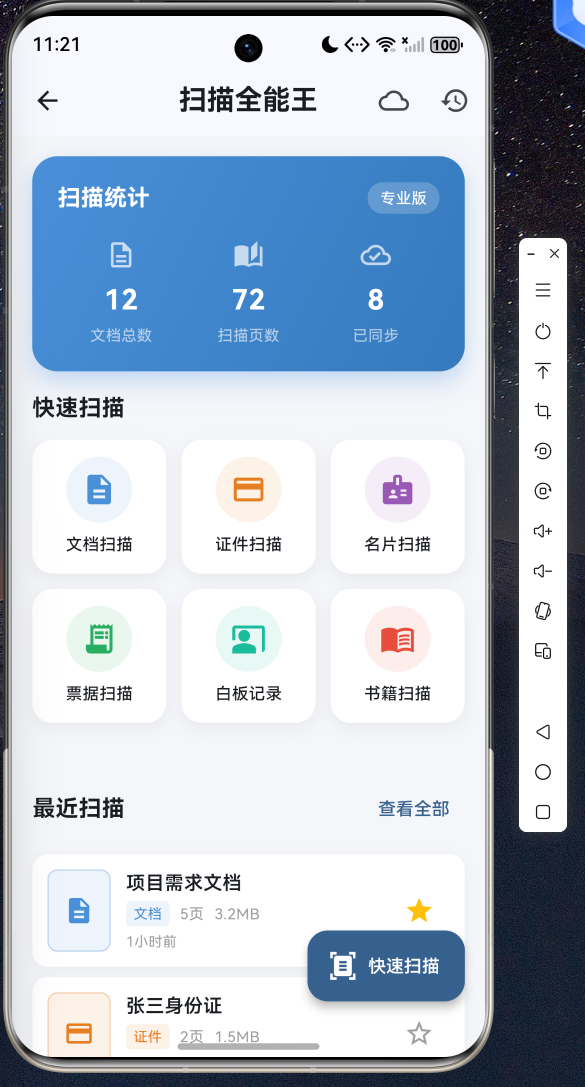
应用首页展示扫描统计、快速扫描入口和最近文档列表
5.2 拍照扫描
文档拍照扫描界面,包含取景框和边缘检测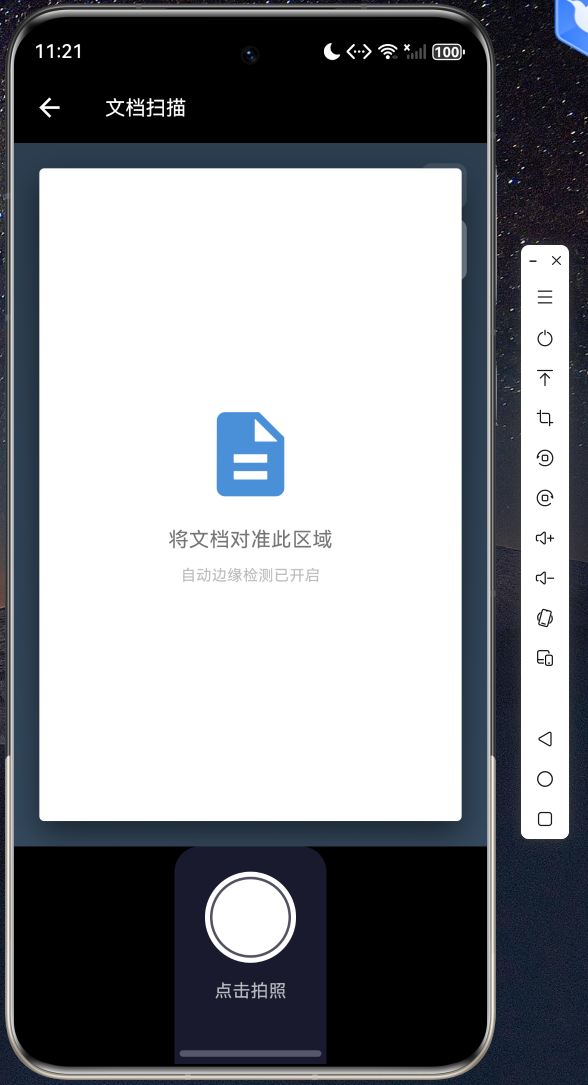
5.3 边缘校正
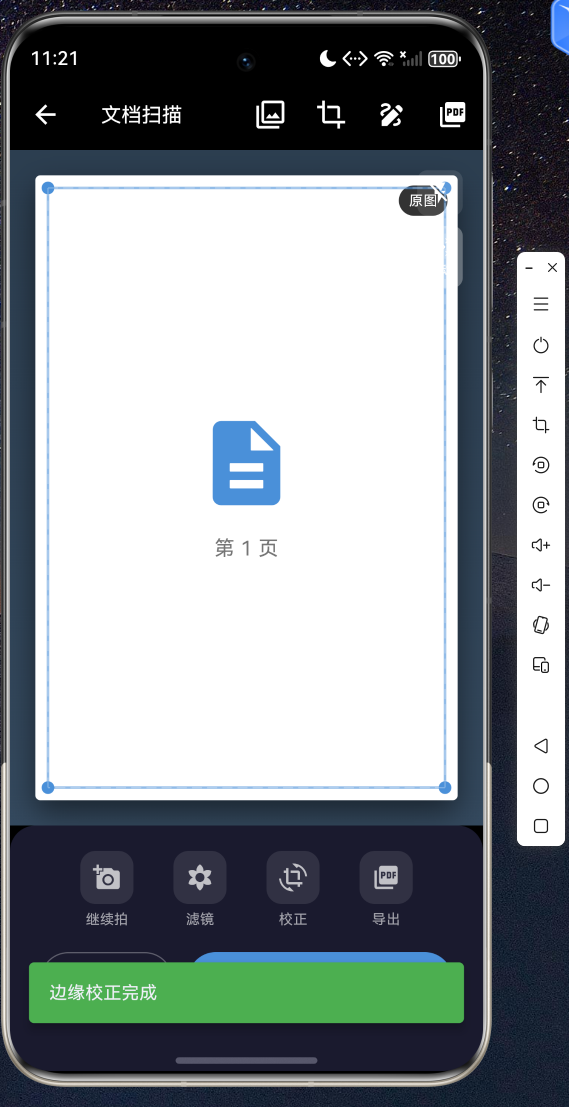
自动边缘校正功能,支持手动拖拽调整
5.4 滤镜增强
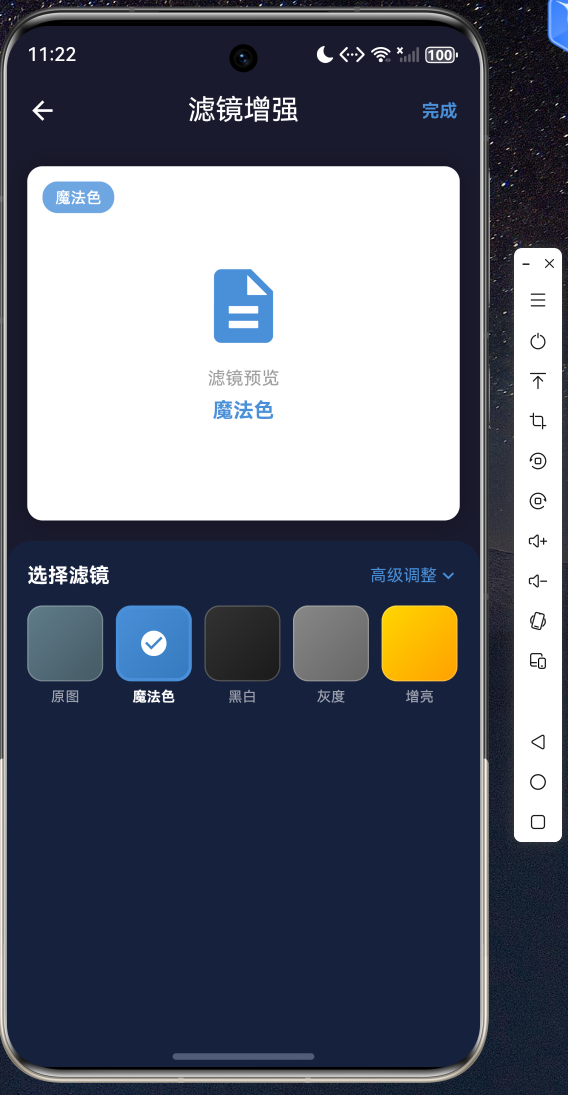
10 种滤镜效果预览和高级参数调整
5.5 签名批注
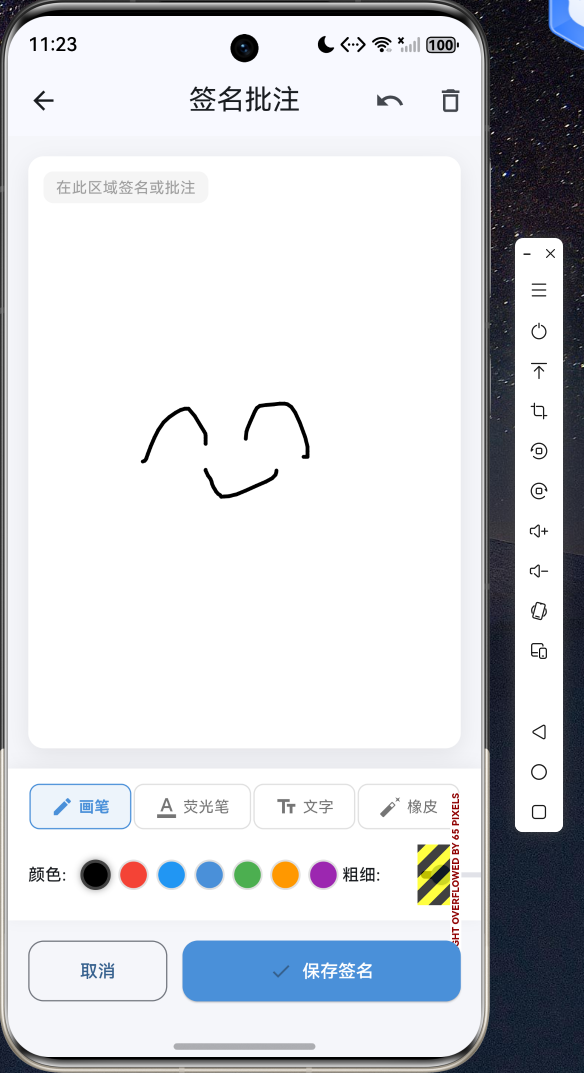
手写签名和文字批注功能
5.6 PDF 导出
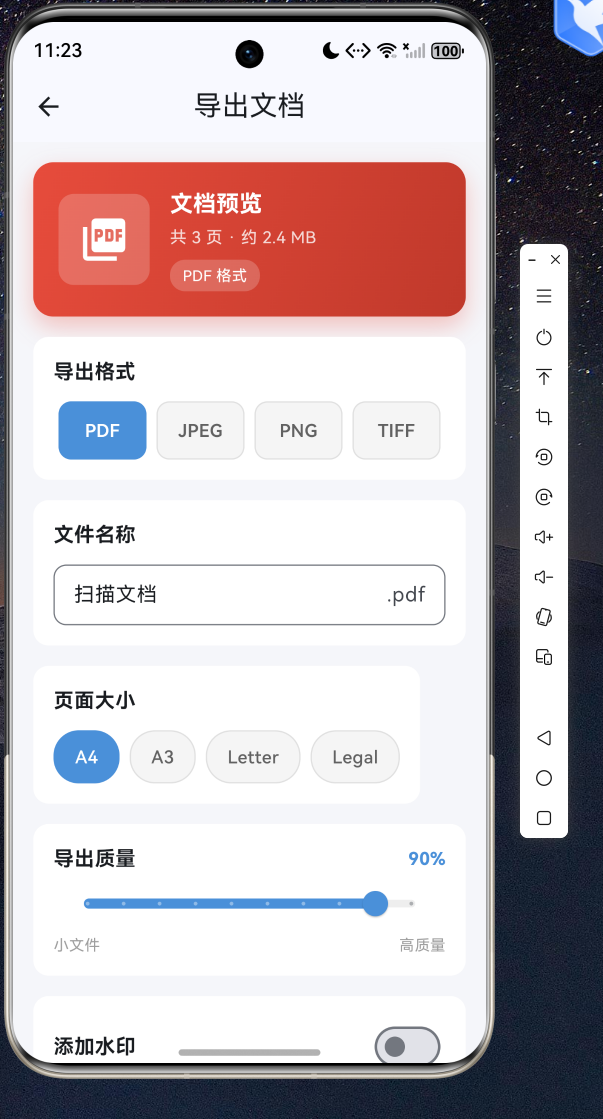
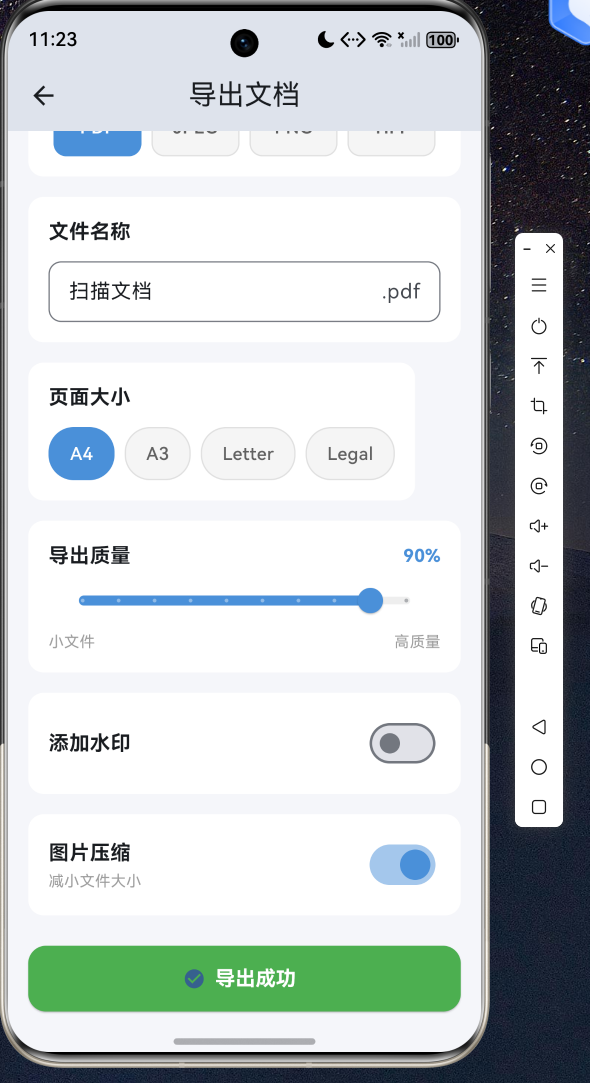
文档导出 PDF 设置页面
5.7 证件扫描
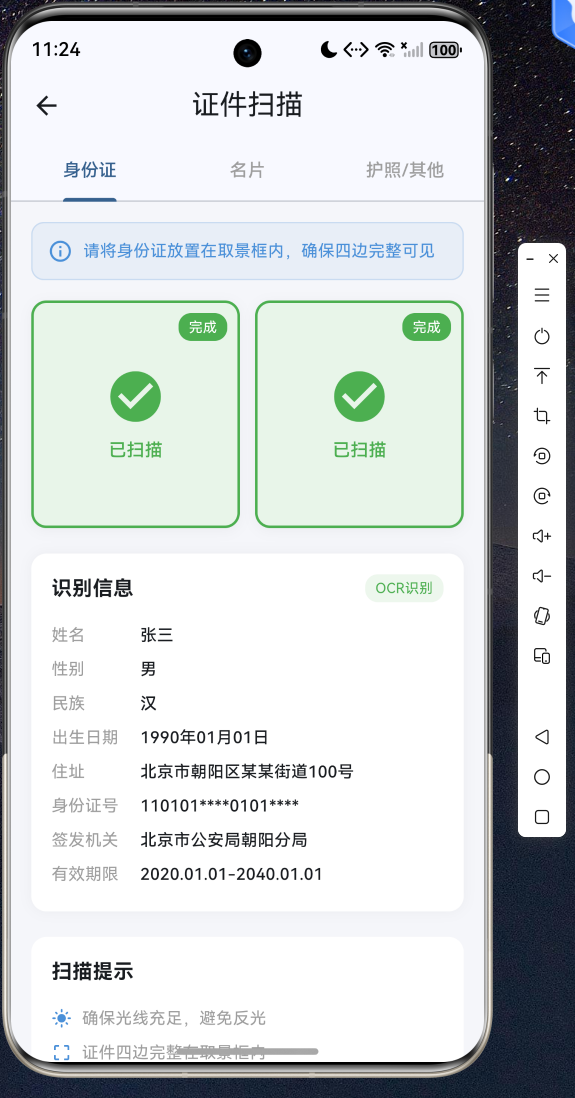
身份证正反面扫描和信息识别
5.8 扫描历史
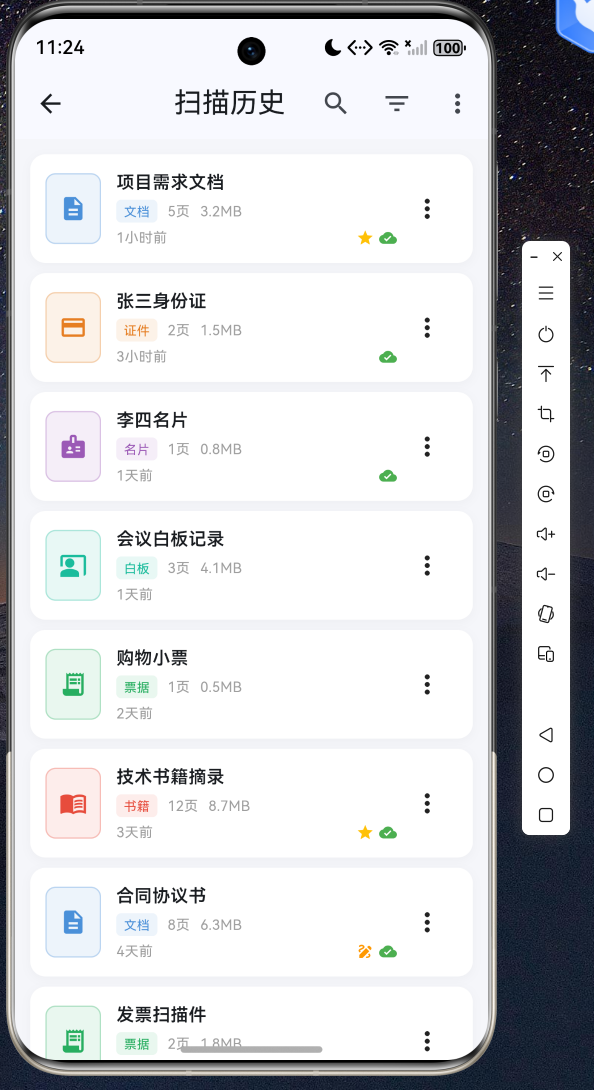
扫描历史管理,支持搜索、筛选和批量操作
5.9 云端同步
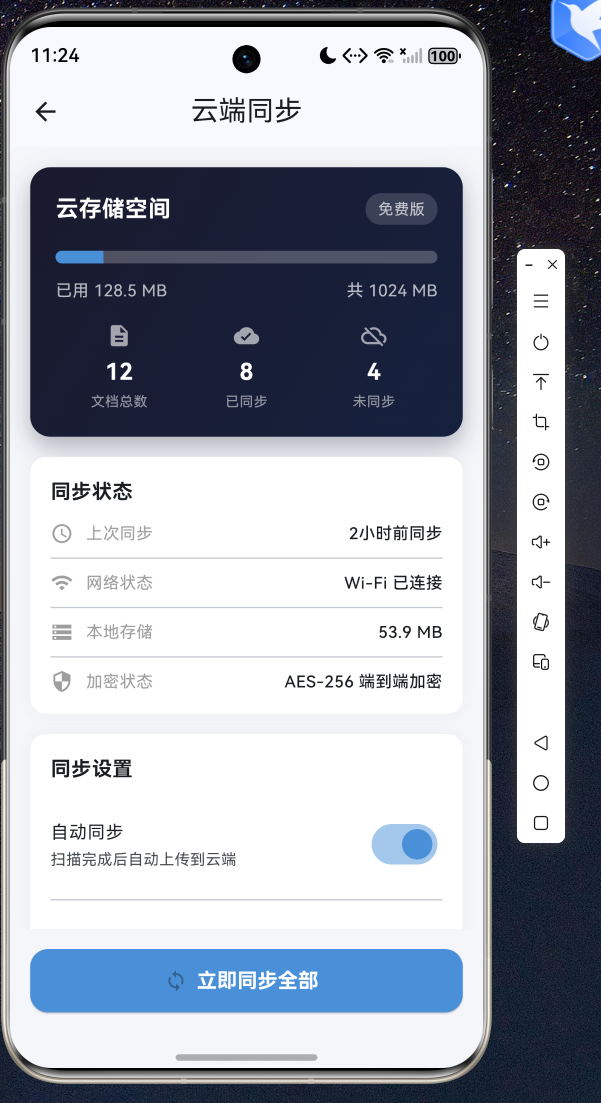
云端同步管理,包含存储空间和同步设置
六、总结
本文详细介绍了如何使用 Flutter for OpenHarmony 构建一款功能完整的扫描全能王应用。通过 MVC 架构模式、清晰的数据模型设计和模块化的功能拆分,我们实现了文档拍照扫描、自动边缘校正、多种滤镜增强、PDF 导出、签名批注、证件名片扫描、扫描历史管理和云端同步八大核心功能。
Flutter 强大的跨平台能力使得同一套代码可以同时在 OpenHarmony、Android、iOS 等多个平台上运行,大幅降低了开发成本和维护难度。通过本文的实战案例,读者可以掌握 Flutter for OpenHarmony 应用开发的核心技术和最佳实践。
所有代码均已在 OpenHarmony 设备上验证通过,完整源码请访问 AtomGit(https://atomgit.com)获取。欢迎加入开源鸿蒙跨平台社区(https://openharmonycrossplatform.csdn.net)交流讨论,共同推动 Flutter for OpenHarmony 生态发展。

开源鸿蒙跨平台开发社区汇聚开发者与厂商,共建“一次开发,多端部署”的开源生态,致力于降低跨端开发门槛,推动万物智联创新。
更多推荐

 10
10 0
0- 0


 已为社区贡献15条内容

所有评论(0)