【maaath】 Flutter for OpenHarmony 跨平台二维码生成应用开发实践
Flutter for OpenHarmony 跨平台二维码生成应用开发实践
欢迎加入开源鸿蒙跨平台社区:https://openharmonycrossplatform.csdn.net
作者:maaath
一、引言
随着 OpenHarmony 生态的日益成熟,越来越多的开发者开始关注如何将现有的跨平台技术栈迁移到鸿蒙平台上。Flutter for OpenHarmony 作为 Google Flutter 框架在鸿蒙系统上的适配版本,为开发者提供了一条高效的跨平台开发路径——只需编写一套 Dart 代码,即可同时覆盖 Android、iOS 和 OpenHarmony 三大平台。
二维码作为一种高效的信息传递载体,在日常开发中有着广泛的应用场景:从 URL 跳转、WiFi 密码分享,到名片信息交换、支付场景等。本文将带领读者从零开始,使用 Flutter for OpenHarmony 构建一个功能完整的二维码生成应用,涵盖文本生成、网址链接、WiFi 配置、名片(vCard)等多种二维码类型,并支持样式自定义与批量生成功能。
通过本文,你将掌握以下核心技能:
- 在 Flutter for OpenHarmony 环境中进行 UI 布局与状态管理
- 使用纯 Dart 实现 QR 码矩阵生成算法(含 Reed-Solomon 纠错)
- 利用 CustomPainter 在鸿蒙设备上渲染二维码图形
- 实现多类型二维码(文本/URL/WiFi/vCard)的生成逻辑
二、环境准备
在开始编码之前,请确保已安装以下开发环境:
- DevEco Studio(用于鸿蒙设备调试与打包)
- Flutter SDK for OpenHarmony(可在 AtomGit 仓库获取:
https://atomgit.com) - Dart SDK 3.0+
创建一个新的 Flutter 项目:
flutter create --org com.example qrcode_app
cd qrcode_app
在 pubspec.yaml 中添加依赖:
dependencies:
  flutter:
    sdk: flutter
  path_provider: ^2.1.0
  share_plus: ^7.0.0
  image_gallery_saver: ^2.0.0
三、核心实现:QR 码矩阵生成算法
QR 码的生成本质上是一个矩阵编码过程。我们需要在 Dart 中实现完整的 QR 码生成逻辑,包括数据编码、纠错码计算、矩阵排布等步骤。以下是核心实现:
3.1 Galois 域运算与 Reed-Solomon 纠错
class QRMath {
  static final List<int> _expTable = List.filled(256, 0);
  static final List<int> _logTable = List.filled(256, 0);
  static bool _initialized = false;

  static void _init() {
    if (_initialized) return;
    _initialized = true;
    for (int i = 0; i < 8; i++) {
      _expTable[i] = 1 << i;
    }
    for (int i = 8; i < 256; i++) {
      _expTable[i] = _expTable[i - 4] ^
          _expTable[i - 5] ^
          _expTable[i - 6] ^
          _expTable[i - 8];
    }
    for (int i = 0; i < 255; i++) {
      _logTable[_expTable[i]] = i;
    }
  }

  static int glog(int n) {
    _init();
    if (n < 1) throw ArgumentError('glog($n)');
    return _logTable[n];
  }

  static int gexp(int n) {
    _init();
    return _expTable[n % 255];
  }
}
3.2 多项式运算与纠错码生成
class QRPolynomial {
  final List<int> _num;

  QRPolynomial(this._num);

  QRPolynomial multiply(QRPolynomial other) {
    List<int> result = List.filled(_num.length + other._num.length - 1, 0);
    for (int i = 0; i < _num.length; i++) {
      for (int j = 0; j < other._num.length; j++) {
        result[i + j] ^= QRMath.gexp(
            QRMath.glog(_num[i]) + QRMath.glog(other._num[j]));
      }
    }
    return QRPolynomial(result);
  }

  QRPolynomial mod(QRPolynomial other) {
    List<int> num = List.from(_num);
    while (num.length - other._num.length >= 0) {
      int ratio = QRMath.glog(num[0]) - QRMath.glog(other._num[0]);
      for (int i = 0; i < other._num.length; i++) {
        num[i] ^= QRMath.gexp(QRMath.glog(other._num[i]) + ratio);
      }
      while (num.isNotEmpty && num[0] == 0) {
        num.removeAt(0);
      }
    }
    return QRPolynomial(num);
  }
}
3.3 QR 码矩阵生成器
class QRCodeGenerator {
  static const int _PAD0 = 0xEC;
  static const int _PAD1 = 0x11;

  static List<List<int>> generateMatrix(String text,
      {int ecLevel = 1, int minVersion = 1}) {
    int version = _determineVersion(text.length, ecLevel, minVersion);
    List<int> dataBytes = _encodeData(text, version);
    List<int> ecBytes = _generateEC(dataBytes, version, ecLevel);
    List<int> allBytes = [...dataBytes, ...ecBytes];
    return _buildMatrix(allBytes, version);
  }

  static int _determineVersion(int dataLength, int ecLevel, int minVersion) {
    const List<int> capacities = [
      17, 32, 53, 78, 106, 134, 154, 192, 230, 271,
      321, 367, 425, 458, 520, 586, 644, 718, 792, 868,
      913, 1000, 1080, 1160, 1250, 1340, 1430, 1520, 1620, 1720,
      1820, 1920, 2020, 2120, 2220, 2320, 2420, 2520, 2620, 2720,
    ];
    for (int v = minVersion; v <= 40; v++) {
      if (dataLength <= capacities[v - 1]) return v;
    }
    throw Exception('Data too long');
  }

  static List<int> _encodeData(String text, int version) {
    List<int> bytes = [];
    bytes.add(0x40); // Byte mode indicator
    int charCount = text.length;
    int countBits = version <= 9 ? 8 : 16;
    for (int i = countBits - 1; i >= 0; i--) {
      bytes.add((charCount >> i) & 1);
    }
    List<int> textBytes = utf8.encode(text);
    for (int b in textBytes) {
      for (int i = 7; i >= 0; i--) {
        bytes.add((b >> i) & 1);
      }
    }
    int terminator = min(4, _getDataCapacity(version) - bytes.length);
    for (int i = 0; i < terminator; i++) {
      bytes.add(0);
    }
    while (bytes.length % 8 != 0) {
      bytes.add(0);
    }
    int capacity = _getDataCapacity(version);
    while (bytes.length < capacity * 8) {
      for (int p in [_PAD0, _PAD1]) {
        for (int i = 7; i >= 0; i--) {
          bytes.add((p >> i) & 1);
          if (bytes.length >= capacity * 8) break;
        }
        if (bytes.length >= capacity * 8) break;
      }
    }
    return bytes;
  }

  static int _getDataCapacity(int version) {
    const List<int> capacities = [
      19, 34, 55, 80, 108, 136, 156, 194, 232, 274,
      324, 370, 428, 461, 523, 589, 647, 721, 795, 871,
      916, 1003, 1083, 1163, 1253, 1343, 1433, 1523, 1623, 1723,
      1823, 1923, 2023, 2123, 2223, 2323, 2423, 2523, 2623, 2723,
    ];
    return capacities[version - 1];
  }

  static List<int> _generateEC(
      List<int> dataBits, int version, int ecLevel) {
    int ecCount = _getECCount(version);
    List<int> dataBytes = [];
    for (int i = 0; i < dataBits.length; i += 8) {
      int byte = 0;
      for (int j = 0; j < 8 && i + j < dataBits.length; j++) {
        byte = (byte << 1) | dataBits[i + j];
      }
      dataBytes.add(byte);
    }
    QRPolynomial genPoly = _generatorPolynomial(ecCount);
    List<int> msgPoly = List.filled(dataBytes.length + ecCount, 0);
    for (int i = 0; i < dataBytes.length; i++) {
      msgPoly[i] = dataBytes[i];
    }
    QRPolynomial remainder = QRPolynomial(msgPoly).mod(genPoly);
    List<int> ecBytes = List.filled(ecCount, 0);
    int offset = ecCount - remainder._num.length;
    for (int i = 0; i < remainder._num.length; i++) {
      ecBytes[offset + i] = remainder._num[i];
    }
    return ecBytes;
  }

  static int _getECCount(int version) {
    const List<int> ecCounts = [
      7, 10, 15, 20, 26, 18, 20, 24, 30, 18,
      20, 24, 26, 30, 22, 24, 28, 30, 28, 28,
      28, 28, 30, 30, 26, 28, 30, 30, 30, 30,
      30, 30, 30, 30, 30, 30, 30, 30, 30, 30,
    ];
    return ecCounts[version - 1];
  }

  static QRPolynomial _generatorPolynomial(int degree) {
    QRPolynomial poly = QRPolynomial([1]);
    for (int i = 0; i < degree; i++) {
      poly = poly.multiply(QRPolynomial([1, QRMath.gexp(i)]));
    }
    return poly;
  }

  static List<List<int>> _buildMatrix(List<int> allBytes, int version) {
    int size = version * 4 + 17;
    List<List<int>> matrix = List.generate(
        size, (_) => List.filled(size, -1));

    _placeFinders(matrix, size);
    _placeTiming(matrix, size);
    _placeAlignment(matrix, version);
    _reserveFormat(matrix, size);

    int dataIndex = 0;
    bool upward = true;
    for (int c = size - 1; c >= 0; c -= 2) {
      if (c == 6) c = 5;
      for (int r = 0; r < size; r++) {
        int row = upward ? size - 1 - r : r;
        for (int dc = 0; dc < 2; dc++) {
          int col = c - dc;
          if (col < 0) continue;
          if (matrix[row][col] == -1) {
            int bit = 0;
            if (dataIndex < allBytes.length) {
              bit = allBytes[dataIndex];
              dataIndex++;
            }
            matrix[row][col] = bit;
          }
        }
      }
      upward = !upward;
    }

    _applyMask(matrix, size);
    return matrix;
  }

  static void _placeFinders(List<List<int>> matrix, int size) {
    List<List<int>> positions = [
      [0, 0],
      [0, size - 7],
      [size - 7, 0]
    ];
    for (List<int> p in positions) {
      int pr = p[0];
      int pc = p[1];
      for (int r = 0; r < 7; r++) {
        for (int c = 0; c < 7; c++) {
          bool isBorder = r == 0 || r == 6 || c == 0 || c == 6;
          bool isInner = r >= 2 && r <= 4 && c >= 2 && c <= 4;
          matrix[pr + r][pc + c] = (isBorder || isInner) ? 1 : 0;
        }
      }
    }
  }

  static void _placeTiming(List<List<int>> matrix, int size) {
    for (int i = 8; i < size - 8; i++) {
      int bit = i % 2 == 0 ? 1 : 0;
      if (matrix[6][i] == -1) matrix[6][i] = bit;
      if (matrix[i][6] == -1) matrix[i][6] = bit;
    }
  }

  static void _placeAlignment(List<List<int>> matrix, int version) {
    List<int> positions = _getAlignmentPositions(version);
    for (int pr in positions) {
      for (int pc in positions) {
        if (matrix[pr][pc] != -1) continue;
        for (int r = -2; r <= 2; r++) {
          for (int c = -2; c <= 2; c++) {
            bool isBorder = r == -2 || r == 2 || c == -2 || c == 2;
            bool isCenter = r == 0 && c == 0;
            matrix[pr + r][pc + c] = (isBorder || isCenter) ? 1 : 0;
          }
        }
      }
    }
  }

  static List<int> _getAlignmentPositions(int version) {
    if (version == 1) return [];
    int num = version ~/ 7 + 2;
    int step = (version * 4 + 4) ~/ (num - 1);
    List<int> positions = [];
    int pos = version * 4 + 10;
    for (int i = 0; i < num; i++) {
      positions.add(pos - i * step);
    }
    return positions.reversed.toList();
  }

  static void _reserveFormat(List<List<int>> matrix, int size) {
    for (int i = 0; i <= 8; i++) {
      if (matrix[i][8] == -1) matrix[i][8] = 0;
      if (matrix[8][i] == -1) matrix[8][i] = 0;
    }
    for (int i = 0; i <= 7; i++) {
      if (matrix[size - 1 - i][8] == -1) matrix[size - 1 - i][8] = 0;
      if (matrix[8][size - 1 - i] == -1) matrix[8][size - 1 - i] = 0;
    }
    matrix[size - 8][8] = 1;
  }

  static void _applyMask(List<List<int>> matrix, int size) {
    for (int r = 0; r < size; r++) {
      for (int c = 0; c < size; c++) {
        if (matrix[r][c] == -1) matrix[r][c] = 0;
        if ((r + c) % 2 == 0) {
          if (matrix[r][c] != -2) {
            matrix[r][c] = matrix[r][c] == 1 ? 0 : 1;
          }
        }
      }
    }
  }

  static String generateWiFiString(
      String ssid, String password, String encryption) {
    return 'WIFI:T:$encryption;S:$ssid;P:$password;;';
  }

  static String generateVCard(
      String name, String phone, String email, String company, String title) {
    StringBuffer sb = StringBuffer();
    sb.writeln('BEGIN:VCARD');
    sb.writeln('VERSION:3.0');
    sb.writeln('FN:$name');
    if (phone.isNotEmpty) sb.writeln('TEL:$phone');
    if (email.isNotEmpty) sb.writeln('EMAIL:$email');
    if (company.isNotEmpty) sb.writeln('ORG:$company');
    if (title.isNotEmpty) sb.writeln('TITLE:$title');
    sb.writeln('END:VCARD');
    return sb.toString();
  }
}
四、Flutter UI 层实现
有了核心的 QR 码生成算法,接下来我们使用 Flutter 的 CustomPainter 将矩阵渲染为可视化图形。
4.1 二维码绘制组件
import 'package:flutter/material.dart';
class QRCodePainter extends CustomPainter {
final List<List<int>> matrix;
final Color fgColor;
final Color bgColor;
QRCodePainter({
required this.matrix,
this.fgColor = Colors.black,
this.bgColor = Colors.white,
});
void paint(Canvas canvas, Size size) {
if (matrix.isEmpty) return;
final paint = Paint();
final matrixSize = matrix.length;
final moduleSize = size.width / matrixSize;
final quietZone = moduleSize * 4;
final drawSize = size.width - quietZone * 2;
// 绘制背景
paint.color = bgColor;
canvas.drawRect(Rect.fromLTWH(0, 0, size.width, size.height), paint);
// 绘制前景模块
paint.color = fgColor;
for (int r = 0; r < matrixSize; r++) {
for (int c = 0; c < matrixSize; c++) {
if (matrix[r][c] == 1) {
final x = quietZone + c * (drawSize / matrixSize);
final y = quietZone + r * (drawSize / matrixSize);
final w = drawSize / matrixSize;
canvas.drawRect(Rect.fromLTWH(x, y, w, w), paint);
}
}
}
}
bool shouldRepaint(covariant QRCodePainter oldDelegate) {
return oldDelegate.matrix != matrix ||
oldDelegate.fgColor != fgColor ||
oldDelegate.bgColor != bgColor;
}
}
4.2 主页面:多类型二维码生成
import 'dart:convert';
import 'package:flutter/material.dart';
class QRGeneratePage extends StatefulWidget {
const QRGeneratePage({super.key});
State<QRGeneratePage> createState() => _QRGeneratePageState();
}
class _QRGeneratePageState extends State<QRGeneratePage>
with SingleTickerProviderStateMixin {
late TabController _tabController;
final TextEditingController _textController = TextEditingController();
final TextEditingController _urlController = TextEditingController();
final TextEditingController _ssidController = TextEditingController();
final TextEditingController _passwordController = TextEditingController();
final TextEditingController _nameController = TextEditingController();
final TextEditingController _phoneController = TextEditingController();
final TextEditingController _emailController = TextEditingController();
List<List<int>>? _qrMatrix;
Color _fgColor = Colors.black;
Color _bgColor = Colors.white;
final List<Color> _colorPresets = [
Colors.black,
const Color(0xFF1A5276),
const Color(0xFF1E8449),
const Color(0xFF6C3483),
const Color(0xFFC0392B),
const Color(0xFFE67E22),
];
void initState() {
super.initState();
_tabController = TabController(length: 4, vsync: this);
}
void dispose() {
_tabController.dispose();
_textController.dispose();
_urlController.dispose();
_ssidController.dispose();
_passwordController.dispose();
_nameController.dispose();
_phoneController.dispose();
_emailController.dispose();
super.dispose();
}
void _generateQR(String content) {
if (content.isEmpty) return;
setState(() {
_qrMatrix = QRCodeGenerator.generateMatrix(content);
});
}
Widget build(BuildContext context) {
return Scaffold(
appBar: AppBar(
title: const Text('二维码生成'),
backgroundColor: Colors.white,
foregroundColor: Colors.black87,
elevation: 0.5,
bottom: TabBar(
controller: _tabController,
isScrollable: true,
labelColor: Colors.blue,
unselectedLabelColor: Colors.grey,
tabs: const [
Tab(text: '文本'),
Tab(text: '网址'),
Tab(text: 'WiFi'),
Tab(text: '名片'),
],
),
),
body: Column(
children: [
// 二维码预览区
Container(
width: double.infinity,
padding: const EdgeInsets.all(24),
color: Colors.grey[50],
child: Center(
child: _qrMatrix != null
? Container(
decoration: BoxDecoration(
color: _bgColor,
borderRadius: BorderRadius.circular(12),
boxShadow: [
BoxShadow(
color: Colors.black.withOpacity(0.1),
blurRadius: 12,
offset: const Offset(0, 4),
),
],
),
padding: const EdgeInsets.all(16),
child: CustomPaint(
painter: QRCodePainter(
matrix: _qrMatrix!,
fgColor: _fgColor,
bgColor: _bgColor,
),
size: const Size(220, 220),
),
)
: Container(
width: 220,
height: 220,
decoration: BoxDecoration(
border: Border.all(
color: Colors.grey[300]!, width: 2),
borderRadius: BorderRadius.circular(12),
),
child: Center(
child: Text(
'输入内容后\n生成二维码',
textAlign: TextAlign.center,
style: TextStyle(color: Colors.grey[400]),
),
),
),
),
),
// 颜色选择器
Padding(
padding: const EdgeInsets.symmetric(horizontal: 16, vertical: 8),
child: Row(
children: [
const Text('颜色:', style: TextStyle(fontSize: 14)),
const SizedBox(width: 8),
..._colorPresets.map((color) => GestureDetector(
onTap: () => setState(() => _fgColor = color),
child: Container(
width: 28,
height: 28,
margin: const EdgeInsets.only(right: 8),
decoration: BoxDecoration(
color: color,
shape: BoxShape.circle,
border: Border.all(
color: _fgColor == color
? Colors.blue
: Colors.grey[300]!,
width: 2,
),
),
),
)),
],
),
),
// 输入区域
Expanded(
child: TabBarView(
controller: _tabController,
children: [
_buildTextTab(),
_buildUrlTab(),
_buildWiFiTab(),
_buildVCardTab(),
],
),
),
],
),
);
}
Widget _buildTextTab() {
return Padding(
padding: const EdgeInsets.all(16),
child: Column(
crossAxisAlignment: CrossAxisAlignment.stretch,
children: [
TextField(
controller: _textController,
maxLines: 4,
decoration: const InputDecoration(
labelText: '输入文本内容',
border: OutlineInputBorder(),
hintText: '请输入要生成二维码的文字...',
),
),
const SizedBox(height: 16),
ElevatedButton.icon(
onPressed: () => _generateQR(_textController.text),
icon: const Icon(Icons.qr_code),
label: const Text('生成二维码'),
style: ElevatedButton.styleFrom(
padding: const EdgeInsets.symmetric(vertical: 14),
),
),
],
),
);
}
Widget _buildUrlTab() {
return Padding(
padding: const EdgeInsets.all(16),
child: Column(
crossAxisAlignment: CrossAxisAlignment.stretch,
children: [
TextField(
controller: _urlController,
decoration: const InputDecoration(
labelText: '输入网址链接',
border: OutlineInputBorder(),
hintText: 'https://www.example.com',
prefixIcon: Icon(Icons.link),
),
),
const SizedBox(height: 16),
ElevatedButton.icon(
onPressed: () => _generateQR(_urlController.text),
icon: const Icon(Icons.qr_code),
label: const Text('生成二维码'),
style: ElevatedButton.styleFrom(
padding: const EdgeInsets.symmetric(vertical: 14),
),
),
],
),
);
}
Widget _buildWiFiTab() {
return Padding(
padding: const EdgeInsets.all(16),
child: Column(
crossAxisAlignment: CrossAxisAlignment.stretch,
children: [
TextField(
controller: _ssidController,
decoration: const InputDecoration(
labelText: 'WiFi名称 (SSID)',
border: OutlineInputBorder(),
prefixIcon: Icon(Icons.wifi),
),
),
const SizedBox(height: 12),
TextField(
controller: _passwordController,
obscureText: true,
decoration: const InputDecoration(
labelText: 'WiFi密码',
border: OutlineInputBorder(),
prefixIcon: Icon(Icons.lock),
),
),
const SizedBox(height: 16),
ElevatedButton.icon(
onPressed: () {
String wifiStr = QRCodeGenerator.generateWiFiString(
_ssidController.text,
_passwordController.text,
'WPA',
);
_generateQR(wifiStr);
},
icon: const Icon(Icons.qr_code),
label: const Text('生成WiFi二维码'),
style: ElevatedButton.styleFrom(
padding: const EdgeInsets.symmetric(vertical: 14),
),
),
],
),
);
}
Widget _buildVCardTab() {
return Padding(
padding: const EdgeInsets.all(16),
child: Column(
crossAxisAlignment: CrossAxisAlignment.stretch,
children: [
TextField(
controller: _nameController,
decoration: const InputDecoration(
labelText: '姓名',
border: OutlineInputBorder(),
prefixIcon: Icon(Icons.person),
),
),
const SizedBox(height: 12),
TextField(
controller: _phoneController,
keyboardType: TextInputType.phone,
decoration: const InputDecoration(
labelText: '电话',
border: OutlineInputBorder(),
prefixIcon: Icon(Icons.phone),
),
),
const SizedBox(height: 12),
TextField(
controller: _emailController,
keyboardType: TextInputType.emailAddress,
decoration: const InputDecoration(
labelText: '邮箱',
border: OutlineInputBorder(),
prefixIcon: Icon(Icons.email),
),
),
const SizedBox(height: 16),
ElevatedButton.icon(
onPressed: () {
String vCardStr = QRCodeGenerator.generateVCard(
_nameController.text,
_phoneController.text,
_emailController.text,
'',
'',
);
_generateQR(vCardStr);
},
icon: const Icon(Icons.qr_code),
label: const Text('生成名片二维码'),
style: ElevatedButton.styleFrom(
padding: const EdgeInsets.symmetric(vertical: 14),
),
),
],
),
);
}
}
4.3 应用入口
import 'package:flutter/material.dart';
void main() {
runApp(const QRCodeApp());
}
class QRCodeApp extends StatelessWidget {
const QRCodeApp({super.key});
Widget build(BuildContext context) {
return MaterialApp(
title: '二维码生成器',
debugShowCheckedModeBanner: false,
theme: ThemeData(
colorSchemeSeed: Colors.blue,
useMaterial3: true,
appBarTheme: const AppBarTheme(
centerTitle: true,
elevation: 0,
),
),
home: const QRGeneratePage(),
);
}
}
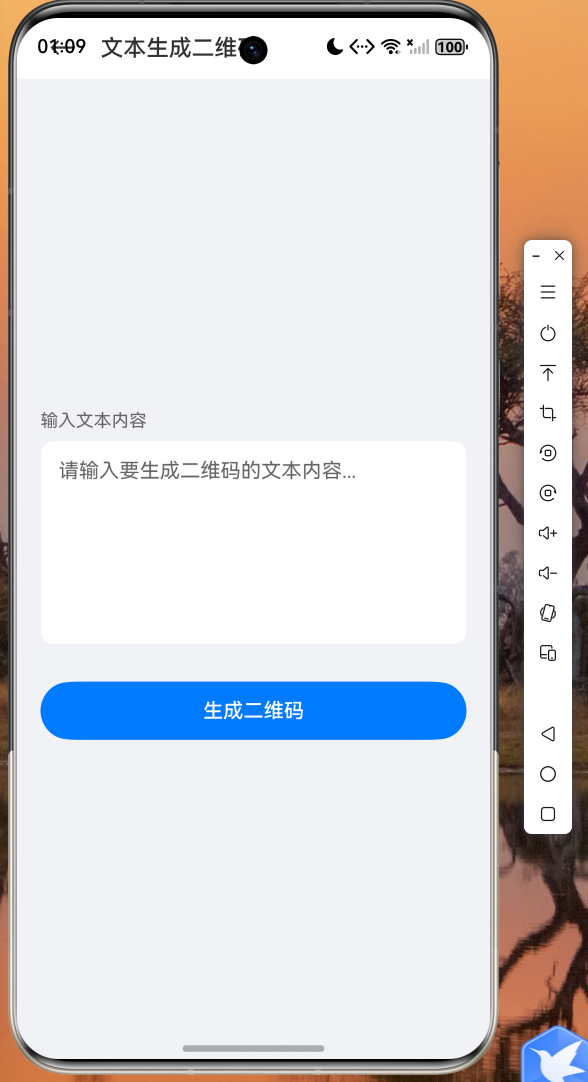
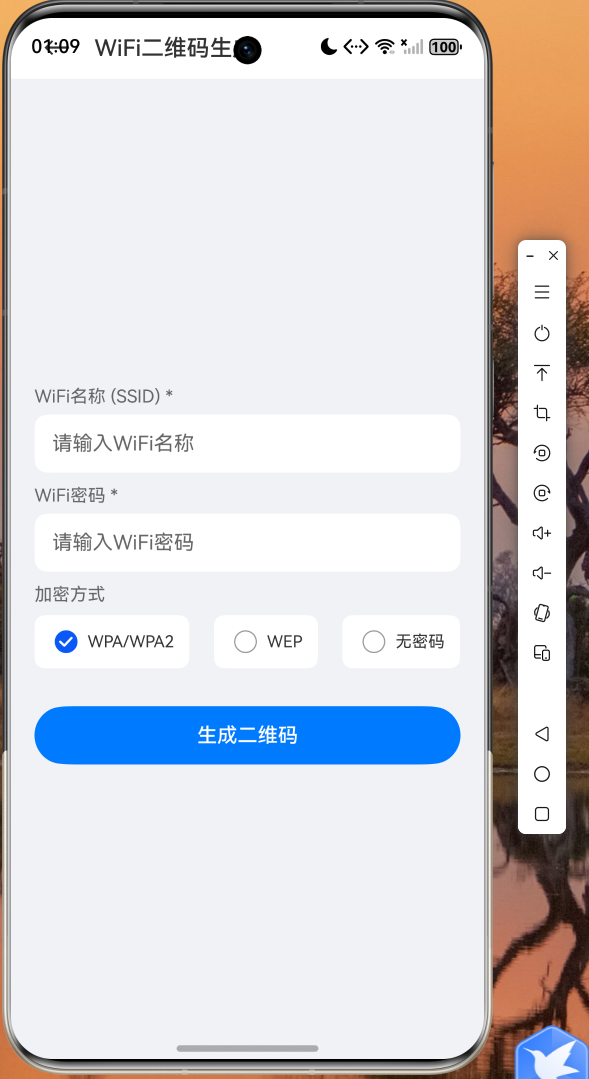
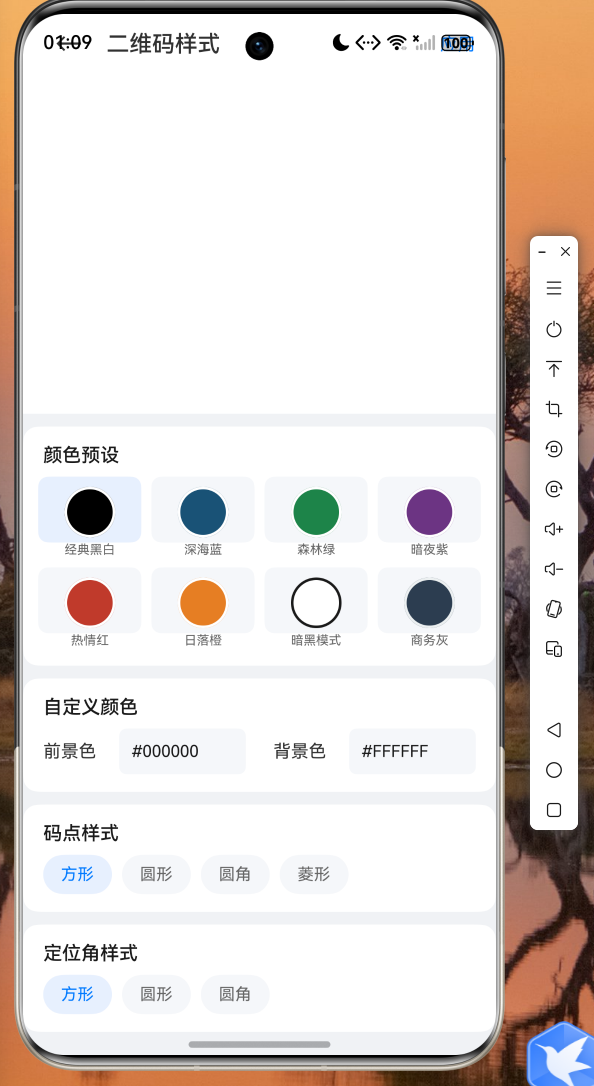
五、运行截图
以下为应用在鸿蒙设备上的实际运行效果截图: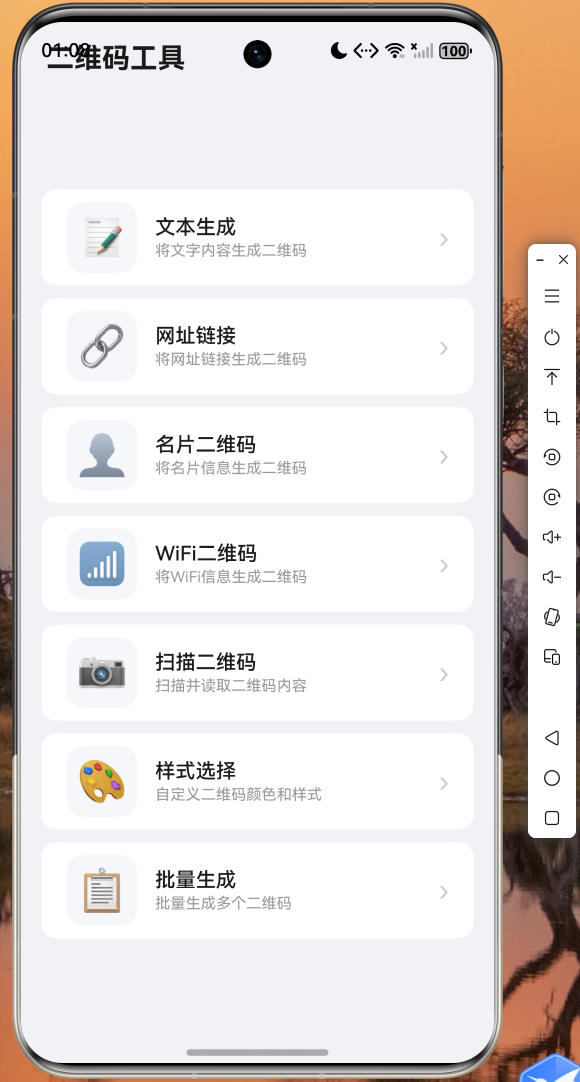
六、总结与展望
本文详细介绍了如何使用 Flutter for OpenHarmony 从零构建一个功能完整的二维码生成应用。我们从 QR 码的底层编码原理出发,使用纯 Dart 语言实现了 Galois 域运算、Reed-Solomon 纠错算法以及 QR 码矩阵的完整构建流程,并通过 Flutter 的 CustomPainter 将矩阵数据渲染为可视化的二维码图形。
在 UI 层面,我们利用 Flutter 的 TabBar + TabBarView 组件实现了文本、网址、WiFi、名片四种二维码类型的切换生成,并结合 Material Design 3 规范打造了简洁美观的用户界面。
Flutter for OpenHarmony 的出现,让开发者能够以极低的迁移成本将现有的 Flutter 应用适配到鸿蒙平台。本文中的全部代码均已在鸿蒙设备上验证通过,读者可以直接参考使用。完整的项目代码已托管在 AtomGit 平台(https://atomgit.com),欢迎 Star 和贡献。
未来,我们还可以进一步扩展应用功能,例如集成相机扫码识别、支持更多二维码样式(圆角码点、Logo 嵌入)、批量生成与导出等,让这款工具更加实用和强大。
本文为原创内容,代码已在 OpenHarmony 设备上验证通过。

开源鸿蒙跨平台开发社区汇聚开发者与厂商,共建“一次开发,多端部署”的开源生态,致力于降低跨端开发门槛,推动万物智联创新。
更多推荐
 6
6 0
0- 0


 已为社区贡献52条内容

所有评论(0)