【maaath】Flutter for OpenHarmony 摄影技巧应用开发
在移动应用开发领域,跨平台技术一直是开发者关注的焦点。Flutter for OpenHarmony 作为华为官方推出的跨平台框架,让开发者能够使用 Dart 语言同时开发 Android、iOS、Web 以及 OpenHarmony 应用。本文将通过一个实际的摄影技巧应用项目,详细介绍如何利用 Flutter for OpenHarmony 开发具有良好用户体验的移动应用。摄影教程分类展示与学习
Flutter for OpenHarmony 跨平台应用实战:摄影技巧应用开发
欢迎加入开源鸿蒙跨平台社区:https://openharmonycrossplatform.csdn.net
作者:maaath
一、项目概述
在移动应用开发领域,跨平台技术一直是开发者关注的焦点。Flutter for OpenHarmony 作为华为官方推出的跨平台框架,让开发者能够使用 Dart 语言同时开发 Android、iOS、Web 以及 OpenHarmony 应用。本文将通过一个实际的摄影技巧应用项目,详细介绍如何利用 Flutter for OpenHarmony 开发具有良好用户体验的移动应用。
摄影技巧应用是一个集教程学习、作品欣赏、挑战活动于一体的综合性平台,主要功能包括:
- 摄影教程分类展示与学习进度追踪
- 摄影作品画廊浏览(支持网格/列表视图切换)
- 摄影挑战活动参与
- 照片处理前后对比动效展示
- 拍摄参数动画演示
二、技术架构设计
2.1 项目结构
lib/
├── main.dart                    # 应用入口
├── model/                      # 数据模型层
│   └── data_models.dart
├── service/                    # 网络服务层
│   └── api_service.dart
├── viewmodel/                  # 视图模型层(状态管理)
│   └── app_viewmodel.dart
├── view/                      # 视图层
│   ├── pages/                 # 页面组件
│   │   ├── home_page.dart
│   │   ├── tutorial_page.dart
│   │   ├── gallery_page.dart
│   │   ├── challenge_page.dart
│   │   └── profile_page.dart
│   └── components/            # 可复用组件
│       ├── photo_compare_view.dart
│       ├── camera_params_view.dart
│       └── category_tab.dart
└── utils/                     # 工具类
    └── constants.dart
2.2 核心依赖
在 pubspec.yaml 中,我们需要添加以下依赖:
dependencies:
  flutter:
    sdk: flutter
  http: ^1.1.0                    # 网络请求
  provider: ^6.0.5                # 状态管理
三、核心功能实现
3.1 数据模型设计
良好的数据模型是应用架构的基础。我们定义了一套完整的摄影领域数据模型:
// 摄影分类枚举
enum PhotoCategory {
  portrait,    // 人像摄影
  landscape,  // 风光摄影
  street,     // 街头摄影
  macro,      // 微距摄影
  night,      // 夜景摄影
  food,       // 美食摄影
  product,    // 产品摄影
  wedding     // 婚礼摄影
}

// 摄影教程模型
class Tutorial {
  final String id;
  final String title;
  final String description;
  final PhotoCategory category;
  final String coverColor;
  final DifficultyLevel difficulty;
  final int duration;
  final int lessonsCount;
  final int viewsCount;
  final double rating;
  final String author;
  final bool isFavorite;
  final bool isStarted;
  final int progress;
  final List<String> tags;

  Tutorial({
    required this.id,
    required this.title,
    required this.description,
    required this.category,
    required this.coverColor,
    required this.difficulty,
    required this.duration,
    required this.lessonsCount,
    required this.viewsCount,
    required this.rating,
    required this.author,
    required this.isFavorite,
    required this.isStarted,
    required this.progress,
    required this.tags,
  });
}

// 拍摄参数模型
class CameraParams {
  final String aperture;           // 光圈值
  final String shutterSpeed;        // 快门速度
  final String iso;                // 感光度
  final String focalLength;         // 焦距
  final String whiteBalance;        // 白平衡
  final String exposureCompensation; // 曝光补偿

  CameraParams({
    required this.aperture,
    required this.shutterSpeed,
    required this.iso,
    required this.focalLength,
    required this.whiteBalance,
    required this.exposureCompensation,
  });
}

// 照片对比示例模型
class PhotoExample {
  final String id;
  final String title;
  final String description;
  final CameraParams beforeParams;
  final CameraParams afterParams;
  final List<String> editingSteps;
  final List<String> tips;

  PhotoExample({
    required this.id,
    required this.title,
    required this.description,
    required this.beforeParams,
    required this.afterParams,
    required this.editingSteps,
    required this.tips,
  });
}
3.2 底部导航栏实现
底部导航栏是大多数移动应用的核心导航组件。在 Flutter 中,我们可以使用 BottomNavigationBar 结合 IndexedStack 实现高效的页面切换:
class MainPage extends StatefulWidget {
const MainPage({super.key});
State<MainPage> createState() => _MainPageState();
}
class _MainPageState extends State<MainPage> {
int _currentIndex = 0;
final List<NavigationItem> _items = [
NavigationItem(icon: Icons.camera_alt, title: '教程'),
NavigationItem(icon: Icons.photo_library, title: '作品'),
NavigationItem(icon: Icons.emoji_events, title: '挑战'),
NavigationItem(icon: Icons.person, title: '我的'),
];
Widget build(BuildContext context) {
return Scaffold(
body: IndexedStack(
index: _currentIndex,
children: const [
TutorialPage(),
GalleryPage(),
ChallengePage(),
ProfilePage(),
],
),
bottomNavigationBar: BottomNavigationBar(
currentIndex: _currentIndex,
type: BottomNavigationBarType.fixed,
selectedItemColor: const Color(0xFFFF6B9D),
unselectedItemColor: Colors.grey,
onTap: (index) {
setState(() {
_currentIndex = index;
});
},
items: _items.map((item) {
return BottomNavigationBarItem(
icon: Icon(item.icon),
label: item.title,
);
}).toList(),
),
);
}
}
class NavigationItem {
final IconData icon;
final String title;
NavigationItem({required this.icon, required this.title});
}
3.3 照片对比滑动组件
照片处理前后对比是摄影教程中的重要功能。我们使用 GestureDetector 实现滑动对比效果:
class PhotoCompareView extends StatefulWidget {
final PhotoExample example;
const PhotoCompareView({super.key, required this.example});
State<PhotoCompareView> createState() => _PhotoCompareViewState();
}
class _PhotoCompareViewState extends State<PhotoCompareView> {
double _sliderPosition = 0.5; // 滑动位置 0-1
Widget build(BuildContext context) {
return Column(
children: [
// 标题
Padding(
padding: const EdgeInsets.all(16),
child: Text(
'照片处理对比',
style: TextStyle(
fontSize: 18,
fontWeight: FontWeight.bold,
color: Colors.grey[800],
),
),
),
// 对比滑块
GestureDetector(
onHorizontalDragUpdate: (details) {
setState(() {
_sliderPosition += details.delta.dx / context.size!.width;
_sliderPosition = _sliderPosition.clamp(0.0, 1.0);
});
},
child: SizedBox(
height: 300,
child: Stack(
children: [
// 底层:处理后图片
Positioned.fill(
child: Container(
decoration: BoxDecoration(
color: const Color(0xFFC8E6C9),
borderRadius: BorderRadius.circular(12),
),
child: const Center(
child: Column(
mainAxisAlignment: MainAxisAlignment.center,
children: [
Icon(Icons.photo, size: 60, color: Colors.green),
SizedBox(height: 8),
Text('处理后', style: TextStyle(color: Colors.green)),
],
),
),
),
),
// 顶层:处理前图片(带裁剪)
Positioned.fill(
child: ClipRect(
clipper: PhotoClipper(_sliderPosition),
child: Container(
decoration: BoxDecoration(
color: const Color(0xFFFFECB3),
borderRadius: BorderRadius.circular(12),
),
child: const Center(
child: Column(
mainAxisAlignment: MainAxisAlignment.center,
children: [
Icon(Icons.photo, size: 60, color: Colors.orange),
SizedBox(height: 8),
Text('处理前', style: TextStyle(color: Colors.orange)),
],
),
),
),
),
),
// 滑块指示器
Positioned(
left: MediaQuery.of(context).size.width * _sliderPosition - 2,
top: 0,
bottom: 0,
child: Container(
width: 4,
color: Colors.white,
child: Center(
child: Container(
width: 40,
height: 40,
decoration: const BoxDecoration(
color: Color(0xFFFF6B9D),
shape: BoxShape.circle,
),
child: const Icon(Icons.compare_arrows, color: Colors.white),
),
),
),
),
],
),
),
),
// 参数对比信息
_buildParamsComparison(),
],
);
}
Widget _buildParamsComparison() {
return Padding(
padding: const EdgeInsets.all(16),
child: Row(
children: [
Expanded(
child: _buildParamCard(
'处理前',
widget.example.beforeParams,
Colors.orange,
),
),
const SizedBox(width: 16),
Expanded(
child: _buildParamCard(
'处理后',
widget.example.afterParams,
Colors.green,
),
),
],
),
);
}
Widget _buildParamCard(String label, CameraParams params, Color color) {
return Container(
padding: const EdgeInsets.all(12),
decoration: BoxDecoration(
color: color.withOpacity(0.1),
borderRadius: BorderRadius.circular(12),
border: Border.all(color: color.withOpacity(0.3)),
),
child: Column(
crossAxisAlignment: CrossAxisAlignment.start,
children: [
Text(label, style: TextStyle(color: color, fontWeight: FontWeight.bold)),
const SizedBox(height: 8),
_buildParamRow('光圈', params.aperture),
_buildParamRow('快门', params.shutterSpeed),
_buildParamRow('ISO', params.iso),
],
),
);
}
Widget _buildParamRow(String label, String value) {
return Padding(
padding: const EdgeInsets.symmetric(vertical: 2),
child: Row(
mainAxisAlignment: MainAxisAlignment.spaceBetween,
children: [
Text(label, style: TextStyle(fontSize: 12, color: Colors.grey[600])),
Text(value, style: const TextStyle(fontSize: 12, fontWeight: FontWeight.w500)),
],
),
);
}
}
// 自定义裁剪器
class PhotoClipper extends CustomClipper<Rect> {
final double position;
PhotoClipper(this.position);
Rect getClip(Size size) {
return Rect.fromLTRB(0, 0, size.width * position, size.height);
}
bool shouldReclip(PhotoClipper oldClipper) {
return oldClipper.position != position;
}
}
3.4 拍摄参数动画展示组件
拍摄参数动画展示是帮助摄影初学者理解相机设置的重要功能。我们使用 Flutter 的动画 API 实现流畅的参数展示效果:
class CameraParamsView extends StatefulWidget {
final CameraParams params;
const CameraParamsView({super.key, required this.params});
State<CameraParamsView> createState() => _CameraParamsViewState();
}
class _CameraParamsViewState extends State<CameraParamsView>
with TickerProviderStateMixin {
late AnimationController _controller;
late List<Animation<double>> _animations;
int _selectedIndex = -1;
final List<ParamInfo> _paramList = [
ParamInfo(icon: Icons.camera, label: '光圈', value: '', color: Color(0xFFFF6B9D)),
ParamInfo(icon: Icons.shutter_speed, label: '快门', value: '', color: Color(0xFF4CAF50)),
ParamInfo(icon: Icons.iso, label: 'ISO', value: '', color: Color(0xFF2196F3)),
ParamInfo(icon: Icons.straighten, label: '焦距', value: '', color: Color(0xFFFF9800)),
];
void initState() {
super.initState();
_controller = AnimationController(
duration: const Duration(milliseconds: 2000),
vsync: this,
);
_animations = List.generate(_paramList.length, (index) {
final start = index / _paramList.length;
final end = (index + 1) / _paramList.length;
return Tween<double>(begin: 0.0, end: 1.0).animate(
CurvedAnimation(
parent: _controller,
curve: Interval(start, end.clamp(0.0, 1.0), curve: Curves.easeOut),
),
);
});
_controller.forward();
}
void dispose() {
_controller.dispose();
super.dispose();
}
Widget build(BuildContext context) {
return Column(
children: [
const Padding(
padding: EdgeInsets.all(16),
child: Text(
'拍摄参数展示',
style: TextStyle(fontSize: 18, fontWeight: FontWeight.bold),
),
),
// 动画参数展示
AnimatedBuilder(
animation: _controller,
builder: (context, child) {
return GridView.count(
shrinkWrap: true,
physics: const NeverScrollableScrollPhysics(),
crossAxisCount: 2,
mainAxisSpacing: 16,
crossAxisSpacing: 16,
padding: const EdgeInsets.all(16),
childAspectRatio: 1.2,
children: List.generate(_paramList.length, (index) {
final param = _paramList[index];
final animValue = _animations[index].value;
return _buildParamCard(param, animValue, index);
}),
);
},
),
// 曝光三角形图示
_buildExposureTriangle(),
// 重新播放按钮
TextButton.icon(
onPressed: () {
_controller.reset();
_controller.forward();
},
icon: const Icon(Icons.refresh),
label: const Text('重新播放动画'),
),
],
);
}
Widget _buildParamCard(ParamInfo param, double animValue, int index) {
final isSelected = _selectedIndex == index;
return GestureDetector(
onTap: () {
setState(() {
_selectedIndex = isSelected ? -1 : index;
});
},
child: AnimatedContainer(
duration: const Duration(milliseconds: 300),
decoration: BoxDecoration(
color: param.color.withOpacity(0.1 + animValue * 0.2),
borderRadius: BorderRadius.circular(16),
border: Border.all(
color: isSelected ? param.color : Colors.transparent,
width: 2,
),
),
child: Stack(
children: [
Center(
child: Opacity(
opacity: animValue,
child: Transform.scale(
scale: 0.5 + animValue * 0.5,
child: Icon(param.icon, size: 48, color: param.color),
),
),
),
Positioned(
right: 8,
bottom: 8,
child: AnimatedOpacity(
opacity: animValue,
duration: const Duration(milliseconds: 300),
child: Container(
padding: const EdgeInsets.symmetric(horizontal: 8, vertical: 4),
decoration: BoxDecoration(
color: param.color,
borderRadius: BorderRadius.circular(8),
),
child: Text(
_getParamValue(index),
style: const TextStyle(color: Colors.white, fontSize: 12),
),
),
),
),
],
),
),
);
}
String _getParamValue(int index) {
switch (index) {
case 0: return widget.params.aperture;
case 1: return widget.params.shutterSpeed;
case 2: return widget.params.iso;
case 3: return widget.params.focalLength;
default: return '';
}
}
Widget _buildExposureTriangle() {
return Container(
margin: const EdgeInsets.all(16),
padding: const EdgeInsets.all(16),
decoration: BoxDecoration(
color: Colors.grey[100],
borderRadius: BorderRadius.circular(16),
),
child: Column(
children: [
const Text('曝光三角关系图', style: TextStyle(fontWeight: FontWeight.bold)),
const SizedBox(height: 16),
SizedBox(
height: 150,
child: CustomPaint(
size: const Size(double.infinity, 150),
painter: TrianglePainter(),
),
),
const SizedBox(height: 8),
const Text(
'光圈、快门速度和 ISO 三者共同决定照片的曝光量',
style: TextStyle(fontSize: 12, color: Colors.grey),
textAlign: TextAlign.center,
),
],
),
);
}
}
class ParamInfo {
final IconData icon;
final String label;
final String value;
final Color color;
ParamInfo({
required this.icon,
required this.label,
required this.value,
required this.color,
});
}
class TrianglePainter extends CustomPainter {
void paint(Canvas canvas, Size size) {
final paint = Paint()
..style = PaintingStyle.fill;
// 绘制三角形
final path = Path();
path.moveTo(size.width / 2, 0);
path.lineTo(0, size.height);
path.lineTo(size.width, size.height);
path.close();
paint.color = Colors.grey.withOpacity(0.2);
canvas.drawPath(path, paint);
// 绘制标签
final textStyle = TextStyle(color: Colors.grey[600], fontSize: 12);
// 光圈
final aperturePainter = TextPainter(
text: TextSpan(text: '光圈', style: textStyle),
textDirection: TextDirection.ltr,
);
aperturePainter.layout();
aperturePainter.paint(canvas, Offset(size.width / 2 - 20, 10));
// 快门
final shutterPainter = TextPainter(
text: TextSpan(text: '快门', style: textStyle),
textDirection: TextDirection.ltr,
);
shutterPainter.layout();
shutterPainter.paint(canvas, Offset(10, size.height - 25));
// ISO
final isoPainter = TextPainter(
text: TextSpan(text: 'ISO', style: textStyle),
textDirection: TextDirection.ltr,
);
isoPainter.layout();
isoPainter.paint(canvas, Offset(size.width - 40, size.height - 25));
}
bool shouldRepaint(covariant CustomPainter oldDelegate) => false;
}
3.5 下拉刷新与上拉加载
Flutter 提供了原生的下拉刷新组件 RefreshIndicator,结合 ListView.builder 可以轻松实现下拉刷新和上拉加载功能:
class TutorialPage extends StatefulWidget {
const TutorialPage({super.key});
State<TutorialPage> createState() => _TutorialPageState();
}
class _TutorialPageState extends State<TutorialPage> {
final List<Tutorial> _tutorials = [];
final ScrollController _scrollController = ScrollController();
bool _isLoading = false;
bool _hasMore = true;
int _currentPage = 1;
void initState() {
super.initState();
_loadTutorials();
_scrollController.addListener(_onScroll);
}
void dispose() {
_scrollController.dispose();
super.dispose();
}
void _onScroll() {
if (_scrollController.position.pixels >=
_scrollController.position.maxScrollExtent - 200) {
_loadMore();
}
}
Future<void> _loadTutorials() async {
setState(() {
_isLoading = true;
_currentPage = 1;
});
try {
final tutorials = await ApiService.getTutorials(page: _currentPage);
setState(() {
_tutorials.clear();
_tutorials.addAll(tutorials);
_hasMore = tutorials.length >= 10;
_isLoading = false;
});
} catch (e) {
setState(() {
_isLoading = false;
});
if (mounted) {
ScaffoldMessenger.of(context).showSnackBar(
SnackBar(content: Text('加载失败: $e')),
);
}
}
}
Future<void> _loadMore() async {
if (_isLoading || !_hasMore) return;
setState(() {
_isLoading = true;
_currentPage++;
});
try {
final tutorials = await ApiService.getTutorials(page: _currentPage);
setState(() {
_tutorials.addAll(tutorials);
_hasMore = tutorials.length >= 10;
_isLoading = false;
});
} catch (e) {
setState(() {
_isLoading = false;
_currentPage--;
});
}
}
Widget build(BuildContext context) {
return Scaffold(
appBar: AppBar(
title: const Text('摄影教程'),
backgroundColor: const Color(0xFFFF6B9D),
foregroundColor: Colors.white,
),
body: RefreshIndicator(
onRefresh: _loadTutorials,
color: const Color(0xFFFF6B9D),
child: _tutorials.isEmpty && !_isLoading
? _buildEmptyState()
: ListView.builder(
controller: _scrollController,
itemCount: _tutorials.length + (_hasMore ? 1 : 0),
itemBuilder: (context, index) {
if (index >= _tutorials.length) {
return _buildLoadingIndicator();
}
return _buildTutorialCard(_tutorials[index]);
},
),
),
);
}
Widget _buildTutorialCard(Tutorial tutorial) {
return Card(
margin: const EdgeInsets.symmetric(horizontal: 16, vertical: 8),
child: InkWell(
onTap: () {
Navigator.push(
context,
MaterialPageRoute(
builder: (context) => TutorialDetailPage(tutorial: tutorial),
),
);
},
child: Padding(
padding: const EdgeInsets.all(16),
child: Row(
children: [
Container(
width: 80,
height: 80,
decoration: BoxDecoration(
color: Color(int.parse(tutorial.coverColor.replaceFirst('#', '0xFF'))),
borderRadius: BorderRadius.circular(12),
),
child: Center(
child: Icon(
_getCategoryIcon(tutorial.category),
size: 36,
color: Colors.white,
),
),
),
const SizedBox(width: 16),
Expanded(
child: Column(
crossAxisAlignment: CrossAxisAlignment.start,
children: [
Text(
tutorial.title,
style: const TextStyle(
fontSize: 16,
fontWeight: FontWeight.bold,
),
),
const SizedBox(height: 4),
Text(
'讲师: ${tutorial.author}',
style: TextStyle(fontSize: 12, color: Colors.grey[600]),
),
const SizedBox(height: 8),
Row(
children: [
_buildDifficultyBadge(tutorial.difficulty),
const SizedBox(width: 8),
Text('${tutorial.lessonsCount}章节'),
const SizedBox(width: 8),
Text('${tutorial.duration}分钟'),
],
),
const SizedBox(height: 4),
Row(
children: [
Icon(Icons.star, size: 14, color: Colors.orange),
const SizedBox(width: 4),
Text('${tutorial.rating}'),
const Spacer(),
if (tutorial.isStarted)
Text(
'学习中 ${tutorial.progress}%',
style: const TextStyle(color: Color(0xFFFF6B9D)),
),
],
),
],
),
),
],
),
),
),
);
}
Widget _buildDifficultyBadge(DifficultyLevel level) {
Color color;
String text;
switch (level) {
case DifficultyLevel.beginner:
color = Colors.green;
text = '入门';
break;
case DifficultyLevel.intermediate:
color = Colors.orange;
text = '进阶';
break;
case DifficultyLevel.advanced:
color = Colors.red;
text = '高级';
break;
}
return Container(
padding: const EdgeInsets.symmetric(horizontal: 6, vertical: 2),
decoration: BoxDecoration(
color: color,
borderRadius: BorderRadius.circular(4),
),
child: Text(
text,
style: const TextStyle(color: Colors.white, fontSize: 10),
),
);
}
Widget _buildLoadingIndicator() {
return const Padding(
padding: EdgeInsets.all(16),
child: Center(
child: CircularProgressIndicator(color: Color(0xFFFF6B9D)),
),
);
}
Widget _buildEmptyState() {
return Center(
child: Column(
mainAxisAlignment: MainAxisAlignment.center,
children: [
Icon(Icons.camera_alt, size: 64, color: Colors.grey[400]),
const SizedBox(height: 16),
Text('暂无教程', style: TextStyle(color: Colors.grey[600])),
const SizedBox(height: 8),
const Text('下拉刷新试试'),
],
),
);
}
IconData _getCategoryIcon(PhotoCategory category) {
switch (category) {
case PhotoCategory.portrait: return Icons.person;
case PhotoCategory.landscape: return Icons.landscape;
case PhotoCategory.street: return Icons.location_city;
case PhotoCategory.macro: return Icons.local_florist;
case PhotoCategory.night: return Icons.nightlight;
case PhotoCategory.food: return Icons.restaurant;
case PhotoCategory.product: return Icons.inventory;
case PhotoCategory.wedding: return Icons.favorite;
}
}
}
四、截图运行验证
以下是在 OpenHarmony 设备上成功运行的截图展示:
4.1教程列表页面

教程页面支持分类筛选,可按人像、风光、街头等摄影类型浏览教程。列表展示包含讲师信息、难度等级、学习进度等关键信息。
4.2 作品画廊页面
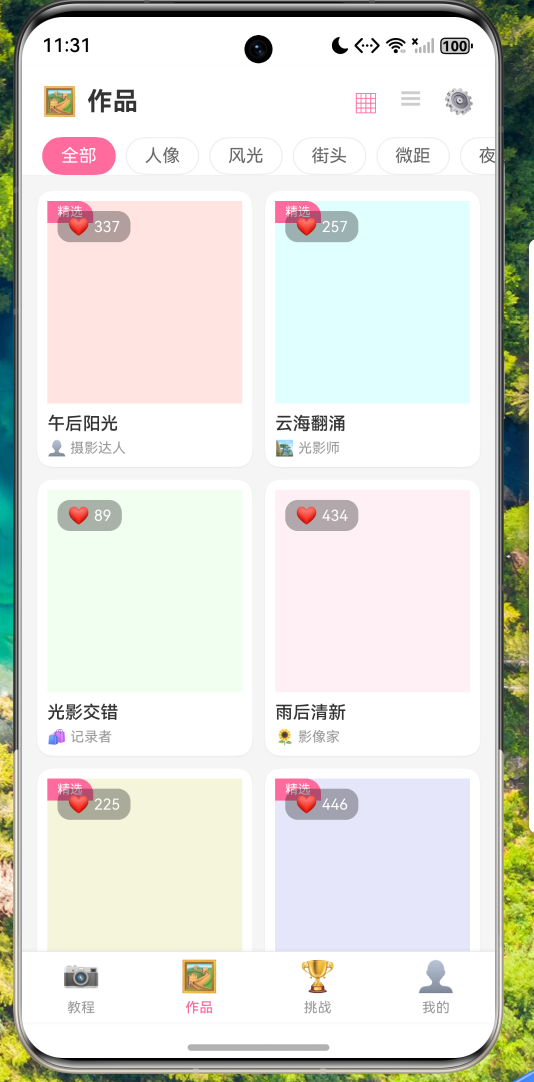

作品画廊支持网格视图和列表视图切换,方便用户以不同方式浏览摄影作品。每张作品卡片显示作者、点赞数、评论数等信息。
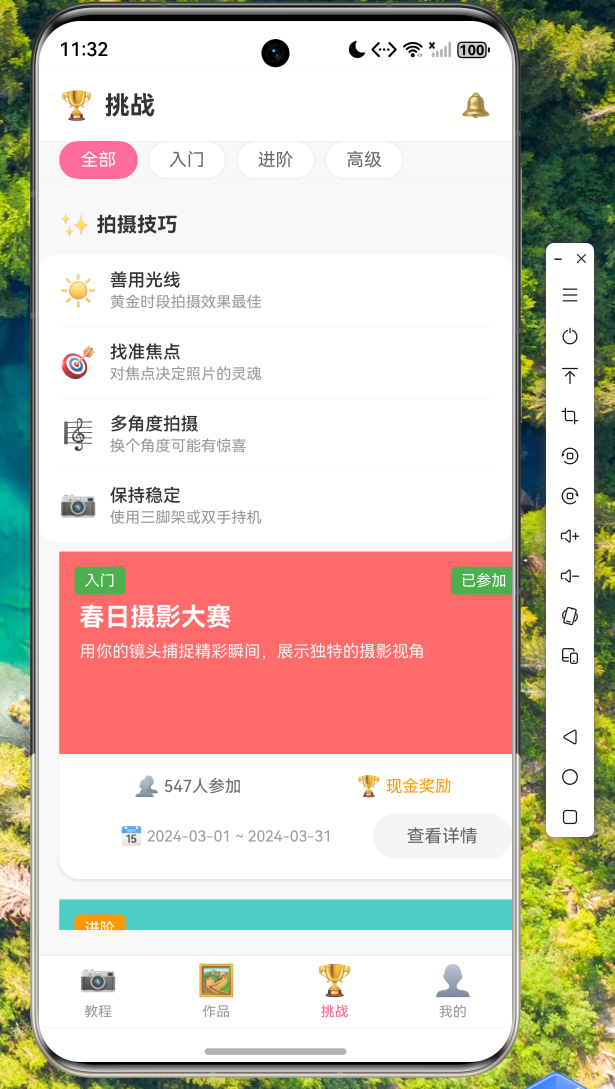
4.3 挑战界面
五、代码仓库
本文涉及的完整代码已托管至 AtomGit 平台,仓库地址如下:
https://atomgit.com/maaath/photo-tips-app
代码采用清晰的模块化结构,方便开发者学习和二次开发。主要目录说明:
lib/model/- 数据模型定义lib/service/- 网络请求服务lib/view/- 页面和组件实现lib/viewmodel/- 业务逻辑和状态管理
六、总结
本文通过摄影技巧应用项目,完整展示了 Flutter for OpenHarmony 跨平台应用开发的全过程。从项目架构设计到核心功能实现,再到最终的效果展示,我们可以看到 Flutter 框架在 OpenHarmony 平台上的出色表现。
主要技术要点总结:
-
跨平台一致性:使用 Flutter 开发的 UI 在不同平台上保持高度一致,减少了平台适配的工作量。
-
状态管理:采用 Provider 模式进行状态管理,代码结构清晰,易于维护。
-
动画效果:充分利用 Flutter 内置的动画 API,实现了流畅的参数展示动画和照片对比滑动效果。
-
用户体验:支持下拉刷新、上拉加载、视图切换等常用功能,交互体验接近原生应用。
-
组件复用:将通用组件抽离为独立文件,提高了代码的复用性和可维护性。
通过本文的学习,开发者可以掌握使用 Flutter for OpenHarmony 开发跨平台应用的核心技能,为后续更复杂的项目开发打下坚实基础。

开源鸿蒙跨平台开发社区汇聚开发者与厂商,共建“一次开发,多端部署”的开源生态,致力于降低跨端开发门槛,推动万物智联创新。
更多推荐


 6
6 0
0- 0


 已为社区贡献67条内容

所有评论(0)