Flutter开发OpenHarmony数据清单应用:网络请求与分页加载实战
本实验旨在基于Flutter框架开发一个支持OpenHarmony(开源鸿蒙)平台的数据清单应用,重点实现网络请求能力,包括数据的分页加载、下拉刷新、上拉加载更多等核心功能。通过本实验,掌握Flutter网络编程的基本方法和OpenHarmony平台的应用开发流程。Flutter网络编程:使用Dio进行HTTP请求分页加载实现:滚动监听+数据追加下拉刷新:使用RefreshIndicator组件状
Flutter 三方库 cached_network_image 的鸿蒙化适配与实战指南
欢迎加入开源鸿蒙跨平台社区:https://openharmonycrossplatform.csdn.net
一、实验概述
1.1 实验目的
本实验旨在基于Flutter框架开发一个支持OpenHarmony(开源鸿蒙)平台的数据清单应用,重点实现网络请求能力,包括数据的分页加载、下拉刷新、上拉加载更多等核心功能。通过本实验,掌握Flutter网络编程的基本方法和OpenHarmony平台的应用开发流程。
1.2 开发环境
| 环境项 | 版本/说明 |
|---|---|
| 操作系统 | Windows 11 |
| Flutter SDK | 3.27.5-ohos-1.0.4(OpenHarmony定制版) |
| Dart SDK | 3.6.2 |
| 目标平台 | OpenHarmony 6.0.0.47(API 20) |
| 开发工具 | DevEco Studio |
| 网络库 | Dio 5.4.0 |
| 后端服务 | JSONPlaceholder(模拟REST API) |
1.3 项目结构
my_test_app/
├── lib/
│   ├── main.dart                    # 应用入口
│   ├── models/
│   │   └── data_item.dart           # 数据模型
│   ├── services/
│   │   └── api_service.dart         # API服务(网络请求封装)
│   └── pages/
│       └── data_list_page.dart      # 数据列表页面
├── ohos/                            # OpenHarmony 工程目录
└── pubspec.yaml                     # 项目依赖配置
二、技术实现
2.1 网络请求封装(Dio)
本项目采用Dio作为HTTP客户端库,它是一个功能强大且易用的Dart HTTP网络请求库。
import 'package:dio/dio.dart';

class ApiService {
  static const String baseUrl = 'https://jsonplaceholder.typicode.com';

  late final Dio _dio;

  ApiService() {
    _dio = Dio(BaseOptions(
      baseUrl: baseUrl,
      connectTimeout: const Duration(seconds: 10),
      receiveTimeout: const Duration(seconds: 10),
      headers: {
        'Content-Type': 'application/json',
        'Accept': 'application/json',
      },
    ));

    _dio.interceptors.add(LogInterceptor(
      requestBody: true,
      responseBody: true,
    ));
  }
}
Dio的优势包括:
- 支持多种HTTP方法(GET、POST、PUT、DELETE等)
- 支持请求/响应拦截器
- 支持文件上传下载
- 支持自定义适配器
- 支持请求取消
2.2 分页数据请求
为了实现上拉加载更多功能,API服务需要支持分页参数:
/// 获取数据清单列表(支持分页)
Future<List<DataItem>> getDataItems({int page = 1, int pageSize = 20}) async {
  try {
    final response = await _dio.get(
      '/posts',
      queryParameters: {'_page': page, '_limit': pageSize},
    );

    if (response.statusCode == 200) {
      final List<dynamic> data = response.data;
      return data.asMap().entries.map((entry) {
        final Map<String, dynamic> item = entry.value;
        final int itemId = (page - 1) * pageSize + ((item['id'] ?? 0) as int);
        return DataItem(
          id: itemId,
          name: '物品 ${itemId}',
          description: item['body'] ?? item['title'] ?? '',
          category: _getCategoryFromId(itemId),
          price: itemId * 10.0,
          quantity: itemId % 100,
          imageUrl: 'https://picsum.photos/seed/${itemId}/200/200',
          createTime: DateTime.now().subtract(Duration(days: itemId % 30)),
        );
      }).toList();
    }
    throw DioException(
      requestOptions: response.requestOptions,
      message: 'Failed to load data',
    );
  } on DioException catch (e) {
    throw _handleError(e);
  }
}
2.3 数据模型定义
class DataItem {
  final int id;
  final String name;
  final String description;
  final String category;
  final double price;
  final int quantity;
  final String imageUrl;
  final DateTime createTime;

  DataItem({
    required this.id,
    required this.name,
    required this.description,
    required this.category,
    required this.price,
    required this.quantity,
    required this.imageUrl,
    required this.createTime,
  });
}
2.4 状态管理实现
采用StatefulWidget管理应用状态,包括加载状态、错误状态、空数据状态:
class _DataListPageState extends State<DataListPage> {
final ApiService _apiService = ApiService();
List<DataItem> _items = [];
bool _isLoading = true;
bool _isLoadingMore = false;
bool _hasMoreData = true;
String? _error;
int _currentPage = 1;
static const int _pageSize = 20;
String _selectedCategory = '全部';
final ScrollController _scrollController = ScrollController();
final List<String> _categories = ['全部', '电子产品', '服装', '食品', '家居', '运动'];
void initState() {
super.initState();
_loadData();
_scrollController.addListener(_onScroll);
}
void dispose() {
_scrollController.dispose();
super.dispose();
}
void _onScroll() {
// 当滚动到距离底部200像素时,加载更多数据
if (_scrollController.position.pixels >=
_scrollController.position.maxScrollExtent - 200) {
_loadMoreData();
}
}
}
2.5 上拉加载更多
/// 加载更多数据(上拉加载)
Future<void> _loadMoreData() async {
  if (_isLoadingMore || !_hasMoreData) return;

  setState(() {
    _isLoadingMore = true;
  });

  try {
    _currentPage++;
    final moreItems = await _apiService.getDataItems(
      page: _currentPage,
      pageSize: _pageSize,
    );

    setState(() {
      _items.addAll(moreItems);
      _hasMoreData = moreItems.length >= _pageSize;
      _isLoadingMore = false;
    });
  } catch (e) {
    _currentPage--;
    setState(() {
      _isLoadingMore = false;
    });
    if (mounted) {
      ScaffoldMessenger.of(context).showSnackBar(
        SnackBar(
          content: Text('加载更多失败: ${e.toString()}'),
          behavior: SnackBarBehavior.floating,
        ),
      );
    }
  }
}
2.6 下拉刷新
Flutter提供RefreshIndicator组件实现下拉刷新功能:
/// 下拉刷新
Future<void> _onRefresh() async {
  _currentPage = 1;
  _hasMoreData = true;
  try {
    final items = await _apiService.getDataItems(page: 1, pageSize: _pageSize);
    setState(() {
      _items = items;
      _hasMoreData = items.length >= _pageSize;
    });
  } catch (e) {
    setState(() {
      _error = e.toString();
    });
  }
}

// 在构建列表时使用
return RefreshIndicator(
  onRefresh: _onRefresh,
  child: ListView.builder(
    controller: _scrollController,
    itemCount: _filteredItems.length + (_hasMoreData || _isLoadingMore ? 1 : 0),
    itemBuilder: (context, index) {
      if (index >= _filteredItems.length) {
        return _buildLoadingMoreIndicator();
      }
      return _buildItemCard(_filteredItems[index]);
    },
  ),
);
2.7 数据加载状态提示
为了提供更好的用户体验,需要处理多种数据加载状态:
Widget _buildContent() {
  // 加载中状态
  if (_isLoading) {
    return const Center(child: CircularProgressIndicator());
  }

  // 错误状态
  if (_error != null) {
    return Center(
      child: Column(
        mainAxisAlignment: MainAxisAlignment.center,
        children: [
          Icon(Icons.error_outline, size: 64, color: Colors.red[300]),
          const SizedBox(height: 16),
          Text(_error!, style: const TextStyle(color: Colors.red)),
          const SizedBox(height: 16),
          ElevatedButton(
            onPressed: _loadData,
            child: const Text('重试'),
          ),
        ],
      ),
    );
  }

  // 空数据状态
  if (_filteredItems.isEmpty) {
    return const Center(
      child: Column(
        mainAxisAlignment: MainAxisAlignment.center,
        children: [
          Icon(Icons.inventory_2_outlined, size: 64, color: Colors.grey),
          SizedBox(height: 16),
          Text('暂无数据'),
        ],
      ),
    );
  }

  // 正常数据列表...
}

/// 上拉加载更多指示器
Widget _buildLoadingMoreIndicator() {
  return Container(
    padding: const EdgeInsets.symmetric(vertical: 16),
    alignment: Alignment.center,
    child: _isLoadingMore
        ? Row(
            mainAxisAlignment: MainAxisAlignment.center,
            children: [
              const SizedBox(
                width: 20,
                height: 20,
                child: CircularProgressIndicator(strokeWidth: 2),
              ),
              const SizedBox(width: 12),
              Text('正在加载更多...', style: TextStyle(color: Colors.grey[600])),
            ],
          )
        : _hasMoreData
            ? GestureDetector(
                onTap: _loadMoreData,
                child: Text(
                  '上拉加载更多',
                  style: TextStyle(color: Colors.blue[600]),
                ),
              )
            : Text(
                '已加载全部数据',
                style: TextStyle(color: Colors.grey[600]),
              ),
  );
}
三、运行与测试
3.1 检查设备连接
在运行应用前,首先检查是否有可用的OpenHarmony设备:
flutter devices
预期输出:
Found 3 connected devices:
  127.0.0.1:5555 (mobile)     • 127.0.0.1:5555 • ohos-x64       • Ohos OpenHarmony-6.0.0.47 (API 20)
  Windows (desktop)           • windows        • windows-x64    • Microsoft Windows
3.2 配置签名(重要)
OpenHarmony 应用必须配置签名才能运行。请在 DevEco Studio 中配置:
- 打开项目:
File→Open→ 选择D:\my_test_app\ohos文件夹 - 配置签名:
File→Project Structure→Project→Signing Configs - 勾选 Automatically generate signature
- 点击
OK保存
3.3 运行应用到虚拟机
# 设置 Node.js 路径(使用 DevEco Studio 自带的 Node.js)
$env:PATH = "D:\deveco\DevEco Studio\tools\node;$env:PATH"

# 运行应用
cd d:\my_test_app
flutter run -d 127.0.0.1:5555
3.4 功能测试
运行成功后,可以测试以下功能:
| 功能 | 测试方法 | 预期结果 |
|---|---|---|
| 初始加载 | 启动应用 | 显示加载动画,数据加载后展示列表 |
| 下拉刷新 | 列表顶部下拉 | 触发刷新动画,重新加载数据 |
| 上拉加载 | 滚动到底部 | 显示加载更多提示,自动加载下一页 |
| 分类筛选 | 点击分类标签 | 仅显示对应分类的数据 |
| 详情查看 | 点击列表项 | 弹出详情底部Sheet |
| 错误处理 | 断网测试 | 显示错误提示和重试按钮 |
3.5 运行效果截图
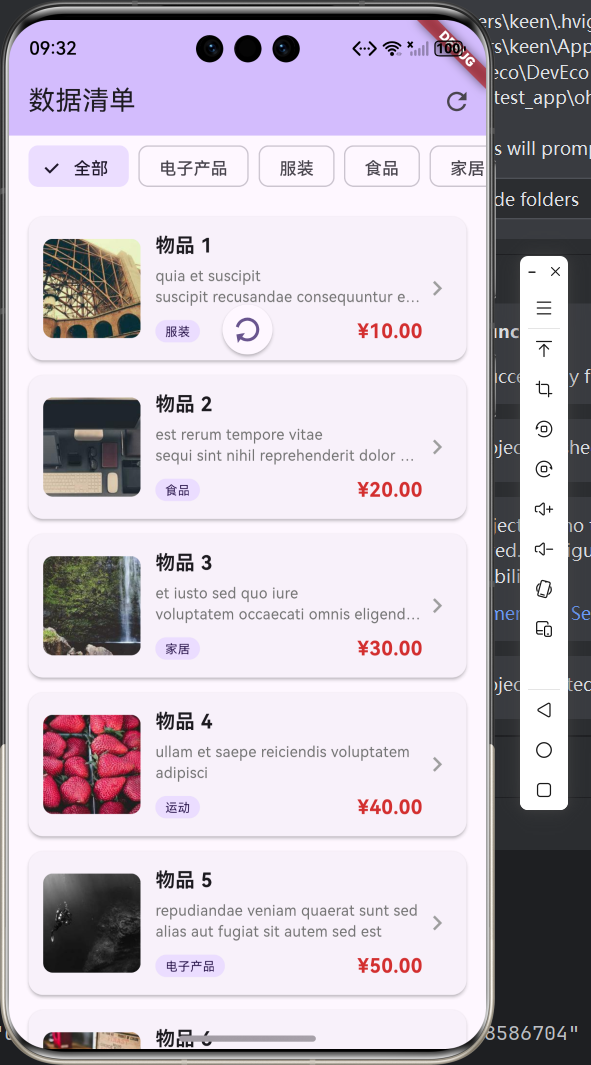
四、关键代码解读
4.1 为什么使用Dio而非http包?
Dio相比Flutter自带的http包具有以下优势:
| 特性 | Dio | http |
|---|---|---|
| API设计 | 更现代化 | 较传统 |
| 拦截器 | 支持 | 不支持 |
| 请求取消 | 支持 | 不支持 |
| 错误处理 | 更完善 | 较简单 |
| 扩展性 | 高 | 一般 |
4.2 分页加载的原理
本项目采用"滚动监听+预加载"策略实现分页:
- 使用
ScrollController监听列表滚动位置 - 当滚动位置接近底部(距离≤200像素)时触发加载
- 使用
_isLoadingMore标志防止重复加载 - 使用
_hasMoreData标志判断是否还有更多数据
4.3 状态管理的重要性
良好的状态管理是保证应用稳定性的关键:
| 状态变量 | 用途 |
|---|---|
_isLoading |
初始加载状态,控制加载动画显示 |
_isLoadingMore |
加载更多状态,防止重复请求 |
_hasMoreData |
数据状态,控制是否继续加载 |
_error |
错误状态,提供友好的错误提示 |
_items |
数据列表,存储已加载的数据 |
五、常见问题与解决方案
5.1 Node.js未安装
问题:hvigor构建时报错"Failed to find npm in the search path"
解决方案:
# Windows使用winget安装
winget install OpenJS.NodeJS.LTS

# 或使用 DevEco Studio 自带的 Node.js
$env:PATH = "D:\deveco\DevEco Studio\tools\node;$env:PATH"
5.2 类型转换错误
问题:编译时报错"A value of type ‘num’ can’t be assigned to a variable of type ‘int’"
解决方案:确保显式类型转换
final int itemId = (page - 1) * pageSize + ((item['id'] ?? 0) as int);
5.3 网络请求超时
问题:请求数据时出现超时错误
解决方案:调整Dio的超时配置
_dio = Dio(BaseOptions(
  connectTimeout: const Duration(seconds: 10),
  receiveTimeout: const Duration(seconds: 10),
));
5.4 签名配置问题
问题:运行时报错"请通过DevEco Studio打开ohos工程后配置调试签名"
解决方案:
- 在 DevEco Studio 中打开
ohos文件夹作为项目 File→Project Structure→Signing Configs- 勾选 Automatically generate signature
- 点击
OK保存后重新运行
六、总结
6.1 知识点回顾
本实验涉及的主要知识点:
- Flutter网络编程:使用Dio进行HTTP请求
- 分页加载实现:滚动监听+数据追加
- 下拉刷新:使用RefreshIndicator组件
- 状态管理:多状态(Loading/Error/Empty)的处理
- OpenHarmony平台:Flutter for OpenHarmony开发环境配置
- 签名配置:OpenHarmony应用签名机制
6.2 扩展方向
后续可以进一步优化的方向:
- 本地缓存:使用sqflite或Hive实现数据本地持久化
- 图片缓存:使用cached_network_image优化图片加载
- 骨架屏:使用shimmer实现更流畅的加载体验
- 错误重试:实现智能重试机制
- 离线支持:在无网络时展示缓存数据
6.3 实验心得
通过本次实验,我们掌握了Flutter网络编程的核心方法,完成了从数据请求到UI展示的完整闭环。Flutter的声明式UI和丰富的组件库使得开发过程高效且愉快:
- RefreshIndicator 提供了原生的下拉刷新体验
- ScrollController 让我们能够精确控制列表滚动行为
- 状态管理 确保了应用在各种场景下的稳定性
OpenHarmony平台的Flutter支持仍在发展中,部分第三方插件(如pull_to_refresh)可能存在兼容性问题,建议优先使用Flutter原生组件实现核心功能。
实验完成日期:2026年4月15日

开源鸿蒙跨平台开发社区汇聚开发者与厂商,共建“一次开发,多端部署”的开源生态,致力于降低跨端开发门槛,推动万物智联创新。
更多推荐

 2
2 0
0- 0


 已为社区贡献2条内容

所有评论(0)