【maaath】Flutter 三方库 dio 的鸿蒙化适配指南:网络请求与数据列表实践
?0,??"",??"",??"pending",??"",``本文详细介绍了dio网络请求库在OpenHarmony平台上的集成与应用实践。通过合理封装网络请求服务、正确配置权限、处理各种异常情况,可以实现稳定可靠的跨平台网络请求能力。希望本文能为开发者在OpenHarmony跨平台开发中提供参考和帮助!
Flutter 三方库 dio 的鸿蒙化适配指南:网络请求与数据列表实践
欢迎加入开源鸿蒙跨平台社区:https://openharmonycrossplatform.csdn.net
一、引言
我在移动应用开发中意识到,网络请求是最基础也是最核心的功能之一。随着开源鸿蒙生态的蓬勃发展,越来越多的开发者开始关注如何在OpenHarmony平台上实现跨平台网络请求能力!所以本文将以Flutter生态中主流的网络请求库dio为例,给大家详细介绍其在OpenHarmony平台上的集成流程、适配要点以及实际应用实践。
二、为什么选择dio
在Flutter生态中,网络请求库的选择较为丰富,如下表:
| 库名 | 特点 | 适用场景 |
|---|---|---|
| dio | 支持拦截器、FormData、Cookie管理,功能全面 | 中大型项目 |
| http | Flutter官方轻量库,无冗余依赖 | 简单请求场景 |
| chopper | 基于注解生成请求代码 | 大型项目维护 |
本文选择dio的原因在于其功能全面、社区活跃,且已通过OpenHarmony兼容性验证。dio提供了强大的拦截器机制、请求取消、文件上传下载、超时控制等特性,因此能够满足大多数应用的网络请求需求。
三、环境准备与项目配置
3.1 开发环境要求
在开始之前,请确保已配置好以下开发环境:
- Flutter SDK(支持OpenHarmony平台)
- DevEco Studio
- OpenHarmony SDK
3.2 添加依赖
在项目的pubspec.yaml文件中添加dio依赖:
yaml dependencies: flutter: sdk: flutter dio: ^5.4.0
执行依赖获取命令:
ash flutter pub get
3.3 配置网络权限
OpenHarmony平台对网络访问有严格的权限控制,需要在module.json5中声明网络权限:
json { "module": { "requestPermissions": [ {"name": "ohos.permission.INTERNET"} ] } }
适配要点:与Android平台不同,OpenHarmony的网络权限声明格式有所差异,需要使用ohos.permission.INTERNET而非Android的android.permission.INTERNET。
四、网络请求服务封装
4.1 数据模型定义
我们首先定义数据模型,用于解析网络请求返回的数据:
class DataItem {
  final int id;
  final String title;
  final String description;
  final String status;
  final String createdAt;

  DataItem({
    required this.id,
    required this.title,
    required this.description,
    required this.status,
    required this.createdAt,
  });

  factory DataItem.fromJson(Map<String, dynamic> json) {
    return DataItem(
      id: json["id"] as int? ?? 0,
      title: json["title"] as String? ?? "",
      description: json["description"] as String? ?? "",
      status: json["status"] as String? ?? "pending",
      createdAt: json["created_at"] as String? ?? "",
    );
  }
}
``
4.2 ApiService服务类
创建统一的网络请求服务类,这里采用单例模式管理dio实例:
import 'package:dio/dio.dart';
import '../models/data_item.dart';
class ApiService {
static final ApiService _instance = ApiService._internal();
factory ApiService() => _instance;
ApiService._internal();
late final Dio _dio;
void init({String? baseUrl}) {
_dio = Dio(BaseOptions(
baseUrl: baseUrl ?? 'https://jsonplaceholder.typicode.com',
connectTimeout: const Duration(seconds: 15),
receiveTimeout: const Duration(seconds: 15),
sendTimeout: const Duration(seconds: 15),
headers: {
'Content-Type': 'application/json',
'Accept': 'application/json',
},
));
_dio.interceptors.add(LogInterceptor(
request: true,
requestBody: true,
responseBody: true,
error: true,
));
}
Future<List<DataItem>> fetchDataList() async {
try {
final response = await _dio.get('/posts');
if (response.statusCode == 200) {
final List<dynamic> data = response.data;
return data.map((json) => DataItem.fromJson({
'id': json['id'],
'title': json['title'],
'description': json['body'],
'status': 'active',
'created_at': DateTime.now().toIso8601String(),
})).toList();
}
throw ApiException('Failed to load data');
} on DioException catch (e) {
throw ApiException(_handleDioError(e));
}
}
String _handleDioError(DioException e) {
switch (e.type) {
case DioExceptionType.connectionTimeout:
return 'Connection timeout';
case DioExceptionType.connectionError:
return 'Connection error';
default:
return 'Unknown error';
}
}
}
class ApiException implements Exception {
final String message;
ApiException(this.message);
String toString() => message;
}
``
适配要点:
1. 超时时间设置建议在10-15秒,OpenHarmony设备网络环境可能较为复杂
2. 拦截器中的日志输出有助于调试,生产环境可关闭
3. 错误处理需要覆盖所有DioExceptionType类型
五、数据列表页面实现
5.1 页面状态管理
enum LoadingStatus { initial, loading, success, error }
class DataListPage extends StatefulWidget {
const DataListPage({super.key});
State<DataListPage> createState() => _DataListPageState();
}
class _DataListPageState extends State<DataListPage> {
final ApiService _apiService = ApiService();
List<DataItem> _dataList = [];
LoadingStatus _status = LoadingStatus.initial;
String _errorMessage = '';
void initState() {
super.initState();
_apiService.init();
_loadData();
}
Future<void> _loadData() async {
setState(() {
_status = LoadingStatus.loading;
});
try {
final data = await _apiService.fetchDataList();
setState(() {
_dataList = data;
_status = LoadingStatus.success;
});
} catch (e) {
setState(() {
_errorMessage = e.toString();
_status = LoadingStatus.error;
});
}
}
}`在这里插入代码片`
``
5.2 列表项UI构建
Widget _buildListItem(DataItem item) {
  return Card(
    margin: const EdgeInsets.symmetric(horizontal: 16, vertical: 8),
    child: InkWell(
      onTap: () => _showDetail(item),
      child: Padding(
        padding: const EdgeInsets.all(16),
        child: Column(
          crossAxisAlignment: CrossAxisAlignment.start,
          children: [
            Row(
              children: [
                Container(
                  padding: const EdgeInsets.symmetric(horizontal: 8, vertical: 4),
                  decoration: BoxDecoration(
                    color: _getStatusColor(item.status),
                    borderRadius: BorderRadius.circular(4),
                  ),
                  child: Text(
                    item.status.toUpperCase(),
                    style: const TextStyle(
                      color: Colors.white,
                      fontSize: 10,
                      fontWeight: FontWeight.bold,
                    ),
                  ),
                ),
                const SizedBox(width: 8),
                Text('ID: ' + item.id.toString()),
              ],
            ),
            const SizedBox(height: 8),
            Text(
              item.title,
              style: Theme.of(context).textTheme.titleMedium?.copyWith(
                fontWeight: FontWeight.bold,
              ),
              maxLines: 2,
              overflow: TextOverflow.ellipsis,
            ),
            const SizedBox(height: 8),
            Text(
              item.description,
              maxLines: 3,
              overflow: TextOverflow.ellipsis,
            ),
          ],
        ),
      ),
    ),
  );
}
``
六、构建与部署
6.1 构建HAP包
完成代码编写后,使用以下命令构建OpenHarmony HAP包:
ash flutter build hap
构建成功后,HAP文件位于:
ohos/entry/build/default/outputs/default/entry-default-unsigned.hap
6.2 设备安装验证
使用hdc工具将HAP安装到OpenHarmony设备:
ash hdc install entry-default-unsigned.hap
以下这是我的运行截图: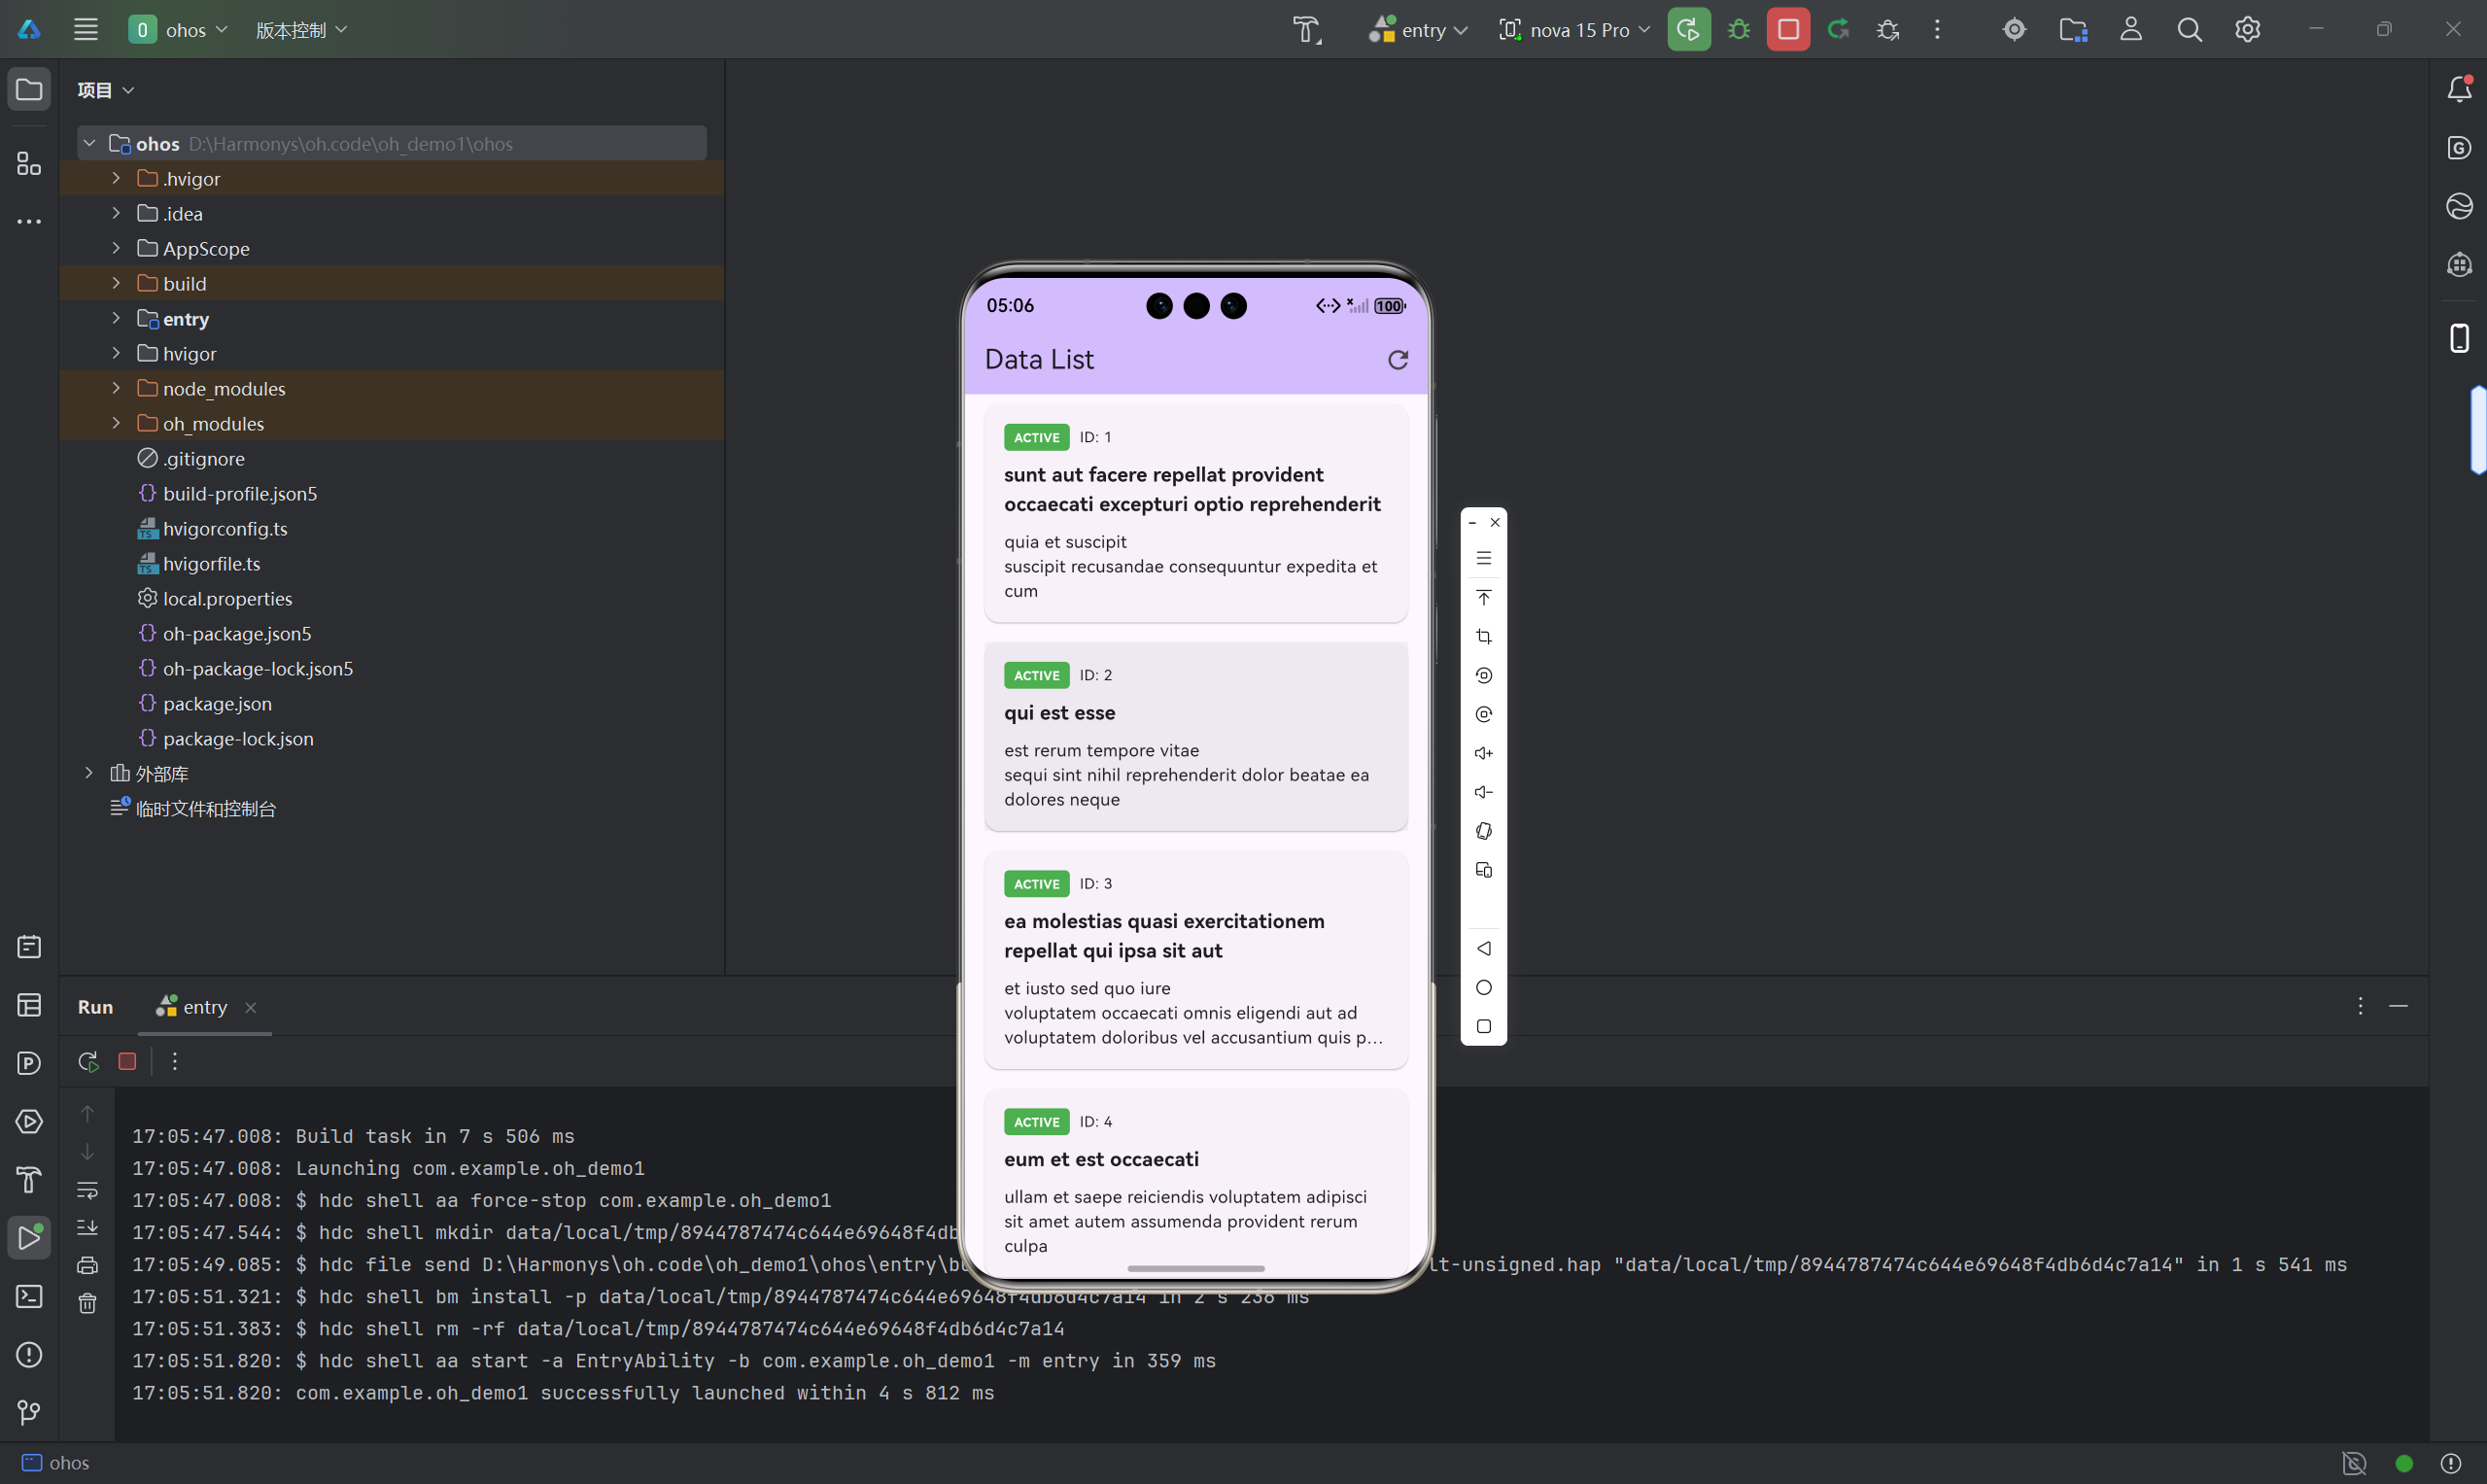
七、适配注意事项
在实际开发过程中,需要注意以下几点:
-
SDK版本兼容性:确保dio版本与OpenHarmony SDK版本兼容,建议使用经过社区验证的稳定版本
-
网络安全配置:OpenHarmony默认禁止明文HTTP请求,如需使用HTTP,需额外配置网络安全策略
-
跨平台稳定性:在OpenHarmony平台上测试时,需关注网络切换、弱网环境下的表现
-
内存管理:大文件下载或上传时,注意内存占用,避免OOM问题
八、总结
本文详细介绍了dio网络请求库在OpenHarmony平台上的集成与应用实践。通过合理封装网络请求服务、正确配置权限、处理各种异常情况,可以实现稳定可靠的跨平台网络请求能力。希望本文能为开发者在OpenHarmony跨平台开发中提供参考和帮助!感谢各位支持!

开源鸿蒙跨平台开发社区汇聚开发者与厂商,共建“一次开发,多端部署”的开源生态,致力于降低跨端开发门槛,推动万物智联创新。
更多推荐

 22
22 0
0- 0


 已为社区贡献4条内容

所有评论(0)