Pod的进阶
Pod 资源限制
在 Kubernetes 中,为了合理管理集群中的资源,容器的 CPU 和内存资源都可以设置请求值(requests)和限制值(limits)。这些设置确保了容器的资源分配和限制,避免资源争用和过度使用。
资源请求与限制(Request & Limit)
-
请求(request):当容器启动时,Kubernetes 会根据容器的资源请求来决定容器应该调度到哪个节点上。这个值表示容器在运行时最少需要的资源。
-
限制(limit):容器在运行时可以使用的最大资源量。如果容器超过了这个限制,Kubernetes 会采取措施来控制容器的资源使用,防止过度消耗。
官网示例:
https://kubernetes.io/docs/concepts/configuration/manage-compute-resources-container/
//Pod 和 容器 的资源请求和限制:
spec.containers[].resources.requests.cpu //定义创建容器时预分配的CPU资源
spec.containers[].resources.requests.memory //定义创建容器时预分配的内存资源
spec.containers[].resources.limits.cpu //定义 cpu 的资源上限
spec.containers[].resources.limits.memory //定义内存的资源上限
vim resource.ymal

apiVersion: v1
kind: Pod
metadata:   # 也可以理解为标签
  name: frontend
spec:
  containers:
  - name: web
    image: nginx
    env:
    - name: WEB_ROOT_PASSWORD
      value: "password"
    resources:
      requests:
        memory: "64Mi"   # 最少 64Mi 内存
        cpu: "250m"      # 最少 0.25 CPU
      limits:
        memory: "128Mi"  # 最大 128Mi 内存
        cpu: "500m"      # 最大 0.5 CPU
  - name: db
    image: mysql
    env:
    - name: MYSQL_ROOT_PASSWORD
      value: "abc123"
    resources:
      requests:
        memory: "512Mi"  # 最少 512Mi 内存
        cpu: "0.5"       # 最少 0.5 CPU
      limits:
        memory: "1Gi"    # 最大 1Gi 内存
        cpu: "1"         # 最大 1 CPU

# 启动
kubectl apply -f resource.yaml
查看节点
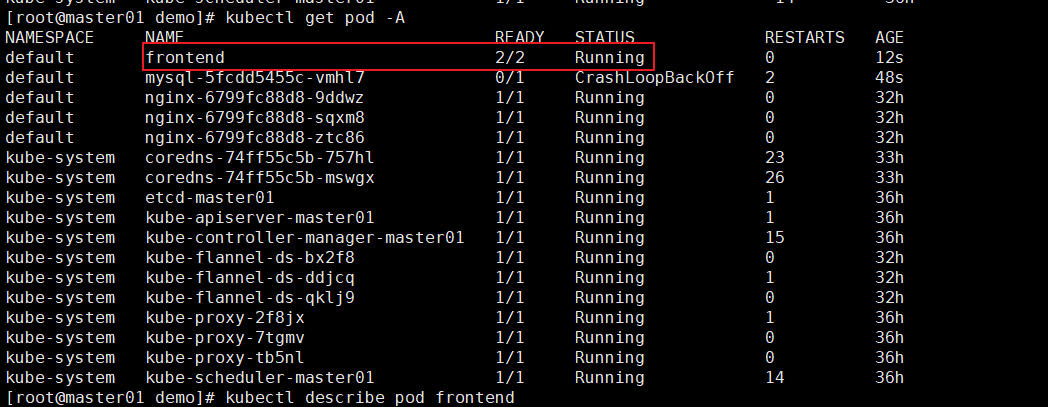
查看信息
# 详细信息
kubectl describe pod frontend

# 查看pod资源分配情况
kubectl get pods -o wide

# 查看节点资源
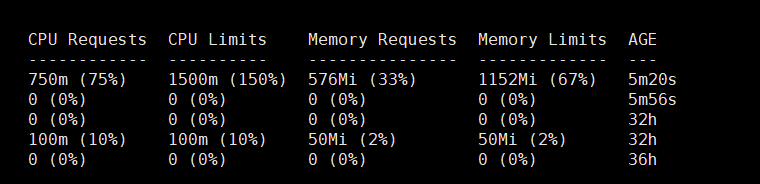
kubectl describe nodes node02
节点资源的信息(部分)
CPU 与内存资源分配的实际情况
总结
-
资源请求与限制:
-
requests是容器启动时最少需要的资源,调度器依据该值选择节点。 -
limits是容器能够使用的最大资源值,超出该值的资源请求会被限制。
-
-
自动匹配:
-
如果未设置
requests,Kubernetes 会自动将其设置为与limits相同。
-
-
资源的分配:
-
Pod 中多个容器的资源请求与限制会被加总,以便监控和调整节点的资源分配。
-
-
资源单位:
-
CPU 使用
m(毫核)表示,例如:500m表示 0.5 个 CPU。 -
内存 使用标准的字节单位表示,通常推荐使用基于 2 的指数单位,如
Gi,Mi等。
-
探针的三种规则
| 探针类型 | 作用说明 | 探测失败时行为 | 默认状态 | 特殊说明 |
|---|---|---|---|---|
| livenessProbe | 判断容器是否正在运行(存活) | kubelet 杀死容器 → 按 Pod 的 restartPolicy 决定是否重启 | Success | 随容器生命周期持续探测 |
| readinessProbe | 判断容器是否准备好接受请求(就绪) | 将该 Pod IP 从对应 Service 的 Endpoints 中剔除 | Success | 在首次探测成功前,Pod 处于 NotReady;只有 Success 后才会变为 Ready |
| startupProbe | 判断容器内的应用是否已启动(针对启动慢或启动时间不确定的应用) v1.17 引入 | 失败:kubelet 杀死容器 → 按 restartPolicy 重启; 成功前,其他探针均不生效 | Success | 成功前,livenessProbe/readinessProbe 被禁用;成功后交由其他探针接管探测 |
Probe支持三种检查方法
| 探测方式 | 工作原理 | 成功条件 | 典型使用场景示例 |
|---|---|---|---|
| exec | 在容器内执行指定命令 | 命令退出返回码为 0 | 运行自定义脚本、检查本地文件/进程等 |
| tcpSocket | 对容器 IP 的指定端口做 TCP 三次握手检测 | 端口可建立 TCP 连接(打开) | 数据库、缓存等非 HTTP 服务的端口监听检测 |
| httpGet | 对容器 IP 的指定端口和路径发起 HTTP GET 请求 | 响应状态码 ≥200 且 <400 | Web 服务的健康检查接口 |
liveness-exec
vim exec.yaml
apiVersion: v1
kind: Pod
metadata:
  name: liveness-exec
  namespace: default
spec:
  containers:
  - name: liveness-exec-container
    image: busybox
    imagePullPolicy: IfNotPresent
    command: ["/bin/sh","-c","touch /tmp/live ; sleep 30; rm -rf /tmp/live; sleep 60"] #
    livenessProbe:
      exec:
        command: ["test","-e","/tmp/live"]
      initialDelaySeconds: 1
      periodSeconds: 3

# 运行
kubectl create -f exec.yaml
描述节点信息
kubectl describe pods liveness-exec
截取部分

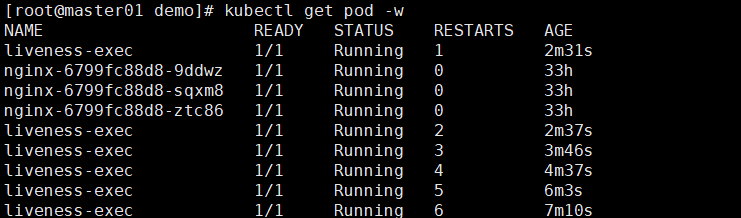
实时监控
kubectl get pod -w
httpget
vim httpget.yaml
apiVersion: v1
kind: Pod
metadata:
  name: liveness-httpget
  namespace: default
spec:
  containers:
  - name: liveness-httpget-container
    image: nginx
    imagePullPolicy: IfNotPresent
    ports:
    - name: http
      containerPort: 80
    livenessProbe:
      httpGet:
        port: http     # 80端口
        path: /index.html
      initialDelaySeconds: 1
      periodSeconds: 3
      timeoutSeconds: 10
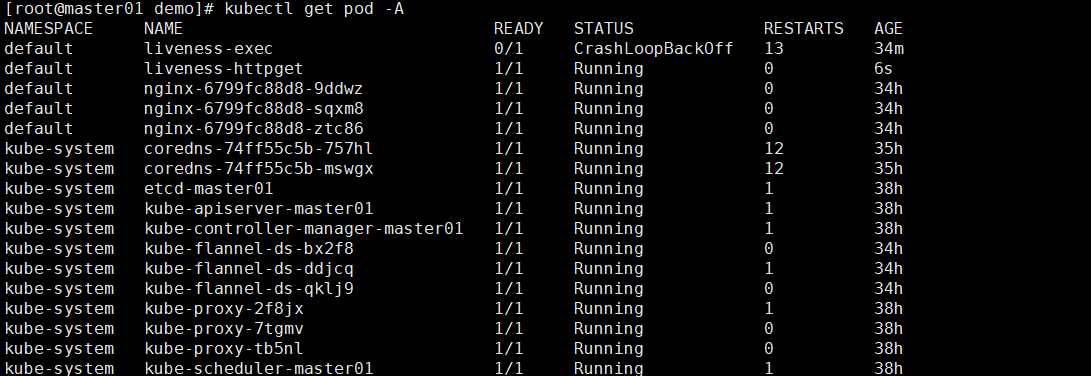
验证是否创建成功
删除容器里面的html文件
kubectl exec -it liveness-httpget -- rm -rf /usr/share/nginx/html/index.html
判断容器被是或否被杀死,然后重启
kubectl describe pod liveness-httpget | grep -E 'Killing|Started|Liveness'

也可以通过节点查看
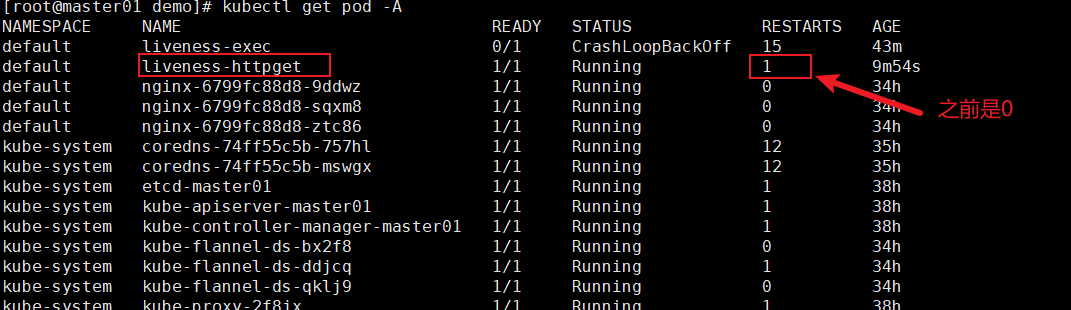
tcpsocket
vim tcpsocket.yaml

apiVersion: v1
kind: Pod
metadata:
  name: probe-tcp
spec:
  containers:
  - name: nginx
    image: soscscs/myapp:v1
    livenessProbe:
      initialDelaySeconds: 5
      timeoutSeconds: 1
      tcpSocket:
        port: 8080
      periodSeconds: 10
      failureThreshold: 2

kubectl create -f tcpsocket.yaml

kubectl get pods -w
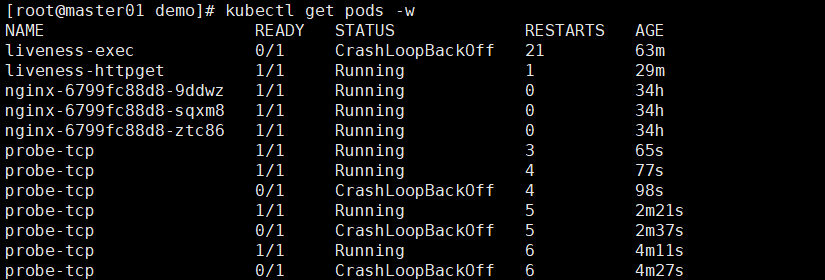
这里因为没有监测到8080端口,所以它一直崩溃
准备就绪
vim readiness-httpget.yaml
apiVersion: v1
kind: Pod
metadata:
  name: readiness-httpget
  namespace: default
spec:
  containers:
  - name: readiness-httpget-container
    image: soscscs/myapp:v1
    imagePullPolicy: IfNotPresent
    ports:
    - name: http
      containerPort: 80
    readinessProbe:
      httpGet:
        port: 80
        path: /index1.html
      initialDelaySeconds: 1
      periodSeconds: 3
    livenessProbe:
      httpGet:
        port: http
        path: /index.html
      initialDelaySeconds: 1
      periodSeconds: 3
      timeoutSeconds: 10

kubectl create -f readiness-httpget.yaml

kubectl exec -it readiness-httpget sh
cd /usr/share/nginx/html/
ls
50x.html    index.html
echo 123 > index1.html
exit

kubectl get pods
此时节点的状态
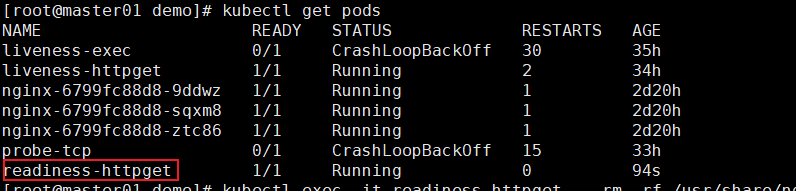
删除index.html
kubectl exec -it readiness-httpget -- rm -rf /usr/share/nginx/html/index.html

kubectl get pods -w
监测状态
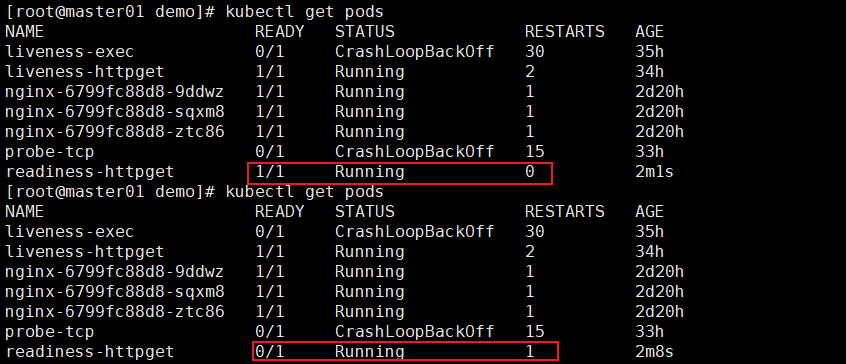
就绪监测2
vim readiness-myapp.yaml

apiVersion: v1
kind: Pod
metadata:
  name: myapp1
  labels:
     app: myapp
spec:
  containers:
  - name: myapp
    image: soscscs/myapp:v1
    ports:
    - name: http
      containerPort: 80
    readinessProbe:
      httpGet:
        port: 80
        path: /index.html
      initialDelaySeconds: 5
      periodSeconds: 5
      timeoutSeconds: 10
---
apiVersion: v1
kind: Pod
metadata:
  name: myapp2
  labels:
     app: myapp
spec:
  containers:
  - name: myapp
    image: soscscs/myapp:v1
    ports:
    - name: http
      containerPort: 80
    readinessProbe:
      httpGet:
        port: 80
        path: /index.html
      initialDelaySeconds: 5
      periodSeconds: 5
      timeoutSeconds: 10
---
apiVersion: v1
kind: Pod
metadata:
  name: myapp3
  labels:
     app: myapp
spec:
  containers:
  - name: myapp
    image: soscscs/myapp:v1
    ports:
    - name: http
      containerPort: 80
    readinessProbe:
      httpGet:
        port: 80
        path: /index.html
      initialDelaySeconds: 5
      periodSeconds: 5
      timeoutSeconds: 10
---
apiVersion: v1
kind: Service
metadata:
  name: myapp
spec:
  selector:
    app: myapp
  type: ClusterIP
  ports:
  - name: http
    port: 80
    targetPort: 80

kubectl create -f readiness-myapp.yaml
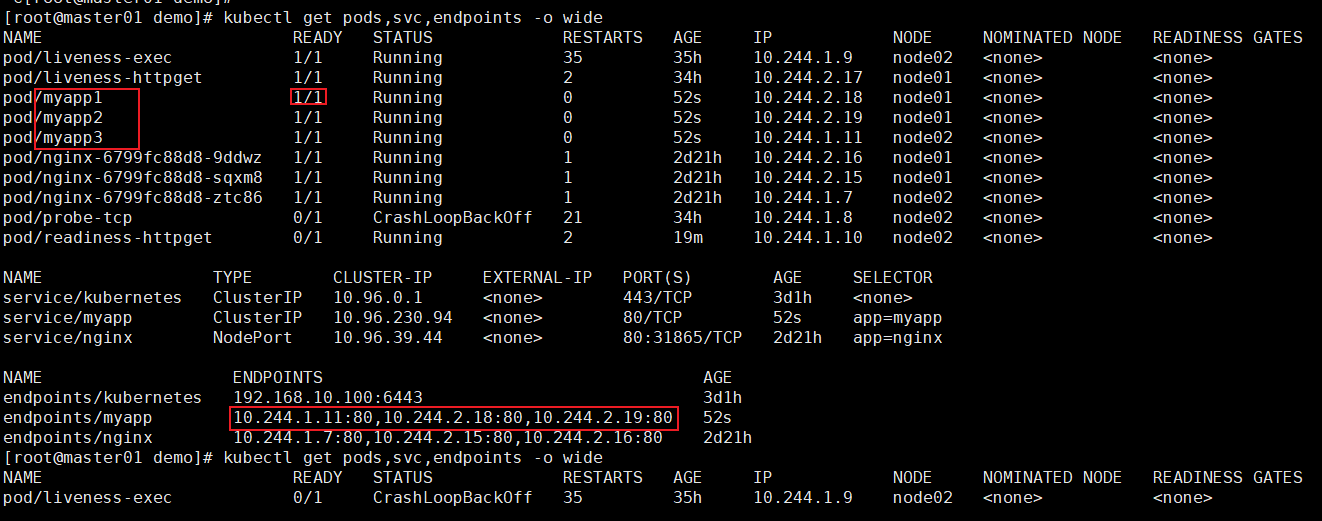
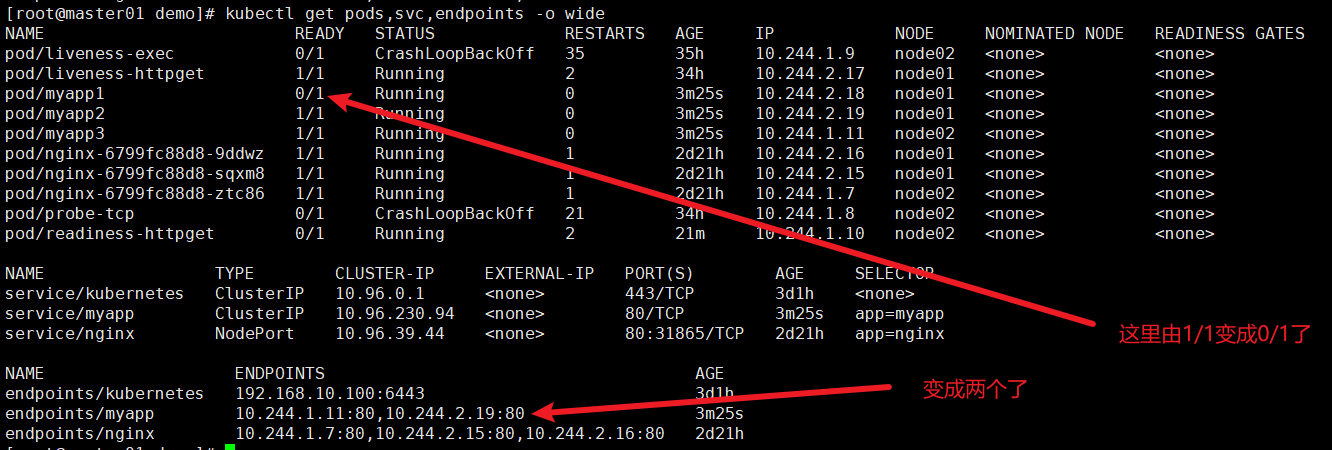
删除index.html
kubectl exec -it pod/myapp1 -- rm -rf /usr/share/nginx/html/index.html
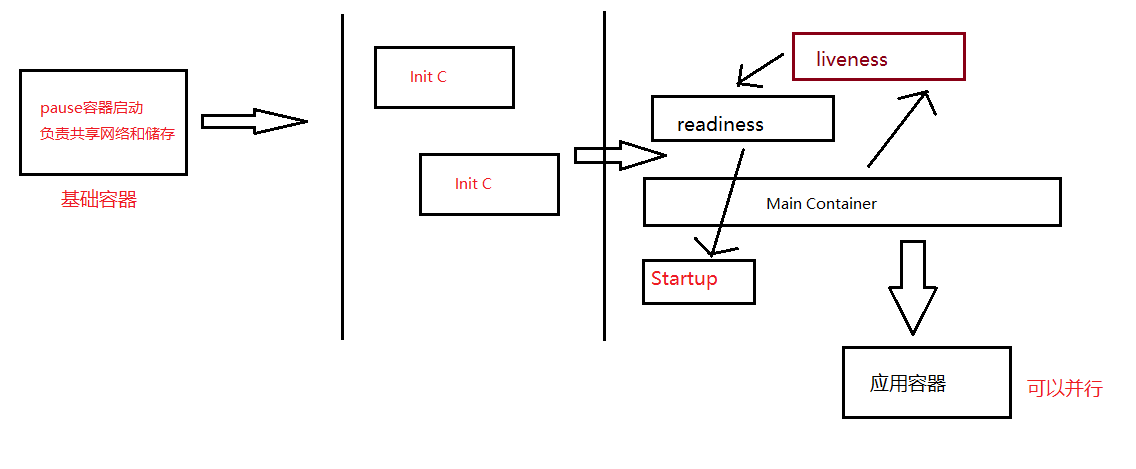
pod的生命周期

开源鸿蒙跨平台开发社区汇聚开发者与厂商,共建“一次开发,多端部署”的开源生态,致力于降低跨端开发门槛,推动万物智联创新。
更多推荐

 15
15 0
0- 0


 已为社区贡献1条内容

所有评论(0)