前端学习日志-9-ts知识点
类
数据结构
栈
后进先出(LIFO)
数组实现
class ArrayStack<T> {
  //定义数组,存储元素
  private data: T[] = [];
  constructor(data: T[]) {
    this.data = data || [];
  }
  //栈相关操作方法
  //push方法 入栈
  push(element:T): void{
    this.data.push(element);
  }
  //pop方法 出栈
  pop(): T | undefined {
    return this.data.pop();
  }
  //peek方法 返回栈顶元素
  peek(): T | undefined {
    return this.data[this.data.length - 1];
  }
  //isEmpty方法 判断栈是否为空
  isEmpty(): boolean {
    return this.data.length === 0;
  }
  //size方法 返回栈元素个数
  size(): number {
    return this.data.length;
  }
}
链表实现
在这里插入代码片
队列
先进先出(FIFO)
数组实现
class ArrayQueue<T> {
  private data: T[] = [];
  constructor(data: T[]){
    this.data = T[] || [];
  }
  enqueue(element: T): void {
    this.data.push(element);
  }
  dequeue(): T | undefined {
    return this.data.shift();
  }
  peek(): T | undefined {
    return this.data[0];
  }
  isEmpty(): boolean {
   return this.data.length === 0;
  }
  size(): number {
   return this.data.length;
  }

}
链表实现
链表
//Node 节点类
class Node<T>{
  val: T;
  next: Node<T> | null = null; // 类型注解 + 初始值
  constructor(value: T){
    this.value = value
  }
}
//链表类
class LinkedList<T> {
  private head: Node<T> | null = null;
  private size: number = 0;

  get length(){
    return this.size
  }

  //append方法 增加节点
  append(value: T): void {
    //创建新节点
    const newNode = new Node(value)
    //插入链表
    if(!this.head){
      this.head = newNode
    }else{
      let current = this.head
      while(current.next){
        current = current.next
      }
      //遍历至最后一个节点
      current.next = newNode
    }
    this.size++;
  }

  //traverse方法 遍历打印链表
  traverse(): void{
    if(!this.head){
      console.log(“链表为空”)
    }
    const values: T[] = [];
    let current = this.head;
    while(current){
      values.push(current.vlaue);
      current = current.next;
    }
    console.log(values.join("->"));
  }

  //insert方法 某个位置插入节点
  insert(value: T, position: number) :boolean{
    //越界判断
    if(position<0||position>this.size) return false;
    //创建新节点
    const newNode = new Node(value);
    //判断是否头部
    if(position === 0){
      newNode.next = this.head;
      this.head = newNode;
    }else{
      let current = this.head;
      let previous: Node<T> | null = null;
      let index = 0;
      //找到插入位置的前后元素
      //index++ < position 实际为 index<position,index+1
      //理论上while时current不存在为null的情况
      while(index++ < position && current){
        previous = current
        current = current.next
      }
      // index === position
      previous.next = newNode;
      newNode.next = current;
    }
    this.size++
    return true
  }

  //removeAt方法 从制定位置删除一个节点
  removeAt(position: number): boolean{
    //越界判断
    if(position < 0 || position>= this.size){
      return false;
    }
    //删除头部 size不为0 this.head存在
    if(position === 0){
      this.head = this.head.next;
    }else{
      let current = this.head;
      let previous : Node<T> | null = null;
      let index = 0;
      while(index++ < position && current){
        previous = current;
        current = current.next;
      }
      previous.next = current.next;
    }
    this.size--;
    return true;
  }

  //getValue方法 输入位置返回节点值
  getValue(position: number): T | null {
    //越界判断
    if(position < 0 || position >= this.size) {
      return null;
    }
    let index = 0;
    let current = this.head;
    while(index++ < position && current){
      current = current.next;
    }
    return current?.value ?? null;
  }

  //getNode方法 输入位置返回节点,,可用于优化插入删除查看方法
  privat getNode(position: number): Node<T> | null{
    //默认position合法
    let index = 0;
    let current = this.head;
    while(index++ < positiong){
      current = current.next;
    }
    return current;
  }

  //update方法 更新某个位置元素,以getNode方法为例
  update(value: T, position: number): boolean{
    if(position < 0 || position >= this.size){
      return false;
    }
    const oldNode = this.getNode(position);
    oldNode.value = value;
    return true;
  }

  //indexOf方法 返回元素的索引(若值相同返回第一个)
  indexOf(value: T): number{
    let current = this.head;
    let index = 0;
    while(current) {
      if(current.value === value){
        return index;
      }
      current = current.next;
      index++;
    }
    return -1;
  }

  //remove方法 删除元素(有多个删除第一个)
  remove(value: T): boolean{
    let index = this.indexOf(value);
    return this.removeAt(index);
  }

  //isEmpty方法 判断链表是否为空
  isEmpty(): boolean{
    return this.size === 0;
  }
}
哈希表
字符串与数组下标建立连接,实现快速查找
- 哈希化:将大数字转化成数组范围内下标的过程,称之为哈希化;
- 哈希函数:我们通常会将单词转化成大数字,把大数字进行哈希化的代码实现放在一个函数中,该函数就称为哈希函数;
- 哈希表:对最终数据插入的数组进行整个结构的封装,得到的就是哈希表。
仍然需要解决的问题:
哈希化过后的下标依然可能重复,如何解决这个问题呢?这种情况称为冲突,冲突是不可避免的,我们只能解决冲突。
方案一:链地址法,解决冲突的办法是每个数组单元中存储的不再是单个数据,而是一个链条
方案二:开放地址法,寻找空白的单元格来放置冲突的数据项。(了解即可,现在很少用到了)
哈希函数
// 霍纳法则计算 hashCode
hashCode = 31 * hashCode + key.charCodeAt(i);
hashCode = hashCode | 0; // 转为32位整数,溢出自动截断
为什么选 31 作为乘数?
这是这个公式的核心设计,选 31 有三个关键原因(行业通用最佳实践):
- 31 是质数(素数)
质数的特性是「只能被 1 和自身整除」,能最大程度减少哈希碰撞(不同字符串生成相同哈希值)。
• 如果用合数(比如 30),因数分解后(2×3×5),容易导致不同字符的编码叠加后产生重复;
• 质数能让哈希值的分布更均匀,降低碰撞概率。 - 31 的计算效率极高
31 = 2⁵ - 1,现代编译器 / CPU 会将 31 * n 优化为 (n << 5) - n(左移 5 位再减 n),比普通乘法快得多。
// 31 * hashCode 等价于(性能更高)
hashCode * 32 - hashCode = (hashCode << 5) - hashCode
- 31 的数值大小适中
• 太小(比如 2):哈希值分布太集中,碰撞概率高;
• 太大(比如 101):数值增长过快,容易导致整数溢出(尤其是 32 位系统);
• 31 在 “分布均匀” 和 “避免溢出” 之间达到了很好的平衡。
补充:处理哈希值溢出
JavaScript/TypeScript 的数字是 64 位浮点数,没有严格的整数溢出,但为了和其他语言(Java/C++)保持一致,通常会用 | 0 将哈希值转为 32 位有符号整数:
hashCode = 31 * hashCode + key.charCodeAt(i);
hashCode = hashCode | 0; // 转为32位整数,溢出自动截断
哈希表
/**
 * 哈希函数例子,将 key 映射成 index
 * @param key 要转换的 key
 * @param max 数组的长度(最大的数值)
 * @returns
 */
function hashFunc(key:string, max: number): number{
  let hashCode = 0;
  const length = key.length;
  for(let i = 0; i < length; i++){
    hashCode = 31 * hashCode + key.charCodeAt(i);
    hashCode = hashCode | 0;
  }
  const index = hashCode % max;
  return index;
}

//哈希表
class HashTable<T> {
  storage: [string,T,number][][] = [];//三维数组 [key,value,hash]
  private bucketSize: number = 7;//哈希桶数量
  private count: number = 0;//存储的键值对总数
  private readonly loadFactor: number = 0.75;// 负载因子阈值(超过则扩容)

  constructor (){
  	// 初始化桶:每个桶初始化为空数组(否则storage是空数组,访问storage[index]会undefined)
    this.storage = new Array(this.bucketSize).fill(null).map(() => []);
  }

  private hashCode(key: string): number {
    let hashCode= 0;
    for(let i = 0; i<key.length; i++){
      hashCode = 31 * hashCode + key.charCodeAt(i);
      hashCode = hashCode | 0;
    }
    return hashCode
  }

  /**
   * 计算键对应的桶索引
   * @param key 字符串键(可选)
   * @param hash 已计算的哈希值(可选)
   * @returns 桶的索引(0 ~ bucketSize-1)
   */
  private getBucketIndex(key?: string, hash?: number): number {
    // 优先使用传入的hash值,无则计算
    const hashCode = hash ?? (key ? this.hashCode(key) : 0);
    // >>> 0 将32位有符号整数转为无符号整数
    return (hashCode >>> 0) % this.bucketSize;
  }

  /**
   * 辅助:获取大于等于num的最小质数(用于扩容)
   * @param num 基准数
   * @returns 最小质数
   */
  private getNextPrime(num: number): number {
    // 质数判断函数 所有大于 3 的质数都满足 6k ± 1(即质数一定在 6 的倍数两侧)
    const isPrime = (n: number): boolean => {
      if (n <= 1) return false;
      if (n <= 3) return true;
      if (n % 2 === 0 || n % 3 === 0) return false;
      for (let i = 5; i * i <= n; i += 6) {
        if (n % i === 0 || n % (i + 2) === 0) return false;
      }
      return true;
    };

    // 从num开始找第一个质数
    let current = num;
    while (!isPrime(current)) {
      current++;
    }
    return current;
  }

  /**
   * 🌟 核心:动态扩容方法
   * 扩容规则:桶数量翻倍(选下一个质数,减少碰撞)
   * 若哈希表数据太大,可以使用更复杂的渐进过渡扩容
   */
  private resize(): void {
    // 1. 计算新的桶数量(翻倍后选最近的质数,优化碰撞概率)
    const newBucketSize = this.getNextPrime(this.bucketSize * 2);
    // 2. 初始化新的空桶数组
    const newStorage: [string, T, number][][] = new Array(newBucketSize).fill(null).map(() => []);
    // 3. 遍历旧桶复制至新桶
    for(const bucket of this.storage){
      for(const [key, value, hash] of bucket){
        // 直接使用缓存的哈希值,无需重新计算
        const newIndex = (hash >>> 0) % newBucketSize;
        newStorage[newIndex].push([key,value,hash])
      }
    }
    this.storage = newStorage;
    this.bucketSize = newBucketSize;
  }

   /**
    * 新增/更新键值对
    * @param key 键
    * @param value 值
    */
   set(key: string, value: T): void{
     // 1. 先计算索引(临时,可能因扩容失效)
     let index = this.getBucketIndex(key);
     let bucket = this.storage[index];

     // 2. 检查是否已存在该键:存在则更新(无需扩容)
  	for (let i = 0; i < bucket.length; i++) {
    		const [k, v, h] = bucket[i];
    		if (k === key) {
      		bucket[i][1] = value; // 更新值(即使后续扩容,更新的是实际存储的bucket)
      		return;
    	   }
  	 }

  	 // 3. 确认新增:此时才检查负载因子,触发扩容(保证扩容后用新bucket)
  	 if (this.count / this.bucketSize > this.loadFactor) {
  	   this.resize();
  	   // 扩容后重新计算索引和bucket(关键!)
       index = this.getBucketIndex(key);
       bucket = this.storage[index];
     }

     // 4. 新增数据(此时bucket一定是新storage的有效引用)
     const hash = this.hashCode(key);
     bucket.push([key, value, hash]);
     this.count++;
   }

   /**
    * 查询键对应的值
    * @param key 键
    * @returns 值(不存在则返回undefined)
    */
   get(key: string): T | undefined {
     const hash = this.hashCode(key);
     const index = this.getBucketIndex(key, hash);
     const bucket = this.storage[index];

     for (const [k, v, h] of bucket) {
       if (k === key) {
         return v;
       }
     }
     return undefined;
   }

   /**
    * 删除指定键值对
    * @param key 键
    * @returns 删除成功返回true,失败返回false
    */
   delete(key: string): boolean {
     if (!key) return false;
     const hash = this.hashCode(key);
     const index = this.getBucketIndex(key, hash);
     const bucket = this.storage[index];

     // 遍历桶内键值对,找到则删除
     for (let i = 0; i < bucket.length; i++) {
       const [k, v, h] = bucket[i];
       if (k === key) {
         bucket.splice(i, 1); // 删除该键值对
         this.count--; // 减少计数
         return true;
       }
     }
     return false;
   }

   /**
    * 判断指定键是否存在
    * @param key 键
    * @returns 存在返回true,否则返回false
    */
   has(key: string): boolean {
     return this.get(key) !== undefined;
   }

   /**
    * 清空哈希表
    */
   clear(): void {
     this.storage = new Array(this.bucketSize).fill(null).map(() => []);
     this.count = 0;
   }

   /**
    * 获取哈希表中元素总数
    * @returns 元素数量
    */
   size(): number {
     return this.count;
   }

   /**
    * 获取当前桶的数量
    * @returns 桶数量
    */
   getBucketCount(): number {
     return this.bucketSize;
   }
}
树
二叉搜索/排序/查找树
非空左子树的所有键值小于其根节点的键值
非空右子树的所有键值大于其根节点的键值
左右子树本身也都是二叉搜索树
相对较小的值总是保存在左节点上,相对较大的值总是保存在右节点上
class TreeNode<T> {
  value: T;
  left: TreeNode<T> | null = null;
  right: TreeNode<T> | null = null;

  constructor(value: T) {
    this.value = value;
  }
}

class BSTree<T> {
  root: TreeNode<T> | null = null;

  insert(value: T): void{
    const newNode = new TreeNode(value);
    //判断是否有根节点
    if(!this.root){
      this.root = newNode;
    }else{
      this.insertNode(this.root,newNode);
    }
  }

  private insertNode(node: TreeNode<T>,newNode: TreeNode<T>): void {
    if(newNode.value < node.value){
      // 去左边查找空白位置
      if (node.left === null) {
        node.left = newNode;
      } else {
        this.insertNode(node.left, newNode);
      }
    } else {
      // 去右边查找空白位置
      if (node.right === null) {
        node.right = newNode;
      } else {
        this.insertNode(node.right, newNode);
      }
    }
  }

   search(value: T): boolean {
     let current = this.root;
     while (current) {
       // 找到了节点
       if (current.value === value) return true;
       if (current.value < value) {
         current = current.right;
       } else {
         current = current.left;
       }
     }
     return false;
   }

   remove(value: T): boolean{
     //要删除的的节点是叶子结点(没有子节点),直接删除
     //要删除的的节点只有一个左子节点,子节点替换
     //要删除的的节点只有一个右子节点,子节点替换
     //要删除的的节点有两个节点,右子树的最小节点替换,左子节点保留
     // 1. 查找待删除节点及其父节点(抽离核心逻辑,提升可读性)
     const { current: delNode, parent } = this.findNodeAndParent(value);
     // 未找到节点,直接返回 false
     if (!delNode) return false;
     // 2. 统一处理节点替换逻辑(抽离重复代码)
     this.replaceNode(delNode, parent);
     return true;
   }

   /**
    * 辅助方法:查找目标节点及其父节点
    * @param value 目标值
    * @returns 包含目标节点和父节点的对象
    */
   private findNodeAndParent(value: T): {
     current: TreeNode<T> | null;
     parent: TreeNode<T> | null;
   } {
     let current = this.root;
     let parent: TreeNode<T> | null = null;

     while (current) {
       if (current.value === value) break;
       parent = current;
       // 二叉搜索树特性:小值左子树,大值右子树
       current = current.value < value ? current.right : current.left;
     }

     return { current, parent };
   }

   /**
    * 辅助方法:统一处理节点替换逻辑(核心优化)
    * @param delNode 待删除节点
    * @param parent 待删除节点的父节点
    */
   private replaceNode(delNode: TreeNode<T>, parent: TreeNode<T> | null): void {
     // 情况1:叶子节点 → 替换为 null
     if (!delNode.left && !delNode.right) {
       this.updateParentChild(parent, delNode, null);
       return;
     }

     // 情况2:只有左子节点 → 替换为左子节点
     if (!delNode.right) {
       this.updateParentChild(parent, delNode, delNode.left);
       return;
     }

     // 情况3:只有右子节点 → 替换为右子节点
     if (!delNode.left) {
       this.updateParentChild(parent, delNode, delNode.right);
       return;
     }

     // 情况4:有两个子节点 → 找后继节点替换
     const successor = this.getSuccessor(delNode);
     this.updateParentChild(parent, delNode, successor);
   }

   /**
    * 辅助方法:更新父节点的子节点引用(消除重复逻辑)
    * @param parent 父节点
    * @param oldChild 旧子节点
    * @param newChild 新子节点
    */
   private updateParentChild(
     parent: TreeNode<T> | null,
     oldChild: TreeNode<T>,
     newChild: TreeNode<T> | null
   ): void {
     // 根节点特殊处理
     if (!parent) {
       this.root = newChild;
       return;
     }

     // 非根节点:判断旧节点在父节点的左/右侧,更新对应引用
     if (parent.left === oldChild) {
       parent.left = newChild;
     } else {
       parent.right = newChild;
     }
   }

   /**
    * 获取后继节点方法
    * @param delNode 待删除节点(确保有两个子节点)
    * @returns 后继节点
    */
   private getSuccessor(delNode: TreeNode<T>): TreeNode<T> {
     // 前置校验:确保 delNode 有右子树(逻辑上必满足,兜底防崩溃)
     if (!delNode.right) {
       throw new Error(`节点 ${delNode.value} 无右子树,无法获取后继节点`);
     }

     // 查找右子树中最左侧节点(后继节点),并记录其父节点
     let successorParent: TreeNode<T> | null = null;
     let successor: TreeNode<T> = delNode.right; // 初始化为右子树,必非空

     while (successor.left) {
       successorParent = successor;
       successor = successor.left;
     }

     // 情况:后继节点不是 delNode 的直接右子节点 → 调整父子关系
     if (successor !== delNode.right && successorParent) {
       // 将后继节点的右子树挂载到其原父节点的左子树
       successorParent.left = successor.right;
       // 将 delNode 的右子树挂载到后继节点的右子树
       successor.right = delNode.right;
     }

     // 核心操作:将 delNode 的左子树挂载到后继节点的左子树
     successor.left = delNode.left;

     return successor;
   }

}
前序遍历(Preorder Traversal)
前序遍历的顺序是:根节点 -> 左子树 -> 右子树
               20
        ┌───────┴───────┐
       18              30
    ┌───┴───┐       ┌───┘
   14      19      22
  ┌─┘
 12

20 18 14 12 19 30 22
递归
preOrderTraverse() {
  this.preOrderTraverseNode(this.root);
}

private preOrderTraverseNode(node: TreeNode<T> | null) {
  if (node) {
    console.log(node.value);
    this.preOrderTraverseNode(node.left);
    this.preOrderTraverseNode(node.right);
  }
}
栈结构(非递归)
  preOrderTraversal(): T[] {
    const result: T[] = [];
    if (!this.root) return result;

    const stack: TreeNode<T>[] = [this.root]; // 初始化栈,压入根节点

    while (stack.length > 0) {
      const node = stack.pop()!; // 弹出栈顶节点
      result.push(node.value); // 先访问根节点

      // 栈是后进先出,所以先压右子节点,再压左子节点(保证左子节点先出栈)
      if (node.right) stack.push(node.right);
      if (node.left) stack.push(node.left);
    }

    return result;
  }
中序遍历(Inorder Traversal)
中序遍历的顺序是:左子树 -> 根节点 -> 右子树
               20
        ┌───────┴───────┐
       18              30
    ┌───┴───┐       ┌───┘
   14      19      22
  ┌─┘
 12

12 14 18 19 20 22 30
递归
  inOrderTraverse() {
    this.inOrderTraverseNode(this.root);
  }

  private inOrderTraverseNode(node: TreeNode<T> | null) {
    if (node) {
      this.inOrderTraverseNode(node.left);
      console.log(node.value);
      this.inOrderTraverseNode(node.right);
    }
  }
栈结构(非递归)
递归中序遍历的逻辑是「先递归左子树 → 访问根 → 递归右子树」,非递归需要模拟这个过程,但栈只能「后进先出」,因此需要先把所有左子节点压栈,再弹栈访问,最后处理右子树。
  inOrderTraversal(): T[] {
    const result: T[] = [];
    if (!this.root) return result;

    const stack: TreeNode<T>[] = [];
    let current: TreeNode<T> | null = this.root;

    // 循环条件:current 非空 或 栈非空
    while (current || stack.length > 0) {
      // 1. 先遍历到最左子节点,沿途节点入栈
      while (current) {
        stack.push(current);
        current = current.left;
      }

      // 2. 弹出栈顶节点(最左节点),访问
      current = stack.pop()!;
      result.push(current.value);

      // 3. 处理右子树
      current = current.right;
    }

    return result;
  }
后序遍历(Postorder Traversal)
后序遍历的顺序是:左子树 -> 右子树 -> 根节点
               20
        ┌───────┴───────┐
       18              30
    ┌───┴───┐       ┌───┘
   14      19      22
  ┌─┘
 12

12 14 19 18 22 30 20
递归
  postOrderTraverse() {
    this.postOrderTraverseNode(this.root);
  }

  private postOrderTraverseNode(node: TreeNode<T> | null) {
    if (node) {
      this.postOrderTraverseNode(node.left);
      this.postOrderTraverseNode(node.right);
      console.log(node.value);
    }
  }
栈结构(非递归)
根节点暂存,左右子树优先处理
1.布尔值标记(前序改)
  postOrderTraversal(): T[] {
    const result: T[] = [];
    if (!this.root) return result;

    // 栈元素:[节点, 是否已访问]
    const stack: [TreeNode<T>, boolean][] = [[this.root, false]];

    while (stack.length > 0) {
      const [node, isVisited] = stack.pop()!;

      if (isVisited) {
        // 已访问:直接加入结果
        result.push(node.value);
      } else {
        // 未访问:按 根 → 右 → 左 入栈(出栈时为 左 → 右 → 根)
        stack.push([node, true]); // 标记为待访问
        if (node.right) stack.push([node.right, false]); // 压入右子节点
        if (node.left) stack.push([node.left, false]); // 压入左子节点
      }
    }

    return result;
  }
2.无标记(中序改)
postOrderTraversalNoFlag(): T[] {
  const result: T[] = [];
  if (!this.root) return result;

  const stack: TreeNode<T>[] = [];
  let current: TreeNode<T> | null = this.root;
  let lastVisited: TreeNode<T> | null = null; // 记录上一次访问的节点

  while (current || stack.length > 0) {
    // 步骤1:先把所有左子节点压栈(和中序一样)
    while (current) {
      stack.push(current);
      current = current.left;
    }

    // 步骤2:取栈顶节点(不弹出,先判断)
    const peekNode = stack[stack.length - 1];

    // 分支1:右子节点为空 或 右子节点已访问 → 可以访问当前节点
    if (!peekNode.right || peekNode.right === lastVisited) {
      stack.pop(); // 弹出并访问
      result.push(peekNode.value);
      lastVisited = peekNode; // 更新上一次访问的节点
      current = null; // 无需处理左子树,置空
    }
    // 分支2:右子节点未访问 → 处理右子树
    else {
      current = peekNode.right;
    }
  }

  return result;
}
层序遍历(LevelOrder Traverse)
从上向向下逐层遍历,通常会借助队列来完成
               20
        ┌───────┴───────┐
       18              30
    ┌───┴───┐       ┌───┘
   14      19      22
  ┌─┘
 12

20 18 30 14 19 22 12
  levelOrderTraverse() {
    // 1. 如果没有根节点,那么不需要遍历
    if (!this.root) return;

    // 2. 创建队列结构
    const queue: TreeNode<T>[] = [];

    // 第一个节点是根节点
    queue.push(this.root);

    // 3. 遍历队列中所有的节点(依次出队)
    while (queue.length) {
      // 3.1 访问节点的过程
      const current = queue.shift()!;
      console.log(current.value);

      // 3.2 将左子节点放入到队列
      if (current.left) {
        queue.push(current.left);
      }

      // 3.3 将右子节点放入到队列
      if (current.right) {
        queue.push(current.right);
      }
    }
  }
树深
最大深度
递归
  /**
   * 递归求最大深度
   * @param node 起始节点(默认根节点)
   * @returns 最大深度(空树返回0)
   */
  maxDepthRecursive(node: TreeNode<T> | null = this.root): number {
    // 终止条件:空节点深度为0
    if (!node) return 0;
    // 分治:当前节点深度 = 1 + 左右子树深度的最大值
    const leftDepth = this.maxDepthRecursive(node.left);
    const rightDepth = this.maxDepthRecursive(node.right);
    return 1 + Math.max(leftDepth, rightDepth);
  }
非递归
maxDepthIterative(): number {
  if (!this.root) return 0;

  const queue: TreeNode<T>[] = [this.root]; // 队列存储当前层的节点
  let depth = 0; // 记录深度

  while (queue.length > 0) {
    const levelSize = queue.length; // 当前层的节点数(关键:区分不同层)
    depth++; // 每遍历一层,深度+1

    // 遍历当前层的所有节点
    for (let i = 0; i < levelSize; i++) {
      const node = queue.shift();
      if (!node) break; // 兜底判断,避免空值
      // 左子节点入队
      if (node.left) queue.push(node.left);
      // 右子节点入队
      if (node.right) queue.push(node.right);
    }
  }

  return depth;
}
最小深度
只有左 / 右子树时,深度 = 1 + 非空子树的深度
递归
  /**
   * 递归求最小深度(关键:处理子树为空的情况)
   * @param node 起始节点(默认根节点)
   * @returns 最小深度(空树返回0)
   */
  minDepthRecursive(node: TreeNode<T> | null = this.root): number {
    // 终止条件1:空节点深度为0
    if (!node) return 0;

    // 终止条件2:叶子节点(无左右子)深度为1
    if (!node.left && !node.right) return 1;

    // 情况1:只有右子树 → 最小深度=1+右子树深度
    if (!node.left) return 1 + this.minDepthRecursive(node.right);

    // 情况2:只有左子树 → 最小深度=1+左子树深度
    if (!node.right) return 1 + this.minDepthRecursive(node.left);

    // 情况3:左右子树都有 → 最小深度=1+min(左子树深度, 右子树深度)
    const leftDepth = this.minDepthRecursive(node.left);
    const rightDepth = this.minDepthRecursive(node.right);
    return 1 + Math.min(leftDepth, rightDepth);
  }
非递归
//层序遍历,第一个叶子节点
minDepthIterative(): number {
  if (!this.root) return 0;

  const queue: TreeNode<T>[] = [this.root];
  let depth = 0;

  while (queue.length > 0) {
    const levelSize = queue.length;
    depth++; // 当前层深度

    // 遍历当前层节点
    for (let i = 0; i < levelSize; i++) {
      const node = queue.shift();
      if (!node) break; // 兜底判断,避免空值

      // 核心:找到第一个叶子节点,直接返回当前深度(最短路径)
      if (!node.left && !node.right) {
        return depth;
      }

      if (node.left) queue.push(node.left);
      if (node.right) queue.push(node.right);
    }
  }

  return depth; // 理论上不会执行到这里(空树已提前返回)
}
二叉堆
最小堆
根结点为最小值,每个结点的值小于或等于其孩子结点的值
数组实现
节点
获取给定节点的左侧子节点位置:2 * index + 1
获取给定节点的右侧子节点位置:2 * index + 2
获取给定节点的父节点位置:(index - 1) / 2
插入数据
insert方法接收一个参数:要插入的数据
需要对插入的数据进行非空判断,如果为null则返回false
数据不为空时,往数组(heap)的末尾追加要插入的数据,增加堆数量
插入完成后,执行siftUp操作,将数据移动至合适的位置
上移完成后,则成功的向堆中插入了一条数据,返回true
上移
siftUp方法接收一个参数:插入数据的索引位置(index)
获取当前要插入数据的父节点位置(parent)
index大于0且heap[parent] > heap[index],交换parent和index位置的节点
更新index和parent的值,继续进行节点交换直至heap[parent] < heap[index]
弹出堆顶
在最小堆中数组的0号元素就是堆的最小值
在移除第一个元素后,减小堆数量,将堆的最后一个元素移动至根部并执行下移(siftDown)函数,交换元素直到堆的结构正常
extract函数不接收参数
如果堆为空则返回undefined
如果堆的长度为1,直接返回堆顶元素
否则,声明一个变量保存堆顶元素
执行下移函数调整堆结构
返回刚才保存堆堆顶元素
下移
siftDown函数接收一个参数:需要调整的元素位置(index)
声明一个变量(element)保存index
获取index的左子节点(left)、右子节点(right)、堆的大小(size)
如果heap[element] > heap[left],则更新element的值为left
如果heap[element] > heap[right],则更新element的值为right
如果index !== element,则交换index和element位置的元素,继续执行siftDown函数
class Heap<T>: {
  private data: T[] = [];
  private length: number = 0;

  constructor(list:T[] = []){
    this.buildHeap(list);
  }

  private swap(i:number,j:number): void{
    let temp = this.data[i]
    this.data[i] = this.data[j]
    this.data[j] = temp
  }

  get size(): number{
    return this.length;
  }

  isEmpty(): boolean {
    return this.length === 0;
  }

  peek():T | undefined{
    return this.isEmpty() ? undefined : this.data[0];
  }

  insert(value: T): boolean{
    if(value != null){
      this.data.push(value);
      this.length++;
      this.siftUp();
      return true;
    }
    return false;
  }

  siftUp(): void{
    let currentIndex = this.data.length - 1;
    //最多上浮到根节点
    while(currentIndex>0){
      let parentIndex = Math.floor((currentIndex-1)/2)
      if(this.data[parentIndex]<=this.data[currentIndex]){
        break;
      }
      this.swap(parentIndex,currentIndex)
      currentIndex = parentIndex
    }
  }

  extract(): T | undefined{
    if(this.length === 0) return undefined;
    if(this.length === 1) {
      this.length --
      return this.data.shift()
    }
    let res = this.data.[0]
    this.data[0] = this.data.pop()
    this.length --
    this.siftDown(0)
    return res
  }

  shiftDown(start:number): void{
    let index = start;
    while(2*index+1<this.length){
      let left = 2*index+1
      let right = 2*index+2
      let temp = left
      //小的比较
      if(right<this.length&&this.data[right]<this.data[left]){
        temp = right
      }

      if (this.data[temp] < this.data[index]) {
        this.swap(temp, index);
        index = temp;
      } else {
        break; // 父节点 ≤ 子节点 → 满足最小堆规则,终止
      }
    }
  }

  buildHeap(list:T[]):void{
    this.data = list
    this.length = list.length
    //非叶子结点最后一位
    let s = Math.floor((this.length-1)/2)
    for(let i = s; i>=0; i--){
      this.siftDown(i)
    }
  }

}
最大堆
根结点为最大值,每个结点的值大于或等于其孩子结点的值
只需要继承最小堆,重写比对函数,将原来的a与b比较,改为b与a比较即可
图
- 顶点
- 边
表示顶点到顶点的连线 - 相邻顶点
表示由一条边连接在一起的顶点 - 度
一个顶点的度表示相邻顶点的数量
出度:指向别人的数量
入度:指向自己的数量 - 路径
路径是顶点之间的一个连续序列,比如0 1 5 9就是一条路径
简单路径: 要求不包含重复的顶点,比如 0 1 5 9
回路: 第一个顶点和最后一个顶点相同的路径,比如 0 1 5 6 3 0 - 无向图
表示所有边都没有方向
比如上图中 0 - 1 之间有边且没有方向,说明这条边可以保证 0 -> 1,也可以保证 1 -> 0 - 有向图
表示图中的边是有方向的 - 无权图
表示边没有携带权重 - 带权图
带权图表示边有一定的权重
这里的权重可以是任意你希望表示的数据 - 子图
如果图G′的所有节点和边都包含在图G中,则称G′是G的一个子图。简单来说,子图是从原图中删除一些节点和边后得到的图
生成子图(Spanning Subgraph):包含原图中所有节点,但只包含部分边的子图
导出子图(Induced Subgraph):选择原图的一部分节点,以及这些节点之间在原图中的所有边所构成的子图。 - 连通性
图中节点之间是否存在路径
连通图(Connected Graph): 如果无向图中任意两个节点之间都存在一条路径,我们称这个图是连通的
连通分量(Connected Component):对于非连通的无向图,其中的多个连通子图被称为连通分量,一个图可以有多个连通分量
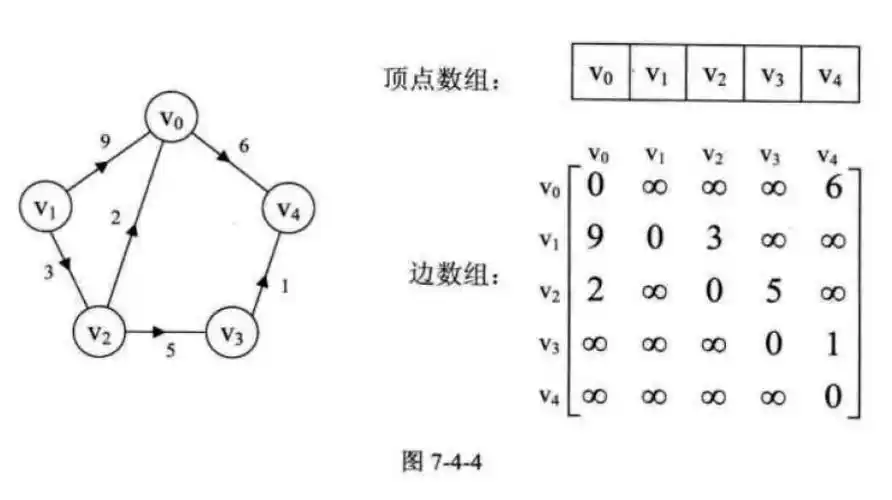
邻接矩阵
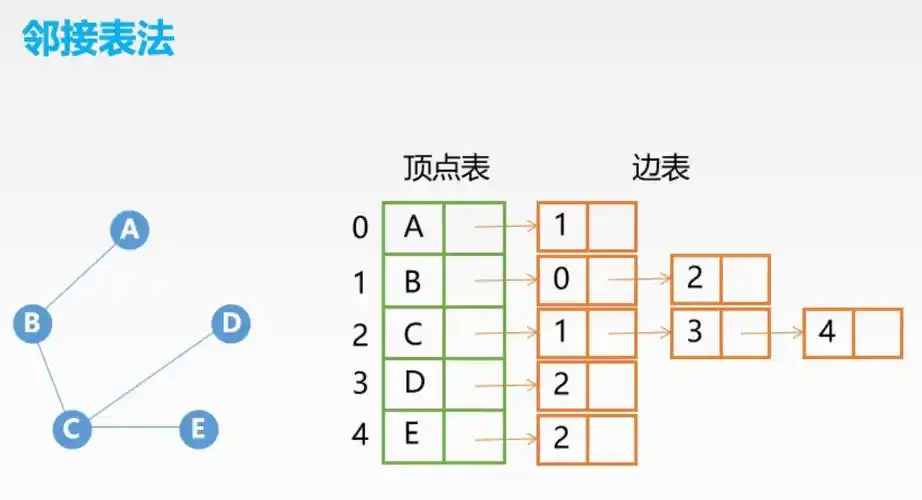
邻接表
在这里插入代码片
符号
?
? 表示该参数是一个可选参数;
当使用某一个对象中的属性时,若无法确定该对象是否会为空就需要在后面加上一个问号来进行判空处理,表示若不为空时再去访问属性。
 const obj = res?.data || {}; // obj是从接口中取到的数据
 const dataError = obj.a.b;  // 若obj为空,则此时会报错
 const dataSafe = obj?.a?.b;  // 相当于 const dataSafe = obj && obj.a && obj.a.b  ? obj.a.b : undefined;

type Coords = {
	x?: number;
	y?: number;
}
??
只有当左侧为null或者undefined时,才会返回右侧的数;主要用于设置默认值
const foo = str ?? 'default'; // 若str 为 null 或 undefined, foo为default
!
变量前使用表示取反;
可将变量转为boolean类型: null、undefined、空字符串 取反之后都为true;
//假值 false 0、-0、0n(BigInt 0)''(空字符串) null undefined NaN
//真值 非 0 数字(如 1、3.14) 非空字符串(如 'test') 所有对象(包括空对象 {}、空数组 []、函数等)
const obj = {
	a: 1,       		// !obj['a'] 为false; 	!!obj['a']  为true;
	b: '',				// !obj['b'] 为true;	!!obj['b']  为false;
	c: 'test',  		// !obj['c'] 为false;	!!obj['c']  为true;
	d: null,			// !obj['d'] 为true;	!!obj['d']  为false;
	e: undefined,		// !obj['e'] 为true;	!!obj['e']  为false;
	f: {},				// !obj['f'] 为false;	!!obj['f']  为true;
	g: { test: 'test'}	// !obj['g'] 为false;	!!obj['g']  为true;
	h: []				// !obj['h'] 为false;	!!obj['h']  为true;
	i: 0				// !obj['i'] 为true;	!!obj['h']  为false;
}
变量后使用,告诉 TypeScript 编译器:“我确定这个值一定不是 null 或 undefined,你不用做类型检查了”
const uploadRef = ref<UploadInstance>();
uploadRef.value!.clearFiles();
// uploadRef.value! 断言 .value 一定不是 undefined,这样才能安全调用 clearFiles() 方法(否则 TypeScript 会提示 “可能为 undefined,无法调用方法”)。

function Fun (data: IParams) {
	const obj = data.name!;
	// data.name 一定不是 null/undefined
}
!!
将任意值转换为其对应的布尔值
高级类型
Record
以 typeof 格式快速创建一个类型,此类型包含一组指定的属性且都是必填。
type Coord = Record<'x' | 'y', number>;

// 等同于
type Coord = {
	x: number;
	y: number;
}
Partial
将类型定义的所有属性都修改为可选。
type Coord = {
	x: number;
	y: number;
}

type Coords = Partial<Coord>;

// 等同于
type Coords = {
	x?: number;
	y?: number;
}
Required
与 Partial程序类型的作用相反,将类型属性都变成必填。
type Coord = {
	x?: number;
	y?: number;
}
type Coords = Required<Coord>;

// 等同于
type Coords = {
	x: number;
	y: number;
}
Readonly
所有属性变为只读
type Coord = {
	x: number;
	y: number;
}

type Coords = Readonly<Coord>;

// 等同于
type Coords = {
    readonly x: number;
    readonly x: number;
}
Mutable
将类型的所有属性从只读(readonly)转换为可变(非只读)
interface User {
  readonly name: string;
  readonly age: number;
}
type MutableUser = Mutable<User>;
// 等价于 { name: string; age: number; }
const user: MutableUser = { name: "Alice", age: 30 };
user.name = "Bob"; // ✅ 可修改
Pick
从类型定义的属性中,选取指定一组属性,返回一个新的类型定义。
type Coord = Record<'x' | 'y', number>;
type Coords = Pick<Coord, 'x'>;

// 等于
type Coords = {
	x: number;
}
Exclude
是一个内置的条件类型,用于从联合类型 T 中排除 U 中存在的类型。它通常用于类型过滤。
type A = string | number | boolean;
type B = Exclude<A, string>; // number | boolean
type C = Exclude<A, string | boolean>; // number
Extract
与 Exclude 完全相反的功能,用于提取指定的 联合类型,如果不存在提取类型,则返回never。可以用在判断一个复杂的 联合类型 中是否包含指定子类型:
type T = Extract<'x' | 'y', 'x'> // 'x'
Omit
Omit 用于从类型 T 中排除某些键(K)。
type Coord = {
	x: number;
	y: number;
}

type Coords = Omit<Coord, 'x'>;     // { y:number}
NonNullable
是一个内置工具类型,用于从类型 T 中排除 null 和 undefined
{
  /**
   * NonNullable : 排除 null 和 undefined
   */
  type A = string | number | null | undefined;
  type B = NonNullable<A>; // string | number
}
Parameters
获取函数的全部参数类型,以 元组类型 返回
type F1 = (a: string, b: number) => void;

type F1ParamTypes = Parameters(F1);  // [string, number]
ConstructorParameters
获取的是 构造函数 的全部参数
// 约束实体实例的结构:可选的count方法,返回number
interface IEntity {
    count?: () => number
}

// 约束实体类的构造函数类型:
// 要求构造函数接收 (boolean, string) 两个参数,返回 IEntity 实例
interface IEntityConstructor {
    new (a: boolean, b: string): IEntity;
}

// 具体的实体类,实现 IEntity 接口
// 构造函数符合 IEntityConstructor 的参数约束(boolean + string)
class Entity implements IEntity {
    constructor(a: boolean, b: string) { }
}

// 提取 IEntityConstructor 构造函数的参数类型,结果为 [boolean, string]
type EntityConstructorParamType = ConstructorParameters<IEntityConstructor>;

// 通用创建函数:接收符合约束的类 + 对应构造参数,返回实例
function createEntity(
  ctor: IEntityConstructor, // 第一个参数:符合构造约束的类
  ...arg: EntityConstructorParamType // 剩余参数:匹配构造函数的参数类型
): IEntity {
    return new ctor(...arg); // 用传入的类和参数创建实例
}

// 调用:传入 Entity 类 + 符合类型的参数,创建实例
const entity = createEntity(Entity, true, 'a');
InstanceType
从类的构造函数中提取实例类型
class User {}
type UserType = InstanceType<typeof User>; // 等价于 User
泛型处理与注意事项
当类中包含泛型时,例如 class User<T> {},直接使用 InstanceType 可能会导致类型不匹配的问题。这是因为 TypeScript 无法自动推断泛型参数的具体类型。因此,我们需要显式地指定泛型参数。
class User<T> {
    data: T;
    constructor(data: T) {
        this.data = data;
    }
}

// 错误的方式
type UserType = InstanceType<typeof User>; // 这里会报错

// 正确的方式
type UserTypeWithGeneric = InstanceType<typeof User<string>>; // 显式指定泛型参数为 string
当类继承自其他类时,InstanceType 同样能够正确解析子类的实例类型。这为复杂的类型推断提供了便利。
class Base {}
class Sub extends Base {}

type BaseType = InstanceType<typeof Base>; // 等价于 Base
type SubType = InstanceType<typeof Sub>; // 等价于 Sub
ReturnType
从给定的函数类型中提取其返回值的类型,当函数返回值类型修改时,通过 ReturnType 提取的类型会自动同步更新,保证类型一致性
// 定义一个返回对象的函数
function getUser() {
  return { name: "张三", age: 20, isStudent: false };
}

// 提取函数返回值类型
type User = ReturnType<typeof getUser>;
// User 的类型为:{ name: string; age: number; isStudent: boolean }
Awaited
递归解包 Promise 的嵌套层级,直接获取其最终解析值的类型,它模拟了 await 操作符或 .then() 方法的行为。
type T1 = Awaited<Promise<string>>;
// T1 = string

type T2 = Awaited<Promise<Promise<number>>>;
// T2 = number

type T3 = Awaited<string>;
// T3 = string(不是 Promise,直接返回原始类型)

type T4 = Awaited<null>;
// T4 = null
搭配ReturnType
async function fetchData() {
  return { id: 1, name: "Lin" };
}
type Result1 = ReturnType<typeof fetchData>;
// Result1 = Promise<{ id: number; name: string }>
type Result2 = Awaited<ReturnType<typeof fetchData>>;
// Result2 = { id: number; name: string }
ThisParameterType
提取一个函数类型的 this参数 的类型,如果该函数类型没有 this参数,则为 unknown。
interface Foo {
    x: number
};

function fn(this: Foo) {}

type Test = ThisParameterType<typeof fn>; // Foo
OmitThisParameter
除函数类型中的 this 参数类型,将「带 this 约束的函数类型」转为「普通函数类型」
function toHex(this: Number) {
  return this.toString(16);
}

const fiveToHex: OmitThisParameter<typeof toHex> = toHex.bind(5);
//原 toHex 的类型是 (this: Number) => string(需要指定 this 才能调用);
//经过 OmitThisParameter 处理后,类型变成 () => string(无 this 约束,可直接调用)。
console.log(fiveToHex());//5

开源鸿蒙跨平台开发社区汇聚开发者与厂商,共建“一次开发,多端部署”的开源生态,致力于降低跨端开发门槛,推动万物智联创新。
更多推荐

 7
7 0
0- 0


 已为社区贡献1条内容

所有评论(0)