迈普4320配置堆叠系统
网络需求
l 实现Device0、Device1形成链形堆叠系统,其中Device0成为主控设备。
网络拓扑
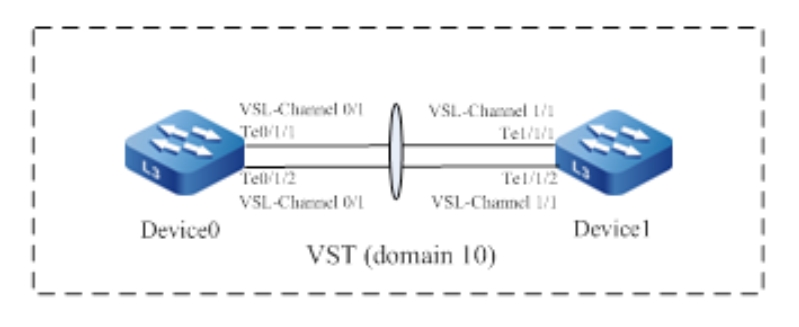
图 1‑2配置设备形成链形堆叠系统
配置步骤
步骤1:
配置Device0。
#在Device0上配置虚拟交换成员设备编号为0,并配置域编号为10,优先级为255。
Device0#configure terminal
Device0(config)#switch virtual member 0
Do you want to modify member id(Yes|No)?y
% Member ID 0 config will take effect only after the exec command 'switch mode virtual' is issued
Device0(config-vst-member-0)#domain 10
% Domain ID 10 config will take effect only after the exec command 'switch mode virtual' is issued
Device0(config-vst-member-0)#priority 255
Device0(config-vst-member-0)#exit
#在Device0上创建虚拟交换链路接口1,并将端口tengigabitethernet1/1和tengigabitethernet1/2加入虚拟交换链路接口1。
Device0(config)#vsl-channel 1
Device0(config-vsl-channel-1)#exit
Device0(config)#interface tengigabitethernet 1/1-1/2
Device0(config-if-range)#vsl-channel 1 mode on
Device0(config-if-range)#exit
#在Device0上保存配置。
Device0#write
Are you sure to overwrite /flash/startup (Yes|No)?y
Building Configuration...done
Write to startup file ... OK
Write to mode file... OK
步骤2:
配置Device1。
#在Device1上配置虚拟交换成员设备编号为1,并配置域编号为10,优先级为200。
Device1#configure terminal
Device1(config)#switch virtual member 1
Do you want to modify member id(Yes|No)?y
% Member ID 1 config will take effect only after the exec command 'switch mode virtual' is issued
Device1(config-vst-member-1)#domain 10
% Domain ID 10 config will take effect only after the exec command 'switch mode virtual' is issued
Device1(config-vst-member-1)#priority 200
Device1(config-vst-member-1)#exit
#在Device1上创建虚拟交换链路接口1,并将端口tengigabitethernet1/1和tengigabitethernet1/2加入虚拟交换链路接口1。
Device1(config)#vsl-channel 1
Device1(config-vsl-channel-1)#exit
Device1(config)#interface tengigabitethernet 1/1-1/2
Device1(config-if-range)#vsl-channel 1 mode on
Device1(config-if-range)#exit
#在Device1上保存配置。
Device1#write
Are you sure to overwrite /flash/startup (Yes|No)?y
Building Configuration...done
Write to startup file ... OK
Write to mode file... OK
步骤3:
配置Device0、Device1运行模式为堆叠模式。
#配置Device0运行模式为堆叠模式。
Device0#switch mode virtual
This command will convert all interface names to naming convention "interface-type member-number/slot/interface" ,
Please make sure to save current configuration.Do you want to proceed? (yes|no)?y
Converting interface names Building configuration...
Copying the startup configuration to backup file named "startup-backupalone"...
Please wait...system reloading is in progress!
ok
Reset system!
Jul 30 2014 17:36:14: %SYS-5-RELOAD: Reload requested
#配置Device1运行模式为堆叠模式。
Device1#switch mode virtual
This command will convert all interface names to naming convention "interface-type member-number/slot/interface" ,
Please make sure to save current configuration.Do you want to proceed? (yes|no)?y
Converting interface names Building configuration...
Copying the startup configuration to backup file named "startup-backupalone"...
Please wait...system reloading is in progress!
ok
Reset system!
Jul 30 2014 17:36:20: %SYS-5-RELOAD: Reload requested
步骤4:
检验结果。
#在Device0上查看,已经形成链形堆叠系统,且Device0为主控设备。
Device0#show switch virtual
Codes: L - local-device,I - isolate-device
Virtual Switch Mode : VIRTUAL
Virtual Switch DomainId : 10
Virtual Switch mac-address : 0001.7a6a.001b
--------------- VST MEMBER INFORMATION ------------------
CODE MemberID Role Pri LocalVsl RemoteVsl
---- -------- ------ ---- --------------- ---------------
L 0 Master 255 vsl-channel 0/1 vsl-channel 1/1
1 Member 200 vsl-channel 1/1 vsl-channel 0/1

开源鸿蒙跨平台开发社区汇聚开发者与厂商,共建“一次开发,多端部署”的开源生态,致力于降低跨端开发门槛,推动万物智联创新。
更多推荐
 0
0 0
0- 0


 已为社区贡献1条内容

所有评论(0)