在Qemu中运行Linux
废话小篇:下午是真困哪,看Spec看的晕头转向。突然想起来以前在前同事的帮助下成功在QEMU上运行过linux。虽然自己没有发挥到它最大的作用,但是做个记录,万一能帮到看到这篇文章的人呢~~
本文用于说明如何在QEMU中运行Linux。
本文中host为x86 Ubuntu20.04
Kernel版本:linux-5.15.30
Busybox版本:busybox-1.35.0
Qemu版本:qemu-7.0.0
在host上安装必要的软件
# Install all of the lack in your system.
sudo apt install libudev-dev
sudo apt install libusb-1.0-0-dev libusbredirparser-dev
sudo apt install flex bison libssl-dev libelf-dev bc
sudo apt install gcc-aarch64-linux-gnu
下载并编译QEMU
执行以下命令,进行下载并编译QEMU(以qemu7.0.0版本为例)。
# https://www.qemu.org/download/#source qemu最新版本网站
wget https://download.qemu.org/qemu-7.0.0.tar.xz
tar xvJf qemu-7.0.0.tar.xz
cd qemu-7.0.0
mkdir build
mkdir install
cd build
#  将prefix参数中的xxxx替换成你本地的路径
../configure --target-list=aarch64-softmmu --prefix=xxxx/qemu-7.0.0/install
make -j36
make install
执行过make install后,到install路径下看一下成果物。为了使用咱们自己编译的QEMU版本,可以将自己的install路径加到PATH路径上,执行以下命令:
vim ~/.bashrc
# 在.bashrc上加上如下内容,其中记得将xxxx替换成自己的路径
export PATH=xxxx/qemu-7.0.0/install:$PATH
source ~/.bashrc #使得设置生效
下载并编译Linux
执行以下命令,下载Linux源码并进行编译(以Linux-5.15.30为例)。
# https://www.kernel.org/pub/linux/kernel/ linux内核源码路径
wget https://www.kernel.org/pub/linux/kernel/v5.x/linux-5.15.30.tar.xz
cd linux-5.15.30
export ARCH=arm64
export CROSS_COMPILE=aarch64-linux-gnu-
make defconfig
make menuconfig
为了可以使用GDB调试,在menuconfig中,需要:打开Debug信息、使能GDB脚本、关闭地址随机化
- 打开Kernel debugging:
Kernel hacking => Kernel debugging - 开启GDB script
Kernel hacking => Compile-time checks and compiler options => Compile the kernel with debug info & Provide GDB script for kernel debugging
并确认关闭“Reduce debugging information” - 关闭地址随机化(Randomize the address):
Kernel Features => Randomize the address of the kernel image
编译:
make -j36
#生成 linux-5.15.30/arch/arm64/boot/Image.gz
下载并编译BusyBox(以busybos-1.35.0为例)
下载busybox源码:https://www.busybox.net/downloads/ 选择合适的版本
wget https://www.busybox.net/downloads/busybox-1.35.0.tar.bz2
cd busybox-1.35.0
make menuconfig
# 可以在menuconfig中,开启DEBUG、DEBUG_PESSIMIZE,
# 以便使 GDB加载busybox_unstripped,对busybox进 调试;
# rootfs中的busybox不必替换。
设置为静态编译:
Setting => Build BusyBox as a static binary (no shared libs)
设置交叉编译工具链:
Setting => Cross compiler pre x => aarch64-linux-gnu-
编译与制作rootfs并进行编译:
dd if=/dev/zero of=rootfs_arm64.img bs=1M count=10
mkfs.ext4 rootfs_arm64.img
mkdir fs
sudo mount -t ext4 -o loop rootfs_arm64.img ./fs
export ARCH=arm64
# cross compiler can be also export here.
sudo make install CONFIG_PREFIX=./fs -j36

cd fs
sudo mkdir proc dev etc home mnt sys
sudo cp -r ../examples/bootfloppy/etc/* etc/

# Edit /etc/fstab
sudo vim etc/fstab
# Append sysfs information in the file,
# as follows: sysfs /sys sysfs defaults 0 0
# then save fstab.

cd ..
sudo umount fs
运行Linux on QEMU
编辑qemu_linux_arm64.sh启动Qemu
#!/bin/bash
# call the script with "-S" as $1, to block the QEMU while booting.

qemu-system-aarch64 -M virt \
        -cpu cortex-a57 -smp 2 -m 4G \
        -kernel ./linux-5.15.30/arch/arm64/boot/Image.gz \
        -device qemu-xhci \
        -device usb-ehci \
        -device usb-tablet \
        -drive file=./busybox-1.35.0/rootfs_arm64.img,format=raw \
        -append "root=/dev/vda rw console=ttyAMA0" -nographic \
        -gdb tcp::1993 $1
GDB in VSCode
使用VSCode进行GDB调试
编写launch.json
cd linux-5.15.30
mkdir .vscode
touch .vscode/launch.json
launch.json的内容如下:
{
	"version": "0.2.0",
	"configurations": [
		{
			"name": "linux-5.15.30",
			"type": "cppdbg",
			"request": "launch",
			"miDebuggerServerAddress": "localhost:1993",
			"miDebuggerPath": "/usr/bin/gdb-multiarch",
			"program": "xxxx/linux-5.15.30/vmlinux", //替换成自己的路径
			"args": [],
			"stopAtEntry": true,
			"cwd": "${fileDirname}",
			"environment": [],
			"externalConsole": false,
			"MIMode": "gdb",
			"logging": {
			"engineLogging": false
			},
			"setupCommands": [
				{
					"description": "为 gdb 启 整 打印",
					"text": "-enable-pretty-printing",
					"ignoreFailures": true
				}
			]
		},
	]
}
运行
在终端中执行qemu_linux_arm64.sh脚本,启动QEMU:
./qemu_linux_arm64.sh -S

VSCode打开linux-5.15.30代码,左侧栏选择“运行和调试”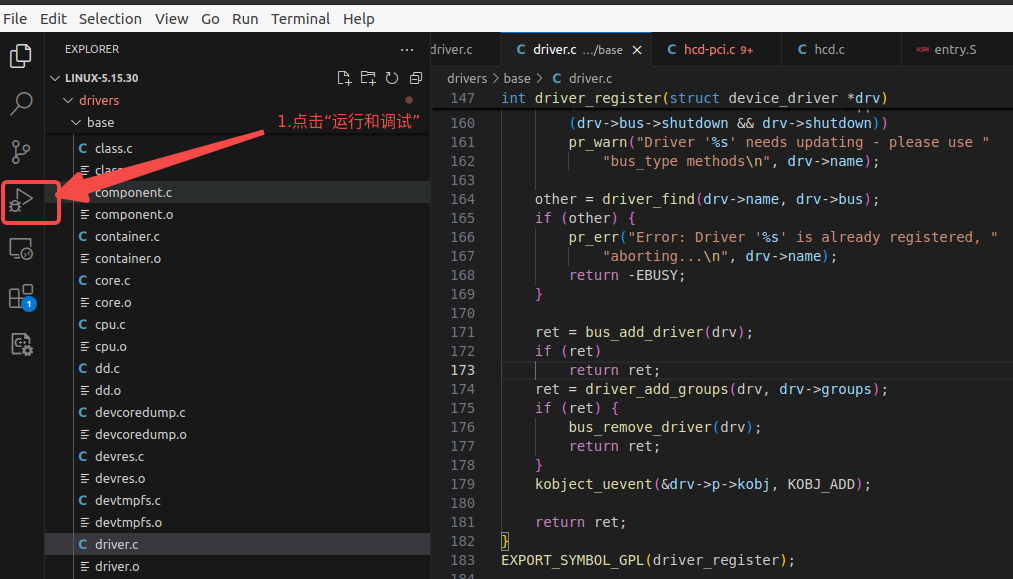 在VSCode界面里,选择“linux-5.15.30”,点击“开始调试”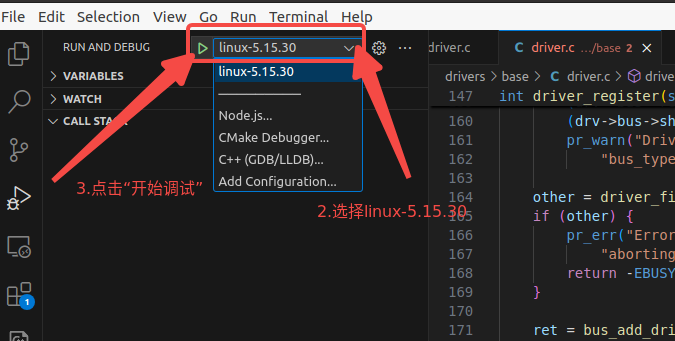
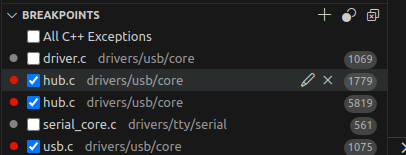
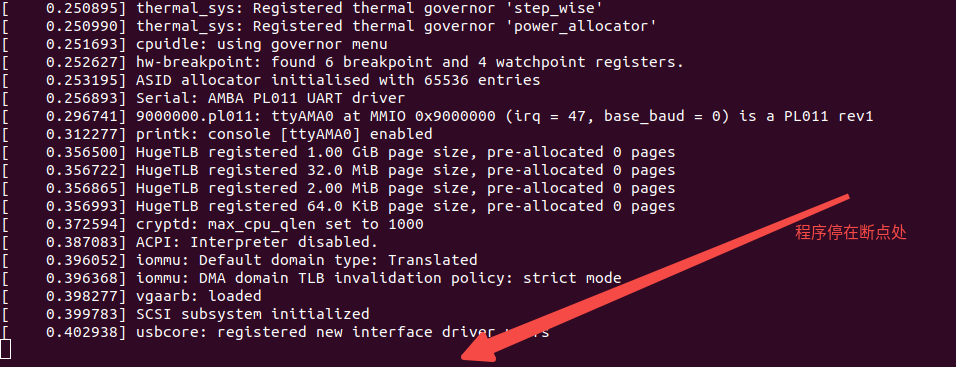
如果在VSCode中设置了断点,代码就会停到断点处。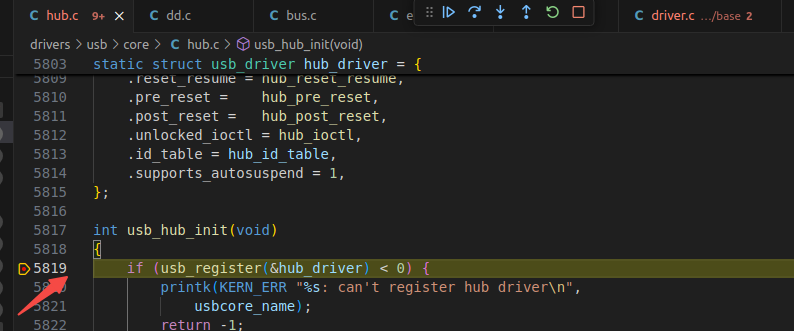
后话
以上就是在QEMU中跑Linux代码的步骤啦,希望对看到这篇文章的你有帮助~~

开源鸿蒙跨平台开发社区汇聚开发者与厂商,共建“一次开发,多端部署”的开源生态,致力于降低跨端开发门槛,推动万物智联创新。
更多推荐



 28
28 0
0- 0


 已为社区贡献1条内容

所有评论(0)