包管理器Helm及Dashboard的部署
·
一、Helm基础
1.什么是Helm
- Helm 是 Kubernetes 的包管理器,类似于 Python 的 pip ,centos 的 yum
- Helm 主要用来管理 Chart 包
- Helm 也提供了一个 helm 命令行工具,该工具可以基于 Chart 包一键创建应用,在创建应用时,可以自定义 Chart 配置
- 可以非常方便地在 Kubernetes 上查找、安装、升级、回滚、卸载应用程序。
- Helm 最新的版本是 v3,Helm3 以 Helm2 的核心功能为基础,和 Helm2 比起来,Helm3 最明显的变化是删除了 Tiller(Helm2 是一种 Client-Server 结构,客户端称为 Helm,服务器称为 Tiller),与 Helm2 不再兼容
2.Helm架构图
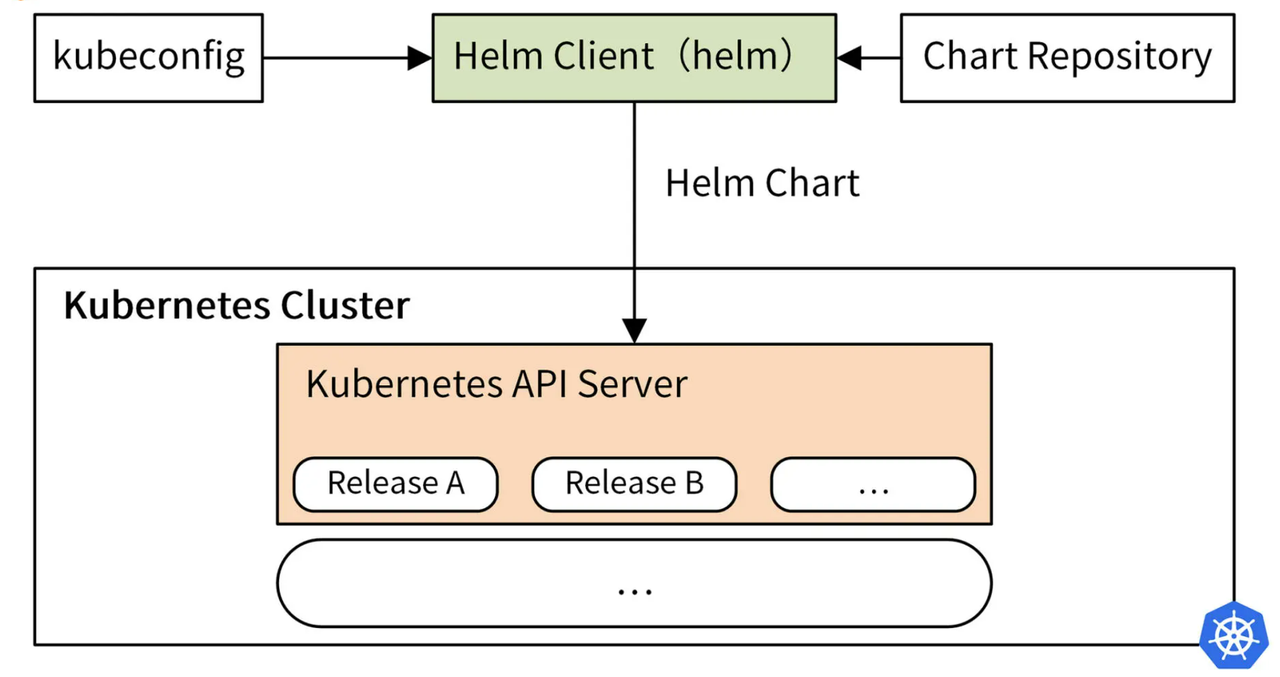
- helm 命令可以从 Chart Repository 中下载 Helm Chart 包,读取kubeconfig文件,并构建 kube-apiserver REST API 接口的 HTTP 请求
- 通过调用 Kubernetes 提供的 REST API 接口,将 Chart 包中包含的所有以 YAML 格式定义的 Kubernetes 资源,在 Kubernetes 集群中创建
- 这些资源以 Release 的形式存在于 Kubernetes 集群中,每个 Release 又包含多个 Kubernetes 资源,例如 Deployment、Pod、Service 等
3.Helm 三大基本概念
- Chart: 代表一个 Helm 包。它包含了在 Kubernetes 集群中运行应用程序、工具或服务所需的所有 YAML 格式的资源定义文件
- Repository(仓库): 它是用来存放和共享 Helm Chart 的地方,类似于存放源码的 GitHub 的 Repository,以及存放镜像的 Docker 的 Repository
- Release:它是运行在 Kubernetes 集群中的 Chart 的实例。一个 Chart 通常可以在同一个集群中安装多次。每一次安装都会创建一个新的 Release
4.Helm的优势
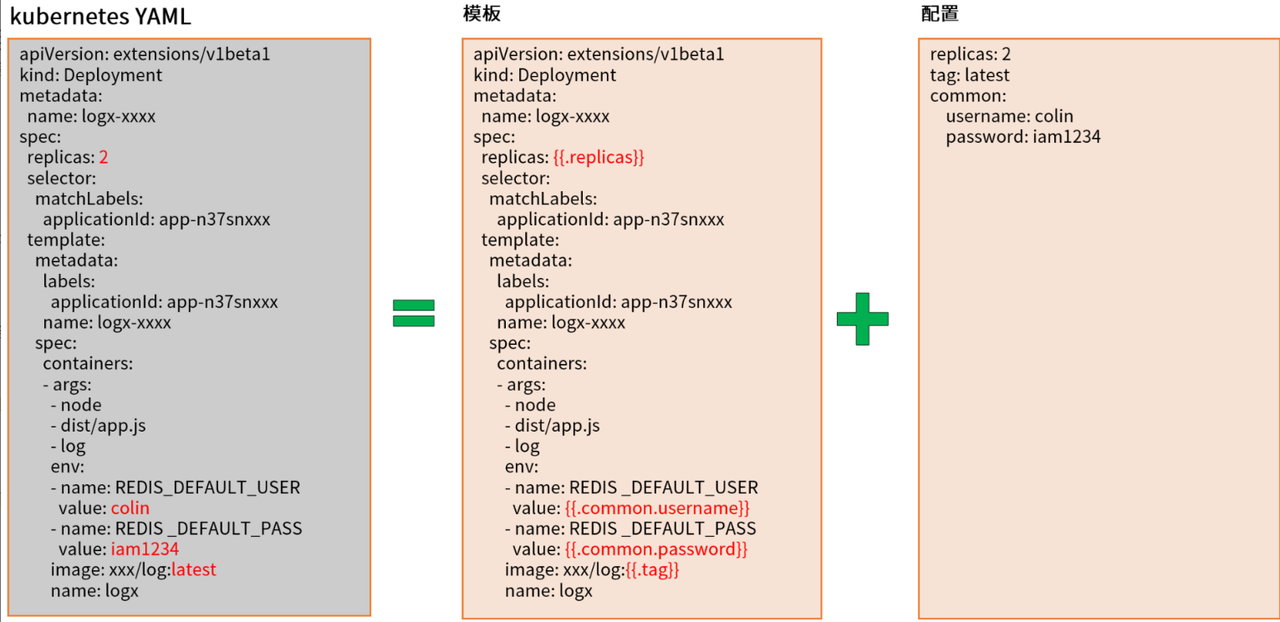
- 在 Helm 中,主要包含两类文件:模板文件和配置文件
- 模板文件通常有多个,配置文件通常有一个
- Helm 的模板文件基于text/template模板文件,提供了更加强大的模板渲染能力
- Helm 可以将配置文件中的值渲染进模板文件中,最终生成一个可以部署的 Kubernetes YAML 格式的资源定义文件
5.Helm 常用命令
- helm create:在本地创建新的 chart
- helm intall:安装 chart
- helm list:列出所有 release
- helm repo:列出、增加、更新、删除 chart 仓库
- helm rollback:回滚 release 到历史版本
- helm pull:拉取远程 chart 到本地
- helm search:使用关键词搜索 chart
- helm uninstall:卸载 release
- helm upgrade:升级 release
二、Helm基本操作
1.安装Helm
[root@localhost 18-helm]# ll
-rw-r--r-- 1 root root 17486196  4月  9  2025 helm-v3.17.0-linux-amd64.tar.gz

[root@localhost 18-helm]# tar xf helm-v3.17.0-linux-amd64.tar.gz

[root@localhost 18-helm]# ll linux-amd64/
总用量 56804
-rwxr-xr-x 1 zhangsan 128 58146968  1月 16  2025 helm
-rw-r--r-- 1 zhangsan 128    11373  1月 16  2025 LICENSE
-rw-r--r-- 1 zhangsan 128     3699  1月 16  2025 README.md

[root@localhost 18-helm]# mv linux-amd64/helm /usr/local/bin/

[root@localhost 18-helm]# helm version
version.BuildInfo{Version:"v3.17.0", GitCommit:"301108edc7ac2a8ba79e4ebf5701b0b6ce6a31e4", GitTreeState:"clean", GoVersion:"go1.23.4"}
安装完helm命令后,可以安装helm命令的自动补全脚本:
helm completion bash > $HOME/.helm-completion.bash
echo 'source $HOME/.helm-completion.bash' >> ~/.bashrc
bash2.安装Helm chart 仓库
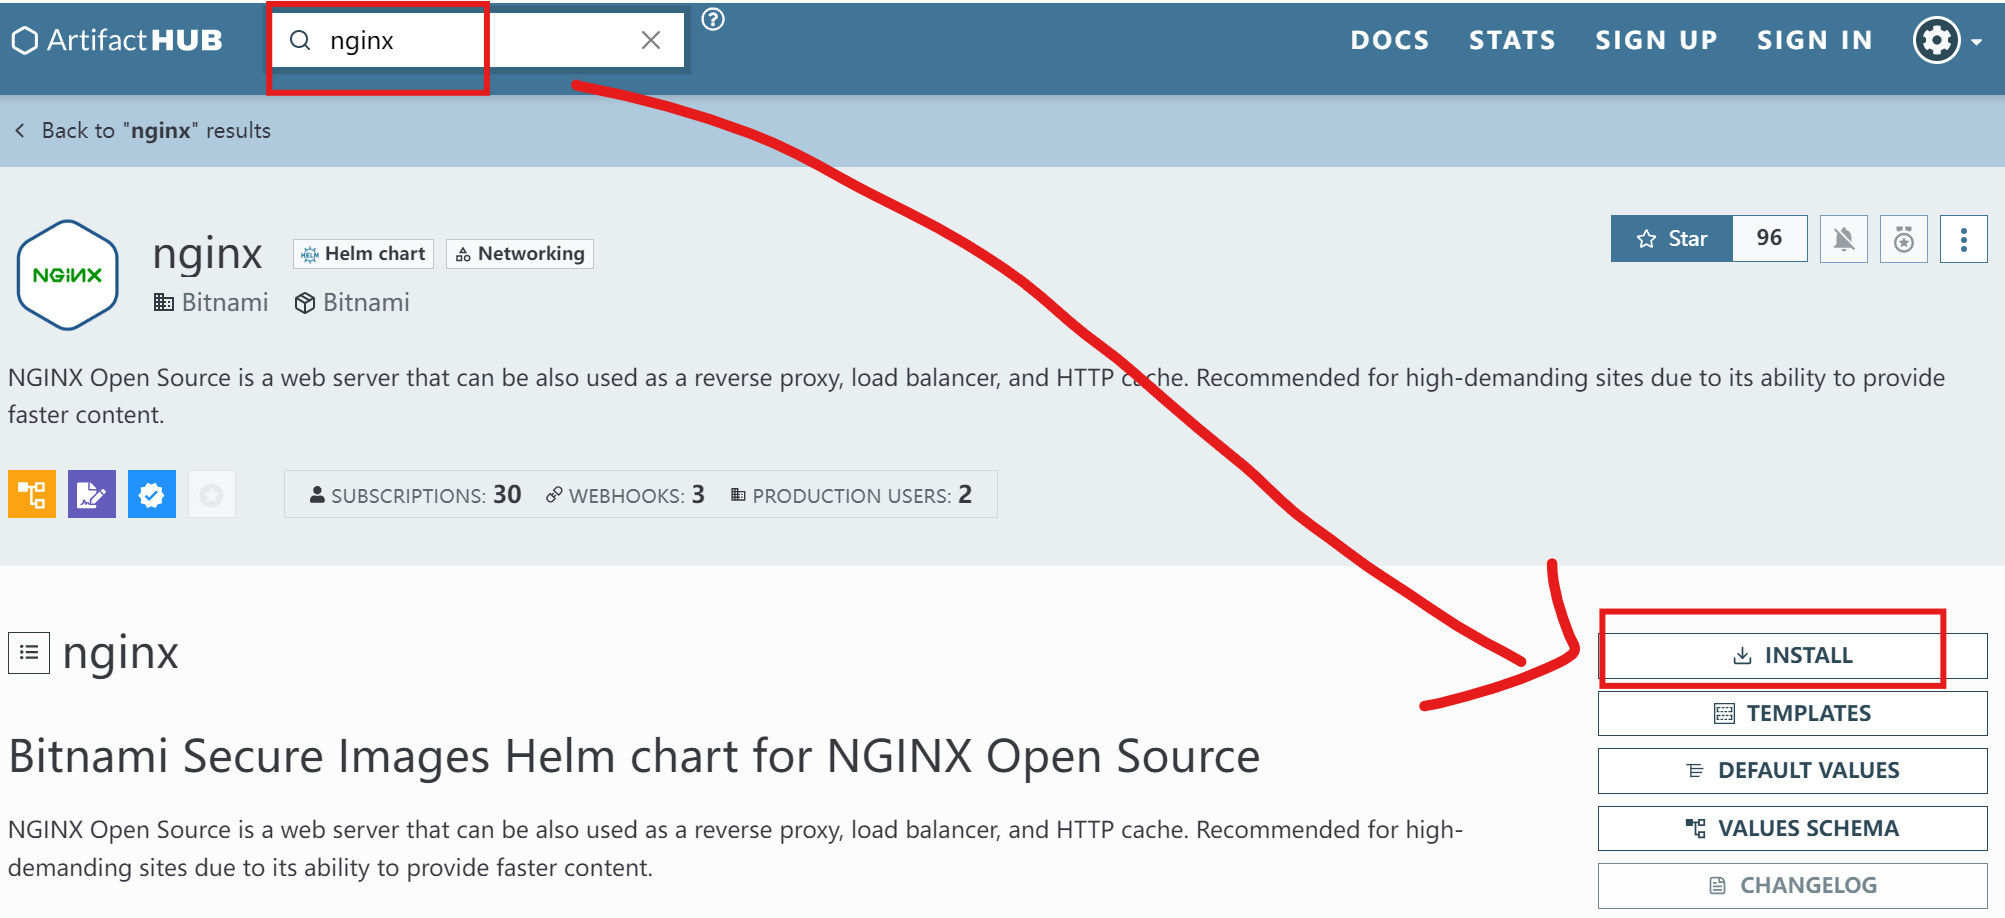
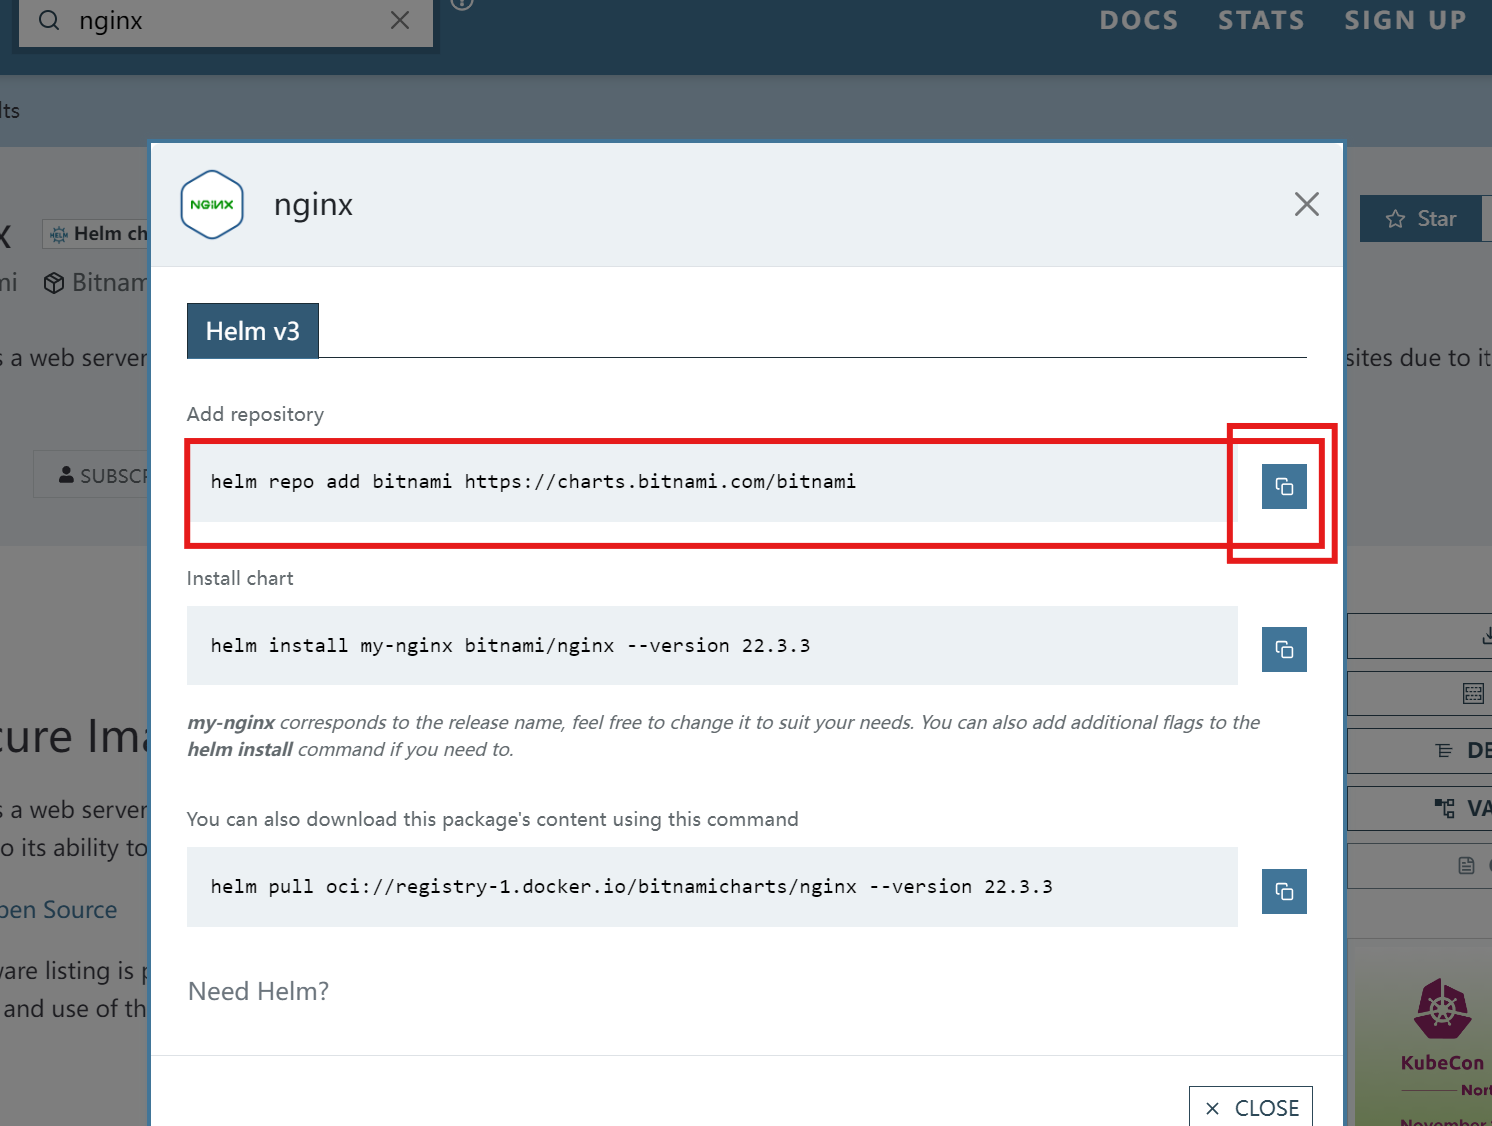
注:Chart 包也有一个托管平台,当前比较流行的 Chart 包托管平台是 Artifact Hub
# # 添加 Chart Repository
[root@localhost 18-helm]# helm repo add bitnami https://charts.bitnami.com/bitnami
"bitnami" has been added to your repositories

# # 查看添加的 Repository 列表
[root@localhost 18-helm]# helm repo list
NAME   	URL
bitnami	https://charts.bitnami.com/bitnami

# 搜索chart,-l选项搜索所有
[root@localhost 18-helm]# helm search repo nginx
NAME                            	CHART VERSION	APP VERSION	DESCRIPTION
bitnami/nginx                   	22.3.3       	1.29.3     	NGINX Open Source is a web server that can be a...
bitnami/nginx-ingress-controller	12.0.7       	1.13.1     	NGINX Ingress Controller is an Ingress controll...
bitnami/nginx-intel             	2.1.15       	0.4.9      	DEPRECATED NGINX Open Source for Intel is a lig...
3.安装 Chart
[root@localhost 18-helm]# helm install nginx bitnami/nginx --version=18.1.15
NAME: nginx
LAST DEPLOYED: Thu Nov 27 18:52:24 2025
NAMESPACE: default
STATUS: deployed
REVISION: 1
TEST SUITE: None
NOTES:
CHART NAME: nginx
CHART VERSION: 18.1.15
APP VERSION: 1.27.1

[root@localhost 18-helm]# kubectl get pod
NAME                   READY   STATUS                  RESTARTS   AGE
nginx-8b896897-ffm8l   0/1     Init:ImagePullBackOff   0          2m44s

[root@localhost 18-helm]# kubectl get svc
NAME                 TYPE           CLUSTER-IP        EXTERNAL-IP   PORT(S)                      AGE
nginx                LoadBalancer   192.168.111.187   <pending>     80:30244/TCP,443:30717/TCP   3m47s

[root@localhost 18-helm]# kubectl get deployments.apps
NAME    READY   UP-TO-DATE   AVAILABLE   AGE
nginx   0/1     1            0           5m21s
4.离线安装 chart
[root@localhost 18-helm]# helm pull bitnami/nginx --version=18.1.15
[root@localhost 18-helm]# ll
总用量 47904
-rw-r--r-- 1 root     root 17486196  4月  9  2025 helm-v3.17.0-linux-amd64.tar.gz
-rw-r--r-- 1 root     root    47880 11月 27 19:00 nginx-18.1.15.tgz

[root@localhost 18-helm]# tar xf nginx-18.1.15.tgz

# 查看
[root@localhost 18-helm]# ll nginx
总用量 140
Chart.lock
charts    # 该目录保存其他依赖的 chart(子 chart)
Chart.yaml
README.md
templates    # chart 配置模板,用于渲染最终的 Kubernetes YAML 文件
├── deployment.yaml    # Kubernetes deployment 配置
├── extra-list.yaml
├── health-ingress.yaml
├── _helpers.tpl    # 用于创建模板时的帮助类
├── hpa.yaml    # Kubernetes hpa 配置
├── ingress-tls-secret.yaml
├── ingress.yaml    #  Kubernetes ingress 配置
├── networkpolicy.yaml
├── NOTES.txt    # 用户运行 helm install 时候的提示信息
├── pdb.yaml
├── prometheusrules.yaml
├── server-block-configmap.yaml
├── serviceaccount.yaml    # Kubernetes serviceaccount 配置
├── servicemonitor.yaml
├── svc.yaml    # Kubernetes service 配置
└── tls-secret.yaml

values.schema.json
values.yaml    # 定义 chart 模板中的自定义配置的默认值,可以在执行 helm install 或 helm update 的时候覆盖
5.三种安装方式
# 在线安装
[root@localhost 18-helm]# helm install nginx bitnami/nginx --version=18.1.15

# 压缩包安装
[root@localhost 18-helm]# helm install nginx-01  nginx-18.1.15.tgz

# 解压后chart包安装
[root@localhost 18-helm]# helm install nginx-02  nginx

# 查看pod信息
[root@localhost 18-helm]# kubectl get pod
NAME                        READY   STATUS                  RESTARTS   AGE
nginx-01-69b46b8687-7m97z   0/1     Init:ImagePullBackOff   0          11m
nginx-02-754c59c568-cj7w4   0/1     Init:ImagePullBackOff   0          8m28s
nginx-8b896897-ffm8l        0/1     Init:ImagePullBackOff   0          75m
注:我们发现存在镜像拉取不到的情况,这些镜像地址都是默认的,我们需要修改成可以使用的
6.自定义 chart 安装
(1)自定义yaml文件,覆盖values.yaml
注:这种设置方式适合在交互界面使用
[root@localhost nginx]# vim nginx-values.yaml

image:
  registry: registry.cn-beijing.aliyuncs.com
  repository: xxhf/nginx
  tag: 1.27.0-debian-12-r5
  digest: ""
  pullPolicy: IfNotPresent

replicaCount: 2
revisionHistoryLimit: 15

[root@localhost nginx]# cd ..
[root@localhost 18-helm]# helm install nginx-03 -f nginx/nginx-values.yaml nginx

# 查看pod
[root@localhost 18-helm]# kubectl get pod
NAME                        READY   STATUS                  RESTARTS   AGE
nginx-01-69b46b8687-7m97z   0/1     Init:ImagePullBackOff   0          37m
nginx-02-754c59c568-cj7w4   0/1     Init:ImagePullBackOff   0          34m
nginx-03-664cc967b5-rh2vf   1/1     Running                 0          47s
nginx-03-664cc967b5-wp6l8   1/1     Running                 0          47s
nginx-8b896897-ffm8l        0/1     Init:ErrImagePull       0          101m
(2)--set key=value命令设置
注:这种设置方式适合在脚本中使用
[root@localhost 18-helm]# helm install nginx-04  \
--set replicaCount=3 \
--set image.registry=registry.cn-beijing.aliyuncs.com \
--set image.repository=xxhf/nginx \
--set image.tag=1.27.0-debian-12-r5 \
nginx

# 查看pod
[root@localhost 18-helm]# kubectl get pod
NAME                        READY   STATUS                  RESTARTS   AGE
nginx-01-69b46b8687-7m97z   0/1     Init:ImagePullBackOff   0          44m
nginx-02-754c59c568-cj7w4   0/1     Init:ImagePullBackOff   0          41m
nginx-03-664cc967b5-rh2vf   1/1     Running                 0          7m31s
nginx-03-664cc967b5-wp6l8   1/1     Running                 0          7m31s
nginx-04-888d57bc8-bzfcm    1/1     Running                 0          91s
nginx-04-888d57bc8-dkqjc    1/1     Running                 0          91s
nginx-04-888d57bc8-wwljx    1/1     Running                 0          91s
nginx-8b896897-ffm8l        0/1     Init:ImagePullBackOff   0          108m
(3)总结
安装过程中,有两种传递配置数据的方式:
- -f,--values:使用 YAML 文件覆盖配置。可以指定多次,优先使用最右边的文件
- --set:通过命令行的方式对指定配置项进行覆盖
7.查看 Release
[root@localhost 18-helm]# helm list
NAME    	NAMESPACE	REVISION	UPDATED                                	STATUS  	CHART        	APP VERSION
nginx   	default  	1       	2025-11-27 18:52:24.93155394 +0800 CST 	deployed	nginx-18.1.15	1.27.1
nginx-01	default  	1       	2025-11-27 19:56:15.280022113 +0800 CST	deployed	nginx-18.1.15	1.27.1
nginx-02	default  	1       	2025-11-27 19:59:26.201673196 +0800 CST	deployed	nginx-18.1.15	1.27.1
nginx-03	default  	1       	2025-11-27 20:32:56.771380013 +0800 CST	deployed	nginx-18.1.15	1.27.1
nginx-04	default  	1       	2025-11-27 20:38:56.532948746 +0800 CST	deployed	nginx-18.1.15	1.27.1
8.升级 Release
更新命令:helm upgrade [RELEASE] [CHART] [flags]
# 我们升级 nginx-04 ,变更它的 replicaCount
[root@localhost 18-helm]# helm upgrade  nginx-04  --set replicaCount=1 nginx
Release "nginx-04" has been upgraded. Happy Helming!
NAME: nginx-04
LAST DEPLOYED: Thu Nov 27 20:50:25 2025
NAMESPACE: default
STATUS: deployed
REVISION: 2    # 每次更新之后,值+1

# 查看配置是否生效
[root@localhost 18-helm]# helm get values  nginx-04
USER-SUPPLIED VALUES:
replicaCount: 1

# 在做一次更新,并查看历史版本
[root@localhost 18-helm]# helm upgrade nginx-04 --set replicaCount=3 --set updateStrategy.rollingUpdate.maxSurge=1 nginx
Release "nginx-04" has been upgraded. Happy Helming!
NAME: nginx-04
LAST DEPLOYED: Thu Nov 27 20:55:48 2025
NAMESPACE: default
STATUS: deployed
REVISION: 3

[root@localhost 18-helm]# helm history nginx-04
REVISION	UPDATED                 	STATUS    	CHART        	APP VERSION	DESCRIPTION
1       	Thu Nov 27 20:38:56 2025	superseded	nginx-18.1.15	1.27.1     	Install complete
2       	Thu Nov 27 20:50:25 2025	superseded	nginx-18.1.15	1.27.1     	Upgrade complete
3       	Thu Nov 27 20:55:48 2025	deployed  	nginx-18.1.15	1.27.1     	Upgrade complete
回滚命令:helm rollback [RELEASE]
# 回滚到上一个版本
[root@localhost 18-helm]# helm rollback nginx-04
Rollback was a success! Happy Helming!
[root@localhost 18-helm]# helm history nginx-04
REVISION	UPDATED                 	STATUS    	CHART        	APP VERSION	DESCRIPTION
1       	Thu Nov 27 20:38:56 2025	superseded	nginx-18.1.15	1.27.1     	Install complete
2       	Thu Nov 27 20:50:25 2025	superseded	nginx-18.1.15	1.27.1     	Upgrade complete
3       	Thu Nov 27 20:55:48 2025	superseded	nginx-18.1.15	1.27.1     	Upgrade complete
4       	Thu Nov 27 20:58:51 2025	deployed  	nginx-18.1.15	1.27.1     	Rollback to 2

# 回滚到指定版本,直接添加版本号
[root@localhost 18-helm]# helm rollback nginx-04 1
Rollback was a success! Happy Helming!
[root@localhost 18-helm]# helm history nginx-04
REVISION	UPDATED                 	STATUS    	CHART        	APP VERSION	DESCRIPTION
1       	Thu Nov 27 20:38:56 2025	superseded	nginx-18.1.15	1.27.1     	Install complete
2       	Thu Nov 27 20:50:25 2025	superseded	nginx-18.1.15	1.27.1     	Upgrade complete
3       	Thu Nov 27 20:55:48 2025	superseded	nginx-18.1.15	1.27.1     	Upgrade complete
4       	Thu Nov 27 20:58:51 2025	superseded	nginx-18.1.15	1.27.1     	Rollback to 2
5       	Thu Nov 27 20:59:57 2025	deployed  	nginx-18.1.15	1.27.1     	Rollback to 1
9.卸载 Release
[root@localhost 18-helm]# helm uninstall nginx
release "nginx" uninstalled

[root@localhost 18-helm]# helm ls
NAME    	NAMESPACE	REVISION	UPDATED                                	STATUS  	CHART        	APP VERSION
nginx-01	default  	1       	2025-11-27 19:56:15.280022113 +0800 CST	deployed	nginx-18.1.15	1.27.1
nginx-02	default  	1       	2025-11-27 19:59:26.201673196 +0800 CST	deployed	nginx-18.1.15	1.27.1
nginx-03	default  	1       	2025-11-27 20:32:56.771380013 +0800 CST	deployed	nginx-18.1.15	1.27.1
nginx-04	default  	5       	2025-11-27 20:59:57.154235843 +0800 CST	deployed	nginx-18.1.15	1.27.1
10.创建 chart 模版
[root@localhost 18-helm]# helm create my-chart
Creating my-chart

[root@localhost 18-helm]# cd my-chart/
[root@localhost my-chart]# ll
总用量 12
charts: 目录 放 子chart ,依赖的 chart
Chart.yaml:  当前 chart 元信息、基础信息,helm search可以搜索到
templates:   YAML 模板
values.yaml: 默认配置文件
我们简单分析一下 helm create 命令自动生成的 templates/deployment.yaml 文件:
- include  包含 另一个文件
metadata:
  name: {{ include "my-chart.fullname" . }}
  labels:
    {{- include "my-chart.labels" . | nindent 4 }}

# my-chart.fullname的定义在当前目录下的_helpers.tpl文件中,定义了my-chart.fullname该怎么调用

- if  逻辑判断     .Values = values.yaml
# 直接去values.yaml文件中找autoscaling.enabled的值,并做一个比较,如果if条件成立,则将.Values.replicaCount的值赋给 replicas
 spec:
  {{- if true = not .Values.autoscaling.enabled}}
  replicas: {{ .Values.replicaCount }}
  {{- end }}
# 渲染之后,就变成了以下字段
 spec:
   replicas: 1

- with 循环
   template:
    metadata:
      {{- with .Values.podAnnotations }}  # 循环 每次 取一行   k1: v1
      annotations:
        {{- toYaml . | nindent 8 }}       # . = k1: v1  ,    -  删除左边的所有的空格,再空出8格
      {{- end }}

          image: "{{ .Values.image.repository }}:{{ .Values.image.tag | default .Chart.AppVersion }}"
          imagePullPolicy: {{ .Values.image.pullPolicy }}
# 渲染完成之后就变成以下字段
image: nginx:1.16.0
使用helm template命令渲染文件并查看:
[root@localhost 18-helm]# helm template my-nginx my-chart/

metadata:
  name: my-nginx-my-chart
  labels:
    helm.sh/chart: my-chart-0.1.0
    app.kubernetes.io/name: my-chart
    app.kubernetes.io/instance: my-nginx
    app.kubernetes.io/version: "1.16.0"
    app.kubernetes.io/managed-by: Helm
...........
spec:
  replicas: 1
...........
  template:
    metadata:
      labels:
        helm.sh/chart: my-chart-0.1.0
        app.kubernetes.io/name: my-chart
        app.kubernetes.io/instance: my-nginx
        app.kubernetes.io/version: "1.16.0"
        app.kubernetes.io/managed-by: Helm
...........
          image: "nginx:1.16.0"
          imagePullPolicy: IfNotPresent
三、部署 Dashboard
1.部署版本
- Dashboard: v2.7.0
- Chart version: 6.0.8
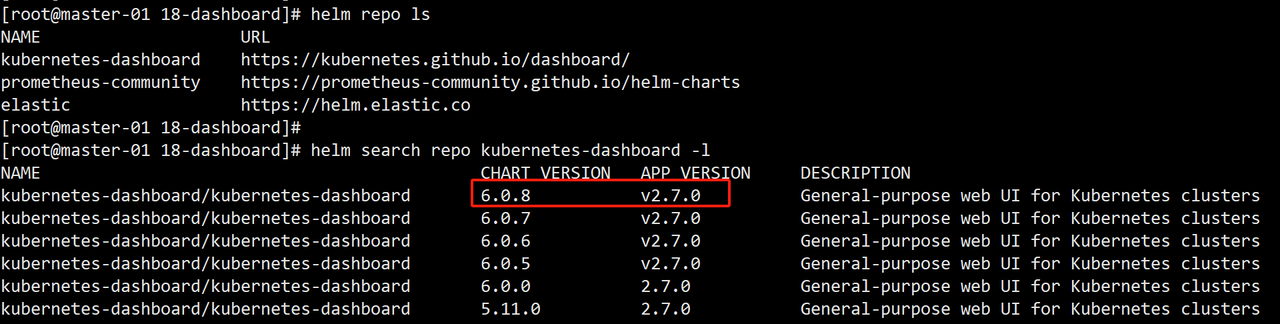
2.添加 chart 仓库
# 下载 helm chart
helm pull kubernetes-dashboard/kubernetes-dashboard --version=6.0.8

# 解压 chart 包
tar xvf kubernetes-dashboard-6.0.8.tgz
3.修改values配置文件
[root@localhost kubernetes-dashboard]# vi my-values.yaml

image:
  repository: registry.cn-beijing.aliyuncs.com/xxhf/dashboard
  tag: v2.7.0
  digest: ""
  pullPolicy: IfNotPresent
4.部署
[root@localhost 18-dashboard]# helm upgrade --install kubernetes-dashboard -f kubernetes-dashboard/my-values.yaml kubernetes-dashboard-6.0.8.tgz --create-namespace --namespace kubernetes-dashboard
Release "kubernetes-dashboard" has been upgraded. Happy Helming!
NAME: kubernetes-dashboard
LAST DEPLOYED: Thu Nov 27 21:54:19 2025
NAMESPACE: kubernetes-dashboard
STATUS: deployed
REVISION: 4
TEST SUITE: None
NOTES:
*********************************************************************************
*** PLEASE BE PATIENT: kubernetes-dashboard may take a few minutes to install ***
*********************************************************************************

Get the Kubernetes Dashboard URL by running:
  export POD_NAME=$(kubectl get pods -n kubernetes-dashboard -l "app.kubernetes.io/name=kubernetes-dashboard,app.kubernetes.io/instance=kubernetes-dashboard" -o jsonpath="{.items[0].metadata.name}")
  echo https://127.0.0.1:8443/
  kubectl -n kubernetes-dashboard port-forward $POD_NAME 8443:8443

[root@localhost 18-dashboard]# kubectl -n kubernetes-dashboard get pod
NAME                                    READY   STATUS    RESTARTS   AGE
kubernetes-dashboard-7cd7f9f8b9-gck6j   1/1     Running   0          63s
修改 SVC 为 NodePort(这里用的是https协议):
[root@localhost 18-dashboard]# kubectl  -n kubernetes-dashboard  edit  svc kubernetes-dashboard
  type: NodePort

service/kubernetes-dashboard edited

[root@localhost 18-dashboard]# kubectl -n kubernetes-dashboard get svc
NAME                   TYPE       CLUSTER-IP        EXTERNAL-IP   PORT(S)         AGE
kubernetes-dashboard   NodePort   192.168.111.134   <none>        443:32342/TCP   18m
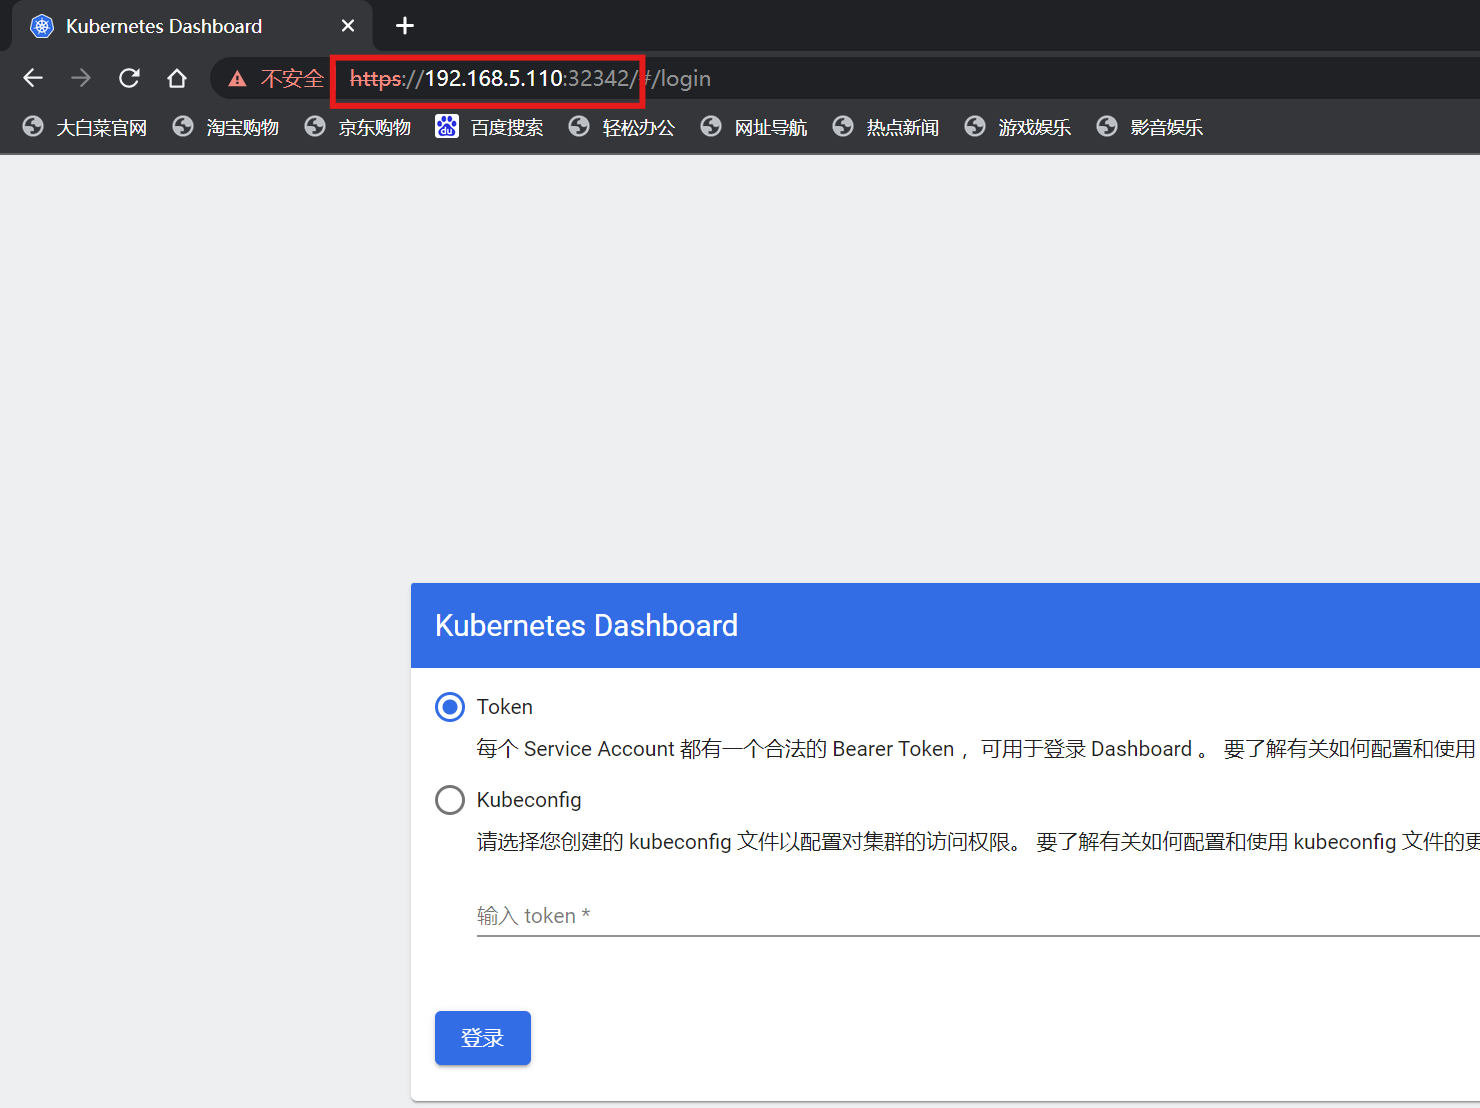
生成token数据,验证登录(这里的数据可以从底层原理那一章节的实例二去获取):
[root@localhost 18-dashboard]# kubectl get secrets ns-admin -o jsonpath='{.data.token}' | base64 -d
eyJhbGciOiJSUzI1NiIsImtpZCI6IlNQeDUzZlJsdnpJT0RicktndlVOcTdScjNNMzZWbExJMDBHSGJVV1lmS28ifQ.eyJpc3MiOiJrdWJlcm5ldGVzL3NlcnZpY2VhY2NvdW50Iiwia3ViZXJuZXRlcy5pby9zZXJ2aWNlYWNjb3VudC9uYW1lc3BhY2UiOiJkZWZhdWx0Iiwia3ViZXJuZXRlcy5pby9zZXJ2aWNlYWNjb3VudC9zZWNyZXQubmFtZSI6Im5zLWFkbWluIiwia3ViZXJuZXRlcy5pby9zZXJ2aWNlYWNjb3VudC9zZXJ2aWNlLWFjY291bnQubmFtZSI6Im5zLWFkbWluIiwia3ViZXJuZXRlcy5pby9zZXJ2aWNlYWNjb3VudC9zZXJ2aWNlLWFjY291bnQudWlkIjoiMmYyYjM4YzQtYzgzYy00M2Q0LThlZjQtOWU0OGIyOTJjOGEwIiwic3ViIjoic3lzdGVtOnNlcnZpY2VhY2NvdW50OmRlZmF1bHQ6bnMtYWRtaW4ifQ.ZjCiSZz2FlV8bKWkJctJn8X_3I59SKuy3ichMBzjG4flg692opLqNWk-6_renPU3bbTmCmA_bLg-HN4k1rbWd0cF-Wh6wmGZyDBa2OsAFGTU_Lh90Wn6PotLz7HdTc42DzJf-5kcOOe4L9CYUlR2s_UCygbQOAN274sTEp3HDIZB1mBHavP26Pi6116obDyU2b-MmuAiM4YNqjoLfc28oAu6tqhwiOwPzFkLCx21KlikGQnRuWTc76c7sixphFE9pb9Uvk3jYAE_Xeg0sWLj1HzMq4NEmID9SqEMqYwkobj1uJie4i6baoNa84ODd0xqQt7kOZgV8jRLkUvB66cjng
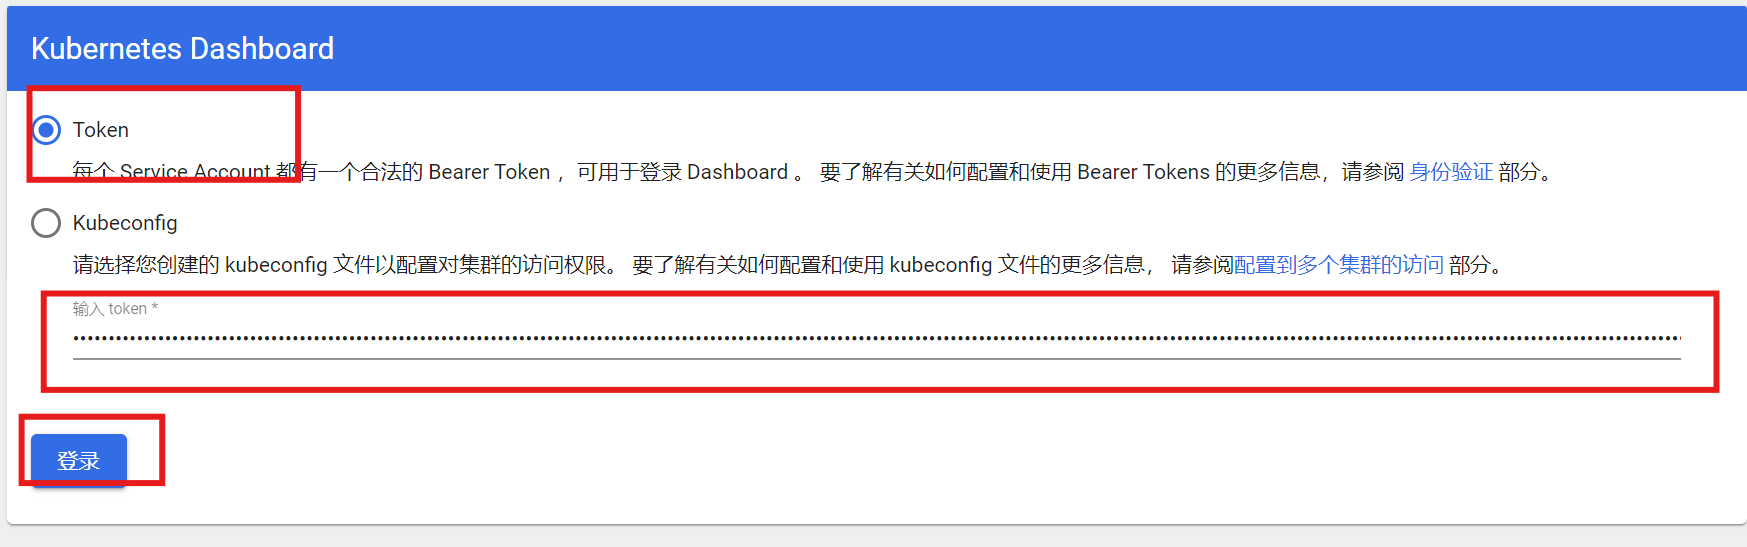
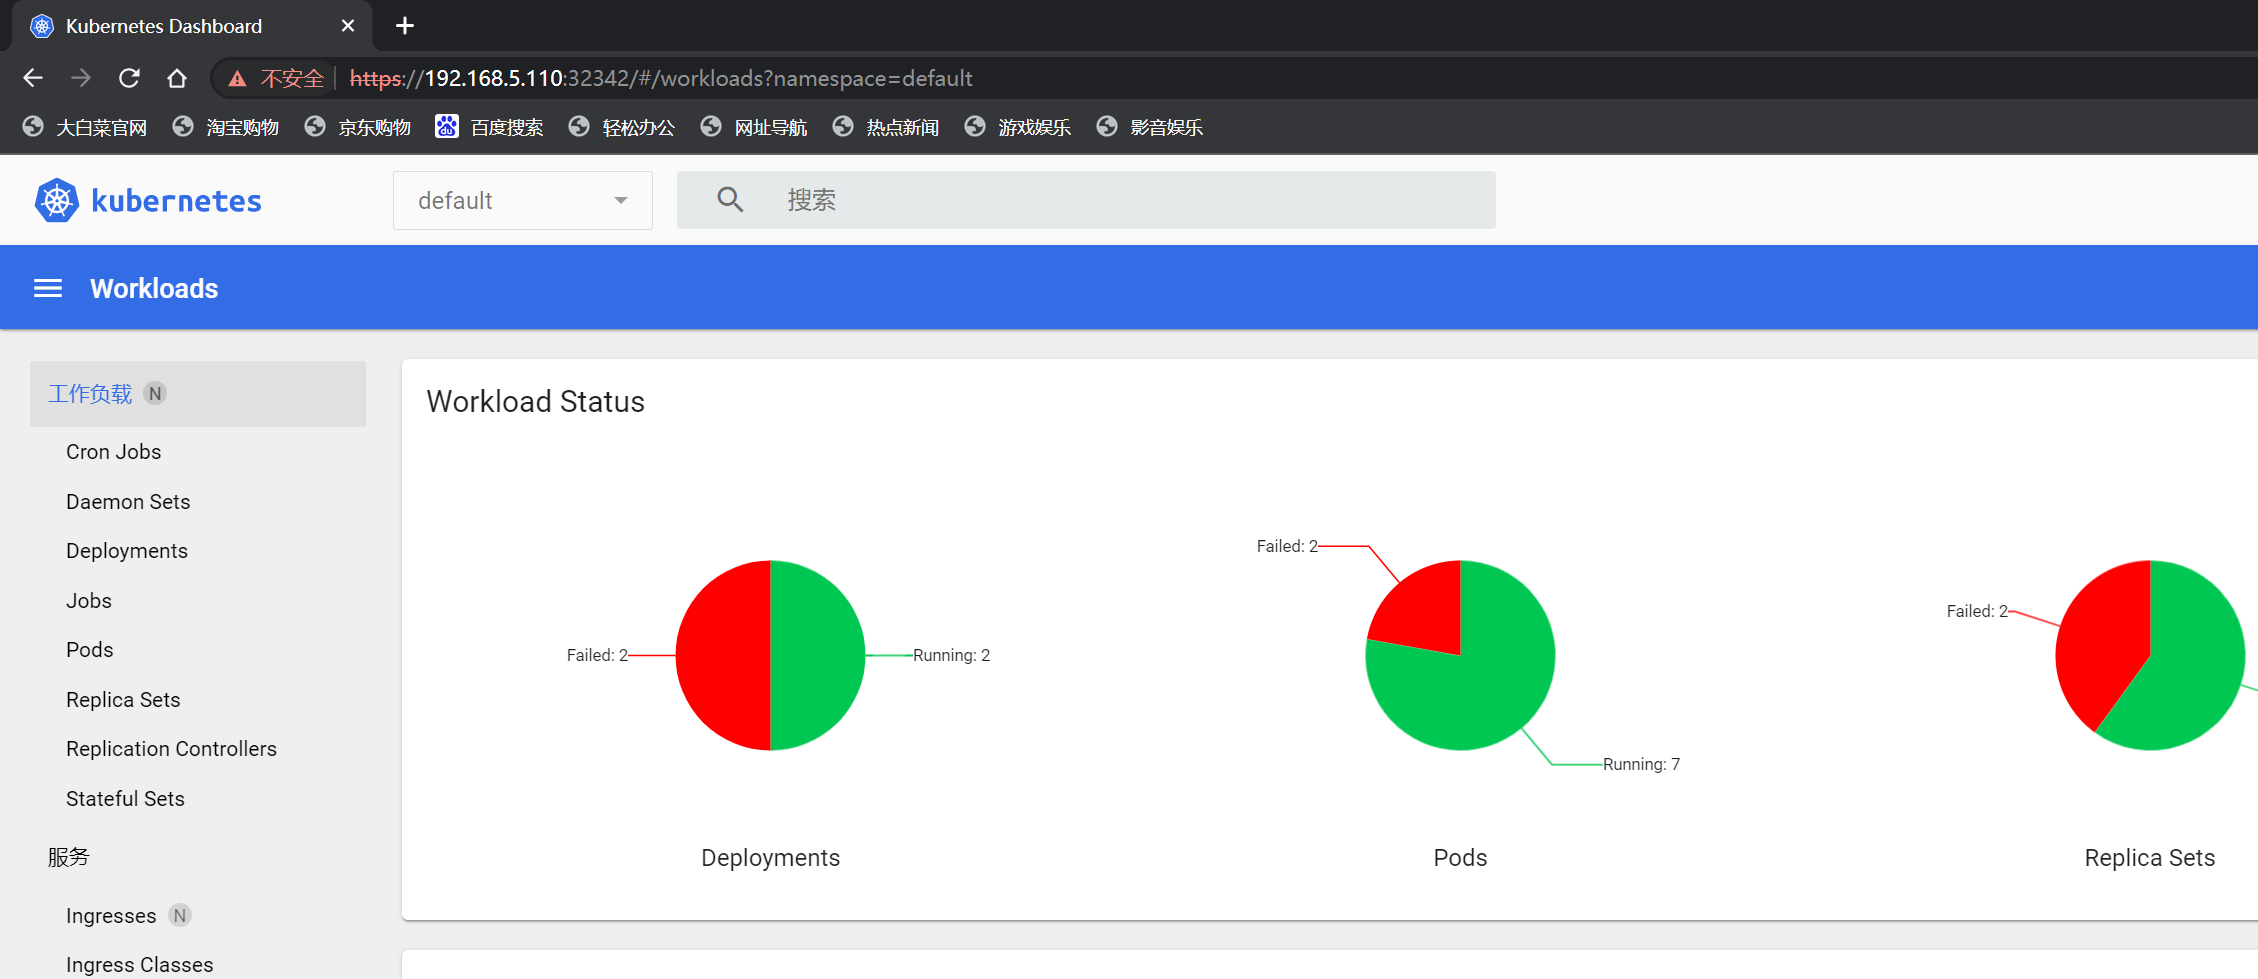
注:我们现在是通过四层svc访问web服务的,工作中一般都是七层ingress
5.启用 ingress
(1)维护ngress-nginx-controller
# 使用ingress前确保ingress-controller正在运行
[root@localhost ingress-nginx-controller]# kubectl -n ingress-nginx get pod
NAME                                        READY   STATUS      RESTARTS   AGE
ingress-nginx-controller-548b89d74d-4sm7w   1/1     Running     0          32s
(2)修改values.yaml文件
[root@localhost kubernetes-dashboard]# vi values.yaml
ingress:

  enabled: true  # 自动创建 ingress 规则
  className: "nginx"
  hosts:
    - ui.xxhf.cc
  tls:
    - secretName: kubernetes-dashboard-tls
      hosts:
        - ui.xxhf.cc
(3)创建 tls 证书
[root@localhost 18-dashboard]# ll
总用量 416
drwxr-xr-x 4 root root    150 11月 28 09:11 kubernetes-dashboard
-rw-r--r-- 1 root root  18717  4月  9  2025 kubernetes-dashboard-6.0.8.tgz
drwxrwxrwx 2 root root    108 10月 23 08:31 ui.xxhf.cc_nginx
-rw-r--r-- 1 root root   9100 10月 23 08:31 ui.xxhf.cc_nginx.zip

[root@localhost 18-dashboard]# cd ui.xxhf.cc_nginx/
[root@localhost ui.xxhf.cc_nginx]# ll
总用量 24
-rw-rw-rw- 1 root root 4458 10月 23 08:31 ui.xxhf.cc_bundle.crt
-rw-rw-rw- 1 root root 4458 10月 23 08:31 ui.xxhf.cc_bundle.pem
-rw-rw-rw- 1 root root 1118 10月 23 08:31 ui.xxhf.cc.csr
-rw-rw-rw- 1 root root 1700 10月 23 08:31 ui.xxhf.cc.key
[root@localhost ui.xxhf.cc_nginx]# kubectl -n kubernetes-dashboard \
  create secret tls kubernetes-dashboard-tls \
  --cert=ui.xxhf.cc_bundle.crt \
  --key=ui.xxhf.cc.key

# 查看kubernetes-dashboard-tls
[root@localhost ui.xxhf.cc_nginx]# kubectl -n kubernetes-dashboard get secrets
NAME                                         TYPE                 DATA   AGE
kubernetes-dashboard-tls                     kubernetes.io/tls    2      6m47s
补充知识点:
# 之前在学习nginx的加密模块那一节有提到过怎么创建证书
# 1. 生成私钥
openssl genrsa -out ui.xxhf.cc.key 2048

# 2. 生成证书签名请求
openssl req -new -key ui.xxhf.cc.key -out ui.xxhf.cc.csr \
  -subj "/C=CN/ST=Beijing/L=Beijing/O=Dev/CN=ui.xxhf.cc"

# 3. 生成自签名证书
openssl x509 -req -days 365 -in ui.xxhf.cc.csr \
  -signkey ui.xxhf.cc.key -out ui.xxhf.cc_bundle.crt

# 4. 可选:复制为 pem 文件
cp ui.xxhf.cc_bundle.crt ui.xxhf.cc_bundle.pem
(4)更新部署
[root@localhost 18-dashboard]# helm upgrade --install kubernetes-dashboard ./kubernetes-dashboard --create-namespace --namespace kubernetes-dashboard
Release "kubernetes-dashboard" has been upgraded. Happy Helming!
NAME: kubernetes-dashboard
LAST DEPLOYED: Fri Nov 28 09:17:25 2025
NAMESPACE: kubernetes-dashboard
STATUS: deployed
REVISION: 5
TEST SUITE: None
NOTES:
*********************************************************************************
*** PLEASE BE PATIENT: kubernetes-dashboard may take a few minutes to install ***
*********************************************************************************
From outside the cluster, the server URL(s) are:
     https://ui.xxhf.cc

[root@localhost 18-dashboard]# kubectl -n kubernetes-dashboard get ing
NAME                   CLASS   HOSTS        ADDRESS   PORTS     AGE
kubernetes-dashboard   nginx   ui.xxhf.cc             80, 443   38s
(5)浏览器访问
# 找到ingress-nginx-controller在哪个节点上运行
[root@localhost 18-dashboard]# kubectl -n ingress-nginx get pod -o wide
NAME                                        READY   STATUS      RESTARTS   AGE   IP              NODE      NOMINATED NODE   READINESS GATES
ingress-nginx-controller-548b89d74d-4sm7w   1/1     Running     0          14m   192.168.5.120   worker    <none>           <none>

# 将worker节点的地址192.168.5.120写入到本机hosts文件当中
192.168.5.120 ui.xxhf.cc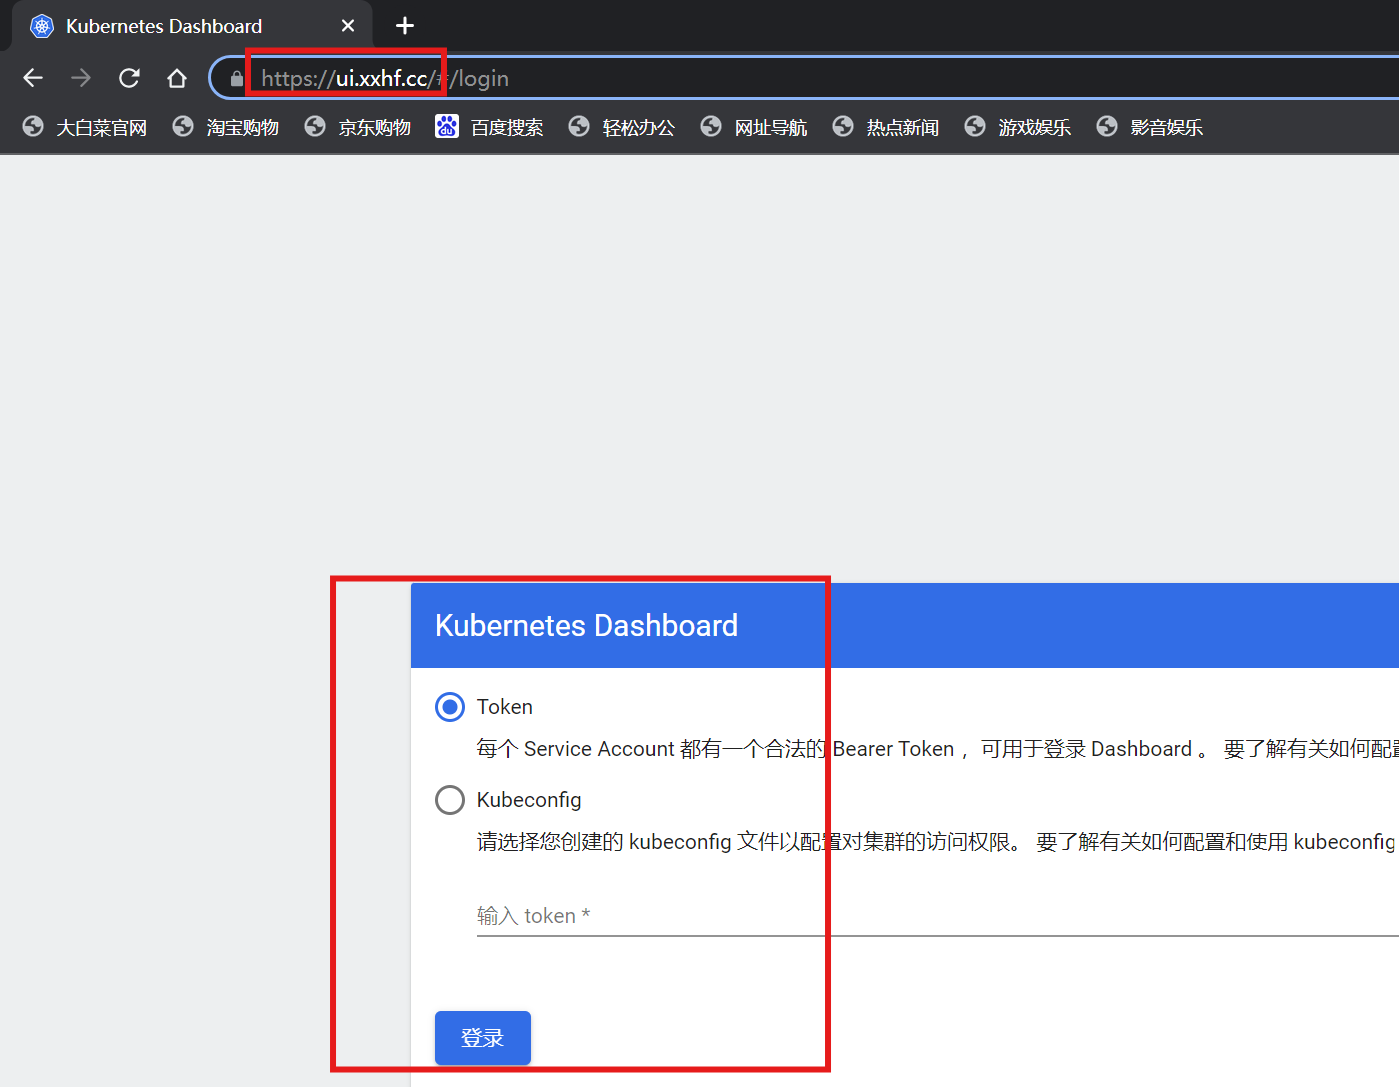
注:这里可以直接用80或443端口访问
[root@localhost 18-dashboard]# kubectl -n ingress-nginx get svc
NAME                                 TYPE           CLUSTER-IP       EXTERNAL-IP   PORT(S)                      AGE
ingress-nginx-controller             LoadBalancer   192.168.111.75   <pending>     80:30080/TCP,443:30443/TCP   26m

注:关于ingress-controller的运行可以去前面发布的博客看看资料,因为没有做网络隔离,所以可以直接用80/443端口访问

开源鸿蒙跨平台开发社区汇聚开发者与厂商,共建“一次开发,多端部署”的开源生态,致力于降低跨端开发门槛,推动万物智联创新。
更多推荐
 20
20 0
0- 0


 已为社区贡献1条内容

所有评论(0)