Kubernetes入门-09.Kubernetes组成模块
本系列课程翻译自Linux Foundation开源软件学园的课程——kubernetes入门(LFS158)
Chapter Overview
In this chapter, we will explore the Kubernetes object model and describe some of its fundamental building blocks, such as Nodes, Namespaces, Pods, ReplicaSets, Deployments, DaemonSets, etc. We will also discuss the essential role of Labels and Selectors in a microservices-driven architecture as they logically group decoupled objects together.
译:
在这个章节中,我们将会探索kubernetes的对象模型并且描述它的一些基础构建模块,例如Node、namespace、Pod、ReplicaSet、Deployment、DaemonSet等等。我们还将讨论在微服务驱动的架构中必不可少的角色:Labels和Selectors,它们将解耦的对象逻辑地组织在一起。
Learning Objectives
By the end of this chapter, you should be able to:
- Describe the Kubernetes object model.
- Discuss Kubernetes building blocks, e.g. Nodes, Namespaces, Pods, ReplicaSets, Deployments, DaemonSets.
- Discuss Labels and Selectors.
译:
在章节的末尾,你将能够:
- 描述Kubernetes的对象模型
- 讨论Kubernetes的构建块,例如Node,namespace,Pod,ReplicaSet,Deployment,DaemonSet
- 讨论Labels和Selectors
Kubernetes Object Model
Kubernetes became popular due to its advanced application lifecycle management capabilities, implemented through a rich object model, representing different persistent entities in the Kubernetes cluster. Those entities describe:
- What containerized applications we are running.
- The nodes where the containerized applications are deployed.
- Application resource consumption.
- Policies attached to applications, like restart/upgrade policies, fault tolerance, ingress/egress, access control, etc.
译:
Kubernetes变得越来越流行,跟它先进的应用生命周期管理能力密不可分,它通过丰富的对象模型,在kubernetes集群中代表了不同类型的持久化实体。这些实体描述了:
- 我们运行了什么容器化应用。
- 部署了容器化应用的节点。
- 应用资源消耗
- 附加到应用上的策略,例如重启/升级策略,容错,ingress/egress,流量控制等。
With each object, we declare our intent, or the desired state of the object, in the spec section. The Kubernetes system manages the status section for objects, where it records the actual state of the object. At any given point in time, the Kubernetes Control Plane tries to match the object's actual state to the object's desired state. An object definition manifest must include other fields that specify the version of the API we are referencing as the apiVersion, the object type as kind, and additional data helpful to the cluster or users for accounting purposes - the metadata. In certain object definitions, however, we find different sections that replace spec, they are data and stringData. Both data and stringData sections facilitate the declaration of information that should be stored by their respective objects.
译:
通过每个对象,我们在“spec”字段中声明我们的意图,或者对象的期望状态。Kubernetes系统管理着对象的"status"部分,用于记录对象的实际状态。在任何一个给定的时刻,kubernetes的控制平面都将尝试让对象的实际状态与对象的期望状态调整为一致。一个对象的定义清单必须包含其他的字段,例如包含了API版本的字段,我们叫apiVersion,对象的类型叫kind,还有用来帮助集群和用户进行审计目的的其他字段-metadata。在一个确定的对象定义清单中,我们发现有不同的部分来替换spec,它们是data和stringData。data和stringData都有助于声明应该由它们各自的对象存储的信息。
Examples of Kubernetes object types are Nodes, Namespaces, Pods, ReplicaSets Deployments, DaemonSets, etc. We will explore them next.
When creating an object, the object's configuration data section from below the spec field has to be submitted to the Kubernetes API Server. The API request to create an object must have the spec section, describing the desired state, as well as other details. Although the API Server accepts object definitions in a JSON format, most often we provide such definition manifests in a YAML format which is converted by kubectl in a JSON payload and sent to the API Server.
译:
kubernetes对象的典型类型有:Nodes,namespace,pod,ReplicaSet,Deployment,DaemonSet等等,我们将在后面探索它们。当我们创建一个对象,这个对象的配置文件部分-在spec字段以下的内容,必须提交给kubernetes API Server。创建一个对象的API请求必须拥有spec部分,描述了期望的状态,以及其他的细节。尽管API Server接受对象定义清单用JSON方式,不过我们通常是用YAML格式来提供定义清单,它会由kubectl转换为JSON payload并发送给API Server.
Nodes
Nodes are virtual identities assigned by Kubernetes to the systems part of the cluster - whether Virtual Machines, bare-metal, Containers, etc. These identities are unique to each system, and are used by the cluster for resources accounting and monitoring purposes, which helps with workload management throughout the cluster.
Each node is managed with the help of two Kubernetes node agents - kubelet and kube-proxy, while it also hosts a container runtime. The container runtime is required to run all containerized workload on the node - control plane agents and user workloads. The kubelet and kube-proxy node agents are responsible for executing all local workload management related tasks - interact with the runtime to run containers, monitor containers and node health, report any issues and node state to the API Server, and manage network traffic to containers.
译:
Node是由Kubernetes分配给集群系统部分的虚拟身份-无论是虚拟机、裸金属、还是容器等。这些身份在每个系统中是独一无二的,会被集群用来做资源审计和监控的目的,这有助于整个集群的工作负载管理。
每个节点都由两种kubernetes节点agent来管理--kubelet和kube-proxy,它同时还托管了一个容器运行时。:
- 容器运行时负责运行节点上所有的容器化workload---控制平面agent,用户的workload。
- kubelet、kube-proxy:执行所有的本地workload管理相关的任务,例如与runtime进行交互来运行容器,监控容器以及节点的健康状况,上报任何的issue和节点状态给API Server,并且管理通往容器的网络流量。
Based on their predetermined functions, there are two distinct types of nodes - control plane and worker. A typical Kubernetes cluster includes at least one control plane node, but it may include multiple control plane nodes for the High Availability (HA) of the control plane. In addition, the cluster includes one or more worker nodes to provide resource redundancy in the cluster. There are cases when a single all-in-one cluster is bootstrapped as a single node on a single VM, bare-metal, or Container, when high availability and resource redundancy are not of importance. These are hybrid or mixed nodes hosting both control plane agents and user workload on the same system. Minikube allows us to bootstrap multi-node clusters with distinct, dedicated control plane nodes, however, if our host system has a limited amount of physical resources (CPU, RAM, disk), we can easily bootstrap a single all-in-one cluster as a single node on a single VM or Container, and still be able to explore most of the topics covered in this course, with the exception of features specific to multi-node clusters, such as DaemonSets, multi node networking, etc.
译:
基于它们预先定义的功能,有两种不同类型的节点-控制平面和工作节点。一个典型的kubernetes集群包含了至少一个控制平面节点,但可以包含多个控制平面节点,来实现控制平面的高可用(HA)。此外,一个集群包含一个或者多个工作节点来提供集群中的资源冗余。确实有这样的情况,一个单独的all-in-one集群引导启动为一个节点,在一个单独的虚拟机、裸金属或者容器上,这种情况下高可用性和资源冗余都不太重要。这些就是混合节点,在同一个系统上同时托管了控制平面代理和用户workload。Minikube让我们可以引导启动一个多节点集群,使用不同的、专用的控制平面节点,然而如果我们的系统只有有限的物理资源(CPU、RAM、Disk),我们可以轻松引导启动一个简单的all-in-one集群,在一个虚机或者容器上作为一个单节点运行,这也能让我们探索这门课程中覆盖的大部分话题,只有一些多节点集群的特性无法覆盖,比如DaemonSet、多节点通信路由等。
Node identities are created and assigned during the cluster bootstrapping process by the tool responsible to initialize the cluster agents. Minikube is using the default kubeadm bootstrapping tool, to initialize the control plane node during the init phase and grow the cluster by adding worker or control plane nodes with the join phase.
The control plane nodes run the control plane agents, such as the API Server, Scheduler, Controller Managers, and etcd in addition to the kubelet and kube-proxy node agents, the container runtime, and add-ons for container networking, monitoring, logging, DNS, etc.
Worker nodes run the kubelet and kube-proxy node agents, the container runtime, and add-ons for container networking, monitoring, logging, DNS, etc.
Collectively, the control plane node(s) and the worker node(s) represent the Kubernetes cluster. A cluster’s nodes are systems distributed either on the same private network, across different networks, even across different cloud networks.
译:
节点身份是在集群引导启动过程中,由负责集群agent初始化的工具来进行创建和分配的。Minikube使用了默认的kubeadm引导工具,用来在init阶段初始化控制平面节点,并且在join阶段通过增加worker或控制平面节点来扩大集群。
-控制平面节点运行控制平面agent,例如API Server、Scheduler、Controller Manager,和etcd,还有kubelet和kube-proxy这样的节点agent,容器运行时,用于容器网络通信、日志、DNS的各种add-ons插件。
-工作节点运行kubelet和kube-proxy节点agent,容器运行时,用于容器通信、监控、日志、DNS的add-ons。
总体来说,控制平面节点和工作节点共同组成了kubernete集群。一个集群的节点可以是分布式的,可以在同一个私有网络,跨不同的网络,甚至可以跨多个云网络。
Namespaces
If multiple users and teams use the same Kubernetes cluster we can partition the cluster into virtual sub-clusters using Namespaces. The names of the resources/objects created inside a Namespace are unique, but not across Namespaces in the cluster.
To list all the Namespaces, we can run the following command:
译:
如果有多个用户和团队使用同一个kubernetes集群,我们可以将集群进一步分区,分为虚拟的子集群,这会使用到namespaces技术。在一个namespace里面的资源/对象名称是唯一的,但在集群中的不同namespace内,名称可以相同。
如要列出所有的namespace,我们可以运行如下的命令:
$ kubectl get namespaces
NAME STATUS AGE
default Active 11h
kube-node-lease Active 11h
kube-public Active 11h
kube-system Active 11h
Generally, Kubernetes creates four Namespaces out of the box: kube-system, kube-public, kube-node-lease, and default. The kube-system Namespace contains the objects created by the Kubernetes system, mostly the control plane agents. The default Namespace contains the objects and resources created by administrators and developers, and objects are assigned to it by default unless another Namespace name is provided by the user. kube-public is a special Namespace, which is unsecured and readable by anyone, used for special purposes such as exposing public (non-sensitive) information about the cluster. The newest Namespace is kube-node-lease which holds node lease objects used for node heartbeat data. Good practice, however, is to create additional Namespaces, as desired, to virtualize the cluster and isolate users, developer teams, applications, or tiers:
译:
通常来说,Kubernetes会默认创建四个namespace:kube-system,kube-public,kube-node-lease,default。
-kube-system namespace:包含了由kubernetes系统创建的对象,通常是控制平面agent;
-default namespace:包含了管理员、开发者创建的对象和资源,新创建的对象默认会分配到default namespace,除非用户制定了另外的namespace名称;
-kube-public namespace:是一个特殊的namespace,它是不安全的,并且可以被任何人可读,用于特殊的目的例如暴露公共(非敏感)的集群相关信息。。
-kube-node-lease namespace是一个新的namespace,它保存用于节点心跳数据的节点租赁对象。
最佳实践是创建额外的namespace,来将一个集群虚拟为小的k8s集群,隔离用户、开发团队、应用或者层级.
$ kubectl create namespace new-namespace-name
Namespaces are one of the most desired features of Kubernetes, securing its lead against competitors, as it provides a solution to the multi-tenancy requirement of today's enterprise development teams.
Resource quotas help users limit the overall resources consumed within Namespaces, while LimitRanges help limit the resources consumed by individual Containers and their enclosing objects in a Namespace. We will briefly cover quota management in a later chapter.
译:
namespaces是kubernetes最受欢迎的特性之一,让它保持着相对于竞品的护城河,他提供了多租户的特性以满足现代化企业开发团队的需求。
"Resource quotas(资源配额)"帮助用户限制namespace内的整个资源消耗,而LimitRange则用来限制一个namespace内,单个容器和其相关的对象的资源消耗。我们将在后续章节中概要阐述配额管理。
Pods
A Pod is the smallest Kubernetes workload object. It is the unit of deployment in Kubernetes, which represents a single instance of the application. A Pod is a logical collection of one or more containers, enclosing and isolating them to ensure that they:
- Are scheduled together on the same host with the Pod.
- Share the same network namespace, meaning that they share a single IP address originally assigned to the Pod.
- Have access to mount the same external storage (volumes) and other common dependencies.
译:
一个Pod是最小的kubernetes工作负载对象。它是kubernetes中的部署单元,表示应用的一个实例。一个Pod是一个或多个容器的逻辑集合,将它们隔离或者组织在一起,来确保它们:
- 被调度到一起,在同一个Host的Pod内;
- 共享同样的网络namespace,这意味着它们共享一个IP地址(分配给Pod的);
- 能够挂载相同外部存储(卷)以及其他常见依赖。
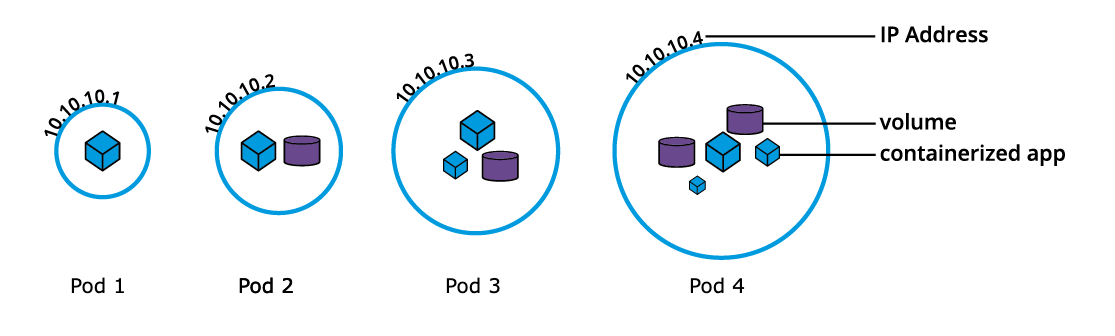
Single- and Multi-Container Pods
Pods are ephemeral in nature, and they do not have the capability to self-heal themselves. That is the reason they are used with controllers, or operators (controllers/operators are used interchangeably), which handle Pods' replication, fault tolerance, self-healing, etc. Examples of controllers are Deployments, ReplicaSets, DaemonSets, Jobs, etc. When an operator is used to manage an application, the Pod's specification is nested in the controller's definition using the Pod Template.
译:
Pod本身是很短暂的,它没有能力来实现自愈。这就是为什么我们需要利用controller或者operator(controller和operators是可以交换的),来处理Pod的副本、容错、自愈等等。
当一个Operator/Controller用来管理一个应用时,Pod的规格将使用Pod模板嵌套在controller的定义清单中。
Below is an example of a stand-alone Pod object's definition manifest in YAML format, without an operator. This represents the declarative method to define an object, and can serve as a template for a much more complex Pod definition manifest if desired:
译:
下面是一个YAML格式的,单独的Pod对象的定义清单示例,没有Operator/Controller。这表明了定义一个对象的声明式的方法,并且可以作为更复杂Pod定义清单的一个模板。
apiVersion: v1
kind: Pod
metadata:
name: nginx-pod
labels:
run: nginx-pod
spec:
containers:
- name: nginx-pod
image: nginx:1.22.1
ports:
- containerPort: 80
The apiVersion field must specify v1 for the Pod object definition. The second required field is kind specifying the Pod object type. The third required field metadata, holds the object's name and optional labels and annotations. The fourth required field spec marks the beginning of the block defining the desired state of the Pod object - also named the PodSpec. Our Pod creates a single container running the nginx:1.22.1 image pulled from a container image registry, in this case from Docker Hub. The containerPort field specifies the container port to be exposed by Kubernetes resources for inter-application access or external client access - to be explored in the Services chapter. The contents of spec are evaluated for scheduling purposes, then the kubelet of the selected node becomes responsible for running the container image with the help of the container runtime of the node. The Pod's name and labels are used for workload accounting purposes.
译:
apiVersion字段必须指明v1,这是Pod对象定义的接口;
第二个必要的字段是kind,指定了Pod对象类型;
第三个必要的字段metadata,负责对象的名字,可选的labels和注解(annotations);
第四个必要的字段spec,标识了定义Pod对象期望状态这个部分的开始,也被命名为PodSpec。
我们的Pod创建了一个单容器,运行了nginx:1.22.1镜像(从容器镜像仓库获取,在这个示例中是从Dokcer Hub获取)。
containerPort字段指定了容器将被kubernetes资源暴露的,为了内部应用访问和外部客户端访问的容器端口,我们将在Service这一章节进行探索。
spec字段的内容是用于调度过程的评估所使用,被选中节点的kubelet会负责运行容器镜像(这当然需要节点上容器运行时的帮助)。Pod的名字和lables则是用来作为workload的审计目的。
The above definition manifest, if stored by a def-pod.yaml file, is loaded into the cluster to run the desired Pod and its associated container image. While create is exemplified below, advanced Kubernetes practitioners may opt to use apply instead:
译:
上面的定义清单,如果存储为def-pod.yaml文件,将会被加载到集群中运行期望的Pod以及与之相关的容器镜像。create是一个示例,进阶的kubernetes实践者可能会使用apply来代替create命令。
$ kubectl create -f def-pod.yaml
Writing up definition manifests, especially complex ones, may prove to be quite time consuming and troublesome because YAML is extremely sensitive to indentation. When eventually editing such definition manifests keep in mind that each indent is two blank spaces wide, and TAB should be omitted.
Imperatively, we can simply run the Pod defined above without the definition manifest as such:
译:
编写定义清单,尤其是复杂的定义清单,可能会花费比较多的时间并遇到麻烦,因为YAML对格式中的缩进是非常敏感的。当实际编辑定义清单的时候,需要注意每一行的缩进都是两个空格,并且TAB要避免使用。而如果是交互式的,我们可以简化运行Pod的定义,避免使用定义清单:
$ kubectl run nginx-pod --image=nginx:1.22.1 --port=80
However, when in need of a starter definition manifest, knowing how to generate one can be a life-saver. The imperative command with additional key flags such as dry-run and the yaml output, can generate the definition template instead of running the Pod, while the template is then stored in the nginx-pod.yaml file. The following is a multi-line command that should be selected in its entirety for copy/paste (including the backslash character "\"):
译:
然而,当需要初始的定义清单时,知道如何生成它可就非常重要了。交互式的命令结合附加的key选项,例如dry-run和yaml output等选项,可以生成一个定义清单而不是直接运行一个Pod,这个模板会被存储在nginx-pod.yaml文件中。接下来是一个多行命令,在复制粘贴过程中需要选中它的全部(包括反斜杠\)
$ kubectl run nginx-pod --image=nginx:1.22.1 --port=80 \
--dry-run=client -o yaml > nginx-pod.yaml
The command above generates a definition manifest in YAML, but we can generate a JSON definition file just as easily with:
译:
上面的这个命令生成一个YAML格式的定义清单,不过我们可以生成一个JSON格式的定义文件,也非常简单:
$ kubectl run nginx-pod --image=nginx:1.22.1 --port=80 \
--dry-run=client -o json > nginx-pod.json
Both the YAML and JSON definition files can serve as templates or can be loaded into the cluster respectively as such:
译:
YAML和JSON定义清单文件都可以作为模板,并加载到cluster中,它们的命令分别是:
$ kubectl create -f nginx-pod.yaml
$ kubectl create -f nginx-pod.json
Before advancing to more complex application deployment and management methods, become familiar with Pod operations with additional commands such as:
译:
在我们进入到更复杂的应用部署和管理之前,请确保熟悉这些Pod的操作,包括下面这些附属的命令。
$ kubectl apply -f nginx-pod.yaml
$ kubectl get pods
$ kubectl get pod nginx-pod -o yaml
$ kubectl get pod nginx-pod -o json
$ kubectl describe pod nginx-pod
$ kubectl delete pod nginx-pod
Labels
Labels are key-value pairs attached to Kubernetes objects such as Pods, ReplicaSets, Nodes, Namespaces and Persistent Volumes. Labels are used to organize and select a subset of objects, based on the requirements in place. Many objects can have the same Label(s). Labels do not provide uniqueness to objects. Controllers use Labels to logically group together decoupled objects, rather than using objects' names or IDs.
译:
Lables是key-value形式的键值对,附加到kubernetes的对象上,例如Pod,Replica Sets,Nodes,Namespaces,Persistent Volumes。Labels是用来根据特定需求,来组织和选择一组对象 。多个对象可以拥有相同的labels。labels并不提供对象的唯一性。Controllers使用Labels来将解耦的对象逻辑上组织在一起,并非使用对象的名字或ID。
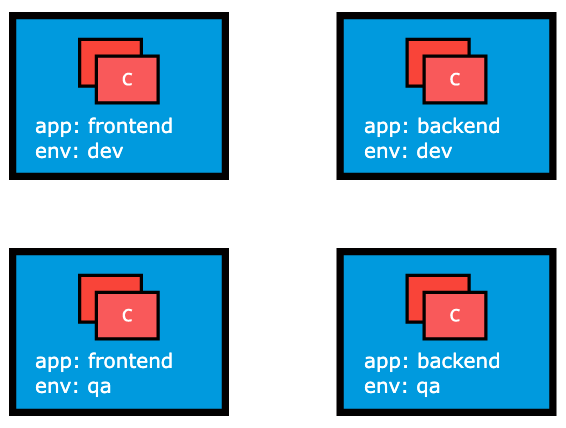
Labels
In the image above, we have used two Label keys: app and env. Based on our requirements, we have given different values to our four Pods. The Label env=dev logically selects and groups the top two Pods, while the Label app=frontend logically selects and groups the left two Pods. We can select one of the four Pods - bottom left, by selecting two Labels: app=frontend AND env=qa.
译:
在上面的图片中,我们用了两个Label的key,分别是app和env。基于我们的需求,我们对4个Pod赋予了不同的值。分别是:
Pod1:app=frontend,env=dev
Pod2:app=backend,env=dev
Pod3:app=frontend,env=qa
Pod4:app=backend,env=qa
使用label:env=dev时,我们逻辑上选中了上面的两个Pod,即Pod1和Pod2;
当使用app=frontend这个label时,我们逻辑选中了左侧的两个Pod,即Pod1和Pod3;
我们还可以通过设定两个labels:app=frontend AND env=qa来选中左下角的这个Pod。
Label Selectors
Controllers, or operators, and Services, use label selectors to select a subset of objects. Kubernetes supports two types of Selectors:
- Equality-Based Selectors
Equality-Based Selectors allow filtering of objects based on Label keys and values. Matching is achieved using the =, == (equals, used interchangeably), or != (not equals) operators. For example, with env==dev or env=dev we are selecting the objects where the env Label key is set to value dev. - Set-Based Selectors
Set-Based Selectors allow filtering of objects based on a set of values. We can use in, notin operators for Label values, and exist/does not exist operators for Label keys. For example, with env in (dev,qa) we are selecting objects where the env Label is set to either dev or qa with !app we select objects with no Label key app.
译:
Controller、Operator和Services,都使用了“标签选择器-label selectors”来选中一组对象。Kubernetes支持两种selectors的类型:
- 基于等号的selector
基于等号的selector允许我们基于labels的key和value对对象进行过滤。匹配方法是使用=,==(等于,可以互换),或者!=(不等于)。例如,使用env=dev或者env==dev,我们都选中了key是env,value是dev的对象。
- 基于组的selector
基于组的selectors允许我们基于一组值做对象过滤。我们可以使用in,notin这样的操作符来作为label的值,或者exist/does not exist这样的操作符来作用于labels的key。例如:
使用env in (dev,qa),我们选中了key是env,值是dev或者qa的对象;
使用! app,我们选择了不具有app这个label key的对象
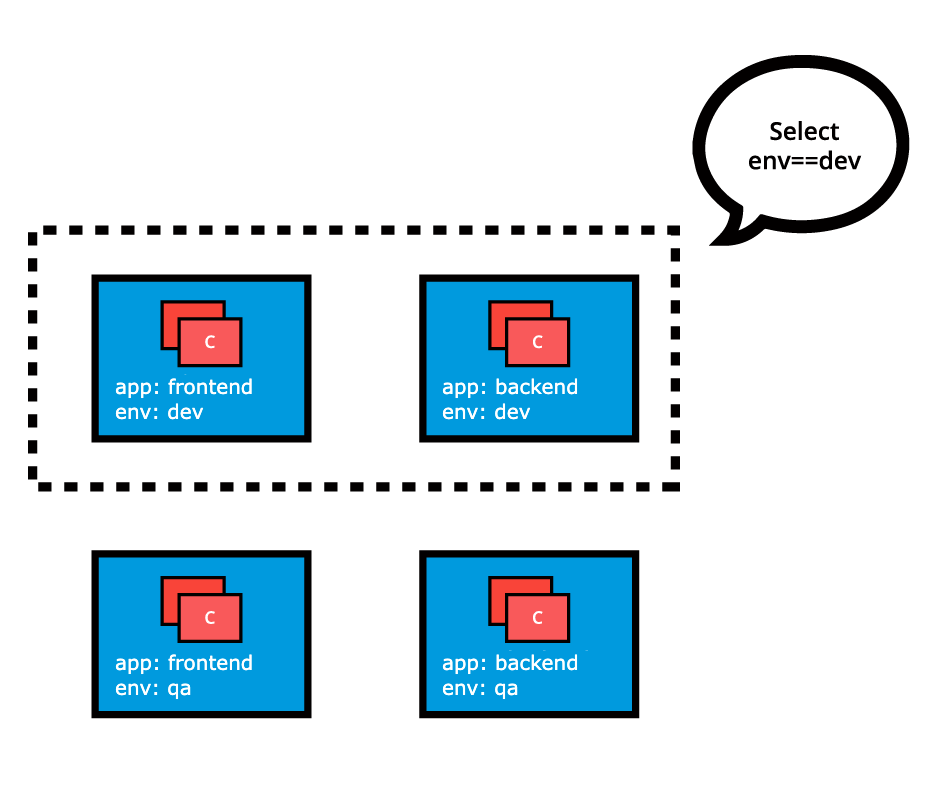
Selectors
ReplicationControllers
Although no longer a recommended controller, a ReplicationController is a complex operator that ensures a specified number of replicas of a Pod are running at any given time the desired version of the application container, by constantly comparing the actual state with the desired state of the managed application. If there are more Pods than the desired count, the replication controller randomly terminates the number of Pods exceeding the desired count, and, if there are fewer Pods than the desired count, then the replication controller requests additional Pods to be created until the actual count matches the desired count. Generally, we do not deploy a Pod independently, as it would not be able to restart itself if terminated in error because a Pod misses the much desired self-healing feature that Kubernetes otherwise promises. The recommended method is to use some type of an operator to run and manage Pods.
In addition to replication, the ReplicationController operator also supports application updates.
However, the default recommended controller is the Deployment which configures a ReplicaSet controller to manage application Pods' lifecycle.
译:尽管ReplicationController已经不再是推荐的控制器,不过我们仍然有必要提及它。它是一个复杂的Operator/Controller,来确保在任何时刻Pod的副本数量都与期望的一致,这是通过持续不断地比较应用程序的实际状态和其期望状态。
如果实际运行的Pod比期望的要多,那么Replication Controller将随机地终止超出数量的Pod;
如果实际运行的Pod比期望的要少,那么Replication Controller就会请求创建更多的Pod,直到实际数量与期望数量相等。
通常情况下我们不会独立地部署Pod,因为它缺少自动自愈的特性,一旦Pod因为某种错误而终止它就没有办法重启自己。这个自愈的特性实际上是需要通过kubernetes的其他机制来提供的。推荐的方式就是使用operator或者Controller来运行和管理Pod。
对副本来说,Replication Controller这个operator也支持应用更新(类似deployment的rollout)。不过默认推荐的controller是Deployment,它通过配置ReplicaSet Controller来管理应用Pod的生命周期。
ReplicaSets (1)
A ReplicaSet is, in part, the next-generation ReplicationController, as it implements the replication and self-healing aspects of the ReplicationController. ReplicaSets support both equality- and set-based Selectors, whereas ReplicationControllers only support equality-based Selectors
译:
ReplicaSet从某种程度上讲是下一代的ReplicationController,因为它继承了ReplicationController的副本(Replication)和自愈的功能。
ReplicaSet同时支持“基于等号的selector”和“基于组的selector”,而ReplicationController仅仅支持“基于等号的selector”。
When a single instance of an application is running there is always the risk of the application instance crashing unexpectedly, or the entire server hosting the application crashing. If relying only on a single application instance, such a crash could adversely impact other applications, services, or clients. To avoid such possible failures, we can run in parallel multiple instances of the application, hence achieving high availability. The lifecycle of the application defined by a Pod will be overseen by a controller - the ReplicaSet. With the help of the ReplicaSet, we can scale the number of Pods running a specific application container image. Scaling can be accomplished manually or through the use of an autoscaler.
Below we graphically represent a ReplicaSet, with the replica count set to 3 for a specific Pod template. Pod-1, Pod-2, and Pod-3 are identical, running the same application container image, being cloned from the same Pod template. For now, the current state matches the desired state. Keep in mind, however, that although the three Pod replicas are said to be identical - running an instance of the same application, same configuration, they are still distinct through unique Pod name and IP address. The Pod object ensures that the application can be individually placed on any worker node of the cluster as a result of the scheduling process.
译:
当一个单实例的应用在运行过程中,总有不符合预期的实例突然崩溃、或者运行应用程序的整个主机崩溃的风险。如果我们依赖这样的单应用实例,刚才提及的crash将会显著地影响其他应用、服务甚至客户。为了避免这种可能的故障,我们可以并行运行多个应用程序的实例,以此来获得高可用性。
应用的生命周期由Pod所定义(Pod挂了应用也就断了),并且被一个Controller进行监视--也就是ReplicaSet。在ReplicaSet的帮助下,我们可以实现对运行了特定应用容器镜像的Pod的数量的横向扩展。横向扩展可以手动完成或者是通过使用autoscaler来自动完成。
下面我们用图形展示了一个ReplicaSet,该RS定义了Replica的数量为3,由一个特定的Pod模板生成。Pod1、Pod2、Pod3都是有完全相同的——运行着相同的应用容器镜像,由同一个Pod模板克隆出来。现在,实际运行状态与期望状态是一致的(都是3个)。不过需要记住的是,尽管这三个Pod Replica说起来是完全一样——运行了相同应用程序的实例、拥有相同的配置,但它们依然存在独一无二性,拥有独立的Pod名称和IP地址。Pod对象确保了应用程序可以被独立地替换到集群中任何一个Worker节点上,这便是调度过程的结果。
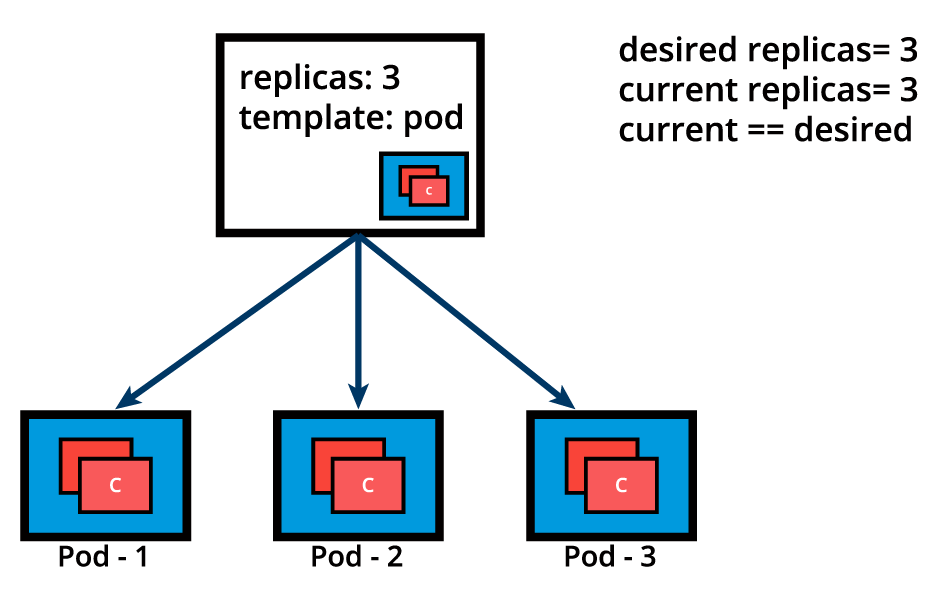
ReplicaSet (Current State Matches the Desired State)
Below is an example of a ReplicaSet object's definition manifest in YAML format. This represents the declarative method to define an object, and can serve as a template for a much more complex ReplicaSet definition manifest if desired:
译:
下面是一个ReplicaSet对象的定义清单模板,用YAML格式输出。它表示了定义一个Replicaset对象的声明式方法,并且可以作为后续更复杂的RS对象对的模板。
apiVersion: apps/v1
kind: ReplicaSet
metadata:
name: frontend
labels:
app: guestbook
tier: frontend
spec:
replicas: 3
selector:
matchLabels:
app: guestbook
template:
metadata:
labels:
app: guestbook
spec:
containers:
- name: php-redis
image: gcr.io/google_samples/gb-frontend:v3
The above definition manifest, if stored by a redis-rs.yaml file, is loaded into the cluster to run a set of three identical Pod replicas and their associated container image. While create is exemplified below, advanced Kubernetes practitioners may opt to use apply instead:
译:
上面的定义清单如果存储为redis-rs.yaml文件,将会被加载到集群中并运行三个完全相同的Pod副本以及它们相关的容器镜像。本示例使用了create
命令,进阶的kubernetes实践者可能倾向于使用apply命令来代替。
$ kubectl create -f redis-rs.yaml
Before advancing to more complex application deployment and management methods, become familiar with ReplicaSet operations with additional commands such as:
译:
在我们进一步探索更复杂的应用程序部署和管理方式之前,请确保对Replicaset相关的操作命令加以熟悉。
$ kubectl apply -f redis-rs.yaml
$ kubectl get replicasets
$ kubectl get rs
$ kubectl scale rs frontend --replicas=4
$ kubectl get rs frontend -o yaml
$ kubectl get rs frontend -o json
$ kubectl describe rs frontend
$ kubectl delete rs frontend
Cont’d on the next page.
ReplicaSets (2)
Let's continue with the same ReplicaSet example and assume that one of the Pods is forced to unexpectedly terminate (due to insufficient resources, timeout, its hosting node has crashed, etc.), causing the current state to no longer match the desired state.
译:
让我们来继续看刚才的ReplicaSet的例子,现在我们假设其中一个Pod被不符合预期地强制终止了(由于资源不足、超时、宿主机节点出现崩溃等),导致了当前状态不再与预期状态匹配。
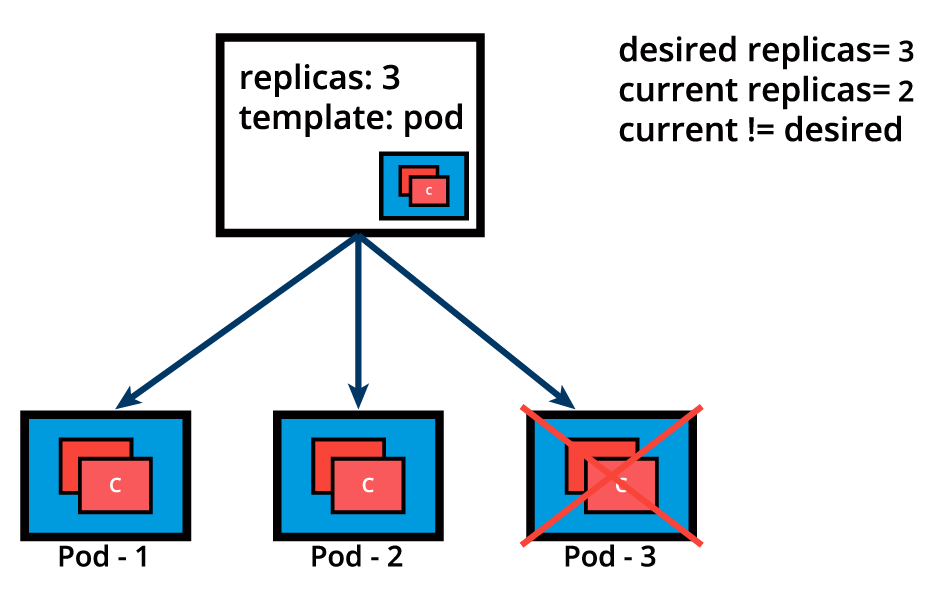
ReplicaSet (Current State and Desired State Are Different)
The ReplicaSet detects that the current state is no longer matching the desired state and triggers a request for an additional Pod to be created, thus ensuring that the current state matches the desired state.
译:
ReplicaSert检测到当前状态与期望状态不匹配,于是触发一个请求用于创建一个额外的Pod,以确保当前状态与期望状态所匹配。
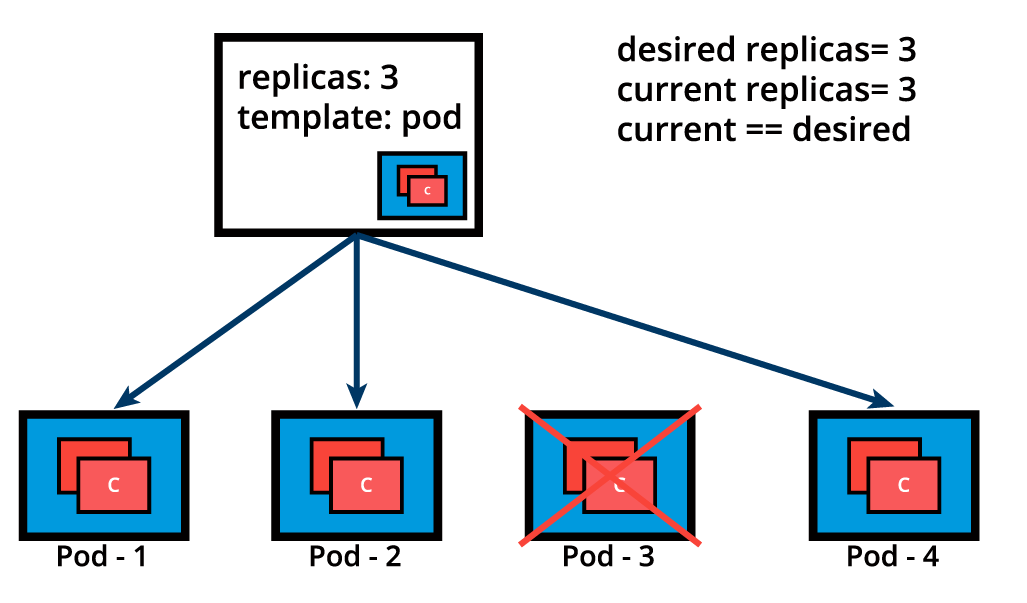
ReplicaSet (Creating a Pod to Match Current State with Desired State)
ReplicaSets can be used independently as Pod controllers but they only offer a limited set of features. A set of complementary features are provided by Deployments, the recommended controllers for the orchestration of Pods. Deployments manage the creation, deletion, and updates of Pods. A Deployment automatically creates a ReplicaSet, which then creates a Pod. There is no need to manage ReplicaSets and Pods separately, the Deployment will manage them on our behalf.
We will take a closer look at Deployments next.
译:ReplicaSet可以用来独立地作为Pod Controller,不过它们只提供了有限的一些feature。而完整特性的清单需要由Deoloyment来提供,Deployment是我们推荐的用来编排Pod的controller。Deployment管理着Pod的创建、删除、更新。一个Deployment会自动创建一个ReplicaSet,后者来创建一个Pod。我们没有必要对ReplicaSet和Pod分别管理,Deployment会基于我们的行为自动进行管理。我们接下来将进一步探索Deployment。
Deployments (1)
Deployment objects provide declarative updates to Pods and ReplicaSets. The DeploymentController is part of the control plane node's controller manager, and as a controller it also ensures that the current state always matches the desired state of our running containerized application. It allows for seamless application updates and rollbacks, known as the default RollingUpdate strategy, through rollouts and rollbacks, and it directly manages its ReplicaSets for application scaling. It also supports a disruptive, less popular update strategy, known as Recreate.
Below is an example of a Deployment object's definition manifest in YAML format. This represents the declarative method to define an object, and can serve as a template for a much more complex Deployment definition manifest if desired:
译:
Deployment对象为Pod和ReplicaSet提供了声明式的更新。Deployment Controller是控制平面节点controller manager的一部分。作为一个controller,它同样保证了运行中容器化应用的实际状态与期望状态相一致。它允许应用无缝地更新和回滚,即被大家所知的RollingUpdate(滚动更新)策略,包括rollouts和rollbacks,它直接管理了它的ReplicaSet用于应用水平扩展。它同样支持一种破坏式的,不那么流行的更新策略,即Recreate。
下面是一个Deployment对象的定义清单,使用了YAML格式。它表示了用声明式的方法来定义一个对象,它也可以为更复杂的Deployment的定义清单作为模板。
apiVersion: apps/v1
kind: Deployment
metadata:
name: nginx-deployment
labels:
app: nginx-deployment
spec:
replicas: 3
selector:
matchLabels:
app: nginx-deployment
template:
metadata:
labels:
app: nginx-deployment
spec:
containers:
- name: nginx
image: nginx:1.20.2
ports:
- containerPort: 80
The apiVersion field is the first required field, and it specifies the API endpoint on the API server which we want to connect to; it must match an existing version for the object type defined. The second required field is kind, specifying the object type - in our case it is Deployment, but it can be Pod, ReplicaSet, Namespace, Service, etc. The third required field metadata, holds the object's basic information, such as name, annotations, labels, namespaces, etc. Our example shows two spec fields (spec and spec.template.spec). The fourth required field spec marks the beginning of the block defining the desired state of the Deployment object. In our example, we are requesting that 3 replicas, that is 3 instances of the Pod, are running at any given time. The Pods are created using the Pod Template defined in spec.template. A nested object, such as the Pod being part of a Deployment, retains its metadata and spec and loses its own apiVersion and kind - both being replaced by template. In spec.template.spec, we define the desired state of the Pod. Our Pod creates a single container running the nginx:1.20.2 image from Docker Hub.
The above definition manifest, if stored by a def-deploy.yaml file, is loaded into the cluster to run a set of three identical Pod replicas and their associated container image, together with their managing ReplicaSet. While create is exemplified below, advanced Kubernetes practitioners may opt to use apply instead:
译:
apiVersion字段是首个需要的字段,它指定了我们需要连接的API Server上的特定API endpoint,它必须与对象类型的现存版本一致。
第二个必须的字段是kind,指定了对象的类型,在本例中是Deployment,但也可以是Pod,ReplicaSet,Namespace,Service等等;
第三个需要的字段是metadata,管理者对象的基本信息,例如name,annotation,labels,namespace等等。
我们的例子展示了两个spec字段(spec和spec.template.spec)。第四个必须的字段spec标识了Deployment对象期望状态这部分内容。在我们的例子中,我们请求了3个副本,即3个Pod实例,在任何时刻都需要有3个Pod运行。而Pod则是由spec.template所定义的Pod模板来进行创建的。
这是一个嵌套式的对象,Pod是属于Deployment的一部分,spec.template里面也保留了Pod的metadata和spec字段,丢失了它自己的apiVersion和kind而被template字段所替换掉。在spec.template.spec字段中,我们定义了Pod期望的状态。我们的Pod创建了一个单个容器-运行了nginx:1.20.2,镜像来自Docker Hub。
上面的这个定义清单,如果保存为def-deploy.yaml文件,将会被加载到集群中,运行一组3个完全一致的Pod副本,以及它相关的容器镜像,和Deployment所管理的ReplicaSet。我们给的示例是create,进阶的kubernetes实践者可能会倾向于使用apply字段。
$ kubectl create -f def-deploy.yaml
Imperatively, we can simply run the Deployment defined above without the definition manifest as such. The following is a multi-line command that should be selected in its entirety for copy/paste (including the backslash character “\”):
译:
如果用交互式的,我们可以简单地运行上面这个Deployment定义,而不去使用定义清单。下面是一个多行命令,我们可以选中它的全部内容进行复制粘贴,包括反斜杠\也需要。
$ kubectl create deployment nginx-deployment \
--image=nginx:1.20.2 --port=80 --replicas=3
However, when in need of a starter definition manifest, knowing how to generate one can be a life-saver. The imperative command with additional key flags such as dry-run and the yaml output, can generate the definition template instead of running the Deployment, while the template is then stored in the nginx-deploy.yaml file. The following is a multi-line command that should be selected in its entirety for copy/paste (including the backslash character “\”):
译:
然后,当需要初始化定义清单的时候,了解如何生成它将会非常有帮助。交互式命令结合一些额外的参数,例如dry-run和yaml output,可以生成这个定义模板,而不会直接运行这个Deployment,与此同时模板被存储为nginx-deploy.yaml。下面是一个多行命令,我们可以选中它的全部内容进行复制粘贴,包括反斜杠\也需要。
$ kubectl create deployment nginx-deployment \
--image=nginx:1.20.2 --port=80 --replicas=3 \
--dry-run=client -o yaml > nginx-deploy.yaml
We can generates a Deployment definition manifest in JSON:
译:
我们可以生成一个Deployment的定义清单,用JSON格式。
$ kubectl create deployment nginx-deployment \
--image=nginx:1.20.2 --port=80 --replicas=3 \
--dry-run=client -o json > nginx-deploy.json
Both the YAML and JSON definition files can serve as templates or can be loaded into the cluster respectively as such:
译:
YAML和JSON定义文件都可以作为模板,或者被加载到集群中,如下所示。
$ kubectl create -f nginx-deploy.yaml
$ kubectl create -f nginx-deploy.json
Once the Deployment object is created, the Kubernetes system attaches the status field to the object and populates it with all necessary status fields.
In the following example, a new Deployment creates ReplicaSet A which then creates 3 Pods, with each Pod Template configured to run one nginx:1.20.2 container image. In this case, the ReplicaSet A is associated with nginx:1.20.2 representing a state of the Deployment. This particular state is recorded as Revision 1.
译:
当Deployment对象创建后,Kubernetes系统将会把status字段附加到对象上,并且把所有必要的status字段贴上去。
在这个实例中,一个新的Deployment将创建一个新的ReplicaSet A,附带有3个Pods,每个Pod模板都配置为运行一个nginx:1.20.2的容器镜像。
在这个例子中,ReplicaSet A是与nginx:1.20.2关联的,表示了Deployment的状态,这个特定的状态被记录为“修订 1”.
注:
查阅其他资料了解到,如果Deployment里面的spec.template.spec发生变化(例如更新了镜像),就会触发Deployment的滚动更新,生成新的ReplicaSet和Revision。
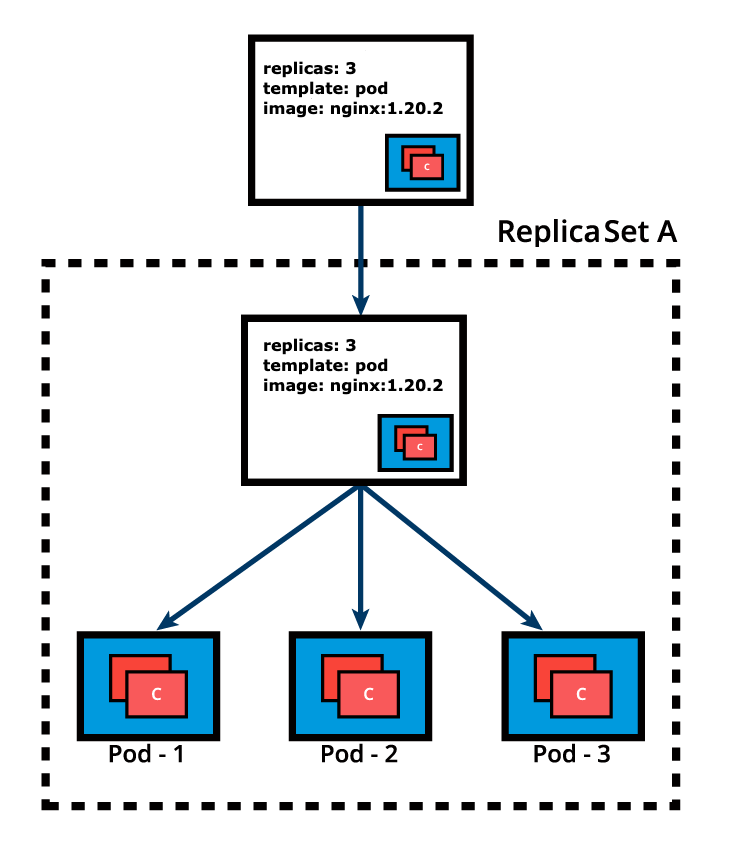
Deployment (ReplicaSet A Created)
In time, we need to push updates to the application managed by the Deployment object. Let's change the Pods' Template and update the container image from nginx:1.20.2 to nginx:1.21.5. The Deployment triggers a new ReplicaSet B for the new container image versioned 1.21.5 and this association represents a new recorded state of the Deployment, Revision 2. The seamless transition between the two ReplicaSets, from ReplicaSet A with three Pods versioned 1.20.2 to the new ReplicaSet B with three new Pods versioned 1.21.5, or from Revision 1 to Revision 2, is a Deployment rolling update.
译:
最终,我们需要推送更新给Deployment对象所管理的应用。让我们改变Pod的模板,更新容器镜像从nginx:1.20.2变为nginx:1.21.5。Deployment会触发一个ReplicaSet B,用新的容器镜像(1.21.5),与此同时会产生一个新的Deployment的记录状态--修订2。这种在两个ReplicaSet之间的无缝转移,从ReplicaSet A(3个Pod,版本为1.20.2)到Replica B(3个Pod,版本为1.21.5),或者说从修订1到修订2,这就是Deployment的滚动更新。
Cont’d on the next page.
Deployments (2)
A rolling update is triggered when we update specific properties of the Pod Template for a deployment. While planned changes such as updating the container image, container port, volumes, and mounts would trigger a new Revision, other operations that are dynamic in nature, like scaling or labeling the deployment, do not trigger a rolling update, thus do not change the Revision number.
Once the rolling update has completed, the Deployment will show both ReplicaSets A and B, where A is scaled to 0 (zero) Pods, and B is scaled to 3 Pods. This is how the Deployment records its prior state configuration settings, as Revisions.
译:
当我们升级了Deployment中Pod模板的特定属性时会触发滚动更新。例如当我们有计划地升级了容器镜像、容器端口、卷,这些操作会触发一个新的修订版本,其他的动态操作例如扩缩容、给deployment打标签等,不会触发滚动更新,也不会改变修订号码。
一旦当滚动更新完成后,Deployment会显示ReplicaSet A和B,此时A缩为0个Pod,B扩张为3个Pod。这就是Deployment记录了它的先前状态配置设定,即“修订”。
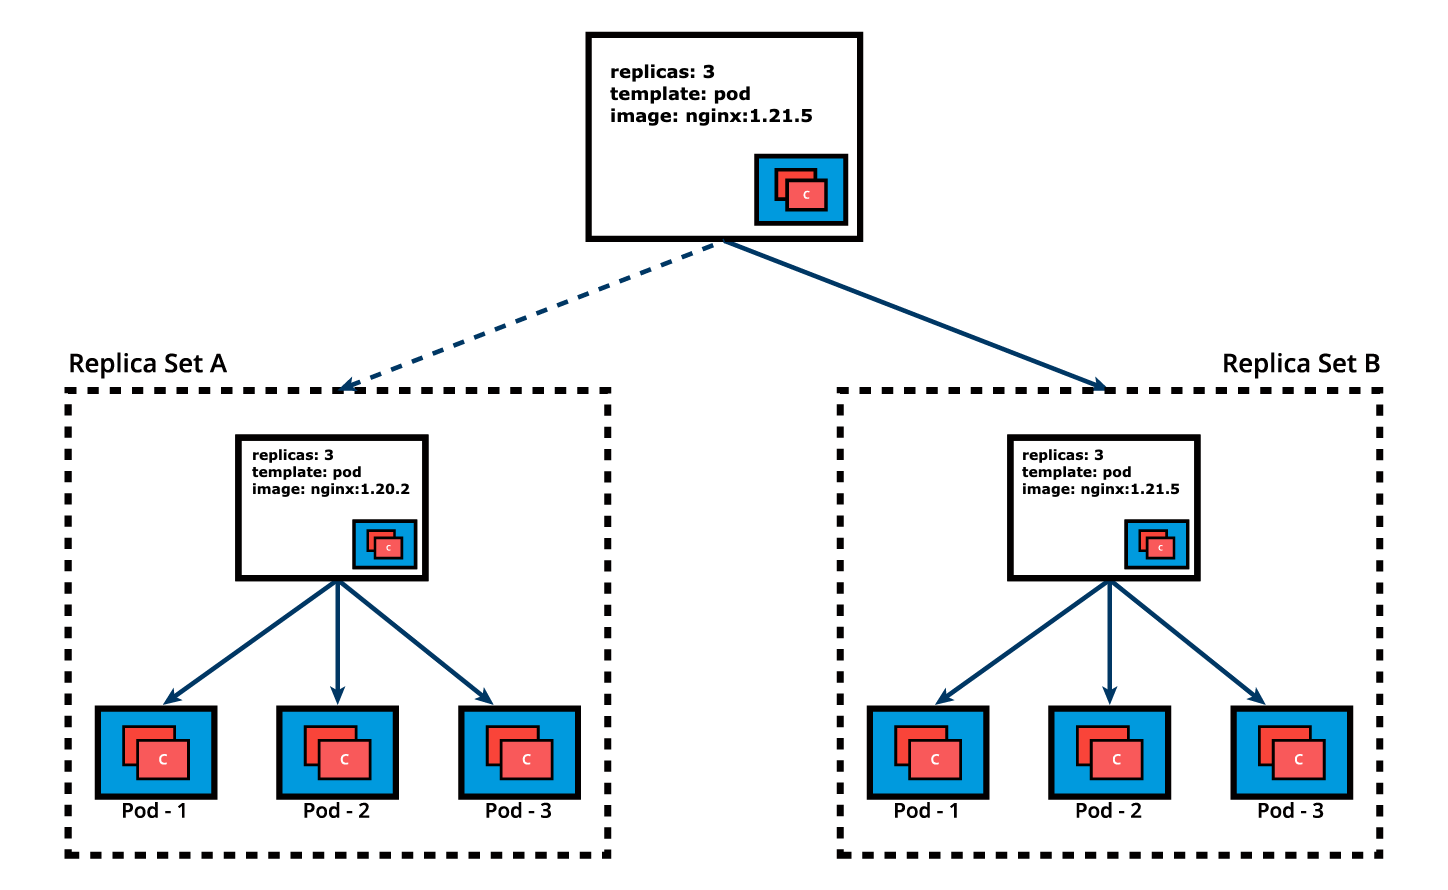
Deployment (ReplicaSet B Created)
Once ReplicaSet B and its 3 Pods versioned 1.21.5 are ready, the Deployment starts actively managing them. However, the Deployment keeps its prior configuration states saved as Revisions which play a key factor in the rollback capability of the Deployment - returning to a prior known configuration state. In our example, if the performance of the new nginx:1.21.5 is not satisfactory, the Deployment can be rolled back to a prior Revision, in this case from Revision 2 back to Revision 1 running nginx:1.20.2 once again.
译:
一旦ReplicaSet B和它的3个Pod(版本是1.21.5)准备好之后,Deployment就会开始积极管理它们。然而Deployment仍然会保留先前的配置状态(保存为“修订”),这对于Deployment的rollback能力至关重要,它能让Deployment回退到先前的配置状态。
例如,如果新的nginx:1.21.5的性能不能满足需求,那么Deployment就可以回滚到先前的修订,在本例中就是从修订2回滚到修订1,再次让Pod运行nginx:1.20.2。
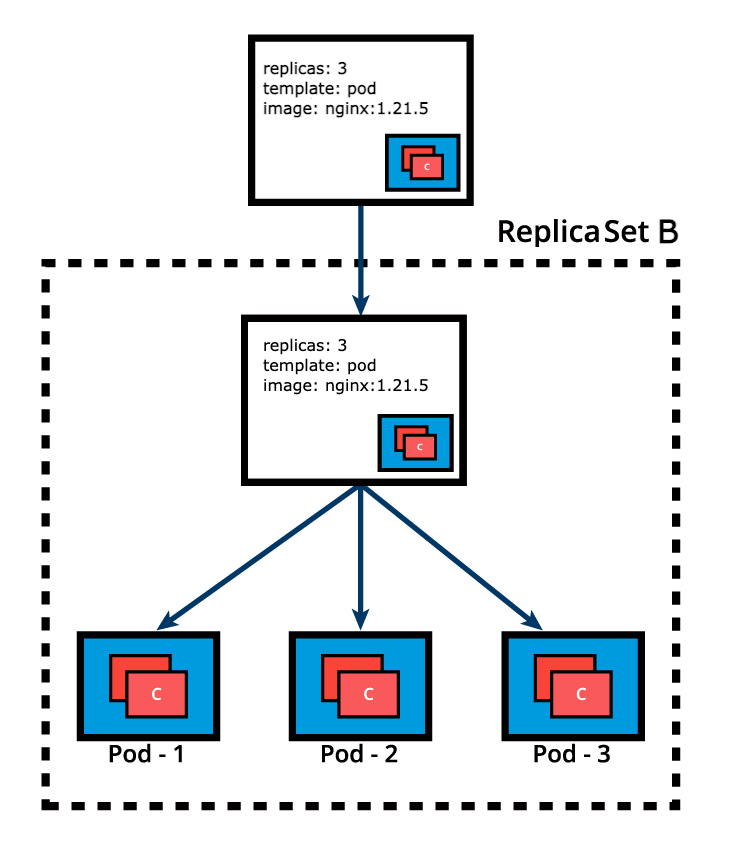
Deployment Points to ReplicaSet B
Before advancing to more complex topics, become familiar with Deployment operations with additional commands such as:
译:
在我们进一步探索更复杂的话题之前,请熟悉下面这些Deployment操作,例如:
$ kubectl apply -f nginx-deploy.yaml --record
$ kubectl get deployments
$ kubectl get deploy -o wide
$ kubectl scale deploy nginx-deployment --replicas=4
$ kubectl get deploy nginx-deployment -o yaml
$ kubectl get deploy nginx-deployment -o json
$ kubectl describe deploy nginx-deployment
$ kubectl rollout status deploy nginx-deployment
$ kubectl rollout history deploy nginx-deployment
$ kubectl rollout history deploy nginx-deployment --revision=1
$ kubectl set image deploy nginx-deployment nginx=nginx:1.21.5 --record
$ kubectl rollout history deploy nginx-deployment --revision=2
$ kubectl rollout undo deploy nginx-deployment --to-revision=1
$ kubectl get all -l app=nginx -o wide
$ kubectl delete deploy nginx-deployment
$ kubectl get deploy,rs,po -l app=nginx
DaemonSets
DaemonSets are operators designed to manage node agents. They resemble ReplicaSet and Deployment operators when managing multiple Pod replicas and application updates, but the DaemonSets present a distinct feature that enforces a single Pod replica to be placed per Node, on all the Nodes or on a select subset of Nodes. In contrast, the ReplicaSet and Deployment operators by default have no control over the scheduling and placement of multiple Pod replicas on the same Node.
译:
DeamonSets是一种设计用于管理节点agent的operator。它类似于ReplicaSet和Deployment operator,可以用来管理多个Pod副本以及应用程序的更新,不过DaemonSets与其他operator完全不同的地方在于:它会强制在每个节点上放置一个Pod副本,在所有的节点或者是一个指定子网的节点。相反,ReplicaSet和Deployment operator默认是没有这种-在同一个节点上控制调度和放置多pod副本的能力。
DaemonSet operators are commonly used in cases when we need to collect monitoring data from all Nodes, or to run storage, networking, or proxy daemons on all Nodes, to ensure that we have a specific type of Pod running on all Nodes at all times. They are critical API resources in multi-node Kubernetes clusters. The kube-proxy agent running as a Pod on every single node in the cluster, or the Calico or Cilium networking node agent implementing the Pod networking across all nodes of the cluster, are examples of applications managed by DaemonSet operators.
Whenever a Node is added to the cluster, a Pod from a given DaemonSet is automatically placed on it. Although it ensures an automated process, the DaemonSet's Pods are placed on all cluster's Nodes by the controller itself, and not with the help of the default Scheduler. When any one Node crashes or it is removed from the cluster, the respective DaemonSet operated Pods are garbage collected. If a DaemonSet is deleted, all Pod replicas it created are deleted as well.
译:
DaemonSet Operator常用于我们需要从所有节点搜集监控数据,或者在所有节点上运行存储、网络、proxy守护进程,来确保在任何时刻、所有主机上都运行我们指定类型的Pod。它们在多节点kubernetes集群中是个至关重要的API资源。例如,在集群中的每个节点上都运行了kube-proxy agent,或者是集群中所有节点都部署了Calico或者Cilium网络通信节点agent来实现Pod通信。这些都是DaemonSet Operator来管理应用的实例。
无论一个新的节点什么时候加入到集群中,DaemonSet就会自动在该节点上放置一个Pod。尽管它确保了一个自动的过程,但DaemonSet的pod与其他pod不同,在所有集群节点上都放置Pod这个动作全靠DaemonSet controller自己来完成,并没有依靠默认scheduler的帮助。当任何一个节点崩溃或者它从集群中被移除,各自的DaemonSet所管理的Pod将会被垃圾回收(一同清理)。如果DaemonSet被删除掉了,那么原先由它创建的所有Pod副本也将被删除。
The placement of DaemonSet Pods is still governed by scheduling properties which may limit its Pods to be placed only on a subset of the cluster's Nodes. This can be achieved with the help of Pod scheduling properties such as nodeSelectors, node affinity rules, taints and tolerations. This ensures that Pods of a DaemonSet are placed only on specific Nodes, such as workers if desired. However, the default Scheduler can take over the scheduling process if a corresponding feature is enabled, accepting again node affinity rules.
Below is an example of a DaemonSet object's definition manifest in YAML format:
译:
DaemonSet Pods在放置Pod的时候,如果我们希望限制Pod只被放置到集群的一个子网节点中,那就还是会收到调度属性(scheduling properties)的管理。这可以通过Pod调度特性来获得,比如nodeSelector,节点亲和规则(node affinity rules),污点(taints)和容忍(toleration)。这些机制可以确保DaemonSet的Pod只被放置到特定的节点,例如只放置到worker节点。然而,默认的调度器(scheduler)可以承接这些调度过程,如果相关特性在已经开启,再次接受节点亲和性规则。
下面是一个DaemonSet对象定义清单的实例,用YAML格式给出。
apiVersion: apps/v1
kind: DaemonSet
metadata:
name: fluentd-agent
namespace: default
labels:
k8s-app: fluentd-agent
spec:
selector:
matchLabels:
k8s-app: fluentd-agent
template:
metadata:
labels:
k8s-app: fluentd-agent
spec:
containers:
- name: fluentd
image: quay.io/fluentd_elasticsearch/fluentd:v4.5.2
The above definition manifest, if stored by a fluentd-ds.yaml file, is loaded into the cluster to run a set of identical Pod replicas, with their associated container image, matching in count the number of cluster nodes. While create is exemplified below, advanced Kubernetes practitioners may opt to use apply instead:
译:
上面的定义清单如果保存为fluentd-ds.yaml文件,将会被加载到集群中运行一组完全一致的Pod副本,以及与之关联的容器镜像,数量上则与集群节点数量一致。下面的示例使用create命令做演示,进阶的Kubernetes实践者可能使用apply来代替。
$ kubectl create -f fluentd-ds.yaml
Before advancing to more complex topics, become familiar with DaemonSet operations with additional commands such as:
译:
在我们深入探索更复杂的话题之前,请熟悉下面这些DaemonSet的操作命令。
$ kubectl apply -f fluentd-ds.yaml --record
$ kubectl get daemonsets
$ kubectl get ds -o wide
$ kubectl get ds fluentd-agent -o yaml
$ kubectl get ds fluentd-agent -o json
$ kubectl describe ds fluentd-agent
$ kubectl rollout status ds fluentd-agent
$ kubectl rollout history ds fluentd-agent
$ kubectl rollout history ds fluentd-agent --revision=1
$ kubectl set image ds fluentd-agent fluentd=quay.io/fluentd_elasticsearch/fluentd:v4.6.2 --record
$ kubectl rollout history ds fluentd-agent --revision=2
$ kubectl rollout undo ds fluentd-agent --to-revision=1
$ kubectl get all -l k8s-app=fluentd-agent -o wide
$ kubectl delete ds fluentd-agent
$ kubectl get ds,po -l k8s-app=fluentd-agent
Services
A containerized application deployed to a Kubernetes cluster may need to reach other such applications, or it may need to be accessible to other applications and possibly clients. This is problematic because the container does not expose its ports to the cluster's network, and it is not discoverable either. The solution would be a simple port mapping, as offered by a typical container host. However, due to the complexity of the Kubernetes framework, such a simple port mapping is not that "simple". The solution is much more sophisticated, with the involvement of the kube-proxy node agent, IP tables, routing rules, cluster DNS server, all collectively implementing a micro-load balancing mechanism that exposes a container's port to the cluster's network, even to the outside world if desired. This mechanism is called a Service, and it is the recommended method to expose any containerized application to the Kubernetes network. The benefits of the Kubernetes Service becomes more obvious when exposing a multi-replica application, when multiple containers running the same image need to expose the same port. This is where the simple port mapping of a container host would no longer work, but the Service would have no issue implementing such a complex requirement.
This is only a brief introduction of the Kubernetes Service resource. Services, their types, configuration options, and more will be discussed in a later chapter.
译:
一个部署在kubernetes集群中的容器化应用可能需要访问其他的微服务应用程序,或者自己也需要被其他应用程序和客户端所访问。这里有个比较麻烦的是:container并没有向集群网络暴露它的端口,并且也无法彼此发现。解决办法可以是简单的端口映射"port mapping",就像典型的容器主机所提供的那样。然而,由于kubernetes框架的复杂性,听上去简单的端口映射事实上并不那么简单。这个方案其实非常精密、复杂,是由多个组件参与其中:kube-proxy节点agent,IP tables,路由规则,集群DNS服务器,它们集体部署实施了一个微型的负载均衡机制来讲容器化应用暴露给kubernetes网络。当我们需要把多副本应用暴露给集群网络时,Service的好处将更加明显,因为在这种场景中多个容器运行着同样的镜像并且需要暴露相同的端口。如果是简单的端口映射--把容器暴露给主机这种方式就不奏效了,满足不了这样的场景,但是Service面对这样复杂的需求就完全没问题。

开源鸿蒙跨平台开发社区汇聚开发者与厂商,共建“一次开发,多端部署”的开源生态,致力于降低跨端开发门槛,推动万物智联创新。
更多推荐
 0
0 0
0- 0


 已为社区贡献6条内容

所有评论(0)