64. 如何在 RKE2 集群中更改运河 CNI 的 MTU 值
本文解释了如何修改 Canal CNI 插件在 RKE2 集群中使用的 MTU 值。:RKE2 服务器节点会自动检测并应用对清单目录中文件所做的更改。配置更改后创建的新 Pod 将使用更新后的 MTU。寻找 vethuMTU 字段,并根据需要更改值。这种行为与 Calico 的 MTU 设计一致。所有 RKE2 均使用 Canal CNI。你可能还能在之前的 MTU 看到较旧的。对应新舱,正确反映
All RKE2 using Canal CNI
所有 RKE2 均使用 Canal CNI
https://blog.csdn.net/lidw2009
This article explains how to modify the MTU value used by the Canal CNI plugin on RKE2 clusters.
本文解释了如何修改 Canal CNI 插件在 RKE2 集群中使用的 MTU 值。
In Canal deployments, Calico’s vethuMTU is rendered as veth_mtu in the Calico configuration, as documented in the upstream chart templates.
在运河部署中,Calico 的 vethuMTU 以 veth_mtu Calico 配置的状态呈现,如上游图表模板中所述。
1. Create a HelmChartConfig to Override the MTU
1. 创建一个 HelmChartConfig 以覆盖 MTU
For Rancher Provisioned RKE2 cluster:
对于 Rancher Provisioned RKE2 集群:
Under Cluster Management locate the desired cluster. Click on the 3-dot menu on the right of the cluster, and select Edit Config -> Cluster Configuration -> Add-on: Canal. Look for the vethuMTU field and change the value as desired.
在集群管理 中找到目标集群。点击集群右侧的三点菜单,选择编辑配置 -> 集群配置 -> 附加组件:Canal。寻找 vethuMTU 字段,并根据需要更改值。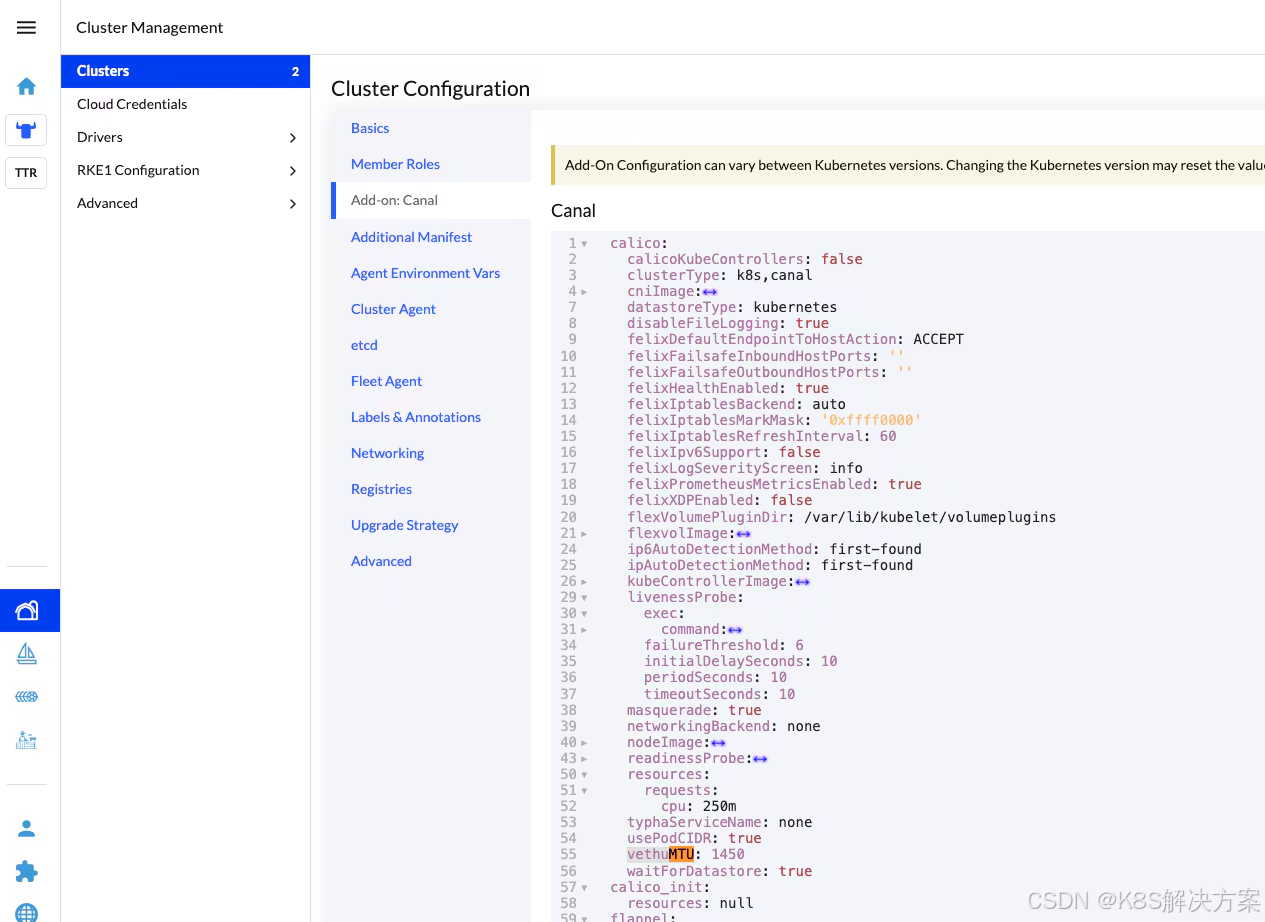
For Standalone RKE2 cluster:
对于独立 RKE2 集群:
Create the following file on each RKE2 server node:
在每个 RKE2 服务器节点上创建以下文件 :
/var/lib/rancher/rke2/server/manifests/rke2-canal-config.yaml
<span style="color:#000000"><span style="background-color:#ffffff"><span style="background-color:#efefef"><code>apiVersion: <a data-cke-saved-href="http://helm.cattle.io/v1" href="http://helm.cattle.io/v1">helm.cattle.io/v1</a>
kind: HelmChartConfig
metadata:
  name: rke2-canal
  namespace: kube-system
spec:
  valuesContent: |-
    calico:
vethuMTU: 1400</code></span></span></span>Note: RKE2 server nodes will automatically detect and apply changes made to files in the manifests directory
注意 :RKE2 服务器节点会自动检测并应用对清单目录中文件所做的更改
2. Restart the Canal DaemonSet
2. 重启运河守护进程 Set
After applying the configuration, restart Canal to load the updated MTU settings:
应用配置后,重启 Canal 以加载更新后的 MTU 设置:
<span style="color:#000000"><span style="background-color:#ffffff"><span style="background-color:#efefef"><code>kubectl rollout restart ds rke2-canal -n kube-system</code></span></span></span>3. Verify That the Configuration Was Applied
3. 验证配置是否已应用
Check that the new MTU value is present in the generated Canal ConfigMap:
检查新的 MTU 值是否存在于生成的 Canal ConfigMap 中:
<span style="color:#000000"><span style="background-color:#ffffff"><span style="background-color:#efefef"><code> kubectl -n kube-system get configmap rke2-canal-config -o yaml | grep -A2 veth_mtu</code></span></span></span>You should see the value applied in Step 1, for example:
你应该能看到步骤1中应用的数值,例如:
<span style="color:#000000"><span style="background-color:#ffffff"><span style="background-color:#efefef"><code>veth_mtu: "1400"</code></span></span></span>4. Important Note: MTU changes take effect for newly created pods
4. 重要提示:MTU 变更适用于新创建的 Pods。
Calico applies MTU settings only when a pod network interface is created.
Calico 仅在创建 pod 网络接口时应用 MTU 设置。
This means: 这意味着:
-
Existing pods retain the old MTU
现有舱体保留了旧的 MTU -
New pods created after the configuration change will use the updated MTU
配置更改后创建的新 Pod 将使用更新后的 MTU -
This behaviour is consistent with Calico’s MTU design
这种行为与 Calico 的 MTU 设计一致
To test the new MTU, you must create a new pod.
要测试新的 MTU,你必须创建一个新的舱体 。
5. Test With a New Pod
5. 用新烟弹测试
Create a test pod to verify that Calico now provisions interfaces using the updated MTU:
创建一个测试舱以验证 Calico 是否使用更新后的 MTU 配置接口:
<span style="color:#000000"><span style="background-color:#ffffff"><span style="background-color:#efefef"><code>kubectl run mtu-test --image=busybox -it --restart=Never -- sh</code></span></span></span>6. Verify MTU on the Node
6. 验证节点上的 MTU
You can inspect MTU values using:
您可以通过以下方法检查 MTU 值:
<span style="color:#000000"><span style="background-color:#ffffff"><span style="background-color:#efefef"><code>ip link show
# or
ip addr
# or
ifconfig -a</code></span></span></span>
You may still see older caliXXXX interfaces at the previous MTU. Only new pod veth interfaces will reflect the updated MTU.
你可能还能在之前的 MTU 看到较旧的 caliXXXX 接口。 只有新的舱体接口会反映更新后的 MTU。
Then, on the node where the pod is scheduled:
然后,在调度舱的节点上:
<span style="color:#000000"><span style="background-color:#ffffff"><span style="background-color:#efefef"><code>ip link show | grep -A1 cali</code></span></span></span>Example Output (Lab Validation)
示例输出(实验室验证)
<span style="color:#000000"><span style="background-color:#ffffff"><code class="language-bash">11: cali1ec7f9e9a2d@if2: ... mtu 1450 ...
27: calif30d30f9a04@if2: ... mtu 1450 ...
29: calie10924b7eb7@if2: ... mtu 1450 ...
34: cali18f8745c1f0@if2: ... mtu 1400 ...
</code></span></span>
Interface 34 corresponds to the new pod and correctly reflects the MTU value of 1400.
接口 34 对应新舱,正确反映了 MTU 值 1400。

开源鸿蒙跨平台开发社区汇聚开发者与厂商,共建“一次开发,多端部署”的开源生态,致力于降低跨端开发门槛,推动万物智联创新。
更多推荐
 9
9 0
0- 0


 已为社区贡献10条内容

所有评论(0)