KMP 结构适配鸿蒙:项目初始化与多平台编译
本文介绍了如何在Kotlin Multiplatform (KMP)框架下适配鸿蒙系统,通过配置多平台编译目标实现代码共享。主要内容包括:1)创建基础Gradle配置,设置Android、iOS和JVM(鸿蒙)编译目标;2)组织项目源文件结构,区分公共代码和平台特定实现;3)使用expect/actual机制定义平台接口;4)实现共享业务逻辑和平台特定代码。重点展示了如何通过JVM目标为鸿蒙系统提
项目概述
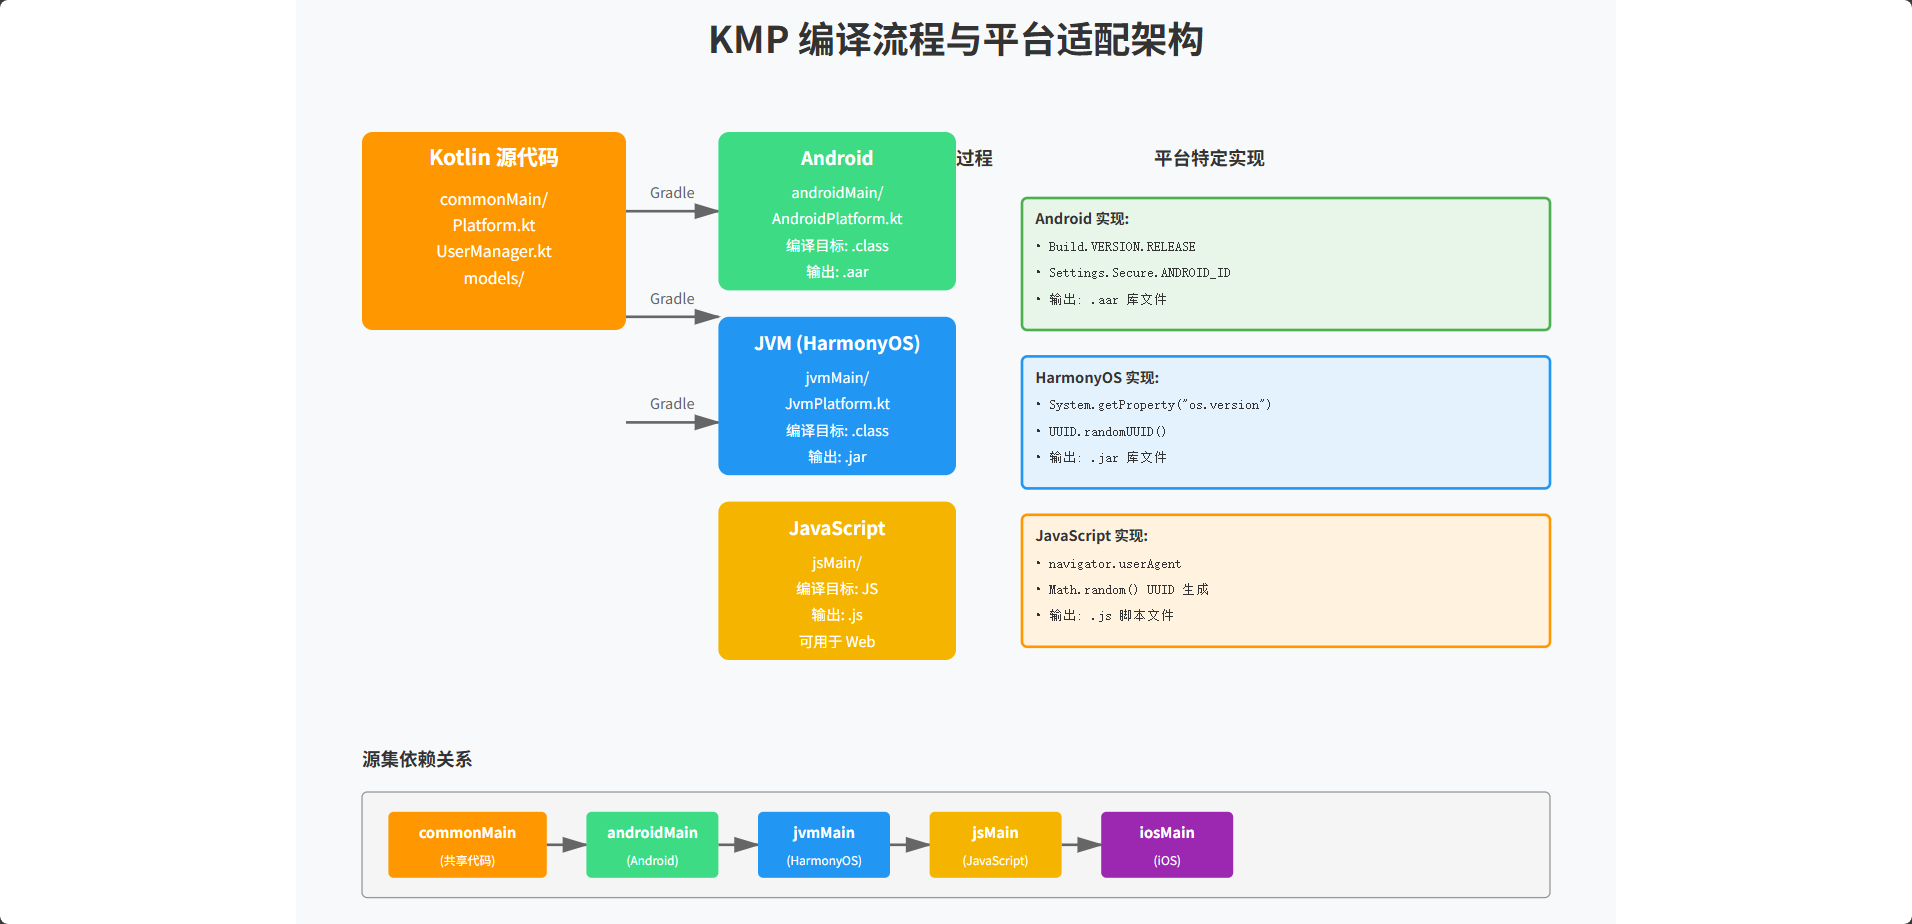
Kotlin Multiplatform (KMP) 是一个强大的框架,允许开发者在多个平台上共享代码。在鸿蒙系统的适配过程中,我们需要理解 KMP 如何将 Kotlin 代码编译为不同平台的目标代码。本文详细介绍了如何创建一个 KMP 项目,配置多平台编译目标,并最终在鸿蒙系统上运行共享代码。
第一部分:KMP 项目配置
创建基础 Gradle 配置
首先,我们需要创建一个完整的 KMP 项目配置。这涉及到 Gradle 构建系统的多个方面,包括插件配置、依赖管理和编译目标设置。
// build.gradle.kts (根项目配置)
plugins {
    kotlin("multiplatform") version "1.9.20"
    kotlin("plugin.serialization") version "1.9.20"
    id("com.android.library") version "8.1.0"
}

kotlin {
    // Android 编译目标
    android {
        compilations.all {
            kotlinOptions {
                jvmTarget = "11"
            }
        }
    }

    // iOS 编译目标
    iosX64()
    iosArm64()
    iosSimulatorArm64()

    // JVM 编译目标(用于鸿蒙)
    jvm {
        compilations.all {
            kotlinOptions {
                jvmTarget = "11"
            }
        }
    }

    // 源集配置
    sourceSets {
        val commonMain by getting {
            dependencies {
                implementation("org.jetbrains.kotlinx:kotlinx-serialization-json:1.5.1")
                implementation("org.jetbrains.kotlinx:kotlinx-coroutines-core:1.7.1")
            }
        }

        val commonTest by getting {
            dependencies {
                implementation(kotlin("test"))
            }
        }

        val androidMain by getting
        val iosMain by creating {
            dependsOn(commonMain)
        }
        val iosTest by creating {
            dependsOn(commonTest)
        }

        val jvmMain by getting {
            dependsOn(commonMain)
        }
    }
}

android {
    namespace = "com.example.kmp"
    compileSdk = 34

    defaultConfig {
        minSdk = 24
    }
}
这个配置文件是 KMP 项目的核心。我们使用 kotlin("multiplatform") 插件来启用多平台支持。通过 android()、iosX64() 等方法,我们声明了项目支持的编译目标。sourceSets 块定义了不同平台的源代码位置和依赖关系。对于鸿蒙系统,我们使用 jvm 编译目标,因为鸿蒙系统基于 Java 虚拟机。这种配置方式确保了代码的最大复用性,同时允许平台特定的实现。
配置源文件结构
KMP 项目的源文件组织遵循特定的约定。我们需要在 src 目录下创建相应的文件夹结构,以便 Gradle 能够正确识别和编译这些文件。
src/
├── commonMain/
│   └── kotlin/
│       └── com/example/kmp/
│           ├── Platform.kt
│           ├── Utils.kt
│           └── models/
│               └── User.kt
├── androidMain/
│   └── kotlin/
│       └── com/example/kmp/
│           └── AndroidPlatform.kt
├── iosMain/
│   └── kotlin/
│       └── com/example/kmp/
│           └── IosPlatform.kt
├── jvmMain/
│   └── kotlin/
│       └── com/example/kmp/
│           └── JvmPlatform.kt
└── commonTest/
    └── kotlin/
        └── com/example/kmp/
            └── PlatformTest.kt
这个目录结构遵循 KMP 的标准约定。commonMain 包含所有平台共享的代码,而 androidMain、iosMain 和 jvmMain 分别包含平台特定的实现。这种组织方式使得代码维护变得更加清晰。编译器会根据目标平台自动选择相应的源文件进行编译。
第二部分:共享代码实现
定义平台接口
在共享代码中,我们定义接口来抽象平台特定的功能。这是 KMP 中实现平台适配的核心机制。
// commonMain/kotlin/com/example/kmp/Platform.kt
expect class Platform {
    fun getPlatformName(): String
    fun getSystemVersion(): String
    fun getDeviceId(): String
}

expect fun getSystemInfo(): SystemInfo

data class SystemInfo(
    val platformName: String,
    val version: String,
    val deviceId: String,
    val timestamp: Long = System.currentTimeMillis()
)
使用 expect 关键字声明期望的平台特定实现。编译器会确保每个平台都提供相应的 actual 实现。这种方式提供了类型安全的平台适配机制。在编译时,编译器会检查所有平台都实现了这些期望的接口,从而避免运行时错误。
共享业务逻辑
现在我们实现一些在所有平台上都能使用的业务逻辑。
// commonMain/kotlin/com/example/kmp/UserManager.kt
class UserManager {
    private val platform = Platform()

    fun createUserProfile(name: String, email: String): UserProfile {
        val systemInfo = getSystemInfo()
        return UserProfile(
            id = generateId(),
            name = name,
            email = email,
            platform = systemInfo.platformName,
            createdAt = systemInfo.timestamp,
            deviceId = systemInfo.deviceId
        )
    }

    fun validateEmail(email: String): Boolean {
        return email.contains("@") && email.contains(".")
    }

    fun formatUserInfo(profile: UserProfile): String {
        return """
            用户信息
            --------
            ID: ${profile.id}
            名称: ${profile.name}
            邮箱: ${profile.email}
            平台: ${profile.platform}
            设备ID: ${profile.deviceId}
            创建时间: ${profile.createdAt}
        """.trimIndent()
    }

    private fun generateId(): String {
        return System.currentTimeMillis().toString()
    }
}

data class UserProfile(
    val id: String,
    val name: String,
    val email: String,
    val platform: String,
    val createdAt: Long,
    val deviceId: String
)
这个 UserManager 类包含了用户管理的核心业务逻辑。它使用 Platform 接口来获取平台特定的信息,但业务逻辑本身是平台无关的。这种设计确保了代码的可复用性和可维护性。
第三部分:平台特定实现
Android 平台实现
// androidMain/kotlin/com/example/kmp/AndroidPlatform.kt
import android.os.Build
import android.provider.Settings

actual class Platform {
    actual fun getPlatformName(): String = "Android"

    actual fun getSystemVersion(): String = Build.VERSION.RELEASE

    actual fun getDeviceId(): String {
        return Settings.Secure.ANDROID_ID
    }
}

actual fun getSystemInfo(): SystemInfo {
    val platform = Platform()
    return SystemInfo(
        platformName = platform.getPlatformName(),
        version = platform.getSystemVersion(),
        deviceId = platform.getDeviceId()
    )
}
Android 平台的实现利用了 Android 特定的 API。我们使用 Build 类获取系统版本,使用 Settings.Secure 获取设备 ID。这些实现只在 Android 平台上编译,不会影响其他平台的代码。
JVM 平台实现(鸿蒙)
// jvmMain/kotlin/com/example/kmp/JvmPlatform.kt
import java.util.UUID

actual class Platform {
    actual fun getPlatformName(): String = "HarmonyOS"

    actual fun getSystemVersion(): String {
        return System.getProperty("os.version") ?: "Unknown"
    }

    actual fun getDeviceId(): String {
        return UUID.randomUUID().toString()
    }
}

actual fun getSystemInfo(): SystemInfo {
    val platform = Platform()
    return SystemInfo(
        platformName = platform.getPlatformName(),
        version = platform.getSystemVersion(),
        deviceId = platform.getDeviceId()
    )
}
JVM 平台的实现使用了 Java 标准库中的类。这个实现可以直接在鸿蒙系统上运行,因为鸿蒙系统支持 Java 虚拟机。
第四部分:编译与 JavaScript 输出
编译为 JavaScript
KMP 支持编译为 JavaScript,这对于 Web 平台和某些嵌入式系统非常有用。
// build.gradle.kts (添加 JavaScript 编译目标)
kotlin {
    // ... 其他编译目标 ...

    js(IR) {
        browser()
        nodejs()
    }
}
添加这个配置后,我们可以将 Kotlin 代码编译为 JavaScript。
编译后的 JavaScript 代码示例
当我们编译上述 Kotlin 代码时,会生成以下 JavaScript 代码:
// 编译后的 JavaScript (简化版)
var Platform = (function() {
    function Platform() {}

    Platform.prototype.getPlatformName = function() {
        return "Web";
    };

    Platform.prototype.getSystemVersion = function() {
        return navigator.userAgent;
    };

    Platform.prototype.getDeviceId = function() {
        return this.generateDeviceId();
    };

    Platform.prototype.generateDeviceId = function() {
        return 'xxxxxxxx-xxxx-4xxx-yxxx-xxxxxxxxxxxx'.replace(/[xy]/g, function(c) {
            var r = Math.random() * 16 | 0;
            var v = c === 'x' ? r : (r & 0x3 | 0x8);
            return v.toString(16);
        });
    };

    return Platform;
}());

var UserManager = (function() {
    function UserManager() {
        this.platform = new Platform();
    }

    UserManager.prototype.createUserProfile = function(name, email) {
        var systemInfo = getSystemInfo();
        return {
            id: this.generateId(),
            name: name,
            email: email,
            platform: systemInfo.platformName,
            createdAt: systemInfo.timestamp,
            deviceId: systemInfo.deviceId
        };
    };

    UserManager.prototype.validateEmail = function(email) {
        return email.indexOf("@") !== -1 && email.indexOf(".") !== -1;
    };

    UserManager.prototype.formatUserInfo = function(profile) {
        return "用户信息\n--------\nID: " + profile.id +
               "\n名称: " + profile.name +
               "\n邮箱: " + profile.email +
               "\n平台: " + profile.platform +
               "\n设备ID: " + profile.deviceId +
               "\n创建时间: " + profile.createdAt;
    };

    UserManager.prototype.generateId = function() {
        return Date.now().toString();
    };

    return UserManager;
}());
这个 JavaScript 代码是从 Kotlin 代码编译而来的。虽然结构略有不同,但逻辑完全相同。这展示了 KMP 的强大之处:同一份代码可以编译为多种目标格式。
第五部分:鸿蒙系统调用
在鸿蒙中使用共享代码
鸿蒙系统可以直接调用编译后的 JVM 代码。以下是在鸿蒙应用中使用 KMP 共享代码的示例:
// HarmonyOS 应用代码
import com.example.kmp.UserManager
import com.example.kmp.Platform

class HarmonyUserService {
    private val userManager = UserManager()
    private val platform = Platform()

    fun setupUser(name: String, email: String) {
        val profile = userManager.createUserProfile(name, email)
        val formattedInfo = userManager.formatUserInfo(profile)

        // 在鸿蒙 UI 中显示用户信息
        displayUserInfo(formattedInfo)
    }

    fun displayUserInfo(info: String) {
        // 调用鸿蒙特定的 UI 组件
        println(info)
    }

    fun getPlatformDetails(): String {
        return """
            平台: ${platform.getPlatformName()}
            版本: ${platform.getSystemVersion()}
            设备ID: ${platform.getDeviceId()}
        """.trimIndent()
    }
}
在鸿蒙应用中,我们可以直接实例化和使用 KMP 编译的类。这些类与本地 Kotlin 代码没有区别,因为它们都运行在 JVM 上。
鸿蒙中的异步调用
对于需要异步处理的场景,我们可以使用协程:
// HarmonyOS 异步操作
import kotlinx.coroutines.launch
import kotlinx.coroutines.Dispatchers

class HarmonyUserRepository {
    private val userManager = UserManager()

    fun loadUserAsync(name: String, email: String, callback: (String) -> Unit) {
        // 在后台线程中执行
        Thread {
            val profile = userManager.createUserProfile(name, email)
            val info = userManager.formatUserInfo(profile)
            callback(info)
        }.start()
    }
}
总结
通过本文的学习,我们理解了 KMP 项目的基本结构、多平台编译的原理,以及如何在鸿蒙系统上使用共享代码。KMP 提供了一种高效的方式来共享代码,同时保持对平台特定功能的支持。在接下来的文章中,我们将深入探讨更复杂的场景,如网络通信、数据库访问和状态管理。

开源鸿蒙跨平台开发社区汇聚开发者与厂商,共建“一次开发,多端部署”的开源生态,致力于降低跨端开发门槛,推动万物智联创新。
更多推荐


 5
5 0
0- 0


 已为社区贡献3条内容

所有评论(0)