如何构建一个具有自动检测、裁剪和导出功能的 React Native 文档扫描器
将手机摄像头变成可靠的文档扫描仪需要精确的边缘检测、透视校正和清晰的图像输出——所有这些都必须实时完成。Dynamsoft Capture Vision React Native SDK 可以处理这些繁重的工作,让您无需编写任何原生代码即可发布适用于 Android 和 iOS 的跨平台文档扫描仪。
如何构建一个具有自动检测、裁剪和导出功能的 React Native 文档扫描器
将手机摄像头变成可靠的文档扫描仪需要精确的边缘检测、透视校正和清晰的图像输出——所有这些都必须实时完成。Dynamsoft Capture Vision React Native SDK 可以处理这些繁重的工作,让您无需编写任何原生代码即可发布适用于 Android 和 iOS 的跨平台文档扫描仪。
你将构建:一个 React Native 应用,它可以从实时摄像头画面中自动检测文档边缘,允许用户使用可拖动的角控点微调裁剪,应用颜色模式(全彩、灰度、二进制),并将结果导出为高质量的 PNG 文件。
演示视频:React Native 文档扫描器实际应用
要点总结
- 本教程演示了如何在单个 React Native 应用中构建完整的文档扫描工作流程——检测、裁剪、处理和导出。
- SDK
dynamsoft-capture-vision-react-native(v3.4.1000)通过统一的 API 提供相机控制、实时文档边界检测、透视校正和图像后处理功能。 - 多帧交叉验证可过滤掉误报,确保只有稳定、高置信度的文档检测才能触发捕获。
- 这种方法适用于收据数字化、身份证件采集、表格处理以及任何取代平板扫描的移动工作流程。
开发者常见问题
- 如何在 React Native 中检测并裁剪摄像头拍摄的文档?
- 如何为移动文档扫描仪添加灰度和黑白模式?
- 如何在安卓和iOS设备上将拍摄的文档保存为PNG文件?
先决条件
开始之前,请确保您已准备好:
- Node.js 18+和 npm
- React Native CLI(非 Expo)及 React Native 0.79+
- 使用模拟器或物理设备(Android)运行 Android Studio
- Xcode 15+和 CocoaPods (iOS)
- Dynamsoft Capture Vision 试用版或完整版许可证密钥
访问dynamsoft.com/customer/license/trialLicense获取 30 天免费试用许可证
步骤一:创建 React Native 项目并安装依赖项
首先创建一个新的 React Native 项目(或使用现有项目),然后安装所需的软件包:
<span style="color:#212529"><span style="color:#333333"><span style="background-color:#eaeaea"><code>npx @react-native-community/cli init ScanDocument
<span style="color:#336666">cd </span>ScanDocument
npm <span style="color:#336666">install </span>dynamsoft-capture-vision-react-native @react-navigation/native @react-navigation/native-stack react-native-safe-area-context react-native-screens react-native-fs
</code></span></span></span>
对于 iOS 系统,请安装原生 pods:
<span style="color:#212529"><span style="color:#333333"><span style="background-color:#eaeaea"><code><span style="color:#336666">cd </span>ios <span style="color:#555555">&&</span> pod <span style="color:#336666">install</span> <span style="color:#555555">&&</span> <span style="color:#336666">cd</span> ..
</code></span></span></span>关键依赖项是dynamsoft-capture-vision-react-native(v3.4.1000),它将相机增强器、捕获视觉路由器和文档规范化器捆绑到一个 React Native 包中。
步骤 2:初始化许可证并配置导航
应用程序入口点注册根组件index.js:
<span style="color:#212529"><span style="color:#333333"><span style="background-color:#eaeaea"><code><span style="color:#006699"><strong>import</strong></span> {AppRegistry} <span style="color:#006699"><strong>from</strong></span> '<span style="color:#cc3300">react-native</span>';
<span style="color:#006699"><strong>import</strong></span> App <span style="color:#006699"><strong>from</strong></span> '<span style="color:#cc3300">./src/App</span>';
<span style="color:#006699"><strong>import</strong></span> {name as appName} <span style="color:#006699"><strong>from</strong></span> '<span style="color:#cc3300">./app.json</span>';

AppRegistry.<span style="color:#cc00ff">registerComponent</span>(appName, () <span style="color:#555555">=></span> App);
</code></span></span></span>在设置中App.tsx,设置一个包含四个屏幕的堆栈导航器,并在主屏幕挂载时初始化 Dynamsoft 许可证:
<span style="color:#212529"><span style="color:#333333"><span style="background-color:#eaeaea"><code><span style="color:#006699"><strong>import</strong></span> {Quadrilateral, ImageData, LicenseManager} <span style="color:#006699"><strong>from</strong></span> '<span style="color:#cc3300">dynamsoft-capture-vision-react-native</span>';
<span style="color:#006699"><strong>import</strong></span> {createNativeStackNavigator, NativeStackScreenProps} <span style="color:#006699"><strong>from</strong></span> '<span style="color:#cc3300">@react-navigation/native-stack</span>';
<span style="color:#006699"><strong>import</strong></span> {NavigationContainer} <span style="color:#006699"><strong>from</strong></span> '<span style="color:#cc3300">@react-navigation/native</span>';

<span style="color:#006699"><strong>export</strong></span> <span style="color:#006699"><strong>type</strong></span> ScreenNames <span style="color:#555555">=</span> ['<span style="color:#cc3300">Home</span>', '<span style="color:#cc3300">Scanner</span>', '<span style="color:#cc3300">Editor</span>', '<span style="color:#cc3300">NormalizedImage</span>'];
<span style="color:#006699"><strong>export</strong></span> <span style="color:#006699"><strong>type</strong></span> RootStackParamList <span style="color:#555555">=</span> <span style="color:#336666">Record</span><span style="color:#555555"><</span>ScreenNames[<span style="color:#006699"><strong>number</strong></span>], <span style="color:#006699"><strong>undefined</strong></span><span style="color:#555555">></span>;
<span style="color:#006699"><strong>export</strong></span> <span style="color:#006699"><strong>type</strong></span> StackNavigation <span style="color:#555555">=</span> NativeStackScreenProps<span style="color:#555555"><</span>RootStackParamList<span style="color:#555555">></span>;

<span style="color:#006699"><strong>const</strong></span> Stack <span style="color:#555555">=</span> createNativeStackNavigator<span style="color:#555555"><</span>RootStackParamList<span style="color:#555555">></span>();

<span style="color:#006699"><strong>function</strong></span> <span style="color:#cc00ff">App</span>(): React.JSX.Element {
  <span style="color:#006699"><strong>return </strong></span>(
    <<span style="color:#00aa88"><strong>SafeAreaProvider</strong></span>>
      <<span style="color:#00aa88"><strong>NavigationContainer</strong></span>>
        <<span style="color:#00aa88"><strong>Stack</strong></span>.<span style="color:#00aa88"><strong>Navigator</strong></span> <span style="color:#330099">initialRouteName</span>=<span style="color:#cc3300">"Home"</span>>
          <<span style="color:#00aa88"><strong>Stack</strong></span>.<span style="color:#00aa88"><strong>Screen</strong></span> <span style="color:#330099">name</span>=<span style="color:#cc3300">"Home"</span> <span style="color:#330099">component</span>=<span style="color:#aa0000">{</span>HomeScreen<span style="color:#aa0000">}</span> <span style="color:#330099">options</span>=<span style="color:#aa0000">{</span>{<span style="color:#330099">headerShown</span>: <span style="color:#006699"><strong>false</strong></span>}<span style="color:#aa0000">}</span> />
          <<span style="color:#00aa88"><strong>Stack</strong></span>.<span style="color:#00aa88"><strong>Screen</strong></span> <span style="color:#330099">name</span>=<span style="color:#cc3300">"Scanner"</span> <span style="color:#330099">component</span>=<span style="color:#aa0000">{</span>Scanner<span style="color:#aa0000">}</span> <span style="color:#330099">options</span>=<span style="color:#aa0000">{</span>{<span style="color:#330099">headerShown</span>: <span style="color:#006699"><strong>false</strong></span>}<span style="color:#aa0000">}</span> />
          <<span style="color:#00aa88"><strong>Stack</strong></span>.<span style="color:#00aa88"><strong>Screen</strong></span> <span style="color:#330099">name</span>=<span style="color:#cc3300">"Editor"</span> <span style="color:#330099">component</span>=<span style="color:#aa0000">{</span>Editor<span style="color:#aa0000">}</span>
            <span style="color:#330099">options</span>=<span style="color:#aa0000">{</span>{<span style="color:#330099">title</span>: '<span style="color:#cc3300">Adjust & Crop</span>', <span style="color:#330099">headerStyle</span>: {<span style="color:#330099">backgroundColor</span>: '<span style="color:#cc3300">#2563EB</span>'}, <span style="color:#330099">headerTintColor</span>: '<span style="color:#cc3300">#fff</span>'}<span style="color:#aa0000">}</span> />
          <<span style="color:#00aa88"><strong>Stack</strong></span>.<span style="color:#00aa88"><strong>Screen</strong></span> <span style="color:#330099">name</span>=<span style="color:#cc3300">"NormalizedImage"</span> <span style="color:#330099">component</span>=<span style="color:#aa0000">{</span>NormalizedImage<span style="color:#aa0000">}</span>
            <span style="color:#330099">options</span>=<span style="color:#aa0000">{</span>{<span style="color:#330099">title</span>: '<span style="color:#cc3300">Review & Export</span>', <span style="color:#330099">headerStyle</span>: {<span style="color:#330099">backgroundColor</span>: '<span style="color:#cc3300">#2563EB</span>'}, <span style="color:#330099">headerTintColor</span>: '<span style="color:#cc3300">#fff</span>'}<span style="color:#aa0000">}</span> />
        </<span style="color:#00aa88"><strong>Stack</strong></span>.<span style="color:#00aa88"><strong>Navigator</strong></span>>
      </<span style="color:#00aa88"><strong>NavigationContainer</strong></span>>
    </<span style="color:#00aa88"><strong>SafeAreaProvider</strong></span>>
  );
}
</code></span></span></span>许可证初始化在HomeScreen组件内部进行。请将许可证字符串替换为您自己的密钥:
<span style="color:#212529"><span style="color:#333333"><span style="background-color:#eaeaea"><code><span style="color:#cc00ff">useEffect</span>(() <span style="color:#555555">=></span> {
  LicenseManager.<span style="color:#cc00ff">initLicense</span>('<span style="color:#cc3300">LICENSE-KEY</span>')
    .<span style="color:#cc00ff">then</span>(() <span style="color:#555555">=></span> <span style="color:#cc00ff">setLicenseReady</span>(<span style="color:#006699"><strong>true</strong></span>))
    .<span style="color:#006699"><strong>catch</strong></span>(e <span style="color:#555555">=></span> {
      console.<span style="color:#cc00ff">error</span>('<span style="color:#cc3300">Init license failed: </span>' <span style="color:#555555">+</span> e.message);
      <span style="color:#cc00ff">setError</span>('<span style="color:#cc3300">License initialization failed.</span><span style="color:#cc3300"><strong>\n</strong></span>' <span style="color:#555555">+</span> e.message);
      <span style="color:#cc00ff">setLicenseReady</span>(<span style="color:#006699"><strong>true</strong></span>);
    });
}, []);
</code></span></span></span>
步骤 3:从摄像头画面中检测并捕获文档
屏幕Scanner打开摄像头,进行实时文档检测,并在确认文档边界稳定后自动拍摄。SDK 的CameraEnhancer、CaptureVisionRouter和MultiFrameResultCrossFilter协同工作:
<span style="color:#212529"><span style="color:#333333"><span style="background-color:#eaeaea"><code><span style="color:#006699"><strong>import</strong></span> {
  CameraEnhancer,
  CameraView,
  CaptureVisionRouter,
  EnumCapturedResultItemType,
  EnumCrossVerificationStatus,
  EnumPresetTemplate,
  MultiFrameResultCrossFilter,
} <span style="color:#006699"><strong>from</strong></span> '<span style="color:#cc3300">dynamsoft-capture-vision-react-native</span>';
</code></span></span></span>
当屏幕对焦清晰时打开相机,当屏幕失去对焦时关闭相机:
<span style="color:#212529"><span style="color:#333333"><span style="background-color:#eaeaea"><code><span style="color:#006699"><strong>const</strong></span> cameraRef <span style="color:#555555">=</span> useRef<span style="color:#555555"><</span>CameraEnhancer<span style="color:#555555">></span>(CameraEnhancer.<span style="color:#cc00ff">getInstance</span>());
<span style="color:#006699"><strong>const</strong></span> cvrRef <span style="color:#555555">=</span> useRef<span style="color:#555555"><</span>CaptureVisionRouter<span style="color:#555555">></span>(CaptureVisionRouter.<span style="color:#cc00ff">getInstance</span>());

<span style="color:#cc00ff">useFocusEffect</span>(
  React.<span style="color:#cc00ff">useCallback</span>(() <span style="color:#555555">=></span> {
    <span style="color:#006699"><strong>const</strong></span> camera <span style="color:#555555">=</span> cameraRef.current;
    camera.<span style="color:#cc00ff">open</span>();
    <span style="color:#006699"><strong>return </strong></span>() <span style="color:#555555">=></span> {
      camera.<span style="color:#cc00ff">close</span>();
    };
  }, []),
);
</code></span></span></span>
将摄像头连接到采集视觉路由器,并启用跨帧验证以过滤掉误报:
<span style="color:#212529"><span style="color:#333333"><span style="background-color:#eaeaea"><code><span style="color:#006699"><strong>if </strong></span>(<span style="color:#555555">!</span>sdkInitialized) {
  cvr.<span style="color:#cc00ff">setInput</span>(camera);
  <span style="color:#006699"><strong>const</strong></span> filter <span style="color:#555555">=</span> <span style="color:#006699"><strong>new</strong></span> <span style="color:#00aa88"><strong>MultiFrameResultCrossFilter</strong></span>();
  filter.<span style="color:#cc00ff">enableResultCrossVerification</span>(EnumCapturedResultItemType.CRIT_DESKEWED_IMAGE, <span style="color:#006699"><strong>true</strong></span>);
  cvr.<span style="color:#cc00ff">addFilter</span>(filter);
  sdkInitialized <span style="color:#555555">=</span> <span style="color:#006699"><strong>true</strong></span>;
}
</code></span></span></span>
注册一个结果接收器,当校正倾斜后的文档图像准备就绪时触发。捕获操作可以通过交叉验证通过或手动点击快门来触发:
<span style="color:#212529"><span style="color:#333333"><span style="background-color:#eaeaea"><code>receiverRef.current <span style="color:#555555">=</span> cvr.<span style="color:#cc00ff">addResultReceiver</span>({
  <span style="color:#330099">onProcessedDocumentResultReceived</span>: result <span style="color:#555555">=></span> {
    <span style="color:#006699"><strong>if </strong></span>(
      result.deskewedImageResultItems <span style="color:#555555">&&</span>
      result.deskewedImageResultItems.length <span style="color:#555555">></span> <span style="color:#ff6600">0</span> <span style="color:#555555">&&</span>
      (ifBtnClick.current <span style="color:#555555">||</span> result.deskewedImageResultItems[<span style="color:#ff6600">0</span>].crossVerificationStatus <span style="color:#555555">===</span> EnumCrossVerificationStatus.CVS_PASSED)
    ) {
      ifBtnClick.current <span style="color:#555555">=</span> <span style="color:#006699"><strong>false</strong></span>;
      <span style="color:#336666">global</span>.originalImage <span style="color:#555555">=</span> cvr.<span style="color:#cc00ff">getIntermediateResultManager</span>().<span style="color:#cc00ff">getOriginalImage</span>(result.originalImageHashId) <span style="color:#006699"><strong>as </strong></span>ImageData;
      <span style="color:#336666">global</span>.deskewedImage <span style="color:#555555">=</span> result.deskewedImageResultItems[<span style="color:#ff6600">0</span>].imageData;
      <span style="color:#336666">global</span>.sourceDeskewQuad <span style="color:#555555">=</span> result.deskewedImageResultItems[<span style="color:#ff6600">0</span>].sourceDeskewQuad;
      <span style="color:#006699"><strong>if </strong></span>(<span style="color:#336666">global</span>.originalImage.width <span style="color:#555555">></span> <span style="color:#ff6600">0</span> <span style="color:#555555">&&</span> <span style="color:#336666">global</span>.originalImage.height <span style="color:#555555">></span> <span style="color:#ff6600">0</span>) {
        navigation.<span style="color:#cc00ff">navigate</span>('<span style="color:#cc3300">NormalizedImage</span>');
      }
    }
  },
});

cvr.<span style="color:#cc00ff">startCapturing</span>(EnumPresetTemplate.PT_DETECT_AND_NORMALIZE_DOCUMENT);
</code></span></span></span>使用内置PT_DETECT_AND_NORMALIZE_DOCUMENT模板即可开始捕获——无需自定义模板配置。
步骤 4:使用可拖动角点微调文档裁剪
屏幕Editor用于ImageEditorView显示带有可拖动四边形叠加层的原始图像。用户拖动角点手柄来微调文档边界,然后再确认:
<span style="color:#212529"><span style="color:#333333"><span style="background-color:#eaeaea"><code><span style="color:#006699"><strong>import</strong></span> {
  EnumDrawingLayerId,
  ImageData,
  ImageEditorView,
  ImageProcessor,
} <span style="color:#006699"><strong>from</strong></span> '<span style="color:#cc3300">dynamsoft-capture-vision-react-native</span>';

<span style="color:#006699"><strong>export</strong></span> <span style="color:#006699"><strong>function</strong></span> <span style="color:#cc00ff">Editor</span>({navigation}: StackNavigation) {
  <span style="color:#006699"><strong>const</strong></span> editorView <span style="color:#555555">=</span> useRef<span style="color:#555555"><</span>ImageEditorView<span style="color:#555555">></span>(<span style="color:#006699"><strong>null</strong></span>);

  <span style="color:#cc00ff">useEffect</span>(() <span style="color:#555555">=></span> {
    <span style="color:#006699"><strong>if </strong></span>(editorView.current) {
      editorView.current.<span style="color:#cc00ff">setOriginalImage</span>(<span style="color:#336666">global</span>.originalImage);
      editorView.current.<span style="color:#cc00ff">setQuads</span>([<span style="color:#336666">global</span>.sourceDeskewQuad], EnumDrawingLayerId.DDN_LAYER_ID);
    }
  }, []);
</code></span></span></span>
用户确认后,提取选定的四边形并重新校正图像倾斜:
<span style="color:#212529"><span style="color:#333333"><span style="background-color:#eaeaea"><code><span style="color:#006699"><strong>const</strong></span> getSelectedQuadAndDeskew <span style="color:#555555">=</span> <span style="color:#006699"><strong>async </strong></span>(): <span style="color:#336666">Promise</span><span style="color:#555555"><</span>ImageData <span style="color:#555555">|</span> <span style="color:#006699"><strong>null</strong></span> <span style="color:#555555">|</span> <span style="color:#006699"><strong>undefined</strong></span><span style="color:#555555">></span> <span style="color:#555555">=></span> {
  <span style="color:#006699"><strong>if </strong></span>(<span style="color:#555555">!</span>editorView.current) {
    <span style="color:#006699"><strong>return</strong></span> <span style="color:#006699"><strong>null</strong></span>;
  }
  <span style="color:#006699"><strong>const</strong></span> quad <span style="color:#555555">=</span> <span style="color:#006699"><strong>await</strong></span> editorView.current.<span style="color:#cc00ff">getSelectedQuad</span>().<span style="color:#006699"><strong>catch</strong></span>(e <span style="color:#555555">=></span> {
    console.<span style="color:#cc00ff">error</span>('<span style="color:#cc3300">getSelectedQuad error: </span>' <span style="color:#555555">+</span> e.message);
    <span style="color:#006699"><strong>return</strong></span> <span style="color:#006699"><strong>null</strong></span>;
  });
  <span style="color:#006699"><strong>if </strong></span>(quad) {
    <span style="color:#336666">global</span>.sourceDeskewQuad <span style="color:#555555">=</span> quad;
    <span style="color:#006699"><strong>return</strong></span> <span style="color:#006699"><strong>new</strong></span> <span style="color:#00aa88"><strong>ImageProcessor</strong></span>().<span style="color:#cc00ff">cropAndDeskewImage</span>(<span style="color:#336666">global</span>.originalImage, quad);
  } <span style="color:#006699"><strong>else</strong></span> {
    Alert.<span style="color:#cc00ff">alert</span>('<span style="color:#cc3300">No selection</span>', '<span style="color:#cc3300">Please select a quad to confirm.</span>');
    <span style="color:#006699"><strong>return</strong></span> <span style="color:#006699"><strong>null</strong></span>;
  }
};
</code></span></span></span>该ImageProcessor.cropAndDeskewImage()方法应用基于四角四边形的透视校正,生成清晰的矩形文档图像。
步骤 5:应用颜色模式并将文档导出为 PNG 格式
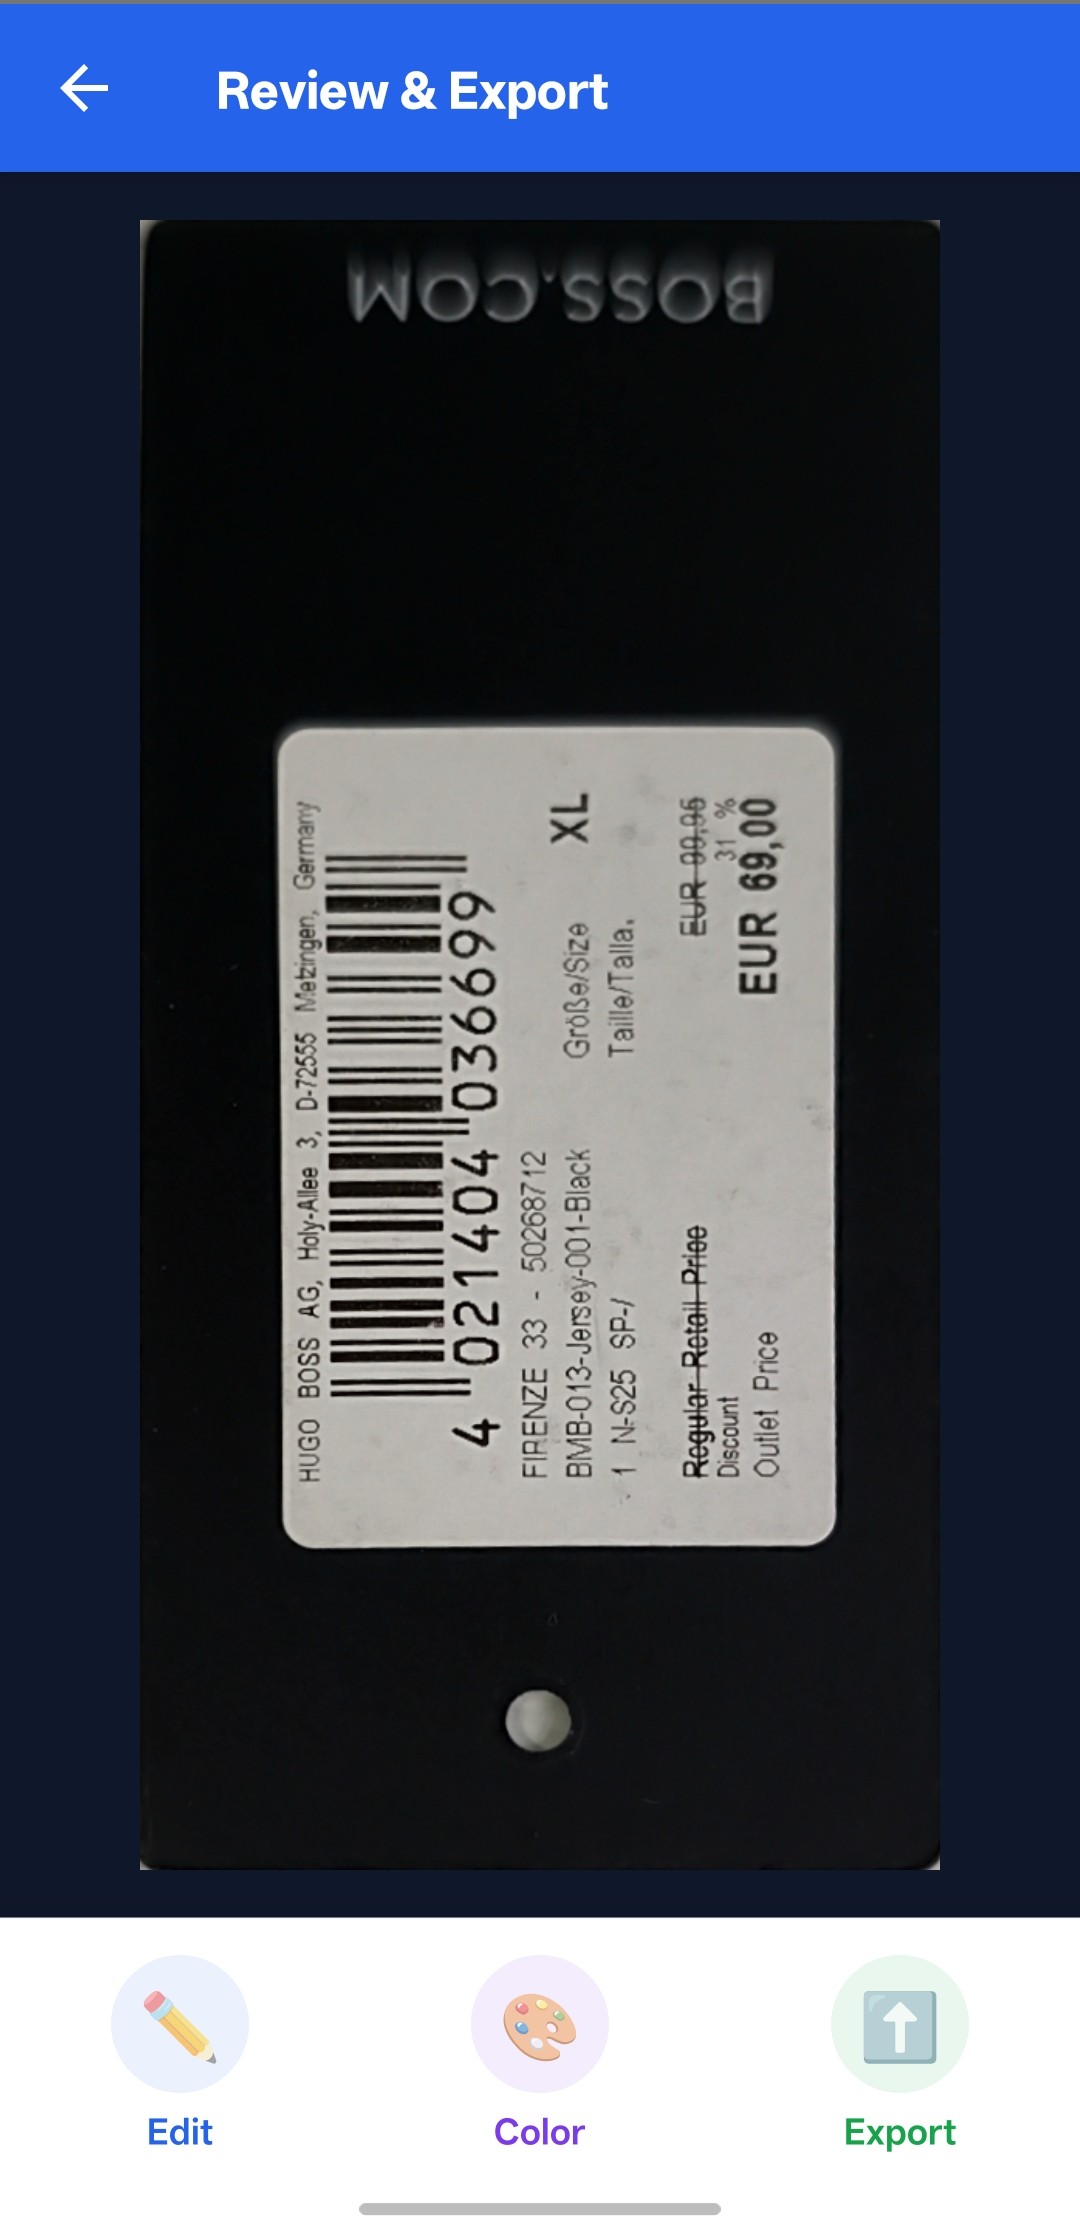
屏幕NormalizedImage显示倾斜校正后的结果,并提供三个操作:编辑(重新打开四边形编辑器)、更改颜色模式和导出。
使用以下命令在彩色、灰度和二值输出之间进行转换ImageProcessor:
<span style="color:#212529"><span style="color:#333333"><span style="background-color:#eaeaea"><code><span style="color:#006699"><strong>import</strong></span> {
  ImageIO,
  ImageProcessor,
  imageDataToBase64,
} <span style="color:#006699"><strong>from</strong></span> '<span style="color:#cc3300">dynamsoft-capture-vision-react-native</span>';

<span style="color:#006699"><strong>const</strong></span> changeColorMode <span style="color:#555555">=</span> (mode: <span style="color:#006699"><strong>string</strong></span>) <span style="color:#555555">=></span> {
  <span style="color:#006699"><strong>if </strong></span>(<span style="color:#336666">global</span>.showingImage <span style="color:#555555">&&</span> <span style="color:#336666">global</span>.showingImage <span style="color:#555555">!==</span> <span style="color:#336666">global</span>.deskewedImage) {
    <span style="color:#336666">global</span>.showingImage.<span style="color:#cc00ff">release</span>();
  }
  <span style="color:#006699"><strong>switch </strong></span>(mode) {
    <span style="color:#006699"><strong>case</strong></span> ColorMode.<span style="color:#330099">color</span>:
      <span style="color:#336666">global</span>.showingImage <span style="color:#555555">=</span> <span style="color:#336666">global</span>.deskewedImage;
      <span style="color:#006699"><strong>break</strong></span>;
    <span style="color:#006699"><strong>case</strong></span> ColorMode.<span style="color:#330099">grayscale</span>:
      <span style="color:#336666">global</span>.showingImage <span style="color:#555555">=</span> <span style="color:#006699"><strong>new</strong></span> <span style="color:#00aa88"><strong>ImageProcessor</strong></span>().<span style="color:#cc00ff">convertToGray</span>(<span style="color:#336666">global</span>.deskewedImage) <span style="color:#555555">??</span> <span style="color:#336666">global</span>.deskewedImage;
      <span style="color:#006699"><strong>break</strong></span>;
    <span style="color:#006699"><strong>case</strong></span> ColorMode.<span style="color:#330099">binary</span>:
      <span style="color:#336666">global</span>.showingImage <span style="color:#555555">=</span>
        <span style="color:#006699"><strong>new</strong></span> <span style="color:#00aa88"><strong>ImageProcessor</strong></span>().<span style="color:#cc00ff">convertToBinaryLocal</span>(
          <span style="color:#336666">global</span>.deskewedImage,
          <span style="color:#0099ff"><em>/*blockSize = */</em></span> <span style="color:#ff6600">0</span>,
          <span style="color:#0099ff"><em>/*compensation = */</em></span> <span style="color:#ff6600">10</span>,
          <span style="color:#0099ff"><em>/*invert = */</em></span> <span style="color:#006699"><strong>false</strong></span>,
        ) <span style="color:#555555">??</span> <span style="color:#336666">global</span>.deskewedImage;
      <span style="color:#006699"><strong>break</strong></span>;
  }
  <span style="color:#cc00ff">setBase64</span>(<span style="color:#cc00ff">imageDataToBase64</span>(<span style="color:#336666">global</span>.showingImage) <span style="color:#555555">??</span> '');
};
</code></span></span></span>
使用以下命令将当前图像导出为 PNG 格式ImageIO.saveToFile(),并写入到平台对应的目录中:
<span style="color:#212529"><span style="color:#333333"><span style="background-color:#eaeaea"><code><span style="color:#006699"><strong>import</strong></span> {
  ExternalCachesDirectoryPath,
  TemporaryDirectoryPath,
} <span style="color:#006699"><strong>from</strong></span> '<span style="color:#cc3300">react-native-fs</span>';

<span style="color:#006699"><strong>const</strong></span> imageIO <span style="color:#555555">=</span> <span style="color:#006699"><strong>new</strong></span> <span style="color:#00aa88"><strong>ImageIO</strong></span>();
<span style="color:#006699"><strong>const</strong></span> savedPath <span style="color:#555555">=</span>
  (Platform.OS <span style="color:#555555">===</span> '<span style="color:#cc3300">ios</span>'
    ? TemporaryDirectoryPath
    : ExternalCachesDirectoryPath) <span style="color:#555555">+</span> <span style="color:#cc3300">`/document_</span>${<span style="color:#336666">Date</span>.<span style="color:#cc00ff">now</span>()}<span style="color:#cc3300">.png`</span>;
imageIO.<span style="color:#cc00ff">saveToFile</span>(<span style="color:#336666">global</span>.showingImage, savedPath, <span style="color:#006699"><strong>true</strong></span>);
Alert.<span style="color:#cc00ff">alert</span>('<span style="color:#cc3300">Saved ✓</span>', '<span style="color:#cc3300">Image saved to:</span><span style="color:#cc3300"><strong>\n</strong></span>' <span style="color:#555555">+</span> savedPath);
</code></span></span></span>
常见问题和特殊情况
- 许可证需要网络连接:试用许可证需要在线验证。如果设备启动时没有连接到互联网,应用程序将显示许可证错误。请确保
android.permission.INTERNET您的设备已安装许可证AndroidManifest.xml(默认情况下已安装)。 - 相机权限被拒绝: SDK 会
CameraEnhancer.requestCameraPermission()在运行时调用相机权限控制,但如果用户拒绝,扫描器屏幕会显示错误提示。为了妥善处理此问题,请在导航至扫描器之前检查权限状态。 - 图像数据的内存管理:代码会在不再需要对象(例如 `<img>` 、`<img>`、 `<img>`)时显式地
.release()调用它们。跳过此步骤可能会导致本地内存泄漏,尤其是在重复扫描文档时。ImageDatashowingImagedeskewedImageoriginalImage
结论
本教程使用 Dynamsoft Capture Vision SDK,在 React Native 中构建了一个完整的文档扫描应用程序,涵盖了从实时摄像头检测、交互式裁剪到色彩处理和 PNG 导出等各个环节。同一套代码库可同时运行于 Android 和 iOS 平台。

开源鸿蒙跨平台开发社区汇聚开发者与厂商,共建“一次开发,多端部署”的开源生态,致力于降低跨端开发门槛,推动万物智联创新。
更多推荐

 8
8 0
0- 0


 已为社区贡献8条内容

所有评论(0)