开源鸿蒙-基于React鸿蒙热更新
编译运行鸿蒙项目,每次都需要"npm run dev"编译,拷贝编译出来的"bundle.harmony.js"到鸿蒙项目里,特别麻烦。React官网有写鸿蒙热更新的方法,但还是看不懂。后面参考了两位老师的博客,最后实现出来了。如果不会搭建React鸿蒙环境的就看第一个链接。如果已经完成React的鸿蒙环境搭建的,请看第二个和第三个链接。如果还是看不懂,可以看看我这篇文章。第一个链接:开源鸿蒙-R
前言
编译运行鸿蒙项目,每次都需要"npm run dev"编译,拷贝编译出来的"bundle.harmony.js"到鸿蒙项目里,特别麻烦。React官网有写鸿蒙热更新的方法,但还是看不懂。后面参考了两位老师的博客,最后实现出来了。如果不会搭建React鸿蒙环境的就看第一个链接。如果已经完成React的鸿蒙环境搭建的,请看第二个和第三个链接。如果还是看不懂,可以看看我这篇文章。
第一个链接:
一文搞定开源鸿蒙React Native项目配置Metro热加载-CSDN博客![]() https://blog.csdn.net/zl392321162/article/details/155355327第三个链接:
https://blog.csdn.net/zl392321162/article/details/155355327第三个链接:
一、环境搭建
这里我是基于你已经完成了我的React环境搭建,来进行的。如果没完成,请先完成React的鸿蒙环境搭建。
1.1 修改metor.config.js文件
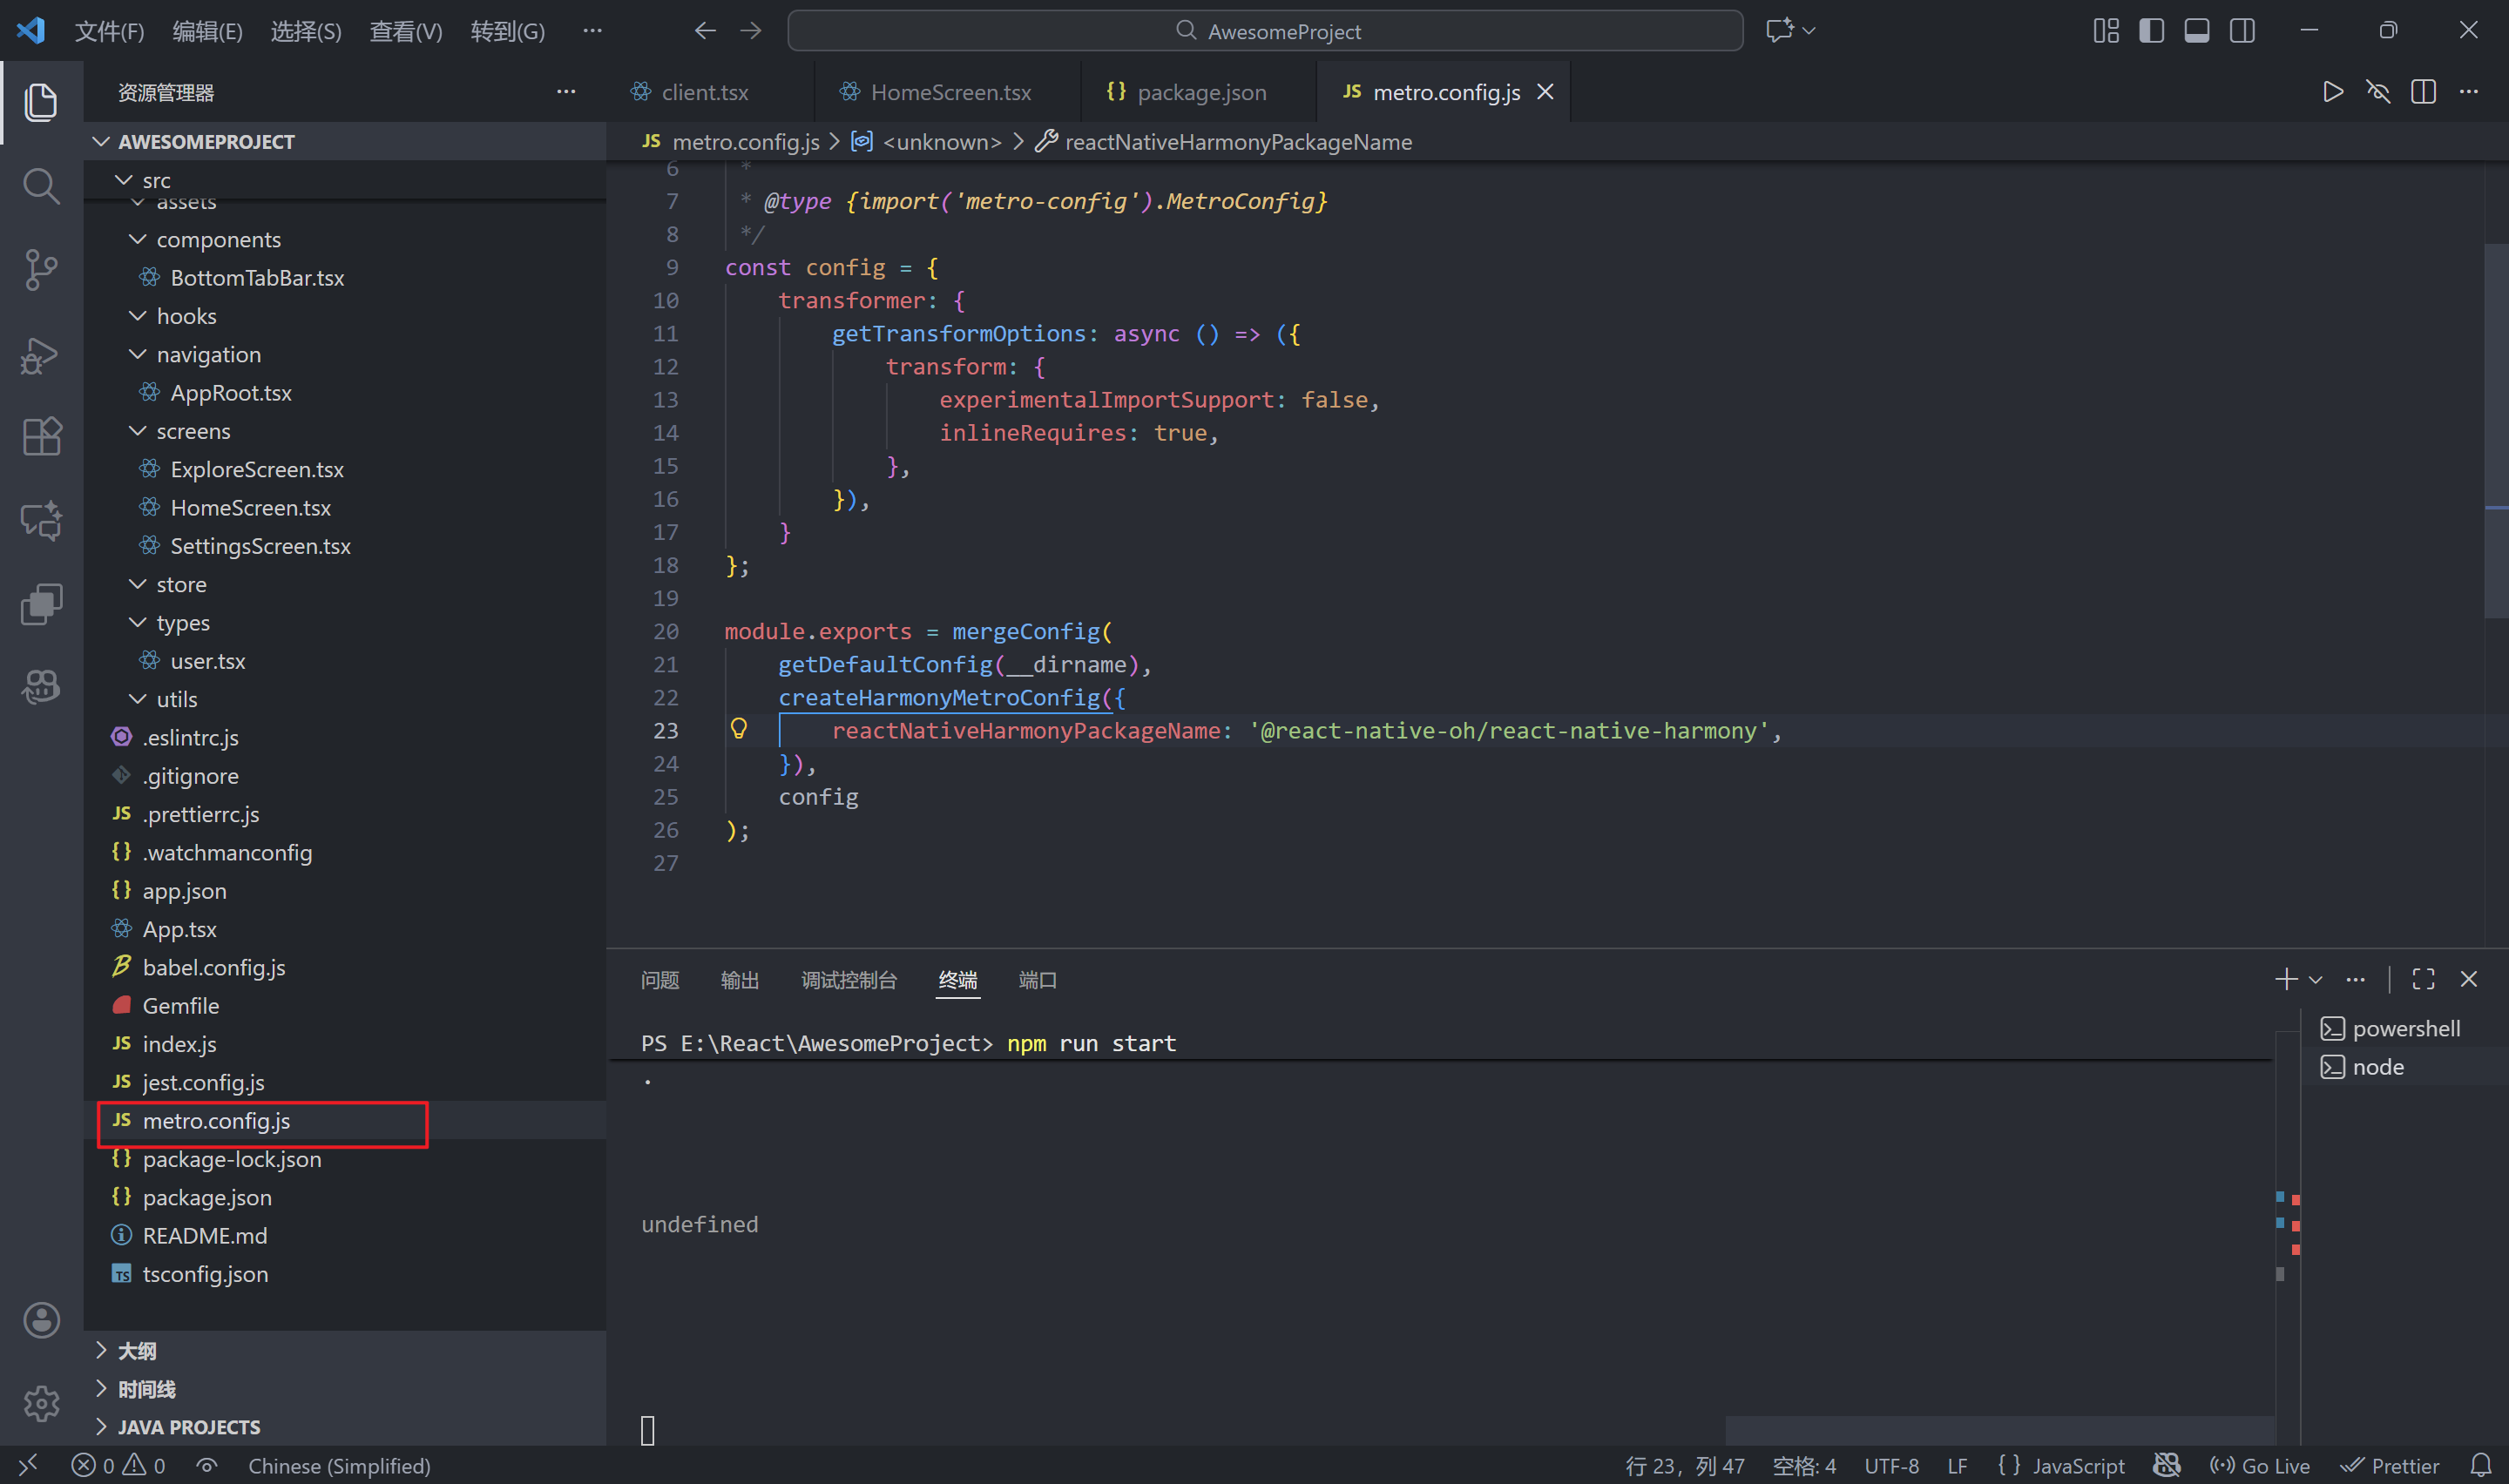
const {getDefaultConfig, mergeConfig} = require('@react-native/metro-config');
const { createHarmonyMetroConfig } = require('@react-native-oh/react-native-harmony/metro.config');
/**
 * Metro configuration
 * https://facebook.github.io/metro/docs/configuration
 *
 * @type {import('metro-config').MetroConfig}
 */
const config = {
    transformer: {
        getTransformOptions: async () => ({
            transform: {
                experimentalImportSupport: false,
                inlineRequires: true,
            },
        }),
    }
};

module.exports = mergeConfig(
    getDefaultConfig(__dirname),
    createHarmonyMetroConfig({
        reactNativeHarmonyPackageName: '@react-native-oh/react-native-harmony',
    }),
    config
);
1.2 修改Index.ets文件
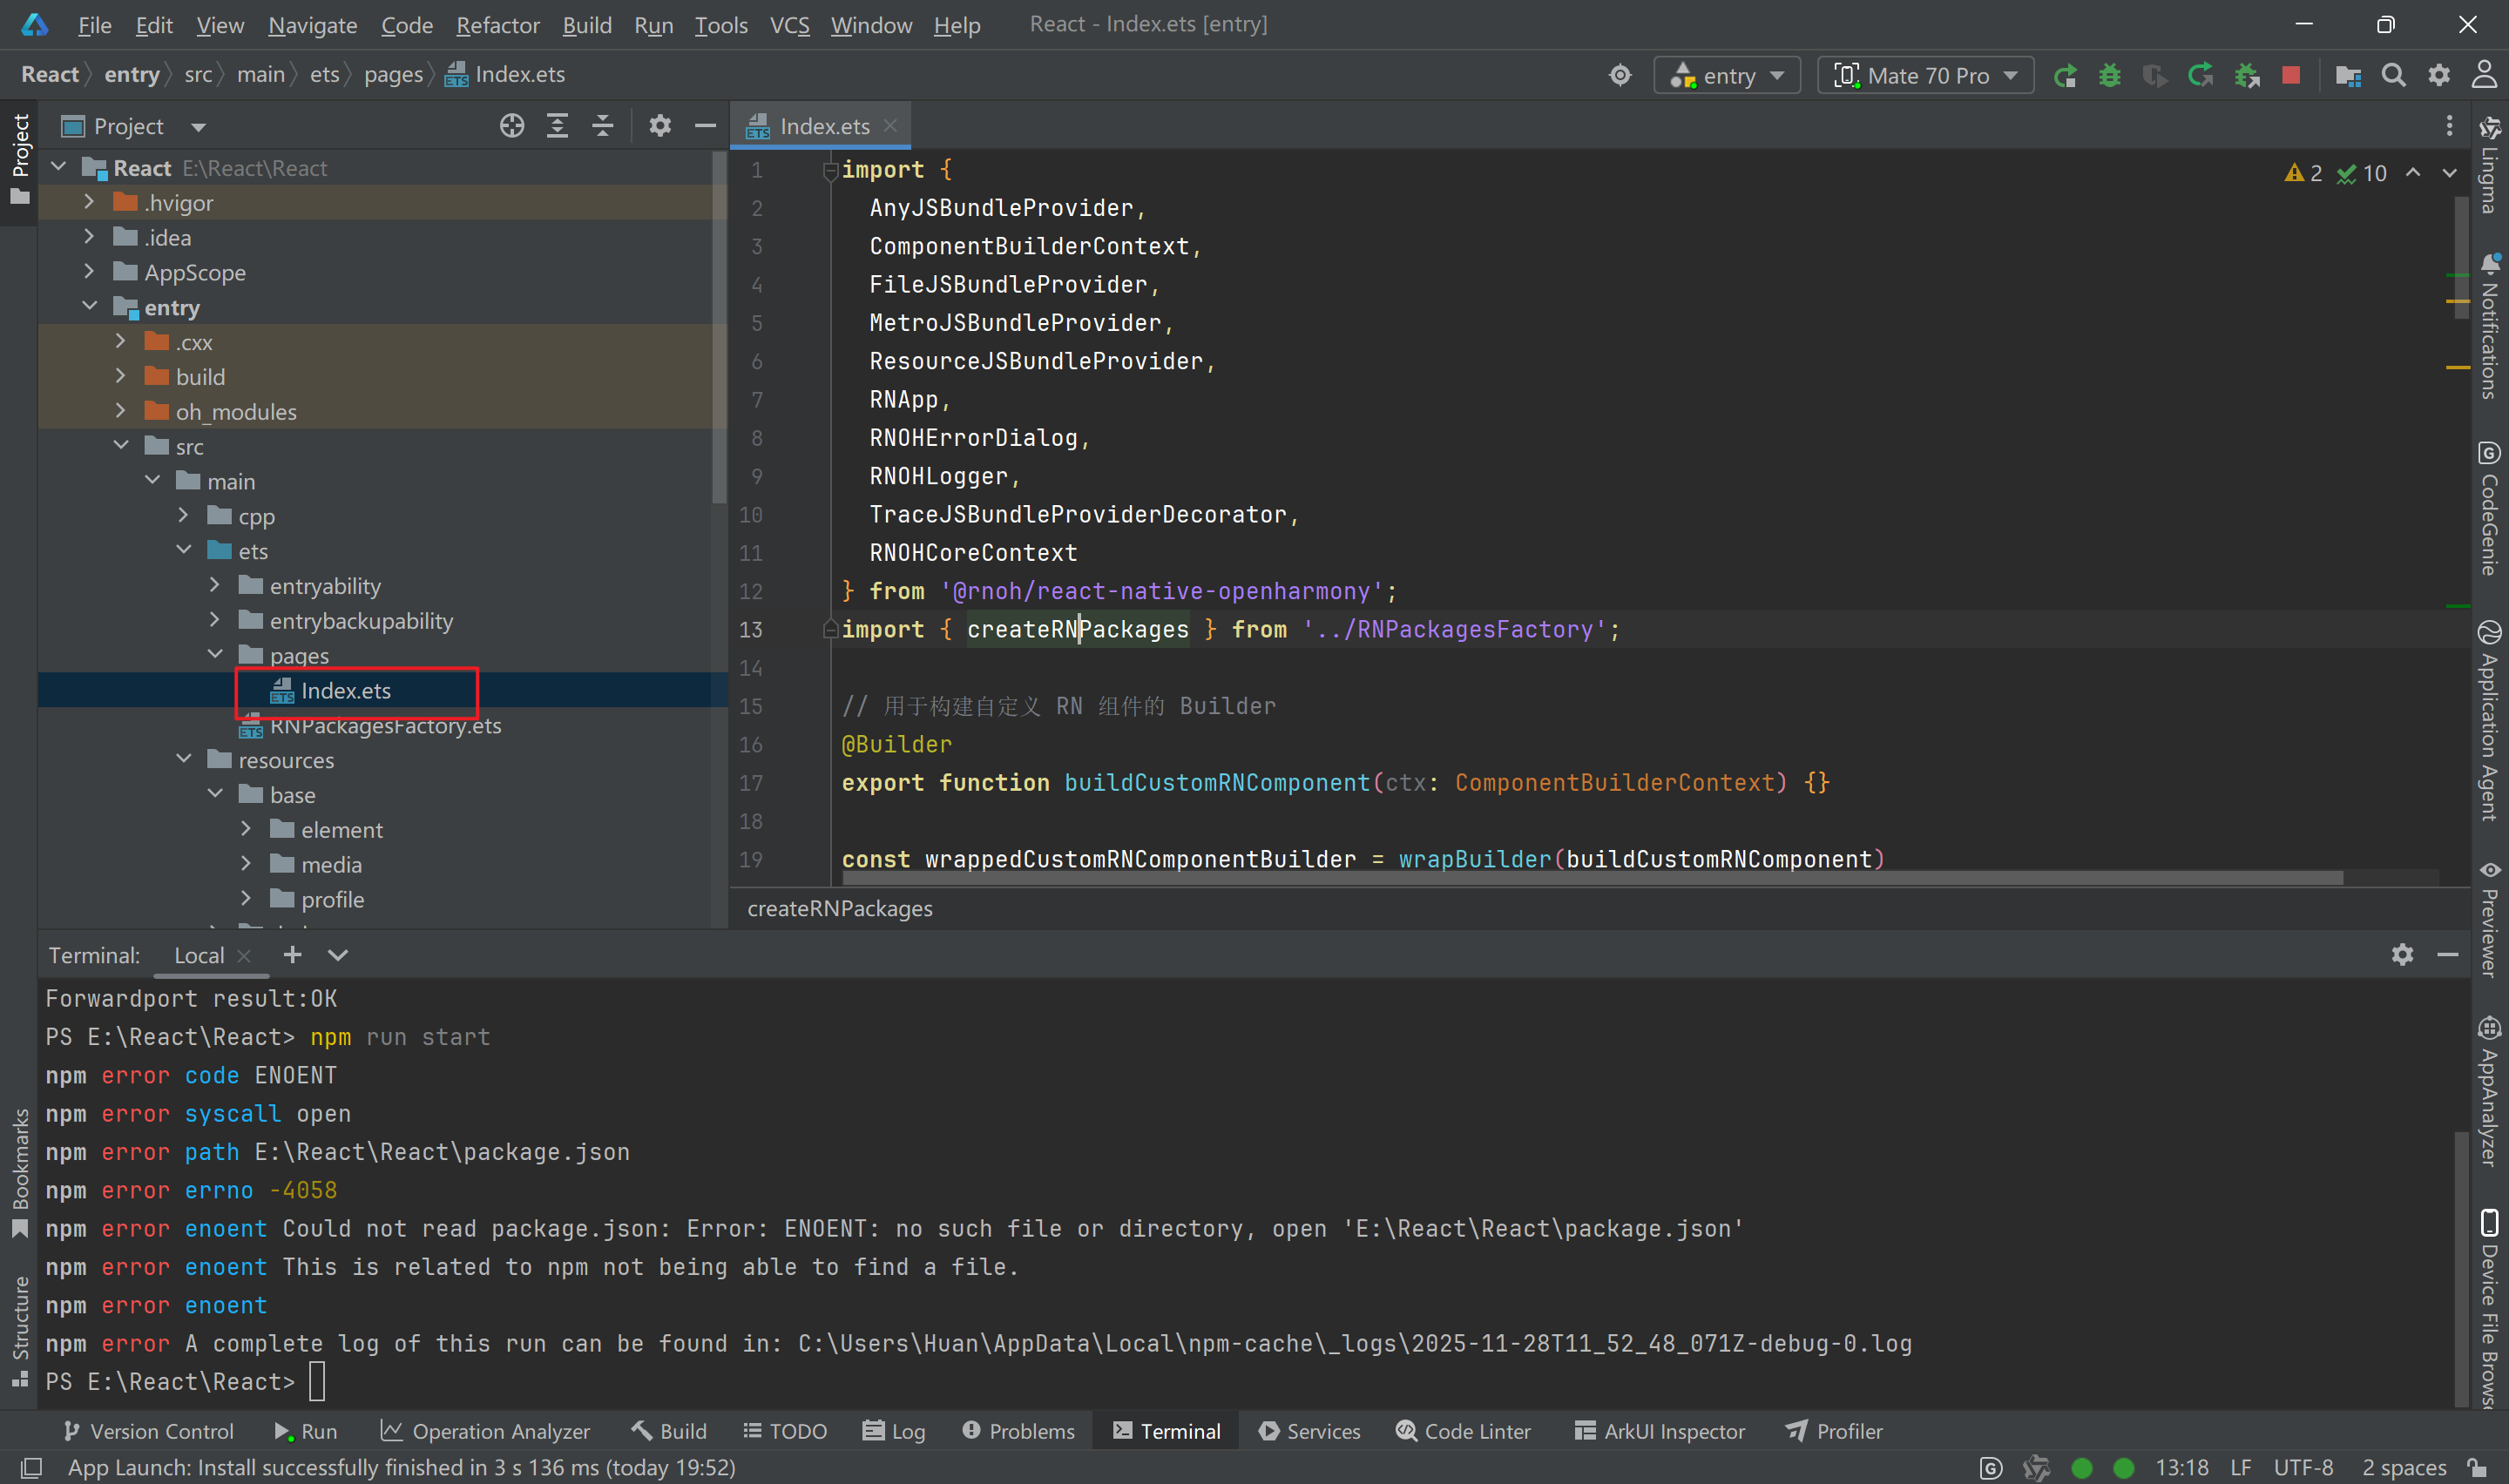
import {
  AnyJSBundleProvider,
  ComponentBuilderContext,
  FileJSBundleProvider,
  MetroJSBundleProvider,
  ResourceJSBundleProvider,
  RNApp,
  RNOHErrorDialog,
  RNOHLogger,
  TraceJSBundleProviderDecorator,
  RNOHCoreContext
} from '@rnoh/react-native-openharmony';
import { createRNPackages } from '../RNPackagesFactory';

// 用于构建自定义 RN 组件的 Builder
@Builder
export function buildCustomRNComponent(ctx: ComponentBuilderContext) {}

const wrappedCustomRNComponentBuilder = wrapBuilder(buildCustomRNComponent)

@Entry
@Component
struct Index {
  @StorageLink('RNOHCoreContext') private rnohCoreContext: RNOHCoreContext | undefined = undefined
  @State shouldShow: boolean = false
  @State rnInstanceKey: number = 0 // 用于强制重新创建 RNApp 组件
  private logger!: RNOHLogger

  aboutToAppear() {
    this.logger = this.rnohCoreContext!.logger.clone("Index")
    const stopTracing = this.logger.clone("aboutToAppear").startTracing();
    this.shouldShow = true
    stopTracing();
  }

  // 清理方法
  private cleanUp() {
    this.logger.info("Cleaning up RN instance")
    this.shouldShow = false
  }

  // 初始化方法
  private init() {
    this.logger.info("Initializing new RN instance")
    this.rnInstanceKey += 1 // 改变 key 强制重新渲染 RNApp
    this.shouldShow = true
  }

  onBackPress(): boolean | undefined {
    // 拦截物理返回键,交给 React Native 处理
    this.rnohCoreContext!.dispatchBackPress()
    return true
  }

  build() {
    Column() {
      if (this.rnohCoreContext && this.shouldShow) {
        if (this.rnohCoreContext?.isDebugModeEnabled) {
          RNOHErrorDialog({ ctx: this.rnohCoreContext })
        }
        RNApp({
          rnInstanceConfig: {
            createRNPackages,
            enableNDKTextMeasuring: true,
            enableBackgroundExecutor: false,
            enableCAPIArchitecture: true,
            arkTsComponentNames: []
          },
          initialProps: { "foo": "bar" } as Record<string, string>,
          appKey: "AwesomeProject",
          wrappedCustomRNComponentBuilder: wrappedCustomRNComponentBuilder,
          onSetUp: (rnInstance) => {
            rnInstance.enableFeatureFlag("ENABLE_RN_INSTANCE_CLEAN_UP");

            this.rnohCoreContext?.devToolsController?.eventEmitter.subscribe("RELOAD", async () => {
              this.logger.info("Hot reload triggered via RELOAD event");
              this.cleanUp();
              setTimeout(() => {
                this.init();
              }, 100);
            });
          },

          jsBundleProvider: new TraceJSBundleProviderDecorator(
            new AnyJSBundleProvider([
              new MetroJSBundleProvider(),
              new FileJSBundleProvider('/data/storage/el2/base/files/bundle.harmony.js'),
              new ResourceJSBundleProvider(this.rnohCoreContext.uiAbilityContext.resourceManager, 'hermes_bundle.hbc'),
              new ResourceJSBundleProvider(this.rnohCoreContext.uiAbilityContext.resourceManager, 'bundle.harmony.js')
            ]),
            this.rnohCoreContext.logger),
        })

      }
    }
    .height('100%')
    .width('100%')
  }
}
1.3 搭建热更新
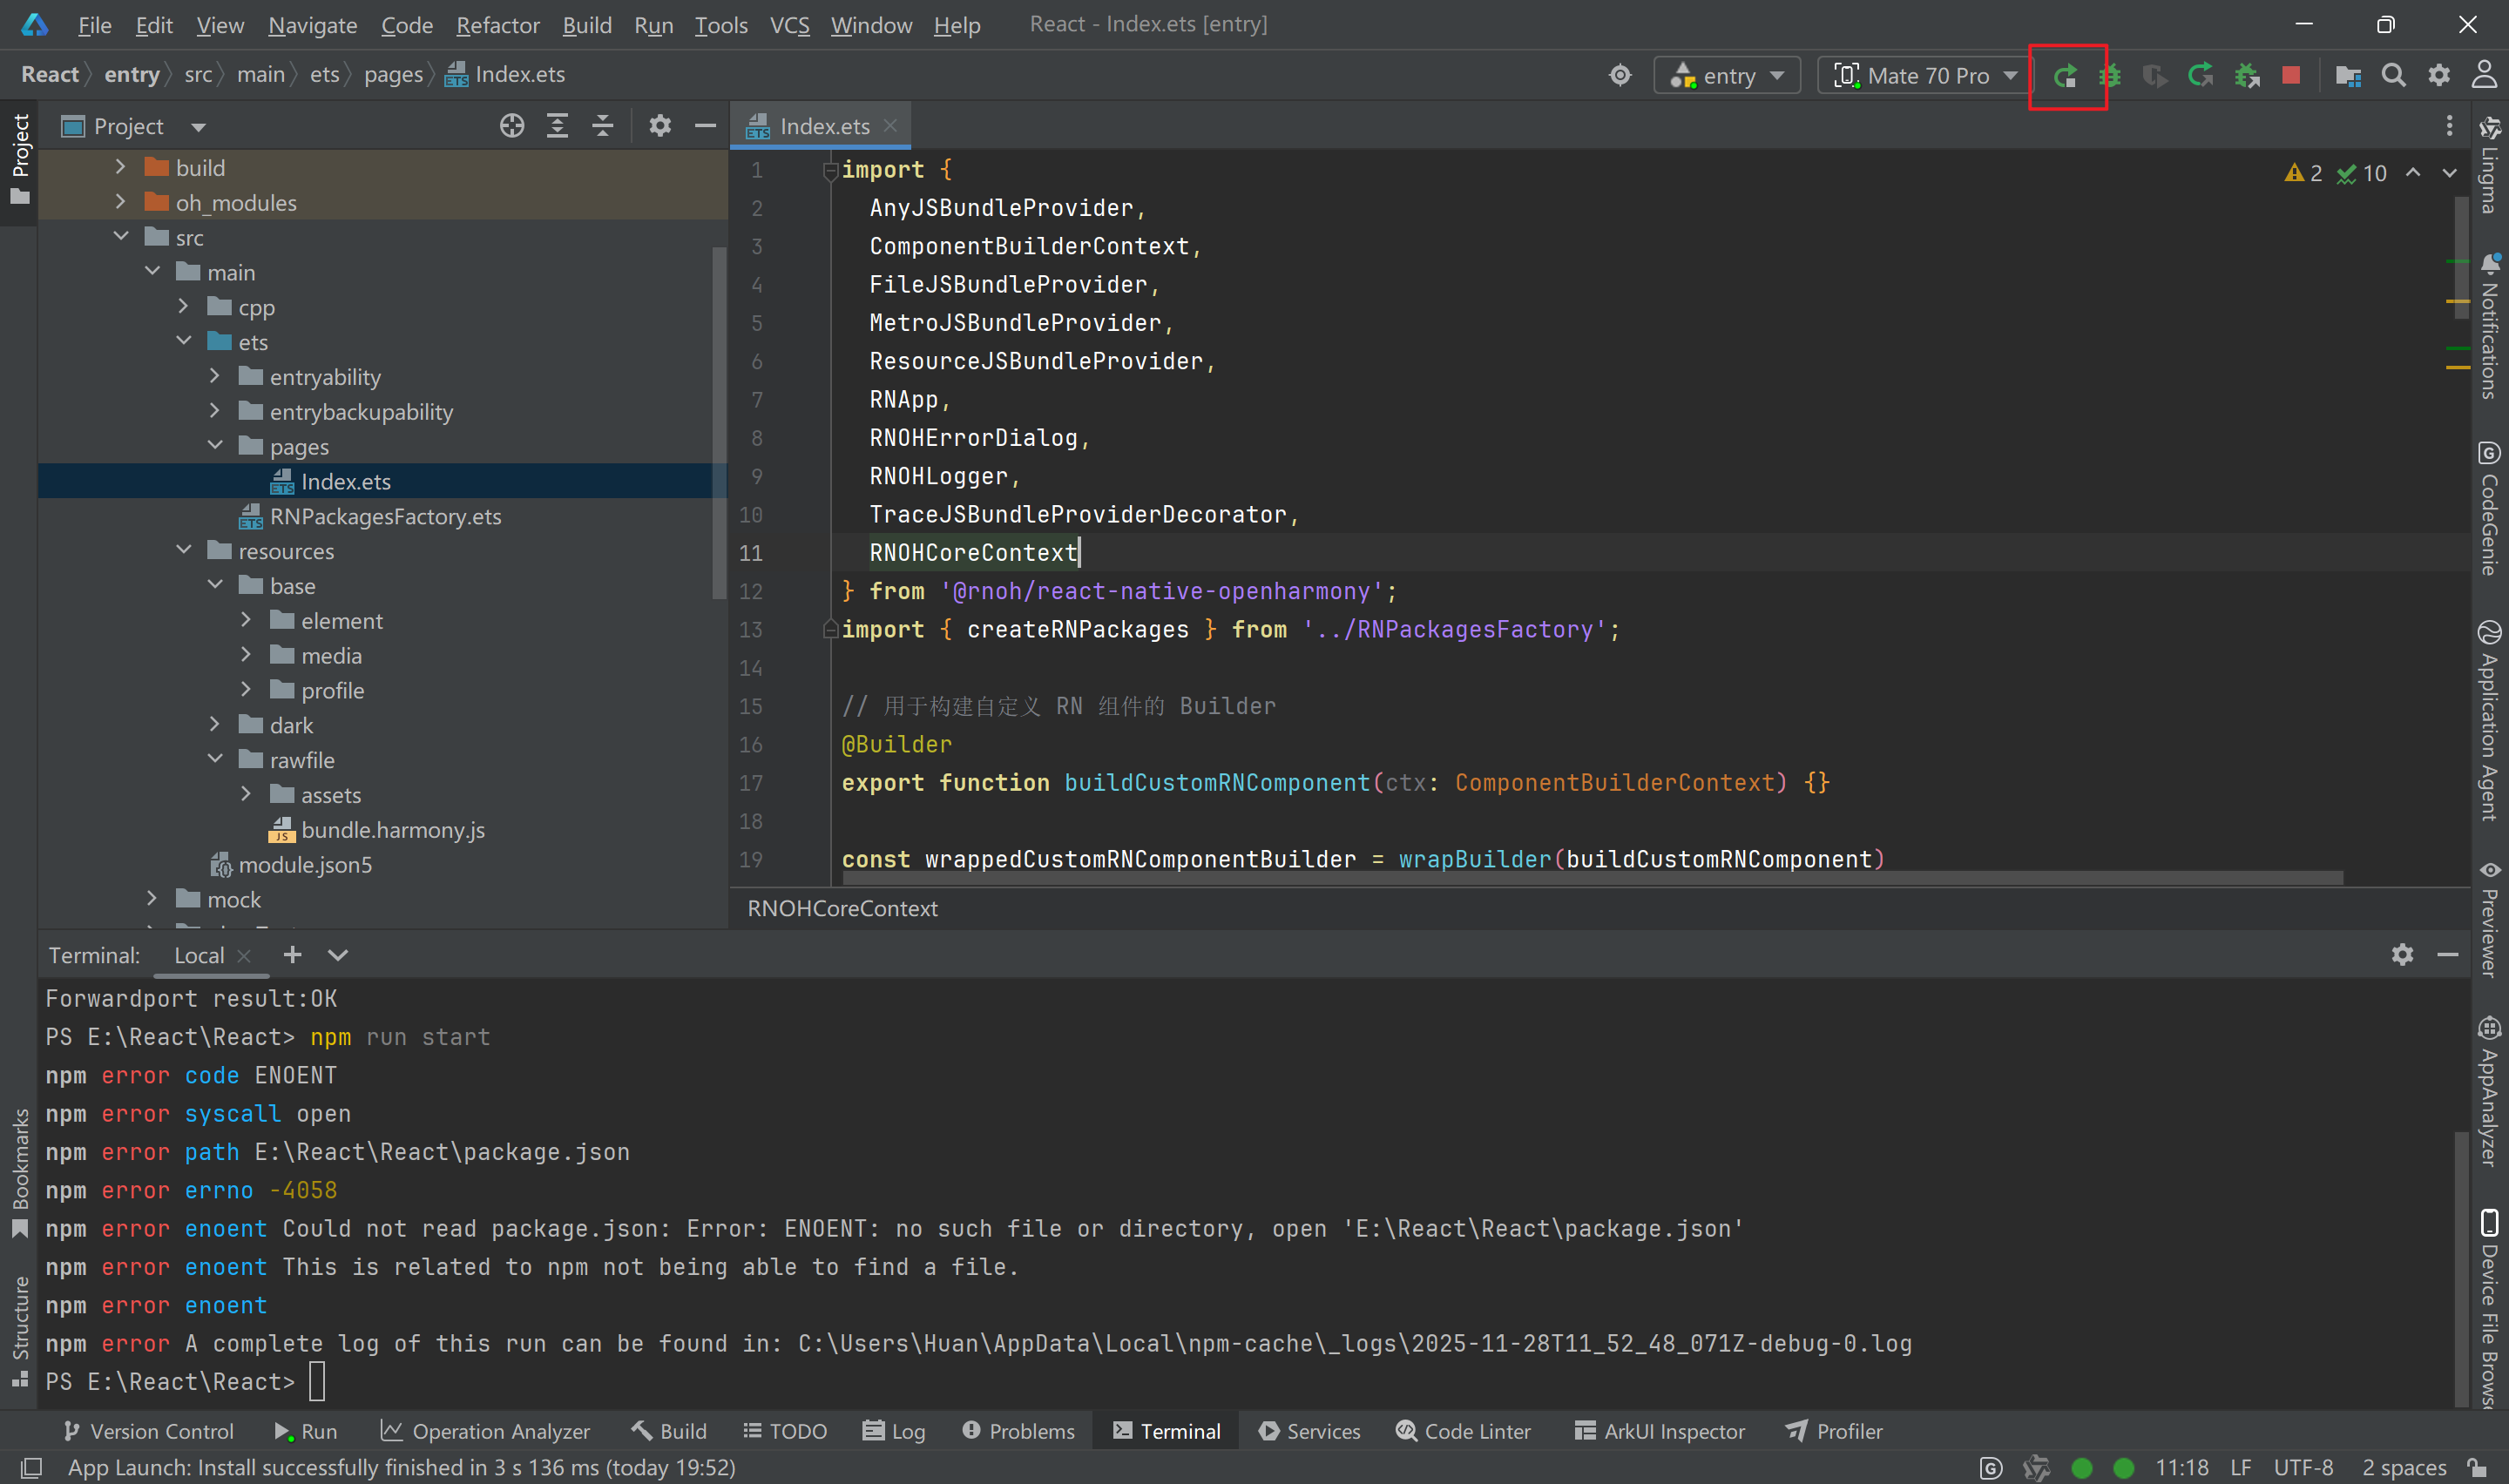
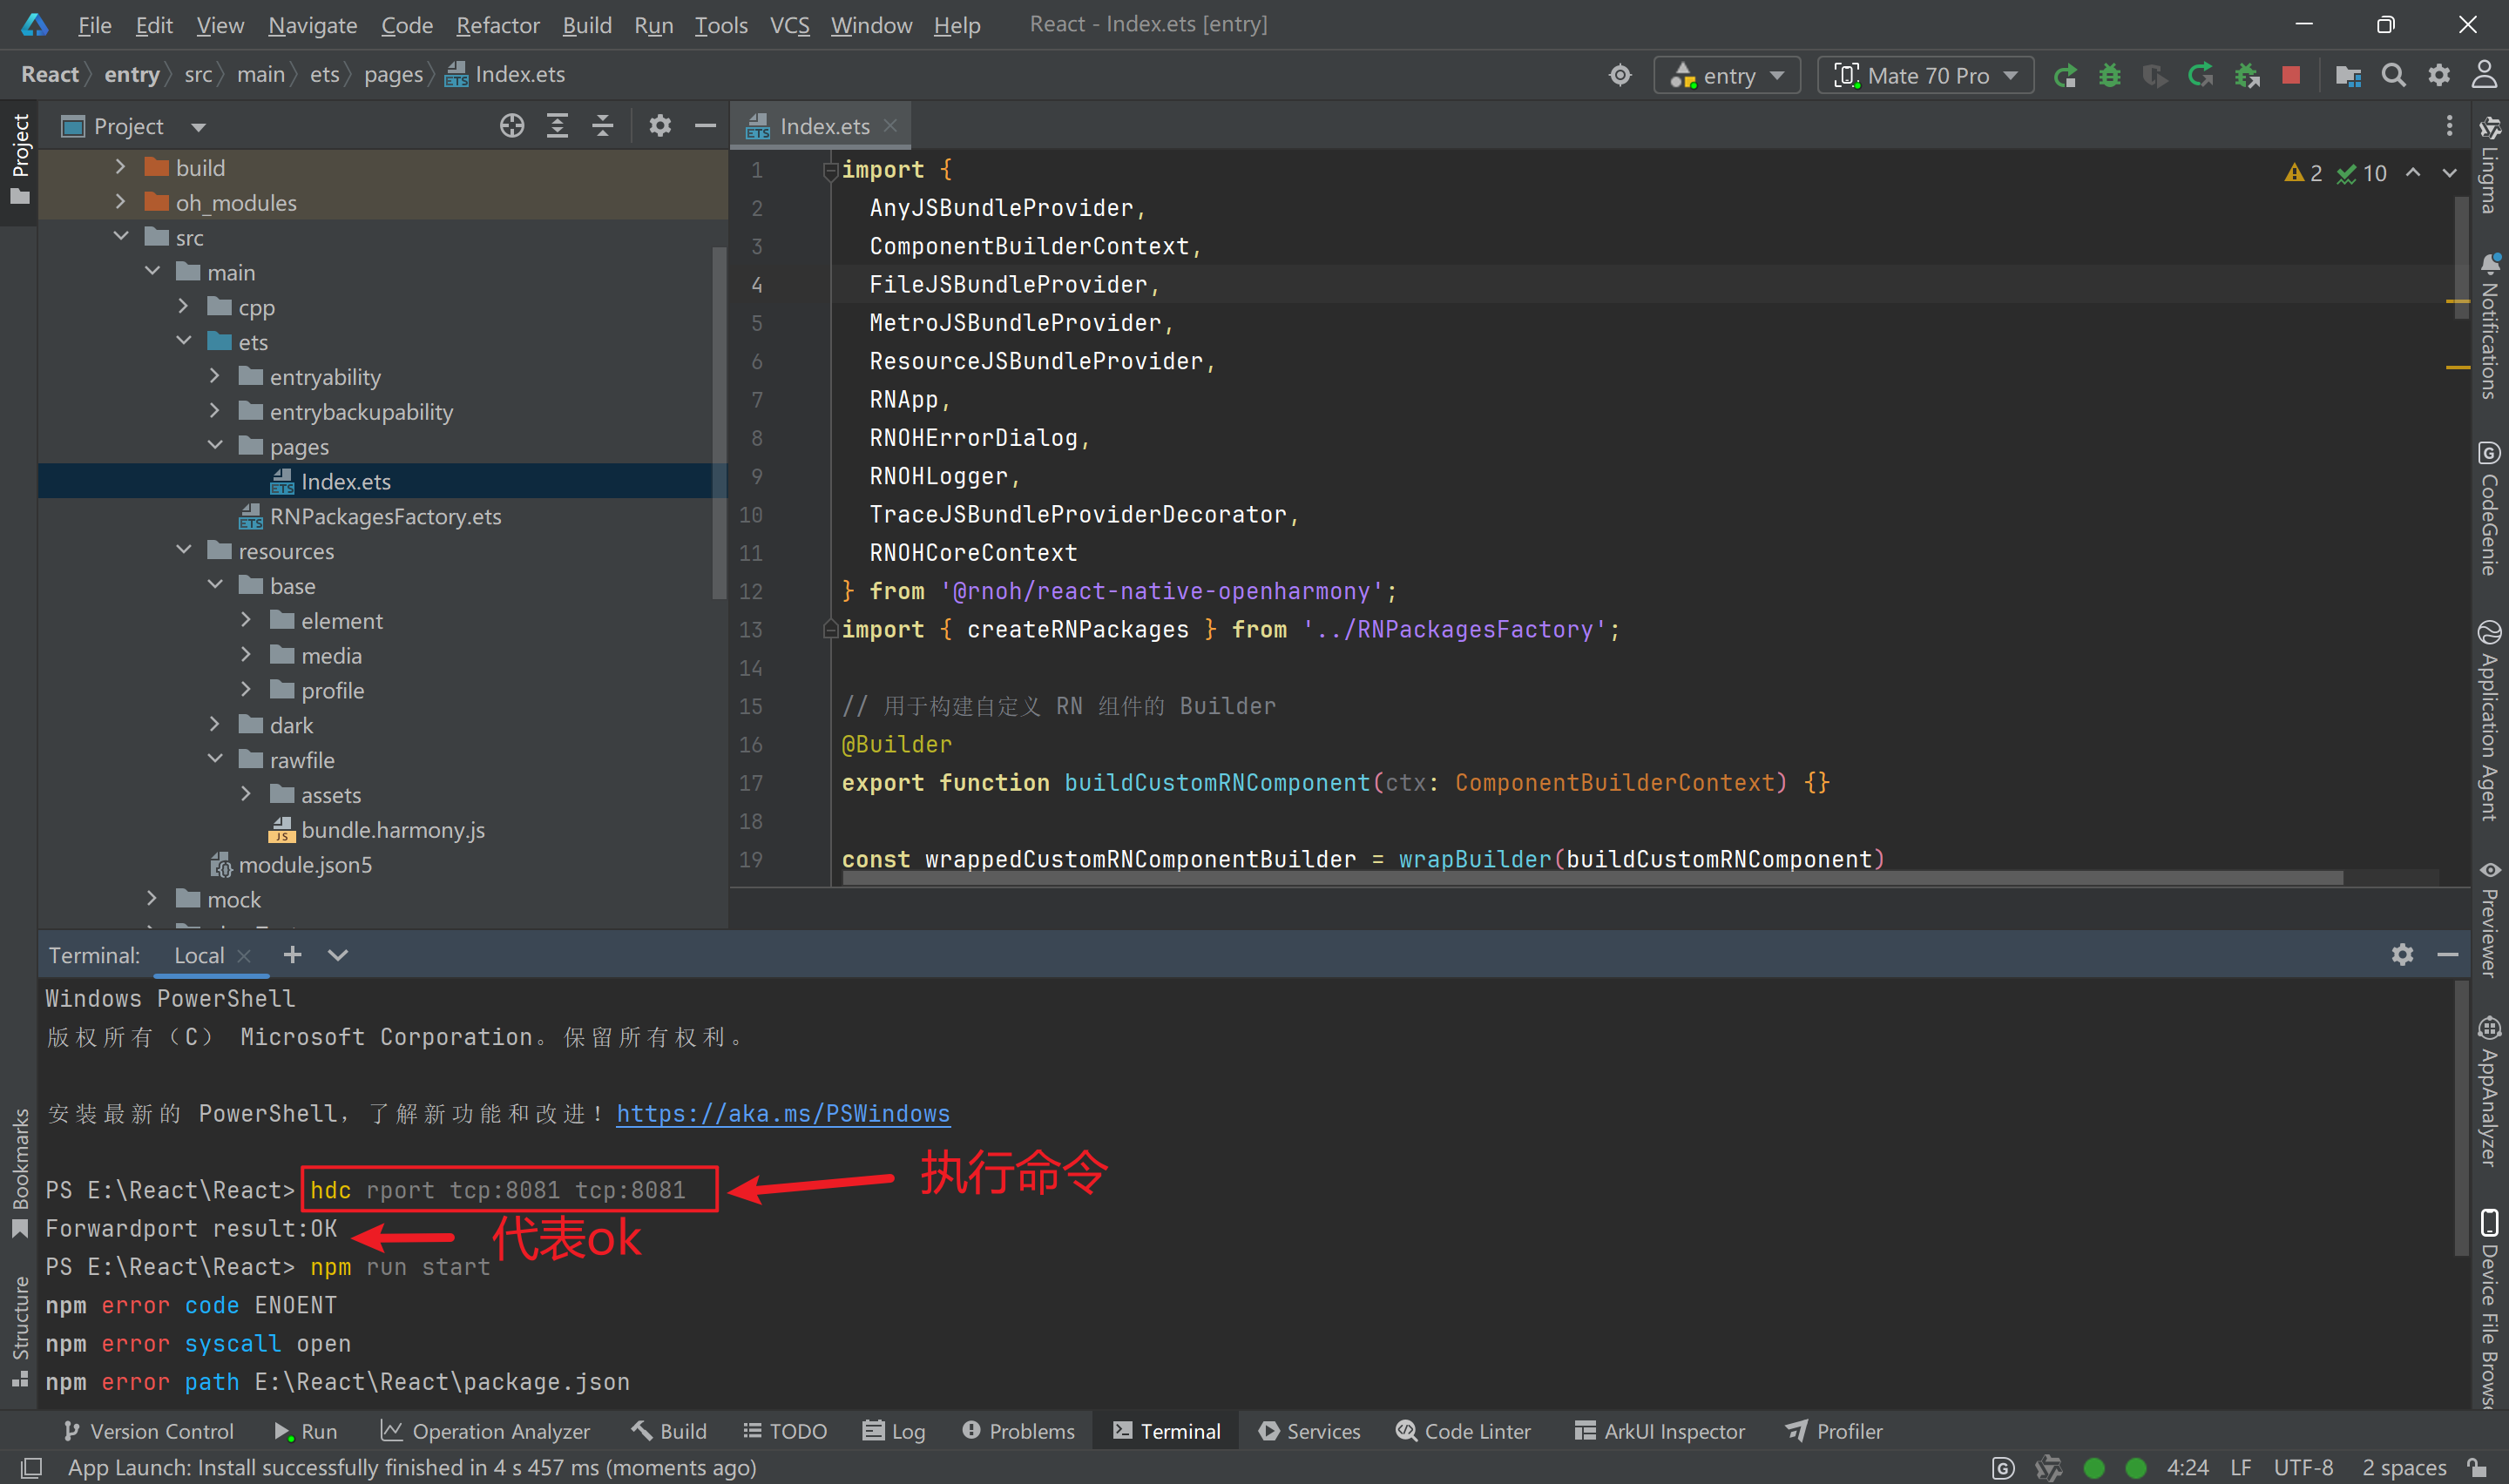
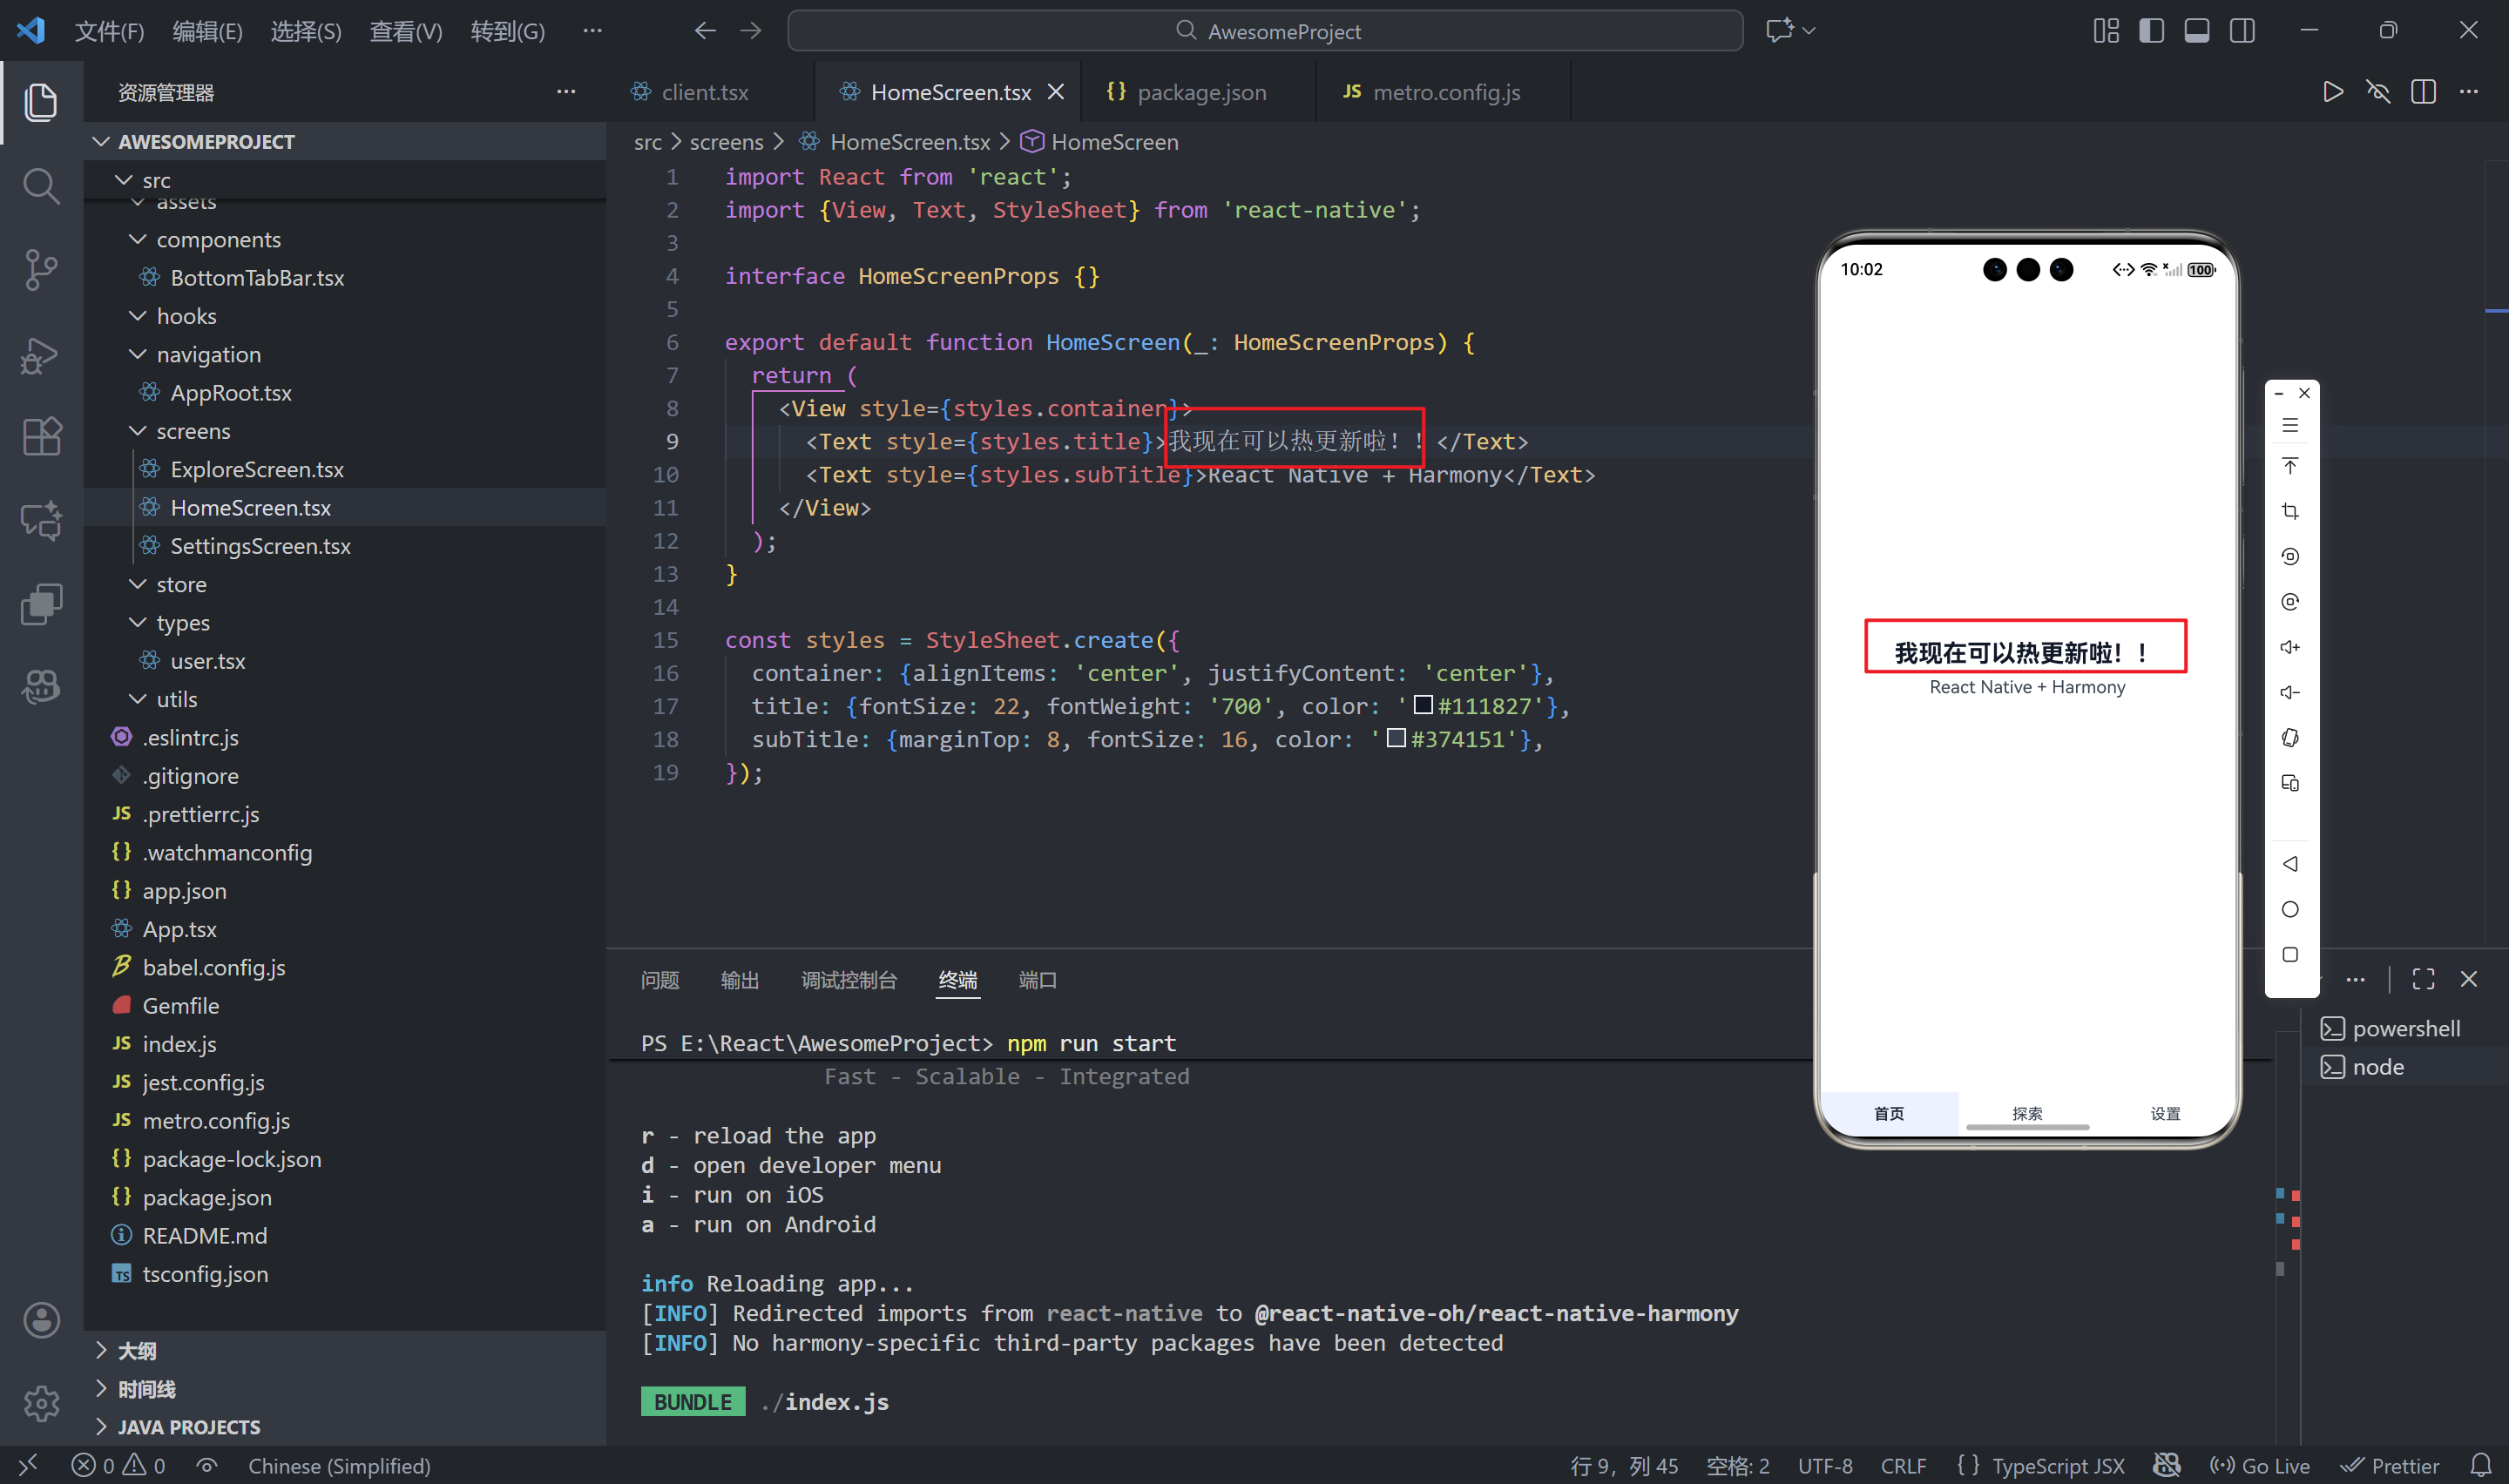
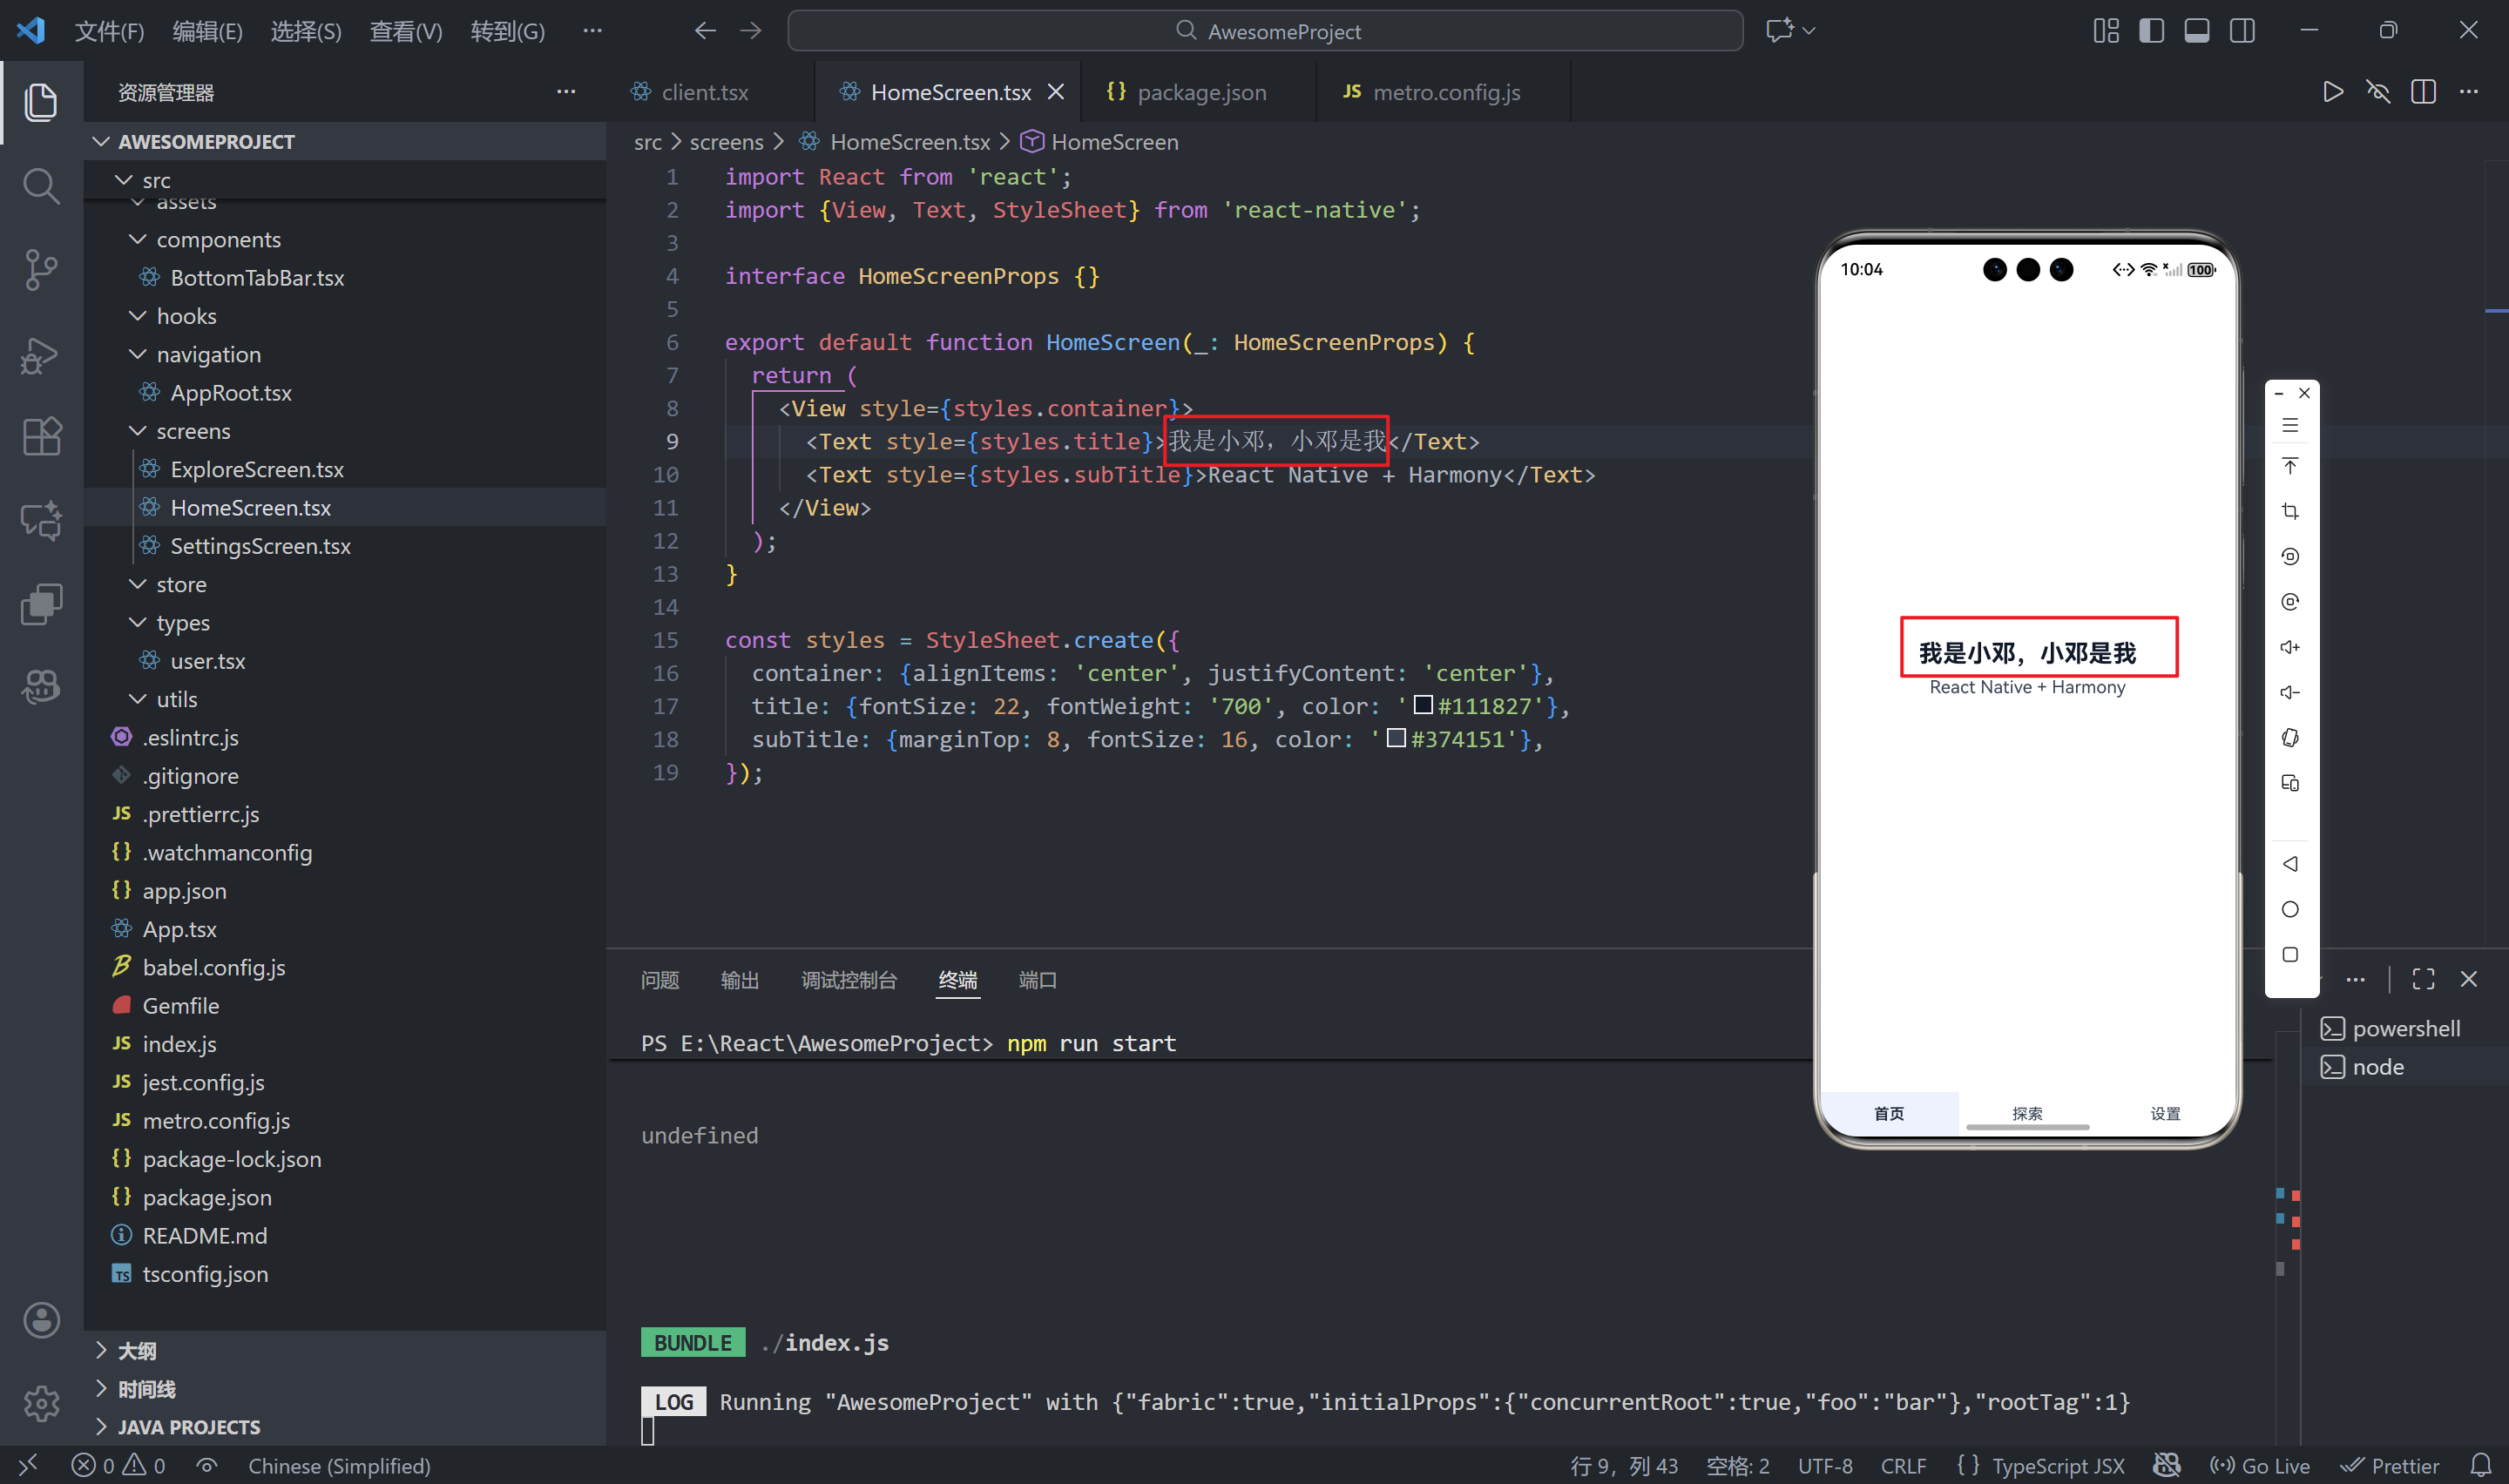
先运行自己的鸿蒙项目,当模拟器启动成功后,在终端执行'hdc rport tcp:8081 tcp:8081"的命令。(注意:必须完成这一步出现“Ok”,不然后续步骤无法实现。)。在项目的根目录,也就是(React/AwesomeProject)执行"npm run start"的命令,会出现让你选r、d、i、a的选项。我们在终端输入r即可。然后就可以改了。我们改动首页的内容"我可以热更新啦",再改成"我是小邓,小邓是我",可以看到我们几乎几秒就更新上去啦!~
r - reload the app
d - open developer menu
i - run on iOS
a - run on Android
import React from 'react';
import {View, Text, StyleSheet} from 'react-native';

interface HomeScreenProps {}

export default function HomeScreen(_: HomeScreenProps) {
  return (
    <View style={styles.container}>
      <Text style={styles.title}>我现在可以热更新啦!!</Text>
      <Text style={styles.subTitle}>React Native + Harmony</Text>
    </View>
  );
}

const styles = StyleSheet.create({
  container: {alignItems: 'center', justifyContent: 'center'},
  title: {fontSize: 22, fontWeight: '700', color: '#111827'},
  subTitle: {marginTop: 8, fontSize: 16, color: '#374151'},
});

到此,文章完结,如果有疑问,可以在评论区留言。如果我的文章对你有帮助,请点赞支持一下吧~

开源鸿蒙跨平台开发社区汇聚开发者与厂商,共建“一次开发,多端部署”的开源生态,致力于降低跨端开发门槛,推动万物智联创新。
更多推荐


 23
23 0
0- 0


 已为社区贡献23条内容

所有评论(0)