基础入门 Flutter for OpenHarmony:app_settings 系统设置跳转详解
在现代移动应用开发中,系统设置跳转是一个非常实用的功能。当用户需要修改某些系统配置(如开启定位、连接 WiFi、授权权限等)时,应用需要能够引导用户快速跳转到对应的系统设置页面。在 Flutter for OpenHarmony 应用开发中,插件正是为此而生的便捷工具。是一个用于打开设备和应用设置页面的 Flutter 插件,它允许开发者在应用程序中轻松跳转到各种系统设置页面。该插件基于原生平台的
欢迎加入开源鸿蒙跨平台社区:https://openharmonycrossplatform.csdn.net
🎯 欢迎来到 Flutter for OpenHarmony 社区!本文将深入讲解 Flutter 中 app_settings 系统设置跳转插件的使用方法,带你全面掌握在应用中跳转到各种系统设置页面的技巧。
一、app_settings 插件概述
在现代移动应用开发中,系统设置跳转是一个非常实用的功能。当用户需要修改某些系统配置(如开启定位、连接 WiFi、授权权限等)时,应用需要能够引导用户快速跳转到对应的系统设置页面。在 Flutter for OpenHarmony 应用开发中,app_settings 插件正是为此而生的便捷工具。
app_settings 是一个用于打开设备和应用设置页面的 Flutter 插件,它允许开发者在应用程序中轻松跳转到各种系统设置页面。该插件基于原生平台的 API 实现,提供了统一的跨平台接口,让开发者无需关心不同平台的实现细节。
📋 app_settings 插件特点
| 特点 | 说明 |
|---|---|
| 系统设置跳转 | 支持打开设备的各种系统设置页面,如 WiFi、定位、蓝牙等 |
| 应用设置跳转 | 支持打开应用自身的设置页面 |
| 设置面板支持 | 支持打开系统设置面板(如音量、网络等) |
| 跨平台支持 | 统一的 API 接口,支持 Android、iOS、macOS 和 OpenHarmony |
| 丰富的设置类型 | 提供多种设置类型枚举,满足不同场景需求 |
| 简单易用 | 一行代码即可实现设置页面跳转 |
为什么需要系统设置跳转功能?
系统设置跳转功能在移动应用开发中有着广泛的应用场景,其重要性体现在以下几个方面:
1. 权限引导
当应用需要某些权限才能正常工作时,用户可能已经拒绝了权限请求。此时,应用需要引导用户前往系统设置页面手动开启权限。例如,地图应用需要定位权限,如果用户拒绝了权限请求,应用可以引导用户前往定位设置页面。
2. 功能配置
某些应用功能依赖于系统设置。例如,下载功能可能需要用户先连接 WiFi,定位功能需要用户开启定位服务。通过设置跳转,用户可以快速完成必要的配置。
3. 问题排查
当应用出现问题时,可能需要用户检查某些系统设置。例如,网络连接失败时,引导用户检查 WiFi 设置;定位失败时,引导用户检查定位服务是否开启。
4. 用户体验优化
通过提供快捷的设置入口,用户无需手动在系统设置中寻找对应的选项,大大提升了用户体验。这种"一键直达"的方式减少了用户的操作步骤,提高了效率。
5. 合规要求
某些应用审核规范要求应用在权限被拒绝后,必须提供引导用户前往设置页面的入口。app_settings 插件可以帮助开发者轻松满足这一要求。
💡 使用场景:权限引导、WiFi 配置、定位服务开启、蓝牙连接、通知设置、应用详情查看等。
二、OpenHarmony 平台适配说明
2.1 兼容性信息
本项目基于 app_settings@5.1.1 开发,适配 Flutter 3.27.5-ohos-1.0.4。OpenHarmony 版本的 app_settings 插件由开源鸿蒙社区进行适配和维护,确保在鸿蒙设备上能够正常工作。
2.2 支持的设置类型
在 OpenHarmony 平台上,app_settings 插件支持以下设置类型:
| 设置类型 | 描述 |
|---|---|
| AppSettingsType.wifi | WiFi 设置 |
| AppSettingsType.location | 位置设置 |
| AppSettingsType.bluetooth | 蓝牙设置 |
| AppSettingsType.notification | 通知设置 |
| AppSettingsType.display | 显示设置 |
| AppSettingsType.settings | 应用设置 |
| AppSettingsType.security | 安全设置 |
| AppSettingsType.sound | 声音设置 |
| AppSettingsType.batteryOptimization | 电池优化设置 |
| AppSettingsType.nfc | NFC 设置 |
| AppSettingsType.vpn | VPN 设置 |
| AppSettingsType.date | 日期设置 |
| AppSettingsType.locale | 语言设置 |
| AppSettingsType.internalStorage | 内部存储设置 |
| AppSettingsType.accessibility | 无障碍设置 |
2.3 平台差异说明
由于 OpenHarmony 系统的特殊性,app_settings 插件在某些功能上与 Android/iOS 平台存在差异:
设置页面可用性:某些设置类型可能在特定设备或系统版本上不可用。如果指定的设置类型在当前设备上不支持,插件会尝试打开通用设置页面或返回失败。
权限要求:某些设置页面的跳转可能需要特定的权限。例如,跳转到定位设置可能需要应用具有定位相关权限。
用户体验差异:不同平台的设置页面布局和交互方式可能不同,开发者需要在设计时考虑这些差异。
三、项目配置与安装
3.1 添加依赖配置
首先,需要在你的 Flutter 项目的 pubspec.yaml 文件中添加 app_settings 依赖。
打开项目根目录下的 pubspec.yaml 文件,找到 dependencies 部分,添加以下配置:
dependencies:
  flutter:
    sdk: flutter

  # 添加 app_settings 依赖(OpenHarmony 适配版本)
  app_settings:
    git:
      url: "https://atomgit.com/openharmony-sig/fluttertpc_app_settings.git"

dev_dependencies:
  # app_settings 鸿蒙平台支持
  app_settings_ohos:
    git:
      url: "https://atomgit.com/openharmony-sig/fluttertpc_app_settings.git"
      path: ./ohos
配置说明:
- 使用 git 方式引用开源鸿蒙适配的 fluttertpc_app_settings 仓库
url:指定 GitCode 托管的仓库地址app_settings_ohos:鸿蒙平台的原生实现,作为 dev_dependency 引入- 本项目基于
app_settings@5.1.1开发,适配 Flutter 3.27.5-ohos-1.0.4
⚠️ 重要:对于 OpenHarmony 平台,必须使用 git 方式引用适配版本,不能直接使用 pub.dev 的版本号。这是因为 pub.dev 上的官方版本可能尚未支持 OpenHarmony 平台,或者存在兼容性问题。同时需要添加
app_settings_ohos作为 dev_dependency 以确保鸿蒙平台功能正常。
3.2 下载依赖
配置完成后,需要在项目根目录执行以下命令下载依赖:
flutter pub get
执行成功后,你会看到类似以下的输出:
Running "flutter pub get" in my_cross_platform_app...
Resolving dependencies...
Got dependencies!
3.3 权限配置
app_settings 插件在 OpenHarmony 平台上通常不需要特殊权限。跳转到系统设置页面是系统提供的标准功能,应用无需额外权限即可使用。
ohos/entry/src/main/module.json5(通常无需配置权限):
{
  "module": {
    "requestPermissions": []
  }
}
💡 提示:app_settings 插件主要是调用系统的设置页面跳转功能,通常不需要额外的权限配置。但如果你的应用有其他功能需求,请根据实际情况配置相应权限。
四、app_settings 基础用法
4.1 导入库
在使用 app_settings 之前,需要先导入库:
import 'package:app_settings/app_settings.dart';
导入后,你就可以使用 app_settings 提供的所有 API 了。这个库的设计非常简洁,主要通过 AppSettings 类的静态方法来实现各种设置页面的跳转。
4.2 打开 WiFi 设置
WiFi 设置是最常用的跳转目标之一。当应用需要网络连接时,可以引导用户前往 WiFi 设置页面:
// 打开 WiFi 设置页面
AppSettings.openAppSettings(type: AppSettingsType.wifi);
这个方法会打开系统的 WiFi 设置页面,用户可以在这里查看可用的 WiFi 网络、连接或断开网络、修改网络配置等。
4.3 打开定位设置
定位设置对于地图、导航、外卖等类型的应用非常重要。当用户关闭了定位服务或拒绝了定位权限时,可以引导用户前往定位设置:
// 打开定位设置页面
AppSettings.openAppSettings(type: AppSettingsType.location);
在定位设置页面,用户可以开启或关闭定位服务,设置定位模式(高精度、省电、仅设备),以及管理应用的定位权限。
4.4 打开蓝牙设置
对于需要蓝牙连接的应用(如智能设备配对、文件传输等),可以引导用户前往蓝牙设置:
// 打开蓝牙设置页面
AppSettings.openAppSettings(type: AppSettingsType.bluetooth);
在蓝牙设置页面,用户可以开启或关闭蓝牙、搜索和配对设备、管理已配对的设备等。
4.5 打开通知设置
通知设置对于需要推送消息的应用非常重要。如果用户关闭了应用的通知权限,可以引导用户前往通知设置页面重新开启:
// 打开通知设置页面
AppSettings.openAppSettings(type: AppSettingsType.notification);
4.6 打开应用设置
应用设置页面通常包含应用的详细信息、权限管理、存储使用情况等。这是引导用户修改应用权限的最佳入口:
// 打开应用设置页面
AppSettings.openAppSettings(type: AppSettingsType.settings);
在应用设置页面,用户可以查看应用的版本信息、清除应用数据、管理应用权限等。这是权限引导场景中最常用的跳转目标。
4.7 打开显示设置
显示设置允许用户调整屏幕亮度、字体大小、显示模式等:
// 打开显示设置页面
AppSettings.openAppSettings(type: AppSettingsType.display);
4.8 打开声音设置
声音设置允许用户调整铃声、通知音、媒体音量等:
// 打开声音设置页面
AppSettings.openAppSettings(type: AppSettingsType.sound);
五、高级用法
5.1 打开设置面板
除了打开完整的设置页面,app_settings 还支持打开设置面板。设置面板是一种轻量级的设置界面,允许用户在不离开当前应用的情况下快速调整某些设置:
// 打开音量设置面板
AppSettings.openAppSettingsPanel(AppSettingsPanelType.volume);

// 打开网络设置面板
AppSettings.openAppSettingsPanel(AppSettingsPanelType.internetConnectivity);
设置面板类型包括:
| 面板类型 | 描述 |
|---|---|
| AppSettingsPanelType.volume | 音量面板 |
| AppSettingsPanelType.internetConnectivity | 网络连接面板 |
| AppSettingsPanelType.nfc | NFC 面板 |
| AppSettingsPanelType.wifi | WiFi 面板 |
⚠️ 注意:设置面板功能在某些平台或设备上可能不支持,使用时需要进行兼容性处理。
5.2 在新任务中打开设置
在 Android 平台上,可以通过设置 asAnotherTask 参数在新任务中打开设置页面:
// 在新任务中打开设置页面
AppSettings.openAppSettings(
  type: AppSettingsType.wifi,
  asAnotherTask: true,
);
这个参数在 Android 平台上有效,可以让设置页面在独立的任务中打开,用户可以通过最近任务列表切换回应用。
5.3 错误处理
虽然设置跳转通常不会失败,但在某些情况下可能会出现问题。建议添加适当的错误处理:
Future<void> openWifiSettings() async {
  try {
    await AppSettings.openAppSettings(type: AppSettingsType.wifi);
  } catch (e) {
    debugPrint('打开 WiFi 设置失败: $e');
    // 显示错误提示
    if (mounted) {
      ScaffoldMessenger.of(context).showSnackBar(
        const SnackBar(content: Text('无法打开设置页面')),
      );
    }
  }
}
5.4 结合权限检查使用
app_settings 最常见的使用场景是与权限检查结合。当权限被拒绝时,引导用户前往设置页面:
Future<void> checkAndRequestPermission() async {
  final status = await Permission.location.status;

  if (status.isDenied) {
    // 权限被拒绝,请求权限
    final result = await Permission.location.request();
    if (result.isPermanentlyDenied) {
      // 权限被永久拒绝,引导用户前往设置
      _showPermissionDialog();
    }
  } else if (status.isPermanentlyDenied) {
    // 权限已被永久拒绝,引导用户前往设置
    _showPermissionDialog();
  } else if (status.isGranted) {
    // 权限已授予,执行相关功能
    _startLocationService();
  }
}

void _showPermissionDialog() {
  showDialog(
    context: context,
    builder: (context) => AlertDialog(
      title: const Text('需要定位权限'),
      content: const Text('请在设置中开启定位权限以使用此功能'),
      actions: [
        TextButton(
          onPressed: () => Navigator.pop(context),
          child: const Text('取消'),
        ),
        TextButton(
          onPressed: () {
            Navigator.pop(context);
            AppSettings.openAppSettings(type: AppSettingsType.location);
          },
          child: const Text('去设置'),
        ),
      ],
    ),
  );
}
六、实际应用场景
6.1 权限引导场景
当应用需要权限但用户拒绝时,引导用户前往设置页面是最常见的使用场景:
class PermissionGuideWidget extends StatelessWidget {
const PermissionGuideWidget({super.key});
Widget build(BuildContext context) {
return AlertDialog(
title: const Text('权限被拒绝'),
content: const Column(
mainAxisSize: MainAxisSize.min,
crossAxisAlignment: CrossAxisAlignment.start,
children: [
Text('应用需要以下权限才能正常工作:'),
SizedBox(height: 10),
Text('• 定位权限:用于提供位置相关服务'),
Text('• 相机权限:用于拍照和扫码功能'),
],
),
actions: [
TextButton(
onPressed: () => Navigator.pop(context),
child: const Text('取消'),
),
ElevatedButton(
onPressed: () {
Navigator.pop(context);
AppSettings.openAppSettings(type: AppSettingsType.settings);
},
child: const Text('前往设置'),
),
],
);
}
}
6.2 网络异常处理
当应用检测到网络异常时,可以引导用户检查网络设置:
class NetworkErrorHandler {
  static void showNetworkErrorDialog(BuildContext context) {
    showDialog(
      context: context,
      builder: (context) => AlertDialog(
        title: const Text('网络连接失败'),
        content: const Text('请检查您的网络连接,确保 WiFi 或移动数据已开启。'),
        actions: [
          TextButton(
            onPressed: () => Navigator.pop(context),
            child: const Text('取消'),
          ),
          ElevatedButton(
            onPressed: () {
              Navigator.pop(context);
              AppSettings.openAppSettings(type: AppSettingsType.wifi);
            },
            child: const Text('检查网络'),
          ),
        ],
      ),
    );
  }
}
6.3 定位服务检查
对于需要定位的应用,可以检测定位服务状态并引导用户开启:
class LocationServiceHandler {
  static Future<bool> checkAndPromptLocationService(BuildContext context) async {
    bool serviceEnabled = await Geolocator.isLocationServiceEnabled();

    if (!serviceEnabled) {
      if (context.mounted) {
        showDialog(
          context: context,
          builder: (context) => AlertDialog(
            title: const Text('定位服务未开启'),
            content: const Text('请在设置中开启定位服务以使用此功能。'),
            actions: [
              TextButton(
                onPressed: () => Navigator.pop(context),
                child: const Text('取消'),
              ),
              ElevatedButton(
                onPressed: () {
                  Navigator.pop(context);
                  AppSettings.openAppSettings(type: AppSettingsType.location);
                },
                child: const Text('去设置'),
              ),
            ],
          ),
        );
      }
      return false;
    }
    return true;
  }
}
6.4 设置中心页面
在应用的设置页面中,可以提供快捷的系统设置入口:
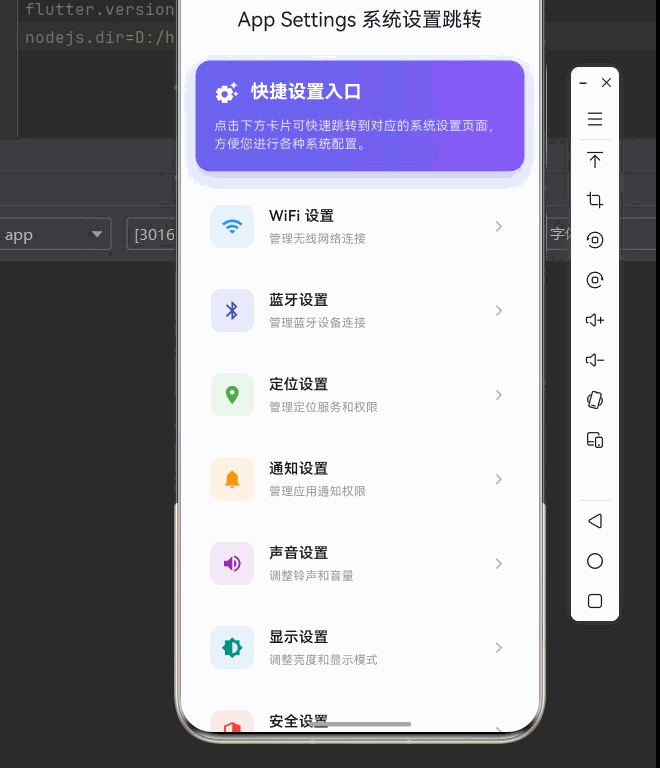
class SettingsCenterPage extends StatelessWidget {
const SettingsCenterPage({super.key});
Widget build(BuildContext context) {
return Scaffold(
appBar: AppBar(title: const Text('设置中心')),
body: ListView(
children: [
_buildSectionHeader('网络设置'),
_buildSettingTile(
icon: Icons.wifi,
title: 'WiFi 设置',
subtitle: '管理无线网络连接',
onTap: () => AppSettings.openAppSettings(type: AppSettingsType.wifi),
),
_buildSettingTile(
icon: Icons.bluetooth,
title: '蓝牙设置',
subtitle: '管理蓝牙设备',
onTap: () => AppSettings.openAppSettings(type: AppSettingsType.bluetooth),
),
_buildSectionHeader('设备设置'),
_buildSettingTile(
icon: Icons.location_on,
title: '定位设置',
subtitle: '管理定位服务',
onTap: () => AppSettings.openAppSettings(type: AppSettingsType.location),
),
_buildSettingTile(
icon: Icons.notifications,
title: '通知设置',
subtitle: '管理应用通知',
onTap: () => AppSettings.openAppSettings(type: AppSettingsType.notification),
),
_buildSettingTile(
icon: Icons.volume_up,
title: '声音设置',
subtitle: '调整音量和铃声',
onTap: () => AppSettings.openAppSettings(type: AppSettingsType.sound),
),
_buildSettingTile(
icon: Icons.brightness_6,
title: '显示设置',
subtitle: '调整亮度和显示',
onTap: () => AppSettings.openAppSettings(type: AppSettingsType.display),
),
_buildSectionHeader('应用设置'),
_buildSettingTile(
icon: Icons.apps,
title: '应用信息',
subtitle: '查看应用详情和权限',
onTap: () => AppSettings.openAppSettings(type: AppSettingsType.settings),
),
],
),
);
}
Widget _buildSectionHeader(String title) {
return Padding(
padding: const EdgeInsets.fromLTRB(16, 20, 16, 8),
child: Text(
title,
style: const TextStyle(
color: Colors.grey,
fontSize: 12,
fontWeight: FontWeight.bold,
),
),
);
}
Widget _buildSettingTile({
required IconData icon,
required String title,
required String subtitle,
required VoidCallback onTap,
}) {
return ListTile(
leading: Icon(icon, color: Colors.blue),
title: Text(title),
subtitle: Text(subtitle, style: const TextStyle(color: Colors.grey)),
trailing: const Icon(Icons.chevron_right),
onTap: onTap,
);
}
}
七、完整示例代码
下面是一个完整的示例应用,展示了 app_settings 插件的各种用法:
import 'package:flutter/material.dart';
import 'package:app_settings/app_settings.dart';
void main() {
runApp(const MyApp());
}
class MyApp extends StatelessWidget {
const MyApp({super.key});
Widget build(BuildContext context) {
return MaterialApp(
title: 'App Settings 示例',
debugShowCheckedModeBanner: false,
theme: ThemeData(
colorScheme: ColorScheme.fromSeed(seedColor: const Color(0xFF6366F1)),
useMaterial3: true,
),
home: const AppSettingsDemoPage(),
);
}
}
class AppSettingsDemoPage extends StatefulWidget {
const AppSettingsDemoPage({super.key});
State<AppSettingsDemoPage> createState() => _AppSettingsDemoPageState();
}
class _AppSettingsDemoPageState extends State<AppSettingsDemoPage> {
final List<_SettingItem> _settings = [
_SettingItem(
icon: Icons.wifi,
title: 'WiFi 设置',
subtitle: '管理无线网络连接',
type: AppSettingsType.wifi,
color: Colors.blue,
),
_SettingItem(
icon: Icons.bluetooth,
title: '蓝牙设置',
subtitle: '管理蓝牙设备连接',
type: AppSettingsType.bluetooth,
color: Colors.indigo,
),
_SettingItem(
icon: Icons.location_on,
title: '定位设置',
subtitle: '管理定位服务和权限',
type: AppSettingsType.location,
color: Colors.green,
),
_SettingItem(
icon: Icons.notifications,
title: '通知设置',
subtitle: '管理应用通知权限',
type: AppSettingsType.notification,
color: Colors.orange,
),
_SettingItem(
icon: Icons.volume_up,
title: '声音设置',
subtitle: '调整铃声和音量',
type: AppSettingsType.sound,
color: Colors.purple,
),
_SettingItem(
icon: Icons.brightness_6,
title: '显示设置',
subtitle: '调整亮度和显示模式',
type: AppSettingsType.display,
color: Colors.teal,
),
_SettingItem(
icon: Icons.security,
title: '安全设置',
subtitle: '管理安全和隐私选项',
type: AppSettingsType.security,
color: Colors.red,
),
_SettingItem(
icon: Icons.apps,
title: '应用设置',
subtitle: '查看应用详情和权限',
type: AppSettingsType.settings,
color: Colors.grey,
),
];
Widget build(BuildContext context) {
return Scaffold(
appBar: AppBar(
title: const Text('App Settings 系统设置跳转'),
centerTitle: true,
elevation: 0,
),
body: Container(
decoration: const BoxDecoration(
gradient: LinearGradient(
begin: Alignment.topCenter,
end: Alignment.bottomCenter,
colors: [
Color(0xFFF5F7FF),
Color(0xFFFFFFFF),
],
),
),
child: ListView.builder(
padding: const EdgeInsets.all(16),
itemCount: _settings.length + 1,
itemBuilder: (context, index) {
if (index == 0) {
return _buildHeader();
}
final item = _settings[index - 1];
return _buildSettingCard(item);
},
),
),
);
}
Widget _buildHeader() {
return Container(
margin: const EdgeInsets.only(bottom: 20),
padding: const EdgeInsets.all(20),
decoration: BoxDecoration(
gradient: const LinearGradient(
colors: [Color(0xFF6366F1), Color(0xFF8B5CF6)],
),
borderRadius: BorderRadius.circular(16),
boxShadow: [
BoxShadow(
color: const Color(0xFF6366F1).withOpacity(0.3),
blurRadius: 15,
offset: const Offset(0, 8),
),
],
),
child: const Column(
crossAxisAlignment: CrossAxisAlignment.start,
children: [
Row(
children: [
Icon(Icons.settings_suggest, color: Colors.white, size: 28),
SizedBox(width: 12),
Text(
'快捷设置入口',
style: TextStyle(
color: Colors.white,
fontSize: 20,
fontWeight: FontWeight.bold,
),
),
],
),
SizedBox(height: 12),
Text(
'点击下方卡片可快速跳转到对应的系统设置页面,方便您进行各种系统配置。',
style: TextStyle(
color: Colors.white70,
fontSize: 14,
),
),
],
),
);
}
Widget _buildSettingCard(_SettingItem item) {
return Container(
margin: const EdgeInsets.only(bottom: 12),
decoration: BoxDecoration(
color: Colors.white,
borderRadius: BorderRadius.circular(12),
boxShadow: [
BoxShadow(
color: Colors.grey.withOpacity(0.1),
blurRadius: 10,
offset: const Offset(0, 2),
),
],
),
child: Material(
color: Colors.transparent,
child: InkWell(
borderRadius: BorderRadius.circular(12),
onTap: () => _openSettings(item.type),
child: Padding(
padding: const EdgeInsets.all(16),
child: Row(
children: [
Container(
width: 48,
height: 48,
decoration: BoxDecoration(
color: item.color.withOpacity(0.1),
borderRadius: BorderRadius.circular(12),
),
child: Icon(item.icon, color: item.color, size: 24),
),
const SizedBox(width: 16),
Expanded(
child: Column(
crossAxisAlignment: CrossAxisAlignment.start,
children: [
Text(
item.title,
style: const TextStyle(
fontSize: 16,
fontWeight: FontWeight.w600,
),
),
const SizedBox(height: 4),
Text(
item.subtitle,
style: TextStyle(
fontSize: 13,
color: Colors.grey[500],
),
),
],
),
),
Icon(
Icons.chevron_right,
color: Colors.grey[400],
),
],
),
),
),
),
);
}
void _openSettings(AppSettingsType type) {
AppSettings.openAppSettings(type: type);
}
}
class _SettingItem {
final IconData icon;
final String title;
final String subtitle;
final AppSettingsType type;
final Color color;
const _SettingItem({
required this.icon,
required this.title,
required this.subtitle,
required this.type,
required this.color,
});
}
八、最佳实践
8.1 合理的引导时机
不要在应用启动时立即引导用户前往设置页面。应该在用户真正需要某个功能时,再进行引导。这样可以提高用户的理解和配合度。
8.2 清晰的说明
在引导用户前往设置页面之前,应该清楚地解释为什么需要用户进行这个操作。用户更愿意配合当他们理解了目的。
8.3 提供取消选项
在引导对话框中,始终提供取消选项。强制用户前往设置页面会造成负面体验。
8.4 检查返回状态
用户从设置页面返回后,应该重新检查相关状态(如权限、服务开关等),并做出相应的处理。
8.5 避免频繁引导
不要频繁弹出引导对话框。如果用户多次拒绝,应该尊重用户的选择,不要反复打扰。
九、总结
本文详细介绍了 Flutter for OpenHarmony 中 app_settings 插件的使用方法,包括:
- 各种系统设置页面的跳转方法
- 设置面板的使用
- 与权限检查结合的最佳实践
- 实际应用场景示例
通过 app_settings 插件,开发者可以轻松实现系统设置跳转功能,提升用户体验,满足权限引导、功能配置等多种场景的需求。
📚 扩展阅读:

开源鸿蒙跨平台开发社区汇聚开发者与厂商,共建“一次开发,多端部署”的开源生态,致力于降低跨端开发门槛,推动万物智联创新。
更多推荐
 15
15 0
0- 0


 已为社区贡献81条内容

所有评论(0)