Flutter for OpenHarmony 实战:图片滤镜应用器
在移动开发领域,我们总是面临着选择与适配。今天,你的Flutter应用在Android和iOS上跑得正欢,明天可能就需要考虑一个新的平台:HarmonyOS(鸿蒙)。这不是一道选答题,而是很多团队正在面对的现实。Flutter的优势很明确——写一套代码,就能在两个主要平台上运行,开发体验流畅。而鸿蒙代表的是下一个时代的互联生态,它不仅仅是手机系统,更着眼于未来全场景的体验。
欢迎加入开源鸿蒙跨平台社区: https://openharmonycrossplatform.csdn.net
前言:跨生态开发的新机遇
在移动开发领域,我们总是面临着选择与适配。今天,你的Flutter应用在Android和iOS上跑得正欢,明天可能就需要考虑一个新的平台:HarmonyOS(鸿蒙)。这不是一道选答题,而是很多团队正在面对的现实。
Flutter的优势很明确——写一套代码,就能在两个主要平台上运行,开发体验流畅。而鸿蒙代表的是下一个时代的互联生态,它不仅仅是手机系统,更着眼于未来全场景的体验。将现有的Flutter应用适配到鸿蒙,听起来像是一个“跨界”任务,但它本质上是一次有价值的技术拓展:让产品触达更多用户,也让技术栈覆盖更广。
不过,这条路走起来并不像听起来那么简单。Flutter和鸿蒙,从底层的架构到上层的工具链,都有着各自的设计逻辑。会遇到一些具体的问题:代码如何组织?原有的功能在鸿蒙上如何实现?那些平台特有的能力该怎么调用?更实际的是,从编译打包到上架部署,整个流程都需要重新摸索。
这篇文章想做的,就是把这些我们趟过的路、踩过的坑,清晰地摊开给你看。我们不会只停留在“怎么做”,还会聊到“为什么得这么做”,以及“如果出了问题该往哪想”。这更像是一份实战笔记,源自真实的项目经验,聚焦于那些真正卡住过我们的环节。
无论你是在为一个成熟产品寻找新的落地平台,还是从一开始就希望构建能面向多端的应用,这里的思路和解决方案都能提供直接的参考。理解了两套体系之间的异同,掌握了关键的衔接技术,不仅能完成这次迁移,更能积累起应对未来技术变化的能力。
混合工程结构深度解析
项目目录架构
当Flutter项目集成鸿蒙支持后,典型的项目结构会发生显著变化。以下是经过ohos_flutter插件初始化后的项目结构:
my_flutter_harmony_app/
├── lib/                          # Flutter业务代码(基本不变)
│   ├── main.dart                 # 应用入口
│   ├── home_page.dart           # 首页
│   └── utils/
│       └── platform_utils.dart  # 平台工具类
├── pubspec.yaml                  # Flutter依赖配置
├── ohos/                         # 鸿蒙原生层(核心适配区)
│   ├── entry/                    # 主模块
│   │   └── src/main/
│   │       ├── ets/              # ArkTS代码
│   │       │   ├── MainAbility/
│   │       │   │   ├── MainAbility.ts       # 主Ability
│   │       │   │   └── MainAbilityContext.ts
│   │       │   └── pages/
│   │       │       ├── Index.ets           # 主页面
│   │       │       └── Splash.ets          # 启动页
│   │       ├── resources/        # 鸿蒙资源文件
│   │       │   ├── base/
│   │       │   │   ├── element/  # 字符串等
│   │       │   │   ├── media/    # 图片资源
│   │       │   │   └── profile/  # 配置文件
│   │       │   └── en_US/        # 英文资源
│   │       └── config.json       # 应用核心配置
│   ├── ohos_test/               # 测试模块
│   ├── build-profile.json5      # 构建配置
│   └── oh-package.json5         # 鸿蒙依赖管理
└── README.md
展示效果图片
flutter 实时预览 效果展示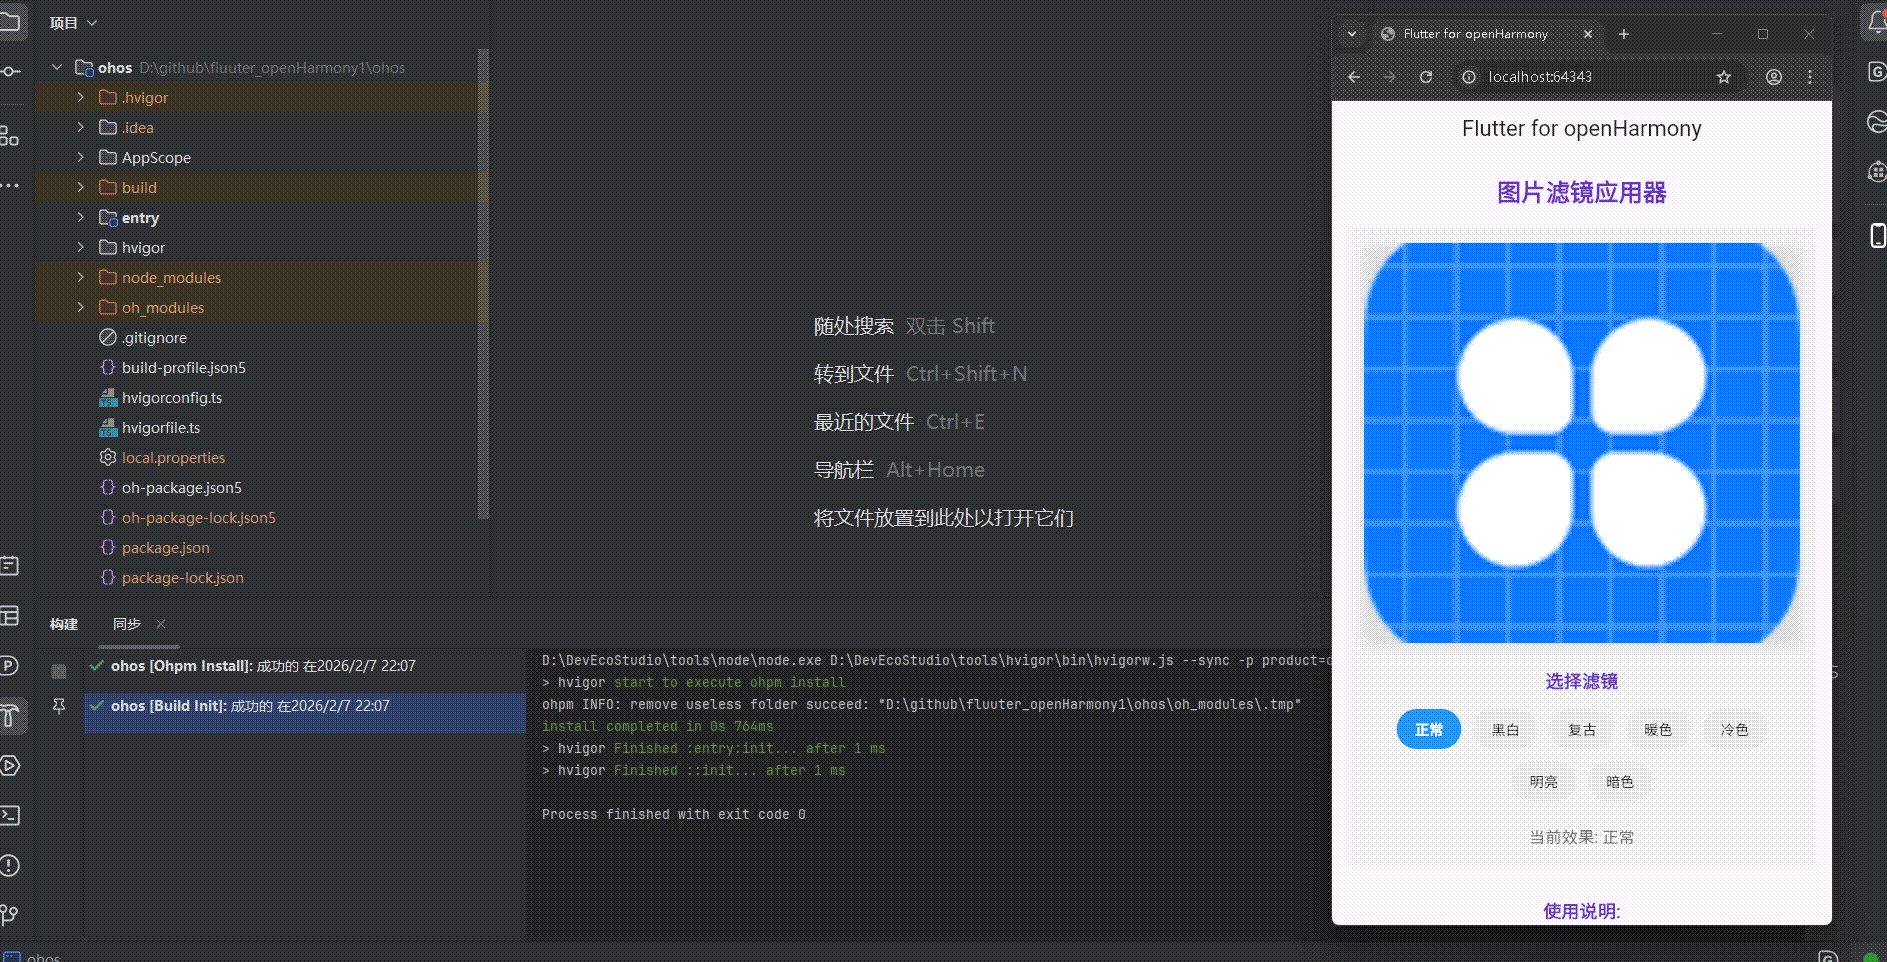
运行到鸿蒙虚拟设备中效果展示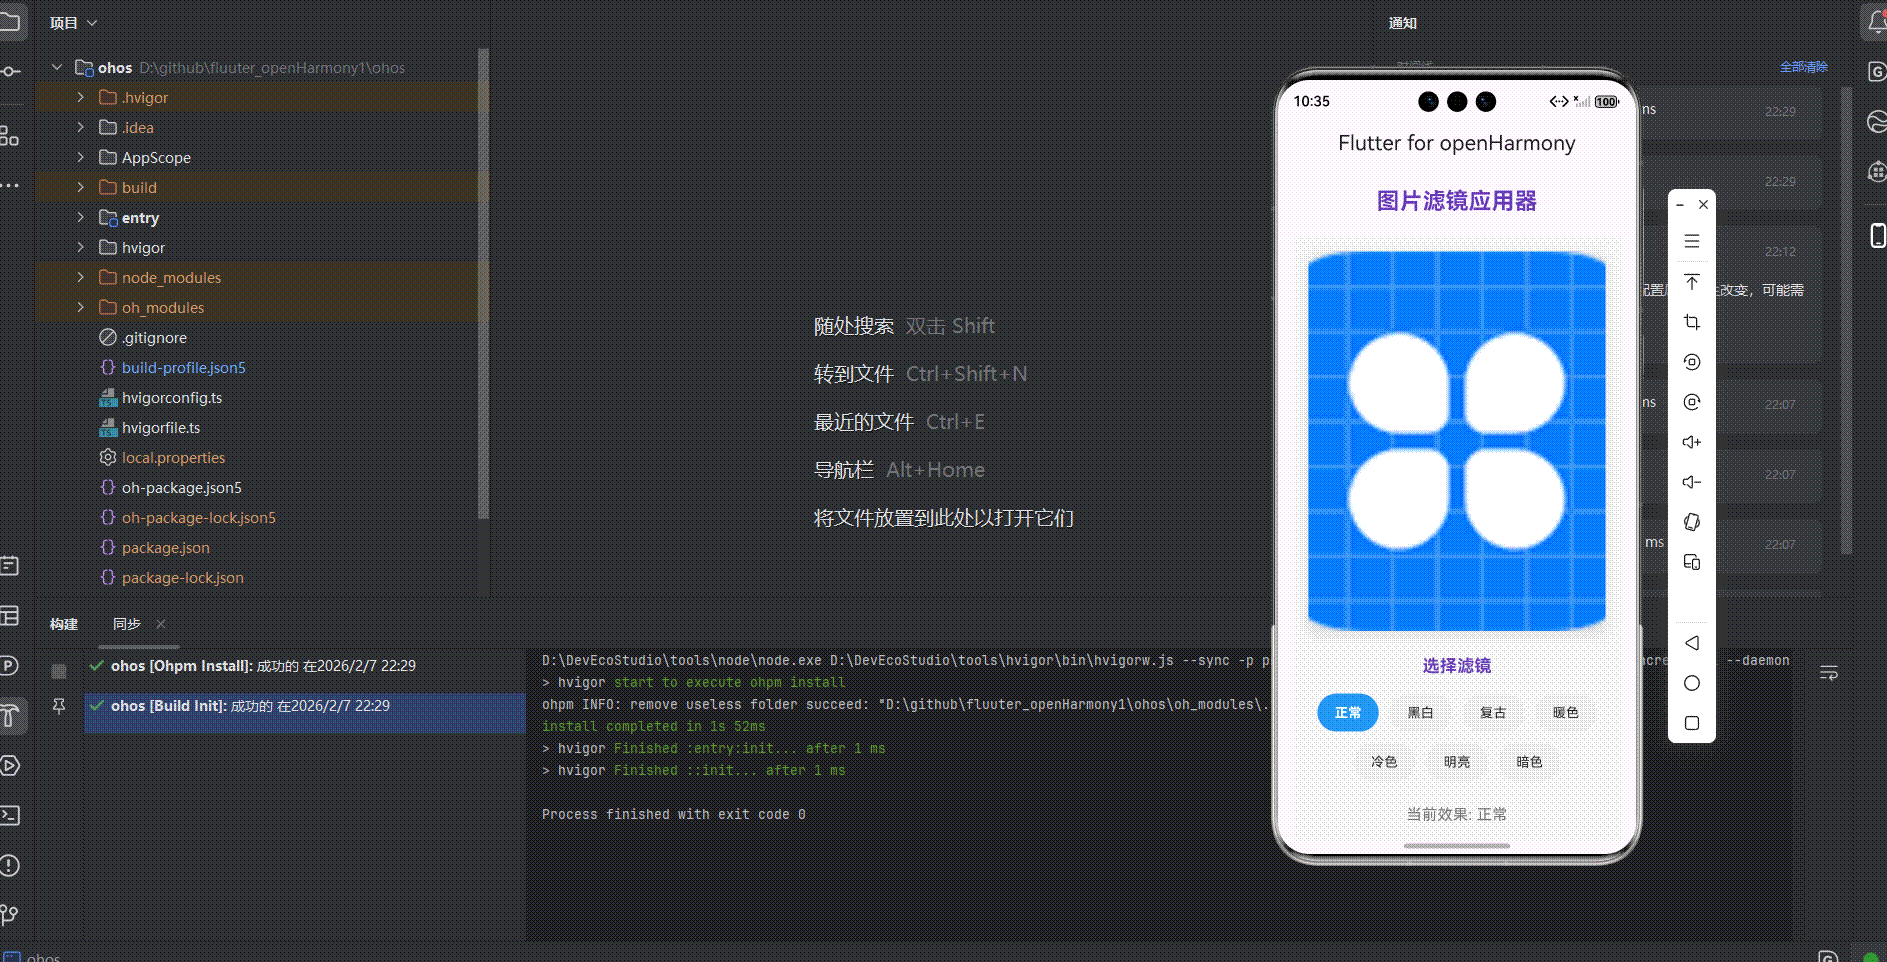
目录
功能代码实现
图片滤镜应用器组件
图片滤镜应用器组件是一个用于为图片应用不同滤镜效果的交互式组件。它提供了多种预设滤镜(如黑白、复古、暖色等),用户可以通过点击来实时预览不同滤镜效果。
核心实现
组件文件:lib/components/image_filter_applier.dart
import 'package:flutter/material.dart';
class ImageFilterApplier extends StatefulWidget {
final String imagePath;
final double width;
final double height;
final Color backgroundColor;
final Color selectedFilterColor;
const ImageFilterApplier({
Key? key,
required this.imagePath,
this.width = double.infinity,
this.height = 400,
this.backgroundColor = Colors.white,
this.selectedFilterColor = Colors.blue,
}) : super(key: key);
State<ImageFilterApplier> createState() => _ImageFilterApplierState();
}
class _ImageFilterApplierState extends State<ImageFilterApplier> {
FilterType _selectedFilter = FilterType.normal;
Widget build(BuildContext context) {
return Container(
padding: EdgeInsets.all(16.0),
color: widget.backgroundColor,
child: Column(
crossAxisAlignment: CrossAxisAlignment.center,
children: [
// 图片预览区域
Container(
width: widget.width,
height: widget.height,
decoration: BoxDecoration(
borderRadius: BorderRadius.circular(12),
boxShadow: [
BoxShadow(
color: Colors.grey.withOpacity(0.2),
spreadRadius: 2,
blurRadius: 8,
offset: Offset(0, 4),
),
],
),
child: ClipRRect(
borderRadius: BorderRadius.circular(12),
child: _applyFilter(
Image.asset(
widget.imagePath,
fit: BoxFit.cover,
width: widget.width,
height: widget.height,
),
_selectedFilter,
),
),
),
SizedBox(height: 24),
// 滤镜选择区域
Text(
'选择滤镜',
style: TextStyle(
fontSize: 18,
fontWeight: FontWeight.bold,
color: Colors.deepPurple,
),
),
SizedBox(height: 16),
// 滤镜选项
Wrap(
spacing: 12,
runSpacing: 12,
alignment: WrapAlignment.center,
children: FilterType.values.map((filter) {
return GestureDetector(
onTap: () {
setState(() {
_selectedFilter = filter;
});
},
child: Container(
padding: EdgeInsets.symmetric(
horizontal: 16,
vertical: 8,
),
decoration: BoxDecoration(
borderRadius: BorderRadius.circular(20),
color: _selectedFilter == filter
? widget.selectedFilterColor
: Colors.grey[200],
border: Border.all(
color: _selectedFilter == filter
? widget.selectedFilterColor
: Colors.transparent,
width: 2,
),
),
child: Text(
_getFilterName(filter),
style: TextStyle(
color: _selectedFilter == filter
? Colors.white
: Colors.black87,
fontWeight: _selectedFilter == filter
? FontWeight.bold
: FontWeight.normal,
),
),
),
);
}).toList(),
),
// 滤镜效果说明
SizedBox(height: 24),
Text(
'当前效果: ${_getFilterName(_selectedFilter)}',
style: TextStyle(
fontSize: 16,
color: Colors.grey[600],
),
),
],
),
);
}
Widget _applyFilter(Widget child, FilterType filter) {
switch (filter) {
case FilterType.normal:
return child;
case FilterType.blackAndWhite:
return ColorFiltered(
colorFilter: ColorFilter.matrix([
0.2126, 0.7152, 0.0722, 0, 0,
0.2126, 0.7152, 0.0722, 0, 0,
0.2126, 0.7152, 0.0722, 0, 0,
0, 0, 0, 1, 0,
]),
child: child,
);
case FilterType.vintage:
return ColorFiltered(
colorFilter: ColorFilter.matrix([
0.62793478, 0.32021437, 0.05185581, 0, 0,
0.03433463, 0.64302188, 0.02264358, 0, 0,
0.0231811, 0.07319451, 0.90362451, 0, 0,
0, 0, 0, 1, 0,
]),
child: child,
);
case FilterType.warm:
return ColorFiltered(
colorFilter: ColorFilter.matrix([
1.2, 0, 0, 0, 0,
0, 1.0, 0, 0, 0,
0, 0, 0.8, 0, 0,
0, 0, 0, 1, 0,
]),
child: child,
);
case FilterType.cool:
return ColorFiltered(
colorFilter: ColorFilter.matrix([
0.8, 0, 0, 0, 0,
0, 1.0, 0, 0, 0,
0, 0, 1.2, 0, 0,
0, 0, 0, 1, 0,
]),
child: child,
);
case FilterType.bright:
return ColorFiltered(
colorFilter: ColorFilter.matrix([
1.3, 0, 0, 0, 0,
0, 1.3, 0, 0, 0,
0, 0, 1.3, 0, 0,
0, 0, 0, 1, 0,
]),
child: child,
);
case FilterType.dark:
return ColorFiltered(
colorFilter: ColorFilter.matrix([
0.7, 0, 0, 0, 0,
0, 0.7, 0, 0, 0,
0, 0, 0.7, 0, 0,
0, 0, 0, 1, 0,
]),
child: child,
);
default:
return child;
}
}
String _getFilterName(FilterType filter) {
switch (filter) {
case FilterType.normal:
return '正常';
case FilterType.blackAndWhite:
return '黑白';
case FilterType.vintage:
return '复古';
case FilterType.warm:
return '暖色';
case FilterType.cool:
return '冷色';
case FilterType.bright:
return '明亮';
case FilterType.dark:
return '暗色';
default:
return '正常';
}
}
}
enum FilterType {
normal,
blackAndWhite,
vintage,
warm,
cool,
bright,
dark,
}
组件使用方法
在lib/main.dart中集成图片滤镜应用器组件:
import 'package:flutter/material.dart';
import 'components/image_filter_applier.dart';
void main() {
runApp(const MyApp());
}
class MyApp extends StatelessWidget {
const MyApp({super.key});
Widget build(BuildContext context) {
return MaterialApp(
title: 'Flutter for openHarmony',
theme: ThemeData(
colorScheme: ColorScheme.fromSeed(seedColor: Colors.deepPurple),
useMaterial3: true,
),
debugShowCheckedModeBanner: false,
home: const MyHomePage(title: 'Flutter for openHarmony'),
);
}
}
class MyHomePage extends StatefulWidget {
const MyHomePage({super.key, required this.title});
final String title;
State<MyHomePage> createState() => _MyHomePageState();
}
class _MyHomePageState extends State<MyHomePage> {
Widget build(BuildContext context) {
return Scaffold(
appBar: AppBar(
title: Text(widget.title),
centerTitle: true,
),
body: SingleChildScrollView(
padding: EdgeInsets.all(16.0),
child: Column(
crossAxisAlignment: CrossAxisAlignment.center,
children: <Widget>[
// 标题
Text(
'图片滤镜应用器',
style: TextStyle(
fontSize: 24,
fontWeight: FontWeight.bold,
color: Colors.deepPurple,
),
),
SizedBox(height: 20),
// 图片滤镜应用器组件
ImageFilterApplier(
imagePath: 'before.jpg',
width: double.infinity,
height: 400,
backgroundColor: Colors.grey[100]!,
selectedFilterColor: Colors.blue,
),
SizedBox(height: 32),
// 说明文字
Text(
'使用说明:',
style: TextStyle(
fontSize: 18,
fontWeight: FontWeight.bold,
color: Colors.deepPurple,
),
),
SizedBox(height: 8),
Text(
'• 点击下方的滤镜选项来应用不同的滤镜效果',
style: TextStyle(fontSize: 16),
),
Text(
'• 支持的滤镜效果:正常、黑白、复古、暖色、冷色、明亮、暗色',
style: TextStyle(fontSize: 16),
),
Text(
'• 选择滤镜后,图片会实时预览滤镜效果',
style: TextStyle(fontSize: 16),
),
Text(
'• 当前选中的滤镜会以蓝色高亮显示',
style: TextStyle(fontSize: 16),
),
SizedBox(height: 20),
],
),
),
);
}
}
开发注意事项
-
图片资源配置
- 在
pubspec.yaml中添加assets配置:assets: - assets/ - 在项目根目录创建
assets文件夹 - 准备图片文件,如示例中的
before.jpg
- 在
-
组件参数使用
imagePath:图片资源路径,直接使用文件名width:组件宽度,默认为double.infinityheight:组件高度,默认为400backgroundColor:背景颜色,默认为白色selectedFilterColor:选中滤镜的颜色,默认为蓝色
-
滤镜效果实现
- 使用
ColorFiltered和ColorFilter.matrix实现各种滤镜效果 - 黑白滤镜:使用灰度转换矩阵
- 复古滤镜:使用复古色调矩阵
- 暖色/冷色滤镜:调整RGB通道值
- 明亮/暗色滤镜:调整整体亮度
- 使用
-
交互体验优化
- 使用
GestureDetector实现点击交互 - 点击滤镜选项时实时更新选中状态和预览效果
- 使用
Wrap组件自适应排列滤镜选项 - 高亮显示当前选中的滤镜
- 使用
-
性能考虑
- 使用
ColorFiltered比自定义绘制更高效 - 合理使用
setState,只在必要时更新UI - 避免在滤镜切换时重建整个组件
- 使用
本次开发中容易遇到的问题
-
图片资源加载失败
- 问题:运行时出现"Unable to load asset"错误
- 原因:
pubspec.yaml中未配置assets目录- assets目录不存在
- 图片路径引用错误
- 解决方案:
- 在
pubspec.yaml中添加assets配置:assets: - assets/ - 创建assets目录并添加图片文件
- 使用正确的图片路径,直接使用文件名
- 在
-
滤镜效果不明显
- 问题:应用滤镜后效果不明显或不符合预期
- 原因:
- 颜色矩阵参数设置不当
- 图片本身的色彩特性影响
- 解决方案:
- 调整颜色矩阵参数以获得更明显的效果
- 尝试使用不同类型的图片测试
-
布局适配问题
- 问题:在不同屏幕尺寸下滤镜选项排列不合理
- 原因:使用固定布局而非自适应布局
- 解决方案:
- 使用
Wrap组件替代Row或Column - 设置合理的
spacing和runSpacing
- 使用
-
性能问题
- 问题:切换滤镜时出现卡顿
- 原因:
- 频繁的
setState调用 - 组件重建开销过大
- 频繁的
- 解决方案:
- 优化状态更新逻辑
- 考虑使用
const构造器和缓存
-
颜色矩阵理解困难
- 问题:难以理解和调整颜色矩阵参数
- 原因:颜色矩阵的数学原理较为复杂
- 解决方案:
- 参考标准滤镜的矩阵参数
- 使用在线颜色矩阵生成工具
- 逐步调整参数并观察效果
总结本次开发中用到的技术点
-
自定义组件开发
- 创建了
ImageFilterApplier可复用组件 - 支持多种自定义参数,增强组件灵活性
- 实现了组件的封装和状态管理
- 创建了
-
颜色滤镜实现
- 使用
ColorFiltered和ColorFilter.matrix实现各种滤镜效果 - 掌握了颜色矩阵的基本原理和应用
- 实现了7种不同风格的滤镜效果
- 使用
-
交互设计
- 使用
GestureDetector处理点击事件 - 实现了实时预览和状态更新
- 设计了直观的用户界面
- 使用
-
布局管理
- 使用
Wrap组件实现自适应布局 - 合理使用
Container、SizedBox等布局组件 - 实现了响应式设计,适配不同屏幕尺寸
- 使用
-
状态管理
- 使用
StatefulWidget和setState管理组件状态 - 实现了选中状态的管理和更新
- 确保状态变化时UI的正确更新
- 使用
-
枚举类型使用
- 创建了
FilterType枚举管理滤镜类型 - 使用枚举提高代码可读性和维护性
- 简化了滤镜选择的逻辑
- 创建了
-
图片处理
- 使用
Image.asset加载本地图片资源 - 使用
ClipRRect实现图片圆角效果 - 结合
BoxFit.cover确保图片正确显示
- 使用
-
OpenHarmony平台适配
- 使用Flutter标准组件和API,确保跨平台兼容
- 遵循OpenHarmony的开发规范
- 确保代码在OpenHarmony设备上正常运行
-
资源管理
- 正确配置和使用assets资源
- 优化图片加载和显示
- 确保资源路径的正确引用
-
用户体验设计
- 设计了直观的用户界面
- 实现了实时预览功能
- 添加了使用说明和状态提示
通过这些技术点的综合运用,我们成功实现了一个功能完整、交互友好的图片滤镜应用器组件,可直接集成到Flutter for OpenHarmony项目中使用。
欢迎加入开源鸿蒙跨平台社区: https://openharmonycrossplatform.csdn.net

开源鸿蒙跨平台开发社区汇聚开发者与厂商,共建“一次开发,多端部署”的开源生态,致力于降低跨端开发门槛,推动万物智联创新。
更多推荐


 0
0 0
0- 0


 已为社区贡献15条内容

所有评论(0)