Flutter for OpenHarmony 实战_吃豆人游戏幽灵AI与绘制技术
本文介绍了Flutter开发吃豆人游戏中幽灵AI与绘制技术的实现方案。主要内容包括:1) 幽灵数据结构采用Map存储坐标和颜色属性;2) 随机移动AI算法通过收集可行路径并随机选择方向实现;3) 使用CustomPainter绘制幽灵的头部半圆、身体矩形和波浪底边,并添加眼睛细节;4) 碰撞检测系统通过位置比较判断玩家与幽灵相遇。幽灵移动频率控制在300ms,比玩家稍慢以保持游戏平衡性。该方案在O
Flutter for OpenHarmony 实战:吃豆人游戏幽灵AI与绘制技术
欢迎加入开源鸿蒙跨平台社区:开源鸿蒙跨平台开发者社区
幽灵是吃豆人游戏中最具挑战性的元素,它们的AI行为和视觉效果直接影响游戏的难度和吸引力。本文将详细介绍幽灵的数据结构设计、随机移动AI算法、复杂的CustomPainter绘制技术以及碰撞检测系统的完整实现。
一、幽灵数据结构设计
1.1 Map存储方案
late List<Map<String, int>> ghosts;

ghosts = [
  {'x': 7, 'y': 7, 'color': 0xFF0000},
  {'x': 6, 'y': 7, 'color': 0xFFFF00},
  {'x': 8, 'y': 7, 'color': 0xFF00FF},
  {'x': 7, 'y': 6, 'color': 0xFFFF00FF},
];
每个幽灵使用Map存储三个属性:x坐标、y坐标和颜色值。这种设计简单直接,适合这种小规模的数据结构。四个幽灵使用红、黄、品红、紫色区分,便于玩家识别。
1.2 初始位置布局
幽灵初始分布在迷宫中心区域:
- 红色幽灵:(7, 7)
- 黄色幽灵:(6, 7)
- 品红幽灵:(8, 7)
- 紫色幽灵:(7, 6)
这种布局让幽灵从中心区域开始向四周扩散,增加了游戏的初始难度和策略性。
二、随机移动AI算法
2.1 可能的移动收集
void moveGhosts() {
  for (var ghost in ghosts) {
    List<Map<String, int>> possibleMoves = [];

    if (isValidMove(ghost['x']! - 1, ghost['y']!)) {
      possibleMoves.addAll([
        {'x': ghost['x']! - 1, 'y': ghost['y']!},
        {'x': ghost['x']! + 1, 'y': ghost['y']!}
      ]);
    }
    if (isValidMove(ghost['x']!, ghost['y']! - 1)) {
      possibleMoves.addAll([
        {'x': ghost['x']!, 'y': ghost['y']! - 1},
        {'x': ghost['x']!, 'y': ghost['y']! + 1}
      ]);
    }

    if (possibleMoves.isNotEmpty) {
      possibleMoves.shuffle();
      ghost['x'] = possibleMoves[0]['x']!;
      ghost['y'] = possibleMoves[0]['y']!;
    }
  }

  setState(() {});
}
这个AI算法分为三个步骤:首先检查上下左右四个方向的可行性,然后将所有可行的移动加入列表,最后随机选择一个方向。这种完全随机的方式让幽灵的行为不可预测,增加了游戏的挑战性。
2.2 移动验证机制
bool isValidMove(int x, int y) {
  if (x < 0 || x >= cols || y < 0 || y >= rows) {
    return false;
  }
  return maze[y][x] != 1;
}
与吃豆人使用相同的验证函数,确保幽灵不会移动到墙壁或迷宫外,保持了游戏规则的一致性。
2.3 移动频率控制
ghostTimer = Timer.periodic(const Duration(milliseconds: 300), (timer) {
  if (!gameOver && !won) {
    moveGhosts();
    checkCollisions();
  }
});
幽灵每300毫秒移动一次,比吃豆人的200毫秒慢50毫秒。这个细微的时间差让玩家拥有速度优势,但又不至于让游戏过于简单,是游戏平衡性的关键设计。
三、幽灵CustomPainter绘制
3.1 基础形状设计
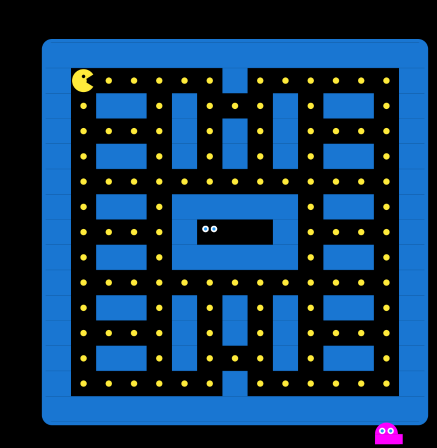
幽灵由三个几何部分组成:上半圆头部、矩形身体、波浪底边。
final ghostCenter = Offset(
  ghost['x']! * cellWidth + cellWidth / 2,
  ghost['y']! * cellHeight + cellHeight / 2,
);

final ghostPaint = Paint()
  ..color = Color(ghost['color']!)
  ..style = PaintingStyle.fill;
首先计算幽灵的中心点坐标,然后创建对应颜色的画笔,为后续绘制做准备。
3.2 头部绘制

canvas.drawArc(
  Rect.fromCircle(center: ghostCenter, radius: cellWidth / 2.2),
  pi,
  pi,
  true,
  ghostPaint,
);
使用半圆弧绘制头部,从π(180度)开始,绘制π弧度(180度),形成一个完整的半圆。半径设置为单元格宽度的2.2分之,确保幽灵占据合适的大小。
3.3 身体绘制
canvas.drawRect(
  Rect.fromLTWH(
    ghostCenter.dx - cellWidth / 2.2,
    ghostCenter.dy,
    cellWidth * 1.1,
    cellHeight * 0.4,
  ),
  ghostPaint,
);
矩形宽度约为单元格的1.1倍,高度为0.4倍。矩形的左上角从圆心水平位置开始,垂直方向从圆心向下延伸,形成头部下方的身体部分。
3.4 波浪底边绘制
final path = Path();
final bottomY = ghostCenter.dy + cellHeight * 0.4;
path.moveTo(ghostCenter.dx - cellWidth / 2.2, bottomY);

for (int i = 0; i < 4; i++) {
  final waveX = ghostCenter.dx - cellWidth / 2.2 + i * cellWidth * 0.275;
  path.lineTo(waveX, bottomY - cellHeight * 0.15);
  path.lineTo(waveX + cellWidth * 0.137, bottomY);
}

path.close();
canvas.drawPath(path, ghostPaint);
使用Path绘制4个波浪形凸起。循环中每次计算凸起的左右X坐标,先向上绘制到凸起顶部,再向下绘制到底部,形成锯齿状的波浪效果。凸起高度为单元格高度的15%,宽度约为27.5%。
四、眼睛细节绘制
4.1 眼白绘制

final eyeWhitePaint = Paint()
  ..color = Colors.white
  ..style = PaintingStyle.fill;

canvas.drawCircle(
  Offset(ghostCenter.dx - cellWidth / 6, ghostCenter.dy - cellHeight / 8),
  cellWidth / 8,
  eyeWhitePaint,
);
canvas.drawCircle(
  Offset(ghostCenter.dx + cellWidth / 6, ghostCenter.dy - cellHeight / 8),
  cellWidth / 8,
  eyeWhitePaint,
);
两个白色圆形作为眼白,位于头部上方区域。左右眼白在水平方向对称分布,距离中心为cellWidth/6,垂直方向位于圆心上方cellHeight/8处。半径为cellWidth/8,与整体比例协调。
4.2 瞳孔绘制

final eyePupilPaint = Paint()
  ..color = Colors.blue
  ..style = PaintingStyle.fill;

canvas.drawCircle(
  Offset(ghostCenter.dx - cellWidth / 6, ghostCenter.dy - cellHeight / 8),
  cellWidth / 16,
  eyePupilPaint,
);
canvas.drawCircle(
  Offset(ghostCenter.dx + cellWidth / 6, ghostCenter.dy - cellHeight / 8),
  cellWidth / 16,
  eyePupilPaint,
);
蓝色瞳孔位于眼白正中心,半径为眼白的一半(cellWidth/16)。瞳孔与眼白同心排列,形成简单的眼睛效果。
五、碰撞检测系统
5.1 位置比较检测
void checkCollisions() {
  for (var ghost in ghosts) {
    if (ghost['x'] == pacmanX && ghost['y'] == pacmanY) {
      lives--;
      if (lives <= 0) {
        gameOver = true;
        gameTimer?.cancel();
        ghostTimer?.cancel();
      } else {
        pacmanX = 1;
        pacmanY = 1;
        for (int i = 0; i < ghosts.length; i++) {
          ghosts[i]['x'] = 7 + (i % 2);
          ghosts[i]['y'] = 7 + (i ~/ 2);
        }
      }
      setState(() {});
      return;
    }
  }
}
遍历所有幽灵,检查其坐标是否与吃豆人重合。使用简单的相等比较,因为所有角色都在网格上移动。检测到碰撞后立即返回,一次只处理一个碰撞。
5.2 生命值管理

lives--;
if (lives <= 0) {
  gameOver = true;
  gameTimer?.cancel();
  ghostTimer?.cancel();
}
每次碰撞扣除一条生命,生命值为0时设置游戏结束状态并停止所有定时器。这种设计给玩家多次机会,提高了游戏的宽容度。
5.3 位置重置算法
pacmanX = 1;
pacmanY = 1;
for (int i = 0; i < ghosts.length; i++) {
  ghosts[i]['x'] = 7 + (i % 2);
  ghosts[i]['y'] = 7 + (i ~/ 2);
}
使用取模和整除运算分配幽灵位置。i%2产生0、1的交替模式,i~/2产生0、0、1、1的序列。配合基础坐标(7,7),生成(7,7)、(8,7)、(7,8)、(8,8)四个位置。
六、性能优化
6.1 shouldRepaint实现
bool shouldRepaint(PacManPainter oldDelegate) {
return oldDelegate.pacmanX != pacmanX ||
oldDelegate.pacmanY != pacmanY ||
oldDelegate.pacmanDirection != pacmanDirection ||
oldDelegate.mouthOpen != mouthOpen ||
oldDelegate.ghosts != ghosts;
}
只在关键状态变化时重绘,特别是ghosts变量的变化检测。这种精确的控制避免了不必要的重绘,显著提高了游戏性能。
6.2 颜色值直接使用
final ghostPaint = Paint()
  ..color = Color(ghost['color']!)
  ..style = PaintingStyle.fill;
直接使用存储的整数颜色值,避免重复创建Color对象,减少了内存分配和垃圾回收压力。
七、AI改进方向
当前使用随机移动AI,虽然简单有效,但可以进一步改进:
- 追踪算法:幽灵可以朝向吃豆人的方向移动,增加攻击性
- 分散策略:多个幽灵协调向不同方向移动,形成包围网
- 预测算法:预测吃豆人的下一步位置,提前拦截
- 区域控制:不同幽灵负责迷宫的不同区域,提高覆盖效率
这些改进可以让游戏难度更加丰富,提供不同的挑战体验。
总结
本文详细介绍了吃豆人游戏幽灵的完整实现,从数据结构到AI算法,从基础绘制到细节优化,涵盖了游戏开发中的多个关键技术点。随机移动AI简单但有效,复杂的CustomPainter绘制让幽灵形象生动,精确的碰撞检测保证了游戏公平性。这些技术的综合应用,创造了既有挑战性又有吸引力的游戏体验。

开源鸿蒙跨平台开发社区汇聚开发者与厂商,共建“一次开发,多端部署”的开源生态,致力于降低跨端开发门槛,推动万物智联创新。
更多推荐


 21
21 0
0- 0


 已为社区贡献84条内容

所有评论(0)