UI 组件库与样式系统设计-Cordova 与 OpenHarmony 混合开发实战
本文介绍了Web层UI组件库的实现方案,包括CSS变量定义和通用组件开发。通过定义全局CSS变量(颜色、字体、间距等设计令牌)确保视觉一致性,并基于这些变量实现可复用的UI组件如按钮、对话框等。组件采用模块化设计,支持参数化定制,修改CSS变量即可全局更新样式。该方案提高了开发效率,降低了维护成本,同时支持与原生UI组件集成。
欢迎大家加入开源鸿蒙跨平台开发者社区,一起共建开源鸿蒙跨平台生态。
本文对应模块:Web 层的 UI 组件库实现,包括 CSS 变量定义、通用组件实现(按钮、对话框、Toast、Loader、Card)、响应式设计,以及与原生 UI 组件的集成。
📌 概述
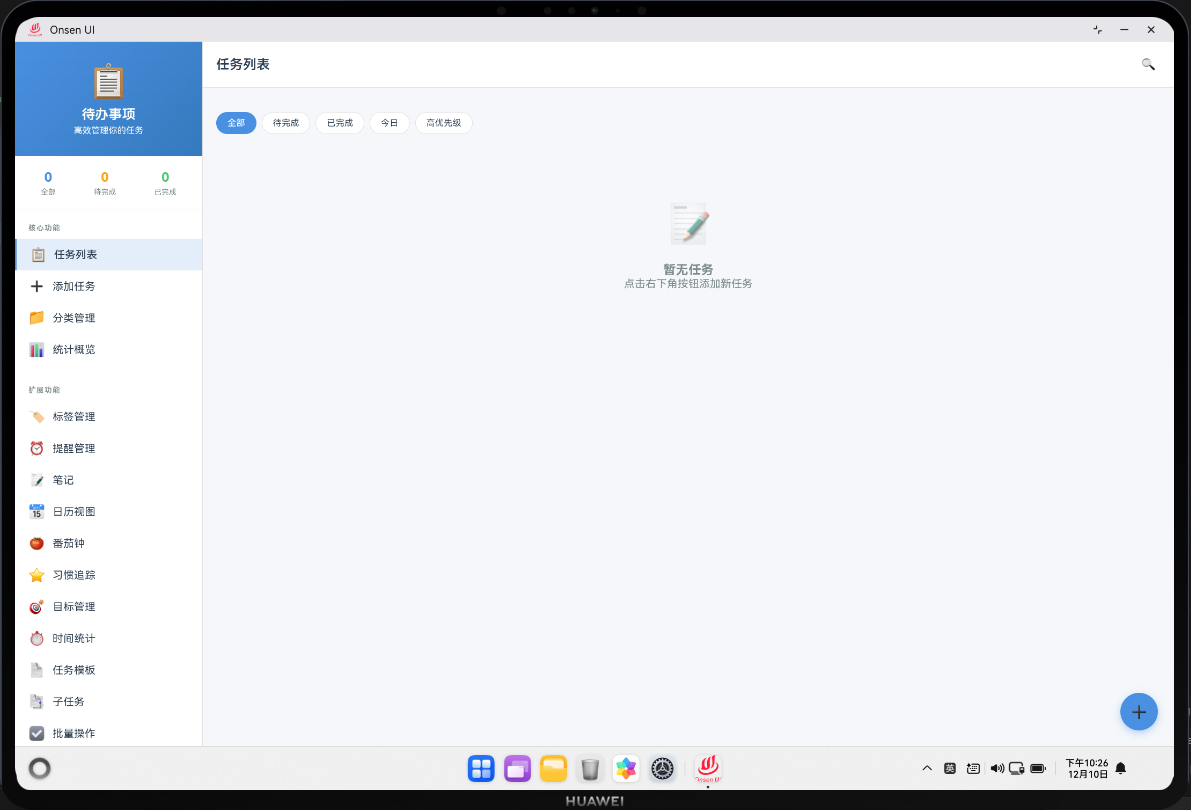
一个优秀的应用需要一个完整的 UI 组件库和统一的样式系统。UI 组件库提供了一套可复用的组件,包括按钮、对话框、提示框、加载指示器和卡片等。样式系统使用 CSS 变量来定义颜色、字体、间距等设计令牌,确保整个应用的视觉一致性。通过合理的组件化设计,可以提高开发效率、降低维护成本,并提供良好的用户体验。
🔗 UI 系统的设计流程
Web 层首先定义全局的 CSS 变量,包括颜色系统、排版系统、间距系统等设计令牌。然后基于这些变量实现各种 UI 组件,如按钮、对话框等。每个组件都是独立的、可复用的,可以通过参数来定制其外观和行为。当需要修改应用的整体风格时,只需要修改 CSS 变量,所有使用这些变量的组件都会自动更新。原生层可以通过 Cordova 插件与 Web 层的 UI 系统进行交互,例如显示原生对话框或通知。
🎯 CSS 变量定义
/* ui-components.css */

:root {
    /* ==================== 颜色系统 ==================== */

    /* 主色调 */
    --color-primary: #4a90e2;
    --color-primary-light: #7aabf0;
    --color-primary-dark: #2e5c8a;

    /* 次色调 */
    --color-secondary: #50c878;
    --color-secondary-light: #7dd99f;
    --color-secondary-dark: #2d7a4a;

    /* 警告和错误 */
    --color-warning: #f5a623;
    --color-danger: #e74c3c;
    --color-success: #50c878;
    --color-info: #4a90e2;

    /* 中立色 */
    --color-text-primary: #333333;
    --color-text-secondary: #666666;
    --color-text-tertiary: #999999;
    --color-text-disabled: #cccccc;

    --color-bg-primary: #ffffff;
    --color-bg-secondary: #f5f5f5;
    --color-bg-tertiary: #eeeeee;

    --color-border: #e0e0e0;
    --color-border-light: #f0f0f0;

    /* ==================== 排版系统 ==================== */

    /* 字体族 */
    --font-family-base: -apple-system, BlinkMacSystemFont, 'Segoe UI', Roboto, 'Helvetica Neue', Arial, sans-serif;
    --font-family-mono: 'Monaco', 'Menlo', 'Ubuntu Mono', 'Consolas', 'source-code-pro', monospace;

    /* 字体大小 */
    --font-size-xs: 12px;
    --font-size-sm: 14px;
    --font-size-base: 16px;
    --font-size-lg: 18px;
    --font-size-xl: 20px;
    --font-size-2xl: 24px;
    --font-size-3xl: 28px;
    --font-size-4xl: 32px;

    /* 行高 */
    --line-height-tight: 1.2;
    --line-height-normal: 1.5;
    --line-height-relaxed: 1.8;

    /* 字体粗细 */
    --font-weight-light: 300;
    --font-weight-normal: 400;
    --font-weight-medium: 500;
    --font-weight-semibold: 600;
    --font-weight-bold: 700;

    /* ==================== 间距系统 ==================== */

    --spacing-xs: 4px;
    --spacing-sm: 8px;
    --spacing-md: 16px;
    --spacing-lg: 24px;
    --spacing-xl: 32px;
    --spacing-2xl: 48px;

    /* ==================== 圆角系统 ==================== */

    --radius-xs: 2px;
    --radius-sm: 4px;
    --radius-md: 8px;
    --radius-lg: 16px;
    --radius-full: 9999px;

    /* ==================== 阴影系统 ==================== */

    --shadow-sm: 0 1px 2px 0 rgba(0, 0, 0, 0.05);
    --shadow-md: 0 4px 6px -1px rgba(0, 0, 0, 0.1);
    --shadow-lg: 0 10px 15px -3px rgba(0, 0, 0, 0.1);
    --shadow-xl: 0 20px 25px -5px rgba(0, 0, 0, 0.1);

    /* ==================== 过渡效果 ==================== */

    --transition-fast: 150ms ease-in-out;
    --transition-base: 250ms ease-in-out;
    --transition-slow: 350ms ease-in-out;

    /* ==================== 其他 ==================== */

    --z-index-dropdown: 1000;
    --z-index-sticky: 1020;
    --z-index-fixed: 1030;
    --z-index-modal-backdrop: 1040;
    --z-index-modal: 1050;
    --z-index-popover: 1060;
    --z-index-tooltip: 1070;
}
代码解释:
CSS 变量使用 -- 前缀定义,可以在整个应用中复用。:root 选择器定义全局变量,所有元素都可以访问这些变量。代码中定义了颜色系统(包括主色、次色、警告色、中立色等)、排版系统(字体族、字体大小、行高、字体粗细)、间距系统(用于 padding 和 margin)、圆角系统、阴影系统和过渡效果。还定义了 z-index 层级,用于控制元素的堆叠顺序。使用 var() 函数引用变量,例如 color: var(--color-primary);。这种方式便于维护和修改整个应用的样式,只需要修改变量值,所有使用这个变量的地方都会自动更新。
🧩 UI 组件库实现
1. 按钮组件
/**
 * UI 组件库
 * 提供常用的 UI 组件
 */

class UIComponents {
    /**
     * 创建按钮
     * @param {string} text - 按钮文本
     * @param {Function} onClick - 点击回调
     * @param {Object} options - 选项
     */
    static createButton(text, onClick, options = {}) {
        const button = document.createElement('button');
        button.className = 'ui-button';
        button.textContent = text;

        // 应用变体样式
        const variant = options.variant || 'primary';
        button.classList.add(`ui-button--${variant}`);

        // 应用大小样式
        const size = options.size || 'md';
        button.classList.add(`ui-button--${size}`);

        // 禁用状态
        if (options.disabled) {
            button.disabled = true;
            button.classList.add('ui-button--disabled');
        }

        // 绑定点击事件
        if (onClick) {
            button.addEventListener('click', onClick);
        }

        return button;
    }

    /**
     * 创建输入框
     * @param {Object} options - 选项
     */
    static createInput(options = {}) {
        const input = document.createElement('input');
        input.className = 'ui-input';
        input.type = options.type || 'text';
        input.placeholder = options.placeholder || '';
        input.value = options.value || '';

        if (options.disabled) {
            input.disabled = true;
        }

        return input;
    }

    /**
     * 创建对话框
     * @param {string} title - 对话框标题
     * @param {HTMLElement|string} content - 对话框内容
     * @param {Array} buttons - 按钮数组
     */
    static createDialog(title, content, buttons = []) {
        const dialog = document.createElement('div');
        dialog.className = 'ui-dialog';

        // 创建对话框背景
        const backdrop = document.createElement('div');
        backdrop.className = 'ui-dialog-backdrop';
        backdrop.addEventListener('click', () => dialog.hide());

        // 创建对话框容器
        const container = document.createElement('div');
        container.className = 'ui-dialog-container';

        // 创建标题
        const titleElement = document.createElement('div');
        titleElement.className = 'ui-dialog-title';
        titleElement.textContent = title;
        container.appendChild(titleElement);

        // 创建内容
        const contentElement = document.createElement('div');
        contentElement.className = 'ui-dialog-content';
        if (typeof content === 'string') {
            contentElement.textContent = content;
        } else {
            contentElement.appendChild(content);
        }
        container.appendChild(contentElement);

        // 创建按钮区域
        const buttonArea = document.createElement('div');
        buttonArea.className = 'ui-dialog-buttons';
        buttons.forEach(button => {
            buttonArea.appendChild(button);
        });
        container.appendChild(buttonArea);

        dialog.appendChild(backdrop);
        dialog.appendChild(container);

        // 添加显示和隐藏方法
        dialog.show = () => {
            dialog.style.display = 'flex';
            document.body.appendChild(dialog);
        };

        dialog.hide = () => {
            dialog.style.display = 'none';
            if (dialog.parentNode) {
                dialog.parentNode.removeChild(dialog);
            }
        };

        return dialog;
    }

    /**
     * 显示 Toast 提示
     * @param {string} message - 提示信息
     * @param {Object} options - 选项
     */
    static showToast(message, options = {}) {
        const toast = document.createElement('div');
        toast.className = 'ui-toast';
        toast.textContent = message;

        // 应用类型样式
        const type = options.type || 'info';
        toast.classList.add(`ui-toast--${type}`);

        document.body.appendChild(toast);

        // 动画显示
        setTimeout(() => {
            toast.classList.add('ui-toast--show');
        }, 10);

        // 自动隐藏
        const duration = options.duration || 3000;
        setTimeout(() => {
            toast.classList.remove('ui-toast--show');
            setTimeout(() => {
                if (toast.parentNode) {
                    toast.parentNode.removeChild(toast);
                }
            }, 300);
        }, duration);
    }

    /**
     * 创建加载指示器
     */
    static createLoader() {
        const loader = document.createElement('div');
        loader.className = 'ui-loader';
        loader.innerHTML = `
            <div class="ui-loader-spinner"></div>
            <p class="ui-loader-text">加载中...</p>
        `;
        return loader;
    }

    /**
     * 创建卡片
     * @param {Object} options - 选项
     */
    static createCard(options = {}) {
        const card = document.createElement('div');
        card.className = 'ui-card';

        if (options.title) {
            const title = document.createElement('div');
            title.className = 'ui-card-title';
            title.textContent = options.title;
            card.appendChild(title);
        }

        if (options.content) {
            const content = document.createElement('div');
            content.className = 'ui-card-content';
            if (typeof options.content === 'string') {
                content.textContent = options.content;
            } else {
                content.appendChild(options.content);
            }
            card.appendChild(content);
        }

        return card;
    }
}
代码解释:
UIComponents 类提供了一套静态方法来创建常用的 UI 组件。createButton() 方法创建按钮元素,支持不同的变体(primary、secondary)和大小(sm、md、lg)。通过 options 参数可以配置按钮的外观和行为,包括是否禁用。createInput() 方法创建输入框,支持不同的类型(text、password、email 等)和占位符。createDialog() 方法创建模态对话框,包含标题、内容和按钮。showToast() 方法显示临时提示信息,自动在指定时间后隐藏。createCard() 方法创建卡片组件,用于展示内容。createLoader() 方法创建加载指示器,显示加载中的状态。所有组件都返回 DOM 元素,可以直接添加到页面中,这样可以灵活地组合和使用这些组件。
2. 按钮样式
/* 按钮基础样式 */
.ui-button {
    display: inline-flex;
    align-items: center;
    justify-content: center;
    font-family: var(--font-family-base);
    font-weight: var(--font-weight-medium);
    border: none;
    border-radius: var(--radius-md);
    cursor: pointer;
    transition: all var(--transition-base);
    outline: none;
}

/* 按钮大小变体 */
.ui-button--sm {
    padding: var(--spacing-xs) var(--spacing-sm);
    font-size: var(--font-size-sm);
    min-height: 28px;
}

.ui-button--md {
    padding: var(--spacing-sm) var(--spacing-md);
    font-size: var(--font-size-base);
    min-height: 36px;
}

.ui-button--lg {
    padding: var(--spacing-md) var(--spacing-lg);
    font-size: var(--font-size-lg);
    min-height: 44px;
}

/* 按钮颜色变体 */
.ui-button--primary {
    background-color: var(--color-primary);
    color: white;
    box-shadow: var(--shadow-sm);
}

.ui-button--primary:hover {
    background-color: var(--color-primary-dark);
    box-shadow: var(--shadow-md);
}

.ui-button--primary:active {
    transform: scale(0.98);
}

.ui-button--secondary {
    background-color: transparent;
    color: var(--color-primary);
    border: 1px solid var(--color-primary);
}

.ui-button--secondary:hover {
    background-color: var(--color-primary);
    color: white;
}

/* 禁用状态 */
.ui-button--disabled,
.ui-button:disabled {
    opacity: 0.5;
    cursor: not-allowed;
    pointer-events: none;
}
代码解释:
按钮样式使用 CSS 变量保持样式的一致性,所有颜色、字体、间距等都引用了全局定义的变量。.ui-button 定义了按钮的基础样式,使用 inline-flex 布局使内容居中。transition 属性使按钮交互更流畅,当鼠标悬停或点击时会有平滑的动画效果。:hover 和 :active 伪类提供视觉反馈,让用户知道按钮是可交互的。不同大小的按钮(sm、md、lg)通过不同的 padding 和 font-size 来区分。不同颜色的按钮(primary、secondary)通过不同的背景色和文字色来区分。禁用状态使用 opacity 降低透明度,cursor: not-allowed 改变鼠标指针,pointer-events: none 禁用点击事件。
3. 对话框样式
/* 对话框背景 */
.ui-dialog {
    display: none;
    position: fixed;
    top: 0;
    left: 0;
    width: 100%;
    height: 100%;
    z-index: var(--z-index-modal);
    align-items: center;
    justify-content: center;
}

.ui-dialog-backdrop {
    position: absolute;
    top: 0;
    left: 0;
    width: 100%;
    height: 100%;
    background-color: rgba(0, 0, 0, 0.5);
    z-index: var(--z-index-modal-backdrop);
}

/* 对话框容器 */
.ui-dialog-container {
    position: relative;
    background-color: var(--color-bg-primary);
    border-radius: var(--radius-lg);
    box-shadow: var(--shadow-xl);
    max-width: 90%;
    width: 400px;
    max-height: 90vh;
    overflow-y: auto;
    z-index: var(--z-index-modal);
    animation: slideUp 0.3s ease-out;
}

@keyframes slideUp {
    from {
        opacity: 0;
        transform: translateY(20px);
    }
    to {
        opacity: 1;
        transform: translateY(0);
    }
}

/* 对话框标题 */
.ui-dialog-title {
    padding: var(--spacing-lg);
    font-size: var(--font-size-lg);
    font-weight: var(--font-weight-semibold);
    color: var(--color-text-primary);
    border-bottom: 1px solid var(--color-border);
}

/* 对话框内容 */
.ui-dialog-content {
    padding: var(--spacing-lg);
    color: var(--color-text-secondary);
    line-height: var(--line-height-normal);
}

/* 对话框按钮区域 */
.ui-dialog-buttons {
    display: flex;
    gap: var(--spacing-md);
    padding: var(--spacing-lg);
    border-top: 1px solid var(--color-border);
    justify-content: flex-end;
}

.ui-dialog-buttons .ui-button {
    flex: 1;
}
代码解释:
对话框样式使用 position: fixed 使对话框固定在视口中,不会随着页面滚动而移动。.ui-dialog 是对话框的容器,设置为 display: none 默认隐藏,需要时通过 JavaScript 改为 display: flex 来显示。.ui-dialog-backdrop 是半透明的背景层,用于遮挡页面内容,点击背景可以关闭对话框。z-index 确保对话框显示在其他元素上方,modal-backdrop 的 z-index 比 modal 小,这样背景在对话框后面。animation 属性提供平滑的进入动画,使用 slideUp 关键帧从下方滑入。max-height 和 overflow-y: auto 处理内容过长的情况,使对话框内容可以滚动。.ui-dialog-buttons 使用 flex 布局排列按钮,justify-content: flex-end 使按钮右对齐。
4. Toast 样式
/* Toast 提示 */
.ui-toast {
    position: fixed;
    bottom: var(--spacing-lg);
    left: 50%;
    transform: translateX(-50%) translateY(100px);
    padding: var(--spacing-md) var(--spacing-lg);
    background-color: var(--color-text-primary);
    color: white;
    border-radius: var(--radius-md);
    box-shadow: var(--shadow-lg);
    z-index: var(--z-index-tooltip);
    transition: transform var(--transition-base);
    max-width: 90%;
    word-break: break-word;
}

.ui-toast--show {
    transform: translateX(-50%) translateY(0);
}

/* Toast 类型变体 */
.ui-toast--success {
    background-color: var(--color-success);
}

.ui-toast--warning {
    background-color: var(--color-warning);
}

.ui-toast--danger {
    background-color: var(--color-danger);
}

.ui-toast--info {
    background-color: var(--color-info);
}
代码解释:
Toast 样式定义了一个临时提示框,使用 position: fixed 固定在屏幕底部。初始状态下,使用 transform: translateY(100px) 将 Toast 隐藏在屏幕下方。当添加 .ui-toast–show 类时,transform 改为 translateY(0),使 Toast 滑入屏幕。transition 属性使这个动画平滑进行。left: 50% 和 translateX(-50%) 使 Toast 水平居中。不同的 Toast 类型(success、warning、danger、info)使用不同的背景颜色,通过 CSS 变量引用全局定义的颜色。这样可以快速改变所有 Toast 的颜色。
🎨 响应式设计
/* 平板设备 */
@media (max-width: 768px) {
    :root {
        --font-size-base: 14px;
        --spacing-md: 12px;
    }

    .ui-dialog-container {
        width: 90%;
    }
}

/* 手机设备 */
@media (max-width: 480px) {
    :root {
        --font-size-base: 12px;
        --spacing-md: 8px;
    }

    .ui-dialog-container {
        width: 95%;
        max-height: 80vh;
    }

    .ui-dialog-buttons {
        flex-direction: column;
    }
}
代码解释:
响应式设计使用 @media 查询根据不同的屏幕尺寸调整样式。对于平板设备(最大宽度 768px),减小字体大小和间距,使内容更紧凑。对于手机设备(最大宽度 480px),进一步减小字体大小和间距,并调整对话框的宽度和高度。对话框按钮改为 flex-direction: column,使按钮竖排排列,这样在小屏幕上更容易点击。通过修改 CSS 变量的值,可以影响所有使用这些变量的元素,实现全局的响应式调整。这种方法比为每个元素单独编写媒体查询更高效。
🔌 原生 UI 组件与 Web 层的集成
HarmonyOS 原生层提供了丰富的 UI 组件,可以通过 Cordova 插件与 Web 层的 UI 系统进行集成。例如,可以使用原生对话框来替代 Web 层的对话框,以获得更好的性能和原生体验。
// ArkTS 代码示例 - 原生对话框组件
import { promptAction } from '@kit.ArkUI';
import { CordovaPlugin, CallbackContext } from '@magongshou/harmony-cordova/Index';
import { PluginResult, MessageStatus } from '@magongshou/harmony-cordova/Index';

export class UIPlugin extends CordovaPlugin {
    // 显示原生对话框
    async showNativeDialog(callbackContext: CallbackContext, args: string[]): Promise<void> {
        try {
            const dialogConfig = JSON.parse(args[0]);

            const result = await promptAction.showDialog({
                title: dialogConfig.title,
                message: dialogConfig.message,
                buttons: [
                    { text: '取消', color: '#666666' },
                    { text: '确定', color: '#0066cc' }
                ]
            });

            const pluginResult = PluginResult.createByString(
                MessageStatus.OK,
                JSON.stringify({ buttonIndex: result.index })
            );
            callbackContext.sendPluginResult(pluginResult);
        } catch (error) {
            const pluginResult = PluginResult.createByString(
                MessageStatus.ERROR,
                (error as Error).message
            );
            callbackContext.sendPluginResult(pluginResult);
        }
    }

    // 显示原生 Toast 提示
    async showNativeToast(callbackContext: CallbackContext, args: string[]): Promise<void> {
        try {
            const message = args[0];

            promptAction.showToast({
                message: message,
                duration: 2000
            });

            const pluginResult = PluginResult.createByString(MessageStatus.OK, 'Toast 已显示');
            callbackContext.sendPluginResult(pluginResult);
        } catch (error) {
            const pluginResult = PluginResult.createByString(
                MessageStatus.ERROR,
                (error as Error).message
            );
            callbackContext.sendPluginResult(pluginResult);
        }
    }
}
原生代码解释:
UIPlugin 是一个 Cordova 插件,提供了原生 UI 组件的访问接口。showNativeDialog 方法使用 HarmonyOS 的 promptAction 模块显示原生对话框。dialogConfig 包含对话框的标题和消息内容。promptAction.showDialog() 返回一个 Promise,解析后得到用户点击的按钮索引。showNativeToast 方法显示原生 Toast 提示,message 是要显示的文本,duration 是显示时间(毫秒)。这两个方法都通过 PluginResult 将结果返回给 Web 层。
Web 层调用原生 UI 组件
Web 层可以调用原生插件来显示原生 UI 组件,以获得更好的性能和用户体验:
// JavaScript 代码 - 调用原生 UI 组件
function showNativeDialog(title, message) {
    return new Promise((resolve, reject) => {
        cordova.exec(
            function(result) {
                console.log('对话框结果:', result);
                resolve(result.buttonIndex === 1); // 返回用户是否点击了确定
            },
            function(error) {
                console.error('显示对话框失败:', error);
                reject(error);
            },
            'UIPlugin',
            'showNativeDialog',
            [JSON.stringify({ title, message })]
        );
    });
}

function showNativeToast(message) {
    return new Promise((resolve, reject) => {
        cordova.exec(
            function() {
                resolve();
            },
            function(error) {
                reject(error);
            },
            'UIPlugin',
            'showNativeToast',
            [message]
        );
    });
}

// 在应用中使用
async function deleteTask(taskId) {
    const confirmed = await showNativeDialog('删除任务', '确定要删除这个任务吗?');
    if (confirmed) {
        await taskManager.deleteTask(taskId);
        await showNativeToast('任务已删除');
    }
}
Web 层代码解释:
showNativeDialog 函数使用 cordova.exec() 调用原生插件的 showNativeDialog 方法。成功回调接收对话框的结果,包括用户点击的按钮索引。如果用户点击了确定按钮(索引为 1),函数返回 true。showNativeToast 函数显示原生 Toast 提示,不需要返回结果。deleteTask 函数展示了实际的使用场景:首先显示原生对话框询问用户是否确定删除。如果用户确认,则调用 taskManager.deleteTask() 删除任务,然后显示 Toast 提示用户任务已删除。这样可以提供更好的原生体验。
📝 总结
一个完整的 UI 组件库和样式系统是构建现代应用的基础。Web 层通过 CSS 变量和 JavaScript 组件提供了灵活的 UI 系统,而原生层通过 Cordova 插件提供了高性能的原生 UI 组件。通过合理的设计和集成,可以在两层之间取得平衡,既能保证开发效率,又能提供优秀的用户体验。

开源鸿蒙跨平台开发社区汇聚开发者与厂商,共建“一次开发,多端部署”的开源生态,致力于降低跨端开发门槛,推动万物智联创新。
更多推荐
 29
29 0
0- 0


 已为社区贡献24条内容

所有评论(0)