Flutter for OpenHarmony 实战:网络监控登录系统完整开发指南
本文详细介绍了使用Flutter for OpenHarmony开发网络监控登录系统的完整过程。系统包含服务器控制、客户端状态管理、实时状态指示和连接统计四大核心功能模块。通过状态指示灯(红/绿灯)直观展示8个客户端连接状态,采用StatefulWidget实现动态UI更新。文章重点讲解了服务器控制逻辑、客户端数据模型设计、状态同步机制以及界面组件的实现方法,为开发者在鸿蒙平台上构建实时监控应用提
Flutter for OpenHarmony 实战:网络监控登录系统完整开发指南
文章目录
摘要
欢迎加入开源鸿蒙跨平台社区:开源鸿蒙跨平台开发者社区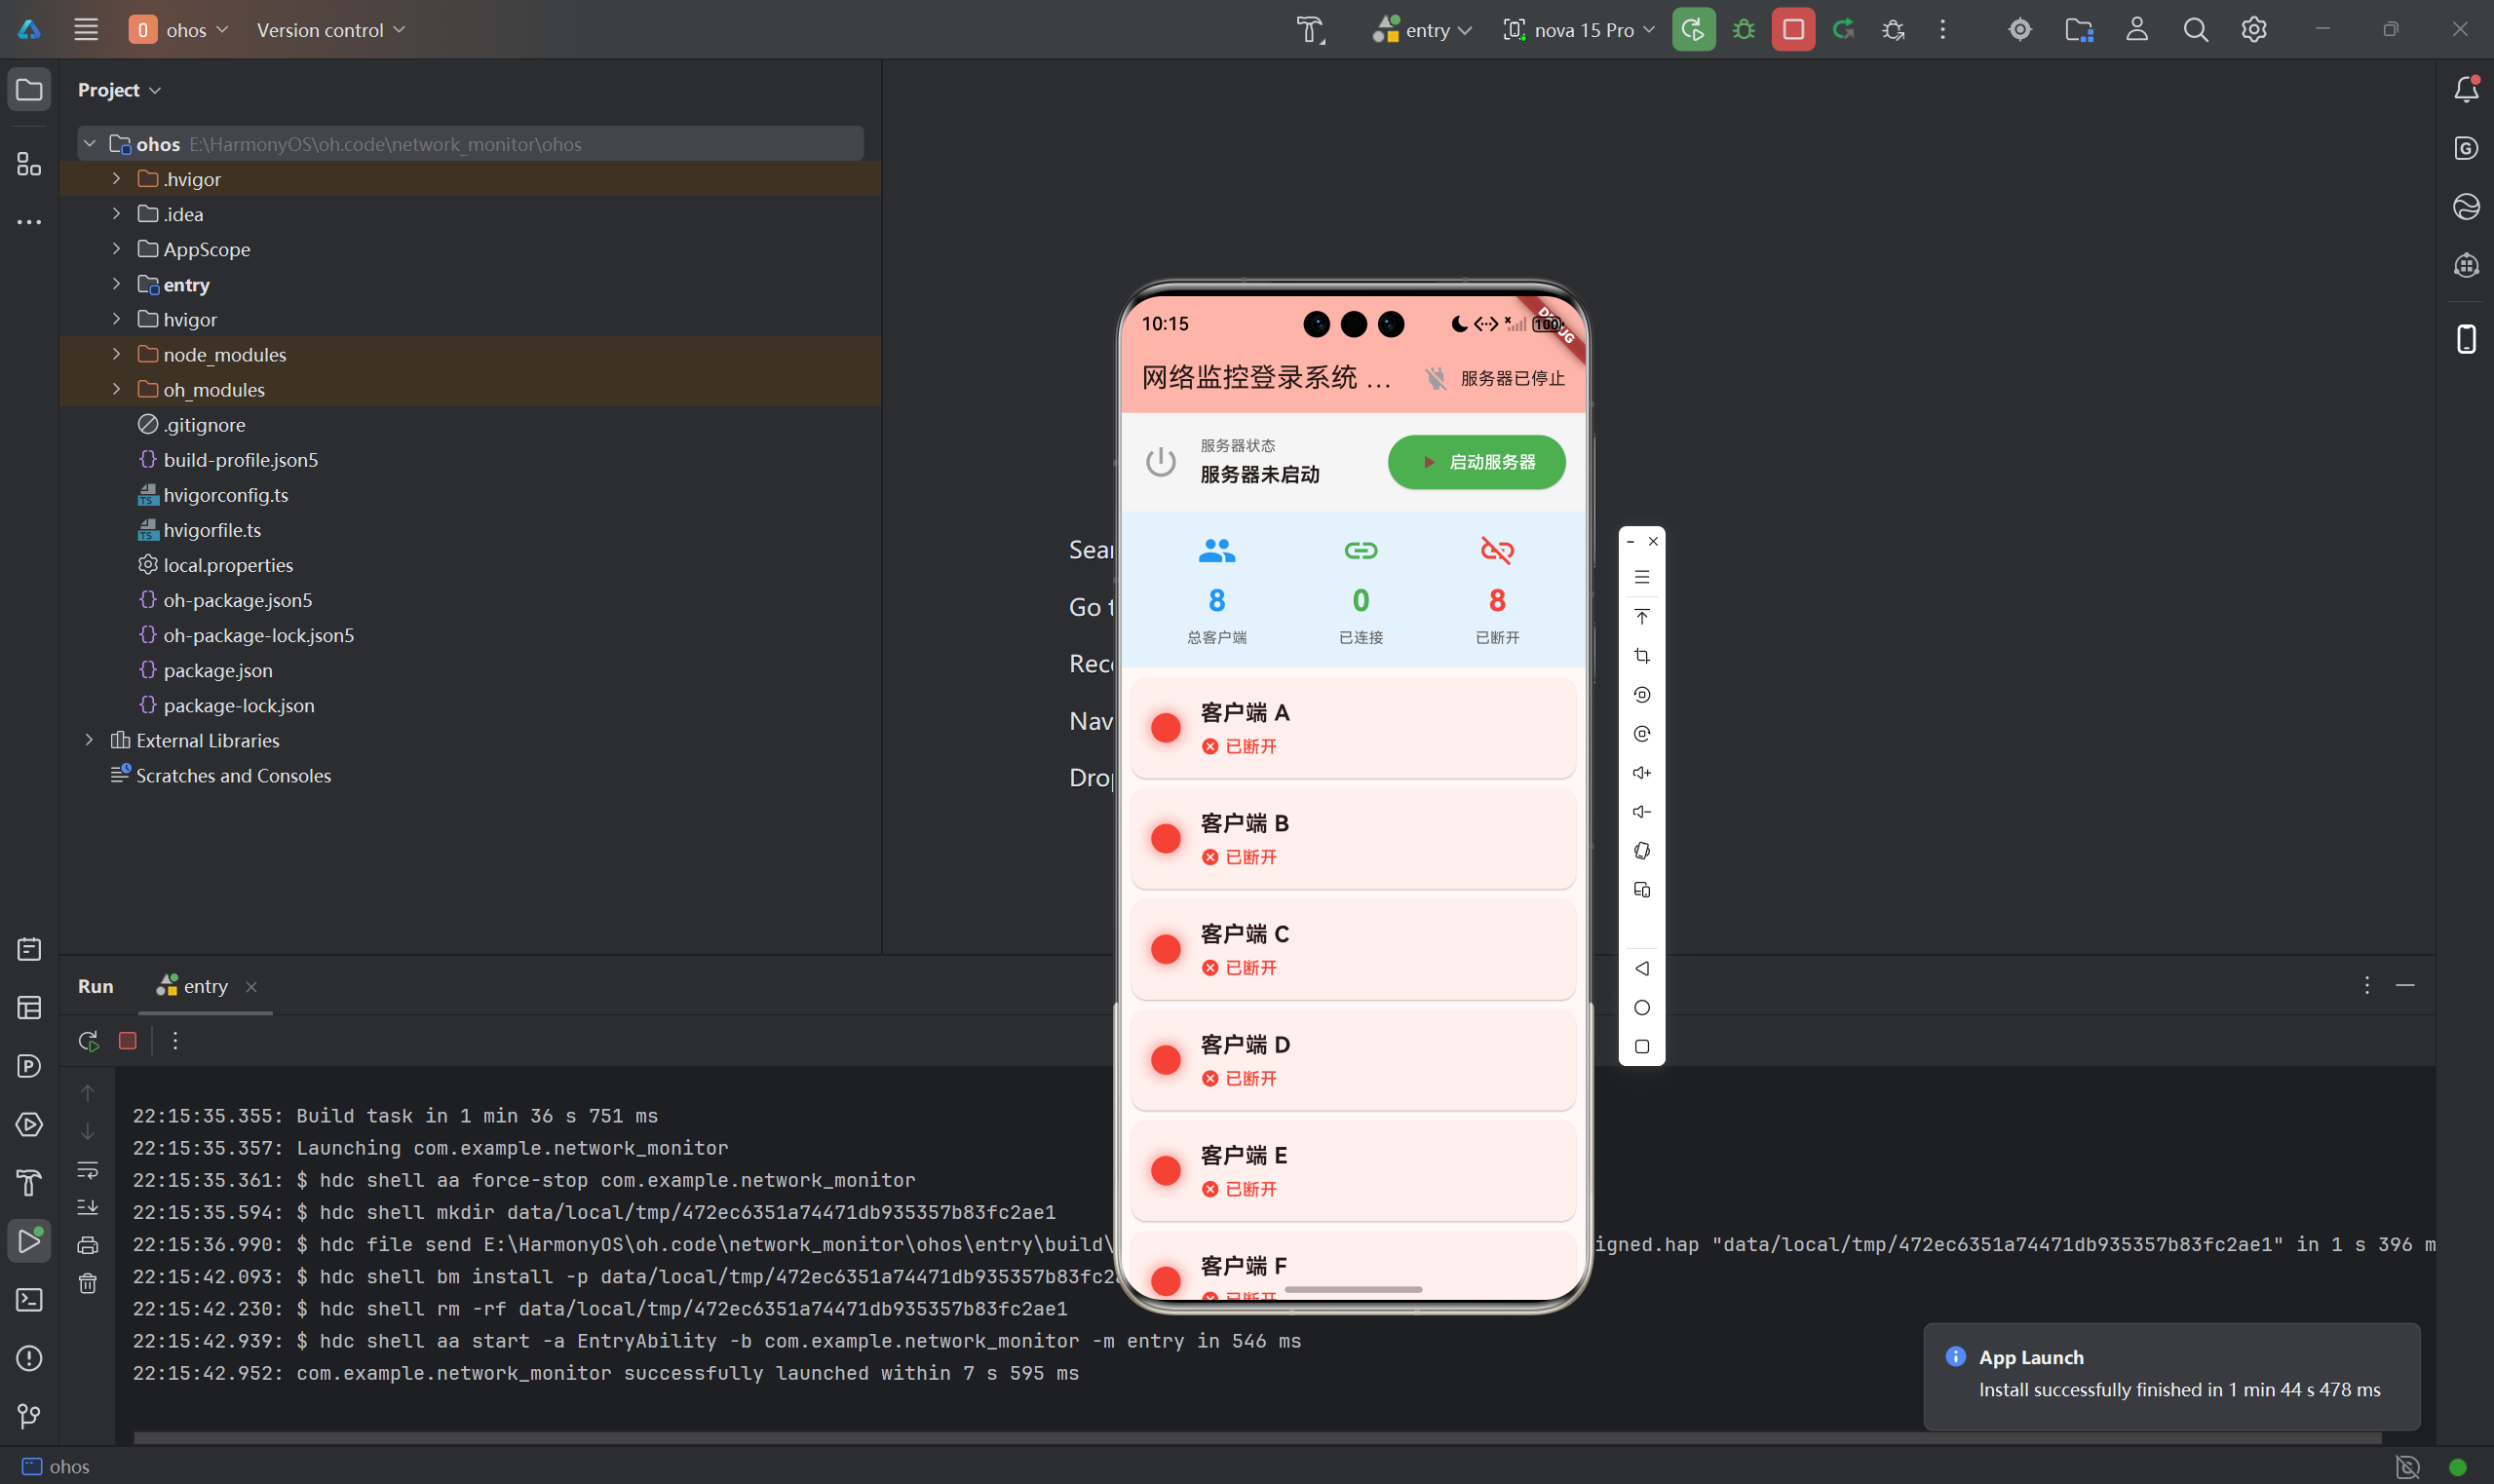
网络监控系统是服务器管理的重要工具,用于实时监控客户端的连接状态。本文将详细介绍如何使用Flutter for OpenHarmony框架开发一款网络监控登录系统的服务器端应用。文章涵盖了客户端状态管理、红绿灯指示器、服务器控制、连接统计等核心技术点。通过本文学习,读者将掌握Flutter在鸿蒙平台上开发网络监控应用的完整流程,了解状态同步和实时监控界面的实现方法。
一、项目背景与功能概述
1.1 网络监控应用场景
网络监控系统广泛应用于:
- 服务器状态监控
- 客户端连接管理
- 设备在线状态监控
- 网络拓扑可视化
1.2 应用功能规划
| 功能模块 | 具体功能 |
|---|---|
| 服务器控制 | 启动/停止服务器监听 |
| 客户端管理 | 显示多个客户端状态 |
| 状态指示 | 红灯(断开)/绿灯(连接) |
| 连接统计 | 总数、已连接、已断开 |
| 时间记录 | 连接时间、断开时间 |
1.3 界面设计要求
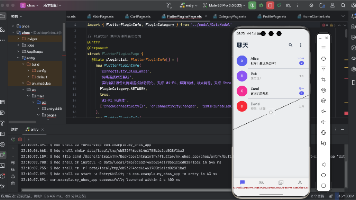
- 8个客户端(A-H)
- 每个客户端有独立的状态指示灯
- 红色表示断开连接
- 绿色表示已连接
- 实时更新状态
二、数据模型设计
2.1 客户端状态类
class ClientStatus {
  final String id;              // 客户端ID
  final String name;            // 客户端名称
  bool isConnected;             // 连接状态
  DateTime? lastConnectTime;    // 最后连接时间
  DateTime? lastDisconnectTime; // 最后断开时间

  ClientStatus({
    required this.id,
    required this.name,
    this.isConnected = false,
    this.lastConnectTime,
    this.lastDisconnectTime,
  });
}
2.2 客户端列表初始化
final List<ClientStatus> _clients = [
  ClientStatus(id: 'A', name: '客户端 A'),
  ClientStatus(id: 'B', name: '客户端 B'),
  ClientStatus(id: 'C', name: '客户端 C'),
  ClientStatus(id: 'D', name: '客户端 D'),
  ClientStatus(id: 'E', name: '客户端 E'),
  ClientStatus(id: 'F', name: '客户端 F'),
  ClientStatus(id: 'G', name: '客户端 G'),
  ClientStatus(id: 'H', name: '客户端 H'),
];
三、技术选型与架构设计
3.1 核心技术栈
状态管理
- StatefulWidget管理应用状态
- setState更新UI
UI组件
- Container:状态指示灯
- Card:客户端卡片
- ListView:客户端列表
- Icon:状态图标
颜色设计
- 绿色:已连接
- 红色:已断开
- 灰色:服务器停止
3.2 应用架构
ServerMonitorPage (服务器监控页面)
    ├── 服务器控制区域
    │   ├── 服务器状态显示
    │   └── 启动/停止按钮
    ├── 统计信息区域
    │   ├── 总客户端数
    │   ├── 已连接数
    │   └── 已断开数
    └── 客户端列表区域
        └── ClientCard (8个)
            ├── 状态指示灯
            ├── 客户端信息
            ├── 连接/断开按钮
            └── 时间信息
3.3 数据流设计
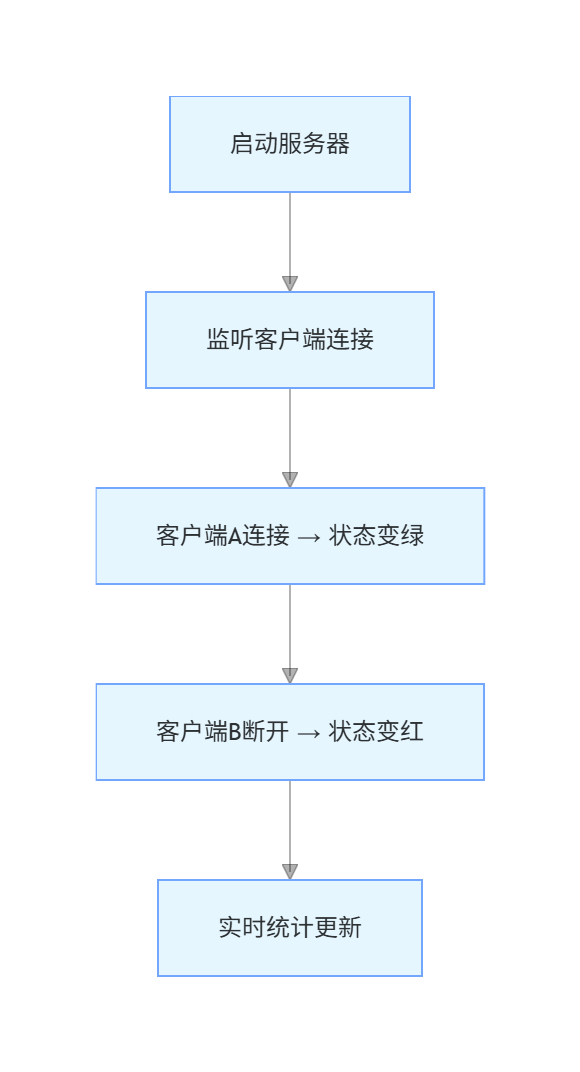
四、服务器控制实现
4.1 服务器状态管理
class _ServerMonitorPageState extends State<ServerMonitorPage> {
  bool _serverRunning = false;
  int _connectedCount = 0;

  // 切换服务器状态
  void _toggleServer() {
    setState(() {
      _serverRunning = !_serverRunning;
      if (!_serverRunning) {
        // 服务器停止,断开所有客户端
        for (var client in _clients) {
          if (client.isConnected) {
            client.isConnected = false;
            client.lastDisconnectTime = DateTime.now();
          }
        }
        _connectedCount = 0;
      }
    });
  }
}
4.2 服务器控制UI
Container(
  padding: const EdgeInsets.all(16),
  color: Colors.grey.shade100,
  child: Row(
    children: [
      Icon(
        _serverRunning ? Icons.settings_input_antenna : Icons.power_settings_new,
        size: 32,
        color: _serverRunning ? Colors.green : Colors.grey,
      ),
      const SizedBox(width: 16),
      Expanded(
        child: Column(
          crossAxisAlignment: CrossAxisAlignment.start,
          children: [
            const Text('服务器状态'),
            const SizedBox(height: 4),
            Text(
              _serverRunning ? '正在监听客户端连接...' : '服务器未启动',
              style: const TextStyle(
                fontSize: 16,
                fontWeight: FontWeight.bold,
              ),
            ),
          ],
        ),
      ),
      const SizedBox(width: 16),
      ElevatedButton.icon(
        onPressed: _toggleServer,
        icon: Icon(_serverRunning ? Icons.stop : Icons.play_arrow),
        label: Text(_serverRunning ? '停止服务器' : '启动服务器'),
        style: ElevatedButton.styleFrom(
          backgroundColor: _serverRunning ? Colors.red : Colors.green,
          foregroundColor: Colors.white,
        ),
      ),
    ],
  ),
)
五、状态指示灯实现
5.1 状态颜色获取
Color _getStatusColor(bool isConnected) {
  return isConnected ? Colors.green : Colors.red;
}
5.2 指示灯UI实现
Container(
  width: 24,
  height: 24,
  decoration: BoxDecoration(
    shape: BoxShape.circle,
    color: _getStatusColor(client.isConnected),
    boxShadow: [
      BoxShadow(
        color: _getStatusColor(client.isConnected).withValues(alpha: 0.5),
        blurRadius: 8,
        spreadRadius: 2,
      ),
    ],
  ),
)
设计要点
- 圆形容器表示指示灯
- 阴影效果增强发光感
- 颜色区分状态(红/绿)
六、客户端状态管理
6.1 模拟客户端连接
void _simulateClientConnect(int index) {
  if (!_serverRunning) {
    ScaffoldMessenger.of(context).showSnackBar(
      const SnackBar(content: Text('请先启动服务器')),
    );
    return;
  }

  setState(() {
    if (!_clients[index].isConnected) {
      _clients[index].isConnected = true;
      _clients[index].lastConnectTime = DateTime.now();
      _connectedCount++;
    }
  });
}
6.2 模拟客户端断开
void _simulateClientDisconnect(int index) {
  setState(() {
    if (_clients[index].isConnected) {
      _clients[index].isConnected = false;
      _clients[index].lastDisconnectTime = DateTime.now();
      _connectedCount--;
    }
  });
}
6.3 实际应用中的实现
在实际应用中,通过Socket监听客户端连接:
// 实际应用示例(需要socket插件)
ServerSocket socket = await ServerSocket.bind(InternetAddress.anyIPv4, 8080);
socket.listen((Socket client) {
  // 客户端连接
  String clientId = client.remoteAddress.address;
  // 更新状态为绿色
});

// 监听断开
client.done.then((_) {
  // 客户端断开
  // 更新状态为红色
});
七、统计信息显示
7.1 统计数据
int _connectedCount = 0;
int _disconnectedCount = _clients.length - _connectedCount;
7.2 统计UI组件
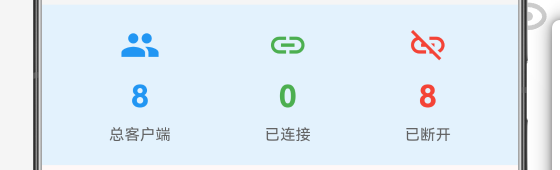
Container(
  padding: const EdgeInsets.all(16),
  color: Colors.blue.shade50,
  child: Row(
    mainAxisAlignment: MainAxisAlignment.spaceAround,
    children: [
      _buildStatItem('总客户端', '${_clients.length}', Icons.people),
      _buildStatItem('已连接', '$_connectedCount', Icons.link, Colors.green),
      _buildStatItem('已断开', '${_clients.length - _connectedCount}', Icons.link_off, Colors.red),
    ],
  ),
)
7.3 统计项组件
Widget _buildStatItem(String label, String value, IconData icon, [Color? color]) {
  return Column(
    children: [
      Icon(icon, size: 32, color: color ?? Colors.blue),
      const SizedBox(height: 8),
      Text(
        value,
        style: TextStyle(
          fontSize: 24,
          fontWeight: FontWeight.bold,
          color: color ?? Colors.blue,
        ),
      ),
      const SizedBox(height: 4),
      Text(
        label,
        style: TextStyle(
          fontSize: 12,
          color: Colors.grey.shade700,
        ),
      ),
    ],
  );
}
八、客户端卡片UI
8.1 卡片布局
Widget _buildClientCard(ClientStatus client, int index) {
  return Card(
    margin: const EdgeInsets.only(bottom: 8),
    child: Padding(
      padding: const EdgeInsets.all(16),
      child: Column(
        children: [
          // 主要信息区域
          Row(
            children: [
              // 状态指示灯
              Container(/* ... */),
              const SizedBox(width: 16),
              // 客户端信息
              Expanded(child: /* ... */),
              // 操作按钮
              if (_serverRunning)
                Row(/* ... */),
            ],
          ),
          // 时间信息区域
          if (client.lastConnectTime != null || client.lastDisconnectTime != null)
            Padding(/* ... */),
        ],
      ),
    ),
  );
}
8.2 时间格式化
String _formatTime(DateTime time) {
  return '${time.hour.toString().padLeft(2, '0')}:'
         '${time.minute.toString().padLeft(2, '0')}:'
         '${time.second.toString().padLeft(2, '0')}';
}
九、运行效果与测试
9.1 项目运行命令
cd E:\HarmonyOS\oh.code\network_monitor
flutter run -d ohos
9.2 功能测试清单
服务器控制测试
- 点击启动服务器按钮
- 服务器状态变为运行中
- 所有客户端可以连接
- 点击停止服务器
- 所有客户端变为断开状态
状态指示灯测试
- 断开状态显示红色
- 连接状态显示绿色
- 颜色有发光效果
连接功能测试
- 服务器启动后可连接客户端
- 连接后指示灯变绿
- 连接计数增加
- 记录连接时间
断开功能测试
- 点击断开按钮
- 指示灯变红
- 连接计数减少
- 记录断开时间
统计信息测试
- 总数固定为8
- 已连接数实时更新
- 已断开数实时更新
十、总结
本文详细介绍了使用Flutter for OpenHarmony开发网络监控登录系统服务器端的完整过程,涵盖了以下核心技术点:
- 状态管理:服务器状态、客户端连接状态
- 状态指示灯:红绿灯效果、阴影发光
- 服务器控制:启动/停止、状态切换
- 客户端管理:连接/断开、时间记录
- 统计显示:实时统计、数据更新
- UI交互:按钮控制、状态反馈
这个项目展示了Flutter在网络监控应用开发中的完整流程。在第二篇文章中,我们将深入讲解Socket通信原理和实际网络编程实现。
读者可以基于此项目添加更多功能:
- 真实的Socket通信
- 客户端信息详情
- 连接日志记录
- 自动重连机制
- 心跳检测
- 多服务器支持
通过本文的学习,读者应该能够掌握Flutter在鸿蒙平台上开发监控类应用的基本方法。
欢迎加入开源鸿蒙跨平台社区: 开源鸿蒙跨平台开发者社区

开源鸿蒙跨平台开发社区汇聚开发者与厂商,共建“一次开发,多端部署”的开源生态,致力于降低跨端开发门槛,推动万物智联创新。
更多推荐
 28
28 0
0- 0


 已为社区贡献71条内容

所有评论(0)