Flutter for OpenHarmony生活助手App实战:菜谱管理功能实现
本文介绍了一个实用的菜谱管理功能设计方案。针对网上菜谱搜索繁琐、步骤复杂、广告多等问题,作者设计了简洁的菜谱卡片布局,包含名称、时间、难度和分类等关键信息。通过图标和标签优化信息展示,并设计了详情页展示完整菜谱内容。该方案注重实用性和用户体验,解决了烹饪过程中查找菜谱不便的痛点,帮助用户高效管理常用菜谱。
说起做饭这件事,我自己是从完全不会到慢慢摸索过来的。刚开始的时候,每次做饭都要上网搜菜谱,看一步做一步,手机屏幕还经常被油污弄脏。后来就想着,要是有个专门的菜谱管理功能就好了,可以收藏自己喜欢的菜谱,做的时候直接打开看。
为什么需要菜谱管理功能
你可能会想,网上菜谱那么多,为什么还要自己管理?说实话,网上的菜谱虽然多,但有几个问题:
- 每次都要搜索:想做某个菜,还要重新搜一遍
- 步骤太复杂:有些菜谱写得太详细,反而看不清重点
- 没有个性化:不能根据自己的口味调整
- 广告太多:很多菜谱网站广告满天飞,影响体验
所以我就想做一个简单实用的菜谱管理功能,可以收藏、编辑、分类,还能记录自己的做菜心得。
页面布局设计
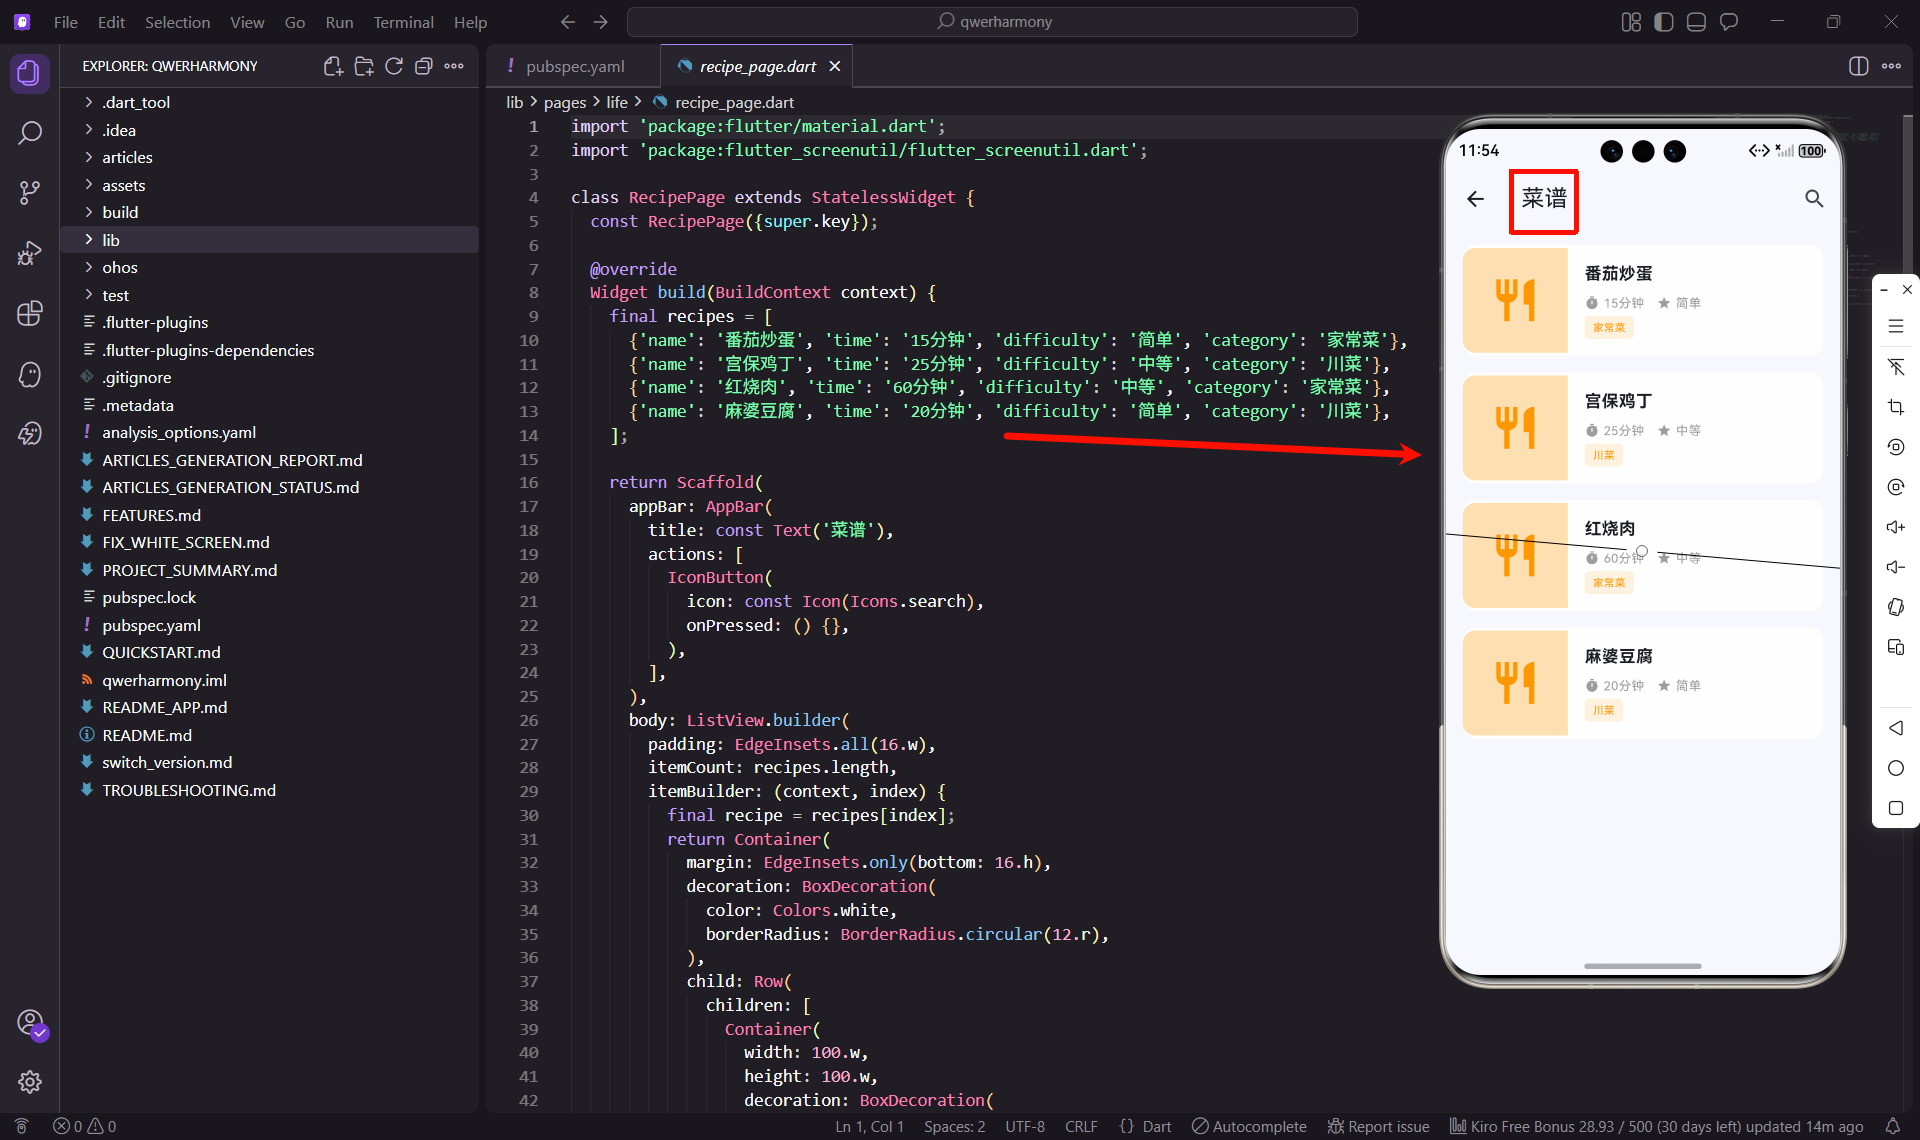
菜谱页面我采用了列表布局,每个菜谱是一个卡片,展示关键信息。先看看基本结构:
class RecipePage extends StatelessWidget {
const RecipePage({super.key});
Widget build(BuildContext context) {
final recipes = [
{'name': '番茄炒蛋', 'time': '15分钟', 'difficulty': '简单', 'category': '家常菜'},
{'name': '宫保鸡丁', 'time': '25分钟', 'difficulty': '中等', 'category': '川菜'},
{'name': '红烧肉', 'time': '60分钟', 'difficulty': '中等', 'category': '家常菜'},
{'name': '麻婆豆腐', 'time': '20分钟', 'difficulty': '简单', 'category': '川菜'},
];
每个菜谱包含名称、时间、难度、分类四个基本属性。这些信息能帮助用户快速判断要不要做这道菜。时间和难度特别重要,决定了是否适合当下的情况。
AppBar设计
return Scaffold(
  appBar: AppBar(
    title: const Text('菜谱'),
    actions: [
      IconButton(
        icon: const Icon(Icons.search),
        onPressed: () {},
      ),
    ],
  ),
AppBar右边放了一个搜索按钮,菜谱多了之后搜索功能就很重要了。想吃什么直接搜,比翻列表快多了。
菜谱卡片设计
每个菜谱卡片的设计是这样的:
body: ListView.builder(
  padding: EdgeInsets.all(16.w),
  itemCount: recipes.length,
  itemBuilder: (context, index) {
    final recipe = recipes[index];
    return Container(
      margin: EdgeInsets.only(bottom: 16.h),
      decoration: BoxDecoration(
        color: Colors.white,
        borderRadius: BorderRadius.circular(12.r),
      ),
      child: Row(
        children: [
          Container(
            width: 100.w,
            height: 100.w,
            decoration: BoxDecoration(
              color: Colors.orange[100],
              borderRadius: BorderRadius.only(
                topLeft: Radius.circular(12.r),
                bottomLeft: Radius.circular(12.r),
              ),
            ),
            child: Icon(
              Icons.restaurant,
              size: 48.sp,
              color: Colors.orange,
            ),
          ),
左边是一个正方形的图片区域,100x100的尺寸刚好合适,不会太大也不会太小。如果有菜品图片就显示图片,没有就显示一个餐具图标。背景色用橙色,和美食的主题比较搭配。
信息展示
Expanded(
  child: Padding(
    padding: EdgeInsets.all(16.w),
    child: Column(
      crossAxisAlignment: CrossAxisAlignment.start,
      children: [
        Text(
          recipe['name'] as String,
          style: TextStyle(
            fontSize: 16.sp,
            fontWeight: FontWeight.bold,
          ),
        ),
        SizedBox(height: 8.h),
        Row(
          children: [
            Icon(Icons.timer, size: 14.sp, color: Colors.grey),
            SizedBox(width: 4.w),
            Text(
              recipe['time'] as String,
              style: TextStyle(fontSize: 12.sp, color: Colors.grey),
            ),
            SizedBox(width: 12.w),
            Icon(Icons.star, size: 14.sp, color: Colors.grey),
            SizedBox(width: 4.w),
            Text(
              recipe['difficulty'] as String,
              style: TextStyle(fontSize: 12.sp, color: Colors.grey),
            ),
          ],
        ),
菜名用粗体显示,下面是时间和难度信息。用图标配合文字,信息更直观。时间用时钟图标,难度用星星图标,一眼就能看懂。
分类标签
SizedBox(height: 4.h),
Container(
  padding: EdgeInsets.symmetric(horizontal: 8.w, vertical: 4.h),
  decoration: BoxDecoration(
    color: Colors.orange[50],
    borderRadius: BorderRadius.circular(4.r),
  ),
  child: Text(
    recipe['category'] as String,
    style: TextStyle(fontSize: 10.sp, color: Colors.orange),
  ),
),
分类标签用小标签的形式展示,橙色背景配橙色文字,和整体风格统一。标签不要太大,点缀一下就好。
菜谱详情页
点击菜谱卡片,进入详情页查看完整信息:
class RecipeDetailPage extends StatelessWidget {
final Map<String, dynamic> recipe;
const RecipeDetailPage({super.key, required this.recipe});
Widget build(BuildContext context) {
return Scaffold(
appBar: AppBar(
title: Text(recipe['name']),
actions: [
IconButton(
icon: const Icon(Icons.edit),
onPressed: () {},
),
IconButton(
icon: const Icon(Icons.share),
onPressed: () {},
),
],
),
body: SingleChildScrollView(
child: Column(
crossAxisAlignment: CrossAxisAlignment.start,
children: [
_buildImage(),
_buildInfo(),
_buildIngredients(),
_buildSteps(),
_buildNotes(),
],
),
),
);
}
}
详情页包含图片、基本信息、食材、步骤、备注几个部分。AppBar右边有编辑和分享按钮,方便用户修改菜谱或分享给朋友。
食材列表
Widget _buildIngredients() {
  final ingredients = [
    {'name': '鸡蛋', 'amount': '3个'},
    {'name': '番茄', 'amount': '2个'},
    {'name': '葱', 'amount': '适量'},
    {'name': '盐', 'amount': '适量'},
  ];

  return Container(
    padding: EdgeInsets.all(16.w),
    child: Column(
      crossAxisAlignment: CrossAxisAlignment.start,
      children: [
        Text('食材', style: TextStyle(fontSize: 18.sp, fontWeight: FontWeight.bold)),
        SizedBox(height: 12.h),
        ...ingredients.map((ingredient) => Padding(
          padding: EdgeInsets.only(bottom: 8.h),
          child: Row(
            mainAxisAlignment: MainAxisAlignment.spaceBetween,
            children: [
              Text(ingredient['name']!, style: TextStyle(fontSize: 14.sp)),
              Text(ingredient['amount']!, style: TextStyle(fontSize: 14.sp, color: Colors.grey)),
            ],
          ),
        )),
      ],
    ),
  );
}
食材列表用左右布局,左边是食材名称,右边是用量。这样看起来很清晰,准备食材的时候一目了然。
制作步骤
Widget _buildSteps() {
  final steps = [
    '鸡蛋打散,番茄切块',
    '热锅凉油,倒入蛋液炒熟盛出',
    '锅中加油,放入番茄翻炒',
    '加入炒好的鸡蛋,加盐调味',
    '撒上葱花,出锅',
  ];

  return Container(
    padding: EdgeInsets.all(16.w),
    child: Column(
      crossAxisAlignment: CrossAxisAlignment.start,
      children: [
        Text('步骤', style: TextStyle(fontSize: 18.sp, fontWeight: FontWeight.bold)),
        SizedBox(height: 12.h),
        ...steps.asMap().entries.map((entry) => Container(
          margin: EdgeInsets.only(bottom: 16.h),
          child: Row(
            crossAxisAlignment: CrossAxisAlignment.start,
            children: [
              Container(
                width: 24.w,
                height: 24.w,
                decoration: const BoxDecoration(
                  color: Colors.orange,
                  shape: BoxShape.circle,
                ),
                child: Center(
                  child: Text(
                    '${entry.key + 1}',
                    style: TextStyle(color: Colors.white, fontSize: 12.sp),
                  ),
                ),
              ),
              SizedBox(width: 12.w),
              Expanded(
                child: Text(
                  entry.value,
                  style: TextStyle(fontSize: 14.sp, height: 1.5),
                ),
              ),
            ],
          ),
        )),
      ],
    ),
  );
}
步骤用序号标记,每个步骤前面有个橙色圆圈,里面是数字。这样看起来很有条理,做的时候不会乱。
添加菜谱功能
用户可以添加自己的菜谱:
class AddRecipePage extends StatefulWidget {
const AddRecipePage({super.key});
State<AddRecipePage> createState() => _AddRecipePageState();
}
class _AddRecipePageState extends State<AddRecipePage> {
final TextEditingController nameController = TextEditingController();
final TextEditingController timeController = TextEditingController();
String selectedDifficulty = '简单';
String selectedCategory = '家常菜';
final difficulties = ['简单', '中等', '困难'];
final categories = ['家常菜', '川菜', '粤菜', '湘菜', '鲁菜', '其他'];
List<Map<String, String>> ingredients = [];
List<String> steps = [];
添加页面需要输入菜名、时间、难度、分类,还要添加食材和步骤。界面要简洁,不要让用户觉得麻烦。
动态添加食材
Widget buildIngredientsInput() {
  return Column(
    children: [
      ...ingredients.asMap().entries.map((entry) => Row(
        children: [
          Expanded(
            child: TextField(
              decoration: const InputDecoration(labelText: '食材名称'),
              onChanged: (value) => ingredients[entry.key]['name'] = value,
            ),
          ),
          SizedBox(width: 12.w),
          Expanded(
            child: TextField(
              decoration: const InputDecoration(labelText: '用量'),
              onChanged: (value) => ingredients[entry.key]['amount'] = value,
            ),
          ),
          IconButton(
            icon: const Icon(Icons.remove_circle, color: Colors.red),
            onPressed: () => setState(() => ingredients.removeAt(entry.key)),
          ),
        ],
      )),
      TextButton.icon(
        onPressed: () => setState(() => ingredients.add({'name': '', 'amount': ''})),
        icon: const Icon(Icons.add),
        label: const Text('添加食材'),
      ),
    ],
  );
}
食材可以动态添加和删除,每行有两个输入框,一个输入名称,一个输入用量。右边有个删除按钮,可以删除不需要的食材。
数据存储
菜谱数据需要持久化存储:
import 'package:shared_preferences/shared_preferences.dart';
import 'dart:convert';

class RecipeStorage {
  static const String _key = 'recipes_data';

  static Future<void> saveRecipes(List<Map<String, dynamic>> recipes) async {
    final prefs = await SharedPreferences.getInstance();
    final jsonString = jsonEncode(recipes);
    await prefs.setString(_key, jsonString);
  }

  static Future<List<Map<String, dynamic>>> loadRecipes() async {
    final prefs = await SharedPreferences.getInstance();
    final jsonString = prefs.getString(_key);
    if (jsonString == null) return [];
    return List<Map<String, dynamic>>.from(jsonDecode(jsonString));
  }
}
存储方案很简单,就是把菜谱列表转成JSON字符串。如果菜谱很多,可以考虑用数据库,比如sqflite,查询和管理会更方便。
搜索和筛选
菜谱多了之后,搜索和筛选功能就很重要:
List<Map<String, dynamic>> searchRecipes(String query, List<Map<String, dynamic>> recipes) {
  if (query.isEmpty) return recipes;

  return recipes.where((recipe) {
    final name = recipe['name'] as String;
    return name.contains(query);
  }).toList();
}

List<Map<String, dynamic>> filterByCategory(String category, List<Map<String, dynamic>> recipes) {
  if (category == '全部') return recipes;
  return recipes.where((recipe) => recipe['category'] == category).toList();
}

List<Map<String, dynamic>> filterByDifficulty(String difficulty, List<Map<String, dynamic>> recipes) {
  if (difficulty == '全部') return recipes;
  return recipes.where((recipe) => recipe['difficulty'] == difficulty).toList();
}
可以按名称搜索,也可以按分类和难度筛选。多种筛选方式组合使用,能快速找到想要的菜谱。
收藏功能
可以从网上收藏菜谱,或者收藏朋友分享的菜谱:
class RecipeImportPage extends StatelessWidget {
const RecipeImportPage({super.key});
Widget build(BuildContext context) {
return Scaffold(
appBar: AppBar(title: const Text('导入菜谱')),
body: Padding(
padding: EdgeInsets.all(16.w),
child: Column(
children: [
TextField(
decoration: const InputDecoration(
labelText: '粘贴菜谱链接或文本',
border: OutlineInputBorder(),
),
maxLines: 5,
),
SizedBox(height: 16.h),
ElevatedButton(
onPressed: () {
// 解析菜谱内容
},
child: const Text('导入'),
),
],
),
),
);
}
}
用户可以粘贴菜谱链接或文本,系统自动解析出食材和步骤。这个功能实现起来有点复杂,需要做文本解析,但很实用。
实际使用体验
我自己用这个菜谱功能已经有一段时间了,感觉还是挺方便的。特别是把常做的菜谱都收藏起来,做的时候直接打开看,不用每次都搜索。
有时候还会在菜谱上加备注,记录自己的改进方法。比如某道菜我觉得盐放少点更好,就在备注里写上。这种个性化的调整,是网上菜谱给不了的。
不过也发现了一些可以改进的地方:
- 图片上传:应该支持上传菜品图片,看着更有食欲
- 视频教程:有些复杂的步骤,视频比文字更清楚
- 营养分析:可以分析菜品的营养成分,更健康
- 购物清单:可以根据菜谱生成购物清单,买菜更方便
总结
菜谱管理功能看起来简单,但要做好需要考虑很多细节。最重要的是要让用户觉得方便,愿意用。界面要简洁,操作要流畅,信息要清晰。
我在开发这个功能的时候,一直在思考怎么让它更实用。后来发现,好的菜谱应用不是菜谱最多的,而是最符合用户习惯的。
如果你也在开发类似的功能,建议多从用户角度思考,多试用,多改进。一个好用的菜谱管理功能,真的能让做饭变得更轻松愉快。
欢迎加入开源鸿蒙跨平台社区:https://openharmonycrossplatform.csdn.net

开源鸿蒙跨平台开发社区汇聚开发者与厂商,共建“一次开发,多端部署”的开源生态,致力于降低跨端开发门槛,推动万物智联创新。
更多推荐

 29
29 0
0- 0


 已为社区贡献30条内容

所有评论(0)