flutter_for_openharmony口腔护理app实战+牙齿地图实现
本文介绍了如何使用Flutter实现牙齿地图功能,包括牙齿可视化展示、状态标识、交互选择和统计信息。通过StatefulWidget管理选中状态,使用不同颜色区分牙齿健康状态(健康、龋齿、补牙等),并提供了图例说明。页面布局分为上颌和下颌两行牙齿展示,支持点击查看详情。实现过程涉及状态管理、UI布局和交互处理,为口腔健康应用提供了直观的牙齿状态可视化方案。(149字)
前言
在口腔护理应用中,牙齿地图是一个非常直观且实用的功能模块。它能够帮助用户清晰地了解自己每一颗牙齿的健康状况,包括哪些牙齿是健康的、哪些有龋齿、哪些做过补牙或牙冠治疗,甚至哪些牙齿已经缺失。这种可视化的展示方式,让用户对自己的口腔健康有一个全面的认知。
本篇文章将详细介绍如何使用 Flutter 实现一个功能完善的牙齿地图页面,包括牙齿的可视化展示、状态标识、交互选择以及统计信息等功能。
功能需求分析
在开始编码之前,我们先梳理一下牙齿地图页面需要实现的核心功能:
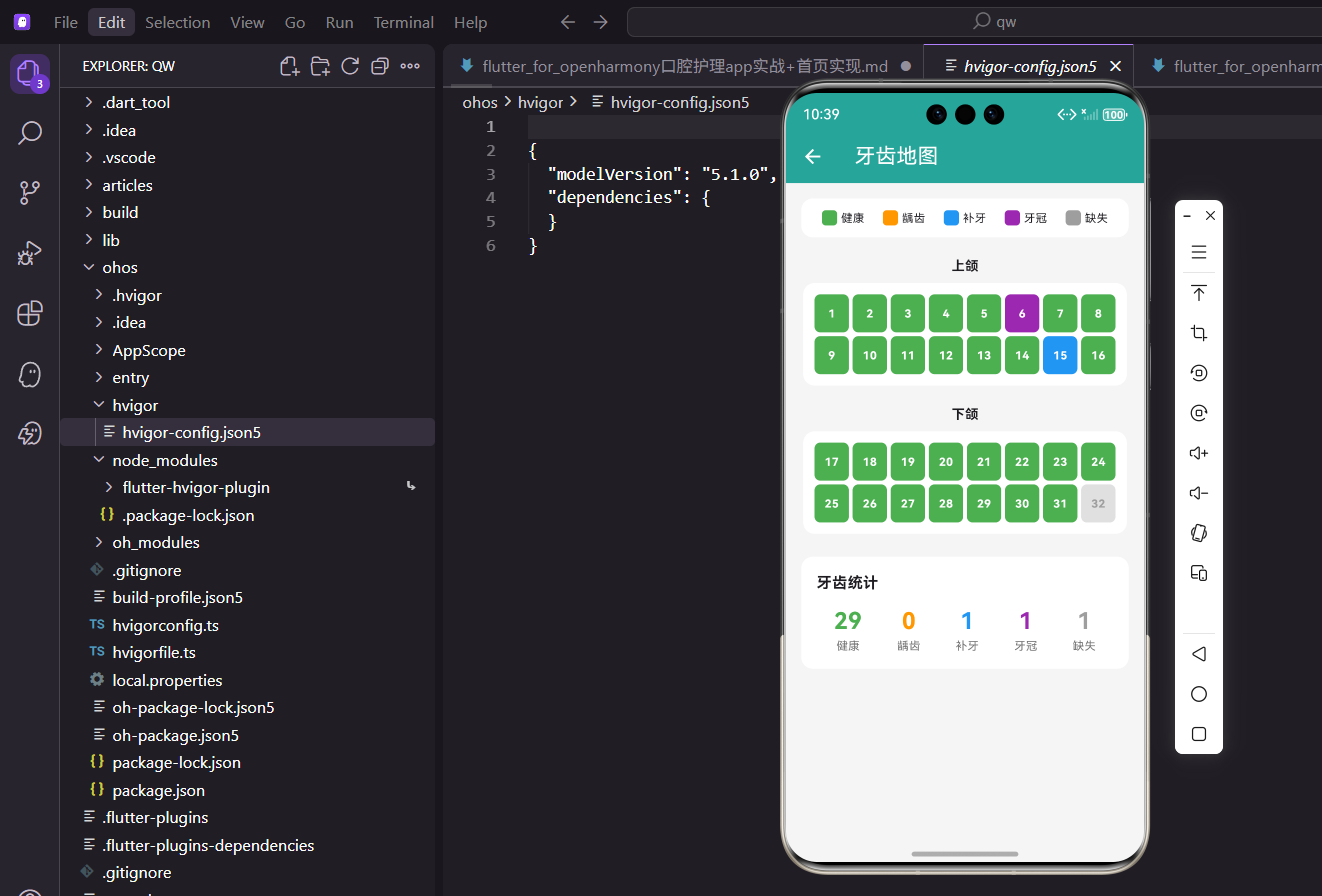
- 牙齿可视化展示:将32颗牙齿按照上颌和下颌分别排列展示
- 状态颜色标识:不同状态的牙齿用不同颜色区分(健康、龋齿、补牙、牙冠、缺失)
- 图例说明:提供颜色与状态的对应说明
- 交互选择:点击某颗牙齿可查看详细信息
- 统计汇总:展示各状态牙齿的数量统计
页面结构设计
整个页面采用 StatefulWidget 来实现,因为我们需要管理用户选中的牙齿状态。页面主体使用 SingleChildScrollView 包裹,确保内容较多时可以滚动查看。
class TeethMapPage extends StatefulWidget {
const TeethMapPage({super.key});
State<TeethMapPage> createState() => _TeethMapPageState();
}
这里我们定义了一个有状态的组件,因为牙齿地图需要响应用户的点击操作,记录当前选中的是哪颗牙齿。
接下来定义状态类,其中 _selectedTooth 用于存储当前选中牙齿的编号:
class _TeethMapPageState extends State<TeethMapPage> {
  int? _selectedTooth;
使用可空类型 int? 是因为初始状态下没有选中任何牙齿,这样可以区分"未选中"和"选中第0颗"的情况。
构建主体布局
页面的 build 方法中,我们使用 Consumer 来监听 AppProvider 的数据变化:
Widget build(BuildContext context) {
return Scaffold(
appBar: AppBar(title: const Text('牙齿地图')),
body: Consumer<AppProvider>(
builder: (context, provider, _) {
return SingleChildScrollView(
padding: const EdgeInsets.all(16),
child: Column(
children: [
_buildLegend(),
const SizedBox(height: 20),
const Text('上颌', style: TextStyle(fontWeight: FontWeight.bold)),
const SizedBox(height: 8),
_buildTeethRow(provider, 1, 16, true),
const SizedBox(height: 20),
const Text('下颌', style: TextStyle(fontWeight: FontWeight.bold)),
const SizedBox(height: 8),
_buildTeethRow(provider, 17, 32, false),
const SizedBox(height: 24),
if (_selectedTooth != null)
_buildToothDetail(provider, _selectedTooth!),
_buildStatistics(provider),
],
),
);
},
),
);
}
这段代码展示了页面的整体结构。我们将内容分为几个主要部分:图例、上颌牙齿、下颌牙齿、选中牙齿详情和统计信息。使用 Consumer 可以在数据变化时自动重建界面。
实现图例组件
图例是帮助用户理解颜色含义的重要组成部分。我们定义了五种牙齿状态及其对应的颜色:
Widget _buildLegend() {
  final items = [
    {'color': Colors.green, 'label': '健康'},
    {'color': Colors.orange, 'label': '龋齿'},
    {'color': Colors.blue, 'label': '补牙'},
    {'color': Colors.purple, 'label': '牙冠'},
    {'color': Colors.grey, 'label': '缺失'},
  ];
这里使用 Map 列表来存储图例数据,每个条目包含颜色和标签两个属性。这种数据结构便于后续遍历渲染。
图例的 UI 实现如下:
  return Container(
    padding: const EdgeInsets.all(12),
    decoration: BoxDecoration(
      color: Colors.white,
      borderRadius: BorderRadius.circular(12),
    ),
    child: Row(
      mainAxisAlignment: MainAxisAlignment.spaceAround,
      children: items.map((item) => Row(
        children: [
          Container(
            width: 16,
            height: 16,
            decoration: BoxDecoration(
              color: item['color'] as Color,
              borderRadius: BorderRadius.circular(4),
            ),
          ),
          const SizedBox(width: 4),
          Text(item['label'] as String, style: const TextStyle(fontSize: 12)),
        ],
      )).toList(),
    ),
  );
}
通过 map 方法遍历图例数据,为每个状态生成一个小色块和对应的文字说明。spaceAround 让各个图例项均匀分布在容器中。
构建牙齿行
牙齿按照上颌(1-16号)和下颌(17-32号)分两行展示。我们封装了一个通用的方法来构建牙齿行:
Widget _buildTeethRow(AppProvider provider, int start, int end, bool isUpper) {
  return Container(
    padding: const EdgeInsets.all(12),
    decoration: BoxDecoration(
      color: Colors.white,
      borderRadius: BorderRadius.circular(12),
    ),
    child: Wrap(
      alignment: WrapAlignment.center,
      spacing: 4,
      runSpacing: 4,
      children: List.generate(end - start + 1, (index) {
        final position = start + index;
        final tooth = provider.teethInfo.firstWhere(
          (t) => t.position == position,
          orElse: () => provider.teethInfo[0],
        );
        return _buildTooth(position, tooth.status);
      }),
    ),
  );
}
这个方法接收起始和结束位置参数,使用 Wrap 组件来实现自动换行布局。List.generate 动态生成指定数量的牙齿组件,并从 provider 中获取每颗牙齿的状态信息。
单颗牙齿的渲染
每颗牙齿都是一个可点击的小方块,根据状态显示不同的颜色:
Widget _buildTooth(int position, String status) {
  Color color;
  switch (status) {
    case 'healthy':
      color = Colors.green;
      break;
    case 'cavity':
      color = Colors.orange;
      break;
    case 'filled':
      color = Colors.blue;
      break;
    case 'crown':
      color = Colors.purple;
      break;
    case 'missing':
      color = Colors.grey.shade300;
      break;
    default:
      color = Colors.green;
  }
使用 switch 语句根据状态字符串映射到对应的颜色。这种方式比多个 if-else 更加清晰易读。
接下来是牙齿的视觉呈现和交互处理:
  final isSelected = _selectedTooth == position;

  return GestureDetector(
    onTap: () => setState(() => _selectedTooth = position),
    child: Container(
      width: 36,
      height: 40,
      decoration: BoxDecoration(
        color: color,
        borderRadius: BorderRadius.circular(6),
        border: isSelected ? Border.all(color: Colors.black, width: 2) : null,
        boxShadow: isSelected ? [const BoxShadow(color: Colors.black26, blurRadius: 4)] : null,
      ),
      child: Center(
        child: Text(
          '$position',
          style: TextStyle(
            color: status == 'missing' ? Colors.grey : Colors.white,
            fontSize: 12,
            fontWeight: FontWeight.bold,
          ),
        ),
      ),
    ),
  );
}
当牙齿被选中时,会添加黑色边框和阴影效果,让用户清楚地知道当前选中的是哪颗牙齿。缺失的牙齿文字颜色使用灰色,与背景形成对比。
牙齿详情展示
当用户点击某颗牙齿后,页面会显示该牙齿的详细信息:
Widget _buildToothDetail(AppProvider provider, int position) {
  final tooth = provider.teethInfo.firstWhere(
    (t) => t.position == position,
    orElse: () => provider.teethInfo[0],
  );

  String statusText;
  switch (tooth.status) {
    case 'healthy':
      statusText = '健康';
      break;
    case 'cavity':
      statusText = '龋齿';
      break;
    case 'filled':
      statusText = '已补牙';
      break;
    case 'crown':
      statusText = '牙冠';
      break;
    case 'missing':
      statusText = '缺失';
      break;
    default:
      statusText = '未知';
  }
首先从数据源中获取对应位置的牙齿信息,然后将英文状态码转换为中文显示文本。
详情卡片的 UI 实现:
  String toothName = _getToothName(position);

  return Container(
    margin: const EdgeInsets.only(bottom: 16),
    padding: const EdgeInsets.all(16),
    decoration: BoxDecoration(
      color: Colors.white,
      borderRadius: BorderRadius.circular(12),
      border: Border.all(color: const Color(0xFF26A69A)),
    ),
    child: Column(
      crossAxisAlignment: CrossAxisAlignment.start,
      children: [
        Row(
          children: [
            const Icon(Icons.info_outline, color: Color(0xFF26A69A)),
            const SizedBox(width: 8),
            Text('第 $position 颗牙 - $toothName',
                 style: const TextStyle(fontWeight: FontWeight.bold, fontSize: 16)),
          ],
        ),
        const SizedBox(height: 12),
        _buildDetailRow('状态', statusText),
        if (tooth.lastTreatment != null)
          _buildDetailRow('最近治疗', tooth.lastTreatment!),
        if (tooth.lastCheckDate != null)
          _buildDetailRow('最近检查',
              '${tooth.lastCheckDate!.year}-${tooth.lastCheckDate!.month}-${tooth.lastCheckDate!.day}'),
      ],
    ),
  );
}
详情卡片使用主题色边框突出显示,内部展示牙齿编号、名称、状态以及治疗和检查记录。条件渲染确保只有存在数据时才显示对应字段。
牙齿名称映射
为了让用户更好地理解每颗牙齿的位置,我们实现了一个位置到名称的映射方法:
String _getToothName(int position) {
  if (position <= 8 || (position >= 17 && position <= 24)) {
    final names = ['中切牙', '侧切牙', '尖牙', '第一前磨牙',
                   '第二前磨牙', '第一磨牙', '第二磨牙', '第三磨牙(智齿)'];
    final index = (position <= 8) ? position - 1 : position - 17;
    return names[index % 8];
  } else {
    final names = ['第三磨牙(智齿)', '第二磨牙', '第一磨牙', '第二前磨牙',
                   '第一前磨牙', '尖牙', '侧切牙', '中切牙'];
    final index = (position <= 16) ? position - 9 : position - 25;
    return names[index % 8];
  }
}
这个方法根据牙齿的位置编号返回对应的专业名称。由于上下颌左右两侧的牙齿排列顺序不同,需要分别处理。
详情行组件
为了保持代码整洁,我们将详情行抽取为独立的组件:
Widget _buildDetailRow(String label, String value) {
  return Padding(
    padding: const EdgeInsets.only(bottom: 8),
    child: Row(
      children: [
        Text('$label:', style: TextStyle(color: Colors.grey.shade600)),
        Text(value),
      ],
    ),
  );
}
这是一个简单的键值对展示组件,标签使用灰色文字,值使用默认黑色文字,形成视觉层次。
统计信息展示
页面底部展示各状态牙齿的数量统计:
Widget _buildStatistics(AppProvider provider) {
  final healthy = provider.teethInfo.where((t) => t.status == 'healthy').length;
  final cavity = provider.teethInfo.where((t) => t.status == 'cavity').length;
  final filled = provider.teethInfo.where((t) => t.status == 'filled').length;
  final crown = provider.teethInfo.where((t) => t.status == 'crown').length;
  final missing = provider.teethInfo.where((t) => t.status == 'missing').length;
使用 where 方法过滤出各状态的牙齿,然后获取数量。这种函数式编程风格让代码更加简洁。
统计卡片的布局实现:
  return Container(
    padding: const EdgeInsets.all(16),
    decoration: BoxDecoration(
      color: Colors.white,
      borderRadius: BorderRadius.circular(12),
    ),
    child: Column(
      crossAxisAlignment: CrossAxisAlignment.start,
      children: [
        const Text('牙齿统计',
                   style: TextStyle(fontWeight: FontWeight.bold, fontSize: 16)),
        const SizedBox(height: 12),
        Row(
          mainAxisAlignment: MainAxisAlignment.spaceAround,
          children: [
            _buildStatItem('健康', healthy, Colors.green),
            _buildStatItem('龋齿', cavity, Colors.orange),
            _buildStatItem('补牙', filled, Colors.blue),
            _buildStatItem('牙冠', crown, Colors.purple),
            _buildStatItem('缺失', missing, Colors.grey),
          ],
        ),
      ],
    ),
  );
}
五种状态的统计数据横向排列,每个统计项使用对应的颜色,与图例保持一致。
统计项组件
单个统计项的实现:
Widget _buildStatItem(String label, int count, Color color) {
  return Column(
    children: [
      Text('$count',
           style: TextStyle(fontSize: 24, fontWeight: FontWeight.bold, color: color)),
      Text(label,
           style: TextStyle(color: Colors.grey.shade600, fontSize: 12)),
    ],
  );
}
数字使用大号加粗字体并应用对应颜色,标签使用小号灰色字体,形成主次分明的视觉效果。
数据模型设计
牙齿地图功能依赖于牙齿信息的数据模型,在 oral_models.dart 中定义:
class ToothInfo {
  final int position;
  final String status;
  final String? lastTreatment;
  final DateTime? lastCheckDate;

  ToothInfo({
    required this.position,
    required this.status,
    this.lastTreatment,
    this.lastCheckDate,
  });
}
模型包含位置、状态、最近治疗和最近检查日期四个字段,后两个为可选字段。
Provider 中的数据管理
在 AppProvider 中管理牙齿数据:
List<ToothInfo> _teethInfo = [];
List<ToothInfo> get teethInfo => _teethInfo;

void initTestData() {
  // 初始化32颗牙齿的测试数据
  _teethInfo = List.generate(32, (index) {
    final statuses = ['healthy', 'healthy', 'healthy', 'cavity', 'filled'];
    return ToothInfo(
      position: index + 1,
      status: statuses[index % statuses.length],
      lastCheckDate: DateTime.now().subtract(Duration(days: index * 10)),
    );
  });
}
测试数据生成32颗牙齿,状态按照一定规律分配,便于开发调试时查看各种状态的显示效果。
交互体验优化
为了提升用户体验,我们在牙齿选中时添加了视觉反馈:
decoration: BoxDecoration(
  color: color,
  borderRadius: BorderRadius.circular(6),
  border: isSelected ? Border.all(color: Colors.black, width: 2) : null,
  boxShadow: isSelected ? [const BoxShadow(color: Colors.black26, blurRadius: 4)] : null,
),
选中状态通过边框和阴影双重效果来强调,让用户的操作得到即时反馈。
响应式布局考虑
使用 Wrap 组件而非 Row 来排列牙齿,可以在不同屏幕宽度下自动换行:
child: Wrap(
  alignment: WrapAlignment.center,
  spacing: 4,
  runSpacing: 4,
  children: [...],
),
spacing 控制水平间距,runSpacing 控制行间距,center 对齐确保牙齿居中显示。
性能优化建议
在实际项目中,如果牙齿数据需要频繁更新,可以考虑以下优化:
- 使用
Selector替代Consumer,只监听需要的数据变化 - 将牙齿组件抽取为独立的
StatelessWidget,利用 Flutter 的组件复用机制 - 对于复杂的状态计算,可以使用
compute方法在后台线程执行
扩展功能思路
基于当前的牙齿地图功能,还可以扩展以下特性:
- 历史记录:记录每颗牙齿的状态变化历史
- 治疗计划:为有问题的牙齿制定治疗计划
- 提醒功能:对需要复查的牙齿设置提醒
- 数据导出:将牙齿健康报告导出为 PDF
总结
本文详细介绍了口腔护理 App 中牙齿地图功能的实现过程。通过合理的组件拆分和状态管理,我们实现了一个功能完善、交互友好的牙齿可视化页面。关键技术点包括:
- 使用
StatefulWidget管理选中状态 - 通过
Consumer监听数据变化 - 利用
Wrap实现响应式布局 - 使用颜色编码直观展示牙齿状态
希望本文对你在 Flutter 开发中实现类似的可视化功能有所帮助。
欢迎加入开源鸿蒙跨平台社区:https://openharmonycrossplatform.csdn.net

开源鸿蒙跨平台开发社区汇聚开发者与厂商,共建“一次开发,多端部署”的开源生态,致力于降低跨端开发门槛,推动万物智联创新。
更多推荐

 18
18 0
0- 0


 已为社区贡献30条内容

所有评论(0)