Flutter跨平台生活助手App开发实战:从零开始搭建项目架构
作为一名开发者,我最近在做一个生活助手类的应用,想把开发过程中的一些经验分享给大家。这个应用集成了健康管理、记账、待办事项等功能,目标是帮助用户更好地管理日常生活。今天先聊聊项目的初始化和架构设计这块。
作为一名开发者,我最近在做一个生活助手类的应用,想把开发过程中的一些经验分享给大家。这个应用集成了健康管理、记账、待办事项等功能,目标是帮助用户更好地管理日常生活。今天先聊聊项目的初始化和架构设计这块。
为什么选择Flutter
说实话,一开始我也纠结过技术选型。最后选Flutter主要是看中它的跨平台能力,一套代码可以同时跑在多个平台上,开发效率确实高。而且Flutter的UI渲染性能不错,做出来的界面也比较流畅。
这个项目我用的是Flutter 3.22.1版本,配合鸿蒙适配的依赖包,可以很好地支持OpenHarmony系统。
项目依赖配置
先看看pubspec.yaml文件的配置,这里我选了一些比较实用的库:
name: habithm
description: 生活助手 - 一款集健康管理、记账、待办事项等功能于一体的生活管理应用
version: 2.1.3+2010133

environment:
  sdk: '>=2.19.6 <3.0.0'

dependencies:
  flutter:
    sdk: flutter

  get: ^4.6.5                    # 状态管理和路由
  shared_preferences: ^2.2.0     # 本地数据存储
  fl_chart: ^0.65.0              # 图表展示
  intl: ^0.20.2                  # 日期格式化
  percent_indicator: ^4.2.3      # 进度指示器
  convex_bottom_bar: ^3.0.0      # 底部导航栏
  flutter_screenutil: ^5.9.0     # 屏幕适配
  uuid: ^4.2.2                   # 生成唯一ID
  table_calendar: ^3.0.9         # 日历组件
这些依赖都是经过实际使用验证的,比如get用来做状态管理和路由跳转特别方便,fl_chart可以画出各种好看的图表,flutter_screenutil能解决不同屏幕尺寸的适配问题。
值得一提的是,为了支持鸿蒙系统,我用了一些特殊的依赖配置:
path_provider:
  git:
    url: "https://gitcode.com/openharmony-sig/flutter_packages.git"
    path: "packages/path_provider/path_provider"
    ref: "master"

sqflite:
  git:
    url: "https://gitcode.com/openharmony-sig/flutter_sqflite.git"
    path: "sqflite"
    ref: "br_v2.3.3+1_ohos"
这些是鸿蒙适配版本的依赖,从gitcode上拉取,可以保证在鸿蒙系统上正常运行。
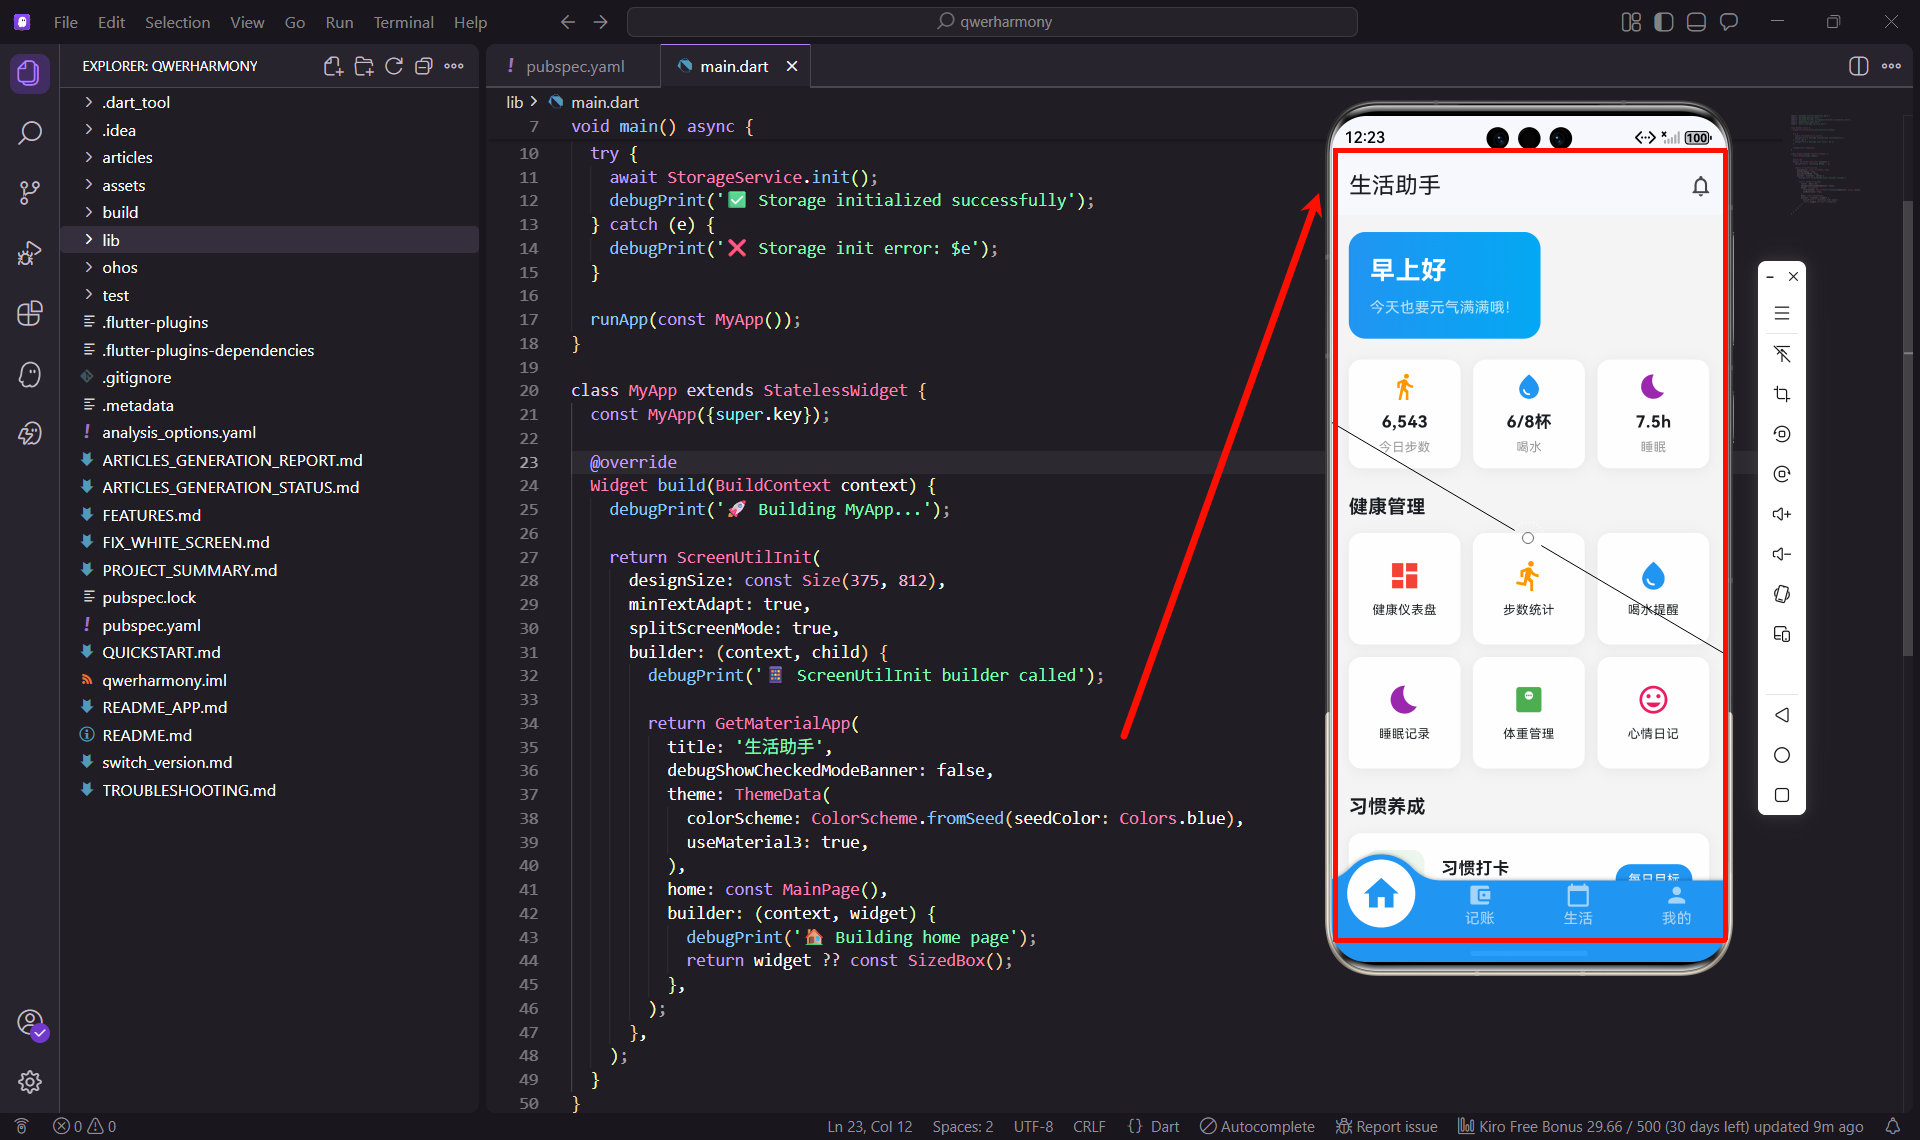
应用入口设计
应用的入口文件main.dart是整个项目的起点,我的设计思路是这样的:
import 'package:flutter/material.dart';
import 'package:get/get.dart';
import 'package:flutter_screenutil/flutter_screenutil.dart';
import 'pages/main_page.dart';
import 'utils/storage_service.dart';
void main() async {
WidgetsFlutterBinding.ensureInitialized();
try {
await StorageService.init();
debugPrint('✅ Storage initialized successfully');
} catch (e) {
debugPrint('❌ Storage init error: $e');
}
runApp(const MyApp());
}
class MyApp extends StatelessWidget {
const MyApp({super.key});
Widget build(BuildContext context) {
debugPrint('🚀 Building MyApp...');
return ScreenUtilInit(
designSize: const Size(375, 812),
minTextAdapt: true,
splitScreenMode: true,
builder: (context, child) {
debugPrint('📱 ScreenUtilInit builder called');
return GetMaterialApp(
title: '生活助手',
debugShowCheckedModeBanner: false,
theme: ThemeData(
colorScheme: ColorScheme.fromSeed(seedColor: Colors.blue),
useMaterial3: true,
),
home: const MainPage(),
builder: (context, widget) {
debugPrint('🏠 Building home page');
return widget ?? const SizedBox();
},
);
},
);
}
}
这里有几个关键点:
1. 异步初始化
WidgetsFlutterBinding.ensureInitialized()这行代码很重要,它确保Flutter引擎初始化完成后再执行后续操作。然后我会初始化本地存储服务,这样应用启动后就可以读取用户的历史数据了。
2. 屏幕适配
用ScreenUtilInit包裹整个应用,设置设计稿尺寸为375x812(iPhone X的尺寸),这样在不同屏幕上都能保持UI比例一致。
3. 状态管理
使用GetMaterialApp替代普通的MaterialApp,这样就可以使用GetX的路由和状态管理功能了。
4. 调试日志
我加了一些debugPrint语句,方便开发时追踪应用的启动流程,出问题时也能快速定位。
本地存储服务
数据持久化是应用的基础功能,我封装了一个StorageService类来统一管理:
import 'package:shared_preferences/shared_preferences.dart';

class StorageService {
  static late SharedPreferences _prefs;

  static Future<void> init() async {
    _prefs = await SharedPreferences.getInstance();
  }

  static Future<bool> setBool(String key, bool value) async {
    return await _prefs.setBool(key, value);
  }

  static bool getBool(String key, {bool defaultValue = false}) {
    return _prefs.getBool(key) ?? defaultValue;
  }

  static Future<bool> setString(String key, String value) async {
    return await _prefs.setString(key, value);
  }

  static String getString(String key, {String defaultValue = ''}) {
    return _prefs.getString(key) ?? defaultValue;
  }

  static Future<bool> setInt(String key, int value) async {
    return await _prefs.setInt(key, value);
  }

  static int getInt(String key, {int defaultValue = 0}) {
    return _prefs.getInt(key) ?? defaultValue;
  }

  static Future<bool> setStringList(String key, List<String> value) async {
    return await _prefs.setStringList(key, value);
  }

  static List<String> getStringList(String key) {
    return _prefs.getStringList(key) ?? [];
  }

  static Future<bool> remove(String key) async {
    return await _prefs.remove(key);
  }
}
这个工具类把SharedPreferences的常用操作都封装好了,使用起来很方便。比如保存用户设置:
// 保存主题设置
await StorageService.setBool('dark_mode', true);

// 读取主题设置
bool isDarkMode = StorageService.getBool('dark_mode');
项目目录结构
一个清晰的目录结构对项目维护很重要,我是这样组织的:
lib/
├── main.dart                 # 应用入口
├── models/                   # 数据模型
│   ├── todo_model.dart      # 待办事项模型
│   ├── transaction_model.dart  # 账单模型
│   └── habit_model.dart     # 习惯模型
├── utils/                    # 工具类
│   └── storage_service.dart # 存储服务
└── pages/                    # 页面
    ├── main_page.dart       # 主页面(底部导航)
    ├── home/                # 首页Tab
    ├── finance/             # 记账Tab
    ├── life/                # 生活Tab
    └── profile/             # 我的Tab
这种结构的好处是:
- models:存放数据模型,方便数据的序列化和反序列化
- utils:存放工具类,比如存储、网络请求、日期处理等
- pages:按功能模块划分页面,每个Tab一个文件夹
数据模型设计
以待办事项为例,看看数据模型是怎么设计的:
class TodoModel {
  final String id;
  final String title;
  final String? description;
  final DateTime? dueDate;
  final String priority;
  final bool isCompleted;
  final String category;

  TodoModel({
    required this.id,
    required this.title,
    this.description,
    this.dueDate,
    required this.priority,
    required this.isCompleted,
    required this.category,
  });

  Map<String, dynamic> toJson() {
    return {
      'id': id,
      'title': title,
      'description': description,
      'dueDate': dueDate?.toIso8601String(),
      'priority': priority,
      'isCompleted': isCompleted,
      'category': category,
    };
  }

  factory TodoModel.fromJson(Map<String, dynamic> json) {
    return TodoModel(
      id: json['id'],
      title: json['title'],
      description: json['description'],
      dueDate: json['dueDate'] != null ? DateTime.parse(json['dueDate']) : null,
      priority: json['priority'],
      isCompleted: json['isCompleted'],
      category: json['category'],
    );
  }

  TodoModel copyWith({
    String? id,
    String? title,
    String? description,
    DateTime? dueDate,
    String? priority,
    bool? isCompleted,
    String? category,
  }) {
    return TodoModel(
      id: id ?? this.id,
      title: title ?? this.title,
      description: description ?? this.description,
      dueDate: dueDate ?? this.dueDate,
      priority: priority ?? this.priority,
      isCompleted: isCompleted ?? this.isCompleted,
      category: category ?? this.category,
    );
  }
}
这个模型包含了:
- 基本属性:id、标题、描述、截止日期等
- toJson方法:把对象转换成JSON,方便存储
- fromJson工厂方法:从JSON创建对象,方便读取
- copyWith方法:创建对象的副本,方便更新部分属性
开发中的一些经验
1. 异常处理
在初始化存储服务时,我加了try-catch来捕获可能的异常,避免应用启动失败:
try {
  await StorageService.init();
  debugPrint('✅ Storage initialized successfully');
} catch (e) {
  debugPrint('❌ Storage init error: $e');
}
即使存储初始化失败,应用也能继续运行,只是无法保存数据而已。
2. 调试信息
开发阶段多打印一些日志很有帮助,我用emoji让日志更容易识别:
- ✅ 表示成功
- ❌ 表示错误
- 🚀 表示启动
- 📱 表示UI相关
- 🏠 表示页面相关
3. 代码规范
我遵循Dart的命名规范:
- 文件名用小写加下划线:
main_page.dart - 类名用大驼峰:
MainPage - 变量名用小驼峰:
currentIndex - 私有变量加下划线:
_prefs
架构设计思路
整个应用采用分层架构:
表现层(Presentation):负责UI展示和用户交互,就是pages目录下的各个页面。
业务层(Business):负责业务逻辑处理,包括数据模型和工具类。
数据层(Data):负责数据存储和读取,使用SharedPreferences和SQLite。
这种分层的好处是职责清晰,修改某一层不会影响其他层。比如我想把SharedPreferences换成其他存储方案,只需要修改StorageService的实现,其他代码不用动。
下一步计划
项目的基础架构搭建好了,接下来要实现底部导航栏,把四个主要功能模块串起来。这部分会涉及到convex_bottom_bar的使用和页面切换逻辑,我会在下一篇文章详细介绍。
小结
今天主要分享了项目初始化和架构设计的内容,包括依赖配置、应用入口、本地存储、数据模型等。这些都是应用开发的基础,打好基础后面的功能开发会顺利很多。
如果你也在做类似的项目,希望这些经验对你有帮助。有什么问题欢迎交流讨论。
欢迎加入开源鸿蒙跨平台社区:https://openharmonycrossplatform.csdn.net

开源鸿蒙跨平台开发社区汇聚开发者与厂商,共建“一次开发,多端部署”的开源生态,致力于降低跨端开发门槛,推动万物智联创新。
更多推荐
 13
13 0
0- 0


 已为社区贡献30条内容

所有评论(0)