Flutter框架跨平台鸿蒙开发——睡眠白噪音APP的开发流程
本文介绍了使用Flutter框架开发跨平台睡眠白噪音APP的完整流程。该应用提供多种自然声音选择、实时音量调节和定时关闭功能,采用响应式设计适配不同设备。开发过程包括项目初始化、音频播放服务实现、数据模型构建和UI界面开发,最终可部署到鸿蒙系统。技术栈采用Flutter+Dart,配合Just Audio音频库实现核心功能,项目结构清晰,模块划分合理,为跨平台音频类应用开发提供了实践参考。
Flutter框架跨平台鸿蒙开发——睡眠白噪音APP的开发流程
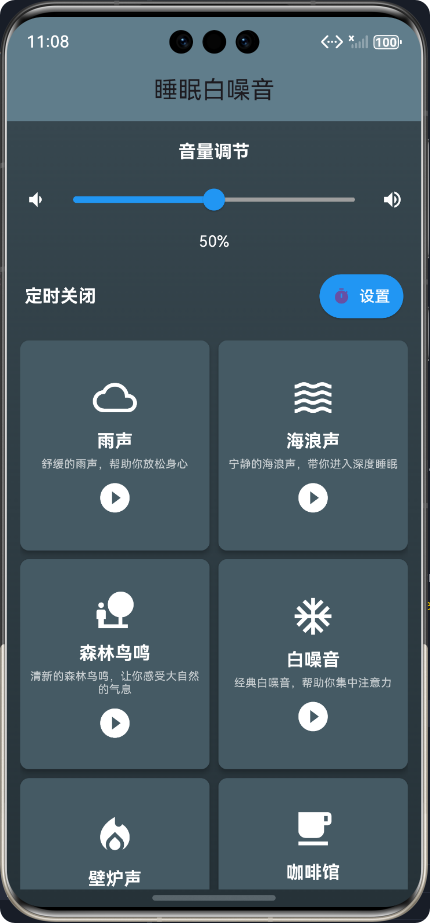
🚀运行效果展示
📝 前言
随着移动互联网的快速发展,跨平台开发框架已成为移动应用开发的主流趋势。Flutter作为Google推出的开源UI框架,
凭借其"Write Once, Run Anywhere"的特性,在跨平台开发领域占据了重要地位。同时,华为推出的鸿蒙操作系统(HarmonyOS)也在不断发展壮大,支持多设备协同和分布式应用开发。
本文将详细介绍如何使用Flutter框架开发一款跨平台的睡眠白噪音APP,并将其部署到鸿蒙系统上。我们将从项目初始化开始,逐步实现核心功能,解决遇到的问题,最终完成一款功能完整、体验良好的睡眠白噪音应用。
🎵 应用介绍
睡眠白噪音APP是一款帮助用户放松身心、改善睡眠质量的应用。它提供了多种自然声音(如雨声、海浪声、森林鸟鸣等),用户可以根据自己的喜好选择不同的白噪音,并调整音量和设置定时关闭功能。
核心功能
- 🌧️ 多种白噪音选择(雨声、海浪声、森林鸟鸣等)
- 🔊 实时音量调节
- ⏰ 定时关闭功能
- 📱 响应式设计,适配不同屏幕尺寸
- 🎨 美观的渐变背景和UI设计
- 🎯 直观的播放控制
🛠️ 开发环境与技术栈
开发环境
| 环境 | 版本 |
|---|---|
| Flutter | 3.6.2 |
| Dart | 3.0.2 |
| DevEco Studio | 4.0.0 |
| HarmonyOS SDK | 3.1.0 |
技术栈
- Flutter:UI框架
- Dart:开发语言
- Just Audio:音频播放库
- Provider:状态管理(可选)
- Shared Preferences:本地存储(可选)
📁 项目结构设计
flutter_text/
├── lib/
│   ├── models/              # 数据模型
│   │   └── white_noise_model.dart  # 白噪音模型
│   ├── services/            # 服务层
│   │   └── white_noise_service.dart  # 音频播放服务
│   ├── screens/             # 界面层
│   │   └── white_noise_screen.dart  # 主界面
│   └── main.dart            # 应用入口
├── assets/                  # 资源文件
│   └── images/              # 图片资源
├── pubspec.yaml             # 项目配置和依赖
└── README.md                # 项目说明
🔄 开发流程
🎯 核心功能实现
1. 音频播放功能
1.1 配置音频播放依赖
在pubspec.yaml文件中添加just_audio依赖:
dependencies:
  flutter:
    sdk: flutter
  just_audio: ^0.9.40
1.2 实现音频播放服务
import 'package:just_audio/just_audio.dart';
import '../models/white_noise_model.dart';

/// 白噪音音频播放服务
class WhiteNoiseService {
  /// 音频播放器实例
  final AudioPlayer _audioPlayer = AudioPlayer();

  /// 当前播放的白噪音
  WhiteNoiseModel? _currentNoise;

  /// 构造函数
  WhiteNoiseService();

  /// 初始化音频播放器
  Future<void> initialize() async {
    try {
      // 设置循环播放
      await _audioPlayer.setLoopMode(LoopMode.one);
    } catch (e) {
      print('初始化音频播放器失败: $e');
    }
  }

  /// 播放白噪音
  Future<void> playWhiteNoise(WhiteNoiseModel noise) async {
    try {
      // 如果当前有正在播放的白噪音,先停止
      if (_currentNoise != null && _currentNoise!.isPlaying) {
        await stopWhiteNoise();
      }

      // 设置音频源
      await _audioPlayer.setUrl(noise.audioUrl);

      // 设置音量
      await _audioPlayer.setVolume(noise.volume);

      // 开始播放
      await _audioPlayer.play();

      // 更新当前播放状态
      _currentNoise = noise.copyWith(isPlaying: true);
    } catch (e) {
      print('播放白噪音失败: $e');
    }
  }

  /// 暂停白噪音
  Future<void> pauseWhiteNoise() async {
    try {
      await _audioPlayer.pause();

      // 更新当前播放状态
      if (_currentNoise != null) {
        _currentNoise = _currentNoise!.copyWith(isPlaying: false);
      }
    } catch (e) {
      print('暂停白噪音失败: $e');
    }
  }

  /// 停止白噪音
  Future<void> stopWhiteNoise() async {
    try {
      await _audioPlayer.stop();
      await _audioPlayer.seek(Duration.zero);

      // 更新当前播放状态
      if (_currentNoise != null) {
        _currentNoise = _currentNoise!.copyWith(isPlaying: false);
      }
    } catch (e) {
      print('停止白噪音失败: $e');
    }
  }

  /// 调节音量
  Future<void> setVolume(double volume) async {
    try {
      // 确保音量在0.0到1.0之间
      final clampedVolume = volume.clamp(0.0, 1.0);

      await _audioPlayer.setVolume(clampedVolume);

      // 更新当前白噪音的音量
      if (_currentNoise != null) {
        _currentNoise = _currentNoise!.copyWith(volume: clampedVolume);
      }
    } catch (e) {
      print('调节音量失败: $e');
    }
  }
}
2. 白噪音数据模型
/// 白噪音模型类
class WhiteNoiseModel {
  /// 白噪音ID
  final String id;

  /// 白噪音名称
  final String name;

  /// 白噪音描述
  final String description;

  /// 音频文件URL
  final String audioUrl;

  /// 图标名称
  final String iconName;

  /// 是否正在播放
  bool isPlaying;

  /// 音量大小 (0.0 - 1.0)
  double volume;

  /// 构造函数
  WhiteNoiseModel({
    required this.id,
    required this.name,
    required this.description,
    required this.audioUrl,
    required this.iconName,
    this.isPlaying = false,
    this.volume = 0.5,
  });
}
3. 主界面设计与实现
3.1 整体布局结构
Widget build(BuildContext context) {
return Scaffold(
appBar: AppBar(
title: const Text('睡眠白噪音'),
centerTitle: true,
backgroundColor: Colors.blueGrey,
),
body: Container(
decoration: BoxDecoration(
gradient: LinearGradient(
begin: Alignment.topCenter,
end: Alignment.bottomCenter,
colors: [Colors.blueGrey.shade800, Colors.blueGrey.shade900],
),
),
child: LayoutBuilder(
builder: (context, constraints) {
return Column(
children: [
// 音量调节
_buildVolumeControl(),
// 定时关闭
_buildTimerControl(),
// 白噪音列表
Expanded(
child: _buildNoiseList(),
),
],
);
},
),
),
);
}
3.2 白噪音列表实现
/// 构建白噪音列表
Widget _buildNoiseList() {
  return Padding(
    padding: const EdgeInsets.fromLTRB(12.0, 8.0, 12.0, 16.0),
    child: GridView.count(
      crossAxisCount: 2,
      crossAxisSpacing: 8.0,
      mainAxisSpacing: 8.0,
      childAspectRatio: 0.9,
      children: _noiseList.map((noise) => _buildNoiseCard(noise)).toList(),
    ),
  );
}

/// 构建白噪音卡片
Widget _buildNoiseCard(WhiteNoiseModel noise) {
  return Material(
    elevation: 4.0,
    borderRadius: BorderRadius.circular(8.0),
    color: noise.isPlaying ? Colors.blue.shade700 : Colors.blueGrey.shade700,
    child: InkWell(
      onTap: () => _toggleNoise(noise),
      borderRadius: BorderRadius.circular(8.0),
      child: Padding(
        padding: const EdgeInsets.all(8.0),
        child: Column(
          mainAxisAlignment: MainAxisAlignment.center,
          mainAxisSize: MainAxisSize.min,
          children: [
            Icon(
              _getIcon(noise.iconName),
              size: 40.0,
              color: Colors.white,
            ),
            const SizedBox(height: 8.0),
            Text(
              noise.name,
              style: const TextStyle(
                color: Colors.white,
                fontSize: 16.0,
                fontWeight: FontWeight.bold,
              ),
            ),
            const SizedBox(height: 4.0),
            Text(
              noise.description,
              textAlign: TextAlign.center,
              style: const TextStyle(
                color: Colors.white70,
                fontSize: 10.0,
                height: 1.2,
              ),
              maxLines: 2,
              overflow: TextOverflow.ellipsis,
            ),
            const SizedBox(height: 8.0),
            Icon(
              noise.isPlaying
                  ? Icons.pause_circle_filled
                  : Icons.play_circle_filled,
              size: 32.0,
              color: Colors.white,
            ),
          ],
        ),
      ),
    ),
  );
}
4. 音量调节功能
/// 构建音量调节控件
Widget _buildVolumeControl() {
  return Padding(
    padding: const EdgeInsets.fromLTRB(16.0, 16.0, 16.0, 8.0),
    child: Column(
      children: [
        const Text(
          '音量调节',
          style: TextStyle(
            color: Colors.white,
            fontSize: 16,
            fontWeight: FontWeight.bold,
          ),
        ),
        const SizedBox(height: 8.0),
        Row(
          children: [
            Icon(
              Icons.volume_down,
              color: Colors.white,
              size: 20.0,
            ),
            Expanded(
              child: Slider(
                value: _currentVolume,
                onChanged: _onVolumeChanged,
                min: 0.0,
                max: 1.0,
                divisions: 100,
                activeColor: Colors.blue,
                inactiveColor: Colors.grey,
              ),
            ),
            Icon(
              Icons.volume_up,
              color: Colors.white,
              size: 20.0,
            ),
          ],
        ),
        Text(
          '${(_currentVolume * 100).toInt()}%',
          style: TextStyle(
            color: Colors.white,
            fontSize: 14,
          ),
        ),
      ],
    ),
  );
}

/// 处理音量变化
Future<void> _onVolumeChanged(double value) async {
  setState(() {
    _currentVolume = value;
  });
  await _noiseService.setVolume(value);
}
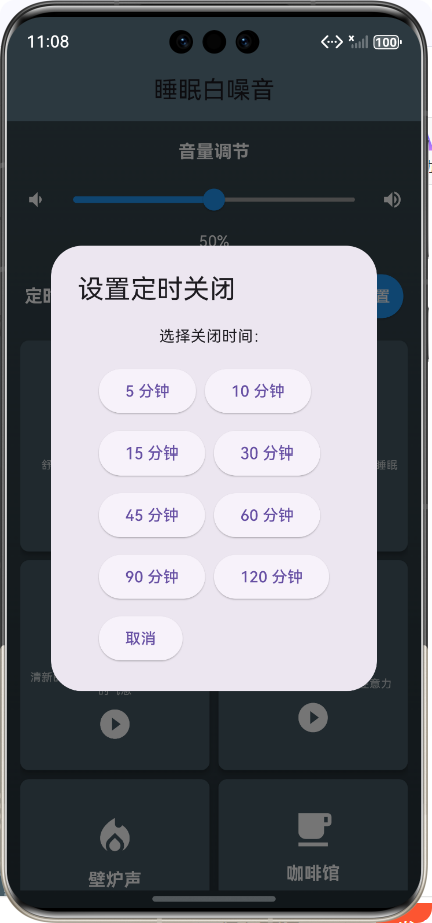
5. 定时关闭功能
5.1 定时关闭流程
5.2 定时关闭功能实现
/// 显示定时关闭选择对话框
void _showTimerDialog() {
  showDialog(
    context: context,
    builder: (context) => AlertDialog(
      title: const Text('设置定时关闭'),
      content: SingleChildScrollView(
        child: Column(
          mainAxisSize: MainAxisSize.min,
          children: [
            const Text('选择关闭时间:'),
            const SizedBox(height: 16),
            Wrap(
              spacing: 8,
              runSpacing: 8,
              children: [
                _timerButton(5),
                _timerButton(10),
                _timerButton(15),
                _timerButton(30),
                _timerButton(45),
                _timerButton(60),
                _timerButton(90),
                _timerButton(120),
                _timerButton(0, label: '取消'),
              ],
            ),
          ],
        ),
      ),
    ),
  );
}

/// 开始定时器
void _startTimer(int minutes) {
  // 先停止之前的定时器
  _stopTimer();

  setState(() {
    _timerMinutes = minutes;
    _remainingSeconds = minutes * 60;
  });

  // 创建新的定时器
  _timer = Timer.periodic(const Duration(seconds: 1), (timer) {
    setState(() {
      if (_remainingSeconds != null && _remainingSeconds! > 0) {
        _remainingSeconds = _remainingSeconds! - 1;
      } else {
        // 时间到,停止播放
        _stopTimer();
        _stopAllNoise();
      }
    });
  });
}
🐛 遇到的问题与解决方案
问题:底部溢出问题
在开发过程中,应用在小屏幕设备上运行时出现了底部溢出97像素的问题,具体表现为白噪音卡片底部显示"Bottom Overflowed by 97 Pixels"的错误提示。
解决方案
- 初始尝试:使用
SingleChildScrollView包裹整个内容,让界面可以滚动 - 优化卡片布局:减小卡片内边距、字体大小和图标尺寸
- 调整网格布局:减小卡片间距,调整
childAspectRatio - 最终方案:重构布局结构,使用
Column+Expanded组合,让白噪音列表占满剩余空间
// 最终解决方案
child: LayoutBuilder(
  builder: (context, constraints) {
    return Column(
      children: [
        // 音量调节和定时关闭控件
        _buildVolumeControl(),
        _buildTimerControl(),

        // 白噪音列表 - 使用Expanded确保填充剩余空间
        Expanded(
          child: _buildNoiseList(),
        ),
      ],
    );
  },
),
🎉 总结
通过本次开发,我们成功使用Flutter框架开发了一款跨平台的睡眠白噪音APP,并将其部署到鸿蒙系统上。在开发过程中,我们学习了如何使用Flutter的各种组件和布局方式,如何集成第三方库实现音频播放功能,以及如何解决开发过程中遇到的UI布局问题。
项目成果
- 完成了一款功能完整的睡眠白噪音APP
- 实现了音频播放、音量调节、定时关闭等核心功能
- 设计了美观的UI界面,适配不同屏幕尺寸
- 成功将应用部署到鸿蒙系统上
学到的经验
- Flutter跨平台开发的优势:代码复用率高,开发效率高
- 合理的项目结构设计:模块化开发,便于维护和扩展
- UI布局的重要性:响应式设计,适配不同设备
- 问题解决思路:从简单到复杂,逐步优化
未来改进方向
- 添加更多白噪音类型
- 支持自定义白噪音混合
- 添加睡眠数据统计功能
- 支持本地音频文件导入
- 优化音频播放性能
- 添加更多主题和背景
📚 参考资料
欢迎加入开源鸿蒙跨平台社区:https://openharmonycrossplatform.csdn.net

开源鸿蒙跨平台开发社区汇聚开发者与厂商,共建“一次开发,多端部署”的开源生态,致力于降低跨端开发门槛,推动万物智联创新。
更多推荐

 23
23 0
0- 0


 已为社区贡献15条内容

所有评论(0)