Flutter 框架跨平台鸿蒙开发 - 打造像素画板应用
二维数组操作:像素数据的存储和处理递归算法:洪水填充的实现历史记录:撤销重做机制颜色管理:HSL色彩空间和调色板数据持久化:JSON序列化和SharedPreferences高清导出:RepaintBoundary图片生成通过本项目,你不仅学会了如何实现像素画板应用,还掌握了Flutter中二维数组处理、递归算法、颜色管理的核心技术。这些知识可以应用到更多创意绘画和图像处理应用的开发。创作你的像素
Flutter实战:打造像素画板应用
前言
像素画板是一款创意绘画应用,让用户可以创作复古风格的像素艺术作品。本文将带你从零开始,使用Flutter开发一个功能完整的像素画板应用,支持多种绘画工具、调色板、作品保存等功能。
应用特色
- 🎨 多种工具:画笔、橡皮、填充、吸管
- 🌈 丰富调色板:16色预设+自定义颜色
- 📐 灵活画布:8×8到64×64可调尺寸
- ↩️ 撤销重做:支持50步历史记录
- 💾 作品保存:本地保存多个作品
- 📤 高清导出:10倍分辨率PNG导出
- 🔲 网格切换:显示/隐藏网格线
- 🎯 洪水填充:递归填充算法
- 📁 作品管理:网格视图作品集
- 🖼️ 实时预览:缩略图预览
效果展示
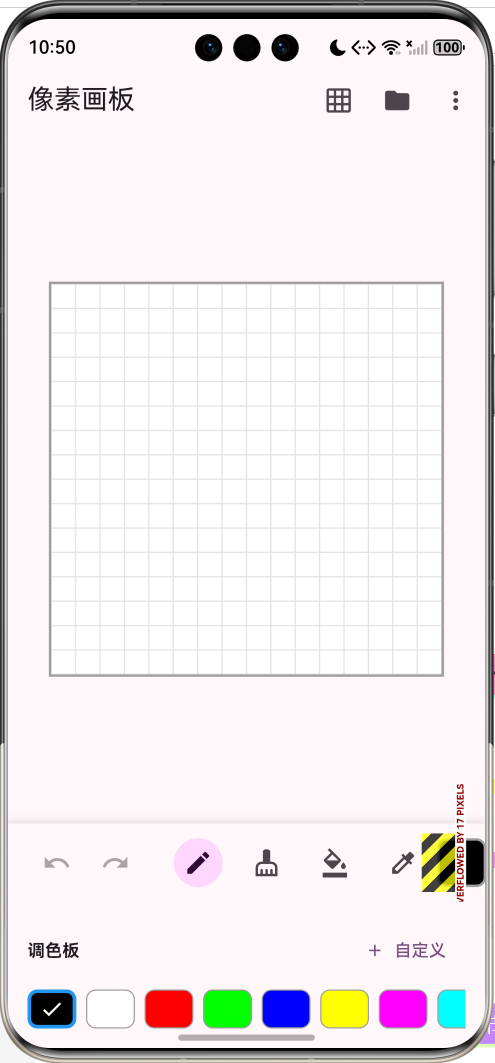
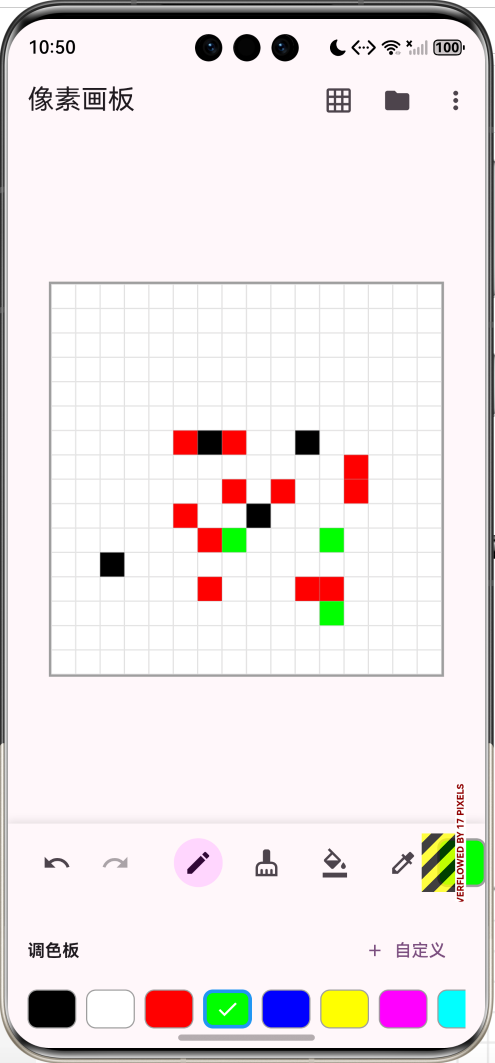
数据模型设计
像素画作品模型
class PixelArt {
  String id;
  String name;
  int width;
  int height;
  List<List<int>> pixels;
  DateTime createdAt;

  PixelArt({
    required this.id,
    required this.name,
    required this.width,
    required this.height,
    required this.pixels,
    required this.createdAt,
  });
}
字段说明:
id:唯一标识符name:作品名称width:画布宽度(像素数)height:画布高度(像素数)pixels:二维数组存储每个像素的颜色值createdAt:创建时间
像素数据结构:
List<List<int>> pixels = [
  [0xFFFFFFFF, 0xFF000000, 0xFFFF0000],  // 第一行
  [0xFF00FF00, 0xFF0000FF, 0xFFFFFF00],  // 第二行
  [0xFFFF00FF, 0xFF00FFFF, 0xFFFFFFFF],  // 第三行
];
核心功能实现
1. 画布初始化
void _initCanvas() {
  _pixels = List.generate(
    _gridHeight,
    (_) => List.filled(_gridWidth, 0xFFFFFFFF),
  );
  _saveToHistory();
}
初始化流程:
- 创建二维数组
- 填充白色(0xFFFFFFFF)
- 保存到历史记录
2. 像素点击处理
void _onPixelTap(int row, int col) {
  setState(() {
    switch (_currentTool) {
      case 'pen':
        _pixels[row][col] = _currentColor;
        _saveToHistory();
        break;
      case 'eraser':
        _pixels[row][col] = 0xFFFFFFFF;
        _saveToHistory();
        break;
      case 'fill':
        _floodFill(row, col, _pixels[row][col], _currentColor);
        _saveToHistory();
        break;
      case 'eyedropper':
        _currentColor = _pixels[row][col];
        _currentTool = 'pen';
        break;
    }
  });
}
工具说明:
pen:画笔,设置像素为当前颜色eraser:橡皮,设置像素为白色fill:填充,使用洪水填充算法eyedropper:吸管,获取像素颜色
3. 洪水填充算法
void _floodFill(int row, int col, int targetColor, int replacementColor) {
  if (targetColor == replacementColor) return;
  if (row < 0 || row >= _gridHeight || col < 0 || col >= _gridWidth) return;
  if (_pixels[row][col] != targetColor) return;

  _pixels[row][col] = replacementColor;

  _floodFill(row - 1, col, targetColor, replacementColor);
  _floodFill(row + 1, col, targetColor, replacementColor);
  _floodFill(row, col - 1, targetColor, replacementColor);
  _floodFill(row, col + 1, targetColor, replacementColor);
}
算法流程:
- 检查边界条件
- 检查当前像素是否为目标颜色
- 替换当前像素颜色
- 递归处理上下左右四个方向
优化建议:
- 对于大画布,可以使用队列实现非递归版本
- 避免栈溢出问题
4. 历史记录管理
void _saveToHistory() {
  // 删除当前位置之后的历史
  if (_historyIndex < _history.length - 1) {
    _history.removeRange(_historyIndex + 1, _history.length);
  }

  // 添加新状态
  _history.add(_pixels.map((row) => List<int>.from(row)).toList());
  _historyIndex++;

  // 限制历史记录数量
  if (_history.length > 50) {
    _history.removeAt(0);
    _historyIndex--;
  }
}

void _undo() {
  if (_historyIndex > 0) {
    setState(() {
      _historyIndex--;
      _pixels = _history[_historyIndex]
          .map((row) => List<int>.from(row))
          .toList();
    });
  }
}

void _redo() {
  if (_historyIndex < _history.length - 1) {
    setState(() {
      _historyIndex++;
      _pixels = _history[_historyIndex]
          .map((row) => List<int>.from(row))
          .toList();
    });
  }
}
历史记录机制:
- 使用列表存储画布状态
- 限制最多50步历史
- 支持撤销和重做操作
- 新操作会清除重做历史
5. 数据持久化
Future<void> _loadArts() async {
  final prefs = await SharedPreferences.getInstance();
  final artsJson = prefs.getString('pixel_arts');
  if (artsJson != null) {
    final List<dynamic> decoded = json.decode(artsJson);
    setState(() {
      _savedArts = decoded.map((item) => PixelArt.fromJson(item)).toList();
    });
  }
}

Future<void> _saveArts() async {
  final prefs = await SharedPreferences.getInstance();
  await prefs.setString(
    'pixel_arts',
    json.encode(_savedArts.map((art) => art.toJson()).toList()),
  );
}
6. 高清导出
Future<void> _exportImage() async {
  try {
    final boundary = _canvasKey.currentContext!.findRenderObject()
        as RenderRepaintBoundary;
    final image = await boundary.toImage(pixelRatio: 10.0);
    final byteData = await image.toByteData(format: ui.ImageByteFormat.png);
    final pngBytes = byteData!.buffer.asUint8List();

    await Share.shareXFiles(
      [XFile.fromData(pngBytes, mimeType: 'image/png', name: 'pixel_art.png')],
      text: '我的像素画',
    );
  } catch (e) {
    if (mounted) {
      ScaffoldMessenger.of(context).showSnackBar(
        SnackBar(content: Text('导出失败: $e')),
      );
    }
  }
}
导出参数:
pixelRatio: 10.0:10倍分辨率- 16×16画布导出为160×160像素
- 保持像素艺术的清晰度
UI组件设计
1. 像素画布组件
class PixelCanvas extends StatelessWidget {
final List<List<int>> pixels;
final bool showGrid;
final Function(int, int)? onPixelTap;
Widget build(BuildContext context) {
final height = pixels.length;
final width = pixels.isEmpty ? 0 : pixels[0].length;
// 计算像素大小
final pixelSize = onPixelTap != null ? 20.0 : 10.0;
return Container(
decoration: BoxDecoration(
border: Border.all(color: Colors.grey, width: 2),
),
child: Column(
mainAxisSize: MainAxisSize.min,
children: List.generate(height, (row) {
return Row(
mainAxisSize: MainAxisSize.min,
children: List.generate(width, (col) {
return GestureDetector(
onTap: onPixelTap != null ? () => onPixelTap!(row, col) : null,
child: Container(
width: pixelSize,
height: pixelSize,
decoration: BoxDecoration(
color: Color(pixels[row][col]),
border: showGrid
? Border.all(
color: Colors.grey.withValues(alpha: 0.3),
width: 0.5,
)
: null,
),
),
);
}),
);
}),
),
);
}
}
设计要点:
- 使用Column和Row嵌套创建网格
- GestureDetector处理点击事件
- 可选显示网格线
- 根据用途调整像素大小
2. 工具栏
Widget _buildToolbar() {
  return Container(
    padding: const EdgeInsets.symmetric(horizontal: 16, vertical: 8),
    decoration: BoxDecoration(
      color: Theme.of(context).colorScheme.surface,
      boxShadow: [
        BoxShadow(
          color: Colors.black.withValues(alpha: 0.1),
          blurRadius: 5,
          offset: const Offset(0, -2),
        ),
      ],
    ),
    child: Row(
      children: [
        IconButton(
          icon: const Icon(Icons.undo),
          onPressed: _historyIndex > 0 ? _undo : null,
          tooltip: '撤销',
        ),
        IconButton(
          icon: const Icon(Icons.redo),
          onPressed: _historyIndex < _history.length - 1 ? _redo : null,
          tooltip: '重做',
        ),
        const SizedBox(width: 16),
        _buildToolButton(Icons.edit, 'pen', '画笔'),
        _buildToolButton(Icons.cleaning_services, 'eraser', '橡皮'),
        _buildToolButton(Icons.format_color_fill, 'fill', '填充'),
        _buildToolButton(Icons.colorize, 'eyedropper', '吸管'),
        const Spacer(),
        Container(
          width: 40,
          height: 40,
          decoration: BoxDecoration(
            color: Color(_currentColor),
            border: Border.all(color: Colors.grey, width: 2),
            borderRadius: BorderRadius.circular(8),
          ),
        ),
      ],
    ),
  );
}
工具按钮:
- 撤销/重做:根据历史状态启用/禁用
- 工具选择:高亮显示当前工具
- 颜色预览:显示当前选中颜色
3. 调色板
Widget _buildColorPalette() {
  return Container(
    height: 120,
    padding: const EdgeInsets.all(16),
    decoration: BoxDecoration(
      color: Theme.of(context).colorScheme.surface,
    ),
    child: Column(
      crossAxisAlignment: CrossAxisAlignment.start,
      children: [
        Row(
          children: [
            const Text(
              '调色板',
              style: TextStyle(
                fontSize: 14,
                fontWeight: FontWeight.bold,
              ),
            ),
            const Spacer(),
            TextButton.icon(
              onPressed: _showColorPicker,
              icon: const Icon(Icons.add, size: 16),
              label: const Text('自定义'),
            ),
          ],
        ),
        const SizedBox(height: 8),
        Expanded(
          child: ListView(
            scrollDirection: Axis.horizontal,
            children: [
              ..._defaultPalette.map((color) => _buildColorItem(color)),
              if (_customPalette.isNotEmpty) ...[
                const SizedBox(width: 8),
                Container(
                  width: 1,
                  color: Colors.grey,
                ),
                const SizedBox(width: 8),
                ..._customPalette.map((color) => _buildColorItem(color)),
              ],
            ],
          ),
        ),
      ],
    ),
  );
}
16色预设调色板:
static const List<int> _defaultPalette = [
  0xFF000000, // 黑色
  0xFFFFFFFF, // 白色
  0xFFFF0000, // 红色
  0xFF00FF00, // 绿色
  0xFF0000FF, // 蓝色
  0xFFFFFF00, // 黄色
  0xFFFF00FF, // 品红
  0xFF00FFFF, // 青色
  0xFFFF8800, // 橙色
  0xFF8800FF, // 紫色
  0xFF00FF88, // 青绿
  0xFFFF0088, // 粉红
  0xFF888888, // 灰色
  0xFF880000, // 深红
  0xFF008800, // 深绿
  0xFF000088, // 深蓝
];
4. 颜色选择器
void _showColorPicker() {
  showDialog(
    context: context,
    builder: (context) => AlertDialog(
      title: const Text('选择颜色'),
      content: SizedBox(
        width: 300,
        height: 400,
        child: GridView.builder(
          gridDelegate: const SliverGridDelegateWithFixedCrossAxisCount(
            crossAxisCount: 8,
            mainAxisSpacing: 8,
            crossAxisSpacing: 8,
          ),
          itemCount: 256,
          itemBuilder: (context, index) {
            final hue = (index % 16) * 22.5;
            final lightness = 0.3 + (index ~/ 16) * 0.05;
            final color = HSLColor.fromAHSL(1.0, hue, 1.0, lightness).toColor();

            return InkWell(
              onTap: () {
                setState(() {
                  _currentColor = color.value;
                  _addToCustomPalette(color.value);
                });
                Navigator.pop(context);
              },
              child: Container(
                decoration: BoxDecoration(
                  color: color,
                  border: Border.all(color: Colors.grey),
                  borderRadius: BorderRadius.circular(4),
                ),
              ),
            );
          },
        ),
      ),
    ),
  );
}
颜色生成算法:
- 使用HSL色彩空间
- 16种色相 × 16种亮度 = 256种颜色
- 色相:0°-360°,每22.5°一个
- 亮度:0.3-1.0,每0.05一个
5. 新建画布对话框
void _showNewCanvasDialog() {
  int width = _gridWidth;
  int height = _gridHeight;

  showDialog(
    context: context,
    builder: (context) => StatefulBuilder(
      builder: (context, setState) {
        return AlertDialog(
          title: const Text('新建画布'),
          content: Column(
            mainAxisSize: MainAxisSize.min,
            children: [
              Row(
                children: [
                  const Text('宽度:'),
                  Expanded(
                    child: Slider(
                      value: width.toDouble(),
                      min: 8,
                      max: 64,
                      divisions: 56,
                      label: '$width',
                      onChanged: (value) {
                        setState(() {
                          width = value.toInt();
                        });
                      },
                    ),
                  ),
                  Text('$width'),
                ],
              ),
              Row(
                children: [
                  const Text('高度:'),
                  Expanded(
                    child: Slider(
                      value: height.toDouble(),
                      min: 8,
                      max: 64,
                      divisions: 56,
                      label: '$height',
                      onChanged: (value) {
                        setState(() {
                          height = value.toInt();
                        });
                      },
                    ),
                  ),
                  Text('$height'),
                ],
              ),
              const SizedBox(height: 16),
              Wrap(
                spacing: 8,
                runSpacing: 8,
                children: [
                  _buildPresetButton('8×8', 8, 8),
                  _buildPresetButton('16×16', 16, 16),
                  _buildPresetButton('32×32', 32, 32),
                  _buildPresetButton('64×64', 64, 64),
                ],
              ),
            ],
          ),
        );
      },
    ),
  );
}
预设尺寸:
- 8×8:适合图标
- 16×16:经典像素艺术
- 32×32:详细作品
- 64×64:复杂场景
6. 作品集展示
GridView.builder(
  gridDelegate: const SliverGridDelegateWithFixedCrossAxisCount(
    crossAxisCount: 2,
    mainAxisSpacing: 12,
    crossAxisSpacing: 12,
    childAspectRatio: 1,
  ),
  itemCount: _savedArts.length,
  itemBuilder: (context, index) {
    final art = _savedArts[index];
    return Card(
      clipBehavior: Clip.antiAlias,
      child: InkWell(
        onTap: () => _loadArt(art),
        child: Column(
          children: [
            Expanded(
              child: Container(
                color: Colors.grey[200],
                child: Center(
                  child: PixelCanvas(
                    pixels: art.pixels,
                    showGrid: false,
                    onPixelTap: null,
                  ),
                ),
              ),
            ),
            Container(
              padding: const EdgeInsets.all(8),
              child: Row(
                children: [
                  Expanded(
                    child: Column(
                      crossAxisAlignment: CrossAxisAlignment.start,
                      children: [
                        Text(art.name),
                        Text('${art.width}×${art.height}'),
                      ],
                    ),
                  ),
                  IconButton(
                    icon: const Icon(Icons.delete),
                    onPressed: () => _deleteArt(art),
                  ),
                ],
              ),
            ),
          ],
        ),
      ),
    );
  },
)
技术要点详解
1. 二维数组操作
// 创建二维数组
List<List<int>> pixels = List.generate(
  height,
  (_) => List.filled(width, 0xFFFFFFFF),
);

// 深拷贝二维数组
List<List<int>> copy = pixels.map((row) => List<int>.from(row)).toList();

// 访问元素
int color = pixels[row][col];

// 修改元素
pixels[row][col] = newColor;
2. 颜色表示
Flutter中颜色使用32位整数表示:
0xAARRGGBB
  ││││││└└─ 蓝色 (0-255)
  ││││└└─── 绿色 (0-255)
  ││└└───── 红色 (0-255)
  └└─────── 透明度 (0-255)
常用颜色:
- 黑色:
0xFF000000 - 白色:
0xFFFFFFFF - 红色:
0xFFFF0000 - 透明:
0x00000000
3. HSL色彩空间
HSLColor hslColor = HSLColor.fromAHSL(
  1.0,        // Alpha (透明度)
  180.0,      // Hue (色相: 0-360)
  1.0,        // Saturation (饱和度: 0-1)
  0.5,        // Lightness (亮度: 0-1)
);

Color color = hslColor.toColor();
HSL优势:
- 更符合人类对颜色的感知
- 易于生成渐变色
- 便于调整亮度和饱和度
4. RepaintBoundary
RepaintBoundary(
  key: _canvasKey,
  child: PixelCanvas(...),
)
作用:
- 创建独立渲染层
- 可以转换为图片
- 优化重绘性能
- 隔离重绘区域
5. 递归算法优化
洪水填充的非递归版本:
void _floodFillIterative(int startRow, int startCol, int targetColor, int replacementColor) {
  if (targetColor == replacementColor) return;

  final queue = <Point<int>>[];
  queue.add(Point(startCol, startRow));

  while (queue.isNotEmpty) {
    final point = queue.removeAt(0);
    final col = point.x;
    final row = point.y;

    if (row < 0 || row >= _gridHeight || col < 0 || col >= _gridWidth) continue;
    if (_pixels[row][col] != targetColor) continue;

    _pixels[row][col] = replacementColor;

    queue.add(Point(col, row - 1));
    queue.add(Point(col, row + 1));
    queue.add(Point(col - 1, row));
    queue.add(Point(col + 1, row));
  }
}
应用场景
1. 游戏素材制作
class GameSprite {
  final PixelArt art;
  final int frameWidth;
  final int frameHeight;

  List<List<List<int>>> getFrames() {
    // 将像素画分割为动画帧
    List<List<List<int>>> frames = [];
    // 实现分割逻辑
    return frames;
  }
}
2. 表情包创作
class EmojiCreator {
  PixelArt createEmoji(String type) {
    // 创建不同类型的表情
    switch (type) {
      case 'smile':
        return _createSmileEmoji();
      case 'sad':
        return _createSadEmoji();
      default:
        return _createDefaultEmoji();
    }
  }
}
3. 像素字体设计
class PixelFont {
  Map<String, PixelArt> characters = {};

  void addCharacter(String char, PixelArt art) {
    characters[char] = art;
  }

  PixelArt renderText(String text) {
    // 将文本渲染为像素画
    return PixelArt(...);
  }
}
功能扩展建议
1. 图层支持
class Layer {
  String name;
  List<List<int>> pixels;
  double opacity;
  bool visible;

  Layer({
    required this.name,
    required this.pixels,
    this.opacity = 1.0,
    this.visible = true,
  });
}

class LayeredPixelArt {
  List<Layer> layers = [];

  List<List<int>> flatten() {
    // 合并所有图层
    return [];
  }
}
2. 动画支持
class PixelAnimation {
  List<PixelArt> frames;
  int fps;

  PixelAnimation({
    required this.frames,
    this.fps = 12,
  });

  void play() {
    // 播放动画
  }
}
3. 对称绘制
enum SymmetryMode {
  none,
  horizontal,
  vertical,
  both,
  radial4,
  radial8,
}

void _drawWithSymmetry(int row, int col, int color, SymmetryMode mode) {
  _pixels[row][col] = color;

  switch (mode) {
    case SymmetryMode.horizontal:
      _pixels[row][_gridWidth - 1 - col] = color;
      break;
    case SymmetryMode.vertical:
      _pixels[_gridHeight - 1 - row][col] = color;
      break;
    case SymmetryMode.both:
      _pixels[row][_gridWidth - 1 - col] = color;
      _pixels[_gridHeight - 1 - row][col] = color;
      _pixels[_gridHeight - 1 - row][_gridWidth - 1 - col] = color;
      break;
    // ... 其他模式
  }
}
4. 滤镜效果
class PixelFilter {
  static List<List<int>> grayscale(List<List<int>> pixels) {
    return pixels.map((row) {
      return row.map((color) {
        final r = (color >> 16) & 0xFF;
        final g = (color >> 8) & 0xFF;
        final b = color & 0xFF;
        final gray = (r * 0.299 + g * 0.587 + b * 0.114).toInt();
        return 0xFF000000 | (gray << 16) | (gray << 8) | gray;
      }).toList();
    }).toList();
  }

  static List<List<int>> invert(List<List<int>> pixels) {
    return pixels.map((row) {
      return row.map((color) {
        return 0xFF000000 | (~color & 0x00FFFFFF);
      }).toList();
    }).toList();
  }
}
5. 导入图片
import 'package:image/image.dart' as img;

Future<PixelArt> importImage(String path, int targetWidth, int targetHeight) async {
  final bytes = await File(path).readAsBytes();
  final image = img.decodeImage(bytes);

  if (image == null) throw Exception('无法解码图片');

  // 缩放图片
  final resized = img.copyResize(
    image,
    width: targetWidth,
    height: targetHeight,
    interpolation: img.Interpolation.nearest,
  );

  // 转换为像素数组
  final pixels = List.generate(targetHeight, (y) {
    return List.generate(targetWidth, (x) {
      final pixel = resized.getPixel(x, y);
      return 0xFF000000 |
          (pixel.r.toInt() << 16) |
          (pixel.g.toInt() << 8) |
          pixel.b.toInt();
    });
  });

  return PixelArt(
    id: DateTime.now().millisecondsSinceEpoch.toString(),
    name: '导入的图片',
    width: targetWidth,
    height: targetHeight,
    pixels: pixels,
    createdAt: DateTime.now(),
  );
}
6. 调色板管理
class PaletteManager {
  List<List<int>> savedPalettes = [];

  void savePalette(List<int> palette, String name) {
    savedPalettes.add(palette);
  }

  List<int> loadPalette(int index) {
    return savedPalettes[index];
  }

  List<int> extractPalette(PixelArt art) {
    final Set<int> colors = {};
    for (var row in art.pixels) {
      colors.addAll(row);
    }
    return colors.toList();
  }
}
性能优化
1. 减少重绘
class PixelCanvas extends StatelessWidget {
Widget build(BuildContext context) {
return RepaintBoundary(
child: CustomPaint(
painter: PixelPainter(pixels, showGrid),
size: Size(width * pixelSize, height * pixelSize),
),
);
}
}
2. 使用CustomPainter
class PixelPainter extends CustomPainter {
final List<List<int>> pixels;
final bool showGrid;
PixelPainter(this.pixels, this.showGrid);
void paint(Canvas canvas, Size size) {
final pixelSize = size.width / pixels[0].length;
for (int row = 0; row < pixels.length; row++) {
for (int col = 0; col < pixels[row].length; col++) {
final paint = Paint()..color = Color(pixels[row][col]);
canvas.drawRect(
Rect.fromLTWH(
col * pixelSize,
row * pixelSize,
pixelSize,
pixelSize,
),
paint,
);
}
}
if (showGrid) {
// 绘制网格线
}
}
bool shouldRepaint(PixelPainter oldDelegate) {
return oldDelegate.pixels != pixels || oldDelegate.showGrid != showGrid;
}
}
3. 限制历史记录
const int maxHistorySize = 50;

void _saveToHistory() {
  if (_history.length >= maxHistorySize) {
    _history.removeAt(0);
    _historyIndex--;
  }

  _history.add(_pixels.map((row) => List<int>.from(row)).toList());
  _historyIndex++;
}
常见问题解答
Q1: 如何实现更大的画布?
A: 可以使用InteractiveViewer实现缩放和平移:
InteractiveViewer(
  minScale: 0.5,
  maxScale: 10.0,
  child: PixelCanvas(...),
)
Q2: 如何优化大画布的性能?
A: 使用CustomPainter代替嵌套的Container,减少Widget数量。
Q3: 如何实现笔刷大小?
A: 修改_onPixelTap方法,绘制多个相邻像素:
void _drawBrush(int row, int col, int size) {
  for (int dr = -size; dr <= size; dr++) {
    for (int dc = -size; dc <= size; dc++) {
      final r = row + dr;
      final c = col + dc;
      if (r >= 0 && r < _gridHeight && c >= 0 && c < _gridWidth) {
        _pixels[r][c] = _currentColor;
      }
    }
  }
}
项目结构
lib/
├── main.dart                    # 主程序入口
├── models/
│   └── pixel_art.dart          # 像素画模型
├── screens/
│   ├── pixel_art_page.dart     # 主页面
│   └── gallery_page.dart       # 作品集页面
├── widgets/
│   ├── pixel_canvas.dart       # 画布组件
│   ├── toolbar.dart            # 工具栏组件
│   ├── color_palette.dart      # 调色板组件
│   └── color_picker.dart       # 颜色选择器
└── utils/
    ├── flood_fill.dart         # 填充算法
    ├── history_manager.dart    # 历史管理
    └── export_helper.dart      # 导出工具
总结
本文实现了一个功能完整的像素画板应用,涵盖了以下核心技术:
- 二维数组操作:像素数据的存储和处理
- 递归算法:洪水填充的实现
- 历史记录:撤销重做机制
- 颜色管理:HSL色彩空间和调色板
- 数据持久化:JSON序列化和SharedPreferences
- 高清导出:RepaintBoundary图片生成
通过本项目,你不仅学会了如何实现像素画板应用,还掌握了Flutter中二维数组处理、递归算法、颜色管理的核心技术。这些知识可以应用到更多创意绘画和图像处理应用的开发。
创作你的像素艺术!
欢迎加入开源鸿蒙跨平台社区:https://openharmonycrossplatform.csdn.net

开源鸿蒙跨平台开发社区汇聚开发者与厂商,共建“一次开发,多端部署”的开源生态,致力于降低跨端开发门槛,推动万物智联创新。
更多推荐
 6
6 0
0- 0


 已为社区贡献6条内容

所有评论(0)