Flutter for OpenHarmony 家具购买记录App实战:购买记录实现
本文介绍了家具购物App中购买记录页面的设计与实现。该页面采用分层布局,包含顶部时间筛选标签、中间汇总统计卡片和底部购买记录列表。筛选功能使用Material Design的ChoiceChip组件实现,统计卡片展示购买次数和总金额,列表项显示商品详情并可点击查看详情。页面右下角设有添加按钮,整体采用棕色系配色方案,确保信息层次清晰。实现上使用Flutter框架,通过StatefulWidget管
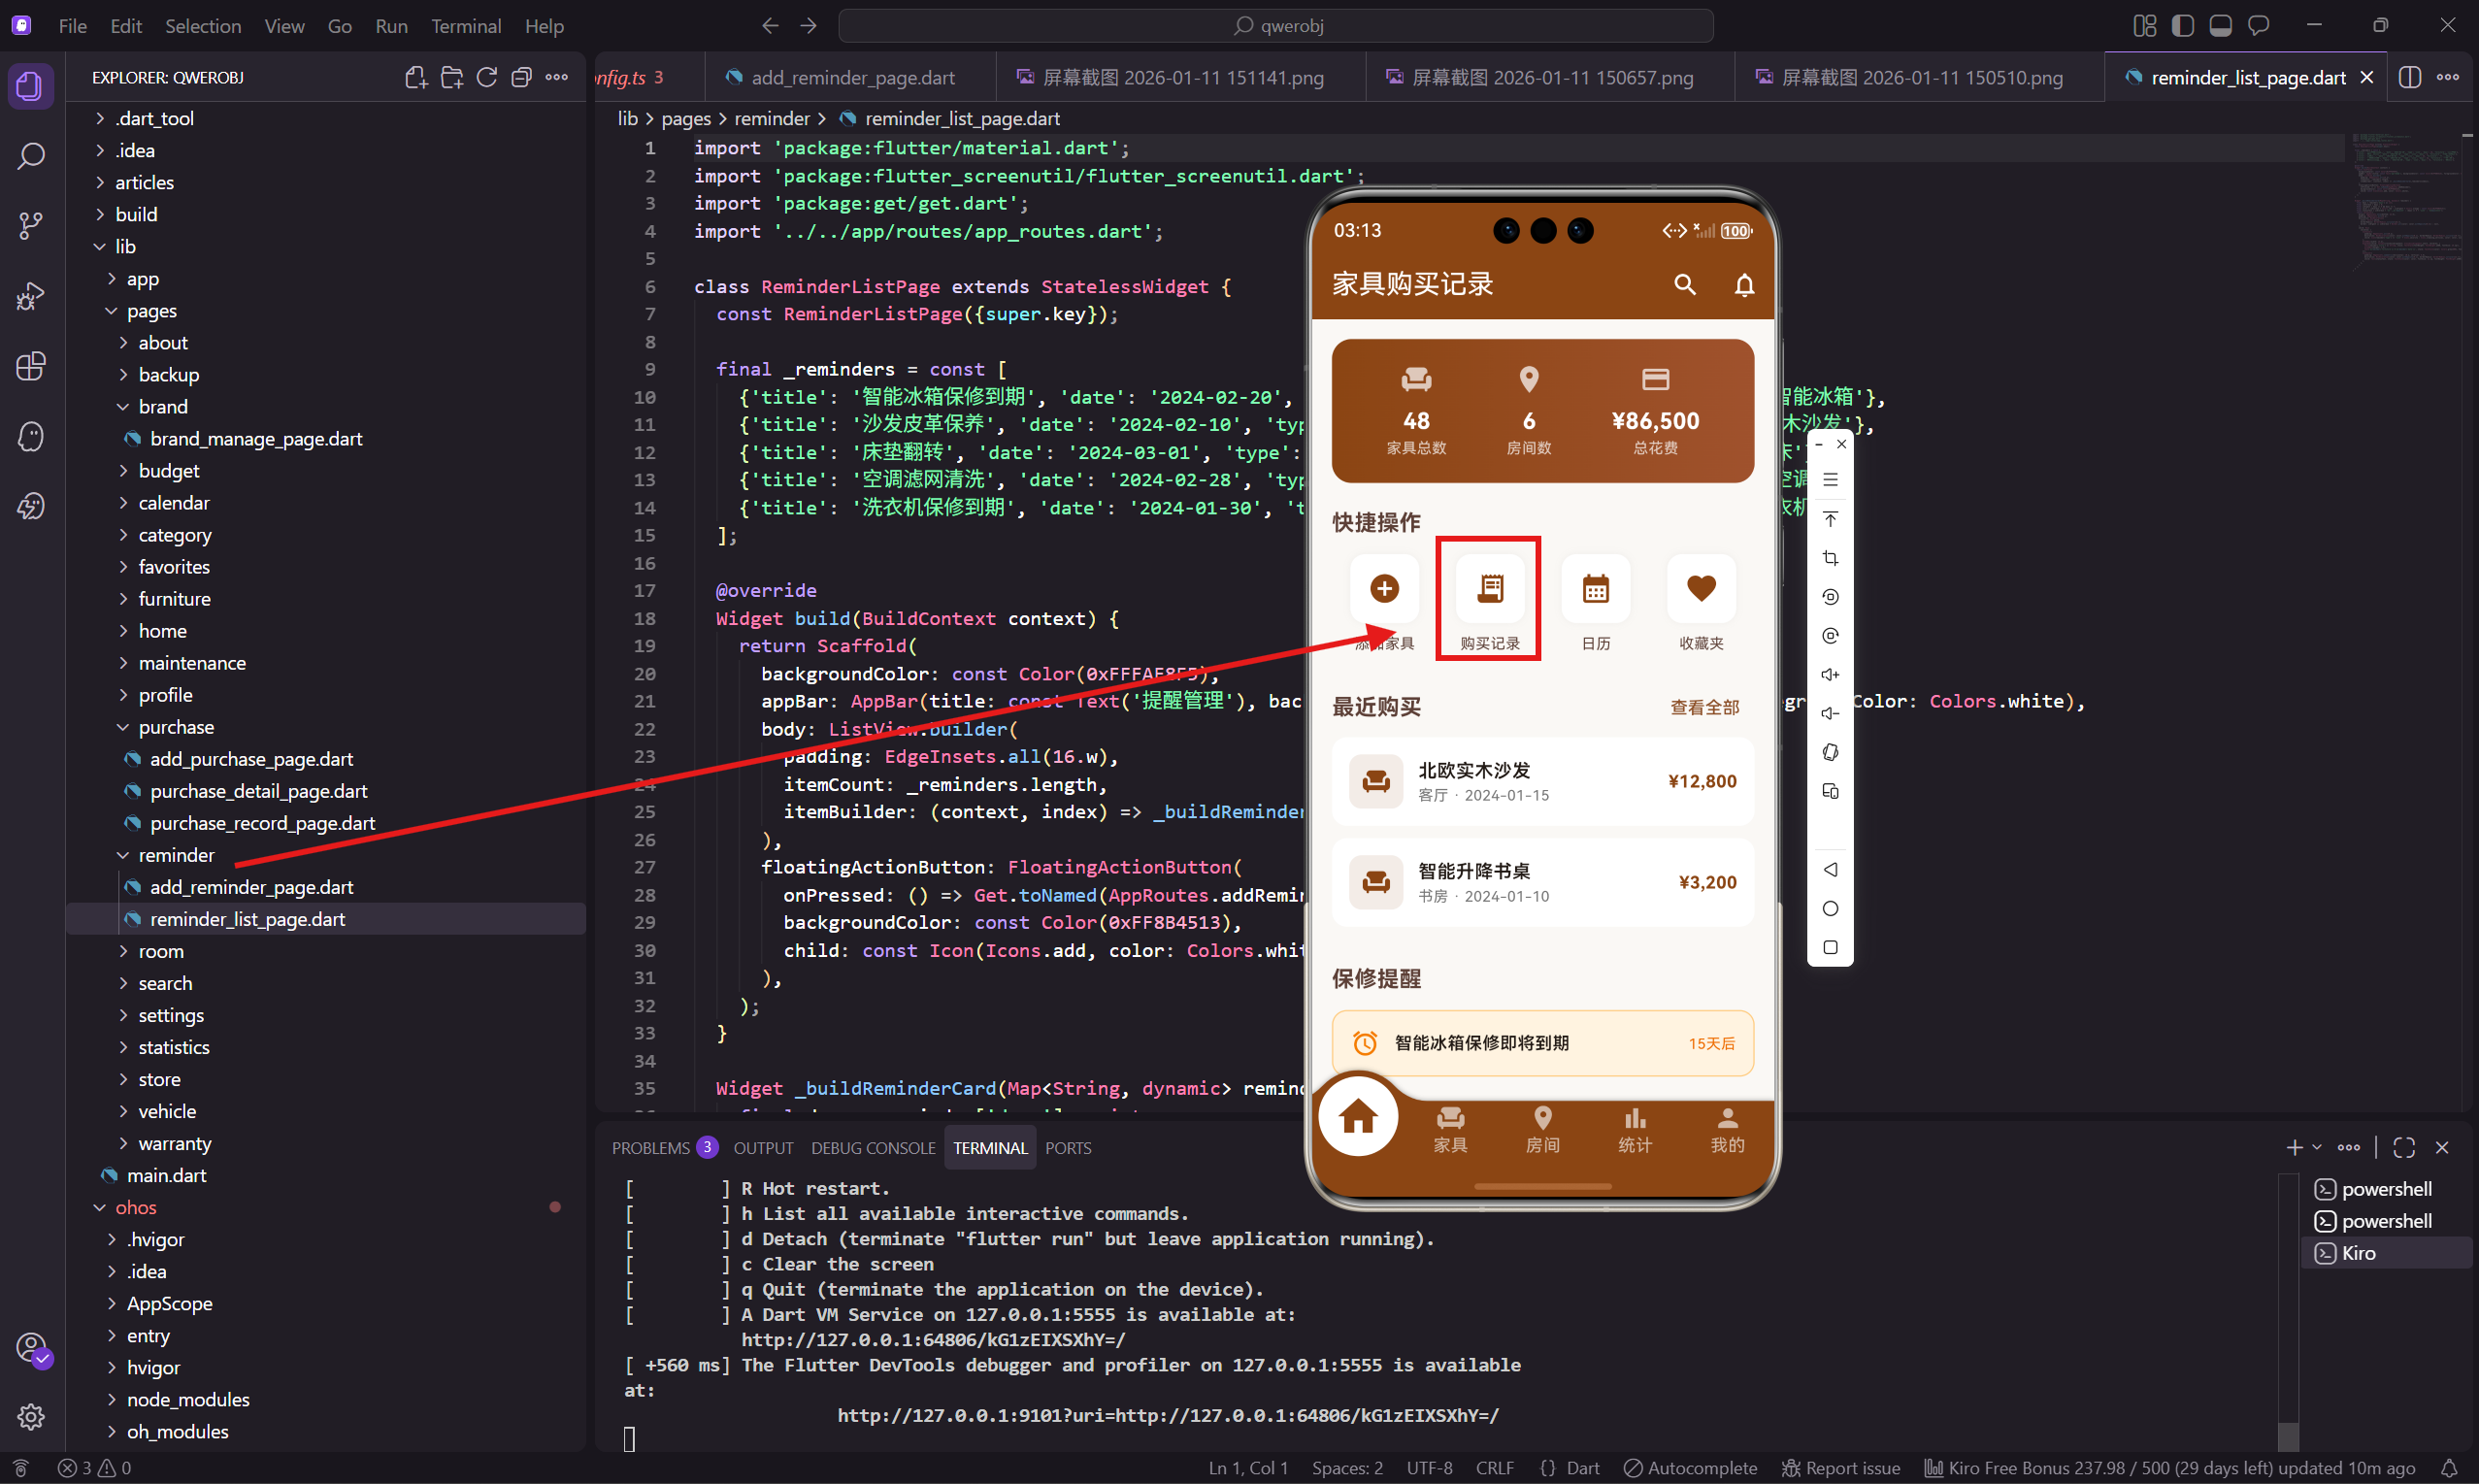
购买记录是这个 App 的核心功能之一,记录了用户所有的家具购买历史。这个页面需要展示购买列表,支持按时间筛选,还要显示一个汇总统计。
说实话,购买记录页面的信息密度比较高,每条记录要显示商品名称、商家、日期、价格、状态,还要有筛选和统计功能。设计的时候要注意信息层次,不能让用户觉得眼花缭乱。
页面设计思路
购买记录页面的设计要点:
- 顶部有筛选标签,可以按时间范围筛选
- 筛选标签下面是汇总统计卡片
- 主体是购买记录列表
- 每条记录显示商品信息、商家、日期、价格、状态
- 右下角有添加按钮
筛选标签用 ChoiceChip 实现,这是 Material Design 的选择芯片组件,很适合这种单选场景。
页面基础结构
购买记录页面用 StatefulWidget,因为要管理筛选状态:
class PurchaseRecordPage extends StatefulWidget {
const PurchaseRecordPage({super.key});
State<PurchaseRecordPage> createState() => _PurchaseRecordPageState();
}
状态类里定义筛选选项和数据:
class _PurchaseRecordPageState extends State<PurchaseRecordPage> {
  String _filter = '全部';
  final _filters = ['全部', '本月', '本季度', '本年'];

  final _records = [
    {'name': '北欧实木沙发', 'store': '宜家家居', 'date': '2024-01-15', 'price': 12800.0, 'status': '已完成'},
    {'name': '智能升降书桌', 'store': '京东自营', 'date': '2024-01-10', 'price': 3200.0, 'status': '已完成'},
    {'name': '真皮双人床', 'store': '顾家家居', 'date': '2023-12-20', 'price': 8500.0, 'status': '已完成'},
    {'name': '实木餐桌椅套装', 'store': '林氏木业旗舰店', 'date': '2023-11-15', 'price': 5600.0, 'status': '已完成'},
    {'name': '智能冰箱', 'store': '苏宁易购', 'date': '2023-10-08', 'price': 6800.0, 'status': '配送中'},
  ];
_filter 是当前选中的筛选选项,默认是"全部"。_filters 是所有筛选选项。
每条购买记录有五个属性:商品名称、商家、日期、价格、状态。状态有"已完成"和"配送中"两种。
build 方法实现
build 方法构建整个页面:
Widget build(BuildContext context) {
return Scaffold(
backgroundColor: const Color(0xFFFAF8F5),
appBar: AppBar(
title: const Text('购买记录'),
backgroundColor: const Color(0xFF8B4513),
foregroundColor: Colors.white
),
body: Column(
children: [
_buildFilterChips(),
_buildSummary(),
Expanded(
child: ListView.builder(
padding: EdgeInsets.symmetric(horizontal: 16.w),
itemCount: _records.length,
itemBuilder: (context, index) => _buildRecordCard(_records[index]),
)
),
],
),
页面用 Column 布局,从上到下依次是筛选标签、汇总统计、购买列表。列表用 Expanded 包裹,占据剩余空间。
添加按钮
右下角的悬浮添加按钮:
      floatingActionButton: FloatingActionButton(
        onPressed: () => Get.toNamed(AppRoutes.addPurchase),
        backgroundColor: const Color(0xFF8B4513),
        child: const Icon(Icons.add, color: Colors.white),
      ),
    );
  }
点击后跳转到添加购买记录页面。
筛选标签组件
筛选标签用横向滚动的 ChoiceChip 列表:
  Widget _buildFilterChips() {
    return Container(
      height: 50.h,
      padding: EdgeInsets.symmetric(horizontal: 16.w),
      child: ListView(
        scrollDirection: Axis.horizontal,
        children: _filters.map((f) => Padding(
          padding: EdgeInsets.only(right: 8.w),
          child: ChoiceChip(
            label: Text(f),
            selected: _filter == f,
            selectedColor: const Color(0xFF8B4513),
            labelStyle: TextStyle(
              color: _filter == f ? Colors.white : Colors.black
            ),
            onSelected: (selected) => setState(() => _filter = f),
          ),
        )).toList(),
      ),
    );
  }
ChoiceChip 是 Material Design 的选择芯片,选中时背景变色。selectedColor 设置选中时的背景色,labelStyle 设置文字颜色。
用横向 ListView 包裹,如果筛选选项很多可以滚动。每个芯片右边留 8 的间距。
汇总统计组件
汇总统计显示购买次数和总花费:
  Widget _buildSummary() {
    final total = _records.fold<double>(0, (sum, r) => sum + (r['price'] as double));
    return Container(
      margin: EdgeInsets.all(16.w),
      padding: EdgeInsets.all(16.w),
      decoration: BoxDecoration(
        gradient: const LinearGradient(
          colors: [Color(0xFF8B4513), Color(0xFFA0522D)]
        ),
        borderRadius: BorderRadius.circular(12.r),
      ),
      child: Row(
        mainAxisAlignment: MainAxisAlignment.spaceAround,
        children: [
          _buildSummaryItem('购买次数', '${_records.length}'),
          Container(width: 1, height: 40.h, color: Colors.white30),
          _buildSummaryItem('总花费', '¥${total.toStringAsFixed(0)}'),
        ],
      ),
    );
  }
用 fold 方法计算总花费,遍历所有记录累加价格。
统计卡片用渐变背景,从深棕色到浅棕色,和首页仪表盘的风格一致。中间用半透明白色竖线分隔。
统计项组件
单个统计项的实现:
  Widget _buildSummaryItem(String label, String value) {
    return Column(
      children: [
        Text(value, style: TextStyle(
          color: Colors.white,
          fontSize: 20.sp,
          fontWeight: FontWeight.bold
        )),
        Text(label, style: TextStyle(color: Colors.white70, fontSize: 12.sp)),
      ]
    );
  }
数值在上面用白色大字,标签在下面用半透明白色小字。
购买记录卡片
每条购买记录是一个可点击的卡片:
  Widget _buildRecordCard(Map<String, dynamic> record) {
    return GestureDetector(
      onTap: () => Get.toNamed(AppRoutes.purchaseDetail, arguments: record),
      child: Container(
        margin: EdgeInsets.only(bottom: 12.h),
        padding: EdgeInsets.all(16.w),
        decoration: BoxDecoration(
          color: Colors.white,
          borderRadius: BorderRadius.circular(12.r)
        ),
        child: Row(
          children: [
            Container(
              padding: EdgeInsets.all(10.w),
              decoration: BoxDecoration(
                color: const Color(0xFF8B4513).withOpacity(0.1),
                borderRadius: BorderRadius.circular(10.r)
              ),
              child: Icon(Icons.receipt_long, color: const Color(0xFF8B4513), size: 24.sp),
            ),
点击卡片跳转到购买详情页,把记录数据通过 arguments 传过去。
左边是收据图标,用浅棕色背景。
记录信息区域
中间是商品名称和商家日期:
            SizedBox(width: 12.w),
            Expanded(
              child: Column(
                crossAxisAlignment: CrossAxisAlignment.start,
                children: [
                  Text(record['name'] as String, style: TextStyle(
                    fontWeight: FontWeight.w600,
                    fontSize: 15.sp
                  )),
                  SizedBox(height: 4.h),
                  Text(
                    '${record['store']} · ${record['date']}',
                    style: TextStyle(color: Colors.grey[600], fontSize: 12.sp)
                  ),
                ]
              )
            ),
商品名称用加粗字体,商家和日期用灰色小字,中间用点号分隔。
价格和状态
右边是价格和状态标签:
            Column(
              crossAxisAlignment: CrossAxisAlignment.end,
              children: [
                Text(
                  '¥${(record['price'] as double).toStringAsFixed(0)}',
                  style: TextStyle(
                    color: const Color(0xFF8B4513),
                    fontWeight: FontWeight.bold,
                    fontSize: 16.sp
                  )
                ),
                SizedBox(height: 4.h),
                Container(
                  padding: EdgeInsets.symmetric(horizontal: 8.w, vertical: 2.h),
                  decoration: BoxDecoration(
                    color: record['status'] == '已完成'
                      ? Colors.green[50]
                      : Colors.orange[50],
                    borderRadius: BorderRadius.circular(10.r)
                  ),
                  child: Text(
                    record['status'] as String,
                    style: TextStyle(
                      color: record['status'] == '已完成'
                        ? Colors.green
                        : Colors.orange,
                      fontSize: 10.sp
                    )
                  ),
                ),
              ]
            ),
          ],
        ),
      ),
    );
  }
价格用主题棕色加粗显示。状态用小标签,"已完成"是绿色,"配送中"是橙色。
状态标签用圆角矩形背景,颜色根据状态动态变化。这种设计让用户一眼就能看出订单状态。
筛选逻辑的实现
当前筛选只是改变了 _filter 状态,没有真正过滤数据。实际项目中需要根据筛选条件过滤:
List<Map<String, dynamic>> get _filteredRecords {
  if (_filter == '全部') return _records;

  final now = DateTime.now();
  return _records.where((r) {
    final date = DateTime.parse(r['date'] as String);
    switch (_filter) {
      case '本月':
        return date.year == now.year && date.month == now.month;
      case '本季度':
        final quarter = (now.month - 1) ~/ 3;
        final recordQuarter = (date.month - 1) ~/ 3;
        return date.year == now.year && recordQuarter == quarter;
      case '本年':
        return date.year == now.year;
      default:
        return true;
    }
  }).toList();
}
用 getter 方法返回过滤后的列表,在 ListView.builder 里用 _filteredRecords 代替 _records。
空状态处理
如果筛选后没有记录,应该显示空状态提示:
if (_filteredRecords.isEmpty) {
  return Center(
    child: Column(
      mainAxisAlignment: MainAxisAlignment.center,
      children: [
        Icon(Icons.receipt_long, size: 60.sp, color: Colors.grey[300]),
        SizedBox(height: 12.h),
        Text('暂无购买记录', style: TextStyle(color: Colors.grey[500])),
      ],
    ),
  );
}
空状态页面显示一个灰色图标和提示文字,比空白页面用户体验好。
下拉刷新
购买记录页面可以加下拉刷新功能,用 RefreshIndicator 包裹列表:
RefreshIndicator(
  onRefresh: () async {
    // 从服务器获取最新数据
    await Future.delayed(Duration(seconds: 1));
  },
  child: ListView.builder(...),
)
下拉时显示刷新指示器,刷新完成后更新列表数据。
分页加载
如果购买记录很多,需要分页加载。可以用 ScrollController 监听滚动位置,滚动到底部时加载更多:
final _scrollController = ScrollController();
void initState() {
super.initState();
_scrollController.addListener(() {
if (_scrollController.position.pixels ==
_scrollController.position.maxScrollExtent) {
// 加载更多数据
}
});
}
加载更多时在列表底部显示加载指示器,加载完成后追加数据到列表。
小结
购买记录页面是一个信息密度较高的列表页面,包含筛选、统计、列表三个部分。筛选用 ChoiceChip 实现,统计用渐变背景卡片,列表项显示完整的购买信息。
状态标签用不同颜色区分,让用户一眼就能看出订单状态。点击卡片可以查看详情。
下一篇会讲添加购买记录页面的实现,包含商品信息、购买信息、支付方式等表单。
欢迎加入开源鸿蒙跨平台社区:https://openharmonycrossplatform.csdn.net

开源鸿蒙跨平台开发社区汇聚开发者与厂商,共建“一次开发,多端部署”的开源生态,致力于降低跨端开发门槛,推动万物智联创新。
更多推荐
 17
17 0
0- 0


 已为社区贡献30条内容

所有评论(0)