Flutter 框架跨平台鸿蒙开发 - 开发二维码生成器与扫描器
size: 200,// 定位点样式(三个角的方块)eyeShape: QrEyeShape.square, // square 或 circle),// 数据点样式dataModuleShape: QrDataModuleShape.square, // square 或 circle),二维码生成:qr_flutter库的使用和样式自定义二维码扫描:mobile_scanner相机调用和结果处
·
📱 Flutter + HarmonyOS 实战:开发二维码生成器与扫描器
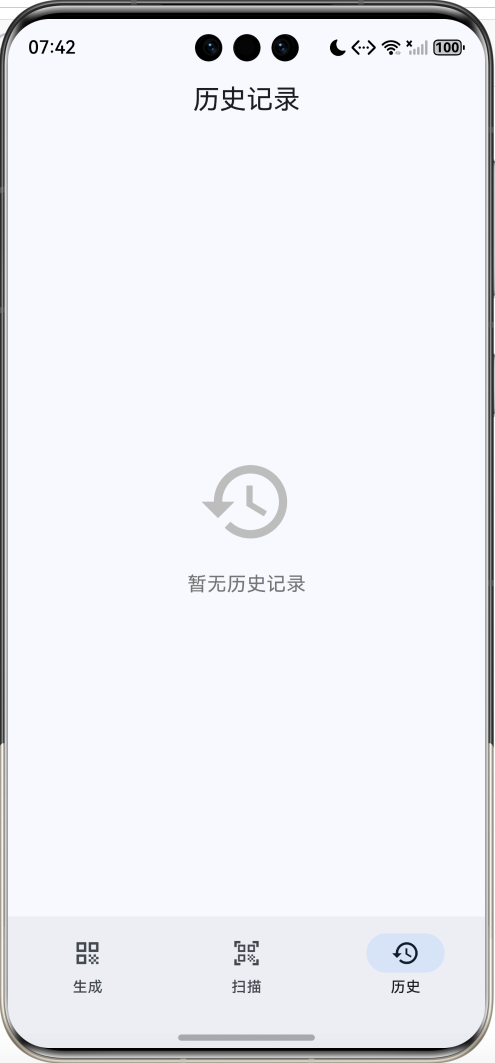
运行效果图
📋 文章导读
| 章节 | 内容概要 | 预计阅读 |
|---|---|---|
| 一 | 二维码原理与应用设计 | 3分钟 |
| 二 | 二维码生成功能实现 | 10分钟 |
| 三 | 二维码扫描功能实现 | 10分钟 |
| 四 | 历史记录与数据管理 | 5分钟 |
| 五 | 保存与分享功能 | 5分钟 |
| 六 | 完整源码与运行 | 3分钟 |
💡 写在前面:二维码已经渗透到我们生活的方方面面,从支付到名片,从网址到WiFi连接。本文将带你用Flutter开发一款功能完善的二维码工具,包含生成、扫描、历史记录等功能,涵盖相机调用、图片处理、文件存储等实用技术。
一、应用设计
1.1 功能模块
1.2 技术选型
| 功能 | 依赖包 | 说明 |
|---|---|---|
| 二维码生成 | qr_flutter |
纯Dart实现,无需原生代码 |
| 二维码扫描 | mobile_scanner |
基于MLKit,性能优秀 |
| 文件存储 | path_provider |
获取系统目录 |
| 分享功能 | share_plus |
跨平台分享 |
1.3 二维码类型
常见的二维码内容格式:
| 类型 | 格式 | 示例 |
|---|---|---|
| 网址 | https://... |
https://flutter.dev |
| 邮箱 | mailto:... |
mailto:test@example.com |
| 电话 | tel:... |
tel:10086 |
| 短信 | sms:... |
sms:10086?body=Hello |
| WiFi | WIFI:T:WPA;S:...;P:...;; |
WiFi连接信息 |
| 文本 | 纯文本 | 任意文字 |
二、二维码生成
2.1 qr_flutter 基础用法
import 'package:qr_flutter/qr_flutter.dart';

QrImageView(
  data: 'https://flutter.dev',  // 二维码内容
  version: QrVersions.auto,     // 自动选择版本
  size: 200,                    // 尺寸
  backgroundColor: Colors.white,
)
2.2 自定义样式
QrImageView(
  data: _qrData,
  version: QrVersions.auto,
  size: 200,
  // 定位点样式(三个角的方块)
  eyeStyle: QrEyeStyle(
    eyeShape: QrEyeShape.square,  // square 或 circle
    color: Colors.blue,
  ),
  // 数据点样式
  dataModuleStyle: QrDataModuleStyle(
    dataModuleShape: QrDataModuleShape.square,  // square 或 circle
    color: Colors.blue,
  ),
  backgroundColor: Colors.white,
)
2.3 样式对比
| 样式 | eyeShape | dataModuleShape | 效果 |
|---|---|---|---|
| 经典 | square | square | 传统方块样式 |
| 圆点 | circle | circle | 圆润可爱 |
| 混合 | square | circle | 定位点方+数据点圆 |
2.4 快捷模板实现
final List<Map<String, dynamic>> _templates = [
  {'icon': Icons.link, 'label': '网址', 'prefix': 'https://'},
  {'icon': Icons.email, 'label': '邮箱', 'prefix': 'mailto:'},
  {'icon': Icons.phone, 'label': '电话', 'prefix': 'tel:'},
  {'icon': Icons.sms, 'label': '短信', 'prefix': 'sms:'},
  {'icon': Icons.wifi, 'label': 'WiFi', 'prefix': 'WIFI:T:WPA;S:'},
  {'icon': Icons.text_fields, 'label': '文本', 'prefix': ''},
];

// 点击模板时填充前缀
onTap: () {
  _controller.text = template['prefix'];
  _controller.selection = TextSelection.fromPosition(
    TextPosition(offset: _controller.text.length),
  );
}
2.5 颜色选择器
final List<Color> _colors = [
  Colors.black,
  Colors.blue,
  Colors.purple,
  Colors.green,
  Colors.red,
  Colors.orange,
];

Wrap(
  spacing: 12,
  children: List.generate(_colors.length, (index) {
    return GestureDetector(
      onTap: () => setState(() => _selectedColorIndex = index),
      child: Container(
        width: 36,
        height: 36,
        decoration: BoxDecoration(
          color: _colors[index],
          shape: BoxShape.circle,
          border: Border.all(
            color: _selectedColorIndex == index
                ? Theme.of(context).colorScheme.primary
                : Colors.transparent,
            width: 3,
          ),
        ),
        child: _selectedColorIndex == index
            ? Icon(Icons.check, color: Colors.white, size: 20)
            : null,
      ),
    );
  }),
)
三、二维码扫描
3.1 mobile_scanner 基础用法
import 'package:mobile_scanner/mobile_scanner.dart';

MobileScannerController _controller = MobileScannerController(
  detectionSpeed: DetectionSpeed.normal,
  facing: CameraFacing.back,
);

MobileScanner(
  controller: _controller,
  onDetect: (BarcodeCapture capture) {
    final barcode = capture.barcodes.firstOrNull;
    if (barcode != null && barcode.rawValue != null) {
      print('扫描结果: ${barcode.rawValue}');
    }
  },
)
3.2 控制器功能
| 方法 | 功能 |
|---|---|
toggleTorch() |
切换闪光灯 |
switchCamera() |
切换前后摄像头 |
start() |
开始扫描 |
stop() |
停止扫描 |
dispose() |
释放资源 |
// 闪光灯控制
IconButton(
  icon: Icon(_isFlashOn ? Icons.flash_on : Icons.flash_off),
  onPressed: () {
    _controller.toggleTorch();
    setState(() => _isFlashOn = !_isFlashOn);
  },
)

// 切换摄像头
IconButton(
  icon: Icon(_isFrontCamera ? Icons.camera_front : Icons.camera_rear),
  onPressed: () {
    _controller.switchCamera();
    setState(() => _isFrontCamera = !_isFrontCamera);
  },
)
3.3 扫描框遮罩
Widget _buildScanOverlay() {
  return ColorFiltered(
    colorFilter: const ColorFilter.mode(
      Colors.black54,
      BlendMode.srcOut,
    ),
    child: Stack(
      children: [
        Container(
          decoration: const BoxDecoration(
            color: Colors.transparent,
            backgroundBlendMode: BlendMode.dstOut,
          ),
        ),
        Center(
          child: Container(
            width: 250,
            height: 250,
            decoration: BoxDecoration(
              color: Colors.white,
              borderRadius: BorderRadius.circular(12),
            ),
          ),
        ),
      ],
    ),
  );
}
3.4 扫描结果处理
void _onDetect(BarcodeCapture capture) {
  final barcode = capture.barcodes.firstOrNull;
  if (barcode != null && barcode.rawValue != null) {
    final data = barcode.rawValue!;

    // 防止重复触发
    if (_scannedData != data) {
      setState(() => _scannedData = data);

      // 保存到历史
      HistoryManager.addItem(HistoryItem(
        content: data,
        type: 'scan',
        time: DateTime.now(),
      ));

      // 显示结果弹窗
      _showResultDialog(data);
    }
  }
}
3.5 智能识别内容类型
bool get _isUrl => data.startsWith('http://') || data.startsWith('https://');
bool get _isPhone => data.startsWith('tel:');
bool get _isEmail => data.startsWith('mailto:');

// 根据类型显示不同操作按钮
ElevatedButton.icon(
  onPressed: () {
    if (_isUrl) {
      // 打开浏览器
    } else if (_isPhone) {
      // 拨打电话
    } else if (_isEmail) {
      // 发送邮件
    }
  },
  icon: Icon(_isUrl ? Icons.open_in_browser :
             _isPhone ? Icons.phone :
             _isEmail ? Icons.email : Icons.touch_app),
  label: Text(_isUrl ? '打开' :
             _isPhone ? '拨打' :
             _isEmail ? '发送' : '操作'),
)
四、历史记录管理
4.1 数据模型
class HistoryItem {
  final String content;
  final String type;  // 'generate' 或 'scan'
  final DateTime time;

  HistoryItem({
    required this.content,
    required this.type,
    required this.time,
  });
}
4.2 内存管理器
class HistoryManager {
  static final List<HistoryItem> _items = [];

  static List<HistoryItem> get items => _items;

  static void addItem(HistoryItem item) {
    _items.add(item);
    // 限制最大数量
    if (_items.length > 50) {
      _items.removeAt(0);
    }
  }

  static void clear() {
    _items.clear();
  }
}
4.3 历史列表展示
ListView.builder(
  itemCount: items.length,
  itemBuilder: (context, index) {
    final item = items[items.length - 1 - index]; // 倒序
    final isGenerate = item.type == 'generate';

    return Card(
      child: ListTile(
        leading: CircleAvatar(
          backgroundColor: isGenerate ? Colors.blue.shade100 : Colors.green.shade100,
          child: Icon(
            isGenerate ? Icons.qr_code : Icons.qr_code_scanner,
            color: isGenerate ? Colors.blue : Colors.green,
          ),
        ),
        title: Text(item.content, maxLines: 2, overflow: TextOverflow.ellipsis),
        subtitle: Text('${isGenerate ? "生成" : "扫描"} · ${_formatTime(item.time)}'),
        trailing: IconButton(
          icon: Icon(Icons.copy),
          onPressed: () => Clipboard.setData(ClipboardData(text: item.content)),
        ),
      ),
    );
  },
)
五、保存与分享
5.1 Widget转图片
使用 RepaintBoundary 将Widget转换为图片:
final GlobalKey _qrKey = GlobalKey();

// 包裹需要截图的Widget
RepaintBoundary(
  key: _qrKey,
  child: Container(
    padding: EdgeInsets.all(24),
    color: Colors.white,
    child: QrImageView(data: _qrData, size: 200),
  ),
)

// 截图并保存
Future<void> _saveQRCode() async {
  final boundary = _qrKey.currentContext?.findRenderObject() as RenderRepaintBoundary?;
  if (boundary == null) return;

  // 转换为图片
  final image = await boundary.toImage(pixelRatio: 3.0);
  final byteData = await image.toByteData(format: ui.ImageByteFormat.png);
  final bytes = byteData!.buffer.asUint8List();

  // 保存到文件
  final directory = await getTemporaryDirectory();
  final file = File('${directory.path}/qrcode.png');
  await file.writeAsBytes(bytes);
}
5.2 分享功能
import 'package:share_plus/share_plus.dart';

Future<void> _shareQRCode() async {
  // 先保存为临时文件
  final file = await _saveToTempFile();

  // 分享文件
  await Share.shareXFiles(
    [XFile(file.path)],
    text: '分享二维码',
  );
}
5.3 权限配置
Android (android/app/src/main/AndroidManifest.xml):
<uses-permission android:name="android.permission.CAMERA"/>
<uses-permission android:name="android.permission.WRITE_EXTERNAL_STORAGE"/>
iOS (ios/Runner/Info.plist):
<key>NSCameraUsageDescription</key>
<string>需要相机权限来扫描二维码</string>
<key>NSPhotoLibraryUsageDescription</key>
<string>需要相册权限来保存二维码</string>
六、完整源码与运行
6.1 项目结构
flutter_qrcode/
├── lib/
│   └── main.dart       # 二维码应用代码(约500行)
├── ohos/               # 鸿蒙平台配置
├── pubspec.yaml        # 依赖配置
└── README.md           # 项目说明
6.2 依赖配置
dependencies:
  flutter:
    sdk: flutter
  qr_flutter: ^4.1.0        # 二维码生成
  mobile_scanner: ^5.1.1    # 二维码扫描
  path_provider: ^2.1.2     # 文件路径
  share_plus: ^7.2.2        # 分享功能
6.3 运行命令
# 获取依赖
flutter pub get

# 运行应用
flutter run

# 运行到鸿蒙设备
flutter run -d ohos
6.4 功能清单
| 功能 | 状态 | 说明 |
|---|---|---|
| 文本生成二维码 | ✅ | 支持任意文本 |
| 快捷模板 | ✅ | 网址/邮箱/电话/短信/WiFi |
| 颜色自定义 | ✅ | 8种颜色可选 |
| 相机扫描 | ✅ | 实时识别 |
| 闪光灯控制 | ✅ | 暗光环境 |
| 前后摄像头 | ✅ | 一键切换 |
| 扫描结果解析 | ✅ | 智能识别类型 |
| 保存图片 | ✅ | 保存到本地 |
| 分享功能 | ✅ | 系统分享 |
| 历史记录 | ✅ | 生成/扫描记录 |
| 复制内容 | ✅ | 一键复制 |
七、扩展方向
7.1 功能扩展
7.2 从相册识别
import 'package:image_picker/image_picker.dart';

Future<void> _scanFromGallery() async {
  final picker = ImagePicker();
  final image = await picker.pickImage(source: ImageSource.gallery);

  if (image != null) {
    // 使用 mobile_scanner 的 analyzeImage 方法
    final result = await _controller.analyzeImage(image.path);
    if (result != null && result.barcodes.isNotEmpty) {
      final data = result.barcodes.first.rawValue;
      // 处理结果
    }
  }
}
7.3 带Logo的二维码
QrImageView(
  data: _qrData,
  size: 200,
  embeddedImage: AssetImage('assets/logo.png'),
  embeddedImageStyle: QrEmbeddedImageStyle(
    size: Size(40, 40),
  ),
)
八、常见问题
Q1: 扫描速度慢怎么办?调整 detectionSpeed 参数:
MobileScannerController(
  detectionSpeed: DetectionSpeed.noDuplicates,  // 不重复检测
  // 或
  detectionSpeed: DetectionSpeed.unrestricted,  // 最快速度
)
mobile_scanner 默认支持多种格式,包括:
- QR Code
- EAN-13, EAN-8
- UPC-A, UPC-E
- Code 39, Code 128
- ITF, PDF417
无需额外配置。
Q3: 二维码内容太长会怎样?二维码有容量限制:
- 数字:最多7089个
- 字母数字:最多4296个
- 二进制:最多2953字节
超出限制会导致生成失败,建议对长内容使用短链接服务。
九、总结
本文实现了一款功能完善的二维码工具应用,核心技术点包括:
- 二维码生成:qr_flutter库的使用和样式自定义
- 二维码扫描:mobile_scanner相机调用和结果处理
- Widget截图:RepaintBoundary转图片
- 文件操作:path_provider获取目录、文件读写
- 分享功能:share_plus跨平台分享
- 内容识别:根据前缀智能判断类型
二维码工具是一个非常实用的应用类型,希望这篇文章能帮你掌握相关技术!
欢迎加入开源鸿蒙跨平台社区:https://openharmonycrossplatform.csdn.net

开源鸿蒙跨平台开发社区汇聚开发者与厂商,共建“一次开发,多端部署”的开源生态,致力于降低跨端开发门槛,推动万物智联创新。
更多推荐

 11
11 0
0- 0


 已为社区贡献32条内容

所有评论(0)