Flutter for OpenHarmony 教育百科实战:语言切换
教育百科App实现中英文切换功能,采用Provider管理语言状态并本地存储。通过LocaleProvider类维护当前语言设置(默认中文),提供便捷属性判断语言类型。实现语言加载、保存及切换方法,支持中文和英文的快速切换。在UI中使用时根据当前语言动态显示文本,包括设置页面标题、对话框选项等。语言切换后即时更新界面并显示对应语言的提示信息,提升多语言用户体验。该方案简洁高效,适合支持少量语言的应
语言切换功能让应用可以支持多种语言,满足不同用户的需求。教育百科App目前支持中文和英文两种语言,实现思路和深色模式类似——用Provider管理状态,保存到本地存储,整个应用响应变化。
不过语言切换有一些特殊的地方,比如文本需要在代码里写两套,对话框的按钮文字也要跟着变……今天就来聊聊这些细节。
LocaleProvider的设计
语言状态用Provider管理:
import 'package:flutter/material.dart';
import '../services/storage_service.dart';

class LocaleProvider extends ChangeNotifier {
  Locale _locale = const Locale('zh', 'CN');
  bool _isInitialized = false;

  Locale get locale => _locale;
  bool get isInitialized => _isInitialized;
_locale存储当前语言设置,Locale是Flutter的语言类,包含语言代码(如’zh’、‘en’)和国家代码(如’CN’、‘US’)。
  // 便捷属性
  bool get isChinese => _locale.languageCode == 'zh';
  bool get isEnglish => _locale.languageCode == 'en';

  String get currentLanguageName => isChinese ? '简体中文' : 'English';
提供几个便捷属性,方便在代码里判断当前语言。
currentLanguageName返回当前语言的显示名称,用在设置页面。
  LocaleProvider() {
    _loadLocale();
  }
}
和ThemeProvider一样,构造函数里加载保存的设置。
加载和保存语言设置
Future<void> _loadLocale() async {
  try {
    final storage = await AppStorage.getInstance();
    final languageCode = storage.getString('languageCode');
    final countryCode = storage.getString('countryCode');

    if (languageCode != null) {
      _locale = Locale(languageCode, countryCode);
    }
  } catch (e) {
    debugPrint('Load locale error: $e');
  } finally {
    _isInitialized = true;
    notifyListeners();
  }
}
从存储读取语言代码和国家代码。如果没有保存过,就用默认的中文。
Future<void> _saveLocale() async {
  try {
    final storage = await AppStorage.getInstance();
    await storage.setString('languageCode', _locale.languageCode);
    if (_locale.countryCode != null) {
      await storage.setString('countryCode', _locale.countryCode!);
    }
  } catch (e) {
    debugPrint('Save locale error: $e');
  }
}
保存时分别存储语言代码和国家代码。
切换语言的方法
提供设置中文和英文的方法:
Future<void> setChinese() async {
  if (isChinese) return;  // 已经是中文,不用操作

  _locale = const Locale('zh', 'CN');
  notifyListeners();
  await _saveLocale();
}

Future<void> setEnglish() async {
  if (isEnglish) return;  // 已经是英文,不用操作

  _locale = const Locale('en', 'US');
  notifyListeners();
  await _saveLocale();
}
和主题切换一样,先更新状态再保存,让UI立刻响应。
为什么不用一个通用的setLocale方法?
当然可以,但目前只支持两种语言,分开写更清晰。如果以后要支持更多语言,可以改成:
Future<void> setLocale(Locale locale) async {
  if (_locale == locale) return;
  _locale = locale;
  notifyListeners();
  await _saveLocale();
}
在页面中使用
设置页面根据当前语言显示不同文字:
Widget build(BuildContext context) {
final localeProvider = Provider.of<LocaleProvider>(context);
final isChinese = localeProvider.isChinese;
return Scaffold(
appBar: AppBar(
title: Text(isChinese ? '设置' : 'Settings'),
),
body: ListView(
children: [
_buildSection(
isChinese ? '外观' : 'Appearance',
[
SwitchListTile(
title: Text(isChinese ? '深色模式' : 'Dark Mode'),
subtitle: Text(isChinese ? '当前为浅色主题' : 'Currently light theme'),
// ...
),
],
),
],
),
);
}
通过
isChinese判断显示中文还是英文。这种方式简单直接,适合支持少量语言的应用。
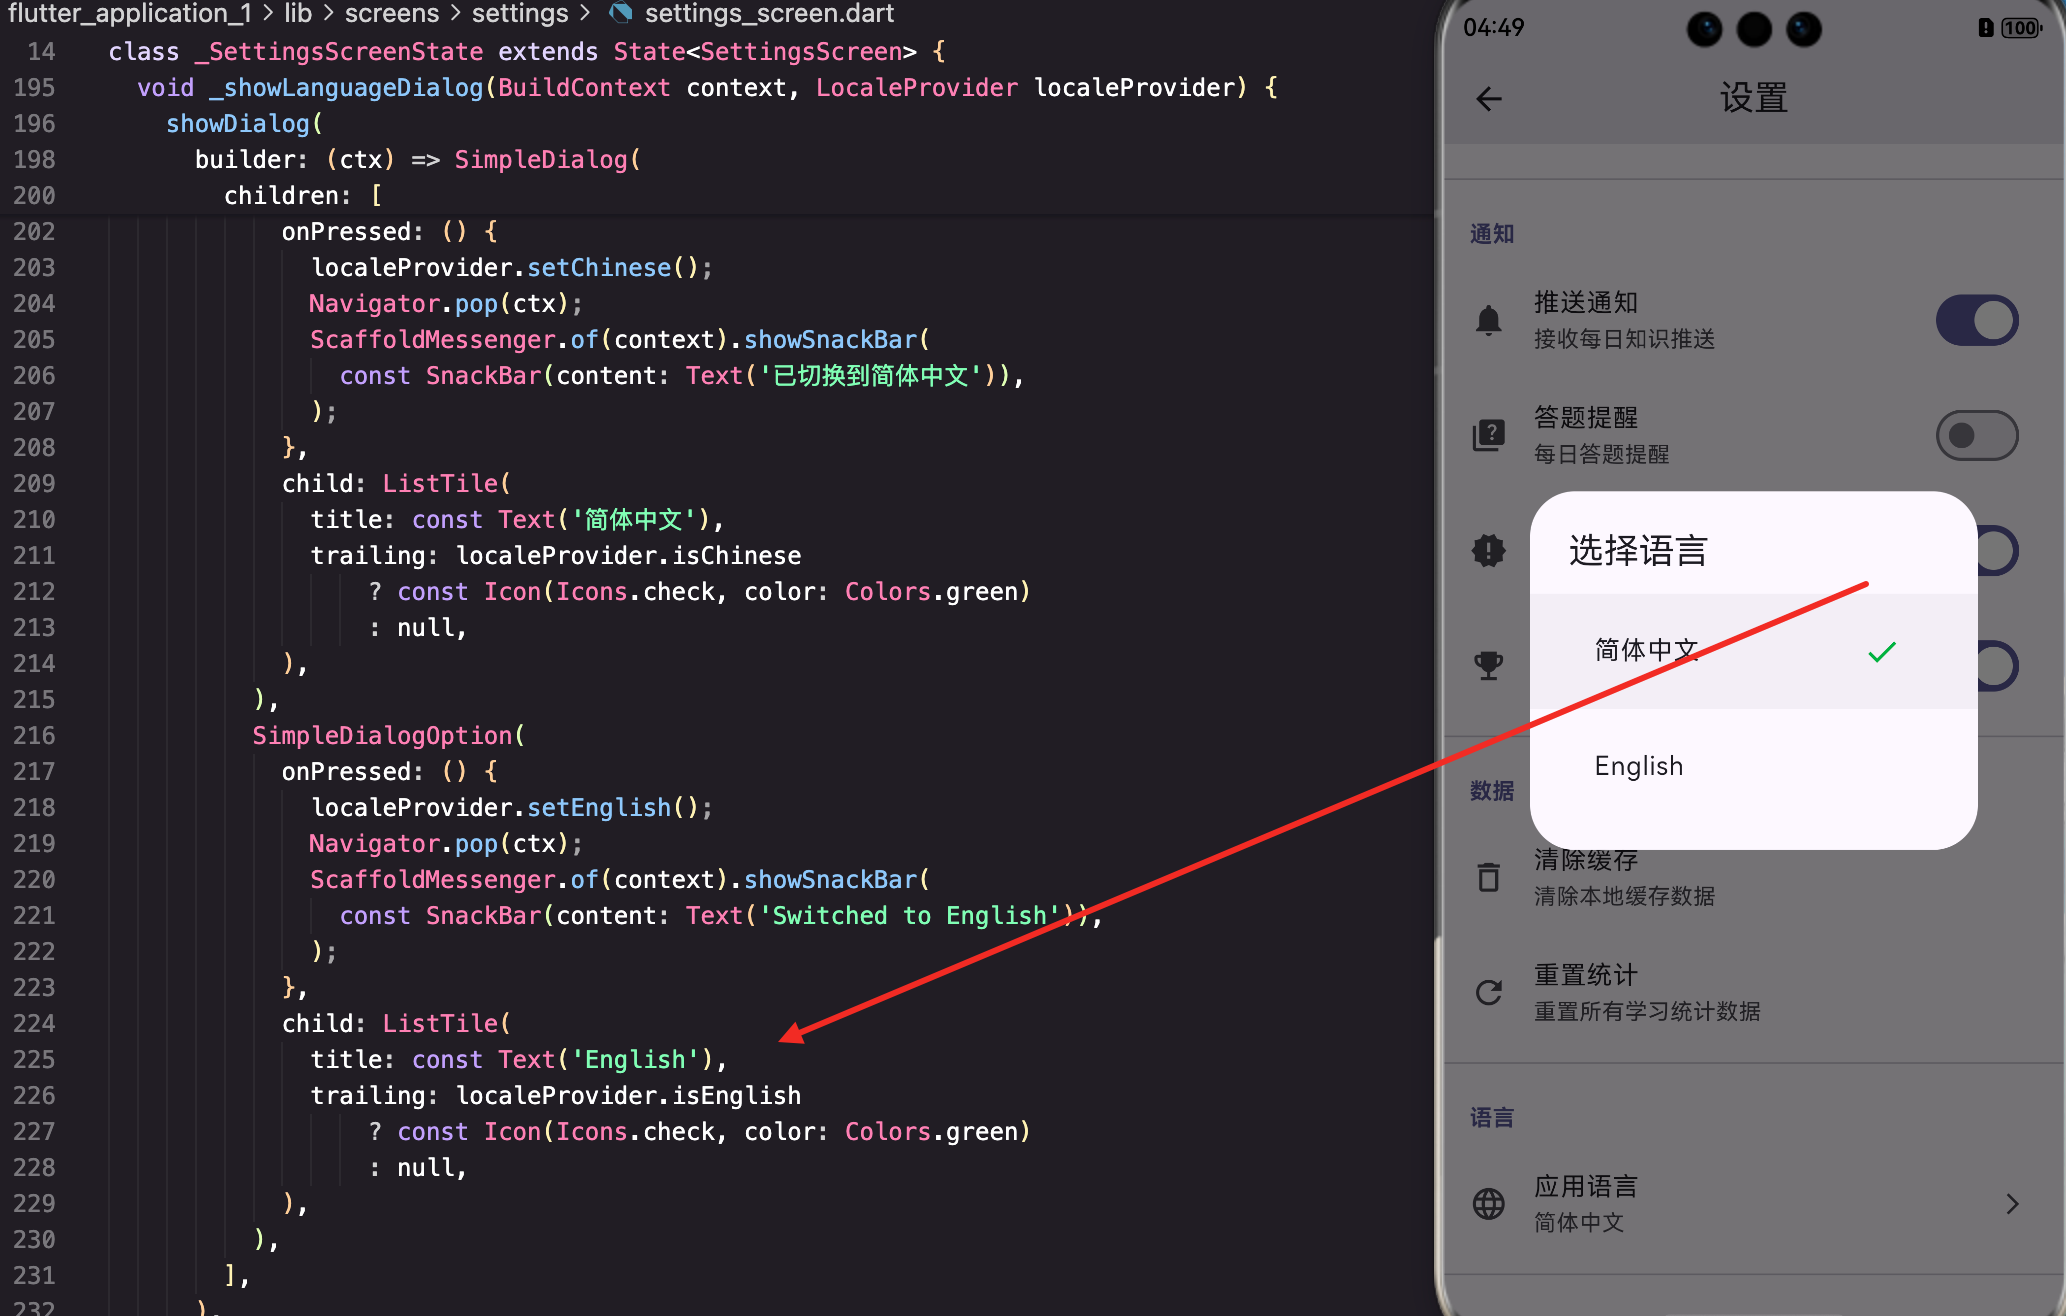
语言选择对话框
在设置页面点击语言设置项,显示选择对话框:
void _showLanguageDialog(BuildContext context, LocaleProvider localeProvider) {
  final isChinese = localeProvider.isChinese;

  showDialog(
    context: context,
    builder: (ctx) => AlertDialog(
      title: Text(isChinese ? '选择语言' : 'Select Language'),
      content: Column(
        mainAxisSize: MainAxisSize.min,
        children: [
          _buildLanguageOption(
            context: ctx,
            label: '简体中文',
            isSelected: localeProvider.isChinese,
            onTap: () {
              localeProvider.setChinese();
              Navigator.pop(ctx);
              _showLanguageChangedSnackBar(context, '已切换到简体中文');
            },
          ),
          const SizedBox(height: 8),
          _buildLanguageOption(
            context: ctx,
            label: 'English',
            isSelected: localeProvider.isEnglish,
            onTap: () {
              localeProvider.setEnglish();
              Navigator.pop(ctx);
              _showLanguageChangedSnackBar(context, 'Switched to English');
            },
          ),
        ],
      ),
    ),
  );
}
对话框标题也要根据当前语言显示。切换后显示SnackBar提示,用新语言的文字。
Widget _buildLanguageOption({
  required BuildContext context,
  required String label,
  required bool isSelected,
  required VoidCallback onTap,
}) {
  return InkWell(
    onTap: onTap,
    borderRadius: BorderRadius.circular(12),
    child: Container(
      padding: const EdgeInsets.symmetric(horizontal: 16, vertical: 14),
      decoration: BoxDecoration(
        color: isSelected
            ? Theme.of(context).colorScheme.primaryContainer
            : Colors.transparent,
        borderRadius: BorderRadius.circular(12),
        border: Border.all(
          color: isSelected
              ? Theme.of(context).colorScheme.primary
              : Colors.grey.withOpacity(0.3),
        ),
      ),
      child: Row(
        children: [
          Text(
            label,
            style: TextStyle(
              fontSize: 16,
              fontWeight: isSelected ? FontWeight.bold : FontWeight.normal,
            ),
          ),
          const Spacer(),
          if (isSelected)
            Icon(
              Icons.check_circle,
              color: Theme.of(context).colorScheme.primary,
            ),
        ],
      ),
    ),
  );
}
选中的语言有高亮背景和勾选图标,未选中的只有边框。
void _showLanguageChangedSnackBar(BuildContext context, String message) {
  ScaffoldMessenger.of(context).showSnackBar(
    SnackBar(
      content: Text(message),
      behavior: SnackBarBehavior.floating,
      duration: const Duration(seconds: 2),
    ),
  );
}
其他页面的适配
其他页面也需要根据语言显示不同内容:
Widget _buildEmptyState(bool isChinese) {
  return Center(
    child: Column(
      mainAxisAlignment: MainAxisAlignment.center,
      children: [
        Icon(Icons.inbox_outlined, size: 64, color: Colors.grey[400]),
        const SizedBox(height: 16),
        Text(
          isChinese ? '暂无数据' : 'No data',
          style: TextStyle(color: Colors.grey[600], fontSize: 16),
        ),
      ],
    ),
  );
}
空状态、错误提示、按钮文字……所有用户可见的文字都需要适配。
对话框的适配
对话框里的文字也要跟着变:
void _showDeleteConfirmDialog(BuildContext context, bool isChinese) {
  showDialog(
    context: context,
    builder: (ctx) => AlertDialog(
      title: Text(isChinese ? '确认删除' : 'Confirm Delete'),
      content: Text(
        isChinese ? '确定要删除这个项目吗?此操作不可撤销。'
                  : 'Are you sure you want to delete this item? This action cannot be undone.',
      ),
      actions: [
        TextButton(
          onPressed: () => Navigator.pop(ctx),
          child: Text(isChinese ? '取消' : 'Cancel'),
        ),
        TextButton(
          onPressed: () {
            Navigator.pop(ctx);
            // 执行删除
          },
          style: TextButton.styleFrom(foregroundColor: Colors.red),
          child: Text(isChinese ? '删除' : 'Delete'),
        ),
      ],
    ),
  );
}
把
isChinese作为参数传入,对话框里的所有文字都根据这个参数显示。
更优雅的方案:国际化框架
上面的方式虽然简单,但如果文字很多,代码会变得很乱。Flutter提供了官方的国际化框架,可以把文字集中管理:
// 定义文字资源
class AppLocalizations {
  final Locale locale;

  AppLocalizations(this.locale);

  static AppLocalizations of(BuildContext context) {
    return Localizations.of<AppLocalizations>(context, AppLocalizations)!;
  }

  static final Map<String, Map<String, String>> _localizedValues = {
    'zh': {
      'settings': '设置',
      'darkMode': '深色模式',
      'language': '语言',
      'cancel': '取消',
      'confirm': '确定',
      // ...更多文字
    },
    'en': {
      'settings': 'Settings',
      'darkMode': 'Dark Mode',
      'language': 'Language',
      'cancel': 'Cancel',
      'confirm': 'OK',
      // ...更多文字
    },
  };

  String get settings => _localizedValues[locale.languageCode]!['settings']!;
  String get darkMode => _localizedValues[locale.languageCode]!['darkMode']!;
  // ...更多getter
}
使用时:
Text(AppLocalizations.of(context).settings)
这种方式更规范,适合大型项目或需要支持多种语言的应用。但对于只支持两种语言的小项目,直接用三元表达式也够用了。
注意事项
语言切换有几个容易踩的坑:
1. 文字长度不同
英文通常比中文长,设计UI时要考虑文字换行的情况:
Text(
  isChinese ? '设置' : 'Settings',
  maxLines: 1,
  overflow: TextOverflow.ellipsis,
)
2. 日期和数字格式
不同语言的日期格式不同,中文是"2024年1月1日",英文是"January 1, 2024":
String formatDate(DateTime date, bool isChinese) {
  if (isChinese) {
    return '${date.year}年${date.month}月${date.day}日';
  } else {
    final months = ['January', 'February', 'March', /* ... */];
    return '${months[date.month - 1]} ${date.day}, ${date.year}';
  }
}
3. 复数形式
英文有单复数之分,中文没有:
String getItemCount(int count, bool isChinese) {
  if (isChinese) {
    return '$count 个项目';
  } else {
    return count == 1 ? '1 item' : '$count items';
  }
}
写在最后
语言切换的实现和主题切换类似,核心是Provider管理状态。难点在于所有用户可见的文字都需要适配,工作量比较大。
对于小项目,直接用三元表达式isChinese ? '中文' : 'English'就够了。对于大项目,建议使用Flutter的国际化框架,把文字集中管理。
下一篇我们来看数据统计功能,了解如何记录和展示用户的学习数据。
本文是Flutter for OpenHarmony教育百科实战系列的第十九篇,后续会持续更新更多内容。
欢迎加入开源鸿蒙跨平台社区:https://openharmonycrossplatform.csdn.net

开源鸿蒙跨平台开发社区汇聚开发者与厂商,共建“一次开发,多端部署”的开源生态,致力于降低跨端开发门槛,推动万物智联创新。
更多推荐
 9
9 0
0- 0


 已为社区贡献20条内容

所有评论(0)