Flutter for OpenHarmony 教育百科实战:国家详情
本文介绍了国家详情页面的设计实现,通过分块布局清晰展示国家信息。页面采用StatelessWidget构建,从列表页传入数据,包含可折叠头部(国旗背景+渐变层)、官方名称显示、基本信息卡片(首都、地区等)等模块。设计亮点包括:使用SliverAppBar实现可折叠效果,添加渐变层提升文字可读性,卡片式布局组织关键信息,以及格式化处理大数字。代码结构清晰,通过私有类封装数据,实现了美观且用户友好的国
国家详情页面展示一个国家的完整信息,包括国旗、首都、人口、面积、语言、货币等。REST Countries API返回的数据非常丰富,怎么把这些数据以清晰美观的方式呈现给用户,是这个页面的主要挑战。
做这个页面的时候,我把信息分成了几个区块:头部展示国旗和名称,基本信息卡片展示首都、地区、人口、面积,然后是语言和货币。这种分块的设计让页面层次分明,用户可以快速找到想要的信息。
页面结构
国家详情页使用StatelessWidget,因为数据从列表页传入,不需要额外加载:
class CountryDetailScreen extends StatelessWidget {
final Map<String, dynamic> country;
const CountryDetailScreen({super.key, required this.country});
Widget build(BuildContext context) {
final flagUrl = country['flags']?['png'];
final name = country['name']['common'] ?? '未知';
final officialName = country['name']['official'] ?? name;
final capital = (country['capital'] as List?)?.join(', ') ?? '未知';
final region = country['region'] ?? '未知';
final subregion = country['subregion'] ?? '';
final population = country['population'] ?? 0;
final area = country['area'] ?? 0;
final languages = country['languages'] as Map<String, dynamic>?;
final currencies = country['currencies'] as Map<String, dynamic>?;
在build方法开头提取所有需要的数据,这样后面的代码更清晰。有些国家有多个首都,用
join(', ')连接成字符串。
为什么用StatelessWidget? 因为所有数据都是从列表页传过来的,不需要再请求API,也没有状态需要管理。用StatelessWidget更简单,性能也更好。
可折叠头部
使用CustomScrollView和SliverAppBar实现头部效果:
    return Scaffold(
      body: CustomScrollView(
        slivers: [
          SliverAppBar(
            expandedHeight: 200,
            pinned: true,
            flexibleSpace: FlexibleSpaceBar(
              title: Text(name, style: const TextStyle(shadows: [Shadow(blurRadius: 10)])),
              background: Stack(
                fit: StackFit.expand,
                children: [
                  if (flagUrl != null)
                    NetworkImageWidget(
                      imageUrl: flagUrl,
                      fit: BoxFit.cover,
                      borderRadius: 0,
                    ),
                  Container(
                    decoration: BoxDecoration(
                      gradient: LinearGradient(
                        begin: Alignment.topCenter,
                        end: Alignment.bottomCenter,
                        colors: [Colors.transparent, Colors.black.withOpacity(0.7)],
                      ),
                    ),
                  ),
                ],
              ),
            ),
          ),
国旗作为背景图片,上面叠加一个从透明到黑色的渐变层,让白色的标题文字更清晰。
Shadow给标题加上阴影,进一步提高可读性。
为什么要加渐变层? 很多国旗的底部是浅色的(比如日本、韩国),如果不加渐变层,白色的标题文字会看不清。渐变层让底部变暗,标题就能清晰显示了。
官方名称显示
如果官方名称和常用名称不同,显示官方名称:
          SliverToBoxAdapter(
            child: Padding(
              padding: const EdgeInsets.all(16),
              child: Column(
                crossAxisAlignment: CrossAxisAlignment.start,
                children: [
                  if (officialName != name)
                    Text(officialName, style: TextStyle(color: Colors.grey[600], fontSize: 16)),
                  const SizedBox(height: 24),
比如"中国"的官方名称是"中华人民共和国",“美国"的官方名称是"美利坚合众国”。这时两个名称都会显示,让用户了解完整信息。
基本信息卡片
用卡片展示首都、地区、人口、面积:
                  _buildInfoCard(context, [
                    _InfoItem(Icons.location_city, '首都', capital),
                    _InfoItem(Icons.public, '地区', '$region${subregion.isNotEmpty ? ' · $subregion' : ''}'),
                    _InfoItem(Icons.people, '人口', _formatNumber(population)),
                    _InfoItem(Icons.square_foot, '面积', '${_formatNumber(area.toInt())} km²'),
                  ]),
地区信息把大区和小区用"·“连接,比如"亚洲 · 东亚”。人口和面积用格式化方法处理,让大数字更易读。
Widget _buildInfoCard(BuildContext context, List<_InfoItem> items) {
  return Card(
    child: Padding(
      padding: const EdgeInsets.all(16),
      child: Column(
        children: items.map((item) => Padding(
          padding: const EdgeInsets.symmetric(vertical: 8),
          child: Row(
            children: [
              Container(
                padding: const EdgeInsets.all(8),
                decoration: BoxDecoration(
                  color: Theme.of(context).colorScheme.primaryContainer,
                  borderRadius: BorderRadius.circular(8),
                ),
                child: Icon(item.icon, size: 20, color: Theme.of(context).colorScheme.primary),
              ),
              const SizedBox(width: 12),
              Column(
                crossAxisAlignment: CrossAxisAlignment.start,
                children: [
                  Text(item.label, style: TextStyle(color: Colors.grey[600], fontSize: 12)),
                  Text(item.value, style: const TextStyle(fontWeight: FontWeight.w500)),
                ],
              ),
            ],
          ),
        )).toList(),
      ),
    ),
  );
}
每行信息包含一个带背景的图标、标签和值。图标使用主题色,和整体风格保持一致。
信息项数据类
定义一个简单的数据类来组织信息:
class _InfoItem {
  final IconData icon;
  final String label;
  final String value;

  _InfoItem(this.icon, this.label, this.value);
}
下划线前缀表示这是私有类,只在当前文件中使用。这种封装让代码更整洁,每个信息项的数据都在一起。
数字格式化
大数字需要格式化显示:
String _formatNumber(int number) {
  if (number >= 1000000000) {
    return '${(number / 1000000000).toStringAsFixed(2)}B';
  } else if (number >= 1000000) {
    return '${(number / 1000000).toStringAsFixed(2)}M';
  } else if (number >= 1000) {
    return '${(number / 1000).toStringAsFixed(2)}K';
  }
  return number.toString();
}
十亿以上显示B(Billion),百万以上显示M(Million),千以上显示K。
toStringAsFixed(2)保留两位小数,比如"14.12亿"显示为"14.12B"。
为什么用英文缩写? 因为B、M、K是国际通用的,不管用户是什么语言背景都能理解。如果用中文的"亿"、“万”,英文用户可能看不懂。
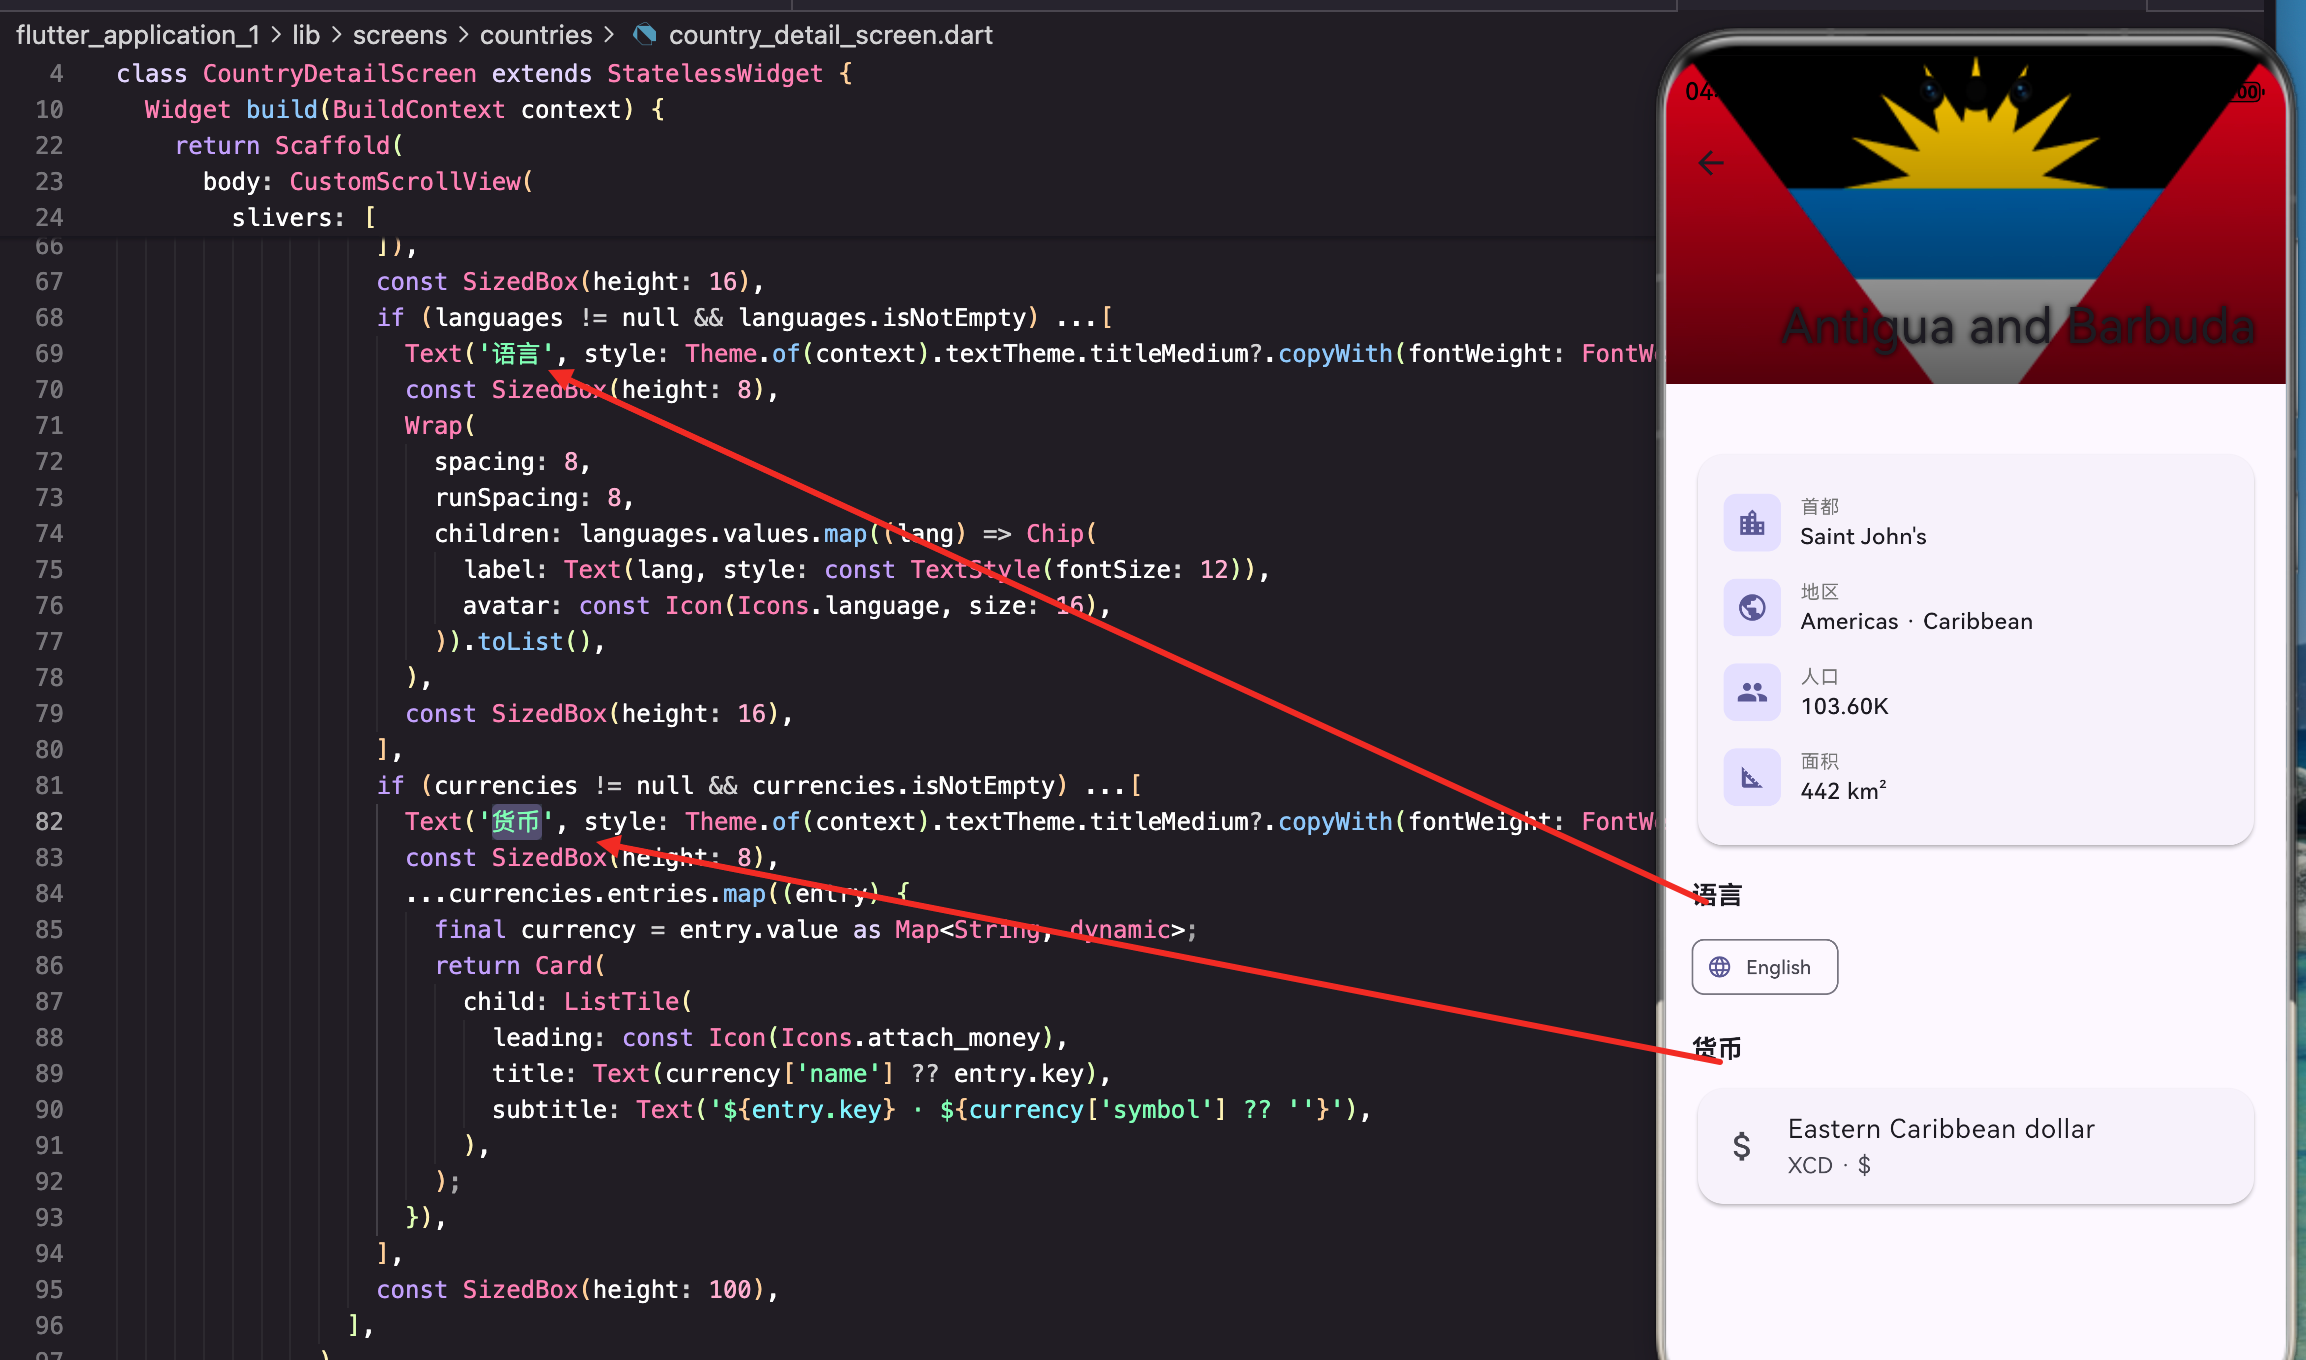
语言展示
用Chip标签展示国家使用的语言:
                  const SizedBox(height: 16),
                  if (languages != null && languages.isNotEmpty) ...[
                    Text('语言', style: Theme.of(context).textTheme.titleMedium?.copyWith(fontWeight: FontWeight.bold)),
                    const SizedBox(height: 8),
                    Wrap(
                      spacing: 8,
                      runSpacing: 8,
                      children: languages.values.map((lang) => Chip(
                        label: Text(lang, style: const TextStyle(fontSize: 12)),
                        avatar: const Icon(Icons.language, size: 16),
                      )).toList(),
                    ),
                    const SizedBox(height: 16),
                  ],
languages是一个Map,key是语言代码(如"zh"、“en”),value是语言名称(如"Chinese"、“English”)。Wrap让标签自动换行,Chip的avatar属性添加一个小图标。
为什么用Wrap而不是Row? 因为有些国家有很多官方语言(比如印度有22种),用Row会超出屏幕。Wrap会自动换行,不管有多少语言都能正常显示。
货币展示
用卡片列表展示国家使用的货币:
                  if (currencies != null && currencies.isNotEmpty) ...[
                    Text('货币', style: Theme.of(context).textTheme.titleMedium?.copyWith(fontWeight: FontWeight.bold)),
                    const SizedBox(height: 8),
                    ...currencies.entries.map((entry) {
                      final currency = entry.value as Map<String, dynamic>;
                      return Card(
                        child: ListTile(
                          leading: const Icon(Icons.attach_money),
                          title: Text(currency['name'] ?? entry.key),
                          subtitle: Text('${entry.key} · ${currency['symbol'] ?? ''}'),
                        ),
                      );
                    }),
                  ],
                  const SizedBox(height: 100),
                ],
              ),
            ),
          ),
        ],
      ),
    );
  }
currencies也是一个Map,key是货币代码(如"USD"、“CNY”),value包含货币名称和符号。ListTile的title显示货币名称,subtitle显示代码和符号。
货币数据的结构: API返回的货币数据格式是这样的:
{
  "CNY": {
    "name": "Chinese yuan",
    "symbol": "¥"
  }
}
所以要用
entry.key获取货币代码,entry.value获取详细信息。
关于数据的完整性
REST Countries API返回的数据非常丰富,除了我展示的这些,还有:
- 时区(timezones)
- 国际电话区号(idd)
- 车辆行驶方向(car.side)
- 国歌(coatOfArms)
- 地图链接(maps)
- 边境国家(borders)
- 等等…
我只选择了最常用的几个字段展示,如果你想做更完整的国家百科,可以把这些字段也加上。
小结
国家详情页面展示了如何处理复杂的嵌套数据结构。通过在build方法开头提取数据,后面的代码更加清晰。数字格式化让大数字更易读,Chip和Card的组合让不同类型的信息有不同的展示方式。渐变层的使用解决了国旗背景上文字不清晰的问题。
下一篇我们来看大学搜索功能的实现,了解如何搜索全球的大学信息。
本文是Flutter for OpenHarmony教育百科实战系列的第十篇。
欢迎加入开源鸿蒙跨平台社区:https://openharmonycrossplatform.csdn.net

开源鸿蒙跨平台开发社区汇聚开发者与厂商,共建“一次开发,多端部署”的开源生态,致力于降低跨端开发门槛,推动万物智联创新。
更多推荐


 24
24 0
0- 0


 已为社区贡献24条内容

所有评论(0)