Flutter与OpenHarmony购物车组件完整实现
前言
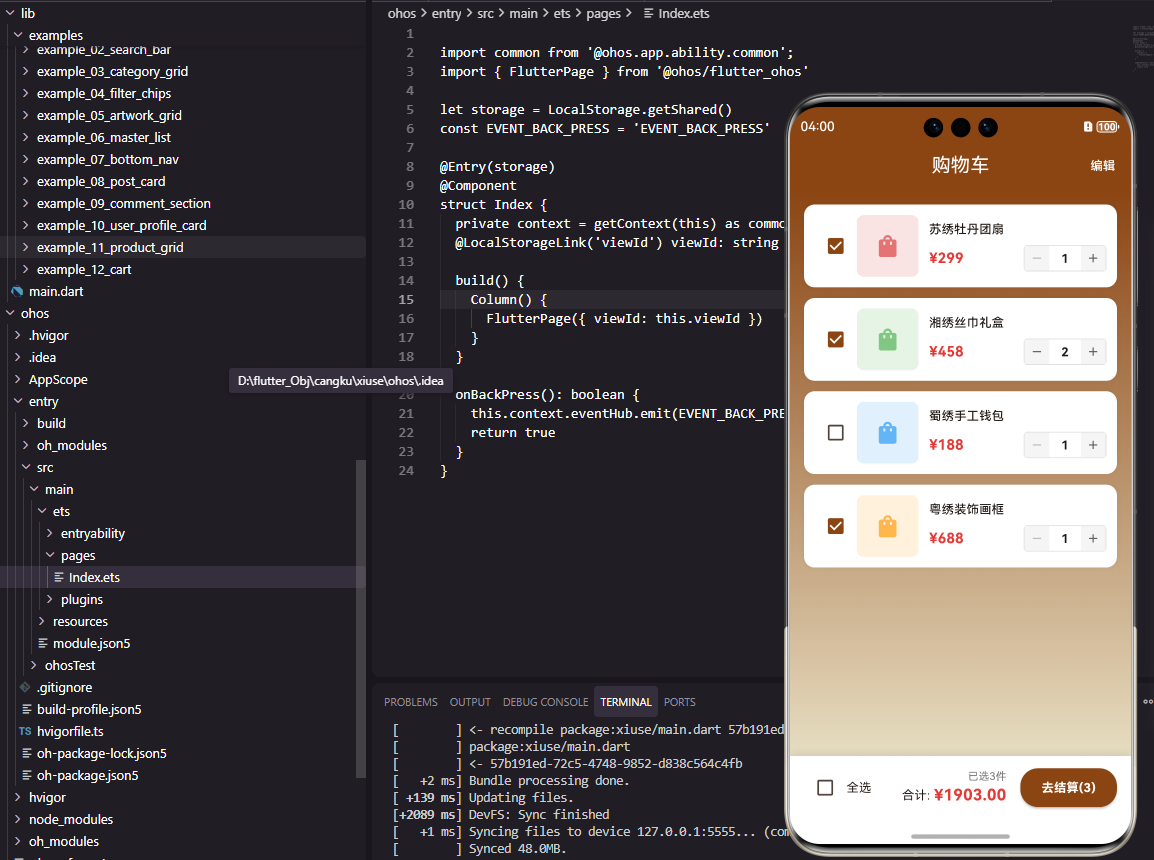
购物车是电商应用中最重要的功能模块之一,它承载着用户的购买意向,直接影响订单转化率。一个设计良好的购物车组件需要展示商品列表、支持数量调整、计算总价、处理选中状态等多种功能。本文将详细介绍如何在Flutter和OpenHarmony平台上实现一个功能完善的购物车组件。
购物车的设计需要考虑用户操作的便捷性、数据的实时同步、以及结算流程的顺畅性。通过本文的学习,开发者将掌握在两个平台上实现专业级购物车功能的核心技术。
Flutter购物车实现
状态管理设计
购物车需要管理商品列表、选中状态和数量等多个状态。
class CartSummaryWidget extends StatefulWidget {
const CartSummaryWidget({super.key});
State<CartSummaryWidget> createState() => _CartSummaryWidgetState();
}
class _CartSummaryWidgetState extends State<CartSummaryWidget> {
final List<Map<String, dynamic>> _cartItems = [
{'name': '苏绣牡丹团扇', 'price': 299, 'quantity': 1, 'selected': true},
{'name': '湘绣丝巾礼盒', 'price': 458, 'quantity': 2, 'selected': true},
{'name': '蜀绣手工钱包', 'price': 188, 'quantity': 1, 'selected': false},
];
每个购物车项包含商品名称、价格、数量和选中状态。使用List存储便于增删改操作。
在实际项目中,购物车数据通常需要与后端同步,并使用状态管理方案(如Provider、Riverpod)进行全局管理。
总价计算逻辑
计算选中商品的总价是购物车的核心功能。
  double get _totalPrice {
    return _cartItems
        .where((item) => item['selected'] as bool)
        .fold(0.0, (sum, item) => sum + (item['price'] as int) * (item['quantity'] as int));
  }

  int get _selectedCount {
    return _cartItems.where((item) => item['selected'] as bool).length;
  }
使用getter方法计算总价和选中数量,每次访问时自动重新计算。where过滤选中的商品,fold累加计算总价。这种响应式计算方式确保UI始终显示最新的数据。
购物车列表构建
展示购物车中的商品列表。
Widget build(BuildContext context) {
return Container(
margin: const EdgeInsets.symmetric(horizontal: 16),
child: Column(
children: [
..._cartItems.asMap().entries.map((entry) {
final index = entry.key;
final item = entry.value;
return Container(
margin: const EdgeInsets.only(bottom: 12),
padding: const EdgeInsets.all(12),
decoration: BoxDecoration(
color: Colors.white,
borderRadius: BorderRadius.circular(12),
boxShadow: [BoxShadow(color: Colors.black.withOpacity(0.05), blurRadius: 5)],
),
child: Row(
children: [
Checkbox(
value: item['selected'] as bool,
onChanged: (value) => setState(() => item['selected'] = value),
activeColor: const Color(0xFF8B4513),
),
asMap().entries获取索引和数据。Checkbox控制商品的选中状态,点击时更新状态并触发UI重建。activeColor设置选中时的颜色与品牌色一致。
商品信息与数量控制
展示商品信息和数量调整按钮。
                  Container(
                    width: 60,
                    height: 60,
                    decoration: BoxDecoration(color: Colors.grey[200], borderRadius: BorderRadius.circular(8)),
                    child: const Icon(Icons.shopping_bag, color: Colors.grey),
                  ),
                  const SizedBox(width: 12),
                  Expanded(
                    child: Column(
                      crossAxisAlignment: CrossAxisAlignment.start,
                      children: [
                        Text(item['name'] as String, style: const TextStyle(fontSize: 14, fontWeight: FontWeight.w500), maxLines: 1, overflow: TextOverflow.ellipsis),
                        const SizedBox(height: 4),
                        Text('¥${item['price']}', style: const TextStyle(fontSize: 14, fontWeight: FontWeight.bold, color: Color(0xFFE53935))),
                      ],
                    ),
                  ),
                  Row(
                    children: [
                      IconButton(
                        onPressed: () => setState(() {
                          if ((item['quantity'] as int) > 1) item['quantity'] = (item['quantity'] as int) - 1;
                        }),
                        icon: const Icon(Icons.remove_circle_outline, size: 24),
                        padding: EdgeInsets.zero,
                        constraints: const BoxConstraints(),
                      ),
                      Padding(
                        padding: const EdgeInsets.symmetric(horizontal: 8),
                        child: Text('${item['quantity']}', style: const TextStyle(fontSize: 14, fontWeight: FontWeight.bold)),
                      ),
                      IconButton(
                        onPressed: () => setState(() => item['quantity'] = (item['quantity'] as int) + 1),
                        icon: const Icon(Icons.add_circle_outline, size: 24),
                        padding: EdgeInsets.zero,
                        constraints: const BoxConstraints(),
                      ),
                    ],
                  ),
                ],
              ),
            );
          }).toList(),
数量减少时检查是否大于1,防止数量变为0或负数。IconButton的padding和constraints设置为最小值,使按钮更紧凑。
结算栏实现
底部显示总价和结算按钮。
          Container(
            padding: const EdgeInsets.all(16),
            decoration: BoxDecoration(
              color: Colors.white,
              borderRadius: BorderRadius.circular(12),
              boxShadow: [BoxShadow(color: Colors.black.withOpacity(0.1), blurRadius: 8)],
            ),
            child: Row(
              mainAxisAlignment: MainAxisAlignment.spaceBetween,
              children: [
                Column(
                  crossAxisAlignment: CrossAxisAlignment.start,
                  children: [
                    Text('已选$_selectedCount件', style: TextStyle(fontSize: 12, color: Colors.grey[600])),
                    Text('合计: ¥${_totalPrice.toStringAsFixed(2)}', style: const TextStyle(fontSize: 18, fontWeight: FontWeight.bold, color: Color(0xFFE53935))),
                  ],
                ),
                ElevatedButton(
                  onPressed: _selectedCount > 0 ? () {} : null,
                  style: ElevatedButton.styleFrom(backgroundColor: const Color(0xFF8B4513), padding: const EdgeInsets.symmetric(horizontal: 32, vertical: 12)),
                  child: const Text('去结算', style: TextStyle(color: Colors.white)),
                ),
              ],
            ),
          ),
        ],
      ),
    );
  }
}
toStringAsFixed(2)格式化价格为两位小数。结算按钮在没有选中商品时禁用(onPressed为null)。
OpenHarmony鸿蒙实现
组件与数据定义
鸿蒙平台使用@State管理购物车状态。
interface CartItem {
  name: string
  price: number
  quantity: number
  selected: boolean
}

@Component
struct CartSummaryComponent {
  @State cartItems: Array<CartItem> = [
    { name: '苏绣牡丹团扇', price: 299, quantity: 1, selected: true },
    { name: '湘绣丝巾礼盒', price: 458, quantity: 2, selected: true },
    { name: '蜀绣手工钱包', price: 188, quantity: 1, selected: false }
  ]
@State使cartItems成为响应式数据,修改时自动触发UI更新。
购物车列表
使用ForEach遍历购物车数据。
  build() {
    Column() {
      ForEach(this.cartItems, (item: CartItem, index: number) => {
        Row() {
          Checkbox()
            .select(item.selected)
            .selectedColor('#8B4513')
            .onChange((value: boolean) => {
              this.cartItems[index].selected = value
              this.cartItems = [...this.cartItems]
            })

          Stack() {
            Image($r('app.media.product'))
              .width(60)
              .height(60)
              .borderRadius(8)
          }
          .width(60)
          .height(60)
          .backgroundColor('#F0F0F0')
          .borderRadius(8)
          .margin({ left: 8 })
Checkbox组件控制选中状态。注意鸿蒙中修改数组元素后需要重新赋值数组才能触发UI更新。
数量控制与结算
实现数量调整和结算功能。
          Column() {
            Text(item.name)
              .fontSize(14)
              .fontWeight(FontWeight.Medium)
              .maxLines(1)
              .textOverflow({ overflow: TextOverflow.Ellipsis })
            Text('¥' + item.price)
              .fontSize(14)
              .fontWeight(FontWeight.Bold)
              .fontColor('#E53935')
              .margin({ top: 4 })
          }
          .layoutWeight(1)
          .alignItems(HorizontalAlign.Start)
          .margin({ left: 12 })

          Row() {
            Text('-')
              .fontSize(20)
              .width(28)
              .height(28)
              .textAlign(TextAlign.Center)
              .borderRadius(14)
              .backgroundColor('#F0F0F0')
              .onClick(() => {
                if (item.quantity > 1) {
                  this.cartItems[index].quantity--
                  this.cartItems = [...this.cartItems]
                }
              })
            Text(item.quantity.toString())
              .fontSize(14)
              .fontWeight(FontWeight.Bold)
              .margin({ left: 12, right: 12 })
            Text('+')
              .fontSize(20)
              .width(28)
              .height(28)
              .textAlign(TextAlign.Center)
              .borderRadius(14)
              .backgroundColor('#F0F0F0')
              .onClick(() => {
                this.cartItems[index].quantity++
                this.cartItems = [...this.cartItems]
              })
          }
        }
        .width('100%')
        .padding(12)
        .backgroundColor(Color.White)
        .borderRadius(12)
        .margin({ bottom: 12 })
      })

      Row() {
        Column() {
          Text('已选' + this.getSelectedCount() + '件')
            .fontSize(12)
            .fontColor('#666666')
          Text('合计: ¥' + this.getTotalPrice().toFixed(2))
            .fontSize(18)
            .fontWeight(FontWeight.Bold)
            .fontColor('#E53935')
        }
        .alignItems(HorizontalAlign.Start)

        Blank()

        Button('去结算')
          .fontSize(14)
          .fontColor(Color.White)
          .backgroundColor('#8B4513')
          .enabled(this.getSelectedCount() > 0)
      }
      .width('100%')
      .padding(16)
      .backgroundColor(Color.White)
      .borderRadius(12)
    }
    .width('90%')
  }

  getSelectedCount(): number {
    return this.cartItems.filter(item => item.selected).length
  }

  getTotalPrice(): number {
    return this.cartItems
      .filter(item => item.selected)
      .reduce((sum, item) => sum + item.price * item.quantity, 0)
  }
}
getSelectedCount和getTotalPrice方法计算选中数量和总价。enabled属性控制按钮的可用状态。
总结
本文详细介绍了Flutter和OpenHarmony平台上购物车组件的实现方法。从状态管理、列表展示、数量控制到结算功能,每个环节都进行了深入讲解。购物车是电商应用的核心功能,其设计质量直接影响用户的购物体验和订单转化率。欢迎加入开源鸿蒙跨平台社区:https://openharmonycrossplatform.csdn.net

开源鸿蒙跨平台开发社区汇聚开发者与厂商,共建“一次开发,多端部署”的开源生态,致力于降低跨端开发门槛,推动万物智联创新。
更多推荐
 15
15 0
0- 0


 已为社区贡献24条内容

所有评论(0)