在OpenHarmony中使用 C/C++/Rust进行应用开发
本文档是一份由移远通信技术股份有限公司提供的技术指南,基于OpenHarmony 5.0.3版本,详细介绍了如何在OpenHarmony系统中开发C/C++/Rust编写的ELF可执行程序。文档主要面向嵌入式应用开发场景,不涉及用户界面显示,专注于底层功能模块的兼容性和性能优化
文档说明
说明:
- 文章由移远通信技术股份有限公司提供
- 以下内容包含了个人理解,仅供参考,如有不合理处,请联系笔者修改/13269100295(微信同号)
- 作者基线工程版本为5.0.3
简介
本文档主要介绍如何开发一个C/C++/Rust编写的ELF可执行程序到OpenHarmony操作系统中。由于这类需求功能偏向于嵌入式应用开发,不涉及用户界面显示,因此不需要使用ArkTS进行开发。移植工作主要关注底层功能模块的兼容性和性能优化,确保在OpenHarmony平台上能够稳定运行。
作为快速崛起的新一代系统级编程语言,Rust以“内存安全、并发友好、性能卓越”著称,能从源头上避免缓冲区溢出、空指针解引用等传统编程语言长期面临的安全问题。其应用场景广泛,既可支撑高性能系统开发,又能适配WebAssembly、嵌入式、区块链、AI推理等前沿领域,已成为数字基础设施的重要组成部分,在操作系统、浏览器引擎、数据库、中间件等领域提供更强健的底层能力与安全保障,OpenHamrony中也有部分组件采取Rust进行开发,并且拥有不错的性能至此Rust也成为系统开发了不得不品鉴的一环,目前开放原子基金会也组织了开放原子旋武开源社区正式成立,助力Rust语言生态落地与数字基座安全
ELF 可执行链接格式(Executable and Linking Format)最初是由 UNIX 系统实验室(UNI XSystem Laboratories,USL)开发并发布的,作为应用程序二进制接口(Application Binary Interface,ABI)的一部分。ELF 是一种用于二进制文件、可执行文件、目标代码、共享库和核心转储格式文件的格式。
文章的重点包括:
- OpenHarmony系统中应用模块的添加
- C/C++代码功能实现
- Rust代码功能实现
- 常用三方库的添加
第一部分 C/C++应用开发
一、 在OpenHarmony中添加一个模块
1. 创建基础应用模板
首先在正式开始应用开发之前我们要先在OpenHarmony中添加一个模块,模块的添加可以参考OpenHarmony文档。既然我们主要功能是应用程序我们可以直接在系统中的applications/standard 去添加我们的应用模块
OpenHarmony中添加一个模块的步骤如下:
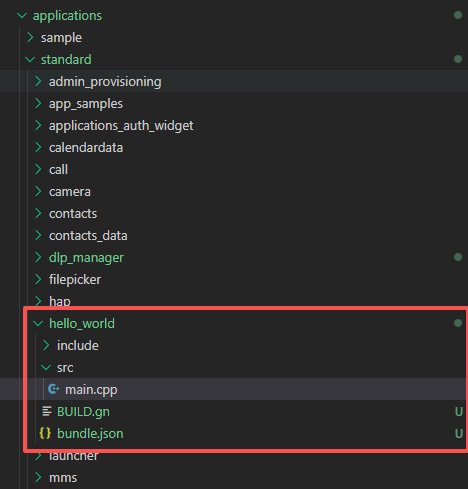
- 在OpenHarmony的源码目录下创建一个新的目录,可参考下方示例图片,我们创建一个名为"hello_world"的目录,目录名就是你要添加的模块的名称。
- 在新创建的目录下创建一个BUILD.gn和bundle.json文件,BUILD.gn文件是用来描述模块的编译规则的。bundle.json文件用来描述模块的元数据。
- 添加用于基础的main.cpp文件,main.cpp文件是应用的入口文件。
2. 配置BUILD.gn文件
我们先来看一下BUILD.gn文件的配置规则,目前OpenHarmony支持的BUILD.gn文件的配置模板如下:
ohos_executable   # 可执行文件
ohos_shared_library   # 共享库文件
ohos_static_library   # 静态库文件
ohos_source_set       # 源文件集合

# 预编译模板:
ohos_prebuilt_executable # 预编译可执行文件,用于直接使用已编译好的可执行文件
ohos_prebuilt_shared_library # 预编译共享库文件,用于直接使用已编译好的共享库文件
ohos_prebuilt_etc # 预编译etc文件,用于直接使用已编译好的etc文件
我们是要开发一个应用程序,所以我们需要配置ohos_executable模板。ohos_executable模板的配置如下:
import("//build/ohos.gni")
ohos_executable("hello_world") {
  sources = []
  include_dirs = []
  cflags = []
  cflags_c = []
  cflags_cc = []
  ldflags = []
  configs = []
  deps =[]                    # 部件内模块依赖

  # 跨部件模块依赖定义,
  # 定义格式为 "部件名:模块名称"
  # 这里依赖的模块必须是依赖的部件声明在inner_kits中的模块
  external_deps = [
    "part_name:module_name",
  ]

  output_name = ""            # 可选,模块输出名
  output_extension = ""       # 可选,模块名后缀
  module_install_dir = ""     # 可选,缺省在/system/lib64或/system/lib下, 模块安装路径,模块安装路径,从system/,vendor/后开始指定
  relative_install_dir = ""   # 可选,模块安装相对路径,相对于/system/lib64或/system/lib;如果有module_install_dir配置时,该配置不生效

  part_name = ""              # 必选,所属部件名称
}
接下来我们根据我们的应用程序的需求来配置BUILD.gn文件。配置后BUILD.gn文件如下:
import("//build/ohos.gni")

ohos_executable("hello_world") {
  sources = [
    "src/main.cpp",
  ]

  include_dirs = [
    "src/include",
  ]

  output_name = "hello_world"
  install_enable = true
  subsystem_name = "applications"
  part_name = "hello_world"

  external_deps = [
  ]

  deps = [

  ]

}
由于我们是应用程序所以可以直接复用已配置好的applications部件,如果有需要自定义新部件需求还需要在产品配置中添加新部件。 配置好BUILD.gn文件后我们还需要配置bundle.json文件。 bundle.json文件的配置如下:
{
    "name": "@ohos/hello_world",
    "description": "hello world example",
    "version": "3.1",
    "license": "Apache License 2.0",
    "publishAs": "code-segment",
    "segment": {
        "destPath": "hello_world"
    },
    "dirs": {},
    "scripts": {},
    "component": {
        "name": "hello_world",
        "subsystem": "applications",
        "syscap": [],
        "features": [],
        "adapted_system_type": [ "mini", "small", "standard" ],
        "rom": "",
        "ram": "",
        "deps": {
            "components": [
            ],
            "third_party": [
            ]
        },
        "build": {
            "sub_component": [
                "//applications/standard/hello_world:hello_world"
            ],
            "inner_kits": [],
            "test": []
        }
    }
}
配置模块结束后,我们需要在产品配置中添加新模块。 产品配置文件一般在OpenHarmony的源码目录下的/Vendor/hihope/产品名目录下,比如作者使用RK3568目录就是/Vendor/hihope/RK3568/,我们可以找到config.json。 在配置文件末尾增加
    {
      "subsystem": "applications", # 所属子系统
      "components": [
        {
          "component": "hello_world", # 组件名称
          "features": []
        }
      ]
    }
添加完毕后,我们main.cpp中增加主函数如下:
#include <stdio.h>

int main() {
    printf("Hello, World!\n");
    return 0;
}
然后我们可以编译应用程序,编译命令如下:
./build.sh --product-name rk3568 --build-target applications/standard/hello_world:hello_world
编译成功后控制台输出
  Please refer to: https://gitee.com/openharmony/developtools_integration_verification/tree/master/tools/startup_guard/rules/NO-Config-Cmds-In-Init/README.md
Do NO-Config-SystemParameter-In-INIT rule checking now:
[NOT ALLOWED]: DAC overallocated memory
  Please refer to: https://gitee.com/openharmony/developtools_integration_verification/tree/master/tools/startup_guard/rules/NO-Config-SystemParameter-In-INIT/README.md
Do NO-User-Group_In-Init rule checking now:
[NOT ALLOWED]: quickfix has different passwd and group values
  Please refer to: https://gitee.com/openharmony/developtools_integration_verification/tree/master/tools/startup_guard/rules/NO-User-Group_In-Init/README.md
Do NO-Plug-In_Module-Init rule checking now:
[NOT ALLOWED]: the dependent shared library libhisysevent.z.so of librebootmodule.z.so is not in whitelist
[NOT ALLOWED]: libmodule_update_init.z.so is not in whitelists
  Please refer to: https://gitee.com/openharmony/developtools_integration_verification/tree/master/tools/startup_guard/rules/NO-Plug-In_Module-Init/README.md
Please modify according to README.md
[OHOS INFO]  rk3568 build success
[OHOS INFO]  Cost Time:  0:00:36
=====build  successful=====
2025-12-13 15:23:23
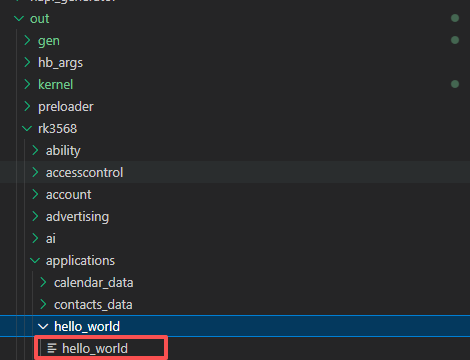
在output目录下找到hello_world可执行文件。
把文件通过hdc推送到开发板上,命令如下:
hdc file send output/hello_world /data
然后通过hdc shell 进去按下如下流程执行运行可执行文件可获得输出结果 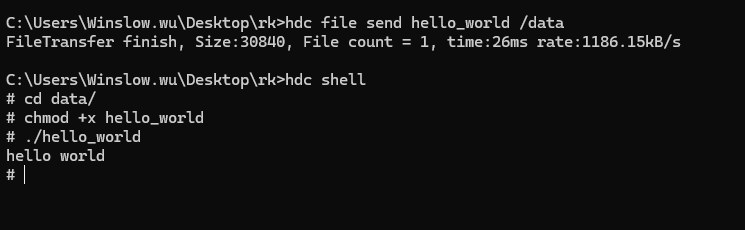
二、实现简单网络请求功能
这里我们通过C/C++中最常用的请求库curl,实现一个简单的GET请求。在OpenHarmony系统源码中给我们提供了丰富的三方库,我们可以直接在BUILD.gn文件中添加curl库的依赖。
注:如果你所需要使用的库在三方组件中没有,则需要自己进行三方库的移植
首先我们可以需要在BUILD.gn文件中添加curl库的依赖。
  external_deps = [
    "curl:curl_shared",
  ]
  # 添加curl库的链接标志
  ldflags = [
    "-lrt",
    "-lpthread",
    "-ldl",
  ]
并且在bundle.json中添加三方库的使用声明
"deps": {
        "components": [
            "curl"
        ],
        "third_party": [
            "curl"
        ]
    },
完整的BUILD.gn文件如下:
import("//build/ohos.gni")

ohos_executable("hello_world") {
  sources = [
    "src/main.cpp",
  ]

  include_dirs = [
    "src/include",
  ]

  output_name = "hello_world"
  install_enable = true
  subsystem_name = "applications"
  part_name = "hello_world"

  external_deps = [
    "curl:curl_shared",
  ]

  ldflags = [
    "-lrt",
    "-lpthread",
    "-ldl",
  ]
  deps = [

  ]

}
完整bundle.json如下:
{
    "name": "@ohos/hello_world",
    "description": "hello world example",
    "version": "3.1",
    "license": "Apache License 2.0",
    "publishAs": "code-segment",
    "segment": {
        "destPath": "hello_world"
    },
    "dirs": {},
    "scripts": {},
    "component": {
        "name": "hello_world",
        "subsystem": "applications",
        "syscap": [],
        "features": [],
        "adapted_system_type": [
            "mini",
            "small",
            "standard"
        ],
        "rom": "",
        "ram": "",
        "deps": {
            "components": [
                "curl"
            ],
            "third_party": [
                "curl"
            ]
        },
        "build": {
            "sub_component": [
                "//applications/standard/hello_world:hello_world"
            ],
            "inner_kits": [],
            "test": []
        }
    }
}
然后我们更新main.cpp 添加请求http://www.baidu.com的代码
#include <iostream>
#include <curl/curl.h>
#include <string>

// 回调函数,用于处理HTTP响应数据
size_t WriteCallback(void* contents, size_t size, size_t nmemb, std::string* response) {
    size_t totalSize = size * nmemb;
    response->append((char*)contents, totalSize);
    return totalSize;
}

int main(int argc, char const *argv[])
{
    // 初始化curl
    CURL* curl = curl_easy_init();
    if (!curl) {
        std::cout << "初始化curl失败" << std::endl;
        return -1;
    }

    std::cout << "开始请求百度..." << std::endl;

    // 存储响应数据
    std::string response;

    // 设置curl选项
    curl_easy_setopt(curl, CURLOPT_URL, "http://www.baidu.com");
    curl_easy_setopt(curl, CURLOPT_WRITEFUNCTION, WriteCallback);
    curl_easy_setopt(curl, CURLOPT_WRITEDATA, &response);
    curl_easy_setopt(curl, CURLOPT_USERAGENT, "Mozilla/5.0");
    curl_easy_setopt(curl, CURLOPT_FOLLOWLOCATION, 1L);
    curl_easy_setopt(curl, CURLOPT_TIMEOUT, 10L);

    // 执行请求
    CURLcode res = curl_easy_perform(curl);

    if (res != CURLE_OK) {
        std::cout << "curl请求失败: " << curl_easy_strerror(res) << std::endl;
    } else {
        // 获取HTTP状态码
        long http_code = 0;
        curl_easy_getinfo(curl, CURLINFO_RESPONSE_CODE, &http_code);

        std::cout << "HTTP状态码: " << http_code << std::endl;
        std::cout << "响应数据长度: " << response.length() << " 字节" << std::endl;

        // 打印前200个字符的响应内容(避免输出过多)
        if (response.length() > 0) {
            std::cout << "响应内容预览:" << std::endl;
            std::cout << response.substr(0, 200) << "..." << std::endl;
        }
    }

    // 清理curl
    curl_easy_cleanup(curl);

    return 0;
}
重新编译并且推送到开发版运行输出结果为: 
功能开发完成后,全量编译系统烧录即可直接在shell中通过执行hello_world运行。
第二部分 Rust应用开发
一、 在OpenHarmony中添加一个模块
1. 创建基础应用模板
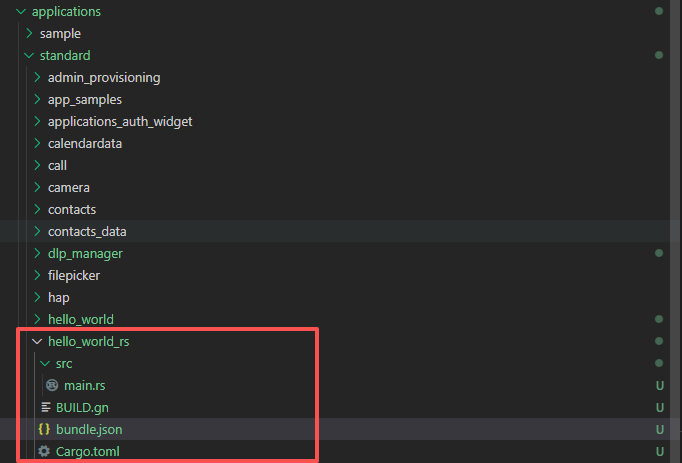
与C/C++应用开发类似,创建一个Rust应用模块,开发环境配置可参考在 Linux 系统上安装 Rust:完整指南,与C/C++应用不同的是,Rust应用模块的目录结构如下:
├── src
│   ├── main.rs
├── BUILD.gn
├── bundle.json
|—— Cargo.toml   ##在当前目录下使用cargo init 初始化项目自动生成
除了BUILD.gn与bundle.json外,Rust应用模块还需要添加一个Cargo.toml文件,用于管理Rust依赖。 Cargo.toml文件内容如下:
[package]
name = "hello_world_rs"
version = "0.1.0"
edition = "2024"

[dependencies]
我们仍然在applications/standard目录下创建hello_world_rs目录,将hello_world_rs模块的代码放入该目录。
2. 配置BUILD.gn文件
Rust的BUILD.gn配置与C/C++应用的BUILD.gn配置类似,主要差异在于添加了对Rust的支持。
GN模板	                  功能	              输出
ohos_rust_executable	    rust可执行文件	    rust可执行文件,不带后缀
ohos_rust_shared_library	rust动态库	        rust dylib动态库,默认后缀.dylib.so
ohos_rust_static_library	rust静态库	        rust rlib静态库,默认后缀.rlib
ohos_rust_proc_macro	    rust proc_macro	    rust proc_macro库, 默认后缀.so
ohos_rust_shared_ffi	    rust FFI动态库	    rust cdylib动态库,给C/C++模块调用,默认后缀.so
ohos_rust_static_ffi	    rust FFI静态库	    rust staticlib库,给C/C++模块调用,默认后缀.a
ohos_rust_cargo_crate	    三方包Cargo crate	  rust三方crate,支持rlib、dylib、bin
ohos_rust_systemtest	    rust系统测试用例	   rust可执行系统测试用例,不带后缀
ohos_rust_unittest	      rust单元测试用例	   rust可执行单元测试用例,不带后缀
ohos_rust_fuzztest	      rust Fuzz测试用例	   rust可执行Fuzz测试用例,不带后缀
这里可以看到除了ffi与单元测试用例外其他配置与C/C++应用的BUILD.gn配置类似,简单配置一下rust可执行文件模块的BUILD.gn文件,内容如下:
import("//build/ohos.gni")

ohos_rust_executable("hello_world_rs") {
  sources = [ "src/main.rs" ]


  output_name = "hello_world_rs"

  # 禁用missing-docs检查
  rustflags = [
    "-A", "missing-docs"
  ]
}
除了BUILD.gn文件外,bundle.json文件与C/C++应用的bundle.json文件类似,我们可复用C/C++的bundle.json的配置,注意需要修改模块名称。
    {
        "name": "@ohos/hello_world_rs",
        "description": "hello world example",
        "version": "3.1",
        "license": "Apache License 2.0",
        "publishAs": "code-segment",
        "segment": {
            "destPath": "hello_world_rs"
        },
        "dirs": {},
        "scripts": {},
        "component": {
            "name": "hello_world_rs",
            "subsystem": "applications",
            "syscap": [],
            "features": [],
            "adapted_system_type": [
                "mini",
                "small",
                "standard"
            ],
            "rom": "",
            "ram": "",
            "deps": {
                "components": [

                ],
                "third_party": [

                ]
            },
            "build": {
                "sub_component": [
                    "//applications/standard/hello_world_rs:hello_world_rs"
                ],
                "inner_kits": [],
                "test": []
            }
        }
    }
配置完成后,配置模块结束后,我们需要在产品配置中添加新模块,配指与C/C++配置一致
    {
      "subsystem": "applications", # 所属子系统
      "components": [
        {
          "component": "hello_world", # 组件名称
          "features": []
        }
      ]
    }
配置完成后,在main.rs里面增加主函数
fn main() {
    println!("Hello, world for rust!");
}
然后控制台中执行
./build.sh --product-name rk3568 --build-target applications/standard/hello_world_rs:hello_world_rs
编译成功后,与C/C++不同编译后的文件在out/rk3568/build/build_framework目录下可以找到hello_world_rs可执行文件。依然可以使用hdc命令将hello_world_rs可执行文件安装到设备上运行,输出如下结果。 
3. 实现Rust代码功能
下面我们来试一下在rust中同样引入一个三方库,并且实现一个简单的功能,不过Rust在OpenHarmony中想依赖三方库的方式与C/C++有一些差异,在常见的Rust工程中通常使用Cargo.toml文件来管理依赖,而在OpenHarmony中,我们需要在BUILD.gn文件中添加对三方库的依赖,这里推荐还是使用Cargo.toml文件进行依赖管理,这样不光能依靠大量的Rust三方库而且更加符合Rust工程的开发习惯。
Rust的软件中有很多都是控制台应用,接下来我们通过引用一个控制台的三方库来实现一个比较花哨的控制台应用。
首先我们更新一下工程中的Cargo.toml文件,添加一个控制台的三方库,这里我们选择ansi_term库,它是一个用于在控制台输出带颜色的文本的库,我们可以在Cargo.toml文件中添加如下依赖:
[dependencies]
ansi_term = "0.12.1"
完整配置如下
[package]
name = "hello_world_rs"
version = "0.1.0"
edition = "2021"

[dependencies]
ansi_term = "0.12"

[[bin]]
name = "hello_world_rs"
path = "src/main.rs"

[profile.release]
lto = true
由于我们的依赖使用Cargo.toml进行管理不再使用BUILD.gn文件,所以接下来编译Rust应用时需要使用cargo命令,进行编译,首先我们需要安装一些 Rust 的 toolchain 来帮助我们构建鸿蒙的原生模块:
rustup target add aarch64-unknown-linux-ohos
rustup target add armv7-unknown-linux-ohos
rustup target add x86_64-unknown-linux-ohos
rustup 已经提供了ohos相关的target,所以我们可以直接使用 cargo build --target="指定平台" --release 命令进行编译。具体平台根据设备架构选择,这里我们选择aarch64-unknown-linux-ohos平台。
cargo build --target=aarch64-unknown-linux-ohos --release
此时如果直接编译会报错,大致是如下内容
 error adding symbols: file in wrong format
          collect2: error: ld returned 1 exit status


error: could not compile `hello_world_rs` (bin "hello_world_rs") due to 1 previous error
这是因为虽然rustup提供了对应的target但是我们还需要指定ohos对应的交叉编译环境,配置系统的一站式编译环境可以参考Rust登陆【华为鸿蒙】操作系统之Native模块开发
这里我们使用一个简单的方式手动指定我们需要的交叉编译链,我们在工程目录下新建.cargo/config.toml文件,并且增加如下内容:
# OpenHarmony交叉编译配置
[target.aarch64-unknown-linux-ohos]
linker = "你的ohos_sdk路径/native/llvm/bin/aarch64-unknown-linux-ohos-clang"
ar = "你的ohos_sdk路径/native/llvm/bin/llvm-ar"

[target.armv7-unknown-linux-ohos]
linker = "你的ohos_sdk路径/native/llvm/bin/armv7-unknown-linux-ohos-clang"
ar = "你的ohos_sdk路径/native/llvm/bin/llvm-ar"

[target.x86_64-unknown-linux-ohos]
linker = "你的ohos_sdk路径/native/llvm/bin/x86_64-unknown-linux-ohos-clang"
ar = "你的ohos_sdk路径/native/llvm/bin/llvm-ar"


# 使用musl目标进行静态链接
[build]
target = "aarch64-unknown-linux-musl"
rustflags = [
    "-C", "target-feature=+crt-static",
    "-C", "link-arg=-static",
]"
然后再次执行编译命令
cargo build --target=aarch64-unknown-linux-ohos --release
编译成功后,我们可以在target/aarch64-unknown-linux-ohos/release目录下找到编译生成的hello_world_rs可执行文件。
接下来我们在main.rs里进行如下修改,引入ansi_term库,并且在主函数中输出带颜色的文本:
use ansi_term::Colour;
use ansi_term::Style;
use std::panic;
use std::backtrace::Backtrace;
use std::thread;
use std::time::Duration;

// 炫酷的标题样式
fn print_title(text: &str) {
    let title_style = Style::new()
        .bold()
        .on(Colour::RGB(40, 44, 52))
        .fg(Colour::RGB(97, 175, 239));

    let border = "═".repeat(text.len() + 4);
    let top_border = Colour::RGB(86, 182, 194).paint(format!("╔{}╗", border));
    let bottom_border = Colour::RGB(86, 182, 194).paint(format!("╚{}╝", border));
    let content = title_style.paint(format!("  {}  ", text));

    println!("\n{}", top_border);
    println!("║{}║", content);
    println!("{}\n", bottom_border);
}

// 成功信息样式
fn print_success(text: &str) {
    let style = Style::new()
        .bold()
        .fg(Colour::Green);
    println!("{}", style.paint(format!("✅ {}", text)));
}

// 错误信息样式
fn print_error(text: &str) {
    let style = Style::new()
        .bold()
        .fg(Colour::Red);
    println!("{}", style.paint(format!("❌ {}", text)));
}

// 警告信息样式
fn print_warning(text: &str) {
    let style = Style::new()
        .bold()
        .fg(Colour::Yellow);
    println!("{}", style.paint(format!("⚠️  {}", text)));
}

// 信息样式
fn print_info(text: &str) {
    let style = Style::new()
        .fg(Colour::Cyan);
    println!("{}", style.paint(format!("ℹ️  {}", text)));
}

// 进度条样式
fn print_progress(step: u32, total: u32, text: &str) {
    let percentage = (step as f32 / total as f32 * 100.0) as u32;
    let bar_length = 20;
    let filled = (percentage as f32 / 100.0 * bar_length as f32) as usize;
    let bar = format!(
        "[{}{}]",
        "█".repeat(filled),
        "░".repeat(bar_length - filled)
    );

    let progress_style = Style::new().fg(Colour::RGB(152, 195, 121));
    let text_style = Style::new().fg(Colour::White);

    println!(
        "{} {}% {}",
        progress_style.paint(bar),
        Colour::RGB(229, 192, 123).paint(percentage.to_string()),
        text_style.paint(text)
    );
}

// 渐变文字效果
fn print_gradient_text(text: &str) {
    let colors = [
        Colour::RGB(255, 95, 109),   // 红色
        Colour::RGB(255, 145, 83),   // 橙色
        Colour::RGB(255, 195, 67),   // 黄色
        Colour::RGB(152, 195, 121),  // 绿色
        Colour::RGB(97, 175, 239),   // 蓝色
        Colour::RGB(198, 120, 221),  // 紫色
    ];

    let mut result = String::new();
    for (i, ch) in text.chars().enumerate() {
        let color_index = i % colors.len();
        let colored_char = colors[color_index].paint(ch.to_string());
        result.push_str(&colored_char.to_string());
    }
    println!("{}", result);
}

// 闪烁文字效果
fn print_blinking_text(text: &str, times: u32) {
    for i in 0..times {
        if i % 2 == 0 {
            let style = Style::new().bold().fg(Colour::RGB(255, 0, 0));
            println!("{}", style.paint(text));
        } else {
            let style = Style::new().bold().fg(Colour::RGB(0, 255, 0));
            println!("{}", style.paint(text));
        }
        thread::sleep(Duration::from_millis(300));
    }
}

// 旋转加载动画
fn print_spinner(text: &str, duration_secs: u32) {
    let frames = ["⠋", "⠙", "⠹", "⠸", "⠼", "⠴", "⠦", "⠧", "⠇", "⠏"];
    let start_time = std::time::Instant::now();
    let duration = Duration::from_secs(duration_secs as u64);

    while start_time.elapsed() < duration {
        for frame in frames.iter() {
            if start_time.elapsed() >= duration {
                break;
            }
            let spinner_style = Style::new().fg(Colour::RGB(86, 182, 194));
            print!("\r{} {} ", spinner_style.paint(*frame), text);
            std::io::Write::flush(&mut std::io::stdout()).unwrap();
            thread::sleep(Duration::from_millis(100));
        }
    }
    println!();
}

// 表格样式输出
fn print_table() {
    let header_style = Style::new().bold().on(Colour::RGB(60, 60, 60));
    let row1_style = Style::new().fg(Colour::RGB(152, 195, 121));
    let row2_style = Style::new().fg(Colour::RGB(229, 192, 123));
    let row3_style = Style::new().fg(Colour::RGB(97, 175, 239));

    println!();
    println!("{}", header_style.paint("┌────────────┬────────────┬────────────┐"));
    println!("{}", header_style.paint("│   项目     │    状态    │    数值    │"));
    println!("{}", header_style.paint("├────────────┼────────────┼────────────┤"));
    println!("{}", row1_style.paint("│   CPU使用  │   正常     │    45%     │"));
    println!("{}", row2_style.paint("│   内存     │   良好     │   2.3GB    │"));
    println!("{}", row3_style.paint("│   磁盘     │   充足     │   85GB     │"));
    println!("{}", header_style.paint("└────────────┴────────────┴────────────┘"));
}

// 彩虹分隔线
fn print_rainbow_separator() {
    let colors = [
        Colour::RGB(255, 0, 0),     // 红
        Colour::RGB(255, 127, 0),   // 橙
        Colour::RGB(255, 255, 0),   // 黄
        Colour::RGB(0, 255, 0),     // 绿
        Colour::RGB(0, 0, 255),     // 蓝
        Colour::RGB(75, 0, 130),    // 靛
        Colour::RGB(148, 0, 211),   // 紫
    ];

    let separator = "━".repeat(60);
    let mut result = String::new();

    for (i, ch) in separator.chars().enumerate() {
        let color_index = i % colors.len();
        let colored_char = colors[color_index].paint(ch.to_string());
        result.push_str(&colored_char.to_string());
    }

    println!("\n{}\n", result);
}

// 自定义panic处理程序(炫酷版)
fn setup_panic_handler() {
    panic::set_hook(Box::new(|panic_info| {
        print_title("🚨 PANIC 发生 🚨");

        // 打印panic信息
        if let Some(location) = panic_info.location() {
            let location_text = format!(
                "位置: {}:{}:{}",
                location.file(),
                location.line(),
                location.column()
            );
            print_error(&location_text);
        }

        // 打印panic消息
        if let Some(s) = panic_info.payload().downcast_ref::<&str>() {
            print_error(&format!("原因: {}", s));
        } else if let Some(s) = panic_info.payload().downcast_ref::<String>() {
            print_error(&format!("原因: {}", s));
        }

        // 打印调用栈
        print_warning("调用栈:");
        let backtrace = Backtrace::force_capture();
        let stack_style = Style::new().fg(Colour::RGB(171, 178, 191));
        println!("{}", stack_style.paint(backtrace.to_string()));

        print_title("🛑 PANIC 结束 🛑");
    }));
}

fn main() -> Result<(), Box<dyn std::error::Error>> {
    setup_panic_handler();

    // 炫酷的启动界面
    print_title("🚀 Rust 炫酷控制台演示程序 🚀");
    print_gradient_text("欢迎体验 ANSI 终端的炫酷效果!");

    // 显示系统信息
    print_title("📊 系统信息展示");
    print_info(&format!("当前目录: {:?}", std::env::current_dir()?));
    print_info(&format!("程序参数: {:?}", std::env::args().collect::<Vec<String>>()));
    print_info(&format!("Rust 版本: {}", std::env::var("RUSTC_VERSION").unwrap_or("未知".to_string())));

    // 进度条演示
    print_title("📈 进度条效果演示");
    let steps = 5;
    for i in 1..=steps {
        print_progress(i, steps, &format!("执行步骤 {}/{}", i, steps));
        thread::sleep(Duration::from_millis(800));
    }

    // 旋转加载动画
    print_title("🌀 加载动画演示");
    print_spinner("正在处理数据...", 3);
    print_success("数据处理完成!");

    // 闪烁文字效果
    print_title("✨ 闪烁文字效果");
    print_blinking_text("⚠️  重要警告信息!", 4);

    // 表格展示
    print_title("📋 表格样式展示");
    print_table();

    // 彩虹分隔线
    print_rainbow_separator();

    // 多种颜色样式演示
    print_title("🎨 颜色样式演示");
    print_success("这是成功信息 - 绿色");
    print_error("这是错误信息 - 红色");
    print_warning("这是警告信息 - 黄色");
    print_info("这是普通信息 - 青色");

    let custom_style = Style::new().bold().fg(Colour::RGB(255, 105, 180)); // 粉色
    println!("{}", custom_style.paint("这是自定义颜色 - 粉色"));

    let bg_style = Style::new().on(Colour::RGB(70, 130, 180)).fg(Colour::White); // 蓝色背景
    println!("{}", bg_style.paint("这是带背景色的文字"));

    // 渐变文字效果
    print_title("🌈 渐变文字效果");
    print_gradient_text("渐变文字效果非常炫酷!");

    // 模拟任务执行
    print_title("⚡ 任务执行模拟");

    let tasks = vec![
        ("初始化系统", true),
        ("加载配置文件", true),
        ("检查依赖", true),
        ("验证数据", false),
        ("启动服务", true),
    ];

    for (i, (task, success)) in tasks.iter().enumerate() {
        thread::sleep(Duration::from_millis(500));
        if *success {
            print_success(&format!("任务 {}: {} - 完成", i + 1, task));
        } else {
            print_error(&format!("任务 {}: {} - 失败", i + 1, task));
        }
    }

    // 最终总结
    print_title("🎉 演示完成");
    print_gradient_text("感谢体验炫酷控制台效果!");

    let final_style = Style::new()
        .bold()
        .fg(Colour::RGB(255, 215, 0)) // 金色
        .on(Colour::RGB(25, 25, 112)); // 深蓝色背景

    println!("{}", final_style.paint("✨ 程序执行完毕,再见! ✨"));

    Ok(())
}
再次执行编译命令
cargo build --target=aarch64-unknown-linux-ohos --release
编译成功后,我们可以在target/aarch64-unknown-linux-ohos/release目录下找到编译生成的hello_world_rs可执行文件。 推入开发板后添加权限并且执行,控制台输入如下图所示

常见问题
Q:OpenHarmony中如何操作GPIO和串口
A:关于OpenHarmony中的常用api可以参考OpenHarmony 开发者文档 或者示例demo
Q:如果我所需要使用三方库没有已经在OpenHarmony中实现,该如何移植,目前支持哪些三方库?
A:三方库移植可以参考OpenHarmony OpenHarmony C/C++三方库移植适配指导说明,支持的三方库可以参考OpenHarmony OpenHarmony C/C++三方库列表
Q:通过Cargo可以在OpenHarmony中使用三方库吗?
A:不可以因为Cargo是Rust的包管理工具,但是在OpenHarmony中构建是通过BUILD.gn构建,因此不能交叉使用,OpenHarmony也提供了Cargo2GN的工具,但是不太好用,因为三包通常都有其他依赖,所以需要如果转换自己写的还好转换三方包就需要全部转换。

开源鸿蒙跨平台开发社区汇聚开发者与厂商,共建“一次开发,多端部署”的开源生态,致力于降低跨端开发门槛,推动万物智联创新。
更多推荐


 32
32 0
0- 0


 已为社区贡献2条内容

所有评论(0)