qt 向布局器里添加_【专题2:电子工程师 之 上位机】 之 【13.QFormLayout表单布局和QGridLayout网格布局】...
希望本是无所谓有,无所谓无的,这正如脚下的路,其实地上本没有路,走的人多了,也便成了路....原创不易,文章会持续更新,感谢您的关注1.说明这种类型的布局器主要用来做表单的。2.案例(1)效果 点击save按钮时,可以校验表单的信息,如果为空,将为空的提示信息写到input标签上。点击clear按钮时,可以清空所有输入框中的内容。(2)代码#include "widget.h"#incl...
·
希望本是无所谓有,无所谓无的,这正如脚下的路,其实地上本没有路,走的人多了,也便成了路....原创不易,文章会持续更新,感谢您的关注1.说明
这种类型的布局器主要用来做表单的。
2.案例
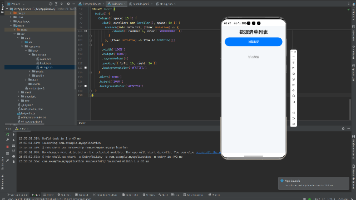
(1)效果
点击save按钮时,可以校验表单的信息,如果为空,将为空的提示信息写到input标签上。点击clear按钮时,可以清空所有输入框中的内容。

(2)代码
#include "widget.h"#include "ui_widget.h"#include #include #include #include #include #include #include Widget::Widget(QWidget *parent) : QWidget(parent), ui(new Ui::Widget){ ui->setupUi(this); this->resize(500, 300); QFormLayout *lay = new QFormLayout(this); //添加一个控件 QLineEdit *name = new QLineEdit(); //"&Name":表示编辑框前面的label上的文字是Name, //加上一个“&”表示按下键盘的'N'时,可以直接定位到 //该编辑框,起快捷键的作用。 lay->addRow("&Name", name); QLineEdit *email = new QLineEdit(); lay->addRow("&Email", email); QLineEdit *age = new QLineEdit(); //插入到下标为1的位置(第二个),行和列的下标从0开始 lay->insertRow(1, "&Age", age); QLabel *info = new QLabel(); info->setText("input"); info->setStyleSheet("color:red"); lay->insertRow(0, "", info); //添加save和clear按钮 QPushButton *save = new QPushButton("Save"); QPushButton *clear = new QPushButton("Clear"); QObject::connect(save, SIGNAL(clicked()), this, SLOT(save())); QObject::connect(clear, SIGNAL(clicked()), this, SLOT(clear())); //添加一个平行布局器 QHBoxLayout *hlay = new QHBoxLayout(); hlay->addWidget(save); hlay->addWidget(clear); lay->addRow(hlay); }槽函数:
void Widget::save(){ //找到当前的layout QFormLayout *lay = (QFormLayout *)this->layout(); //取出input标签中的内容 QLabel *label = (QLabel *)lay->itemAt(0, QFormLayout::FieldRole)->widget(); QString error = ""; for (int i = 0; i < lay->rowCount(); i++) { //一行信息由一个标题和一个输入框组成 //获取输入框 QLayoutItem *item = lay->itemAt(i, QFormLayout::FieldRole); //获取标题 QLayoutItem *layItem = lay->itemAt(i, QFormLayout::LabelRole); if (!layItem)//如果没有Label,就不用提示了 continue; //将标题控件转换为QLabel(能这样转换的前提是,在添加itme时,标题就是QLabel类型) QLabel *titleLabel = (QLabel *)layItem->widget(); if (!titleLabel) continue; QString title = titleLabel->text(); //这里的item包含了所有,也包含了按钮本身,所以需要过掉 QLineEdit *e = (QLineEdit *)item->widget(); if (!e) continue;//当item不是具体控件时(譬如是QHBoxLayout类型时),就返回NULL //此时的e不一定是QLineEdit,还可能是QLabel(因为我们在上面添加了QLabel) QString cname = e->metaObject()->className(); if (cname == "QLineEdit") { //trimmed()指去掉空格 if (e->text().trimmed() == "") { e->setFocus();//移动光标在这个控件上 error += title; error += "is empty!\n"; } } } label->setText(error);}//点击clear时,将所有编辑框中的内容都清空void Widget::clear(){ //找到当前的layout QFormLayout *lay = (QFormLayout *)this->layout(); //遍历QFormLayout中所有QLineEdit //注意,rowCount()方法只有QFormLayout布局或GridLayout布局才有 for (int i = 0; i < lay->rowCount(); i++) { //参数二表示获取的类型,FieldRole表示获取的是每一行的内容, //而不是标题, QLayoutItem *item = lay->itemAt(i, QFormLayout::FieldRole); //这里的item包含了所有,也包含了按钮本身,所以需要过掉 QLineEdit *e = (QLineEdit *)item->widget(); if (!e) continue;//当item不是具体控件时(譬如是QHBoxLayout类型时),就返回NULL //此时的e不一定是QLineEdit,还可能是QLabel(因为我们在上面添加了QLabel) QString cname = e->metaObject()->className(); if (cname == "QLineEdit") { e->setText(""); } }}3.QGridLayout网格布局,添加控件
void addWidget(QWidget *widget, int row, int column, int rowSpan, int columnSpan, Qt::Alignment = Qt::Alignment());参数:
 (1)widget:控件对象。

     (2)row:在第几行进行显示。
(3)column:在第几列进行显示。(row, column)可以看成是一个二维数组的坐标。

     (4)最后一个参数是指对齐方式,对齐方式有很多种,详细如下所示:对齐方式:
enum AlignmentFlag { AlignLeft = 0x0001, AlignLeading = AlignLeft, AlignRight = 0x0002, AlignTrailing = AlignRight, AlignHCenter = 0x0004, AlignJustify = 0x0008, AlignAbsolute = 0x0010, AlignTop = 0x0020, AlignBottom = 0x0040, 4.QGridLayout网格布局,设置元素与元素之间的间隙
(1)void setHorizontalSpacing(int spacing):设置列与列之间的间距。
(2)void setVerticalSpacing(int spacing):设置行与行之间的间距。
(3)void setSpacing(int spacing):行和列统一设置。

专注于 嵌入式 和 qt知识分享
欢迎扫码关注
“嵌入式工程师成长之路”


开源鸿蒙跨平台开发社区汇聚开发者与厂商,共建“一次开发,多端部署”的开源生态,致力于降低跨端开发门槛,推动万物智联创新。
更多推荐

 0
0 0
0- 0


 已为社区贡献1条内容

所有评论(0)