小白学习pid环控制-上位机篇
·
小白学习pid环控制-上位机篇
文章目录
一、前言
- 前置文章指引:
- Github地址: https://github.com/tacom1/HelloPicoWithCirclePid
- 小白学习pid环控制-概览篇
- 小白学习pid环控制-实现篇
- 小白学习pid环控制-通讯篇
- 小白学习pid环控制-上位机篇
在上述文章中实现了如下的一些内容:
- 在概览篇中,尝试搭建了机械运动的平台,并介绍了相关硬件的驱动方式
- 在实现篇中,将各个硬件的驱动整合搭配环级pid算法,实现了电机的跟踪定位
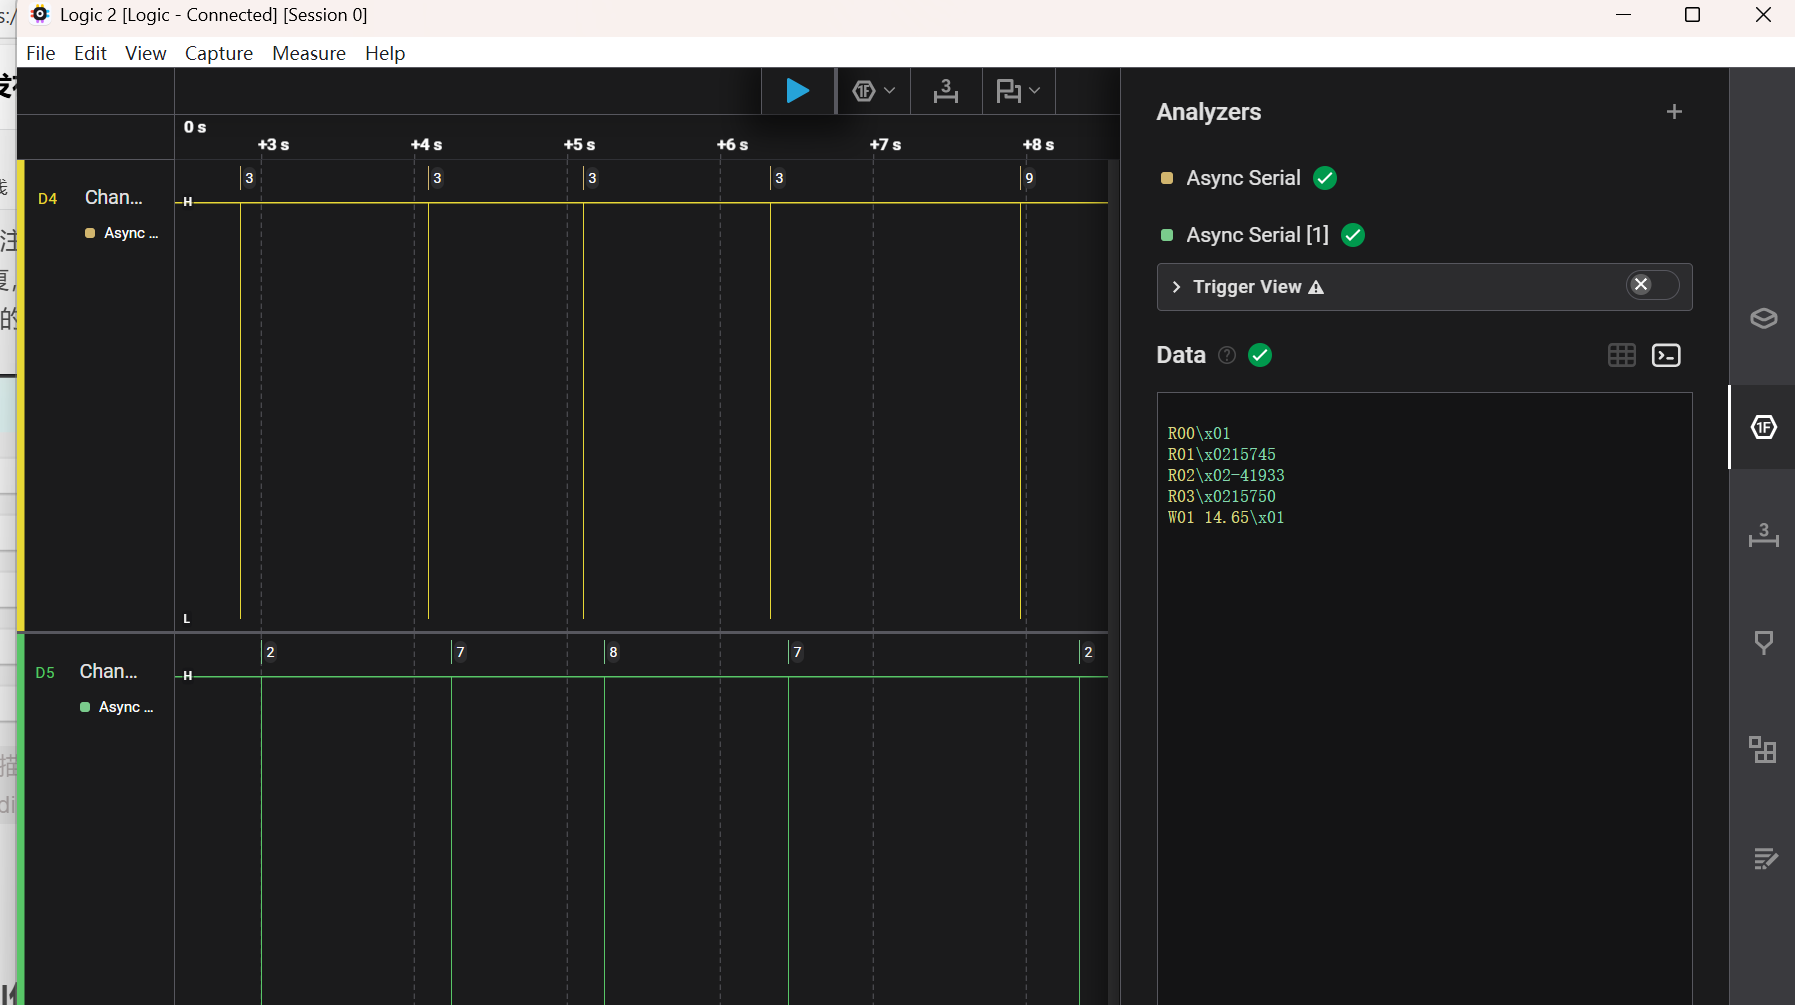
- 在通信篇中,使用uart并适配了几个读写指令并使用协议分析器确定了信号的及时回复、数据的正确性、大致的指令收发时延
- 在这一篇总,我们将封装上述的所有内容,进行简单上位机封装
- 上位机需要至少满足控制以及交互,但个人的美术通常是不及格的,所以在界面设计上是弟中弟 😃 😃 😃
二、先从概念设计开始
2.1 从最小元素开始
- 需要一个组件展示左、右限位的读数
- 需要一个组件展示当前位置的读数
- 需要组合1以及2
- 需要一个按钮完成Reset动作以重置一些读数信息
- 需要一个按钮发送当前需要运动的距离到下位机,数值可以是文本框或者滑动条
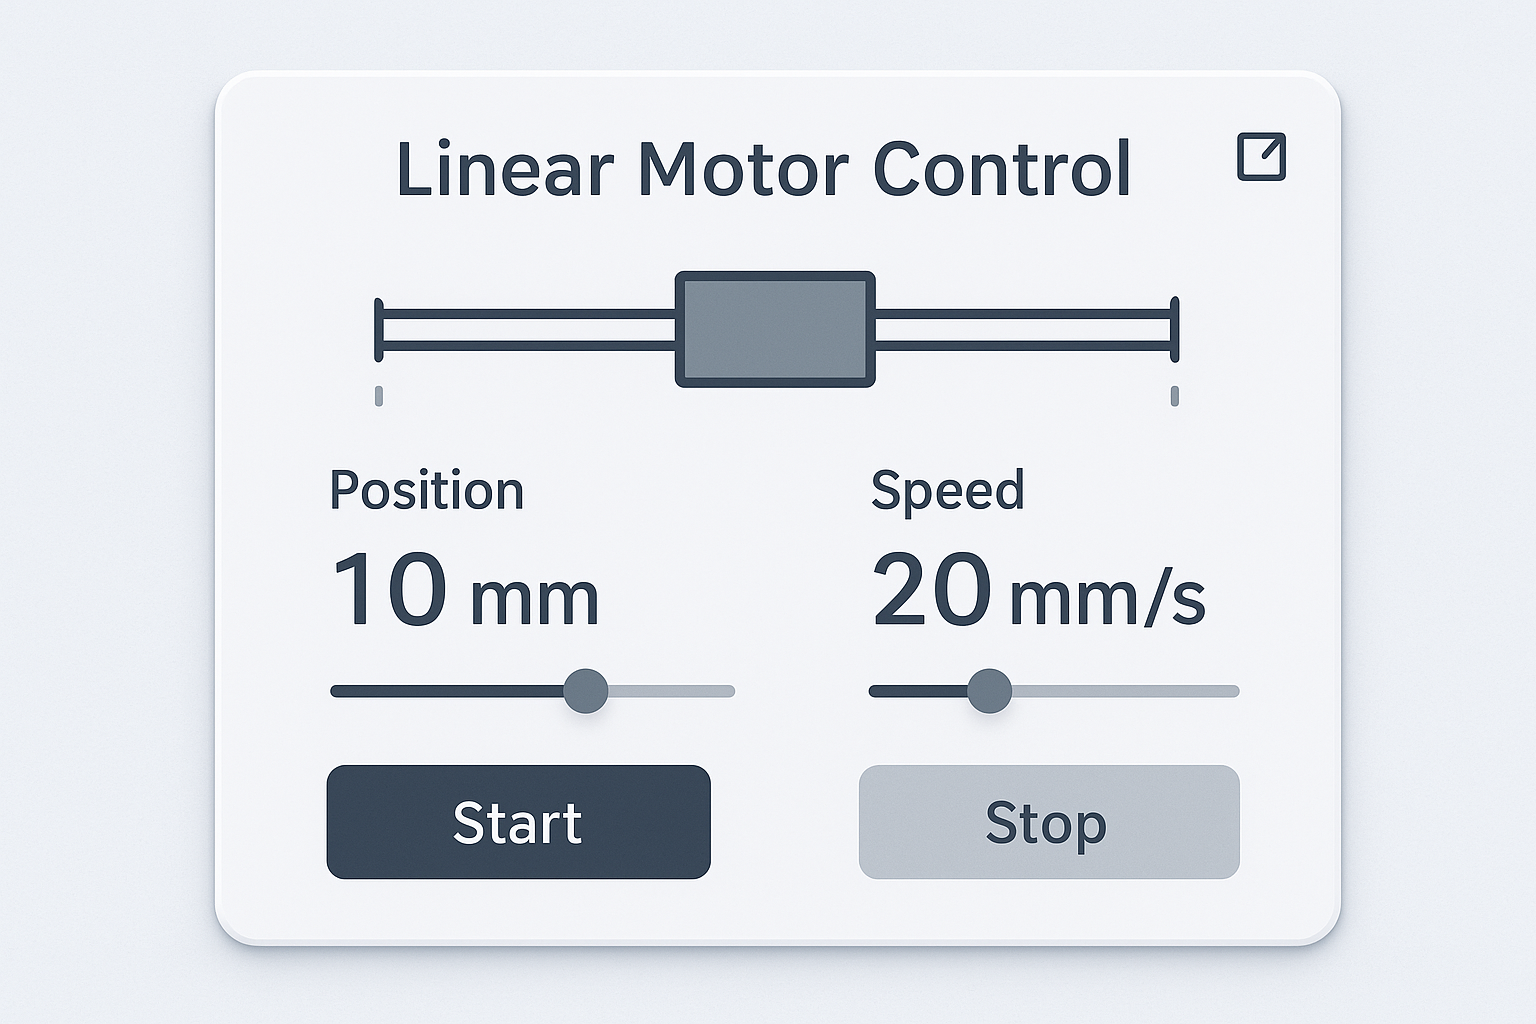
然后输入到AI中进行概念化设计,以下是我生成的两个比较理想的图
2.2 从DesignStudio开始细化实现稿
- Qt的Design Studio是企业用的,他推从两批人先构建好ui,并导出给实际编写Qt任务的人使用,但已经开始逐步有像普通开发者倾斜的趋势
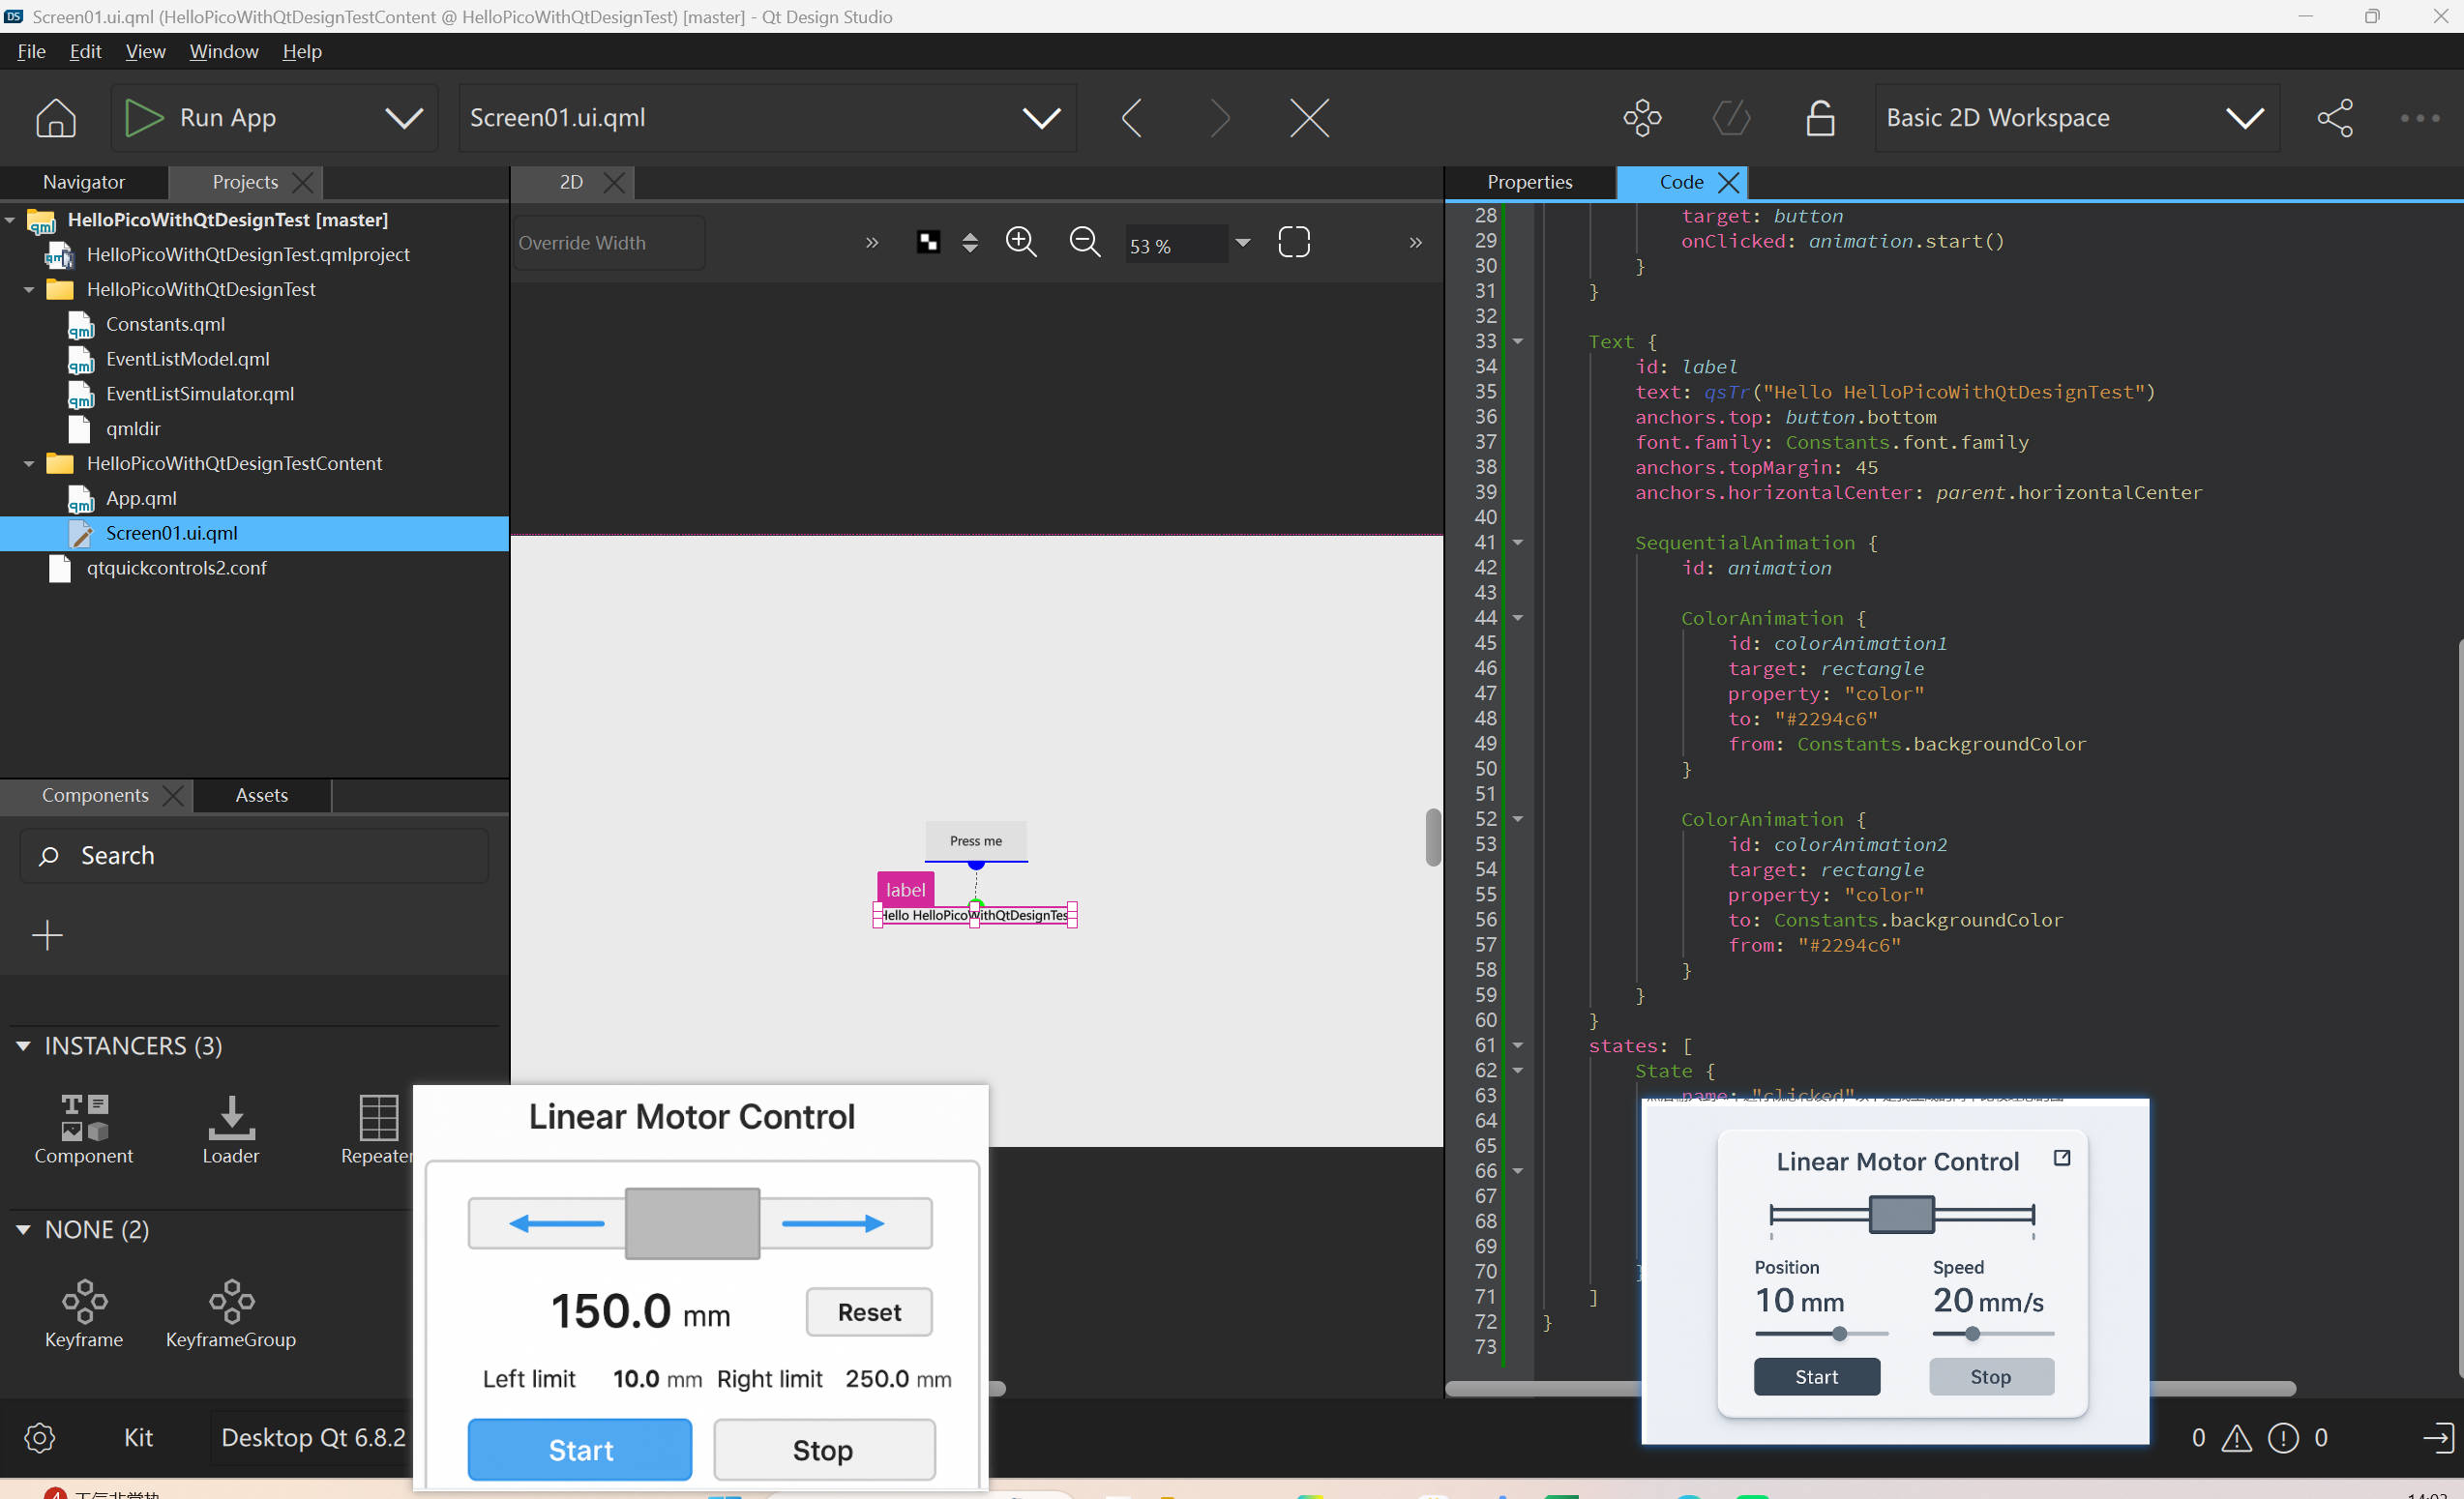
- 最新版本的Studio大致有以下内容需要关注
- 左侧导航栏,相当于项目列表
- 左下组件栏,这里不仅仅只有Control,还有组成基本元素的Rectangle等
- 中间预览:这里有一些bug,预览结果可能跟结果不一致,所更多用于实验自己的想法
- 右侧代码以及参数栏,代码就不多说了,通常程序员喜欢直接写,参数栏并不全但包含了组件对外的基础元素以及布局的设定
2.3 概念细化
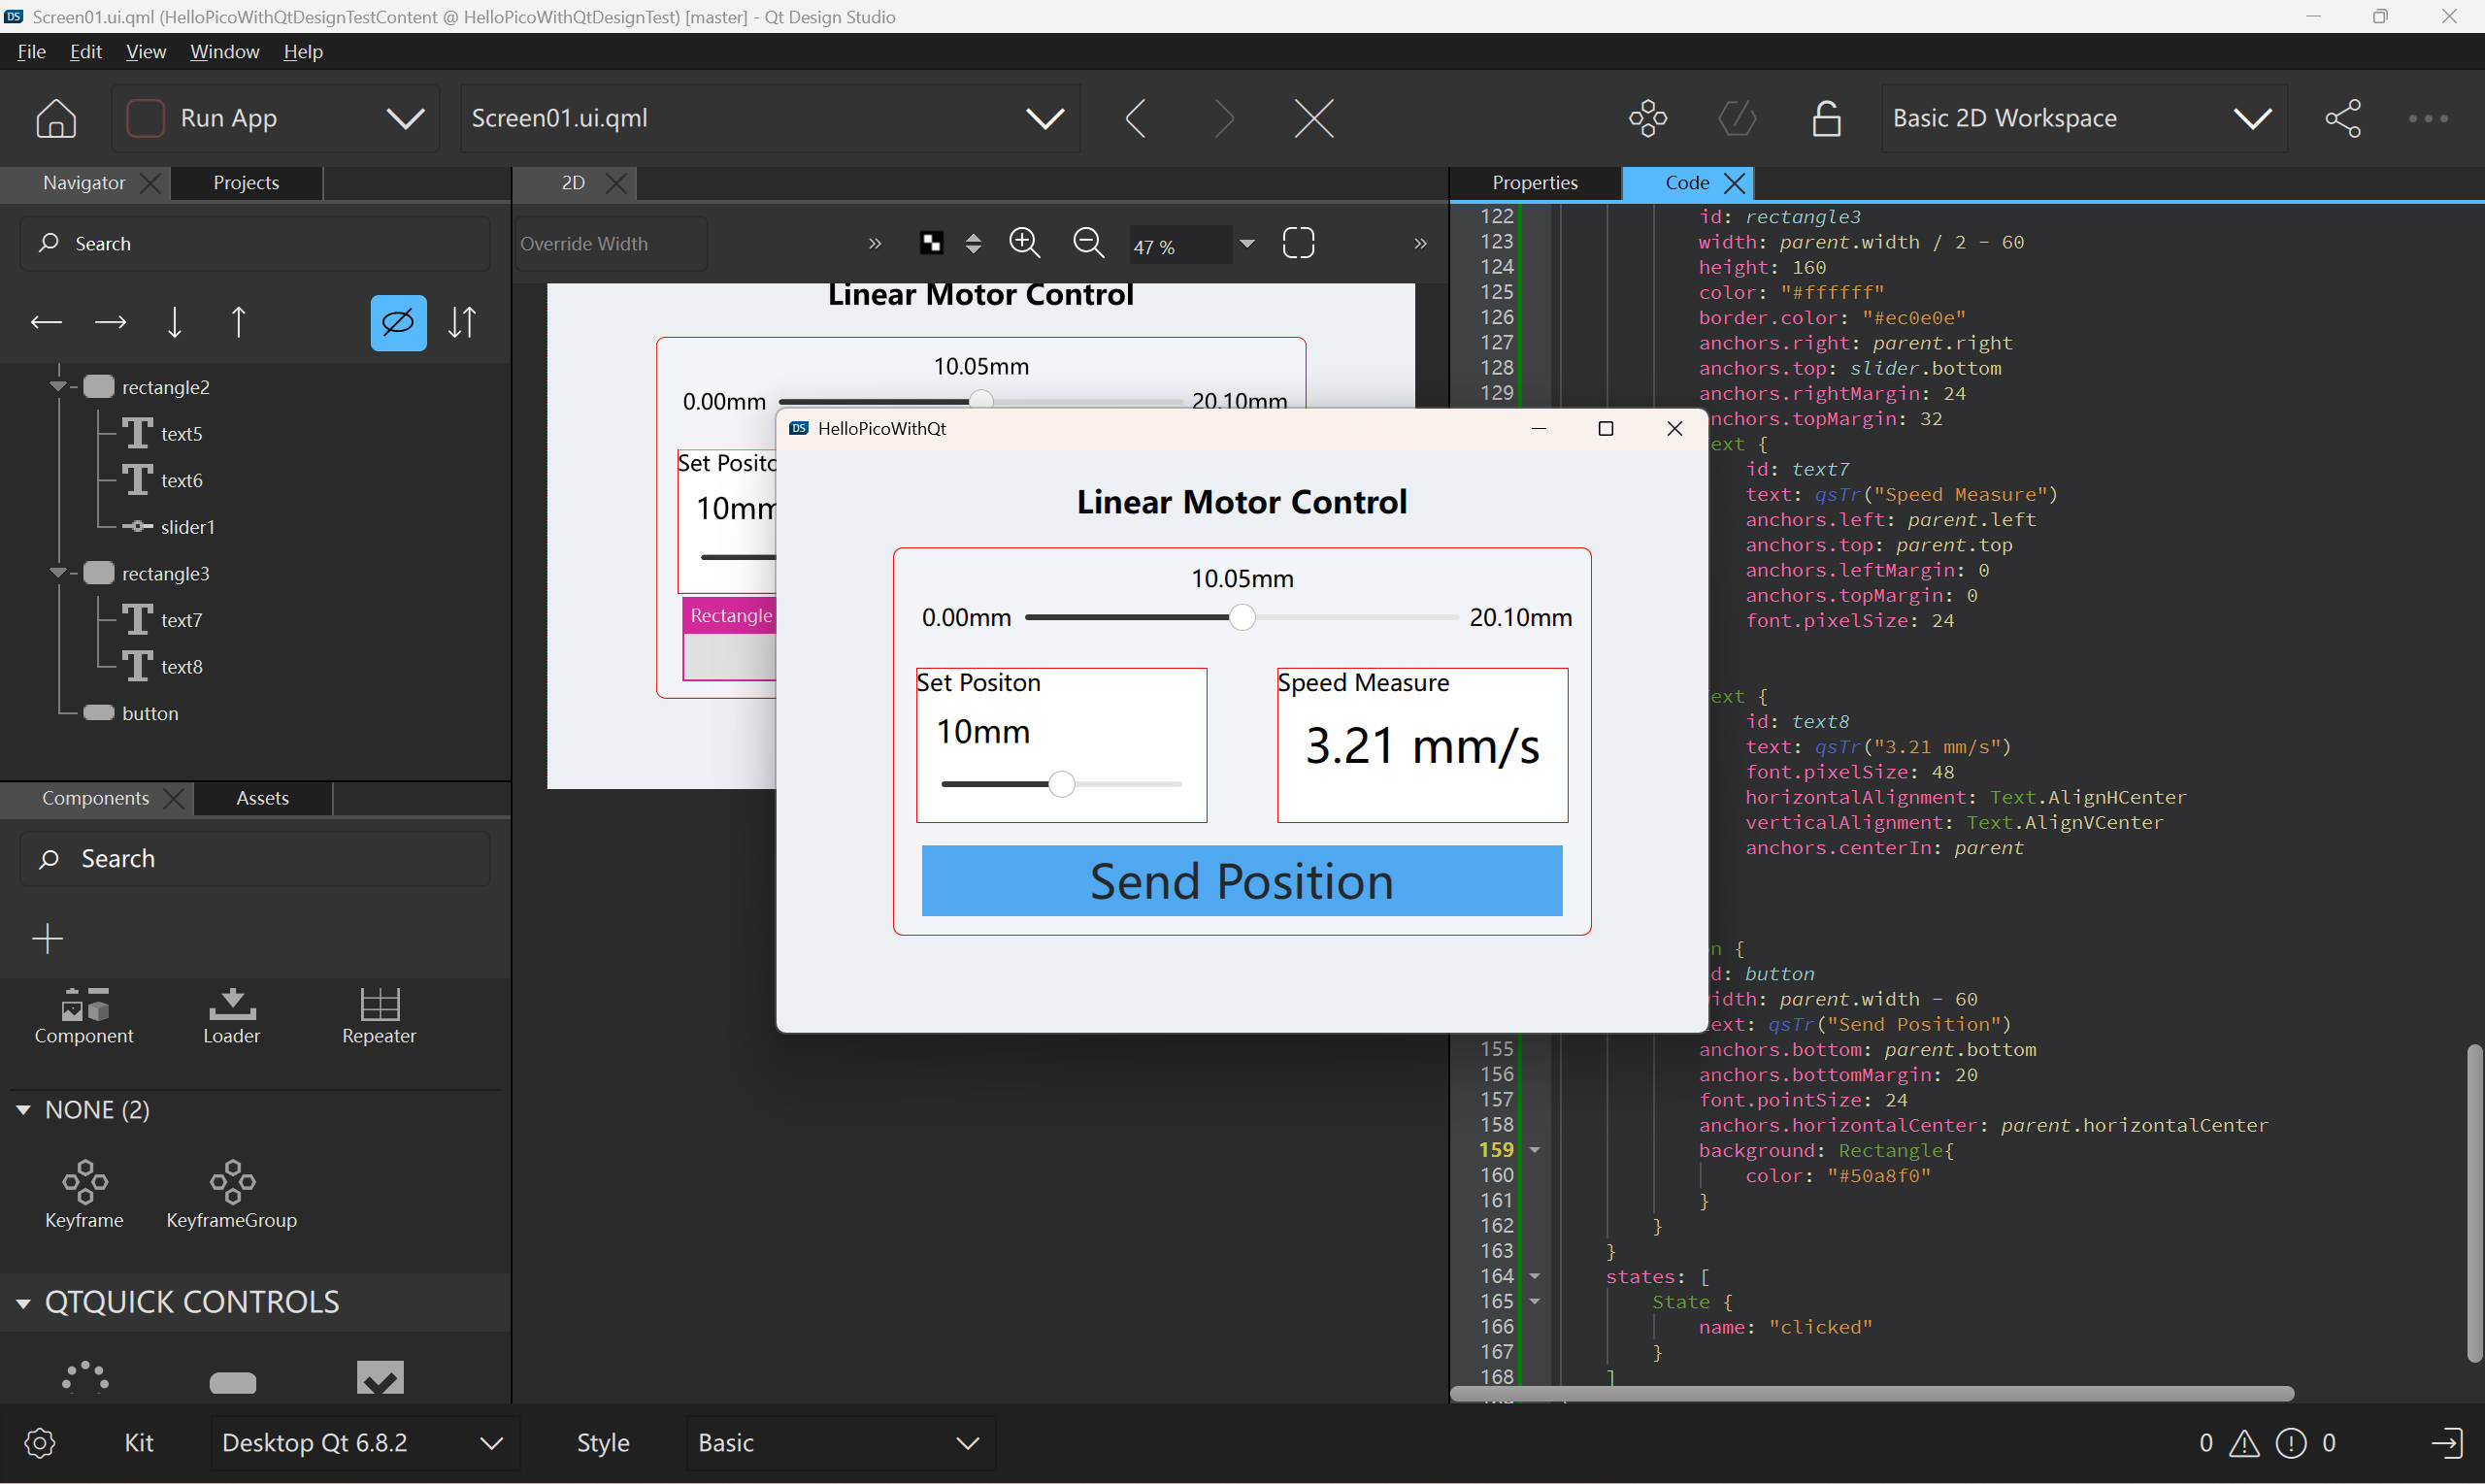
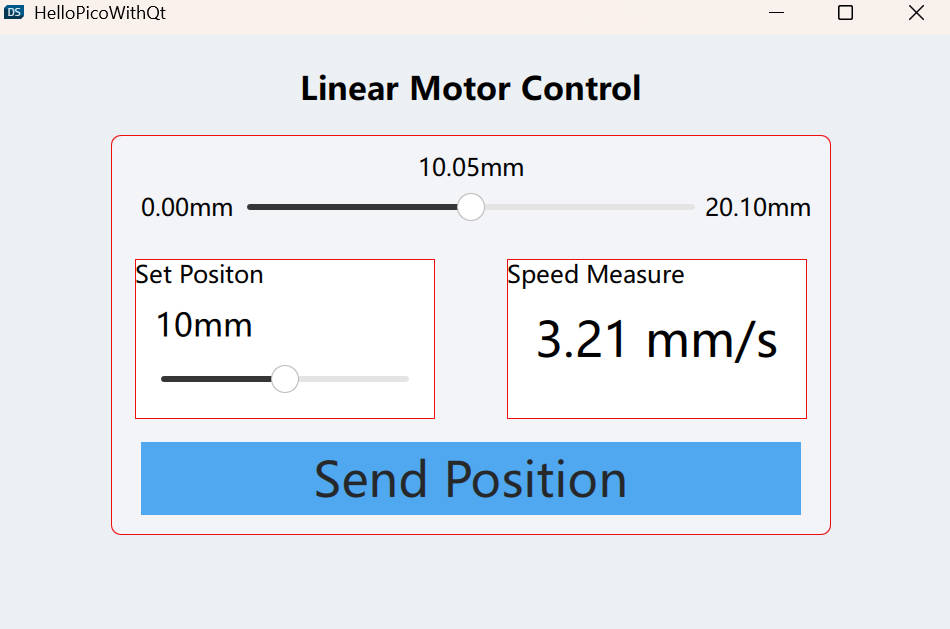
- 对于现有的功能我们总结如下:
- 单个界面即可
- 需要定制一个SliderBar,用于显示一些编码器读数
- 一个显示测速的组件
- 一个设定发送位置的组件以及按钮(Reset由于没写指令所以略过)
- 根据自身的能力对于UI转代码进行复现
三、撰写逻辑代码
由于自己写就不用C++了,嫌麻烦还是python一条龙舒服
3.1 从通信入手-找到通信设备
- windows的Com口总是变化,如果使用固定端口很容易造成失败的情况
from PySide6.QtSerialPort import QSerialPort, QSerialPortInfo

USB_SERIAL_NAME = "USB-Enhanced-SERIAL CH343"

for each_port in QSerialPortInfo.availablePorts():
    print(each_port.portName(),
          each_port.manufacturer(),
          each_port.serialNumber(),
          each_port.productIdentifier(),
          each_port.description())

    if each_port.description() == USB_SERIAL_NAME:
        print("Find", each_port.portName())
3.2 定义串口封装类
- 这里是定义了一些很基础的串口读写操作,由于主要和Ch343芯片通信,所以串口的内容也直接写成了Ch343Serial
- 核心逻辑就是找到对应的设备并开始使用Qt的信号读写数据
class Ch343Serial(QObject):
    errorOccurred = Signal(str)
    dataReceived = Signal(bytearray)

    def __init__(self, parent = None):
        super().__init__(parent)
        self.serial = QSerialPort(self)
        self.serial.errorOccurred.connect(self._handle_serial_error)
        self.serial.readyRead.connect(self._read_serial_data)

    ...
    def write_byte_data(self, bytes_data: bytes):
        if self.serial.isOpen():
            self.serial.write(bytes_data)
            return True
        return False

    @Slot()
    def _read_serial_data(self):
        # PySide6.QtCore.QByteArray -> bytes | bytearray | memoryview
        serial_data = self.serial.readAll().data()
        self.dataReceived.emit(serial_data)


    ...
3.3 定义协串口二级协议类
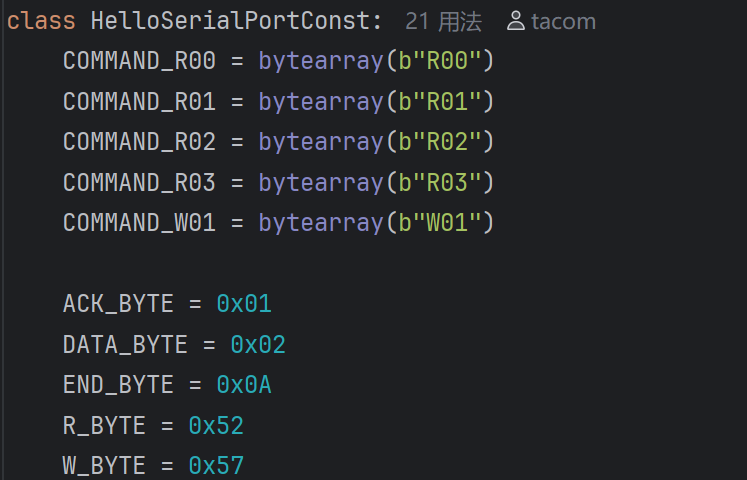
- 这一层封装就要开始实现真正控制下位机的部分
- 主要分为一些基础命令的定义、发送、解析
- 首先判断当前命令是否为定义的内容,然后送入一个命令队列中,并定义每个命令的时延,以保证上一条信息的收发。使用Qt定时器每次检测命令发送时延是否达到,最后发送
- 然后等待数据回复,回复了就检测当前数据的内容是否符合,符合就发送true信号
class HelloSerialPort(QObject):
    responseACK = Signal(bytes, bool)  # command, is_ok
    responseData = Signal(bytes, bool, int)  # command, is_ok, data
    helloSerialError = Signal(str)  # some error info

    def __init__(self, parent=None):
        super().__init__(parent)
        self.ch343 = Ch343Serial(parent)
        self.ch343.dataReceived.connect(self.receive_callback)
        self.ch343.errorOccurred.connect(self.handle_error)

        # Define some var
        ....
        self.command_queue = []
        self.command_consume_timer = QTimer(self)
        self.command_consume_timer.setInterval(200)  # 200ms
        self.command_consume_timer.timeout.connect(self._consume_command)
        self.command_consume_timer.start()


    def send_command(self, command: bytearray):
        if command[:3] in self.command_list:
            ms = 200 if command[0] == HelloSerialPortConst.R_BYTE else 500
            self.command_queue.append([command, ms])
            return
        self.handle_error("Command Not in Defined list")

    @Slot()
    def _consume_command(self):
        def send_byte_data():
            if not self.ch343.write_byte_data(bytes(self.now_command)):
                self.handle_error("Write Data to port error")

        # has command need to be sent in queue
        if len(self.command_queue) != 0:
            now_command_instance = self.command_queue[0]
            now_command_instance[1] -= 200
            if now_command_instance[1] <= 0:
                self.now_command = now_command_instance[0]
                self.command_queue.pop(0)
                send_byte_data()

    def receive_callback(self, data: bytearray):
        self.now_byte_data = data
        然后判断命令数据格式是否正常不正常就触发false信号,正常就转float int之类的

    ...
3.4 简易测试代码
- 注意这一步很重要,请对着协议分析仪确认信号是否正常发送,发送是否及时回复,收发内容是否正确
- 只有保证这一步的正常,才能保证后续代码的封装,否则很容易重写
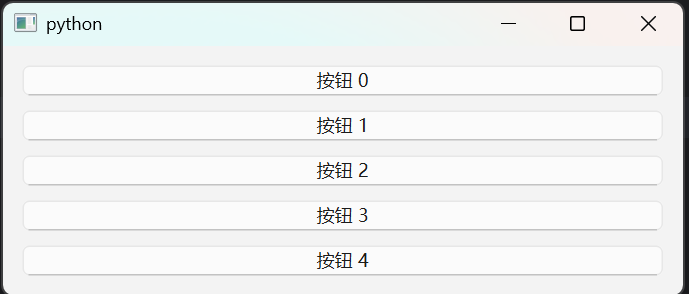
if __name__ == '__main__':
    app = QApplication()

    p = HelloSerialPort(app)
    if not p.open("USB-Enhanced-SERIAL CH343"):
        print("无法打开串口通信设备")
        p.close()
        sys.exit(-1)

    def button_action(number: int):
        if number == 0:
            p.send_command(HelloSerialPortConst.COMMAND_R00)
        if number == 1:
            p.send_command(HelloSerialPortConst.COMMAND_R01)
        if number == 2:
            p.send_command(HelloSerialPortConst.COMMAND_R02)
        if number == 3:
            p.send_command(HelloSerialPortConst.COMMAND_R03)
        if number == 4:
            b = bytearray()
            b.extend(HelloSerialPortConst.COMMAND_W01)
            val = round(random.random() * 10 + 5, 2)
            b.extend(f" {val}".encode('utf-8'))
            p.send_command(b)


    widget = QWidget()
    layout = QVBoxLayout()
    for i in range(5):
        btn = QPushButton(f"按钮 {i}")
        btn.clicked.connect(lambda checked, x=i: button_action(x))
        layout.addWidget(btn)
    widget.setLayout(layout)
    widget.show()
    sys.exit(app.exec())
四、撰写UI代码
4.1 从FluentUI开始借鉴
figma to qt用的好的,或者ai生成用的好的跳过此步骤即可
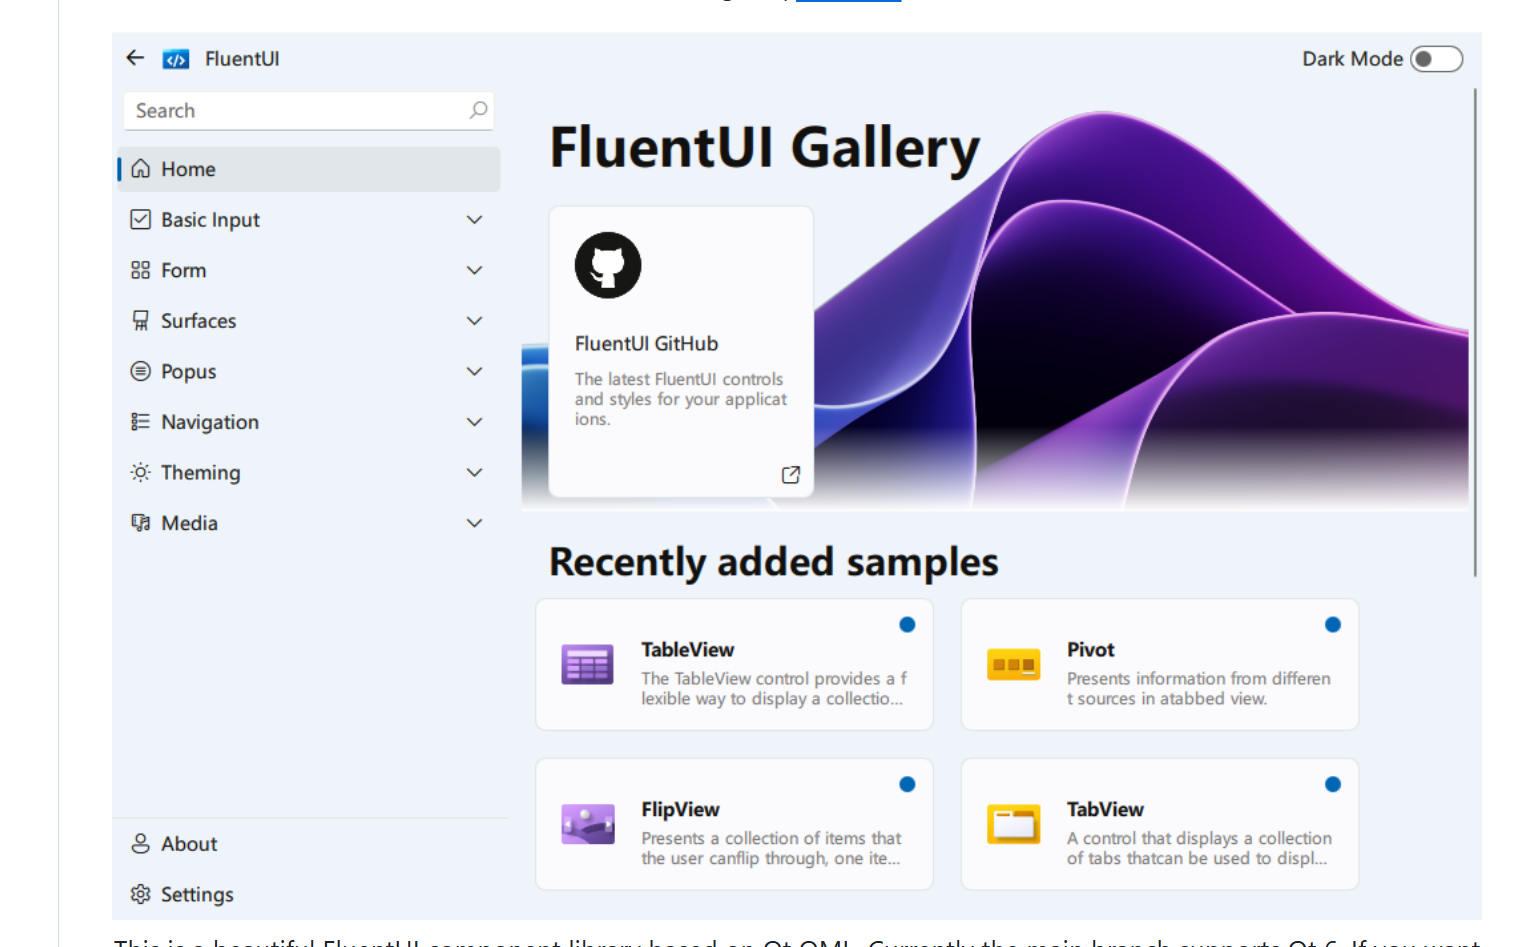
- 一个使用QML开发的界面库,适合开发一些业务系统来使用
- https://github.com/zhuzichu520/FluentUI
- 但感觉耦合度有点高不太适合直接拿去移植,所以此项目通常被我拿来当作借鉴摘抄一小部分代码来使用
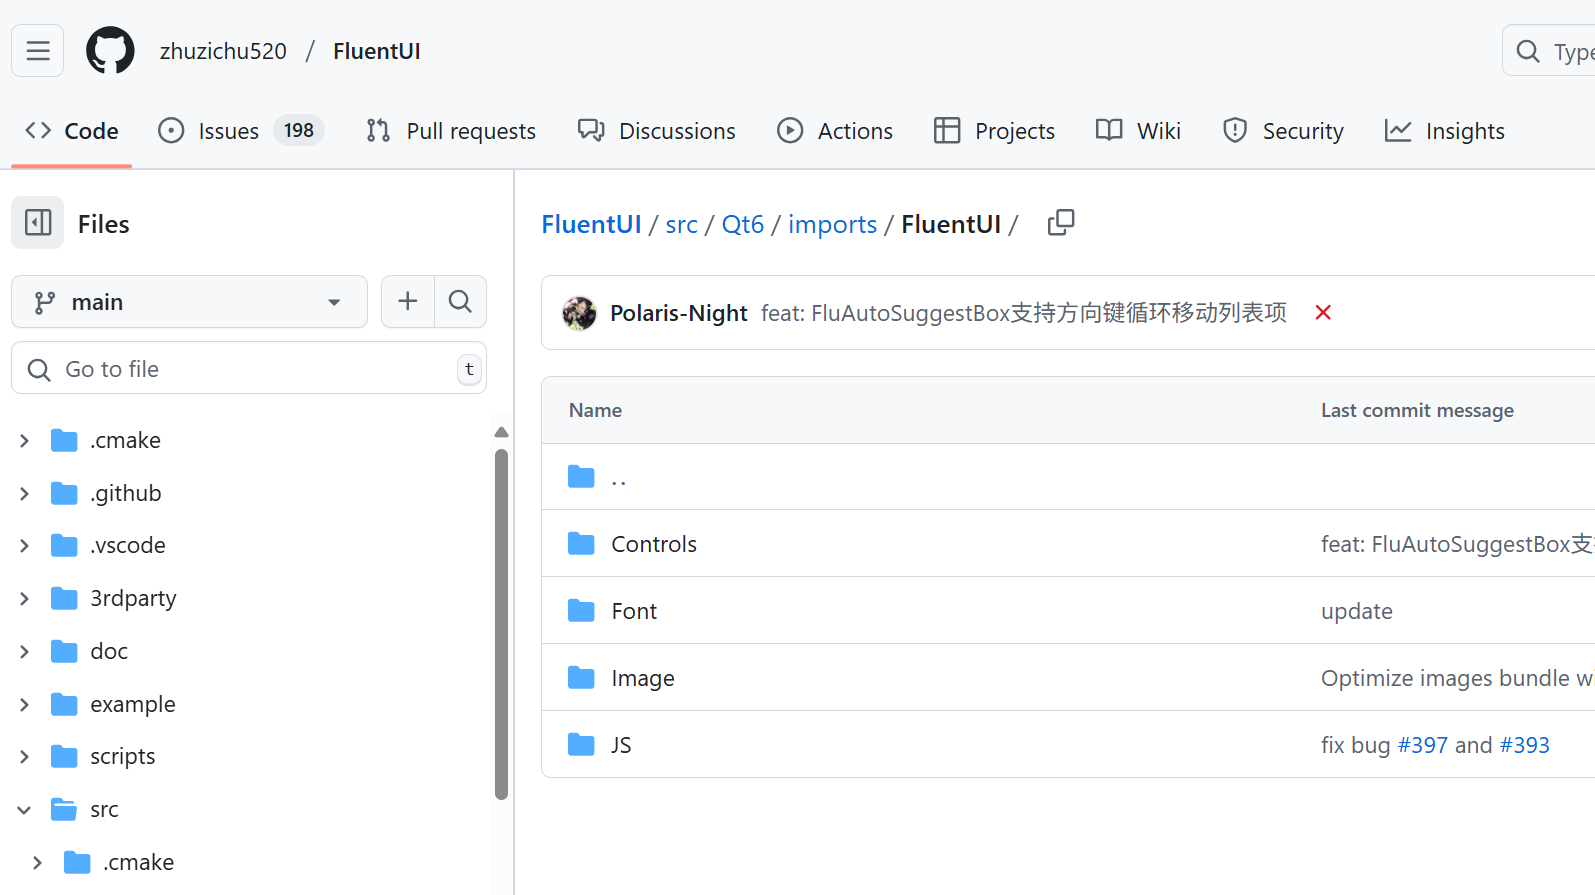
4.2 如何阅读 FluentUI
- 如果使用CPP的话,根据github提示编译后打开Demo,然后遇到想要的组件直接搜索即可
- 如果是python的话,直接打开下列地址,然后去Controls搜索相关组件的定义代码即可,
https://github.com/zhuzichu520/FluentUI/blob/main/doc/md/all_components.md,这里有一些组件样式的快速查询表格,看到想要的去查看源码然后去移植就好了
4.3 适配主窗口代码
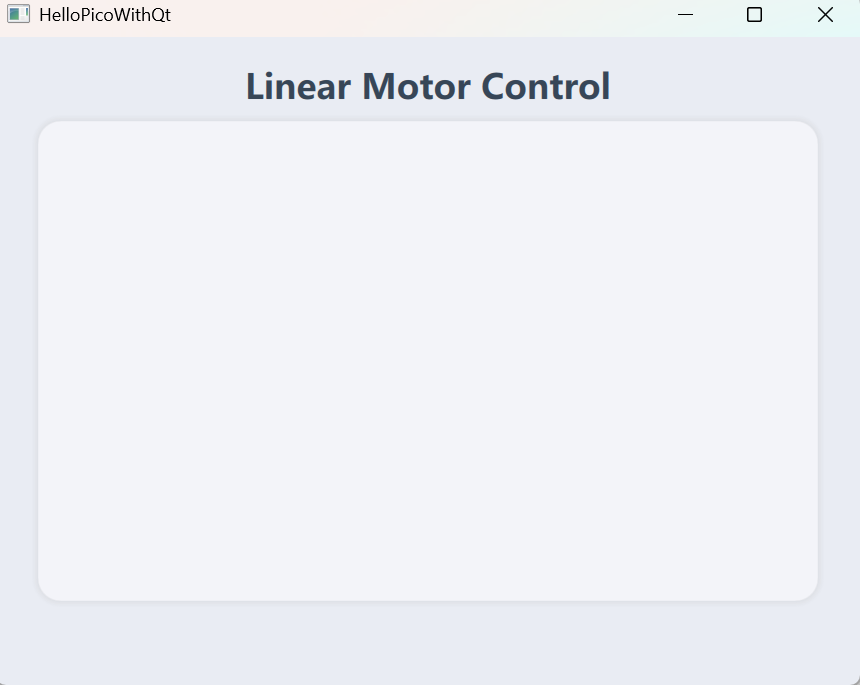
import QtQuick
import QtQuick.Window
import "./Components"
import "./Components/FluentUI"

Window {
    width: 576
    height: 432
    visible: true
    title: qsTr("HelloPicoWithQt")
    color: "#e9ecf3"

    HelloMainContainer{
        width: 520
        height: 320
    }
}
4.4 适配编码器Slider
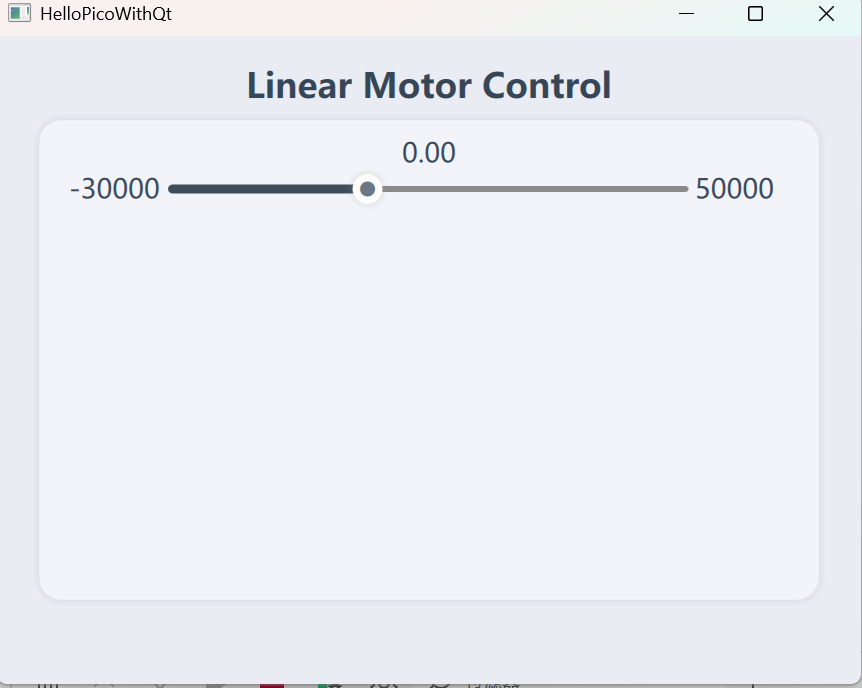
import QtQuick
import "./FluentUI"

FluSlider{
    property bool needMM: true
    property int leftTextMargin: -80
    property int rightTextMargin: -60
    id: root
    tooltipEnabled: false
    from: -30000
    to: 50000
    stepSize: 0.01

    FluText{
        id: leftText
        text: String(root.from) + (needMM ? "mm" : "")
        anchors{
            left: parent.left
            leftMargin: leftTextMargin
            verticalCenter: parent.verticalCenter
        }
        elide: Text.ElideRight
        font.pixelSize: 18
        color: "#3b4a5a"
        horizontalAlignment: Text.AlignHCenter
        verticalAlignment: Text.AlignVCenter
    }

    FluText{
        id: rightText
        text: String(root.to)  + (needMM ? "mm" : "")
        anchors{
            right: parent.right
            rightMargin: rightTextMargin
            verticalCenter: parent.verticalCenter
        }
        font.pixelSize: 18
        color: "#3b4a5a"
        horizontalAlignment: Text.AlignHCenter
        verticalAlignment: Text.AlignVCenter
    }

    FluText{
        id: topText
        text: String(root.value.toFixed(2)) + (needMM ? "mm" : "")
        anchors{
            top: parent.top
            topMargin: -20
            horizontalCenter: parent.horizontalCenter
        }
        font.pixelSize: 18
        color: "#3b4a5a"
        horizontalAlignment: Text.AlignHCenter
        verticalAlignment: Text.AlignVCenter
    }
}
4.5 适配位置组件
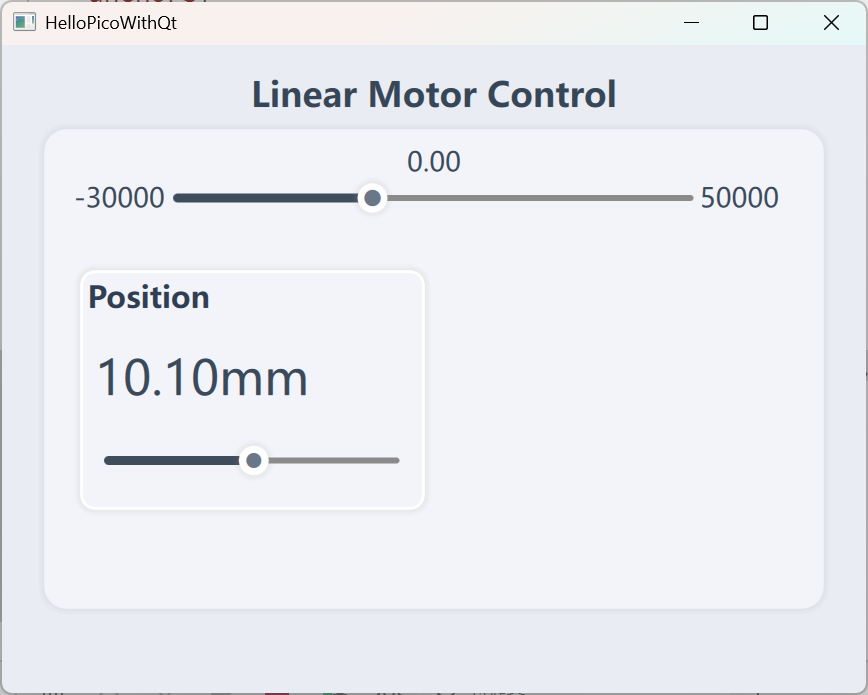
import QtQuick
import "./FluentUI"

Rectangle {
    width: parent.width / 2 - 30
    height: 160
    color: "#00000000"
    border.color: "white"
    border.width: 2
    radius: 10

    FluShadow{
        radius: 10
    }

    HelloSliderForPositionContainer{
        id: slider
        width: parent.width - 20
        anchors{
            top: positionText.bottom
            topMargin: 80
            horizontalCenter: parent.horizontalCenter
        }

        from: 0.00
        to: 20.01
        stepSize: 0.01
        value: 10.10
        leftTextMargin: -50
        rightTextMargin: -75
    }

    FluText{
        id: positionText
        text: "Position"
        color: "#303e51"
        font.bold: true
        //font.weight: Font.Medium
        font.pixelSize: 20

        anchors{
            top: parent.top
            left: parent.left
            leftMargin: 5
            topMargin: 5
        }
    }
}
4.6 适配速度组件
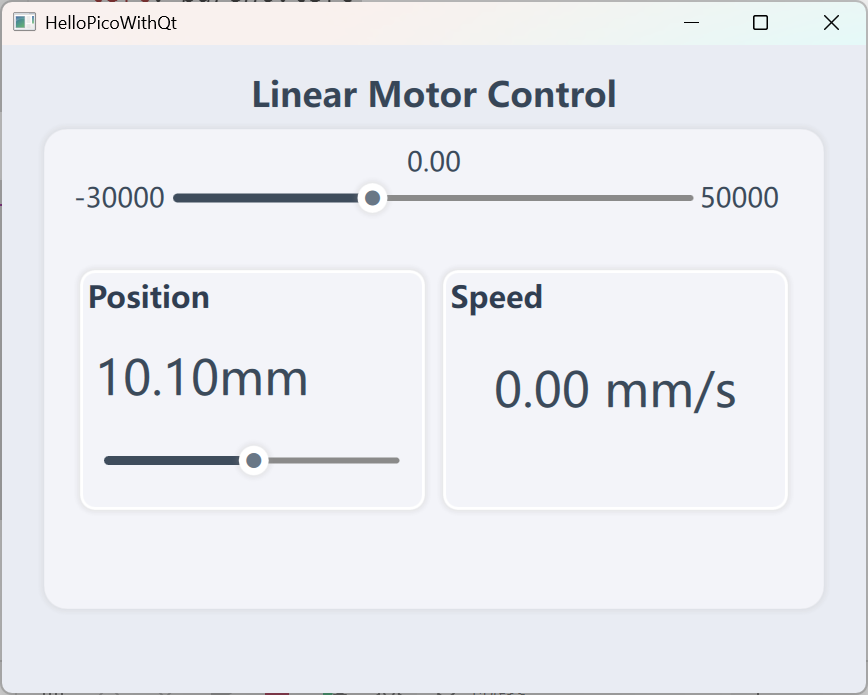
import QtQuick
import "./FluentUI"

Rectangle {
    width: parent.width / 2 - 30
    height: 160
    color: "#00000000"
    border.color: "white"
    border.width: 2
    radius: 10

    FluShadow{
        radius: 10
    }

    FluText{
        id: speedText
        text: "Speed"
        color: "#303e51"
        font.bold: true
        //font.weight: Font.Medium
        font.pixelSize: 20

        anchors{
            top: parent.top
            left: parent.left
            leftMargin: 5
            topMargin: 5
        }
    }

    FluText{
        id: trueText
        text: "0.00 mm/s"
        anchors{
            centerIn: parent
        }
        font.pixelSize: 32
        color: "#3b4a5a"
        horizontalAlignment: Text.AlignHCenter
        verticalAlignment: Text.AlignVCenter
    }

}
4.7 适配按钮组件
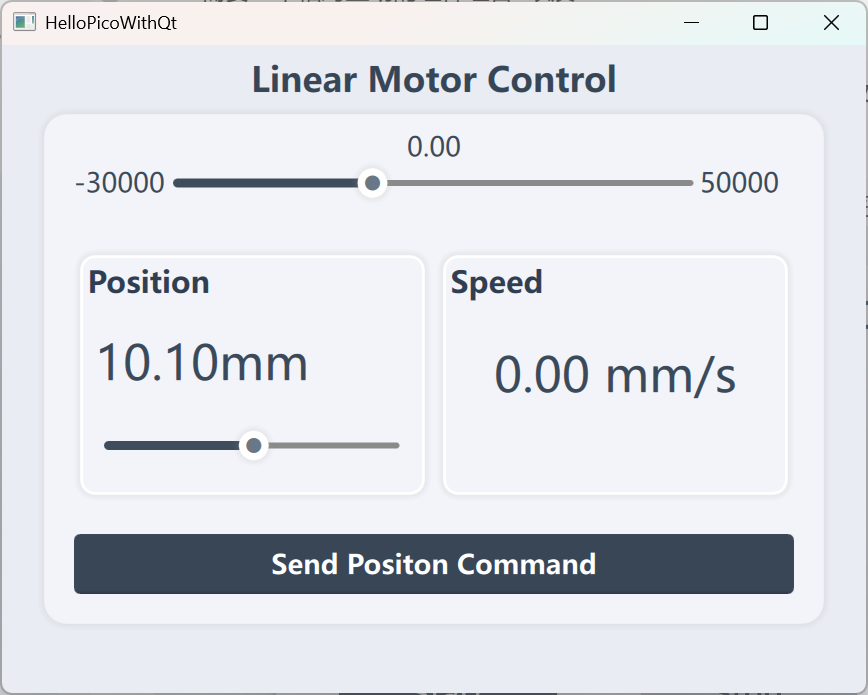
import QtQuick
import "./FluentUI"

FluFilledButton{
    font.pixelSize: 18
    font.bold: true
    normalColor: "#394656"
}
五、联调测试
5.1 注册类到QML
- 这部分就主要给出一些官方的参考示例了
- 作用就是将之前写的代码暴露给QML来调用
- https://doc.qt.io/qtforpython-6/examples/example_qml_tutorials_extending-qml-advanced_methods.html#example-qml-tutorials-extending-qml-advanced-methods
- 下列是一个官方的示例
- 另外设备通信类由于各种限制,通常不会创建多个实例,所以需要使用单例进行封装。或者严格注意使用方式,不创建多个对象
# Copyright (C) 2022 The Qt Company Ltd.
# SPDX-License-Identifier: LicenseRef-Qt-Commercial OR BSD-3-Clause
from __future__ import annotations

from PySide6.QtCore import QObject, Property, Slot
from PySide6.QtQml import QmlElement, ListProperty

from person import Person


# To be used on the @QmlElement decorator
# (QML_IMPORT_MINOR_VERSION is optional)
QML_IMPORT_NAME = "People"
QML_IMPORT_MAJOR_VERSION = 1


@QmlElement
class BirthdayParty(QObject):

    def __init__(self, parent=None):
        super().__init__(parent)
        self._host = None
        self._guests = []

    @Property(Person)
    def host(self):
        return self._host

    @host.setter
    def host(self, h):
        self._host = h

    def guest(self, n):
        return self._guests[n]

    def guestCount(self):
        return len(self._guests)

    def appendGuest(self, guest):
        self._guests.append(guest)

    @Slot(str)
    def invite(self, name):
        guest = Person(self)
        guest.name = name
        self.appendGuest(guest)

    guests = ListProperty(Person, appendGuest)
// Copyright (C) 2017 The Qt Company Ltd.
// SPDX-License-Identifier: LicenseRef-Qt-Commercial OR BSD-3-Clause

import QtQuick
import People

BirthdayParty {
    host: Person {
        name: "Bob Jones"
        shoe_size: 12
    }
    guests: [
        Person { name: "Leo Hodges" },
        Person { name: "Jack Smith" },
        Person { name: "Anne Brown" }
    ]

    Component.onCompleted: invite("William Green")
}
5.2 界面主要逻辑编写
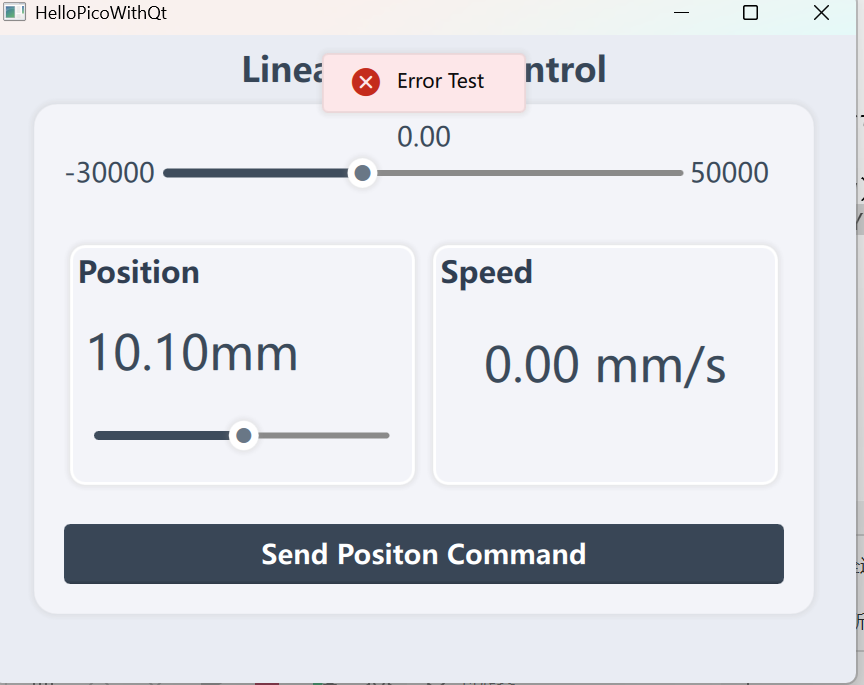
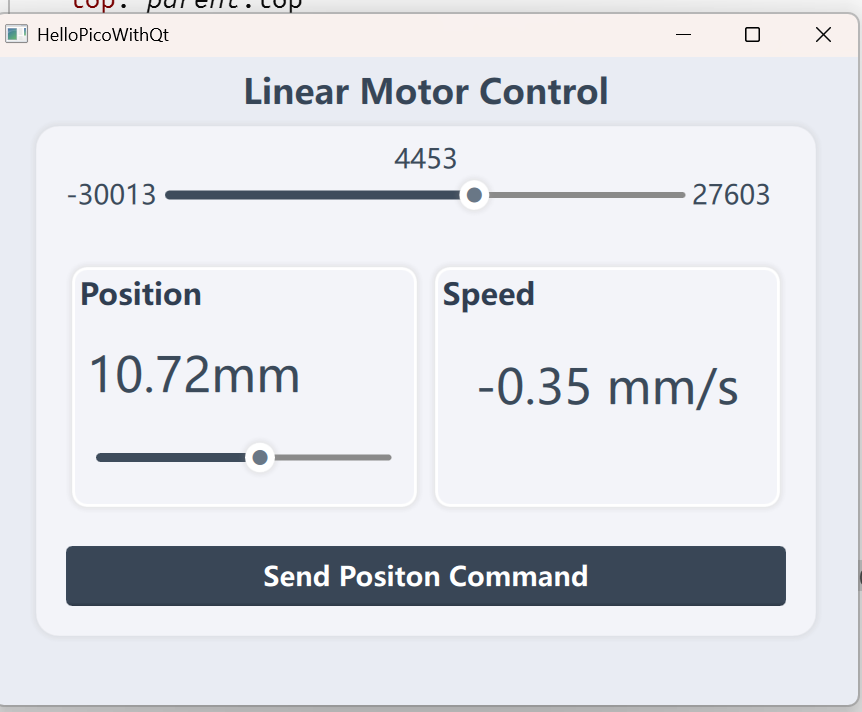
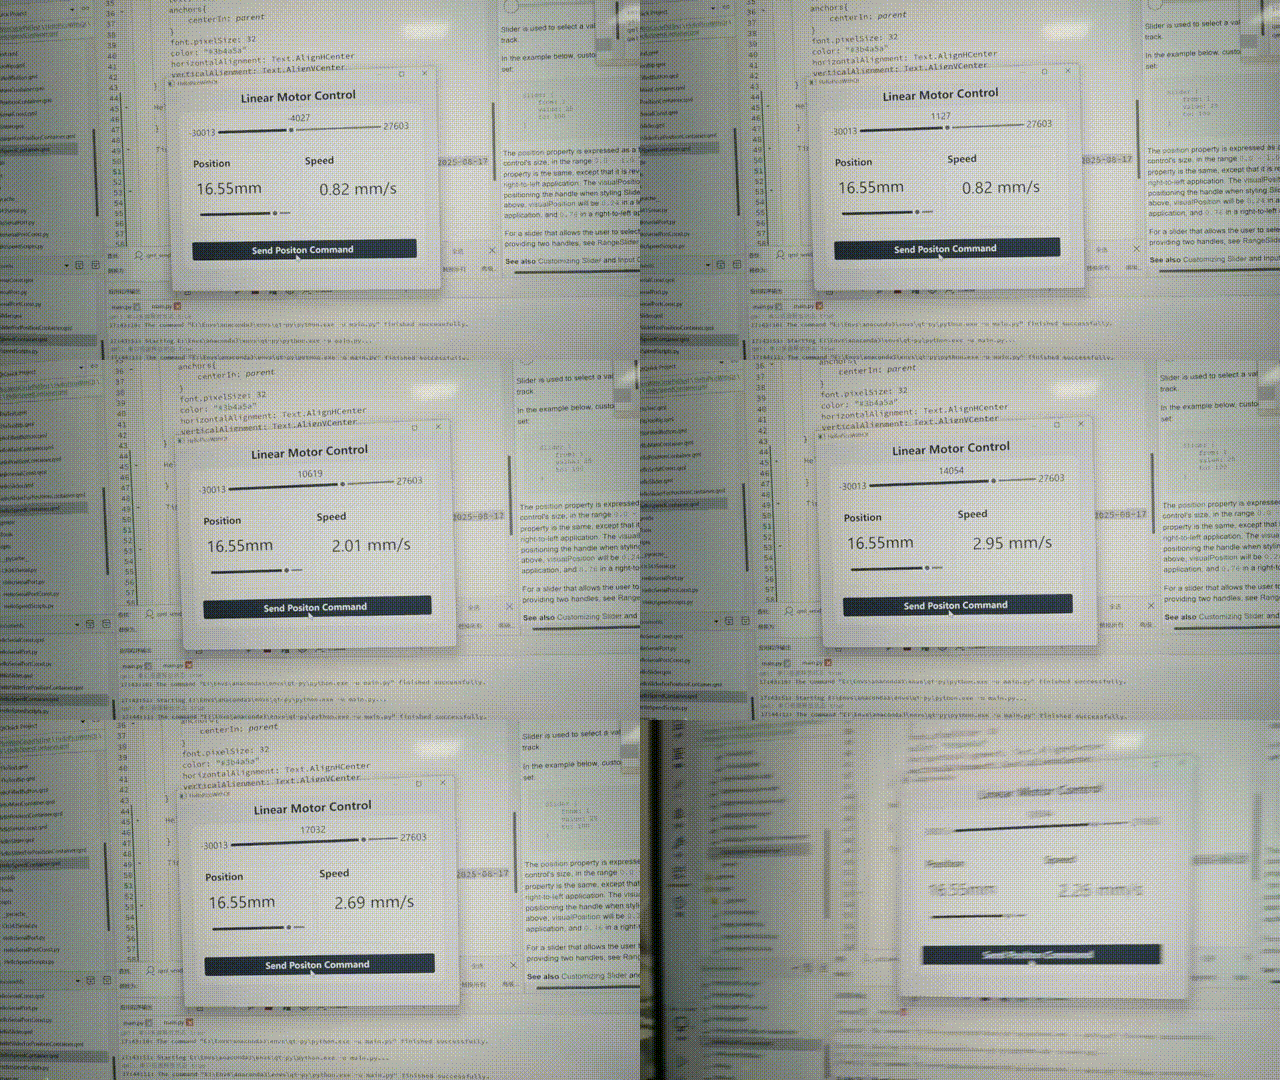
- 这部分主要就是联立第三第四部分的代码,然后按照自己的想法去可视化数据就好了
- 我的基础步骤如下:
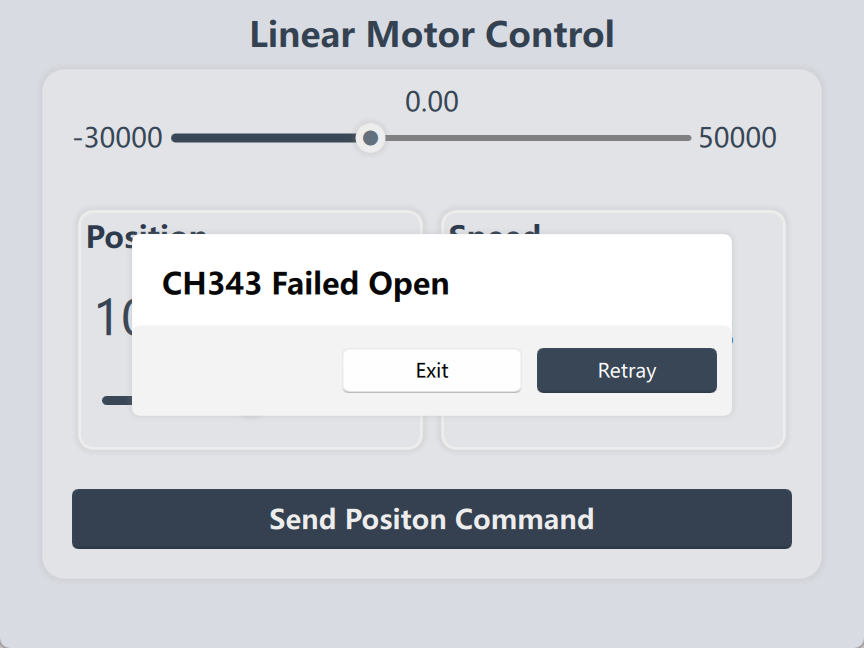
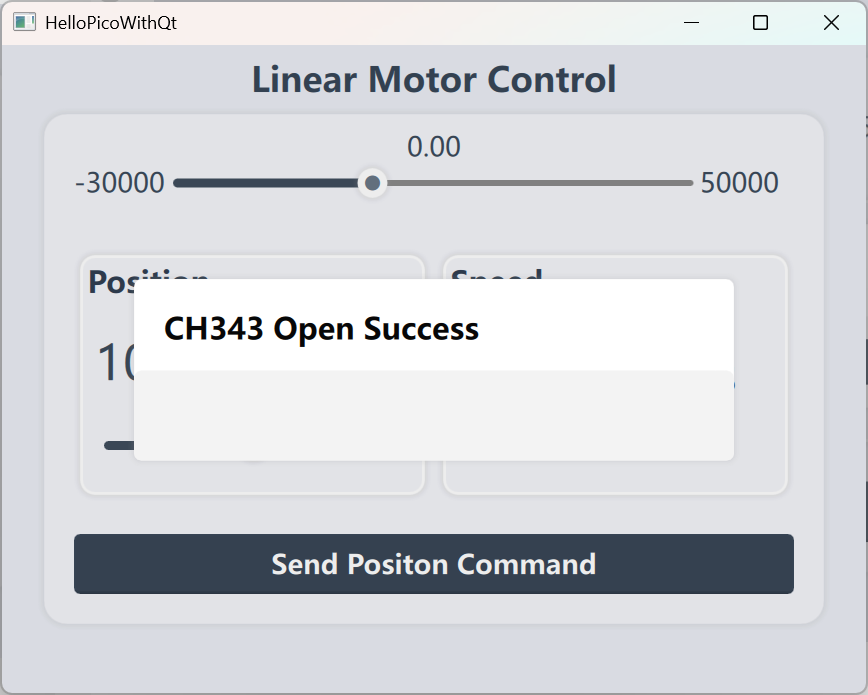
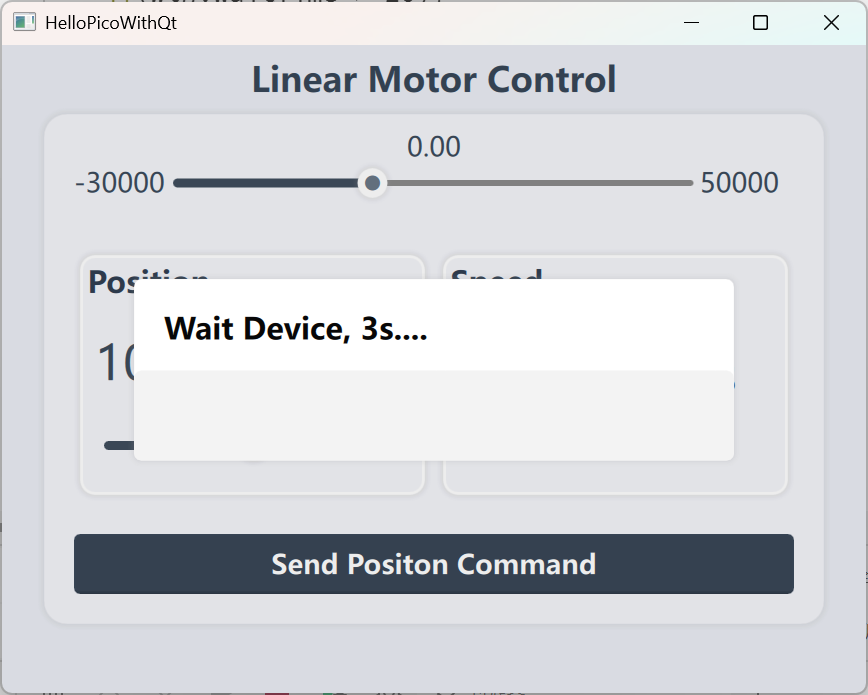
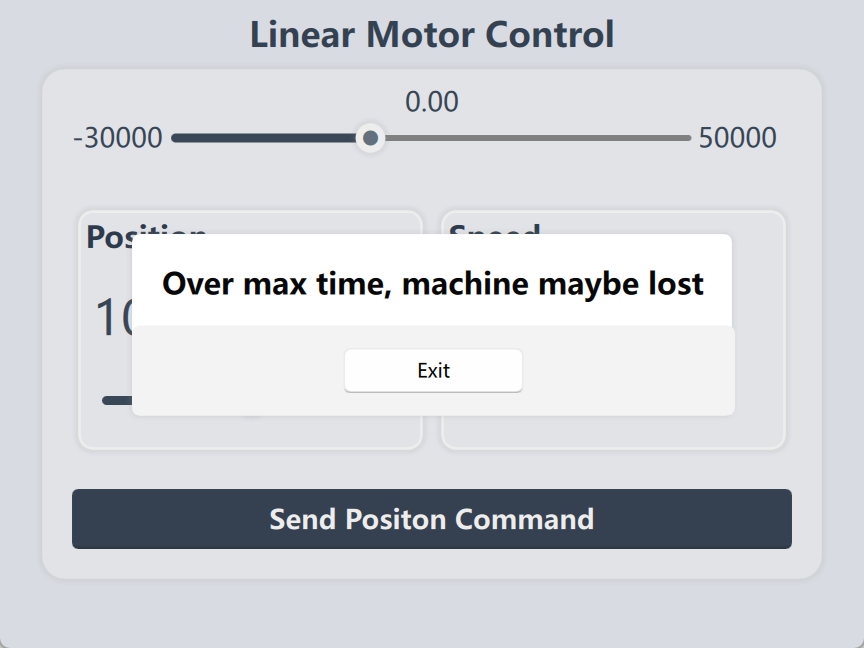
- 打开程序的时候查看是否能正常打开通信设备
- 如果不行的话弹出提示窗口,直到能正常打开位置
- 然后发送一个读取信号,并等待机器回复(刚开始机器需要几十秒的reset),所以界面需要处于一个一直等待的状态
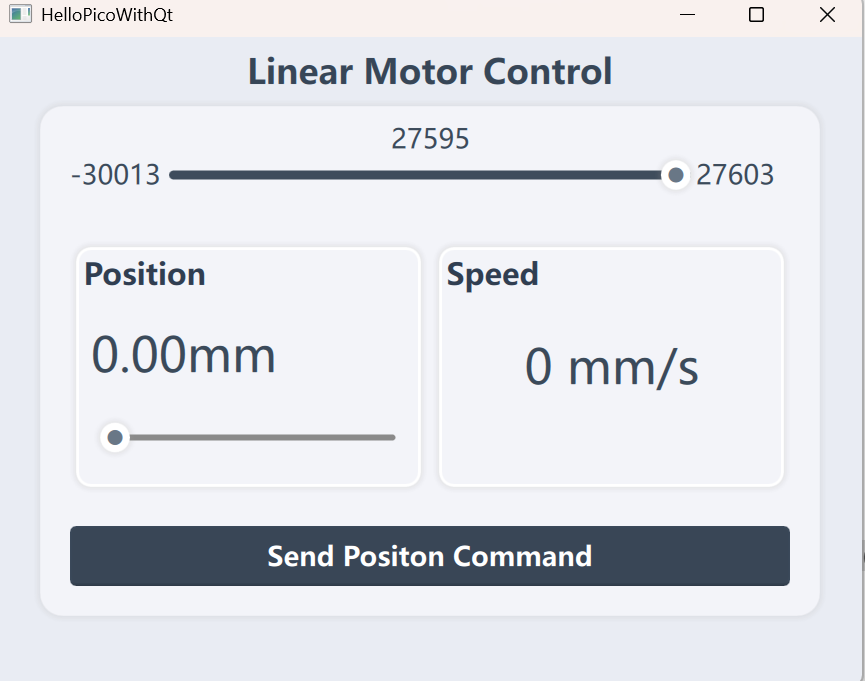
- 等到能正常回复了就读取各个数据并填写到ui中
- ui根据自己的想法将数据转化为各种特定的字符表示
- 点击按钮的话就将数据发送给单例通信类对象
- 点击退出时候重置close事件,并填写资源释放代码
六、程序发布
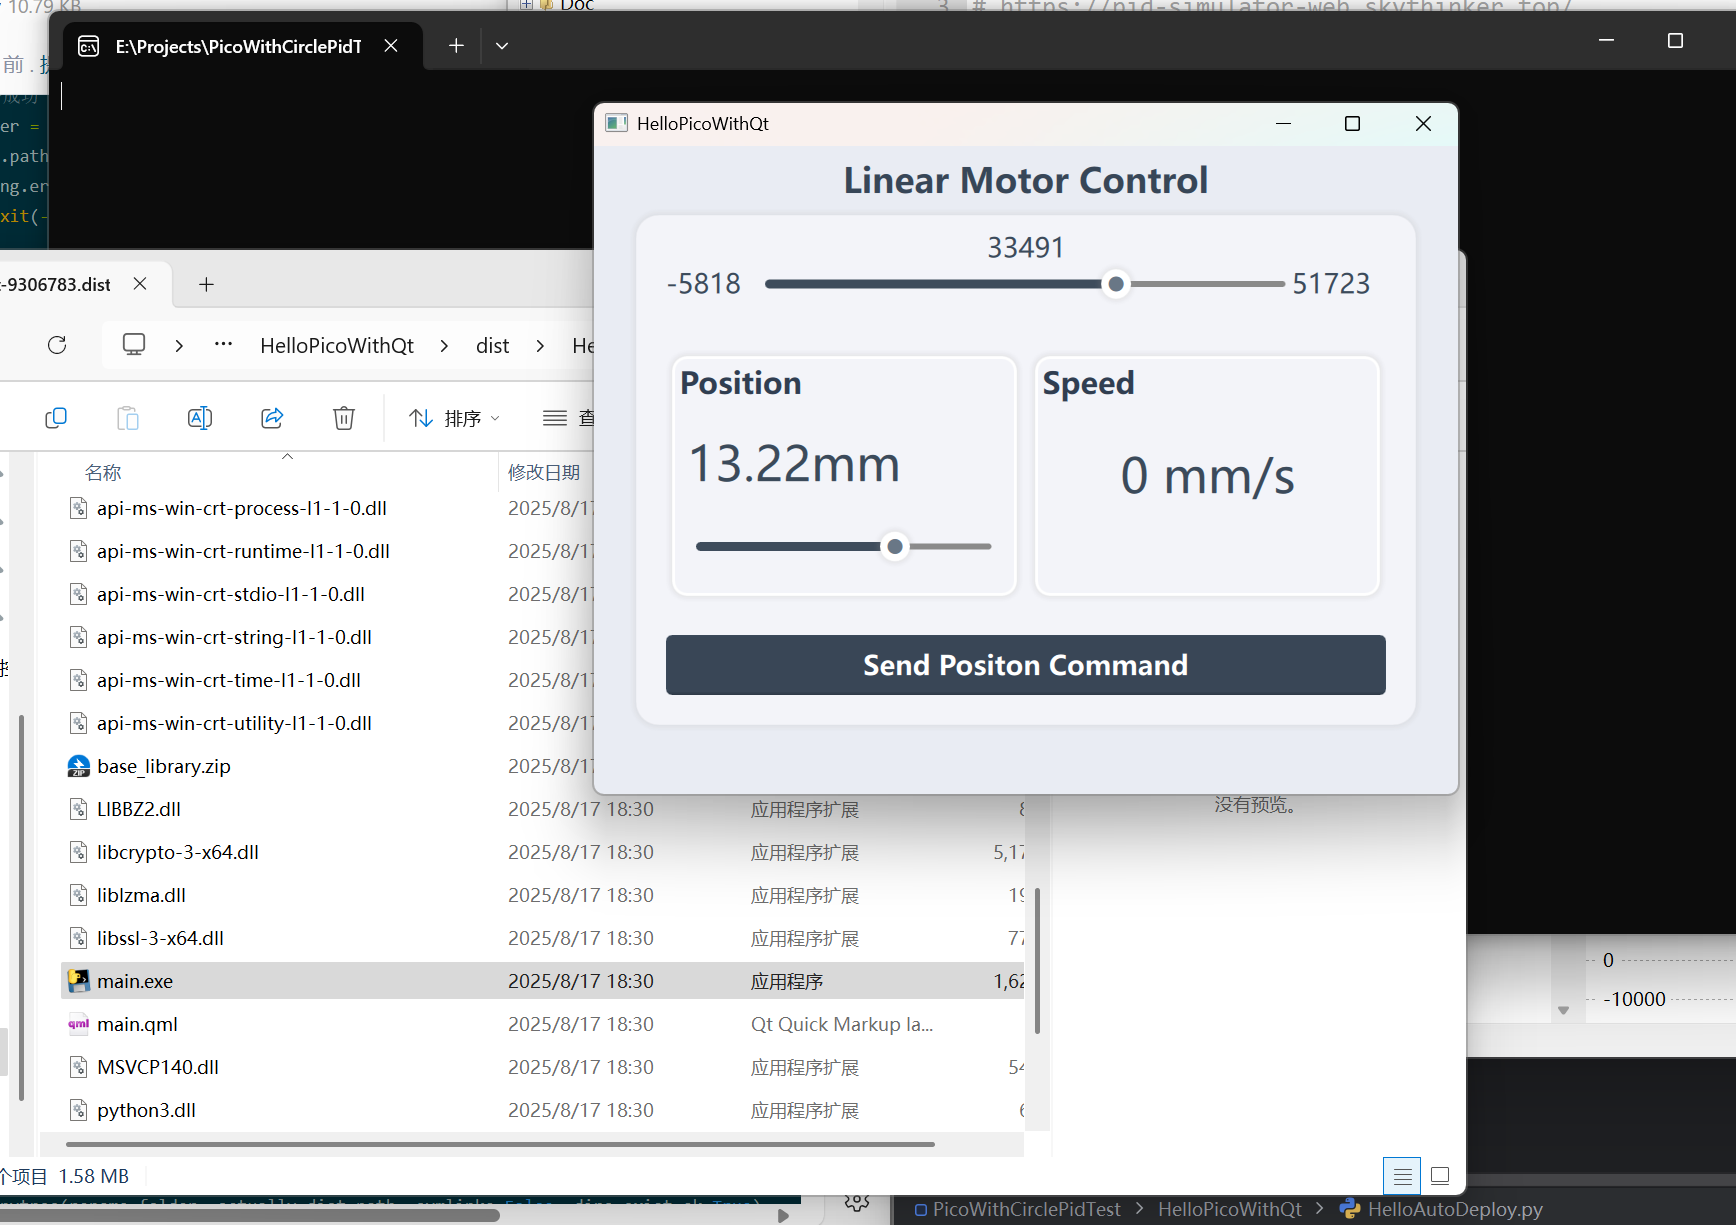
- 程序的发布也就是使用一些方法将代码转换为可执行的exe程序
- 对于python来说成功率最高的就是pyinstaller
- 对于高阶程序员会使用现在的CI/CD技术,将上传的代码自动经过某些步骤发布为exe
- 虽然很多人不太喜欢使用这个黑框框,但毕竟没法保证bug,看看日志总算是好的
以下是我写的简易quick项目打包代码
import subprocess
import shutil
import logging
import os
import sys
import traceback


def subprocess_call(args_list: list, need_result: bool = True):
    if need_result:
        try:
            result = subprocess.run(args_list, capture_output=True, text=True, check=False)
            if result.returncode == 0:
                return result.stdout
        except Exception as e:
            logging.exception(traceback.format_exc())
        return None
    else:
        # 这里不加try, 错了就立刻停止后续代码的执行
        subprocess.run(args_list, text=True, check=False)


result = subprocess.run([shutil.which("git"), "rev-parse", "HEAD"], capture_output=True, text=True, check=False)
if result.returncode != 0:
    logging.error("Git tag获取失败,查看机器是否有git")
    sys.exit(-1)
git_head = result.stdout[:7]

now_script_path = os.path.dirname(os.path.abspath(__file__))
main_file_path = os.path.join(now_script_path, "main.py")

package_name = "HelloPicoWithQt-{}".format(git_head)
dist_path = os.path.join(now_script_path, "dist")
actually_build_path = os.path.join(dist_path, "{}.build".format(package_name))
actually_dist_path = os.path.join(dist_path, "{}.dist".format(package_name))
if os.path.exists(actually_dist_path):
    shutil.rmtree(actually_dist_path)  # 减少bug
os.makedirs(dist_path, exist_ok=True)

pyinstaller_path = shutil.which("pyinstaller")
pyinstaller_command = [
    pyinstaller_path, "-y",
    "--log-level", "INFO",
    "--workpath", actually_build_path,
    "--distpath", actually_dist_path,
    "-D", "--contents-directory", ".",
    main_file_path
]

subprocess_call(pyinstaller_command, need_result=False)

wait_copy_list = ["main.qml", "Components"]
for each_copy in wait_copy_list:
    abs_path = os.path.join(now_script_path, each_copy)
    if os.path.isfile(abs_path):
        shutil.copy(abs_path, actually_dist_path)
    else:
        shutil.copytree(abs_path, os.path.join(actually_dist_path, each_copy))

main_folder = os.path.join(actually_dist_path, "main")
if not os.path.exists(os.path.join(main_folder, "main.exe")):
    logging.error("Pyinstaller打包失败,查看日志看看出什么问题了")
    sys.exit(-1)

logging.info("拷贝结构树")
shutil.copytree(main_folder, actually_dist_path, dirs_exist_ok=True)
shutil.rmtree(main_folder)
logging.info("打包结束")
七、总结
- 经过四个篇章的编写,最终完成了将一些机械运动 -> 电驱 -> 指令 -> 应用软件的封装,写这个文章主要也是想回忆一些久远的记忆,毕竟工作中可不会让你这样整,一方面进度上会有很大问题,还有实现的可能性上随着知识的密集度提升,失败率也会大大提高
- 但对于个人上,我认为后续的社会对于技能的要求会不断提升,很多人会进入野生的状态,所以在不断学习全栈知识
- 很高兴最后还是完成了这样的一个东西,虽然是一个玩具水平,有更多的知识已经精度修正能力的话应该有望实现低分辨率黑白打印机
- 最后希望这四篇文章能帮助一些入门者(其实我也一直在这个范围徘徊 😐),这样就足够了

开源鸿蒙跨平台开发社区汇聚开发者与厂商,共建“一次开发,多端部署”的开源生态,致力于降低跨端开发门槛,推动万物智联创新。
更多推荐


 4
4 0
0- 0


 已为社区贡献1条内容

所有评论(0)