qt 多个模型如何显示在表格中_Qt MOOC系列教程 第五章第四节:QML中的C++模型
我们已经多次讨论过如何创建自己的模型来表示QML中的数据,并且在上一节中我们看到了QStandardItemModel的基本示例。通常,出于性能和功能方面的原因,需要从一开始就要实现自己的模型。QAbstactItemModel类为项目模型类提供了抽象接口,并且它可以被子类化以创建您自己的模型。QAbstractListModel和QAbstractTableModel继承了QAbstr...
我们已经多次讨论过如何创建自己的模型来表示QML中的数据,并且在上一节中我们看到了QStandardItemModel的基本示例。通常,出于性能和功能方面的原因,需要从一开始就要实现自己的模型。QAbstactItemModel类为项目模型类提供了抽象接口,并且它可以被子类化以创建您自己的模型。QAbstractListModel和QAbstractTableModel继承了QAbstractItemModel,可以在创建列表或表格模型时将其子类化。在这一节中,我们将进一步介绍QAbstractTableModel。
1. QAbstractTableModel
当您通过继承QAbstractTableModel来创建自己的表格模型时,您必须至少实现rowCount(),columnCount()和data()方法。
为了使我们的模型在QML中可用,我们还需要重新实现roleNames方法(如上一节中的QStandardItemModel示例)。
如果需要编辑模型还要实现setData()和flags()方法。
为可调整大小的数据结构提供接口的模型也可以提供插入和删除行和列的实现,如果您需要这样做,一定要记住调用适当的函数,以便通知所有连接的视图发生变化:
- 在将新行或列插入数据结构之前,必须调用
beginInsertRows()或beginInsertColumns(),然后立即调用endInsertRows()或endInsertColumns()。 - 在从数据结构中删除行或列之前,必须调用
removeRows()或removeColumns(),然后立即调用endRemoveRows()或endRemoveColumsn()。
1.1 示例
在头文件中,我们将Car定义为存储在表格中的项。角色枚举的方式与我们在QStandardItemModel中使用的方式相同。当子类化QAbstractTableModel时,我们需要至少实现rowCount(),columnCount(),data()和roleNames():
// customtablemodel.h
#include
struct Car
{
    QString manufacturer;
    QString model;
    qint16 year;
};
typedef QVector CarContainer;
class CustomTableModel : public QAbstractTableModel
{
    Q_OBJECT
public:
    enum CarRoles {
        ManufacturerRole = Qt::UserRole + 1,
        ModelRole,
        YearRole
    };
    explicit CustomTableModel(QObject *parent = nullptr);
protected:
    int rowCount(const QModelIndex &parent) const Q_DECL_OVERRIDE;
    int columnCount(const QModelIndex &parent) const Q_DECL_OVERRIDE;
    QVariant data(const QModelIndex &index, int role) const Q_DECL_OVERRIDE;
    QHash roleNames() const Q_DECL_OVERRIDE;
private:
    CarContainer m_container;
};.cpp文件中的代码是不言自明的。我们在构造函数中添加数据只是为了示例:
// customtablemodel.cpp
#include "customtablemodel.h"
CustomTableModel::CustomTableModel(QObject *parent) :
QAbstractTableModel(parent)
{
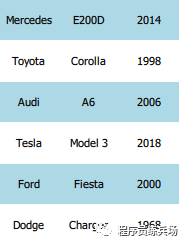
m_container = {
Car{"Mercedes", "E200D", 2014},
Car{"Toyota", "Corolla", 1998},
Car{"Audi", "A6", 2006},
Car{"Tesla", "Model 3", 2018},
Car{"Ford", "Fiesta", 2000},
Car{"Dodge", "Charger", 1968},
};
}
int CustomTableModel::rowCount(const QModelIndex &parent) const
{
Q_UNUSED(parent)
return m_container.count();
}
int CustomTableModel::columnCount(const QModelIndex &parent) const
{
Q_UNUSED(parent)
return 3;
}
QVariant CustomTableModel::data(const QModelIndex &index, int role) const
{
switch(role)
{
case ManufacturerRole:
return m_container[index.row()].manufacturer;
case ModelRole:
return m_container[index.row()].model;
case YearRole:
return m_container[index.row()].year;
}
return QVariant();
}
QHash CustomTableModel::roleNames() const
{
QHash roles;
roles[ManufacturerRole] = "manufacturer";
roles[ModelRole] = "model";
roles[YearRole] = "year";
return roles;
}然后我们像以前一样注册它(注意,在这个例子中,唯一的数据来自构造函数,因为我们没有实现从QML添加数据的功能):
// main.cpp
qmlRegisterType("org.mooc.customtable", 1, 0, "CustomTableModel");
在QML里,我们使用的是Qt 5.12中引入的新TableView项,因此请记住导入QtQuick 2.12(注意:不要将它与已弃用的Quick Controls 1 TabelView混淆)。我们在这里也使用了DelegateChooser,它还在Qt 5.12的实验室中,所以您需要导入Qt.labs.qmlmodels 1.0。
模型中的数据可以通过roleNames()方法中定义的角色名获得。
import QtQuick 2.12
import QtQuick.Window 2.12
import org.mooc.customtable 1.0
import Qt.labs.qmlmodels 1.0

Window {
    visible: true
    width: 640
    height: 480
    title: qsTr("CustomTableModel")

    TableView {
        anchors.fill: parent
        columnSpacing: 0
        rowSpacing: 1
        clip: true

        model: CustomTableModel {}

        delegate: DelegateChooser {
            DelegateChoice {
                column: 0
                Rectangle {
                    implicitWidth: 80
                    implicitHeight: 40
                    color: {
                        if (row % 2 == 0)
                            "lightblue";
                        else
                            "white";
                    }
                    Text {
                        anchors.centerIn: parent
                        text: manufacturer
                    }
                }
            }
            DelegateChoice {
                column: 1
                Rectangle {
                    implicitWidth: 80
                    implicitHeight: 40
                    color: {
                        if (row % 2 == 0)
                            "lightblue";
                        else
                            "white";
                    }
                    Text {
                        anchors.centerIn: parent
                        text: model
                    }
                }
            }
            DelegateChoice {
                column: 2
                Rectangle {
                    implicitWidth: 80
                    implicitHeight: 40
                    color: {
                        if (row % 2 == 0)
                            "lightblue";
                        else
                            "white";
                    }
                    Text {
                        anchors.centerIn: parent
                        text: year
                    }
                }
            }
        }
    }
}
Source: https://materiaalit.github.io/qt-mooc/part5/

开源鸿蒙跨平台开发社区汇聚开发者与厂商,共建“一次开发,多端部署”的开源生态,致力于降低跨端开发门槛,推动万物智联创新。
更多推荐


 0
0 0
0- 0


 已为社区贡献2条内容

所有评论(0)