PyQt5基础知识
PyQt
PyQt 是一套用于创建图形用户界面(GUI)的 Python 绑定库,它将 Python 语言与 Qt 应用程序框架相结合,让开发者能便捷地利用 Qt 强大的功能来开发出功能丰富、界面美观的跨平台桌面应用程序
PyCharm环境准备
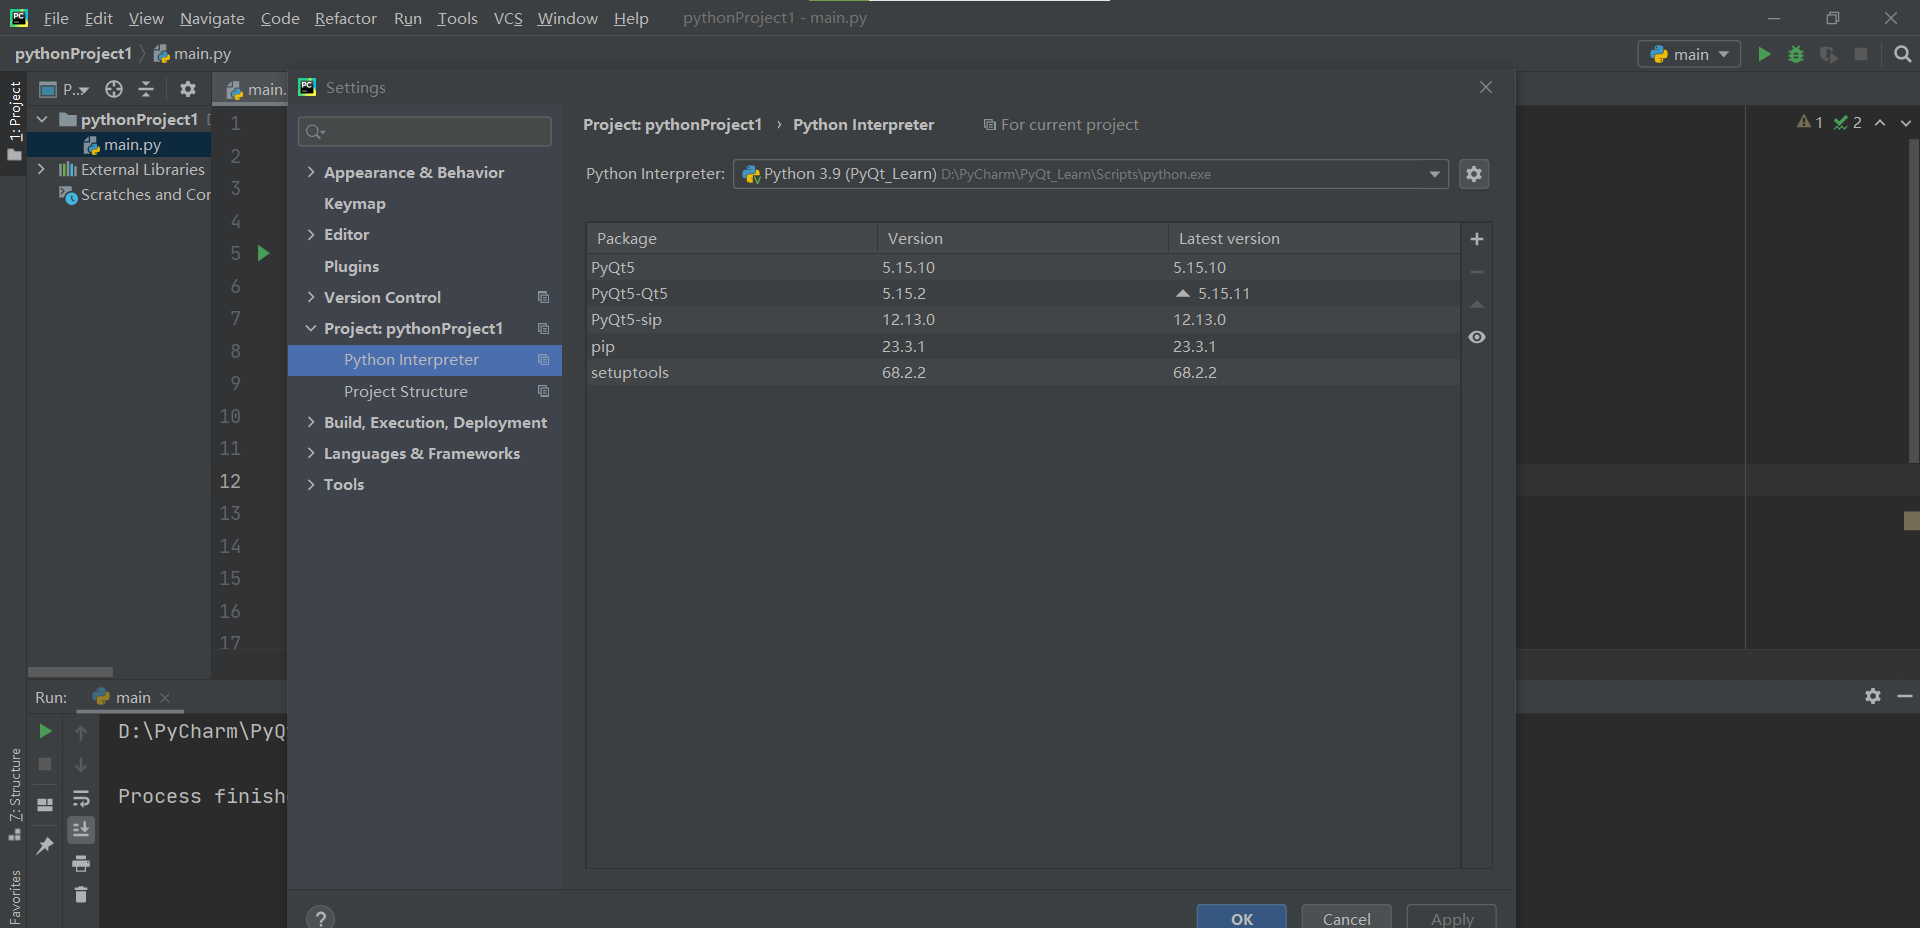
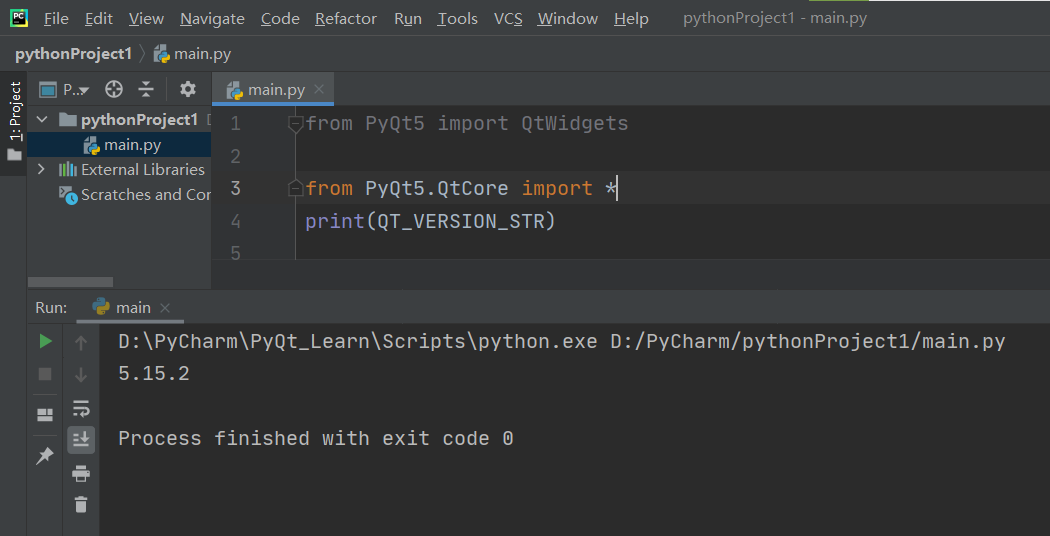
新建环境——添加PyQt5模块——验证版本
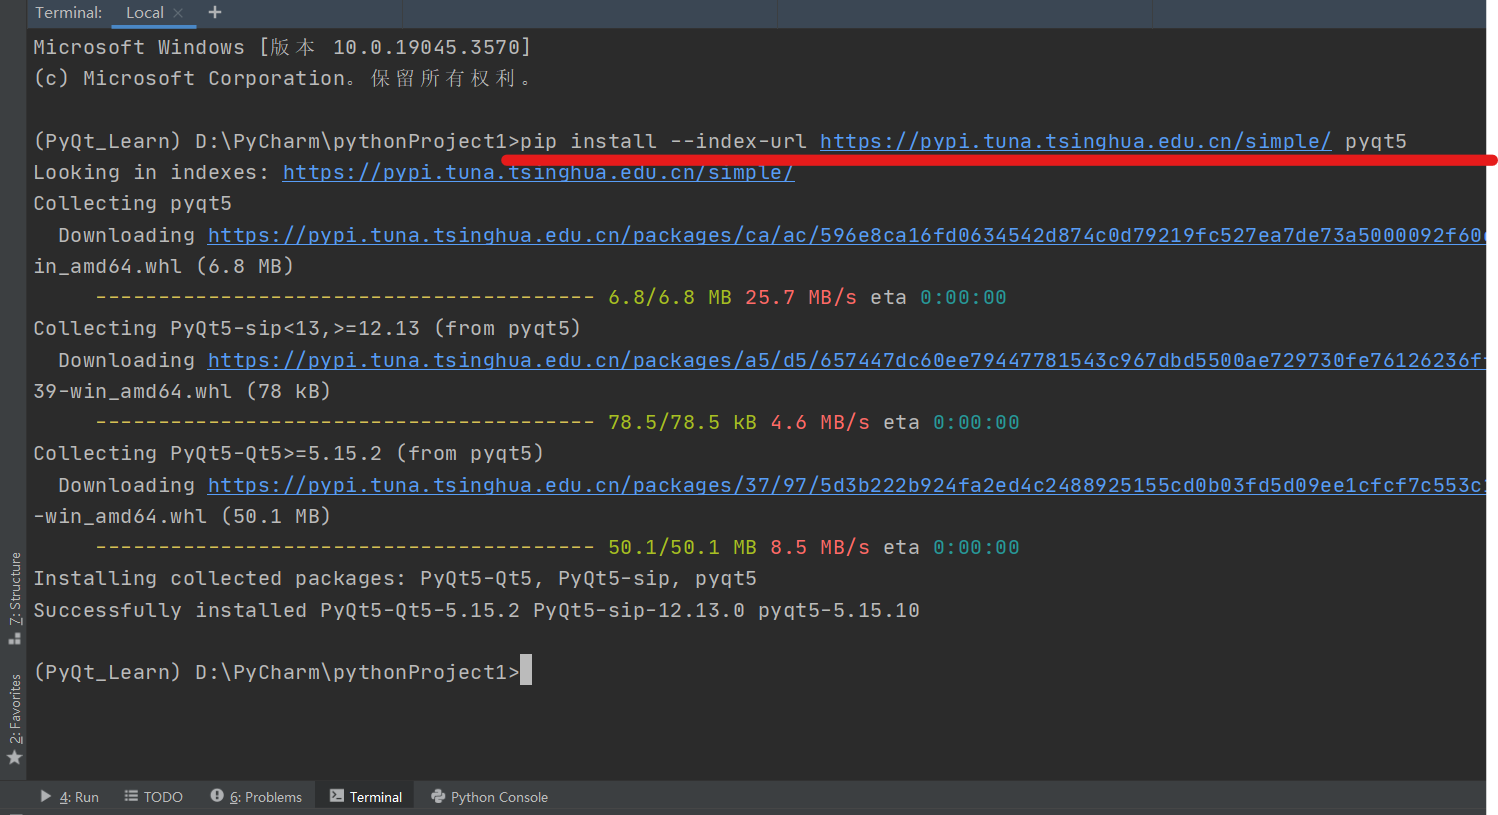
如果pycharm中的setting里添加PyQt5报错,可以按下面的图2,选择在terminal里用命令添加
控件
窗口显示 QWidget
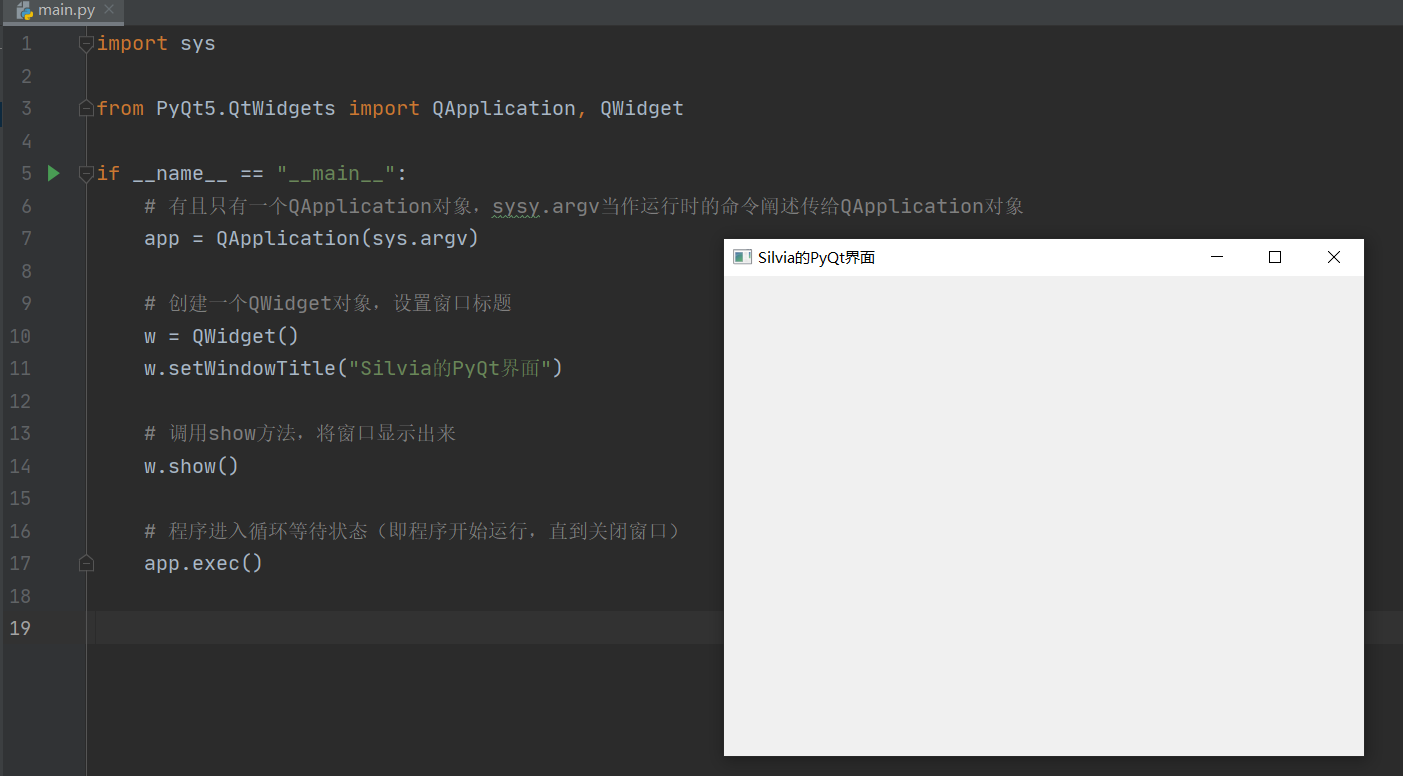
显示一个窗口
QtWidgets(控件):包含了一些列创建桌面应用的UI元素
setWindowTitle( ):设置窗口标题
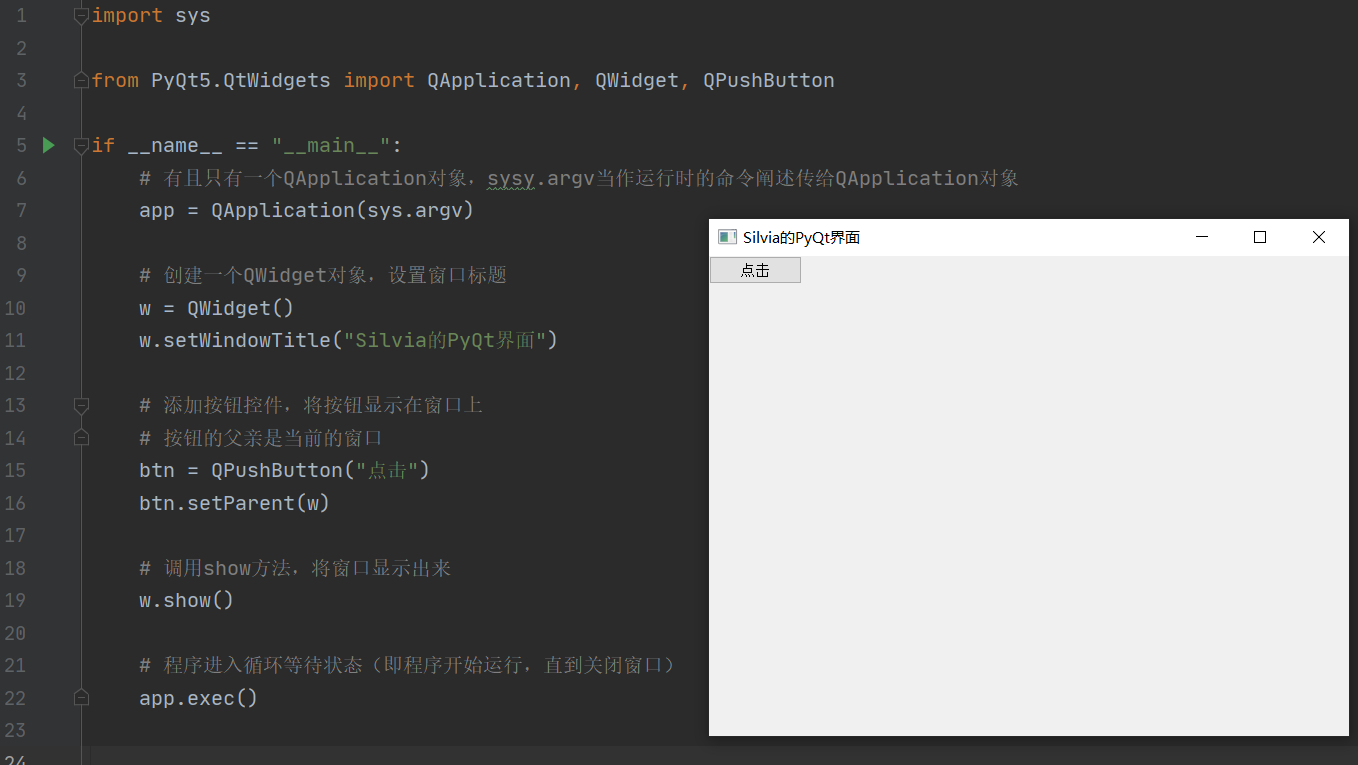
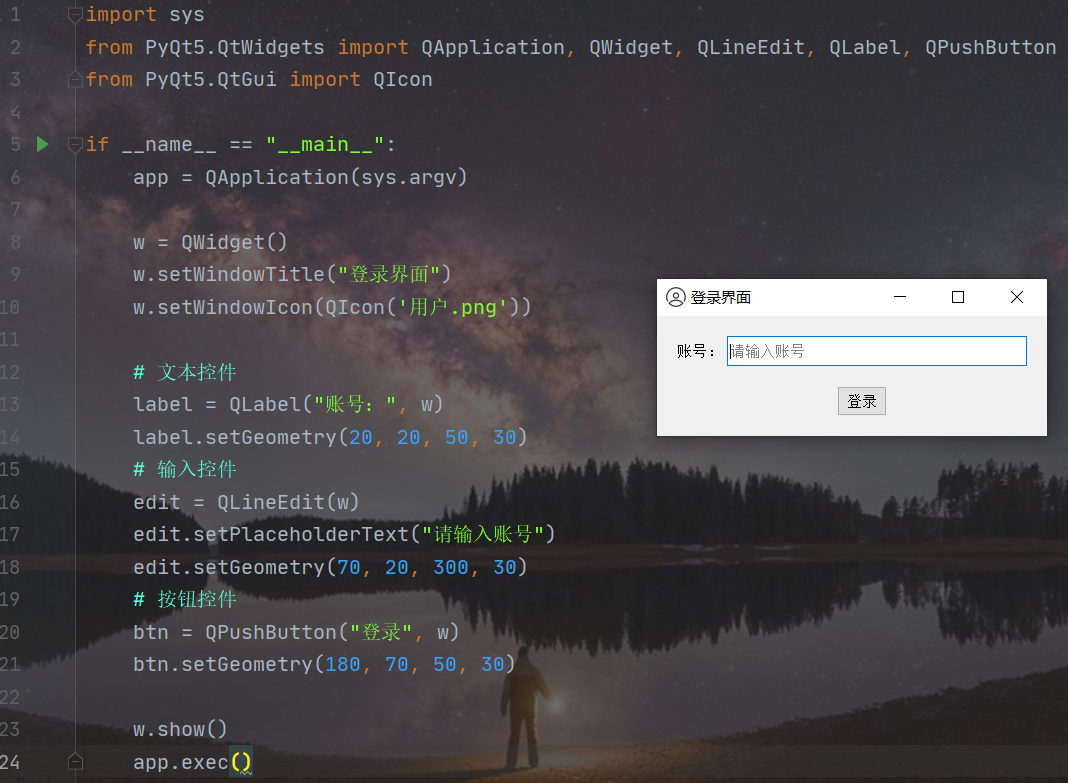
按钮控件 QPushButton
在当前窗口中添加一个按钮控件
QPushButton:按钮控件
setParent( ):将控件放在当前窗口上
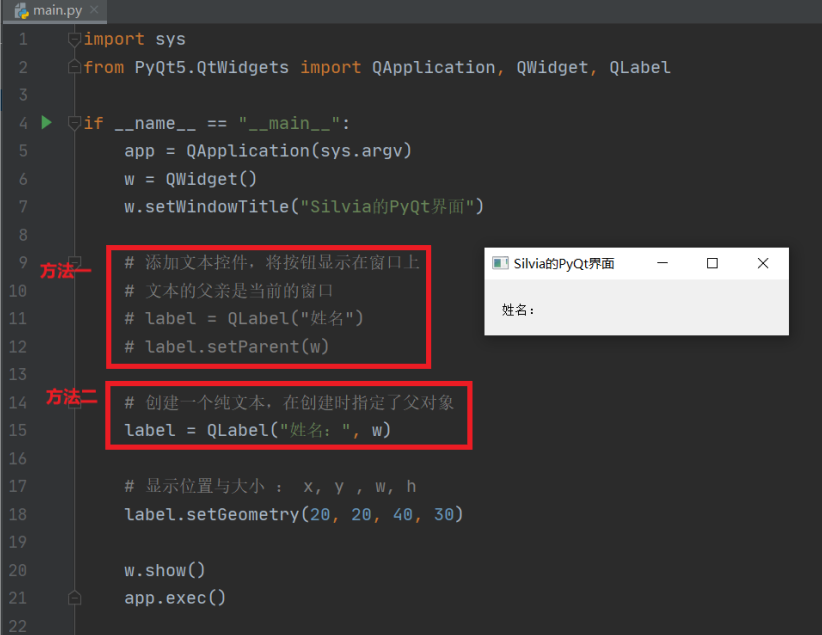
文本控件 QLabel
在当前窗口中添加一个文本控件
QLabel:纯文本控件
setGeometry( ):设置文本显示的位置与大小,以窗口左上角为原点
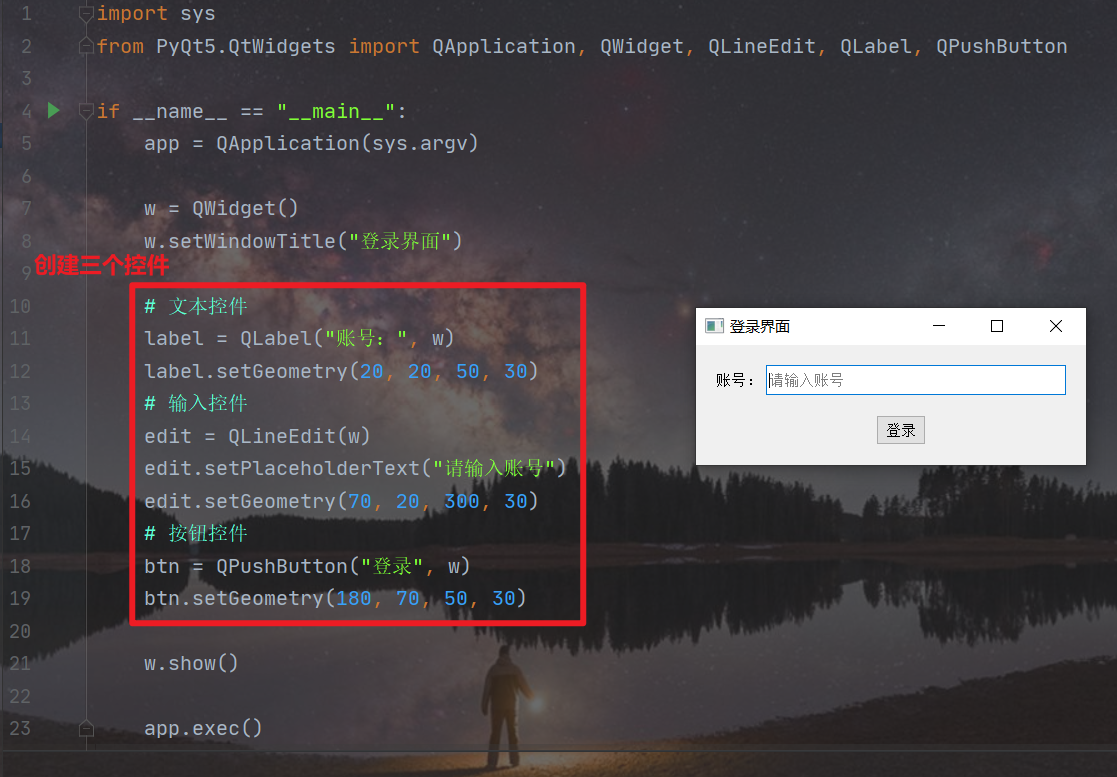
输入控件 QLineEdit
在当前窗口中添加一个输入控件(单行文本)
QLineEdit:单行文本输入控件
setPlaceholderText( ):设置输入框中内容
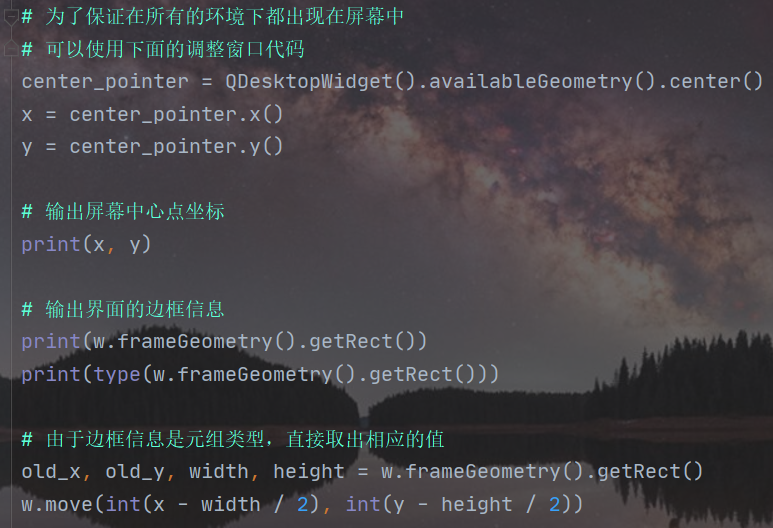
窗口位置设置 QDesktopWidget
保持窗口显示在屏幕中央位置
QDesktopWidget( ):获取电脑屏幕像素长、宽
availableGeometry( ):获取电脑可操作的屏幕像素长、宽
center( ):获取中心位置像素坐标
w.move(x, y):窗口左上角移动到坐标(x, y)处
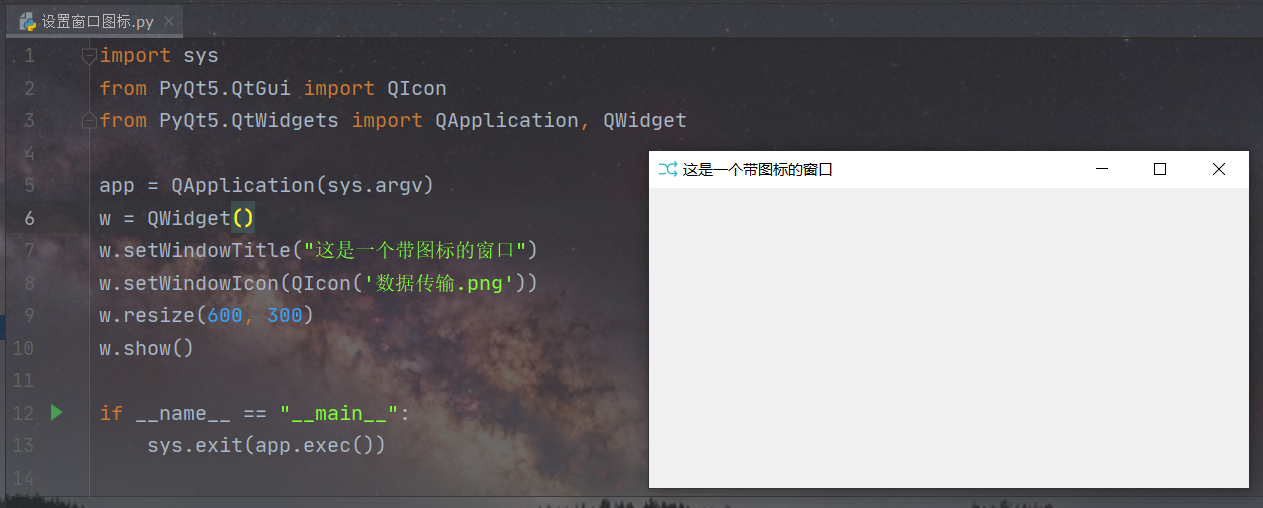
窗口图标设置 QIcon
保持窗口显示在屏幕中央位置
setWindowIcon(QIcon(图标名称or路径)):设置窗口图标
注意:图标文件需要与代码文件在同一目录,或者给出文件的完整路径
布局
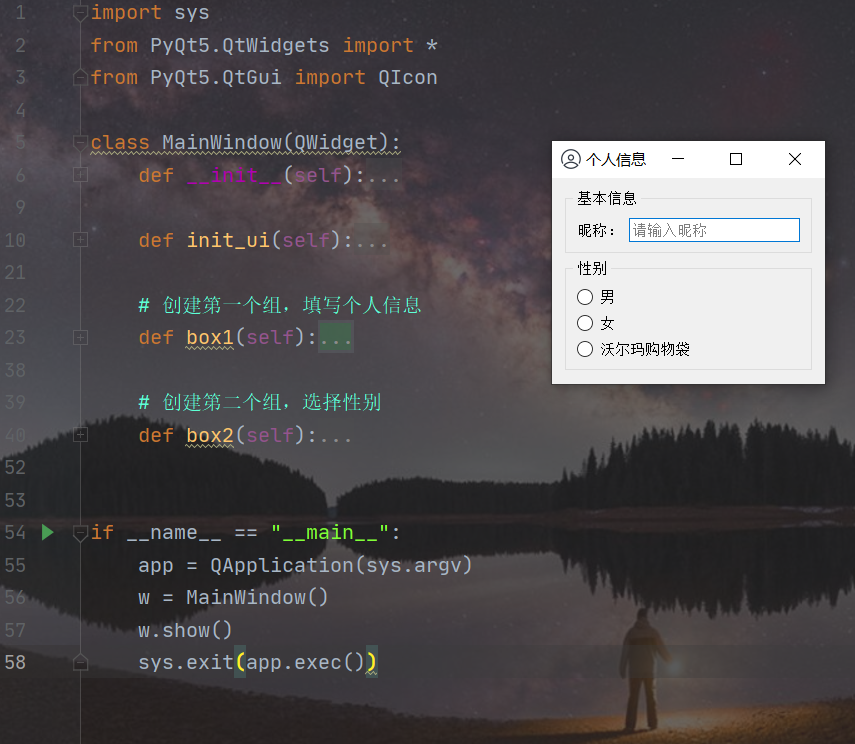
水平/垂直布局 QHBoxLayout / QVBoxLayout
直接将控件add进布局器中,不需要单独添加控件的父类
QGroupBox:设置窗口图标
layout.addWidget( widget / box ):属于QLayout类,将一个控件或盒子添加到布局中
window.setLayout( layout ):属于QWiget类,设置窗口或控件所使用的布局
import sys
from PyQt5.QtWidgets import *
from PyQt5.QtGui import QIcon

class MainWindow(QWidget):
    def __init__(self):
        super().__init__()
        self.init_ui()

    def init_ui(self):
        self.setWindowTitle("个人信息")
        self.setWindowIcon(QIcon('用户.png'))

        # 最外层垂直布局
        layout = QVBoxLayout()
        self.setLayout(layout)

        # 整体采用垂直布局
        layout.addWidget(self.box1())
        layout.addWidget(self.box2())


    # 创建第一个组,填写个人信息
    def box1(self):
        info_box = QGroupBox("基本信息")

        # 文本和输出框水平摆放
        layout = QHBoxLayout()

        name = QLabel("昵称:")
        name_input = QLineEdit()
        name_input.setPlaceholderText("请输入昵称")

        layout.addWidget(name)
        layout.addWidget(name_input)

        info_box.setLayout(layout)
        return info_box

    # 创建第二个组,选择性别
    def box2(self):
        gender_box = QGroupBox("性别")

        # 三个性别水平摆放
        layout = QVBoxLayout()

        # 将控件添加到布局中
        for gender in ["男", "女", "沃尔玛购物袋"]:
            layout.addWidget(QRadioButton(gender))

        gender_box.setLayout(layout)
        return gender_box


if __name__ == "__main__":
    app = QApplication(sys.argv)
    w = MainWindow()
    w.show()
    sys.exit(app.exec())
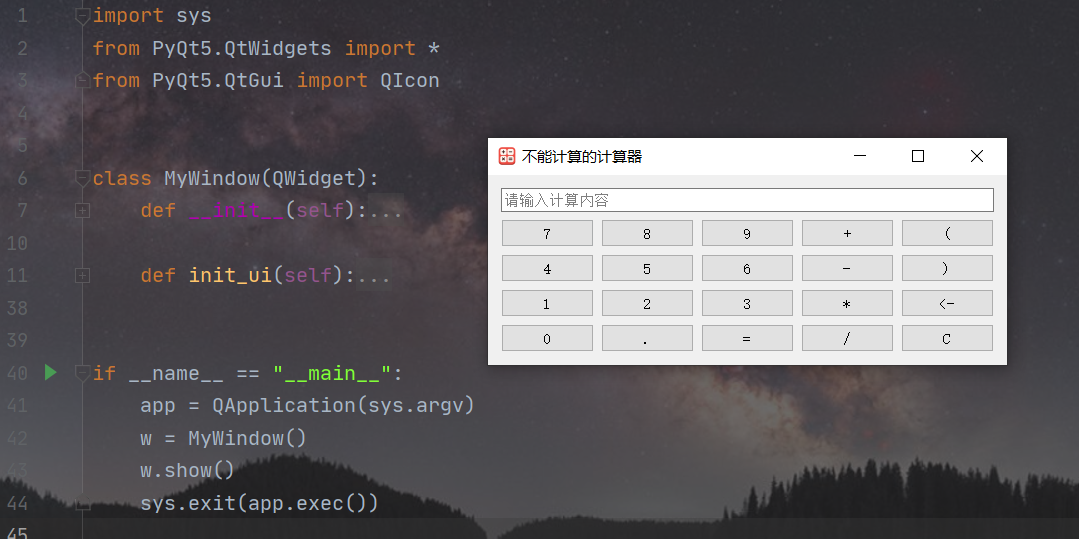
网格布局 QGridLayout
import sys
from PyQt5.QtWidgets import *
from PyQt5.QtGui import QIcon


class MyWindow(QWidget):
    def __init__(self):
        super().__init__()
        self.init_ui()

    def init_ui(self):
        self.setWindowTitle("不能计算的计算器")
        self.setWindowIcon(QIcon('计算器.png'))
        # 设置整体的容器布局
        layout = QVBoxLayout()
        self.setLayout(layout)
        # 添加输入框
        edit = QLineEdit()
        edit.setPlaceholderText("请输入计算内容")
        layout.addWidget(edit)
        # 添加网格布局到容器
        grid = QGridLayout()
        layout.addLayout(grid)
        # 写入网格的数据,字典类型
        data = {
            0: ["7", "8", "9", "+", "("],
            1: ["4", "5", "6", "-", ")"],
            2: ["1", "2", "3", "*", "<-"],
            3: ["0", ".", "=", "/", "C"]
        }
        # 遍历字典取出键值对
        for row_number, list_data in data.items():
            # 遍历列表内字符串,为每个字符串创建一个按钮
            # enumerate 返回一个枚举对象,包含list_data的索引(col_number)和值(number)
            for col_number, number in enumerate(list_data):
                btn = QPushButton(number)
                grid.addWidget(btn, row_number, col_number)


if __name__ == "__main__":
    app = QApplication(sys.argv)
    w = MyWindow()
    w.show()
    sys.exit(app.exec())
表单布局 QFormLayout
QFormLayout( ):创建表单
表单.addRow( widget ):将控件添加进表单中
widget.setFixedSize( w, h ):将控件设置为固定大小
container.addWidget(login_btn, alignment=Qt.AlignCenter):将控件设置在固定位置
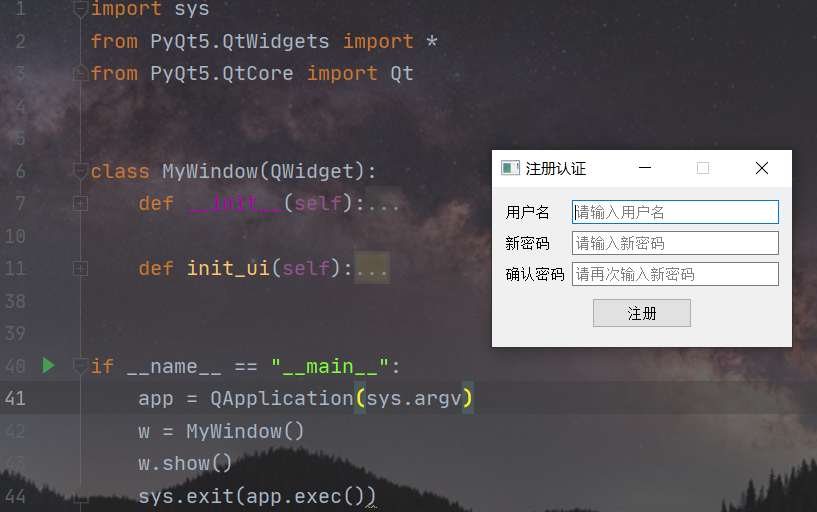
import sys
from PyQt5.QtWidgets import *
from PyQt5.QtCore import Qt


class MyWindow(QWidget):
    def __init__(self):
        super().__init__()
        self.init_ui()

    def init_ui(self):
        self.setWindowTitle("注册认证")
        self.setFixedSize(300, 160)

        # 设置容器为垂直布局
        layout = QVBoxLayout()
        self.setLayout(layout)

        # 设置表单布局并添加到容器中
        form = QFormLayout()
        layout.addLayout(form)

        # 将三个信息添加到表单中
        edit1 = QLineEdit()
        edit1.setPlaceholderText("请输入用户名")
        form.addRow("用户名", edit1)
        edit2 = QLineEdit()
        edit2.setPlaceholderText("请输入新密码")
        form.addRow("新密码", edit2)
        edit3 = QLineEdit()
        edit3.setPlaceholderText("请再次输入新密码")
        form.addRow("确认密码", edit3)

        btn = QPushButton("注册")
        btn.setFixedSize(100, 30)
        # 设置按钮位于容器的中心位置
        layout.addWidget(btn, alignment=Qt.AlignCenter)


if __name__ == "__main__":
    app = QApplication(sys.argv)
    w = MyWindow()
    w.show()
    sys.exit(app.exec())
堆叠布局器 QStackedLayout
创建 窗口 放置在 堆叠布局器 中
创建 堆叠布局器 放置在 水平布局器中
创建 盒子(垂直布局器) 放置在 水平布局器中
创建 水平布局器 设置为整体容器布局
普通写法
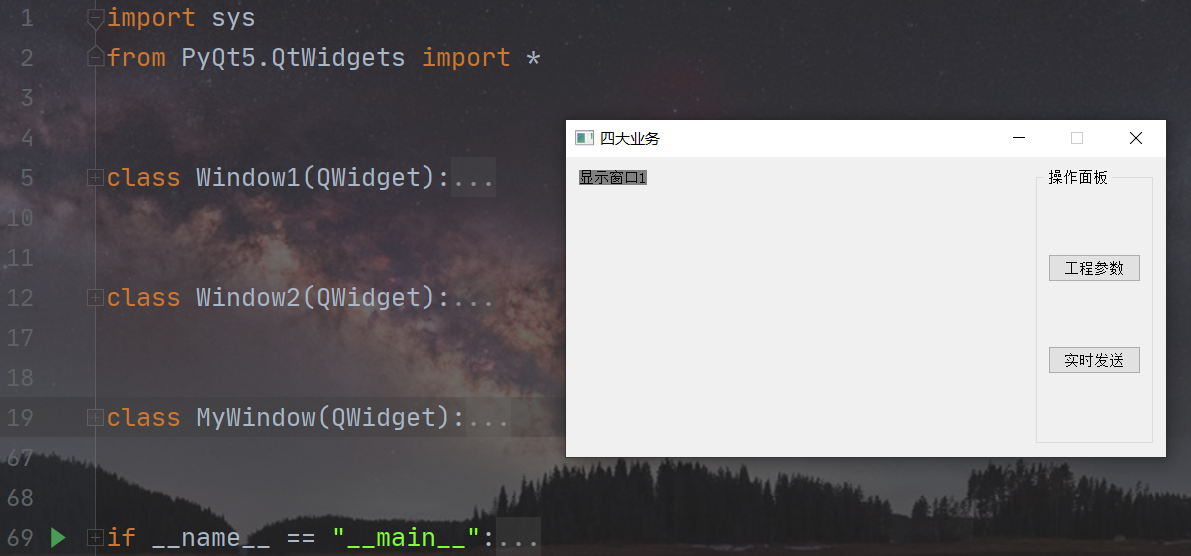
import sys
from PyQt5.QtWidgets import *


class Window1(QWidget):
    def __init__(self):
        super().__init__()
        QLabel("显示窗口1", self)
        self.setStyleSheet("background-color:grey;")


class Window2(QWidget):
    def __init__(self):
        super().__init__()
        QLabel("显示窗口2", self)
        self.setStyleSheet("background-color:grey;")


class MyWindow(QWidget):
    def __init__(self):
        super().__init__()
        self.create_stackedLayout()
        self.init_ui()


    def create_stackedLayout(self):
        self.stacked_layout = QStackedLayout()
        win1 = Window1()
        win2 = Window2()

        self.stacked_layout.addWidget(win1)
        self.stacked_layout.addWidget(win2)


    def init_ui(self):
        self.setWindowTitle("四大业务")
        self.setFixedSize(600, 300)

        layout = QHBoxLayout()
        self.setLayout(layout)

        widget = QWidget()
        widget.setLayout(self.stacked_layout)
        layout.addWidget(widget)

        list_box = QGroupBox("操作面板")
        v_layout = QVBoxLayout()
        btn1 = QPushButton("工程参数")
        btn2 = QPushButton("实时发送")

        v_layout.addWidget(btn1)
        v_layout.addWidget(btn2)

        list_box.setLayout(v_layout)
        layout.addWidget(list_box)

        btn1.clicked.connect(self.btn_press1_clicked)
        btn2.clicked.connect(self.btn_press2_clicked)


    def btn_press1_clicked(self):
        self.stacked_layout.setCurrentIndex(0)
    def btn_press2_clicked(self):
        self.stacked_layout.setCurrentIndex(1)


if __name__ == "__main__":
    app = QApplication(sys.argv)
    w = MyWindow()
    w.show()
    sys.exit(app.exec())
简化写法
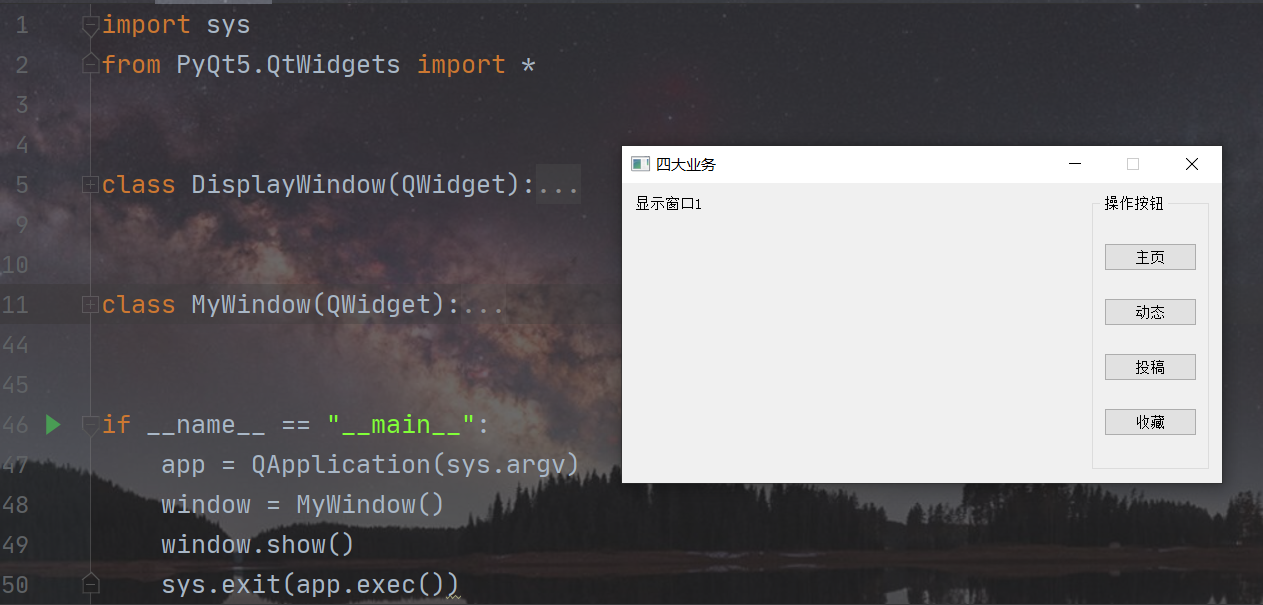
import sys
from PyQt5.QtWidgets import *


class DisplayWindow(QWidget):
    def __init__(self, label_text):
        super().__init__()
        QLabel(label_text, self)


class MyWindow(QWidget):
    def __init__(self):
        super().__init__()
        self.create_stacked_layout()
        self.init_ui()

    def create_stacked_layout(self):
        self.stacked_layout = QStackedLayout()
        for i in range(1, 5):
            self.stacked_layout.addWidget(DisplayWindow(f"显示窗口{i}"))

    def init_ui(self):
        self.setWindowTitle("四大业务")
        self.setFixedSize(600, 300)

        h_layout = QHBoxLayout(self)

        # 左侧的堆叠布局窗口
        stacked_widget = QWidget()
        stacked_widget.setLayout(self.stacked_layout)
        h_layout.addWidget(stacked_widget)

        # 右侧的按钮
        button_box = QGroupBox("操作按钮")
        button_titles = ["主页", "动态", "投稿", "收藏"]
        v_layout = QVBoxLayout(button_box)
        h_layout.addWidget(button_box)

        for index, title in enumerate(button_titles):
            button = QPushButton(title)
            # 当按钮被点击时,调用 lambda 函数,该函数会将 QStackedLayout 的当前索引设置为与按钮对应的索引 idx
            button.clicked.connect(lambda _, idx=index: self.stacked_layout.setCurrentIndex(idx))
            v_layout.addWidget(button)


if __name__ == "__main__":
    app = QApplication(sys.argv)
    window = MyWindow()
    window.show()
    sys.exit(app.exec())
信号与槽
处理事件和通信的基本机制
基本分类
信号与槽的几种类型
在 PyQt 中,信号和槽基本上可以分为以下几种类型:
| 种类 | 解释 | 实例 |
|---|---|---|
| 内置信号和槽 | PyQt提供 | clicked: 当按钮被点击时发送的信号。valueChanged:当参数值改变时发送信号。textChanged: 当文本框内容改变时发送的信号。timeout:当定时器超时时发送的信号。 |
| 自定义信号 | 通过继承 QObject 的类定义的,并使用 pyqtSignal() 来创建 |
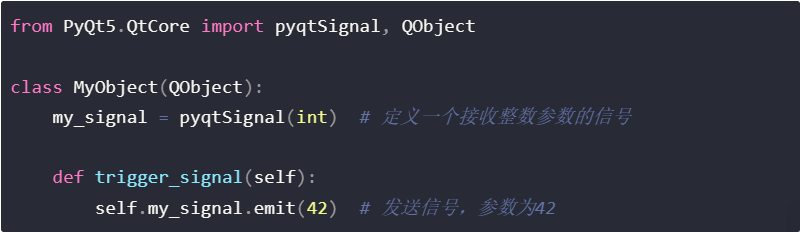 |
| 带有参数的信号 | 自定义信号可以定义接收参数,允许将额外的数据传递给槽 | 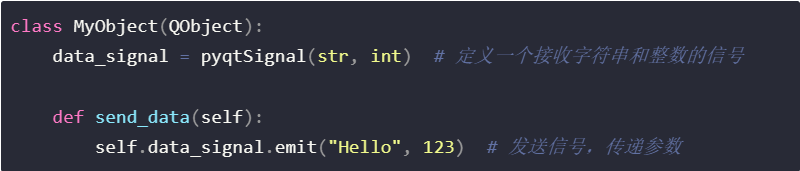 |
何时使用自定义信号
-
需要通知变化:
当某个对象的状态变化需要其他对象做出反应时,比如用户输入、文件加载或数据更新等情况。此时,使用自定义信号将状态变化的通知发出。 -
需要传递参数:
当信号需要附带特定的数据(如新值、状态等)时,可以定义自定义信号,并通过emit发送这些参数。例如,传递用户输入的内容或文件的读取内容。
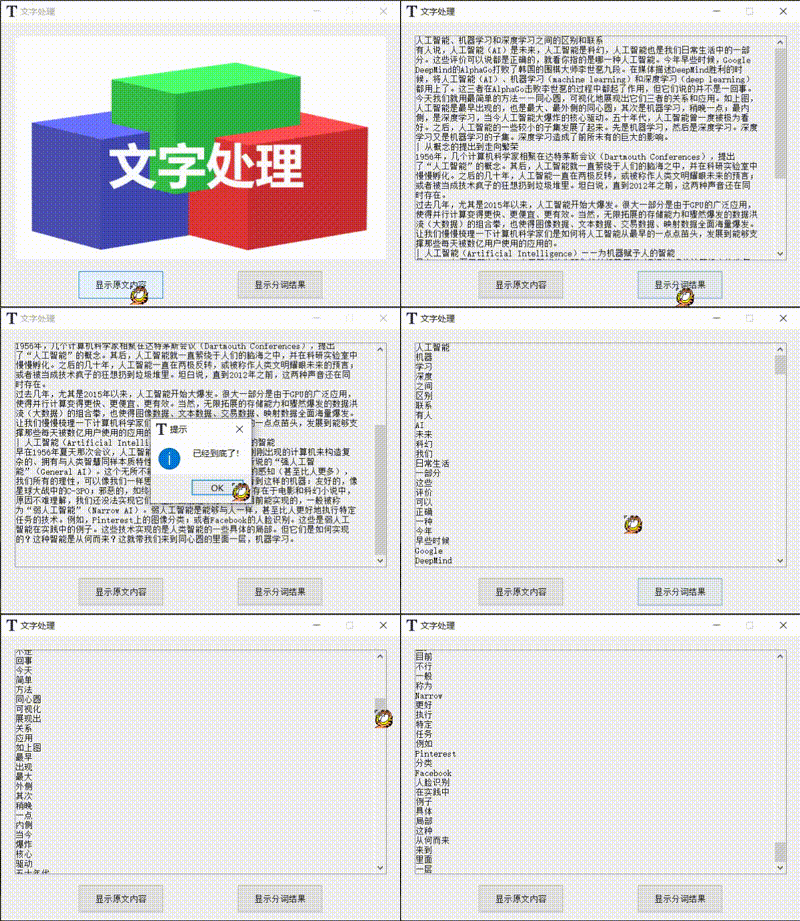
案例一 文本处理 QScrollerArea
import sys
import jieba
from PyQt5.QtWidgets import *
from PyQt5.QtGui import *
from PyQt5.QtCore import *


class Window1(QWidget):
    # 创建一个信号
    end_signal = pyqtSignal(str)

    def __init__(self):
        super().__init__()
        pix = QPixmap('首页.png') # 创建对象
        label = QLabel()
        label.setPixmap(pix)            # 将图片嵌入Label中
        label.setScaledContents(True)   # 将图片像素填充整个可用空间
        layout = QVBoxLayout(self)
        layout.addWidget(label)
        self.setLayout(layout)


class Window2(QWidget):
    # 创建一个信号
    def __init__(self):
        super().__init__()
        with open('data.txt', 'r') as f:
            lines = f.read()
        label = QLabel(lines, self)
        label.setWordWrap(True)             # 允许文本换行
        label.setAlignment(Qt.AlignTop)     # 靠顶端显示
        label.setFixedSize(600, 600)

        # 创建一个滚动对象
        scroll = QScrollArea()
        scroll.setWidget(label)

        layout = QVBoxLayout()
        layout.addWidget(scroll)
        self.setLayout(layout)

        # 连接滚动条的值变化信号到自定义槽函数
        scroll.verticalScrollBar().valueChanged.connect(self.check_scroll_position)

    def check_scroll_position(self, value):
        # 获取滚动条的最大值
        scroll_bar = self.sender()
        if scroll_bar and value == scroll_bar.maximum():
            # 弹出提示框
            QMessageBox.information(self, '提示', '已经到底了!')


class Window3(QWidget):
    def __init__(self):
        super().__init__()
        with open('data.txt', 'r') as f:
            lines = f.readlines()

        D = []
        for line in lines:
            wordlist = jieba.lcut(line)
            for word in wordlist:
                if len(word) >= 2 and word not in D:
                    D.append(word)
        # 将分词结果写入文件
        with open('out1.txt', 'w') as f:
            f.write('\n'.join(D))

        # 读取分词结果并显示
        with open('out1.txt', 'r') as f:
            lines = f.read()

        label = QLabel(lines, self)
        label.setWordWrap(True)
        label.setAlignment(Qt.AlignTop)

        # 创建一个滚动对象
        scroll = QScrollArea()
        scroll.setWidget(label)

        layout = QVBoxLayout()
        layout.addWidget(scroll)
        self.setLayout(layout)


class MyWindow(QWidget):
    def __init__(self):
        super().__init__()
        self.create_stacked_layout()
        self.init_ui()

    def create_stacked_layout(self):
        # 创建一个堆叠布局器
        self.stacked_layout = QStackedLayout()
        # 设置两个显示页面
        win1 = Window1()
        win2 = Window2()
        win3 = Window3()
        # 将页面添加到堆叠布局器中
        self.stacked_layout.addWidget(win1)
        self.stacked_layout.addWidget(win2)
        self.stacked_layout.addWidget(win3)

    def init_ui(self):
        self.setWindowTitle("文字处理")
        self.setWindowIcon(QIcon("文字.png"))
        self.setFixedSize(700, 500)

        # 设置整体布局为水平布局
        container = QVBoxLayout()
        self.setLayout(container)
        # 添加堆叠布局器窗口
        widget = QWidget()
        widget.setLayout(self.stacked_layout)
        container.addWidget(widget)
        # 添加按钮
        h_layout = QHBoxLayout()
        container.addLayout(h_layout)
        btn1 = QPushButton("显示原文内容")
        btn2 = QPushButton("显示分词结果")
        btn1.setFixedSize(150, 50)
        btn2.setFixedSize(150, 50)
        # 添加按钮响应
        btn1.clicked.connect(self.btn1_press_clicked)
        btn2.clicked.connect(self.btn2_press_clicked)
        h_layout.addWidget(btn1)
        h_layout.addWidget(btn2)


    def btn1_press_clicked(self):
        self.stacked_layout.setCurrentIndex(1)

    def btn2_press_clicked(self):
        self.stacked_layout.setCurrentIndex(2)


if __name__ == "__main__":
    app = QApplication(sys.argv)
    w = MyWindow()
    w.show()
    sys.exit(app.exec())
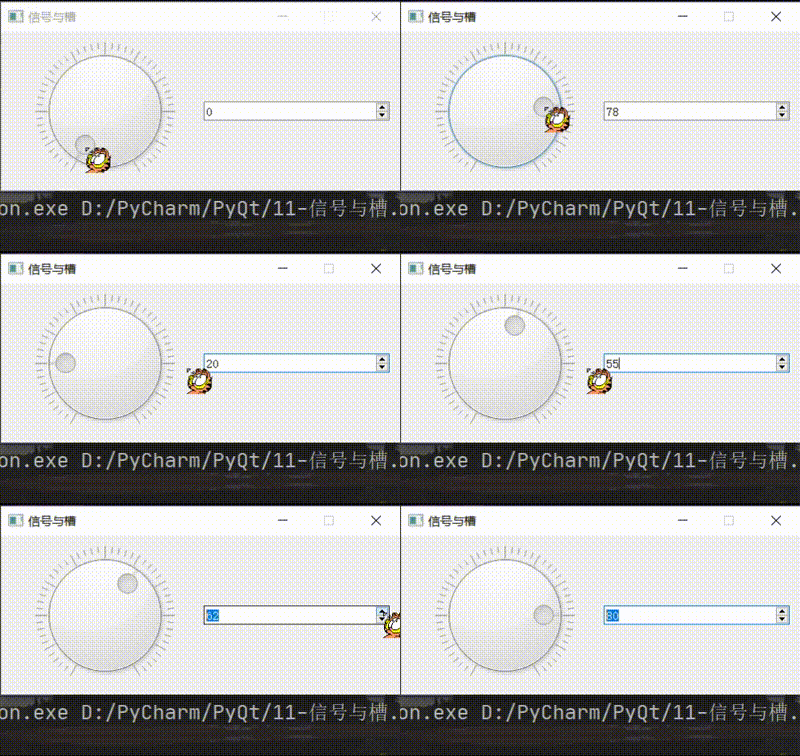
案例二 刻度盘与计数器 QDial、QSpinBox
import sys
from PyQt5.QtWidgets import QApplication, QWidget, QHBoxLayout, QSpinBox, QDial


class MyWindow(QWidget):
    def __init__(self):
        super().__init__()
        self.init_ui()

    def init_ui(self):
        self.setWindowTitle('信号与槽')
        self.setFixedSize(500, 200)

        container = QHBoxLayout()
        self.setLayout(container)

        self.dial = QDial()
        self.dial.setRange(0, 100)          # 刻度范围
        self.dial.setNotchesVisible(True)       # 刻度是否可见
        self.dial.valueChanged.connect(self.update_spin_from_dial) # 表盘刻度改变时,触发改变计数器
        container.addWidget(self.dial)

        self.spin = QSpinBox()
        self.spin.setRange(0, 100)
        self.spin.valueChanged.connect(self.update_dial_from_spin) # 计数改变时,触发改变表盘刻度
        container.addWidget(self.spin)

    # 从表盘刻度更新计数器的值
    def update_spin_from_dial(self):
        self.spin.setValue(self.dial.value())

    # 从计数器更新刻度盘的值
    def update_dial_from_spin(self):
        self.dial.setValue(self.spin.value())


if __name__ == '__main__':
    app = QApplication(sys.argv)
    window = MyWindow()
    window.show()
    sys.exit(app.exec())
案例三 二维表格显示 QTableView

import sys

from PyQt5.QtCore import pyqtSignal
from PyQt5.QtGui import QStandardItemModel, QStandardItem
from PyQt5.QtWidgets import QApplication, QWidget, QVBoxLayout, QTableView, QPushButton, QHeaderView, QMessageBox


class MainWindow(QWidget):
    # 成功添加信息提示
    data_added_signal = pyqtSignal(str)

    def __init__(self):
        super().__init__()
        self.init_ui()

    def init_ui(self):
        self.setWindowTitle('信息登记表')
        self.setFixedSize(600, 300)

        self.layout = QVBoxLayout()
        self.setLayout(self.layout)

        # 创建一个数据源  (Model)
        self.model = QStandardItemModel(3, 3)
        self.model.setHorizontalHeaderLabels(['id', '姓名', '年龄'])

        # 创建一个显示界面  (View)
        self.tableview = QTableView()

        # 关联View控件和Model (Controller)
        self.tableview.setModel(self.model)

        # 将数据置入界面中
        self.layout.addWidget(self.tableview)

        # 使表头自适应宽度
        header = self.tableview.horizontalHeader()
        header.setSectionResizeMode(QHeaderView.Stretch)

        # 添加数据 (Item)
        info = {
            0: ['2401', '猪小妹', '13'],
            1: ['2402', '猴小弟', '11'],
            2: ['2403', '马小哥', '26'],
        }
        for i, values in info.items():
            for j, value in enumerate(values):
                self.model.setItem(i, j, QStandardItem(value))

        self.add = QPushButton('添加信息')
        self.add.clicked.connect(self.add_info)
        self.layout.addWidget(self.add)

        self.data_added_signal.connect(self.show_message)

    def add_info(self):
        # 单条数据添加
        item = ['2404', '羊大姐', '37']
        self.model.appendRow([QStandardItem(value) for value in item])
        # 添加信息后发射添加成功信号
        self.data_added_signal.emit(f'成功添加信息:{item}')
        # 禁用按钮,确保只能按一次
        self.add.setEnabled(False)

    def show_message(self, message):
        QMessageBox.information(self, '信息', message)


if __name__ == '__main__':
    app = QApplication(sys.argv)
    window = MainWindow()
    window.show()
    sys.exit(app.exec())
Qt Designer
待编写。。。
多线程
待编写。。。

开源鸿蒙跨平台开发社区汇聚开发者与厂商,共建“一次开发,多端部署”的开源生态,致力于降低跨端开发门槛,推动万物智联创新。
更多推荐


 10
10 0
0- 0


 已为社区贡献1条内容

所有评论(0)