02使用ffmpeg解码视频之保存成图片
上一篇介绍Qt 和 ffmpeg环境的搭建,本篇介绍使用ffmpeg打开视频文件,并解码保存成一张张的图片。
开发环境:win10, Qt5.13.1 ffmpeg 4.2.2
上一篇介绍Qt 和 ffmpeg环境的搭建,本篇介绍使用ffmpeg打开视频文件,并解码保存成一张张的图片。
具体的步骤如下:
1, av_register_all(); //初始化FFMPEG 调用了这个才能正常适用编码器和解码器
使用这个函数完成编码器和解码器的初始化,只有初始化了编码器和解码器才能正常使用,否则会在打开编解码器的时候失败。
注:在ffmmpeg4.2.2的环境下,不调用这句也可以解码视频图片.ppm的图片用ps CS3可以打开查看
这个后续得看下源码分析
现在还是按正常流程来
2, 分配一个AVFormatContext,FFMPEG所有的操作都要通过这个AVFormatContext来进行
AVFormatContext *pFormatCtx = avformat_alloc_context();
3,打开视频文件
char *file_path = "aa.mp4";
avformat_open_input(&pFormatCtx, file_path, nullptr,nullptr);
4,文件打开成功后,查找文件中的视频流( 0:视频类型 1:音频类型,)
//循环查找视频中包含的流信息,直到找到视频类型的流
//便将其记录下来 保存到videoStream变量中
//这里我们现在只处理视频流 音频流先不管他
for(i = 0; i < pFormatCtx->nb_streams; ++i)
{
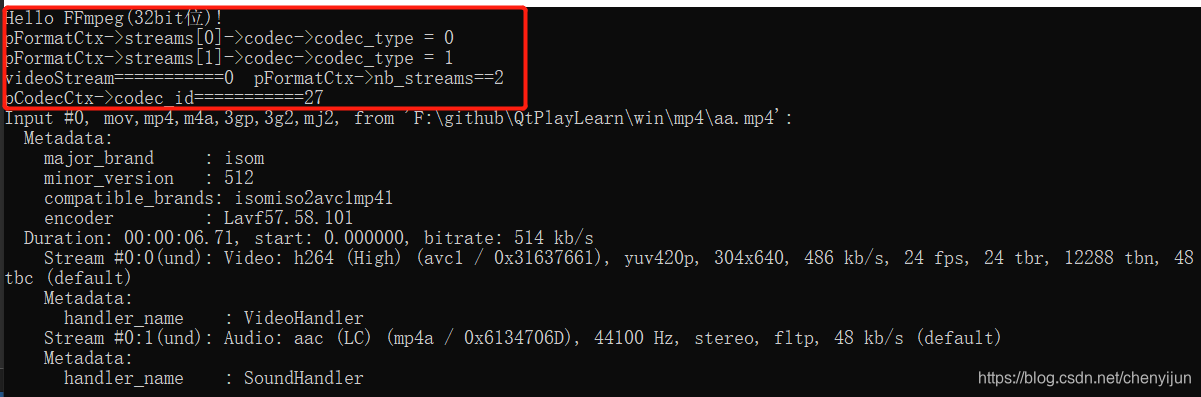
cout << "pFormatCtx->streams[" << i << "]->codec->codec_type = " << pFormatCtx->streams[i]->codec->codec_type << endl;
//0:视频类型 1:音频类型,
if(pFormatCtx->streams[i]->codec->codec_type == AVMEDIA_TYPE_VIDEO)
{
videoStream = i;
}
}
cout << "videoStream===========" << videoStream << " pFormatCtx->nb_streams==" << pFormatCtx->nb_streams << endl;
//如果videoStream为-1 说明没有找到视频流
if(videoStream == -1)
{
cout << "Didn't find a video stream." << endl;
return -3;
}5,找到视频流后, 打开一个解码器来解码:
    //查找解码器
    pCodecCtx = pFormatCtx->streams[videoStream]->codec;
    cout << "pCodecCtx->codec_id===========" << pCodecCtx->codec_id << endl;
    //测试时这个值为27,查到枚举值对应的是AV_CODEC_ID_H264 ,即是H264压缩格式的文件。
    pCodec = avcodec_find_decoder(pCodecCtx->codec_id);

    if (pCodec == NULL) {
        cout << "Codec not found." << endl;
        return -4;
    }

    //打开解码器
    if (avcodec_open2(pCodecCtx, pCodec, NULL) < 0) {
        cout << "Could not open codec." << endl;
        return -5;
    }
6,读取视频
    int y_size = pCodecCtx->width * pCodecCtx->height;
    AVPacket *packet = (AVPacket *) malloc(sizeof(AVPacket)); //分配一个packet
    av_new_packet(packet, y_size); //分配packet的数据

    //从av_read_frame读取的是一帧视频,并存入一个AVPacket的结构中。
    if (av_read_frame(pFormatCtx, packet) < 0)
    {
        break; //这里认为视频读取完了
    }
7,由于视频里的数据是经过编码压缩的,因此需要将其解码:
if (packet->stream_index == videoStream) {
    ret = avcodec_decode_video2(pCodecCtx, pFrame, &got_picture,packet);

    if (ret < 0) {
        cout << "decode error." << endl;
        return -6;
    }
}
8,将解码后的图像数据YUV420格式转成RGB格式
if (got_picture) {
    sws_scale(img_convert_ctx,
              (uint8_t const * const *) pFrame->data,
              pFrame->linesize, 0, pCodecCtx->height, pFrameRGB->data,
              pFrameRGB->linesize);
}
9, 保存为图片格式到本地
saveFrame(pFrameRGB, pCodecCtx->width,pCodecCtx->height,index++); //保存图片
if (index > 10)
    return 0; //这里我们就保存10张图片
完整的代码如下:
#include <iostream>

using namespace std;


extern "C"
{
#include "libavcodec/avcodec.h"
#include "libavformat/avformat.h"
#include "libswscale/swscale.h"
#include "libavdevice/avdevice.h"
}

#include <stdio.h>
///现在我们需要做的是让SaveFrame函数能把RGB信息定稿到一个PPM格式的文件中。
///我们将生成一个简单的PPM格式文件,请相信,它是可以工作的。

void saveFrame(AVFrame *pFrame, int width, int height, int index)
{
    FILE *pFile;
    char szFileName[32];
    int y;
    //Open file
    sprintf(szFileName, "frame%d.ppm", index);
    pFile = fopen(szFileName, "wb");

    if(nullptr == pFile)
        return;

    //Wirte header
    fprintf(pFile, "P6\n%d %d\n255", width, height);
    //Wirte pixel data
    for(y = 0; y < height; ++y)
    {
        fwrite(pFrame->data[0] + y * pFrame->linesize[0], 1, width * 3, pFile);
    }
    //Close file
    fclose(pFile);
}

int main()
{
    //这里简单的输出一个版本号
#ifdef _WIN64
    cout << "Hello FFmpeg(64bit位)!" << endl;
#elif _WIN32
    cout << "Hello FFmpeg(32bit位)!" << endl;
#endif
    char *file_path = "F:\\github\\QtPlayLearn\\win\\mp4\\lasa.mp4";

    AVFormatContext *pFormatCtx;
    AVCodecContext *pCodecCtx;
    AVCodec *pCodec;
    AVFrame *pFrame, *pFrameRGB;
    AVPacket *packet;
    uint8_t *out_buffer;

    static struct SwsContext *img_convert_ctx;

    int videoStream, i, numBytes;
    int ret, got_picture;

    av_register_all();//初始化FFMPEG  调用了这个才能正常适用编码器和解码器

    //Allocate an AVFormatContext.
    pFormatCtx = avformat_alloc_context();
    if(0 != avformat_open_input(&pFormatCtx, file_path, nullptr, nullptr))
    {
        cout << "can't open the file." << endl;
        return -1;
    }

    if(avformat_find_stream_info(pFormatCtx, nullptr) < 0)
    {
        cout << "Could't find stream infomation." << endl;
        return -2;
    }

    videoStream = -1;
    //循环查找视频中包含的流信息,直到找到视频类型的流
    //便将其记录下来 保存到videoStream变量中
    //这里我们现在只处理视频流  音频流先不管他
    for(i = 0; i < pFormatCtx->nb_streams; ++i)
    {
        cout << "pFormatCtx->streams[" << i << "]->codec->codec_type = " << pFormatCtx->streams[i]->codec->codec_type << endl;
        //0:视频类型 1:音频类型,
        if(pFormatCtx->streams[i]->codec->codec_type == AVMEDIA_TYPE_VIDEO)
        {
            videoStream = i;
        }
    }
    cout << "videoStream===========" << videoStream << "  pFormatCtx->nb_streams==" << pFormatCtx->nb_streams << endl;
    //如果videoStream为-1 说明没有找到视频流
    if(videoStream == -1)
    {
        cout << "Didn't find a video stream." << endl;
        return -3;
    }

    //查找解码器
    pCodecCtx = pFormatCtx->streams[videoStream]->codec;
    cout << "pCodecCtx->codec_id===========" << pCodecCtx->codec_id << endl;
    //测试时这个值为27,查到枚举值对应的是AV_CODEC_ID_H264 ,即是H264压缩格式的文件。
    pCodec = avcodec_find_decoder(pCodecCtx->codec_id);

    if (pCodec == NULL) {
        cout << "Codec not found." << endl;
        return -4;
    }

    //打开解码器
    if (avcodec_open2(pCodecCtx, pCodec, NULL) < 0) {
        cout << "Could not open codec." << endl;
        return -5;
    }

    pFrame = av_frame_alloc();
    pFrameRGB = av_frame_alloc();

    img_convert_ctx = sws_getContext(pCodecCtx->width, pCodecCtx->height, \
                                     pCodecCtx->pix_fmt, pCodecCtx->width, pCodecCtx->height, \
                                     AV_PIX_FMT_RGB24, SWS_BICUBIC, NULL, NULL, NULL);

    numBytes = avpicture_get_size(AV_PIX_FMT_RGB24, pCodecCtx->width,pCodecCtx->height);

    out_buffer = (uint8_t *) av_malloc(numBytes * sizeof(uint8_t));
    avpicture_fill((AVPicture *) pFrameRGB, out_buffer, AV_PIX_FMT_RGB24,
                   pCodecCtx->width, pCodecCtx->height);

    int y_size = pCodecCtx->width * pCodecCtx->height;

    packet = (AVPacket *) malloc(sizeof(AVPacket)); //分配一个packet
    av_new_packet(packet, y_size); //分配packet的数据

    av_dump_format(pFormatCtx, 0, file_path, 0); //输出视频信息

    int index = 0;

    while (1)
    {
        if (av_read_frame(pFormatCtx, packet) < 0)
        {
            break; //这里认为视频读取完了
        }

        if (packet->stream_index == videoStream) {
            ret = avcodec_decode_video2(pCodecCtx, pFrame, &got_picture,packet);

            if (ret < 0) {
                cout << "decode error." << endl;
                return -6;
            }

            if (got_picture) {
                sws_scale(img_convert_ctx,
                          (uint8_t const * const *) pFrame->data,
                          pFrame->linesize, 0, pCodecCtx->height, pFrameRGB->data,
                          pFrameRGB->linesize);

                saveFrame(pFrameRGB, pCodecCtx->width,pCodecCtx->height,index++); //保存图片
                if (index > 10)
                    return 0; //这里我们就保存10张图片
            }
        }
        av_free_packet(packet);
    }
    av_free(out_buffer);
    av_free(pFrameRGB);
    avcodec_close(pCodecCtx);
    avformat_close_input(&pFormatCtx);


    unsigned version = avcodec_version();
    cout << "version is:====" << version;
    return 0;
}
运行结果:
用photoshop打开生成.ppm格式的文件
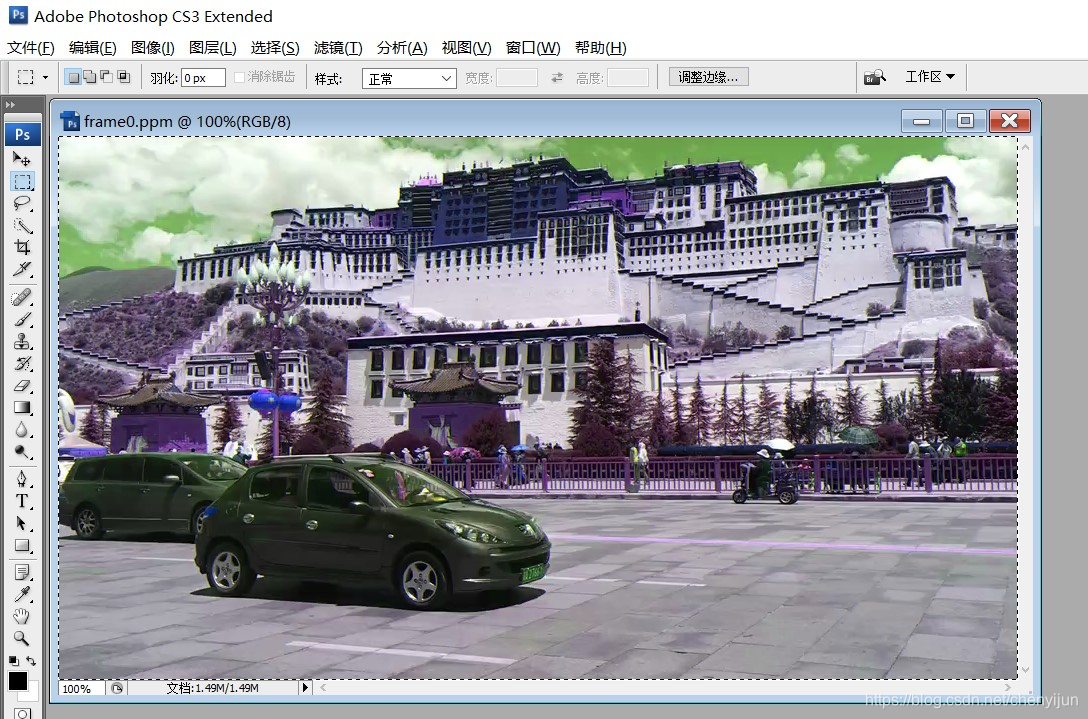
可以正常显示,说明解码成功
总结,ffmpeg相关的资料由于版本的不同存在一定的差异,需要修改调试。
参考:
https://blog.csdn.net/qq214517703/article/details/52618988
https://blog.csdn.net/qq_33316004/article/details/100113963
https://blog.csdn.net/leixiaohua1020/article/details/44220151

开源鸿蒙跨平台开发社区汇聚开发者与厂商,共建“一次开发,多端部署”的开源生态,致力于降低跨端开发门槛,推动万物智联创新。
更多推荐
 0
0 0
0- 0


 已为社区贡献10条内容

所有评论(0)